Lexus RX350 L (2023 year). Manual in english - page 16
 

  Index      Manuals     Lexus RX350 L (2023 year). Manual in english


Search            copyright infringement  


Content      ..     14      15      16      17     ..


Lexus RX350 L (2023 year). Manual in english - page 16


503

7-2. Steps to take in an emergency

7

When trouble

 ari

ses

2

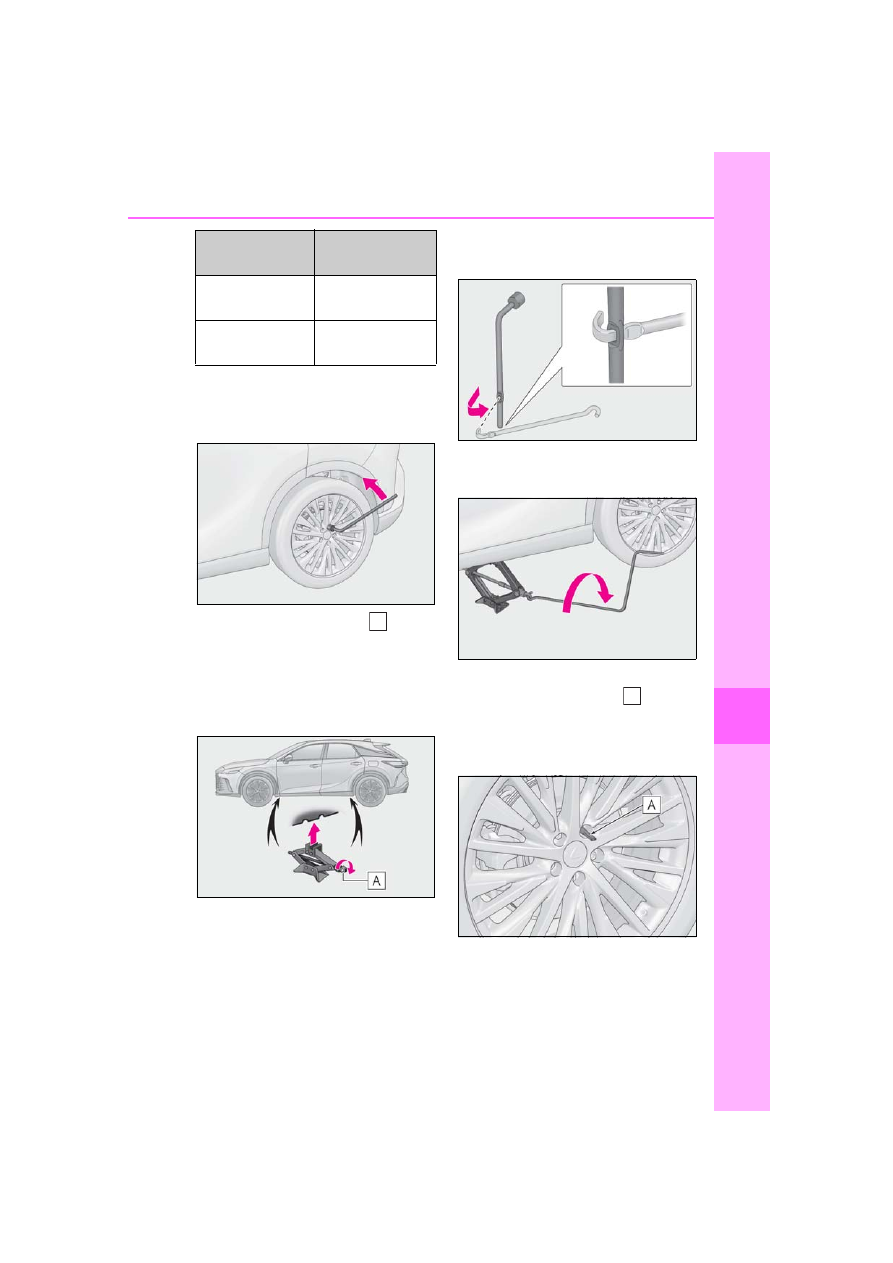
Using a wheel bolt wrench, slightly 
loosen the wheel bolts (approxi-
mately one turn).

3

Turn the tire jack portion   by 
hand until the notch of the jack is in 
contact with the jack point.

The jack point guides are located under 

the rocker panel. They indicate the jack 

point positions.

4

Install the wheel bolt wrench to the 
jack handle.

5

Raise the vehicle until the tire is 
slightly raised off the ground.

6

Remove the uppermost wheel bolt 
and install the guide pin   by 
hand.

Turn the guide pin clockwise to tighten it 

until it stops.

7

Remove all the wheel bolts and the 
tire.

When resting the tire on the ground, place 

the tire so that the wheel design faces up to 

Rear left-hand side

In front of the front 
right-hand side tire

Rear right-hand side

In front of the front 
left-hand side tire

Flat tire

Wheel chock posi-

tions

A

A

504

7-2. Steps to take in an emergency

avoid scratching the wheel surface.

1

Remove any dirt or foreign matter 
from the wheel contact surfaces 
and wheel bolts.

If foreign matter is on the wheel contact 

surface, the wheel bolts may loosen while 

the vehicle is in motion, causing the tire to 

come off.

2

Align a wheel bolt hole on the spare 
tire with the guide pin, and set the 
spare tire on the guide pin.

Securely set the spare tire so that its wheel 

is touching the contact surface.

3

Loosely tighten each wheel bolt by 
hand or using a wheel bolt socket 

.

Push the spare tire to prevent it from falling.
Do not use the wheel bolt socket for any-

thing other than loosely tightening the 

wheel bolts by hand.

4

Remove the guide pin and loosely 
tighten the wheel bolt as in step 

3

.

WARNING

Replacing a flat tire

Do not touch the disc wheels or the area 

around the brakes immediately after the 

vehicle has been driven. After the vehicle 

has been driven the disc wheels and the 

area around the brakes will be extremely 

hot. Touching these areas with hands, 

feet or other body parts while changing a 

tire, etc. may result in burns.

Installing the spare tire

A

505

7-2. Steps to take in an emergency

7

W

he

n t

ro

ub

le

 a

ris

es

5

Lower the vehicle.

6

Securely tighten the wheel bolts 
two or three times in the order 
shown in the illustration using a 
wheel bolt wrench.

Tightening torque:

103 ft•lbf (140 N•m, 14.3 kgf•m)

7

Stow the flat tire, tire jack and all 
tools.

The spare tire

The spare tire is identified by the label 

“TEMPORARY USE ONLY” on the tire 

sidewall.

Use the spare tire temporarily, and only in 

an emergency.

Make sure to check the tire inflation pres-

sure of the spare tire. (

P.530)

When using the spare tire

As the spare tire is not equipped with a tire 

pressure warning valve and transmitter, low 

inflation pressure of the spare tire will not be 

indicated by the tire pressure warning sys-

tem. Also, if you replace the spare tire after 

the tire pressure warning light comes on, 

the light remains on.

When the spare tire is equipped

The vehicle becomes lower when driving 

with the spare tire compared to when driv-

ing with standard tires.

If you have a flat front tire on a road cov-

ered with snow or ice

Install the spare tire on one of the rear 

wheels of the vehicle. Perform the following 

steps and fit tire chains to the front tires:

1

Replace a rear tire with the spare tire.

2

Replace the flat front tire with the tire 

removed from the rear of the vehicle.

3

Fit tire chains to the front tires.

WARNING

Installing the spare tire

Failure to follow these precautions could 

cause the wheel bolts to loosen and the 

tire to fall off, resulting in death or serious 

injury.

The contact surfaces of the wheel bolt 

and wheel are designed specifically to 

fit together. When using wheels that 

were installed when the vehicle was 

shipped from the factory, use special-

ized Lexus genuine wheel bolts. Do 

not use wheel bolts designed for other 

models, model years or types even if 

they are Lexus genuine parts. If the 

vehicle does not have wheels that were 

installed to the vehicle when it was 

shipped from the factory, the fac-

tory-installed wheel bolts may not be 

appropriate for the wheel. Contact 

either the retailer where the wheels 

were purchased or the manufacturer 

of the wheels for proper installation 

advice.

506

7-2. Steps to take in an emergency

WARNING

Never apply oil or grease to the wheel 

bolts or their contact surface on the 

wheel .

Doing so may cause the wheel bolts to 

be tightened excessively, leading to 

damage to the wheel bolts, the 

threaded portion the wheel bolts install 

to 

, or the wheel.

Remove any oil or grease that has 

adhered when installing the wheel 

bolts.

Steel wheel

Aluminum wheel

After replacing a tire, check the tight-

ening torque as soon as possible.

Do not attach a heavily damaged 

wheel ornament, as it may fly off the 

wheel while the vehicle is moving.

If a wheel bolt hole in a wheel or the 

threads of a wheel bolt or the wheel 

hub are deformed, cracked, rusty or 

otherwise damaged, have the vehicle 

inspected by your Lexus dealer.

A

B

When tightening the wheel bolts

Do not tighten the wheel bolts exces-

sively. Doing so may cause the wheel 

bolts, the threads of the wheel hub, or the 

wheel to be damaged.

Guide pin

When removing or installing a tire, make 

sure to use the guide pin.

Also, the guide pin is made of resin. It 

may be damaged if the wheel is placed 

anywhere other than 

 or if a large 

amount of force is applied to the guide 

pin.

When using the spare tire

Remember that the spare tire provided 

is specifically designed for use with 

your vehicle. Do not use your spare 

tire on another vehicle.

Do not use more than one spare tire 

simultaneously.

Replace the spare tire with a standard 

tire as soon as possible.

Avoid sudden acceleration, abrupt 

steering, sudden braking and shifting 

operations that cause sudden engine 

braking.

When the spare tire is attached

The vehicle speed may not be correctly 

detected, and the following systems may 

not operate correctly:

• ABS & Brake assist

• VSC

• TRAC

A

507

7-2. Steps to take in an emergency

7

W

he

n t

ro

ub

le

 a

ris

es

WARNING

• Trailer Sway Control

• EPS

• Adaptive Variable Suspension System 

(if equipped)

• Dynamic radar cruise control

• PCS (Pre-Collision System)

• LTA (Lane Tracing Assist)

• LDA (Lane Departure Alert)

• RSA (Road Sign Assist) (if equipped)

• Automatic High Beam (if equipped)

• AHS (Adaptive High-beam System) (if 

equipped)

• Tire pressure warning system

• Intuitive parking assist

• PKSB (Parking Support Brake) (if 

equipped)

• Lexus parking assist monitor (if 

equipped)

• Panoramic view monitor (if equipped)

• BSM (Blind Spot Monitor)

• RCTA (Rear cross traffic alert)

• Automatic Rear Flashing Hazard 

Lights

• Safe Exit Assist (with door opening 

control)

• Navigation system (if equipped)

Also, not only can the following system 

not be utilized fully, but it may even nega-

tively affect the drive-train components:

• AWD system (AWD models)

Speed limit when using the spare tire

Do not drive at speeds in excess of 50 

mph (80 km/h) when a spare tire is 

installed on the vehicle.

The spare tire is not designed for driving 

at high speeds. Failure to observe this 

precaution may lead to an accident caus-

ing death or serious injury.

After using the tools and jack

Before driving, make sure all the tools 

and jack are securely in place in their 

storage location to reduce the possibility 

of personal injury during a collision or 

sudden braking.

NOTICE

Be careful when driving over bumps 

with the spare tire installed on the 

vehicle

The vehicle becomes lower when driving 

with the spare tire compared to when 

driving with standard tires. Be careful 

when driving over uneven road surfaces.

Driving with tire chains and the spare 

tire

Do not fit tire chains to the spare tire.

Tire chains may damage the vehicle body 

and adversely affect driving perfor-

mance.

When replacing the tires

When removing or fitting the wheels, 

tires or the tire pressure warning valve 

and transmitter, contact your Lexus 

dealer as the tire pressure warning valve 

and transmitter may be damaged if not 

handled correctly.

508

7-2. Steps to take in an emergency

One of the following may be the cause 
of the problem:

There may not be sufficient fuel in 
the vehicle’s tank.
Refuel the vehicle.

The engine may be flooded.
Try to restart the engine again fol-
lowing correct starting procedures. 
(

P.194)

There may be a malfunction in the 
engine immobilizer system. 
(

P.70)

There may be a malfunction in the 
shift control system.

*

 (

P.195, 490)

*

: It may not be possible to shift the shift 

position from P.

One of the following may be the cause 
of the problem:

The battery may be discharged. 
(

P.514)

The battery terminal connections 
may be loose or corroded. 
(

P.442)

The engine starting system may be 
malfunctioning due to an electrical 
problem such as electronic key battery 
depletion or a blown fuse. However, an 
interim measure is available to start the 
engine. (

P.508)

One of the following may be the cause 
of the problem:

One or both of the battery terminals 
may be disconnected. (

P.442)

The battery may be discharged. 
(

P.514)

There may be a malfunction in the 
steering lock system.

Contact your Lexus dealer if the problem 
cannot be repaired, or if repair procedures 
are unknown.

When the engine does not start, the 
following steps can be used as an 
interim measure to start the engine if 
the engine switch is functioning nor-
mally.

If the engine will not start

If the engine will not start even 
though correct starting procedures 
are being followed (

P.194), con-

sider each of the following points:

The engine will not start even 
though the starter motor oper-
ates normally.

The starter motor turns over 
slowly, the interior lights and 
headlights are dim, or the horn 
does not sound or sounds at a low 
volume.

The starter motor does not turn 
over

The starter motor does not turn 
over, the interior lights and head-
lights do not turn on, or the horn 
does not sound.

Starting the engine in an emer-
gency

509

7-2. Steps to take in an emergency

7

W

he

n t

ro

ub

le

 a

ris

es

Do not use this starting procedure 
except in cases of emergency.

1

Pull the parking brake switch to 
check that the parking brake is set. 
(

P.204)

Parking brake indicator will come on.

2

Turn the engine switch to ACC.

*1, *2

3

Press and hold the engine switch 
for about 15 seconds while 
depressing the brake pedal firmly.

Even if the engine can be started using 
the above steps, the system may be 
malfunctioning. Have the vehicle 
inspected by your Lexus dealer.

*1

: ACC mode can be enabled/disabled 

on the customize menu. (

P.543)

*2

: When ACC is disabled, turn the engine 

switch to ON then OFF, and start the 
engine as described in P.511within 5 
seconds.

If you lose your keys

New genuine mechanical keys can 
be made by your Lexus dealer using 
another mechanical key and the 
key number stamped on your key 
number plate.

Keep the plate in a safe place such 
as your wallet, not in the vehicle.

NOTICE

When an electronic key is lost

If the electronic key remains lost, the risk 

of vehicle theft increases significantly. 

Visit your Lexus dealer immediately with 

all remaining electronic keys that were 

provided with your vehicle.

510

7-2. Steps to take in an emergency

When the electronic key does not work 

properly

Check on the center display if the smart 

access system with push-button start is 

enabled. If disabled, change to enable the 

smart access system with push-button 

start.

Check if battery-saving mode is set. If it is 

set, cancel the function. (

P.126)

The electronic key function may be sus-

pended. (

P.100)

Use the mechanical key (

P.102) in 

order to perform the following opera-
tions:

1

Insert a plastic card, etc. into the 
gap in the door handle to pry up the 
cover.

To avoid damage, do not apply excessive 

force to the cover.

2

Remove the cover by pressing it on 
the rear.

3

Use the mechanical key in order to 
perform the following operations:

1

Unlocks all the doors

Turning the key rearward unlocks the 
driver’s door. Turning the key again unlocks 
the other doors.

2

Locks all the doors

If the electronic key does not 
operate properly

If communication between the 
electronic key and vehicle is inter-
rupted (

P.127) or the electronic 

key cannot be used because the 
battery is depleted, the smart 
access system with push-button 
start and wireless remote control 
cannot be used. In such cases, the 
doors can be opened and the 
engine can be started by following 
the procedure below.

NOTICE

In case of a smart access system with 

push-button start malfunction or 

other key-related problems

Take your vehicle with all the electronic 

keys provided with your vehicle to your 

Lexus dealer.

Locking and unlocking the doors

511

7-2. Steps to take in an emergency

7

W

he

n t

ro

ub

le

 a

ris

es

Key linked functions

1

Closes the windows and the moon 
roof

*

 or panoramic moon roof

*

 (turn 

and hold)

2

Opens the windows and the moon 
roof

*

 or panoramic moon roof

*

 (turn 

and hold)

These settings must be customized at your 

Lexus dealer.

*

: If equipped

1

Ensure that the shift position is in P 
and depress the brake pedal.

2

Touch the Lexus emblem side of the 
electronic key to the engine switch.

When the electronic key is detected, a 

buzzer will sound and the engine switch 

mode will change to ON.
When the smart access system with 

push-button start is deactivated in custom-

ization setting, the engine switch will turn 

to ACC.

3

Firmly depress the brake pedal and 
check that 

 is shown on the 

multi-information display.

4

Press the engine switch shortly and 
firmly.

In the event that the engine still cannot 
be started, contact your Lexus dealer.

Stopping the engine

Shift the shift lever to P, set the parking 

brake, and press the engine switch as you 

normally do when stopping the engine.

Replacing the key battery

As the above procedure is a temporary 

measure, it is recommended that the elec-

tronic key battery be replaced immediately 

when the battery is depleted. (

P.460)

Changing engine switch modes

Release the brake pedal and press the 

engine switch in step 

3

 above. The engine 

does not start and modes will be changed 

each time the switch is pressed. (

P.196)

WARNING

When using the mechanical key and 

operating the power windows or the 
moon roof

*

 or panoramic moon roof

*

*

: If equipped

Operate the power window or the moon 

roof or panoramic moon roof after 

checking to make sure that there is no 

possibility of any passenger having any of 

their body parts caught in the window or 

the moon roof or panoramic moon roof.

Also, do not allow children to operate the 

mechanical key. It is possible for children 

and other passengers to get caught in 

the power window or the moon roof or 

panoramic moon roof.

Starting the engine

512

7-2. Steps to take in an emergency

Opening a door using the manual 
release handle from outside the 
vehicle

Pull the manual release handle   to 
open the door.

Normally, the manual release handles can-
not be used to open the doors.
To open a door, enable manual release 
handle operation. (

P.513)

Opening a door using the manual 
release handle from inside the 
vehicle

Pull the manual release handle   
twice to open the door.

Pulling the handle once will enable opera-
tion. Pulling the handle again will open the 
door.

Manual release handle operating condi-

tions

When the vehicle is involved in a collision

The manual release handle may not 

become operable depending on the force 

of the impact and conditions of the colli-

sion.

When the battery voltage drops slowly 

while a door was unlocked

It may not work depending on how it is low-

ered.

When manual release handle operation 

is enabled from inside the vehicle

When manual release handle operation 

is enabled from outside the vehicle using 

the mechanical key

If a door cannot be opened 
using the door opener switch

If a door cannot be opened using 
the door opener switch, it can be 
opened using a manual release 
handle.

NOTICE

Operating a manual release handle

Normally, the manual release handles 

cannot be used to open the doors. To 

enable manual release handle operation, 

perform the following. If the following is 

not performed and/or a manual release 

handle is operated with force, it may 

deform or be damaged.

Opening a door using the man-
ual release handle

A

A

513

7-2. Steps to take in an emergency

7

When trouble

 ari

ses

Enabling outside manual release handle 

operation using the mechanical key

Operation of a manual release handle can 

be enabled by unlocking a door with the 

mechanical key.

1

Insert a plastic card, etc. into the gap in 

the door handle to pry up the cover.

To avoid damage, do not apply excessive 

force to the cover.

2

Remove the cover by pressing it on the 

rear.

3

Using the mechanical key, turn the lock 

cylinder to the unlock side to enable the 

manual release handle operation.

The mechanical key can only be inserted in 

one direction, as the key only has a groove 

on one side.
If the key cannot be inserted in a lock cylin-

der, turn it over and re-attempt to insert it.

Conditions which manual release han-

dle operation is disabled

Normally, operation of the outside man-

ual release handles is disabled, and they 

cannot be used to open the doors.

When operation is enabled by operating a 

manual release handle or using a mechani-

cal key, operation will be disabled automat-

ically if the door is opened using the door 

opener switch or locked.

Operation of the inside manual release 

handles is disabled when the engine 

switch is in ON, and they cannot be used 

to open the doors.

When operation is enabled by operating a 

manual release handle or using a mechani-

cal key, operation will be disabled automat-

ically if the door is opened using the door 

opener switch or locked.

To prevent a door from being opened 

accidentally, when the engine switch is in 

ON, after an inside manual release han-

dle is operated once, operation will auto-

matically be disabled after approximately 

1 second.

514

7-2. Steps to take in an emergency

If you have a set of jumper (or booster) 
cables and a second vehicle with a 
12-volt battery, you can jump start your 
vehicle by following the steps below.

1

Confirm that the electronic key is 
being carried.

When connecting the jumper (or booster) 

cables, depending on the situation, the 

alarm may activate and doors locked. 

(

P.72)

2

Open the hood. (

P.435)

3

Open the positive (+) battery ter-
minal cover.

4

Connect a positive jumper cable clamp to   on your vehicle and connect the 
clamp on the other end of the positive cable to   on the second vehicle. Then, 

If the vehicle battery is dis-
charged

The following procedures may be 
used to start the engine if the vehi-
cle’s battery is discharged.
You can also call your Lexus dealer 
or a qualified repair shop.

Restarting the engine

A

B

515

7-2. Steps to take in an emergency

7

When trouble

 ari

ses

connect a negative cable clamp to   on the second vehicle and connect the 
clamp at the other end of the negative cable to  .

Positive (+) battery terminal (your vehicle)
Positive (+) battery terminal (second vehicle)
Negative (-) battery terminal (second vehicle)
Solid, stationary, unpainted metallic point away from the battery and any mov-
ing parts as shown in the illustration

5

Start the engine of the second vehi-
cle. Increase the engine speed 
slightly and maintain at that level for 
approximately 5 minutes to 
recharge the battery of your vehi-
cle.

6

Open and close any of the doors of 
your vehicle with the engine switch 
off.

7

Maintain the engine speed of the 
second vehicle and start the engine 
of your vehicle by turning the 
engine switch to ON.

8

Once the vehicle’s engine has 
started, remove the jumper cables 
in the exact reverse order from 
which they were connected.

Once the engine starts, have the vehi-
cle inspected at your Lexus dealer as 
soon as possible.

Starting the engine when the battery is 

discharged

The engine cannot be started by push-start-

ing.

If the doors cannot be unlocked using 

the smart access system with push-but-

ton start or wireless remote control

The doors can be opened by enabling its 

respective manual release handle opera-

tion. (

P.513)

Locking the doors after the battery was 

discharged

The doors cannot be locked using the smart 

access system with push-button start or 

wireless remote control.
By locking the door using the mechanical 

key, the operation of the manual release 

C

D

A
B
C
D

516

7-2. Steps to take in an emergency

handle can be disabled.

Driver’s door

1

Insert a plastic card, etc. into the gap in 

the door handle to pry up the cover.

To avoid damage, do not apply excessive 

force to the cover.

2

Remove the cover by pressing it on the 

rear.

3

Using the mechanical key, turn the lock 

cylinder to the unlock side to enable the 

manual release handle operation.

4

Check that the door cannot be opened.

Doors other than the driver’s door

1

Open the door. Using the mechanical 

key, slide the cover in the direction 

shown in the illustration.

To avoid damage, do not apply excessive 

force to the cover.

2

Insert the mechanical key into the open-

ing.

3

Remove the mechanical key and slide 

the cover back to its original position.

4

Check that all of the doors cannot be 

opened.

To prevent battery discharge

Turn off the headlights and the audio sys-

tem while the engine is stopped.

Turn off any unnecessary electrical com-

ponents when the vehicle is running at a 

low speed for an extended period, such 

as in heavy traffic.

When the battery is removed or dis-

charged

Information stored in the ECU is cleared. 

When the battery is depleted, have the 

vehicle inspected at your Lexus dealer.

Some systems may require initialization. 

(

P.559)

517

7-2. Steps to take in an emergency

7

When trouble

 ari

ses

When removing the battery terminals

When the battery terminals are removed, 

the information stored in the ECU is 

cleared. Before removing the battery ter-

minals, contact your Lexus dealer.

If a battery terminal is disconnected, the 

doors will not be able to be opened using 

the door opener switches and the elec-

tronic key may become trapped in the 

vehicle

To prevent the electronic key (mechanical 

key) from being locked inside the vehicle, 

make sure to remove it from the vehicle 

before disconnecting a battery terminal.

If the electronic key (mechanical key) is 

to be left in the vehicle, make sure to 

open a window so an inside manual 

release handle can be operated.

Charging the battery

The electricity stored in the battery will dis-

charge gradually even when the vehicle is 

not in use, due to natural discharge and the 

draining effects of certain electrical appli-

ances. If the vehicle is left for a long time, 

the battery may discharge, and the engine 

may be unable to start. (The battery 

recharges automatically during driving.)

When recharging or replacing the bat-

tery

In some cases, it may not be possible to 

unlock the doors using the smart access 

system with push-button start when the 

battery is discharged. Use the wireless 

remote control or the mechanical key to 

lock or unlock the doors.

The engine may not start on the first 

attempt after the battery has recharged 

but will start normally after the second 

attempt. This is not a malfunction.

The engine switch mode is memorized by 

the vehicle. When the battery is recon-

nected, the system will return to the 

mode it was in before the battery was dis-

charged. Before disconnecting the bat-

tery, turn the engine switch off.

If you are unsure what mode the engine 

switch was in before the battery dis-

charged, be especially careful when 

reconnecting the battery.

If the battery discharges, it may not be 

possible to shift the shift position to other 

positions. In this case, the vehicle cannnot 

be towed without lifting both front wheels 

because the front wheels will be locked.

Some systems may require initialization. 

(

P.559)

The Stop & Start system may not auto-

matically stop the engine for up to an 

hour.

When replacing the battery

Use a genuine battery specifically 

designed for use with the Stop & Start 

system or a battery with equivalent speci-

fications to a genuine battery. If an unsup-

ported battery is used, Stop & Start 

system functions may be restricted to 

protect the battery. Also, battery perfor-

mance may decrease and the engine may 

not be able to restart. Contact your Lexus 

dealer for details.

Use a battery that the case size is same as 

the previous one (LN3), 20 hour rate 

capacity (20HR) is equivalent (65Ah) or 

greater, and performance rating (CCA) 

is equivalent (603A) or greater.

• If the sizes differ, the battery cannot be 

properly secured.

• If the 20 hour rate capacity is low, even if 

the time period where the vehicle is not 

used is a short time, the battery may dis-

charge and the engine may not be able to 

start.

518

7-2. Steps to take in an emergency

For details, consult your Lexus dealer.

WARNING

When removing the battery terminals

Always remove the negative (-) terminal 

first. If the positive (+) terminal contacts 

any metal in the surrounding area when 

the positive (+) terminal is removed, a 

spark may occur, leading to a fire in addi-

tion to electrical shocks and death or 

serious injury.

Avoiding battery fires or explosions

Observe the following precautions to 

prevent accidentally igniting the flamma-

ble gas that may be emitted from the bat-

tery:

Make sure each jumper cable is con-

nected to the correct terminal and that 

it is not unintentionally in contact with 

any other than the intended terminal.

Do not allow the other end of the 

jumper cable connected to the “+” ter-

minal to come into contact with any 

other parts or metal surfaces in the 

area, such as brackets or unpainted 

metal.

Do not allow the + and - clamps of the 

jumper cables to come into contact 

with each other.

Do not smoke, use matches, cigarette 

lighters or allow open flame near the 

battery.

Battery precautions

The battery contains poisonous and cor-

rosive acidic electrolyte, while related 

parts contain lead and lead compounds. 

Observe the following precautions when 

handling the battery:

When working with the battery, always 

wear safety glasses and take care not 

to allow any battery fluids (acid) to 

come into contact with skin, clothing 

or the vehicle body.

Do not lean over the battery.

In the event that battery fluid comes 

into contact with the skin or eyes, 

immediately wash the affected area 

with water and seek medical attention. 

Place a wet sponge or cloth over the 

affected area until medical attention 

can be received.

Always wash your hands after handling 

the battery support, terminals, and 

other battery-related parts.

Do not allow children near the battery.

When replacing the battery

When the vent plug and indicator are 

close to the hold down clamp, the bat-

tery fluid (sulfuric acid) may leak.

For information regarding battery 

replacement, contact your Lexus 

dealer.

NOTICE

When handling jumper cables

When connecting the jumper cables, 

ensure that they do not become entan-

gled in the cooling fan or engine drive 

belt.

519

7-2. Steps to take in an emergency

7

When trouble

 ari

ses

1

Stop the vehicle in a safe place and 
turn off the air conditioning system, 
and then stop the engine.

2

If you see steam:
Carefully lift the hood after the 
steam subsides.
If you do not see steam:
Carefully lift the hood.

3

After the engine has cooled down 
sufficiently, inspect the hoses and 

radiator core (radiator) for any 
leaks.

Radiator
Cooling fan

If a large amount of coolant leaks, immedi-
ately contact your Lexus dealer.

4

The coolant level is satisfactory if it 
is between the “MAX”/“FULL” and 
“MIN”/“LOW” lines on the reser-
voir.

Engine (Type A)

Reservoir
“MAX” line
“MIN” line
Radiator cap

If your vehicle overheats

The following may indicate that 
your vehicle is overheating.

The engine coolant temperature 
gauge (

P.78) is in the red zone 

or a loss of engine power is expe-
rienced. (For example, the vehicle 
speed does not increase.)

“Engine Coolant Temp High Stop 
in a Safe Place See Owner’s 
Manual” is shown on the 
multi-information display.

Steam comes out from under the 
hood.

Correction procedures

A
B

A
B
C
D

520

7-2. Steps to take in an emergency

Engine (Type B)

Reservoir
“FULL” line
“LOW” line
Radiator cap

Intercooler

Reservoir
“FULL” line
“LOW” line

5

Add coolant if necessary.

Water can be used in an emergency if 

coolant is unavailable.

Engine

Intercooler

6

Start the engine and turn the air 
conditioning system on to check 
that the radiator cooling fan oper-
ate and to check for coolant leaks 
from the radiator or hoses.

The fan operate when the air conditioning 

system is turned on immediately after a 

cold start. Confirm that the fan is operating 

by checking the fan sound and air flow. If it 

is difficult to check these, turn the air con-

ditioning system on and off repeatedly. 

(The fan may not operate in freezing tem-

peratures.)

7

If the fan is not operating:
Stop the engine immediately and 
contact your Lexus dealer.
If the fan is operating:
Have the vehicle inspected at the 
nearest Lexus dealer.

8

Check if “Engine Coolant Temp 
High Stop in a Safe Place See 

A
B
C
D

A
B
C

521

7-2. Steps to take in an emergency

7

W

he

n t

ro

ub

le

 a

ris

es

Owner’s Manual” is shown on the 
multi-information display.

If the message does not disappear:

Stop the engine and contact your Lexus 

dealer.

If the message is not displayed:

Have the vehicle inspected at the nearest 

Lexus dealer.

WARNING

When inspecting under the hood of 

your vehicle

Observe the following precautions.

Failure to do so may result in serious 

injury such as burns.

If steam is seen coming from under the 

hood, do not open the hood until the 

steam has subsided. The engine com-

partment may be very hot.

Keep hands and clothing (especially a 

tie, a scarf or a muffler) away from the 

fan and belts. Failure to do so may 

cause the hands or clothing to be 

caught, resulting in serious injury.

Also, it may operate for several min-

utes even after the engine switch is 

turned off.

Do not loosen the radiator cap and the 

coolant reservoir caps while the 

engine and radiator are hot.

High temperature steam or coolant 

could spray out.

NOTICE

When adding engine coolant

Add coolant slowly after the engine has 

cooled down sufficiently. Adding cool 

coolant to a hot engine too quickly can 

cause damage to the engine.

To prevent damage to the cooling sys-

tem

Observe the following precautions:

Avoid contaminating the coolant with 

foreign matter (such as sand or dust, 

etc.).

Do not use any coolant additive.

522

7-2. Steps to take in an emergency

1

Stop the engine. Set the parking 
brake and shift the shift position to 
P.

2

Remove the mud, snow or sand 
from around the front wheels.

3

Place wood, stones or some other 
material under the front wheels to 
help provide traction.

4

Restart the engine.

5

Shift the shift position to D or R and 
release the parking brake. Then, 
while exercising caution, depress 
the accelerator pedal.

When it is difficult to free the vehicle

Press 

 to turn off TRAC.

Vehicles without Trail Mode

Vehicles with Trail Mode

If the vehicle becomes stuck

Carry out the following proce-
dures if the tires spin or the vehicle 
becomes stuck in mud, dirt or snow:

Recovering procedure

WARNING

When attempting to free a stuck vehi-

cle

If you choose to push the vehicle back 

and forth to free it, make sure the sur-

rounding area is clear to avoid striking 

other vehicles, objects or people. The 

vehicle may also lunge forward or lunge 

back suddenly as it becomes free. Use 

extreme caution.

When shifting the shift position

Be careful not to shift the shift position 

with the accelerator pedal depressed.

This may lead to unexpected rapid accel-

eration of the vehicle that may cause an 

accident resulting in death or serious 

injury.

NOTICE

To avoid damage to the transmission 

and other components

Avoid spinning the front wheels and 

depressing the accelerator pedal 

more than necessary.

If the vehicle remains stuck even after 

these procedures are performed, the 

vehicle may require towing to be freed.

523

8

8

Vehi

cle

 spec

ifi

ca

tions

Vehicle specifications

.

8-1. Specifications

Maintenance data (fuel, oil level, 

etc.) ..............................................

524

Fuel information.........................

532

Tire information..........................

534

8-2. Customization

Customizable features............

543

8-3. Initialization

Items to initialize ........................

559

524

8-1. Specifications

8-1.Specifications

*1

: Unladen  vehicle

*2

: For  TALA10L-AWZGTA  models

*4

*3

: Except for TALA10L-AWZGTA models

*4

*4

: The model code is indicated on the Certification Label. (

P.524)

*5

: Vehicles with towing package

Vehicle identification number

The vehicle identification number 
(VIN) is the legal identifier for your 
vehicle. This is the primary identifica-
tion number for your Lexus. It is used in 
registering the ownership of your vehi-
cle.
This number is stamped on the top left 

of the instrument panel.

Maintenance data (fuel, oil level, etc.)

Dimensions and weight

Overall length

192.5 in. (4890 mm)

Overall width

75.6 in. (1920 mm)

Overall height

*1

67.3 in. (1710 mm)

Wheelbase

112.2 in. (2850 mm)

Tread

Front

64.9 in. (1649.5 mm)

Rear

65.5 in. (1664.7 mm)

Vehicle capacity weight
(Occupants + luggage)

1200 lb. (545 kg)

*2

1110 lb. (505 kg)

*3

Trailer Weight Rating

*5

(Trailer weight + cargo weight)

3500 lb. (1588 kg)

Seating capacity

Seating capacity

5 (Front 2, Rear 3)

Vehicle identification

525

8-1. Specifications

8

Vehi

cle

 spec

ifi

ca

tions

On some models, this number is also 
stamped under the right-hand front 
seat.

This number is also on the Certification 

Label.

Engine number

The engine number is stamped on the 
engine block as shown.

Engine

Model

T24A-FTS

Type

4-cylinder in line, 4-cycle, gasoline (with tur-
bocharger)

Bore and stroke

3.44 

 3.92 in. (87.5 

 99.5 mm)

Displacement

146.0 cu. in. (2393 cm

3

)

Valve clearance (engine cold)

Automatic adjustment

Drive belt tension

Automatic adjustment

Fuel

Fuel type

Unleaded gasoline only

526

8-1. Specifications

Oil capacity (Drain and refill

ref-

erence

*

)

*

: The engine oil capacity is a reference 

quantity to be used when changing the 
engine oil. When actually adding the 
engine oil, make sure that the oil level is 
between the low level mark and refill 
upper limit mark (

P.438). Warm up 

and turn off the engine, wait about 5 
minutes, and check the oil level on the 
dipstick.

Engine oil selection

“Toyota Genuine Motor Oil” is used in 
your Lexus vehicle. Use Lexus 
approved “Toyota Genuine Motor Oil” 
or equivalent to satisfy the following 
grade and viscosity.
Oil grade: ILSAC GF-6A multigrade 
engine oil
Recommended viscosity: SAE 0W-20
SAE 0W-20 is the best choice for 
good fuel economy and good starting 
in cold weather.
If SAE 0W-20 is not available, SAE 
5W-20 oil may be used. However, it 
must be replaced with SAE 0W-20 at 
the next oil change.

Outside temperature

Oil viscosity (0W-20 is explained here 
as an example):
• The 0W in 0W-20 indicates the 

characteristic of the oil which allows 
cold startability. Oils with a lower 
value before the W allow for easier 
starting of the engine in cold 
weather.

• The 20 in 0W-20 indicates the vis-

cosity characteristic of the oil when 
the oil is at high temperature. An oil 
with a higher viscosity (one with a 
higher value) may be better suited if 
the vehicle is operated at high 
speeds, or under extreme load con-
ditions.

How to read oil container label:
The International Lubricant Specifica-
tion Advisory Committee (ILSAC) 
Certification Mark is added to some oil 
containers to help you select the oil you 
should use.

Octane Rating

91AKI (Research Octane Number 96) or 
higher

Fuel tank capacity
(Reference)

17.8 gal. (67.5 L, 14.8 Imp. gal.)

Lubrication system

With filter

5.6 qt. (5.3 L, 4.7 Imp. qt.)

Without fil-
ter

5.3 qt. (5.0 L, 4.4 Imp. qt.)

A

527

8-1. Specifications

8

V

eh

icle

 sp

ec

ific

atio

ns

*

: The coolant capacity is a reference quantity.

If replacement is necessary, contact your Lexus dealer.

Cooling system

Capacity

*

Gasoline engine

9.7 qt. (9.2 L, 8.1 Imp. qt.)

Intercooler

3.0 qt. (2.8 L, 2.5 Imp. qt.)

Coolant type

Use either of the following:

“Toyota Super Long Life Coolant”

Similar high-quality ethylene glycol-based non-silicate, 
non-amine, non-nitrite, and non-borate coolant with 
long-life hybrid organic acid technology

Do not use plain water alone.

Ignition system (spark plug)

Make

NGK DILZKAR8E7H

Gap

0.03 in. (0.7 mm)

NOTICE

Iridium-tipped spark plugs

Use only iridium-tipped spark plugs. Do not adjust the spark plug gap.

528

8-1. Specifications

*

: The fluid capacity is a reference quantity.

If replacement is necessary, contact your Lexus dealer.

Your Lexus vehicle is filled with “Toyota Genuine Differential Gear Oil” at the fac-
tory. Use Lexus approved “Toyota Genuine Differential Gear Oil” or an equivalent 
of matching quality to satisfy the above specification. Please contact your Lexus 
dealer for further details.

Your Lexus vehicle is filled with “Toyota Genuine Differential Gear Oil” at the fac-

Electrical system (battery)

Open voltage at 68°F (20°C):

12.3 V or higher
(Turn the engine switch off and turn on the head-
lights for 30 seconds.)

Charging rates:
Slow charge

5 A max.

Transmission

Fluid capacity

*

7.5 qt. (7.1 L, 6.2 Imp. qt.)

Fluid type

Toyota Genuine ATF WS

NOTICE

Transmission fluid type

Using transmission fluid other than the above type may cause abnormal noise or vibra-

tion, or damage the transmission of your vehicle.

Transfer (AWD models)

Oil capacity

0.48 qt. (0.45 L, 0.40 Imp. qt.)

Oil type and viscosity

Toyota Genuine Differential gear oil LT 75W-85 GL-5 
or equivalent

Rear differential (AWD models)

Oil capacity

0.5 qt. (0.5 L, 0.4 Imp. qt.)

Oil type and viscosity

Toyota Genuine Differential gear oil LT 75W-85 GL-5 
or equivalent

529

8-1. Specifications

8

Vehi

cle

 spec

ifi

ca

tions

tory. Use Lexus approved “Toyota Genuine Differential Gear Oil” or an equivalent 
of matching quality to satisfy the above specification. Please contact your Lexus 
dealer for further details.

*1

: Minimum pedal clearance when depressed with a force of 67.5 lbf (300 N, 30.6 kgf) 

while the engine is running.

*2

: Make sure to confirm that the brake warning light (yellow) does not illuminate. (If the 

brake warning light illuminates, refer to P.479.)

Brakes

Pedal clearance

*1

4.2 in. (106 mm) Min.

Pedal free play

0.04 

 0.24 in. (1 

 6 mm)

Brake pad wear limit

0.04 in. (1.0 mm)

Parking brake indicator

*2

When pushing the parking brake switch for 1 to 2 
seconds: turns off
When pulling the parking brake switch for 1 to 2 
seconds: comes on

Fluid type

FMVSS No. 116 DOT 3 or SAE J1703
FMVSS No. 116 DOT 3 or SAE J1704

Steering

Free play

Less than 0.59 in. (15 mm)

530

8-1. Specifications

Type A

Type B

Tires and wheels

Tire size

235/60R19 103V, T165/90D18 107M (spare)

Tire inflation pressure
(Recommended cold tire 
inflation pressure)

Front

33 psi (230 kPa, 2.3 kgf/cm

2

 or bar)

Rear

33 psi (230 kPa, 2.3 kgf/cm

2

 or bar)

Spare

60 psi (420 kPa, 4.2 kgf/cm

2

 or bar)

Driving at high speeds (above 100 mph [160 km/h]) (in 
countries where such speeds are permitted by law)

Add 5 psi (30 kPa, 0.3 kgf/cm

2

 or bar) to the front and rear 

tires. Never exceed the maximum cold tire inflation pres-
sure indicated on the tire sidewall.

Wheel size

19 

 8J, 18 

 4T (spare)

Wheel bolt torque

103 ft•lbf (140 N•m, 14.3 kgf•m)

Tire size

235/60R19 103V, T165/70D20 119M (spare)

Tire inflation pressure
(Recommended cold tire 
inflation pressure)

Front

33 psi (230 kPa, 2.3 kgf/cm

2

 or bar)

Rear

33 psi (230 kPa, 2.3 kgf/cm

2

 or bar)

Spare

60 psi (420 kPa, 4.2 kgf/cm

2

 or bar)

Driving at high speeds (above 100 mph [160 km/h]) (in 
countries where such speeds are permitted by law)

Add 5 psi (30 kPa, 0.3 kgf/cm

2

 or bar) to the front and rear 

tires. Never exceed the maximum cold tire inflation pres-
sure indicated on the tire sidewall.

Wheel size

19 

 8J, 20 

 4T (spare)

Wheel bolt torque

103 ft•lbf (140 N•m, 14.3 kgf•m)

531

8-1. Specifications

8

Vehi

cle

 spec

ifi

ca

tions

Type C

Type D

A: Wedge base bulbs (amber)

Tire size

235/50R21 101V, T165/90D18 107M (spare)

Tire inflation pressure
(Recommended cold tire 
inflation pressure)

Front

33 psi (230 kPa, 2.3 kgf/cm

2

 or bar)

Rear

33 psi (230 kPa, 2.3 kgf/cm

2

 or bar)

Spare

60 psi (420 kPa, 4.2 kgf/cm

2

 or bar)

Driving at high speeds (above 100 mph [160 km/h]) (in 

countries where such speeds are permitted by law)
Add 8 psi (50 kPa, 0.5 kgf/cm

2

 or bar) to the front and rear 

tires. Never exceed the maximum cold tire inflation pres-

sure indicated on the tire sidewall.

Wheel size

21 

 8J, 18 

 4T (spare)

Wheel bolt torque

103 ft•lbf (140 N•m, 14.3 kgf•m)

Tire size

235/50R21 101V, T165/70D20 119M (spare)

Tire inflation pressure
(Recommended cold tire 
inflation pressure)

Front

33 psi (230 kPa, 2.3 kgf/cm

2

 or bar)

Rear

33 psi (230 kPa, 2.3 kgf/cm

2

 or bar)

Spare

60 psi (420 kPa, 4.2 kgf/cm

2

 or bar)

Driving at high speeds (above 100 mph [160 km/h]) (in 

countries where such speeds are permitted by law)
Add 8 psi (50 kPa, 0.5 kgf/cm

2

 or bar) to the front and rear 

tires. Never exceed the maximum cold tire inflation pres-

sure indicated on the tire sidewall.

Wheel size

21 

 8J, 20 

 4T (spare)

Wheel bolt torque

103 ft•lbf (140 N•m, 14.3 kgf•m)

Light bulbs

Light bulbs

Bulb No.

W

Type

Exterior

Front turn signal lights (bulb type)

WY21W

21

A

532

8-1. Specifications

Gasoline quality

In very few cases, driveability problems may 

be caused by the brand of gasoline you are 

using. If driveability problems persist, try 

changing the brand of gasoline. If this does 

not correct the problem, consult your Lexus 

dealer.

Recommendation of the use of gasoline 

containing detergent additives

Lexus recommends the use of gasoline 

that contains detergent additives to avoid 

the build-up of engine deposits.

All gasoline sold in the U.S.A. contains 

minimum detergent additives to clean 

and/or keep clean intake systems, per 

EPA’s lowest additives concentration pro-

gram.

Lexus strongly recommends the use of 

Top Tier Detergent Gasoline. For more 

information on Top Tier Detergent Gaso-

line and a list of marketers, please go to 

the official website www.toptiergas.com.

Recommendation of the use of low 

emissions gasoline

Gasolines containing oxygenates such as 

ethers and ethanol, as well as reformulated 

gasolines, are available in some cities. 

These fuels are typically acceptable for use, 

providing they meet other fuel require-

ments.
Lexus recommends these fuels, since the 

formulations allow for reduced vehicle 

emissions.

Non-recommendation of the use of 

blended gasoline

Use only gasoline containing up to 15% 

ethanol.

DO NOT use any flex-fuel or gasoline 

that could contain more than 15% etha-

nol, including from any pump labeled 
E30 (30% ethanol [

]), E50 (50% 

ethanol [

]), E85 (85% ethanol [

]) 

(which are only some examples of fuel 

containing more than 15% ethanol).

If you use gasohol in your vehicle, be sure 

that it has an octane rating no lower than 

91.

Lexus does not recommend the use of 

gasoline containing methanol.

Non-recommendation of the use of gas-

oline containing MMT

Some gasoline contains an octane enhanc-

ing additive called MMT (Methylcyclopen-

tadienyl Manganese Tricarbonyl).
Lexus does not recommend the use of gas-

oline that contains MMT. If fuel containing 

MMT is used, your emission control system 

may be adversely affected.
The malfunction indicator lamp on the 

instrument cluster may come on. If this hap-

pens, contact your Lexus dealer for service.

If your engine knocks

Consult your Lexus dealer.

You may occasionally notice light knock-

ing for a short time while accelerating or 

Fuel information

You must only use unleaded gaso-
line.

Select premium unleaded gasoline 
with an octane rating of 91 
(Research Octane Number 96) or 
higher required for optimum 
engine performance and fuel econ-
omy. If the octane rating is less than 
91, damage to the engine may 
occur and may void the vehicle war-
ranty.

At minimum, the gasoline you use 
should meet the specifications of 
ASTM D4814 in the U.S.A.

A

B

C

533

8-1. Specifications

8

V

eh

icle

 sp

ec

ific

atio

ns

driving uphill. This is normal and there is 

no need for concern.

NOTICE

Notice on fuel quality

Do not use improper fuels. If improper 

fuels are used, the engine will be dam-

aged.

Do not use leaded gasoline.

Leaded gasoline can cause damage to 

your vehicle’s three-way catalytic con-

verters causing the emission control 

system to malfunction.

Do not use gasohol other than the type 

previously stated.

Other gasohol may cause fuel system 

damage or vehicle performance prob-

lems.

Using unleaded gasoline with an 

octane number or rating lower than 

the level previously stated may cause 

persistent heavy knocking.

At worst, this may lead to engine dam-

age and will void the vehicle warranty.

When refueling with gasohol

Take care not to spill gasohol. It can dam-

age your vehicle’s paint.

Fuel-related poor driveability

If poor driveability (poor hot starting, 

vaporization, engine knocking, etc.) is 

encountered after using a different type 

of fuel, discontinue the use of that type of 

fuel.

534

8-1. Specifications

Full-size tire

Compact spare tire

Tire size (

P.536)

DOT and Tire Identification Number (TIN) (

P.535)

Location of treadwear indicators (

P.445)

Tire ply composition and materials

Plies are layers of rubber-coated parallel cords. Cords are the strands which form the plies 
in a tire.

Radial tires or bias-ply tires

Tire information

Typical tire symbols

A
B
C
D

E


Content      ..     14      15      16      17     ..