Lexus RC F (2023 year). Manual in english - page 10
 

  Index      Manuals     Lexus RC F (2023 year). Manual in english


Search            copyright infringement  


Content      ..     8      9      10      11     ..


Lexus RC F (2023 year). Manual in english - page 10


310

7-2. Steps to take in an emergency

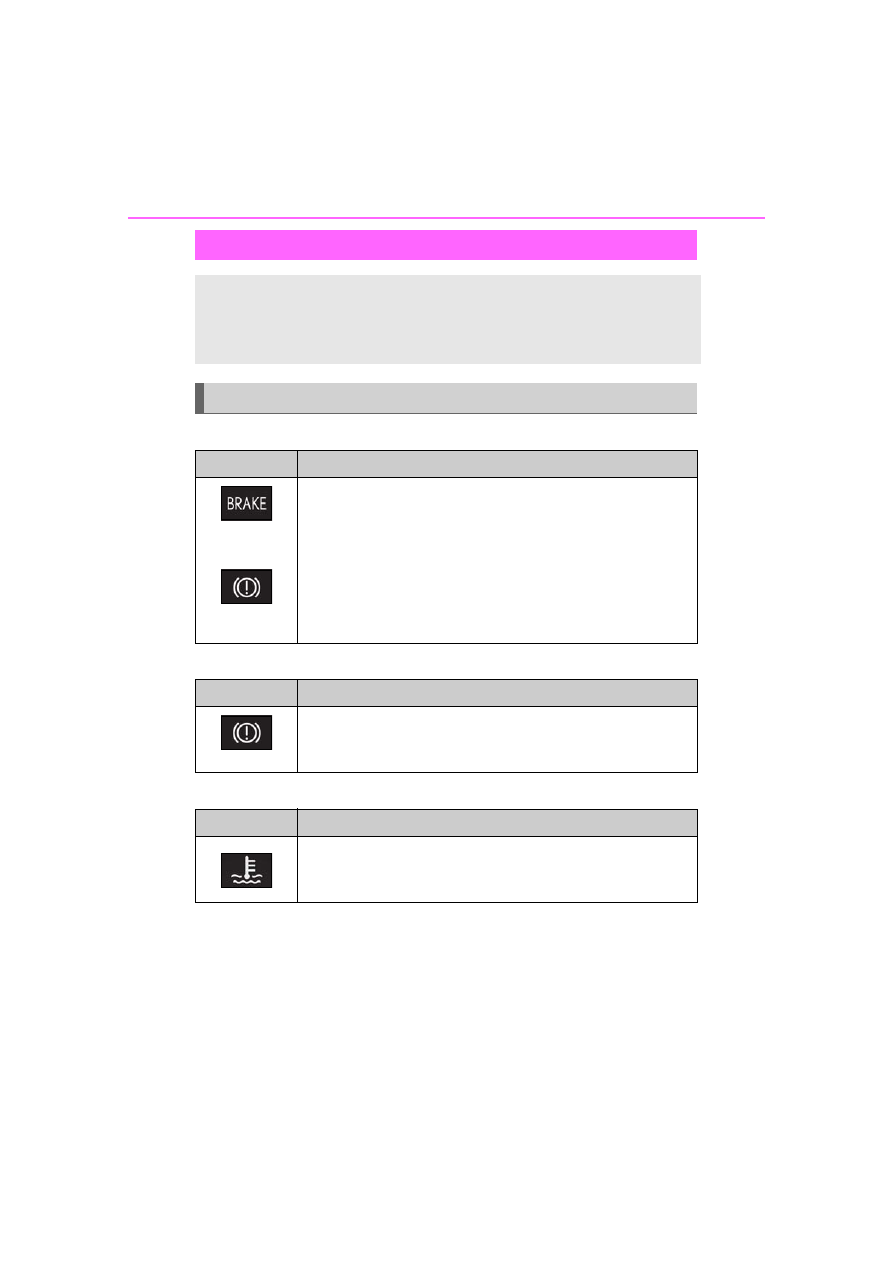
Brake system warning light

Brake system warning light

High coolant temperature warning light

*

 (warning buzzer)

*

: This light illuminates on the multi-information display.

If a warning light turns on or a warning buzzer sounds

Calmly perform the following actions if any of the warning lights comes on or 
flashes. If a light comes on or flashes, but then goes off, this does not necessar-
ily indicate a malfunction in the system. However, if this continues to occur, 
have the vehicle inspected by your Lexus dealer.

Actions to the warning lights or warning buzzers

Warning light

Details/Actions

(U.S.A.)

or

(red)

(Canada)

Indicates that:

The brake fluid level is low; or

The brake system is malfunctioning

Immediately stop the vehicle in a safe place and contact your Lexus 
dealer. Continuing to drive the vehicle may be dangerous.

Warning light

Details/Actions

(yellow)

Indicates a malfunction in the parking brake system

Have the vehicle inspected by your Lexus dealer immediately.

Warning light

Details/Actions

Indicates that the engine coolant temperature is too high

Immediately stop the vehicle in a safe place.
Handling method (

P.348)

311

7-2. Steps to take in an emergency

7

When trouble

 ari

ses

Charging system warning light

Low engine oil pressure warning light

*

 (warning buzzer)

*

: This light illuminates on the multi-information display.

Malfunction indicator lamp

SRS warning light

Warning light

Details/Actions

Indicates a malfunction in the vehicle’s charging system

Immediately stop the vehicle in a safe place and contact your Lexus 
dealer.

Warning light

Details/Actions

Indicates that the engine oil pressure is too low

Immediately stop the vehicle in a safe place and contact your Lexus 
dealer.

Warning light

Details/Actions

(U.S.A.)

or

(Canada)

Indicates a malfunction in:

The electronic engine control system;

The electronic throttle control system; or

The electronic automatic transmission control system

Have the vehicle inspected by your Lexus dealer immediately.

Warning light

Details/Actions

Indicates a malfunction in:

The SRS airbag system;

The front passenger occupant classification system; or

The seat belt pretensioner system

Have the vehicle inspected by your Lexus dealer immediately.

312

7-2. Steps to take in an emergency

ABS warning light

Inappropriate pedal operation warning light

*

 (warning buzzer)

*

: This light illuminates on the multi-information display.

Parking brake warning light (warning buzzer)

Warning light

Details/Actions

(U.S.A.)

or

(Canada)

Indicates a malfunction in:

The ABS; or

The brake assist system

Have the vehicle inspected by your Lexus dealer immediately.

Warning light

Details/Actions

When a buzzer sounds:

Brake Override System is malfunctioning;

Drive-Start Control is malfunctioning; or

Drive-Start Control is operating

Follow the instructions displayed on the multi-information display.

When a buzzer does not sound:
Brake Override System is operating

Release the accelerator pedal and depress the brake pedal.

Warning light

Details/Actions

(flashes)

(U.S.A.)

or

(flashes)

(Canada)

It is possible that the parking brake is not fully engaged or released

Operate the parking brake switch once again.

This light comes on when the parking brake is not released. If the light 
turns off after the parking brake is fully released, the system is operating 
normally.

313

7-2. Steps to take in an emergency

7

When trouble

 ari

ses

Brake hold operated indicator (warning buzzer)

Electric power steering system warning light (warning buzzer)

LTA (Lane Tracing Assist) indicator (warning buzzer)

PCS warning light

Warning light

Details/Actions

(flashes)

Indicates a malfunction in the brake hold system

Have the vehicle inspected by your Lexus dealer immediately.

Warning light

Details/Actions

Indicates a malfunction in the EPS (Electric Power Steering) system

Have the vehicle inspected by your Lexus dealer immediately.

Warning light

Details/Actions

(orange)

Indicates a malfunction in the LTA (Lane Tracing Assist)

Follow the instructions displayed on the multi-information display. 
(

P.176)

Warning light

Details/Actions

(flashes or illumi-

nates)

When a buzzer sounds simultaneously:
Indicates a malfunction has occurred in the PCS (Pre-Collision System).

Have the vehicle inspected by your Lexus dealer immediately.

When a buzzer does not sound:
The PCS (Pre-Collision System) has become temporarily unavailable, 
corrective action may be necessary.

Follow the instructions displayed on the multi-information display. 
(

P.156, 321)

If the PCS (Pre-Collision System) or VSC (Vehicle Stability Control) 
system is disabled, the PCS warning light will illuminate.

P.168

314

7-2. Steps to take in an emergency

Slip indicator

Automatic headlight leveling system warning light

Open door warning light (warning buzzer)

*

*

: Open door warning buzzer: 

P.92

Low fuel level warning light

Driver’s and front passenger’s seat belt reminder light (warning buzzer)

*

*

: Driver’s seat belt warning buzzer:

The driver’s seat belt warning buzzer sounds to alert the driver that his or her seat belt is not 

fastened. Once the engine switch is turned to IGNITION ON mode, the buzzer sounds. 

Warning light

Details/Actions

Indicates a malfunction in:

The VSC (Vehicle Stability Control) system;

The TRAC (Traction Control) system; or

The hill-start assist control system

The light will flash when the VSC or the TRAC system is operating.

Have the vehicle inspected by your Lexus dealer immediately.

Warning light

Details/Actions

Indicates a malfunction in the automatic headlight leveling system

Have the vehicle inspected by your Lexus dealer immediately.

Warning light

Details/Actions

Indicates that a door or the trunk is not fully closed

Check that both side doors and the trunk are closed.

Warning light

Details/Actions

Indicates that remaining fuel is approximately 2.6 gal. (10 L, 2.2 Imp. 
gal.) or less

Refuel the vehicle.

Warning light

Details/Actions

Warns the driver and/or front passenger to fasten their seat belts

Fasten the seat belt. 
If the front passenger’s seat is occupied, the front passenger’s seat 
belt also needs to be fastened to make the warning light (warning 
buzzer) turn off.

315

7-2. Steps to take in an emergency

7

When trouble

 ari

ses

If the seat belt is still unfastened, the buzzer sounds intermittently for a certain period of 
time after the vehicle reaches a certain speed.

Front passenger’s seat belt warning buzzer:
The front passenger’s seat belt warning buzzer sounds to alert the front passenger that his 

or her seat belt is not fastened. If the seat belt is unfastened, the buzzer sounds intermit-
tently for a certain period of time after the vehicle reaches a certain speed.

Rear passengers’ seat belt reminder lights

*1

 (warning buzzer)

*2

*1

: This light illuminates on the center panel.

*2

: Rear passengers’ seat belt warning buzzer:

The rear passengers’ seat belt warning buzzer sounds to alert the rear passenger that his or 

her seat belt is not fastened. If the seat belt is unfastened, the buzzer sounds intermit-
tently for a certain period of time, after the seat belt is fastened and unfastened and the 
vehicle reaches a certain speed.

Master warning light (warning buzzer)

Tire pressure warning light

Warning light

Details/Actions

Warns the rear passengers to fasten their seat belts

Fasten the seat belt.

Warning light

Details/Actions

A buzzer sounds and the warning light comes on and flashes to indicate 
that the master warning system has detected a malfunction.

P.319

Warning light

Details/Actions

When the light comes on:
Low tire inflation pressure such as

Natural causes (

P.316)

Flat tire (

P.322, 333)

Adjust the tire inflation pressure to the specified level. The light will 
turn off after a few minutes. If the warning light does not turn off 
after a few minutes, perform initialization (

P.284). If the light 

does not turn off after performing initialization, have the system 
checked by your Lexus dealer.

When the light comes on after blinking for 1 minute:
Malfunction in the tire pressure warning system

Have the system checked by your Lexus dealer.

316

7-2. Steps to take in an emergency

Warning buzzer

In some cases, the buzzer may not be heard 

due to being in a noisy location or audio 

sound.

SRS warning light

This warning light system monitors the air-

bag sensor assembly, front impact sensors, 

side impact sensors (door), side impact 

sensors (front), side impact sensors (rear), 

driver’s seat position sensor, driver’s seat 

belt buckle switch, front passenger occu-

pant classification system, “AIR BAG ON” 

indicator light, “AIR BAG OFF” indicator 

light, front passenger’s seat belt buckle 

switch, seat belt pretensioners, airbags, 

interconnecting wiring and power sources. 

(

P.29)

Front passenger detection sensor, seat 

belt reminder and warning buzzer

If luggage is placed on the front passen-

ger seat, the front passenger detection 

sensor may cause the warning light to 

flash and the warning buzzer to sound 

even if a passenger is not sitting in the 

seat.

If a cushion is placed on the seat, the sen-

sor may not detect a passenger, and the 

warning light may not operate properly.

If the malfunction indicator lamp comes 

on while driving

First check the following:

Is the fuel tank empty?

If it is, fill the fuel tank immediately.

Is the fuel tank cap loose?

If it is, tighten it securely.

The light will go off after several driving 

trips.
If the light does not go off even after several 

trips, contact your Lexus dealer as soon as 

possible.

Electric power steering system warning 

light (warning buzzer)

When the battery charge becomes insuffi-

cient or the voltage temporarily drops, the 

electric power steering system warning 

light may come on and the warning buzzer 

may sound.

When the tire pressure warning light 

comes on

Check the tire inflation pressure and adjust 

to the appropriate level. Pushing the tire 

pressure warning reset switch will not turn 

off the tire pressure warning light.

The tire pressure warning light may 

come on due to natural causes

The tire pressure warning light may come 

on due to natural causes such as natural air 

leaks and tire inflation pressure changes 

caused by temperature. In this case, adjust-

ing the tire inflation pressure will turn off the 

warning light (after a few minutes).

When a tire is replaced with a spare tire

The spare tire is not equipped with a tire 

pressure warning valve and transmitter. If a 

tire goes flat, the tire pressure warning light 

will not turn off even though the flat tire has 

been replaced with the spare tire.

Conditions that the tire pressure warn-

ing system may not function properly

P.283

If the tire pressure warning light fre-

quently comes on after blinking for 1 

minute

If the tire pressure warning light frequently 

comes on after blinking for 1 minute when 

the engine switch is turned to IGNITION 

ON mode, have it checked by your Lexus 

dealer.

WARNING

If both the ABS and the brake system 

warning lights remain on

Stop your vehicle in a safe place immedi-

ately and contact your Lexus dealer. The 

vehicle will become extremely unstable 

during braking, and the ABS system may 

fail, which could cause an accident 

resulting in death or serious injury.

317

7-2. Steps to take in an emergency

7

W

he

n t

ro

ub

le

 a

ris

es

When the electric power steering 

system warning light comes on

The steering wheel may become 

extremely heavy.

When steering wheel operations are 

heavier than usual, grip the steering 

wheel firmly and operate it using more 

force than usual.

If the tire pressure warning light 

comes on

Be sure to observe the following precau-

tions. Failure to do so could cause a loss 

of vehicle control and result in death or 

serious injury.

Vehicles with a spare tire

Stop your vehicle in a safe place as 

soon as possible. Adjust the tire infla-

tion pressure immediately.

If the tire pressure warning light comes 

on even after tire inflation pressure 

adjustment, it is probable that you have 

a flat tire. Check the tires. If a tire is flat, 

change it with the spare tire and have 

the flat tire repaired by the nearest 

Lexus dealer.

Avoid abrupt maneuvering and brak-

ing. If the vehicle tires deteriorate, you 

could lose control of the steering 

wheel or the brakes.

Vehicles with an emergency tire punc-

ture repair kit

Stop your vehicle in a safe place as 

soon as possible. Adjust the tire infla-

tion pressure immediately.

If the tire pressure warning light comes 

on even after tire inflation pressure 

adjustment, it is probable that you have 

a flat tire. Check the tires. If a tire is flat, 

repair the flat tire by using emergency 

tire puncture repair kit.

Avoid abrupt maneuvering and brak-

ing. If the vehicle tires deteriorate, you 

could lose control of the steering 

wheel or the brakes.

If a blowout or sudden air leakage 

should occur

The tire pressure warning system may 

not activate immediately.

WARNING

Maintenance of the tires

Each tire, including the spare (if pro-

vided), should be checked monthly when 

cold and inflated to the inflation pressure 

recommended by the vehicle manufac-

turer on the vehicle placard or tire infla-

tion pressure label (tire and load 

information label). (If your vehicle has 

tires of a different size than the size indi-

cated on the vehicle placard or tire infla-

tion pressure label [tire and load 

information label], you should determine 

the proper tire inflation pressure for 

those tires.)

As an added safety feature, your vehicle 

has been equipped with a tire pressure 

monitoring system (TPMS-tire pressure 

warning system) that illuminates a low 

tire pressure telltale (tire pressure warn-

ing light) when one or more of your tires 

is significantly under-inflated. Accord-

ingly, when the low tire pressure telltale 

(tire pressure warning light) illuminates, 

you should stop and check your tires as 

soon as possible, and inflate them to the 

proper pressure. Driving on a signifi-

cantly under-inflated tire causes the tire 

to overheat and can lead to tire failure. 

Under-inflation also reduces fuel effi-

ciency and tire tread life, and may affect 

the vehicle’s handling and stopping abil-

ity.

Please note that the TPMS (tire pressure 

warning system) is not a substitute for 

proper tire maintenance, and it is the 

driver’s responsibility to maintain correct 

tire pressure, even if under-inflation has 

not reached the level to trigger illumina-

tion of the TPMS low tire pressure telltale 

(tire pressure warning light).

318

7-2. Steps to take in an emergency

Your vehicle has also been equipped with 

a TPMS (tire pressure warning system) 

malfunction indicator to indicate when 

the system is not operating properly. The 

TPMS (tire pressure warning system) 

malfunction indicator is combined with 

the low tire pressure telltale (tire pres-

sure warning light). When the system 

detects a malfunction, the telltale will 

flash for approximately one minute and 

then remain continuously illuminated. 

This sequence will continue upon subse-

quent vehicle start-ups as long as the 

malfunction exists. When the malfunction 

indicator is illuminated, the system may 

not be able to detect or signal low tire 

pressure as intended.

TPMS (tire pressure warning system) 

malfunctions may occur for a variety of 

reasons, including the installation of 

replacement or alternate tires or wheels 

on the vehicle that prevent the TPMS 

(tire pressure warning system) from func-

tioning properly. Always check the 

TPMS (tire pressure warning system) 

malfunction telltale after replacing one 

or more tires or wheels on your vehicle to 

ensure that the replacement or alternate 

tires and wheels allow the TPMS (tire 

pressure warning system) to continue to 

function properly.

NOTICE

To ensure the tire pressure warning 

system operates properly

Do not install tires with different specifi-

cations or makers, as the tire pressure 

warning system may not operate prop-

erly.

If a warning message is dis-
played

The multi-information display 
shows warnings of system malfunc-
tions, incorrectly performed opera-
tions, and messages that indicate a 
need for maintenance. When a 
message is shown, perform the cor-
rection procedure appropriate to 
the message.

Master warning light

The master warning light also comes on 
or flashes in order to indicate that a mes-
sage is currently being displayed on the 
multi-information display.

Multi-information display

Follow the instructions of the message 
on the multi-information display.
If any of the warning messages are 
shown again after the following actions 
have been performed, contact your 
Lexus dealer.

A

B

319

7-2. Steps to take in an emergency

7

When trouble

 ari

ses

The warning lights and warning buzzers operate as follows depending on the con-
tent of the message. If a message indicates the need for inspection by a dealer, have 
the vehicle inspected by your Lexus dealer immediately.

In some situations, the master warning light and warning buzzer may not oper-
ate as specified. In this case, follow the instructions displayed in the warning 
message.

If a warning light comes on or flashes at the same time that a warning message is 
displayed, take corrective action according to the warning light. (

P.310)

*

: A buzzer sounds the first time a message is shown on the multi-information display.

Warning messages

The warning messages explained below 

may differ from the actual messages 

according to operation conditions and vehi-

cle specifications.

Warning buzzer

In some cases, the buzzer may not be heard 

due to being in a noisy location or audio 

sound.

If “Engine Oil Level Low Add or 

Replace” is displayed

The engine oil level is low. Check the level 

of the engine oil, and add if necessary.

This message may appear if the vehicle is 

stopped on a slope. Move the vehicle to a 

level surface and check to see if the mes-

sage disappears.

If “Engine Stopped Steering Power 

Low” is displayed

This message is displayed if the engine is 

stopped while driving.
When steering wheel operations are 

heavier than usual, grip the steering wheel 

firmly and operate it using more force than 

usual.

If “Power Turned Off to Save Battery” is 

displayed

Power was turned off due to the automatic 

Messages and warnings

Warning buzzer

*

Warning

Comes on

Sounds

Indicates an important situation, such as when a sys-
tem related to driving is malfunctioning or that dan-
ger may result if the correction procedure is not 
performed

Flashes

Sounds

Indicates a situation, such as when damage to the 
vehicle or danger may result

Comes on

Does not sound

Indicates a condition, such as malfunction of electri-
cal components, their condition, or indicates the 
need for maintenance

Flashes

Does not sound

Indicates a situation, such as when an operation has 
been performed incorrectly, or indicates how to 
perform an operation correctly

320

7-2. Steps to take in an emergency

power off function. Next time when starting 

the engine, increase the engine speed 

slightly and maintain that level for approxi-

mately 5 minutes to recharge the battery.

If “Headlight System Malfunction Visit 

Your Dealer” is displayed

The following systems may be malfunction-

ing. Have the vehicle inspected by your 

Lexus dealer immediately.

The LED headlight system

The automatic headlight leveling system

Automatic High Beam

If “Radar Cruise Control Unavailable 

See Owner's Manual” is displayed

The dynamic radar cruise control with 

full-speed range system is suspended tem-

porarily or until the problem shown in the 

message is resolved. (causes and coping 

methods: 

P.156)

If “Radar Cruise Control Unavailable” is 

displayed

The dynamic radar cruise control with 

full-speed range system cannot be used 

temporarily. Use the system when it 

becomes available again.

If a message that indicates the malfunc-

tion of front camera is displayed

The following systems may be suspended 

until the problem shown in the message is 

resolved. (

P.156, 313)

PCS (Pre-Collision System)

LTA (Lane Tracing Assist)

Automatic High Beam

RSA (Road Sign Assist) (if equipped)

Dynamic radar cruise control with 

full-speed range

If a message that indicates the malfunc-

tion of radar sensor is displayed

The following systems may be suspended 

until the problem shown in the message is 

resolved. (P.156, 310)

PCS (Pre-Collision System)

LTA (Lane Tracing Assist)

Dynamic radar cruise control with 

full-speed range

If “Maintenance Required Soon” is dis-

played

Indicates that all maintenance according to 

the driven distance on the maintenance 
schedule

*

 should be performed soon.

Comes on approximately 4500 miles 

(7200 km) after the message has been 

reset. If necessary, perform maintenance. 

Please reset the message after the mainte-

nance is performed. (

P.265)

*

: Refer to the separate “Scheduled Main-

tenance” or “Owner’s Manual Supple-
ment” for the maintenance interval 
applicable to your vehicle.

If “Maintenance Required Visit Your 

Dealer” is displayed

Indicates that all maintenance is required to 

correspond to the driven distance on the 
maintenance schedule

*

.

Comes on approximately 5000 miles 

(8000 km) after the message has been 

reset. (The indicator will not work properly 

unless the message has been reset.) Per-

form the necessary maintenance. Please 

reset the message after the maintenance is 

performed. (

P.265)

*

: Refer to the separate “Scheduled Main-

tenance” or “Owner’s Manual Supple-
ment” for the maintenance interval 
applicable to your vehicle.

If “Active Rear Wing Off Go to Settings 

to turn On” is displayed

The active rear wing switch was pressed 
when the active rear wing

*

 was disabled. 

Enable the active rear wing before pressing 

the active rear wing switch. (

P.206)

*

: If equipped

If a message that indicates the need for 

visiting your Lexus dealer is displayed

The system or part shown on the 

multi-information display is malfunctioning. 

Have the vehicle inspected by your Lexus 

dealer immediately.

If “See Owner’s Manual” is displayed

If the following messages are shown, fol-

321

7-2. Steps to take in an emergency

7

W

he

n t

ro

ub

le

 a

ris

es

lowing the instructions, accordingly.

• “Engine Coolant Temp High” (

P.348)

• “Transmission Fluid Temp High” (

P.130)

If any of the following messages are 

shown on the multi-information display, it 

may indicate a malfunction. Have the 

vehicle inspected by your Lexus dealer 

immediately.

• “Access System with Elec. Key Malfunc-

tion”

If any of the following messages are 

shown on the multi-information display, it 

may indicate a malfunction. Immediately 

stop the vehicle and contact your Lexus 

dealer.

• “Braking Power Low”

• “Charging System Malfunction”

• “Oil Pressure Low”

Stop the vehicle in a safe place on a 
hard, flat surface.

Set the parking brake.

Shift the shift lever to P.

Stop the engine.

Turn on the emergency flashers. 
(

P.302)

Check the degree of the tire dam-
age.

A tire should only be repaired with the 
emergency tire puncture repair kit if 

NOTICE

“High Power Consumption Partial 

Limit On AC/Heater Operation” is 

frequently shown

There is a possible malfunction relating 

to the charging system or the battery 

may be deteriorating. Have the vehicle 

inspected by your Lexus dealer.

If you have a flat tire (vehi-
cles with an emergency tire 
puncture repair kit)

Your vehicle is not equipped with a 
spare tire, but instead is equipped 
with an emergency tire puncture 
repair kit.
A puncture caused by a nail or 
screw passing through the tire 
tread can be repaired temporarily 
with the emergency tire puncture 
repair kit.

WARNING

If you have a flat tire

Do not continue driving with a flat tire. 

Driving even a short distance with a flat 

tire can damage the tire and the wheel 

beyond repair. Driving with a flat tire may 

cause a circumferential groove on the 

side wall. In such a case, the tire may 

explode when using the emergency tire 

puncture repair kit, resulting in death or 

serious injury.

Before repairing the vehicle

322

7-2. Steps to take in an emergency

the damage is caused by a nail or 
screw passing through the tire tread.
• Do not remove the nail or screw 

from the tire. Removing the object 
may widen the opening and disen-
able emergency repair with the kit.

• To avoid sealant leakage, move the 

vehicle until the area of the punc-
ture, if known, is positioned at the 
top of the tire.

A flat tire that cannot be repaired with 

the emergency tire puncture repair kit

In the following cases, the tire cannot be 

repaired with the emergency tire puncture 

repair kit. Contact your Lexus dealer.

When the tire is damaged due to driving 

without sufficient air pressure

When the tire lost air pressure due to a 

crack or damage in the tire sidewall

When the tire is visibly separated from 

the wheel

When the cut or damage to the tread is 

0.16 in. (4 mm) long or more

When the wheel is damaged

When 2 or more sharp objects, such as 

nails or screws, have passed through the 

tread on a single tire

When there is more than one hole or cut 

in the damaged tire

When the sealant has expired

Wheel bolt wrench

Jack handle

*

Location of the emergency tire puncture repair kit and tools

A
B

323

7-2. Steps to take in an emergency

7

When trouble

 ari

ses

Wheel bolt socket
Guide pin
Screwdriver
Emergency tire puncture repair kits
Towing eyelet

Jack

*

(Use of the jack:

P.335)

*

: They can be purchased at your Lexus dealer.

Bottle

Sticker

Compressor

Air pressure gauge
Compressor switch
Power plug
Hose
Air release cap

Emergency tire puncture repair kit

The sealant has a limited lifespan. The 

expiry date is marked on the bottle. The 

sealant should be replaced before the 

expiry date. Contact your Lexus dealer 

C
D

E
F

G

H

Emergency tire puncture repair 
kit components

A

A
B
C
D

E

324

7-2. Steps to take in an emergency

for replacement.

The sealant stored in the emergency tire 

puncture repair kit can be used only once 

to temporarily repair a single tire. If the 

sealant in the bottle and other parts of the 

kit have been used and need to be pur-

chased, contact your Lexus dealer.

The sealant can be used when the outside 

temperature is from -40°F (-40°C) to 

140°F (60°C).

The kit is exclusively designed for size 

and type of tires originally installed on 

your vehicle. Do not use it for tires that a 

different size than the original ones, or for 

any other purposes.

If the sealant gets on your clothes, it may 

stain.

If the sealant adheres to a wheel or the 

surface of the vehicle body, the stain may 

not be removable if it is not cleaned at 

once. Immediately wipe away the sealant 

with a wet cloth.

During operation of the kit, a loud opera-

tion noise is produced. This does not indi-

cate a malfunction.

Do not use the emergency tire puncture 

repair kit to check or to adjust the tire 

pressure.

Note for checking the emergency tire 

puncture repair kit

Check the sealant expiry date occasion-

ally. The expiry date is shown on the bot-

tle.

Do not use sealant whose expiry date has 

already passed. Otherwise, repairs con-

ducted using the emergency tire punc-

ture repair kit may not be performed 

properly.

Replace the liquid sealant bottle of the 

emergency tire puncture repair kit before 

it's expiration date. For information on 

replacement, contact your Lexus dealer.

1

Hold the hook and lift up the lug-
gage mat.

WARNING

Caution while driving

Observe the following precautions. 

Failure to do so may cause an accident.

The emergency tire puncture repair kit 

is made exclusively for your vehicle. 

Do not use it on other vehicles.

Do not use the emergency tire punc-

ture repair kit for tires that are a differ-

ent size than the specified ones or for 

any other purpose. Doing so may 

cause the tires to not be repaired 

properly.

Precautions for use of the sealant

Ingesting the sealant is hazardous to 

your health. If you ingest sealant, con-

sume as much water as possible, then 

immediately consult a doctor.

If sealant gets in eyes or adheres to 

skin, immediately wash it off with water. 

If discomfort persists, consult a doctor.

Taking out the emergency tire 
puncture repair kits

325

7-2. Steps to take in an emergency

7

W

he

n t

ro

ub

le

 a

ris

es

2

Secure the luggage mat using the 
hook.

3

Take out the emergency tire punc-
ture repair kits.

1

Remove the emergency tire punc-
ture repair kit from the plastic bag.

The sticker enclosed with the bottle will be 

attached at a specified location. (See step 

10

.)

2

Pull out the hose and power plug 
from the compressor.

3

Connect the bottle to the compres-
sor.

Insert the bottle straight into the compres-

sor to connect it, and make sure that the 

claws are securely engaged to the com-

pressor as shown in the illustration.

4

Connect the hose to the bottle.

Make sure that the hose is securely con-

nected to the bottle, as shown in the illus-

NOTICE

To prevent damage to luggage mat

When closing the trunk lid, do not leave 

the luggage mat lever hooked onthe 

edge of the trunk.

Emergency repair method

326

7-2. Steps to take in an emergency

tration.

5

Remove the valve cap from the 
valve of the punctured tire.

6

Extend the hose and remove the air 
release cap.

Store the air release cap where it will not 

be lost, as it will be used later.

You will use the air release cap again. 

Therefore keep it in a safe place.

7

Connect the hose to the valve of 
the flat tire.

Screw the end of the hose clockwise as far 

as possible.

8

Make sure that the compressor 
switch is off.

9

Connect the power plug to the 
power outlet socket. (

P.236)

327

7-2. Steps to take in an emergency

7

When trouble

 ari

ses

10

Attach the sticker at a position 
where it is easily seen from the 
driver’s seat.

11

Check the specified tire inflation 
pressure.

Tire inflation pressure is specified on the 

label as shown. (

P.357)

12

Start the engine. (

P.126)

13

To inject the sealant and inflate the 
tire, turn the compressor switch on.

14

Inflate the tire until the specified air 
pressure is reached.

The tire pressure gauge will tempo-
rarily rise to 44-58 psi (300-400 
kPa, 3.0-4.0 kg/cm

2

) and then 

gradually decrease.
Approximately 1-5 minutes after 
the switch is turned on, the tire 
pressure gauge will display the 
actual tire inflation pressure..

When checking the tire inflation pressure, 

turn the compressor switch off. In order to 

not over inflate the tire, check the tire infla-

tion pressure multiple times while inflating 

the tire.
It takes approximately 5-20 minutes 

(depending on ambient temperature) to 

inflate the tire to the specified tire inflation 

pressure. If the specified tire inflation pres-

sure is not reached after 25 minutes or 

more, the tire cannot be repaired. Turn the 

compressor switch off and contact your 

Lexus dealer.
If the tire inflation pressure exceeds the 

specified air pressure, let out some air to 

adjust the tire inflation pressure. (

P.330, 

A

B

328

7-2. Steps to take in an emergency

357)

15

Make sure that the compressor 
switch is off and then disconnect 
the power plug from the power out-
let and the hose from the valve of 
the tire.

Some sealant may leak when the hose is 

removed.

16

Install the valve cap onto the valve 
of the emergency repaired tire.

17

Attach the air release cap to the 
end of the hose.

If the air release cap is not installed, liquid 

sealant may leak onto clothing, the vehicle, 

etc.

18

Temporarily store the bottle in the 
trunk while it is connected to the 
compressor.

19

To ensure the liquid sealant is dis-
tributed evenly within the tire, safely 
drive the vehicle approximately 3 
miles (5 km) at 50 mph (80 km/h) 
or less immediately.

20

After driving, park the vehicle on a 
level surface and connect the 
emergency tire puncture repair kit 
again.

Before connecting the hose, be sure to 

remove the air release cap.

21

Turn the compressor switch on for a 
few seconds and then turn it off and 
check the tire inflation pressure.

If the tire inflation pressure is below 
19 psi (130 kPa, 1.3 kgf/cm

2

 or bar): 

The puncture cannot be repaired. 
Contact your Lexus dealer.
If the tire inflation pressure is 19 psi 
(130 kPa, 1.3 kgf/cm

2

 or bar) or 

higher, but less than the specified 
air pressure: Proceed to 

22

.

If the tire inflation pressure is the 
specified air pressure (

P.357): 

Proceed to 

23

.

22

Turn the compressor switch on to 
inflate the tire until the specified air 
pressure is reached. Drive for 
about 3 miles (5 km) and then per-
form 

20

.

A

B

C

329

7-2. Steps to take in an emergency

7

W

he

n t

ro

ub

le

 a

ris

es

23

Attach the air release cap to the 
end of the hose.

If the air release cap is not installed, liquid 

sealant may leak onto clothing, the vehicle, 

etc.

24

Store the bottle in the trunk while it 
is connected to the compressor.

25

Carefully drive the vehicle at a 
speed of 50 mph (80 km/h) or less 
to a Lexus dealer within 62 miles 
(100 km), taking care to avoid sud-
den braking, acceleration and 
steering inputs.

When having the tire repaired or replaced 

at a Lexus dealer, be sure to inform them 

that the emergency tire puncture repair kit 

has been used.

After a tire is repaired with the emer-

gency tire puncture repair kit

The tire pressure warning valve and 

transmitter should be replaced.

Even if the tire inflation pressure is at the 

recommended level, the tire pressure 

warning light may come on/flash.

If the tire is inflated to more than the 

recommended level

1

Disconnect the hose from the valve.

2

Install the air release cap to the end of 

the hose and push the protrusion on the 

air release cap into the valve to let some 

air out.

3

Disconnect the hose from the valve, 

remove the air release cap from the 

hose and then reconnect the hose.

4

Turn the compressor switch on for a few 

seconds and then turn it off and check 

the tire inflation pressure.

If the tire inflation pressure is lower than the 

specified tire inflation pressure, turn the 

compressor switch on and increase the tire 

inflation pressure until it reaches the speci-

fied value.

When disposing of the liquid sealant

The liquid sealant contains materials which 

are harmful to the environment.

When disposing of liquid sealant or a liquid 

sealant bottle, contact your Lexus dealer or 

contact your local government for informa-

tion on the appropriate authorized waste 

disposal method.

WARNING

When a tire is flat

Do not drive continuously on a flat tire. 

Driving even a short distance with a flat 

tire may damage the tire and wheel 

beyond repair. If a flat tire is driven on 

continuously, cracks may form in the 

sidewall of the tire. If the emergency tire 

puncture repair kit is used in this situa-

tion, the tire may explode.

When fixing the flat tire

Stop your vehicle in a safe and flat 

area.

330

7-2. Steps to take in an emergency

WARNING

Do not touch the wheels or the area 

around the brakes immediately after 

the vehicle has been driven. 

After the vehicle has been driven, the 

wheels and the area around the brakes 

may be extremely hot. Touching these 

areas with hands, feet or other body 

parts may result in burns.

Connect the valve and hose securely 

with the tire installed on the vehicle.

If the hose is not properly connected to 

the valve, air leakage may occur or 

sealant may be sprayed out.

If the hose comes off the valve while 

inflating the tire, there is a risk that the 

hose will move abruptly due to air 

pressure.

After inflation of the tire has com-

pleted, the sealant may splatter when 

the hose is disconnected or some air is 

let out of the tire.

Follow the operation procedure to 

repair the tire. If the procedure is not 

followed, the sealant may spray out.

Keep back from the tire while it is 

being repaired, as there is a chance of 

it bursting while the repair operation is 

being performed. If you notice any 

cracks or deformation of the tire, turn 

off the compressor switch and stop the 

repair operation immediately.

If the emergency tire puncture repair 

kit is continuously operated for a long 

time, the compressor may overheat. 

Do not operate the compressor for 40 

minutes or more continuously.

Parts of the emergency tire puncture 

repair kit become hot during opera-

tion. Be careful when handling it during 

and after operation. Do not touch the 

metal parts around where the bottle 

and compressor connect as they will 

be extremely hot.

Do not attach the vehicle speed warn-

ing sticker to an area other than the 

one indicated. If the sticker is attached 

to an area where an SRS airbag is 

located, such as the pad of the steering 

wheel, it may prevent the SRS airbag 

from operating properly.

Driving to spread the liquid sealant 

evenly

Observe the following precautions to 

reduce the risk of accidents.

Failing to do so may result in a loss of 

vehicle control and cause death or seri-

ous injury.

Drive the vehicle carefully at a low 

speed. Be especially careful when 

turning and cornering.

If the vehicle does not drive straight or 

you feel a pull through the steering 

wheel, stop the vehicle and check the 

following:

• Tire condition. The tire may have sepa-

rated from the wheel.

• Tire inflation pressure. If tire inflation 

pressure is 19 psi (130 kPa, 1.3 kgf/cm

2


or bar) or below, this may indicate 

severe tire damage.

NOTICE

When performing an emergency 

repair

Perform the emergency repair with-

out removing the nail or screw that has 

punctured the tread of the tire. If the 

object that has punctured the tire is 

removed, repair by the emergency tire 

puncture repair kit may not be possi-

ble.

The kit is not waterproof. Make sure 

that the kit is not exposed to water, 

such as when it is being used in the 

rain.

331

7-2. Steps to take in an emergency

7

W

he

n t

ro

ub

le

 a

ris

es

NOTICE

Do not put the kit directly onto dusty 

ground such as sand at the side of the 

road. If the kit vacuums up dust etc., a 

malfunction may occur.

Use the kit with the top facing upward. 

The kit cannot work properly if it is laid 

on its side.

Handling the emergency tire punc-

ture repair kit

The compressor power source should 

be 12 V DC suitable for vehicle use. 

Do not connect the compressor to any 

other source.

If gasoline splatters on the kit, the kit 

may deteriorate. Take care not to allow 

gasoline to contact it.

Put the emergency tire puncture 

repair kit in the plastic bag and store it 

where it will be free from dust and 

water.

Store the emergency tire puncture 

repair kit in the trunk. The kit may be 

thrown around during sudden braking 

and so forth, damaging the kit.

Store the kit in its assigned place out of 

reach of children.

Do not disassemble or modify the kit. 

Do not subject parts such as the air 

pressure indicator to impacts. This may 

cause a malfunction.

To avoid damage to the tire pressure 

warning valves and transmitters

When a tire is repaired with liquid seal-

ants, the tire pressure warning valve and 

transmitter may not operate properly. If a 

liquid sealant is used, contact your Lexus 

dealer as soon as possible. After use of 

liquid sealant, make sure to replace the 

tire pressure warning valve and transmit-

ter when repairing or replacing the tire. 

(

P.284)

332

7-2. Steps to take in an emergency

Stop the vehicle in a safe place on a 
hard, flat surface.

Set the parking brake.

Shift the shift lever to P.

Stop the engine.

Turn on the emergency flashers. 
(

P.302)

Spare tire
Tool bags
Wheel bolt wrench
Towing eyelet

If you have a flat tire (vehi-
cles with a spare tire)

Your vehicle is equipped with a 
spare tire. The flat tire can be 
replaced with the spare tire.

For details about tires: 

P.280

WARNING

If you have a flat tire

Do not continue driving with a flat tire.

Driving even a short distance with a flat 

tire can damage the tire and the wheel 

beyond repair, which could result in an 

accident.

Before jacking up the vehicle

Location of the spare tire, jack and tools

A
B
C
D

333

7-2. Steps to take in an emergency

7

W

he

n t

ro

ub

le

 a

ris

es

Screwdriver
Guide pin
Wheel bolt socket
Jack handle
Jack

1

Remove the luggage mat.

2

Take out the jack.

1

For tightening

2

For loosening

If the jack is too tightly installed to be 
removed by hand, insert a tool, such as the 
screwdriver included with the vehicle, into 
the hole of the jack (portion 

) and 

loosen the jack.

E
F

G

H

I

WARNING

Using the tire jack

Observe the following precautions.

Improper use of the tire jack may cause 

the vehicle to suddenly fall off the jack, 

leading to death or serious injury.

Do not use the tire jack for any pur-

pose other than replacing tires or 

installing and removing tire chains.

Only use the tire jack that comes with 

this vehicle or a jack designed for this 

vehicle, purchased from a lexus dealer, 

when replacing a flat tire.

Do not use it on other vehicles, and do 

not use other tire jacks for replacing 

tires on this vehicle.

Put the jack properly in its jack point.

Do not put any part of your body under 

the vehicle while it is supported by the 

jack.

Do not start the engine or drive the 

vehicle while the vehicle is supported 

by the jack.

Do not raise the vehicle while some-

one is inside.

When raising the vehicle, do not put an 

object on or under the jack.

Do not raise the vehicle to a height 

greater than that required to replace 

the tire.

Use a jack stand if it is necessary to get 

under the vehicle.

When lowering the vehicle, make sure 

that there is no-one near the vehicle. If 

there are people nearby, warn them 

vocally before lowering.

Taking out the jack

A

334

7-2. Steps to take in an emergency

1

Remove the luggage mat.

2

Loosen the center fastener that 
secures the spare tire.

If the center fastener cannot be turned by 

hand, use the wheel bolt wrench that is 

stored in the trunk. (To secure the tire, 

tighten the center fastener by hand. Do not 

use the wrench or other tools.)

1

Chock the tires.

2

Using a wheel bolt wrench, slightly 
loosen the wheel bolts (approxi-
mately one turn).

3

Turn the tire jack portion   by 
hand until the notch of the jack is in 
contact with the jack point.

The jack point guides are located under 

NOTICE

To prevent damage to luggage mat

When closing the trunk lid, do not leave 

the luggage mat lever hooked onthe 

edge of the trunk.

Taking out the spare tire

WARNING

When storing the spare tire

Be careful not to catch fingers or other 

body parts between the spare tire and 

the body of the vehicle.

Replacing a flat tire

Flat tire

Wheel chock posi-

tions

Front left-hand side

Behind the rear 
right-hand side tire

Front right-hand 
side

Behind the rear 
left-hand side tire

Rear left-hand side

In front of the front 
right-hand side tire

Rear right-hand side

In front of the front 
left-hand side tire

A

335

7-2. Steps to take in an emergency

7

W

he

n t

ro

ub

le

 a

ris

es

the rocker panel. They indicate the jack 

point positions.

4

Raise the vehicle until the tire is 
slightly raised off the ground.

5

Remove the uppermost wheel bolt 
and install the guide pin   by 
hand.

Turn the guide pin clockwise to tighten it 

until it stops.

6

Remove the remaining wheel bolts 
and the tire.

When resting the tire on the ground, place 

the tire so that the wheel design faces up to 

avoid scratching the wheel surface.

1

Remove any dirt or foreign matter 
from the wheel contact surfaces 
and wheel bolts.

If foreign matter is not removed, the wheel 

bolts may loosen while the vehicle is in 

A

WARNING

Replacing a flat tire

Do not touch the disc wheels or the area 

around the brakes immediately after the 

vehicle has been driven. After the vehicle 

has been driven the disc wheels and the 

area around the brakes will be extremely 

hot. Touching these areas with hands, 

feet or other body parts while changing a 

tire, etc. may result in burns.

NOTICE

Precaution for CCB (Carbon 

Ceramic Brake) discs (if equipped)

Do not subject the carbon ceramic brake 

disc to strong impact.

It the carbon ceramic brake disc has 

been subjected to a strong impact, even 

if there is no obvious damage, have the 

vehicle inspected by your Lexus dealer.

Installing the spare tire

336

7-2. Steps to take in an emergency

motion, and the wheel may come off.

2

Align a wheel bolt hole on the spare 
tire with the guide pin and install the 
spare tire

Align the center hole of the wheel with the 

center of the hub and securely set the 

spare tire so that the wheel and hub con-

tact surfaces are touching.

3

Loosely tighten each wheel bolt by 
hand or using a wheel bolt socket 

.

Do not use the wheel bolt socket for any-

thing other than loosely tightening the 

wheel bolts by hand.

4

Remove the guide pin and loosely 
tighten the wheel bolt as in step 

3

.

5

Lower the vehicle.

6

Securely tighten the wheel bolts 
two or three times in the order 
shown in the illustration using a 
wheel bolt wrench.

Tightening torque:

103 ft•lbf (140 N•m, 14.3 kgf•m)

7

Stow the flat tire, tire jack and all 
tools.

The spare tire

Use the spare tire temporarily, and only in 

A

337

7-2. Steps to take in an emergency

7

W

he

n t

ro

ub

le

 a

ris

es

an emergency.

Make sure to check the tire inflation pres-

sure of the spare tire. (

P.357)

When using the spare tire

As the spare tire is not equipped with a tire 

pressure warning valve and transmitter, low 

inflation pressure of the spare tire will not be 

indicated by the tire pressure warning sys-

tem. Also, if you replace the spare tire after 

the tire pressure warning light comes on, 

the light remains on.

When the spare tire is equipped

The vehicle becomes lower when driving 

with the spare tire compared to when driv-

ing with standard tires.

WARNING

Installing the tire

Failure to follow these precautions could 

cause the wheel bolts to loosen and the 

tire to fall off, resulting in death or serious 

injury.

The contact surfaces of the wheel bolt 

and wheel are designed specifically to 

fit together. When using wheels that 

were installed when the vehicle was 

shipped from the factory, use special-

ized Lexus genuine wheel bolts.

Do not use wheel bolts designed for 

other models, model years or types 

even if they are Lexus genuine parts. If 

the vehicle does not have wheels that 

were installed to the vehicle when it 

was shipped from the factory, the fac-

tory-installed wheel bolts may not be 

appropriate for the wheel.

Contact either the retailer where the 

wheels were purchased or the manu-

facturer of the wheels for proper 

installation advice.

Never apply oil or grease to the wheel 

bolts or their contact surface on the 

wheel

.

Doing so may cause the wheel bolts to 

be tightened excessively, leading to 

damage to the wheel bolts, the 

threaded portion the wheel bolts install 

to

, or the wheel.

Remove any oil or grease that has 

adhered when installing the wheel 

bolts.

After replacing a tire, check the tight-

ening torque as soon as possible.

Do not attach a heavily damaged 

wheel ornament, as it may fly off the 

wheel while the vehicle is moving.

If a wheel bolt hole in a wheel or the 

threads of a wheel bolt or the wheel 

hub are deformed, cracked, rusty or 

otherwise damaged, have the vehicle 

inspected by your Lexus dealer.

When tightening the wheel bolts

Do not tighten the wheel bolts exces-

sively. Doing so may cause the wheel 

bolts, the threads of the wheel hub, or the 

wheel to be damaged.

Guide pin

When removing or installing a tire, make 

sure to use the guide pin.

Also, the guide pin is made of resin. It 

may be damaged if the wheel is placed 
anywhere other than 

 or if a large 

amount of force is applied to the guide 

pin.

A

B

A

338

7-2. Steps to take in an emergency

WARNING

When using the spare tire

Remember that the spare tire provided 

is specifically designed for use with 

your vehicle. Do not use your spare 

tire on another vehicle.

Do not use more than one spare tire 

simultaneously.

Replace the spare tire with a standard 

tire as soon as possible.

Avoid sudden acceleration, abrupt 

steering, sudden braking and shifting 

operations that cause sudden engine 

braking.

When the spare tire is attached

The vehicle speed may not be correctly 

detected, and the following systems may 

not operate correctly:

• ABS & Brake assist

• VSC

• TRAC

• Dynamic radar cruise control with 

full-speed range

• PCS (Pre-Collision System)

• EPS

• Adaptive Variable Suspension System

• LTA (Lane Tracing Assist)

• VDIM (Vehicle Dynamics Integrated 

Management)

• Tire pressure warning system

• Lexus parking assist monitor

• Intuitive parking assist (if equipped)

• Navigation system (if equipped)

Speed limit when using the spare tire

Do not drive at speeds in excess of 50 

mph (80 km/h) when a spare tire is 

installed on the vehicle.

The spare tire is not designed for driving 

at high speeds. Failure to observe this 

precaution may lead to an accident caus-

ing death or serious injury.

After using the tools and jack

Before driving, make sure all the tools 

and jack are securely in place in their 

storage location to reduce the possibility 

of personal injury during a collision or 

sudden braking.

NOTICE

Driving with tire chains and the spare 

tire

Do not fit tire chains to the spare tire.

Tire chains may damage the vehicle body 

and adversely affect driving perfor-

mance.

When replacing the tires

When removing or fitting the wheels, 

tires or the tire pressure warning valve 

and transmitter, contact your Lexus 

dealer as the tire pressure warning valve 

and transmitter may be damaged if not 

handled correctly.

Precaution for CCB (Carbon 

Ceramic Brake) discs (if equipped)

P.336

339

7-2. Steps to take in an emergency

7

When trouble

 ari

ses

One of the following may be the cause 
of the problem:

There may not be sufficient fuel in 
the vehicle’s tank. 
Refuel the vehicle.

The engine may be flooded. 
Try to restart the engine again fol-
lowing correct starting procedures. 
(

P.126)

There may be a malfunction in the 
engine immobilizer system. 
(

P.57)

One of the following may be the cause 
of the problem:

The battery may be discharged. 
(

P.345)

The battery terminal connections 
may be loose or corroded. 
(

P.278)

The engine starting system may be 
malfunctioning due to an electrical 
problem such as electronic key battery 
depletion or a blown fuse. However, an 
interim measure is available to start the 
engine. (

P.340)

One of the following may be the cause 
of the problem:

One or both of the battery terminals 
may be disconnected. (

P.278)

The battery may be discharged. 
(

P.345)

When the engine does not start, the 
following steps can be used as an 
interim measure to start the engine if 
the engine switch is functioning nor-
mally:

1

Set the parking brake.

2

Shift the shift lever to P.

3

Turn the engine switch to ACCES-
SORY mode.

4

Press and hold the engine switch 
for about 15 seconds while 
depressing the brake pedal firmly.

Even if the engine can be started using 
the above steps, the system may be 

If the engine will not start

If the engine will not start even 
though correct starting procedures 
are being followed (

P.126), con-

sider each of the following points:

The engine will not start even 
though the starter motor oper-
ates normally.

The starter motor turns over 
slowly, the interior lights and 
headlights are dim, or the horn 
does not sound or sounds at a low 
volume.

The starter motor does not turn 
over

The starter motor does not turn 
over, the interior lights and head-
lights do not turn on, or the horn 
does not sound.

Emergency start function

340

7-2. Steps to take in an emergency

malfunctioning. Have the vehicle 
inspected by your Lexus dealer.

If you lose your keys

New genuine mechanical keys can 
be made by your Lexus dealer using 
another mechanical key and the 
key number stamped on your key 
number plate.

Keep the plate in a safe place such 
as your wallet, not in the vehicle.

NOTICE

When an electronic key is lost

If the electronic key remains lost, the risk 

of vehicle theft increases significantly. 

Visit your Lexus dealer immediately with 

all remaining electronic keys and the 

card key that were provided with your 

vehicle.

341

7-2. Steps to take in an emergency

7

W

he

n t

ro

ub

le

 a

ris

es

Remove the cover inside the trunk and 
pull the lever.

When the electronic key does not work 

properly

Make sure that the smart access system 

with push-button start has not been deac-

tivated in the customization setting. If it is 

off, turn the function on.

Check if battery-saving mode is set. If it is 

set, cancel the function. (

P.98)

Unlocking the door

Use the mechanical key (

P.86) in 

order to perform the following opera-
tions:

If the fuel filler door cannot 
be opened

If the fuel filler door cannot be 
opened by pressing the center of 
the rear edge of the fuel filler door 
with the doors unlocked, the follow-
ing procedure can be used to open 
the fuel filler door.

Opening the fuel filler door

If the electronic key does not 
operate properly

If communication between the 
electronic key and vehicle is inter-
rupted (

P.98) or the electronic 

key cannot be used because the 
battery is depleted, the smart 
access system with push-button 
start and wireless remote control 
cannot be used. In such cases, the 
doors and trunk can be opened and 
the engine can be started by follow-
ing the procedure below.

NOTICE

In case of a smart access system with 

push-button start malfunction or 

other key-related problems

Take your vehicle with all the electronic 

keys provided with your vehicle, includ-

ing the card key, to your Lexus dealer.

Locking and unlocking the doors 
and opening the trunk


Content      ..     8      9      10      11     ..