Lexus LS500h (2023 year). Manual in english - page 12
 

  Index      Manuals     Lexus LS500h (2023 year). Manual in english


Search            copyright infringement  


Content      ..     10      11      12      13     ..


Lexus LS500h (2023 year). Manual in english - page 12


376

5-5. Using the storage features

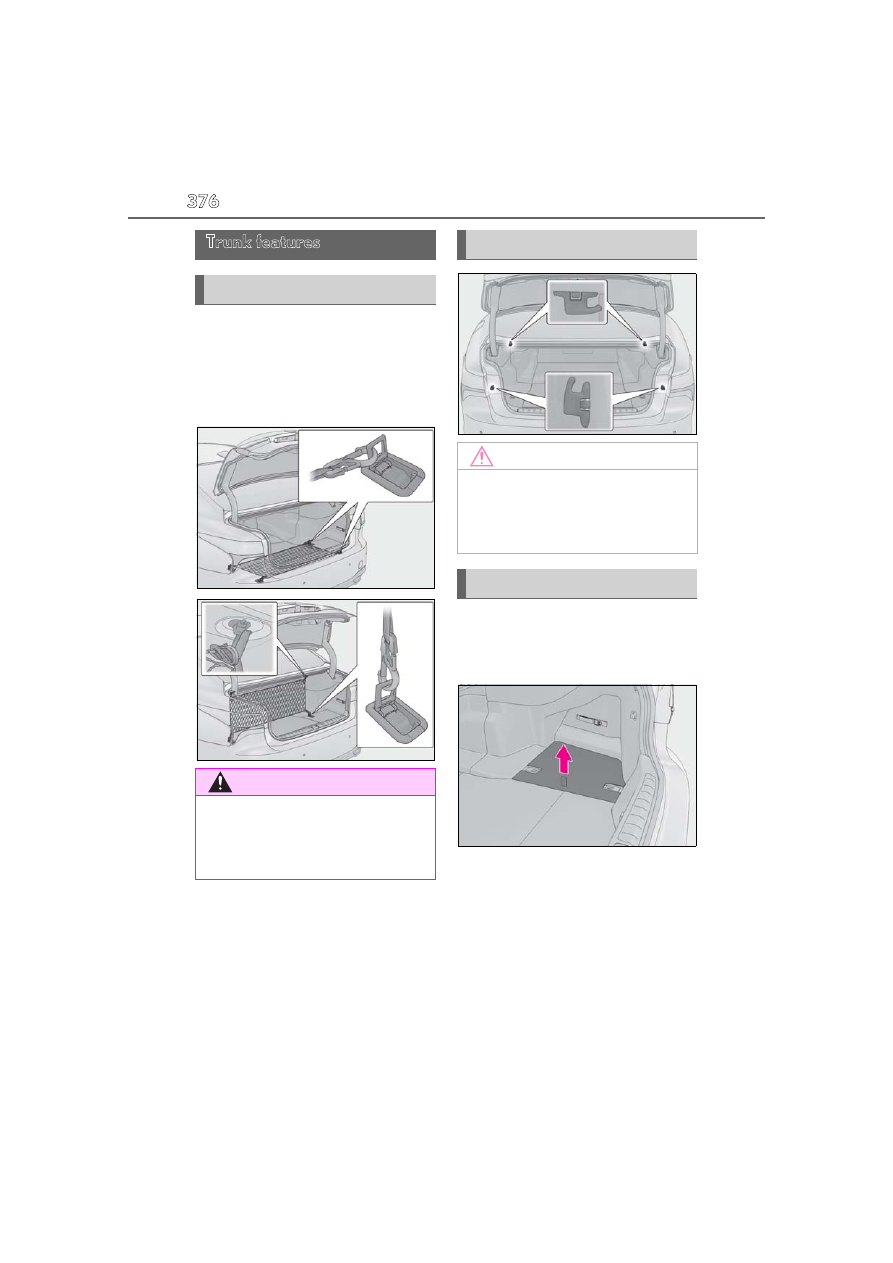
The cargo net is provided for securing 
loose items on the floor or items inside 
the trunk.

Raise the cargo hooks on the floor.
Hook the net on the cargo hooks.

Side

Pull the strap upwards to lift the lug-
gage mat and remove it.

Trunk features

Cargo net

WARNING

When the cargo net is not in use

To avoid injury, always return the cargo 

hooks on the floor to their stowed posi-

tions.

Shopping bag hooks

NOTICE

To prevent damage to the grocery 

bag hooks

Do not hang any object heavier than 11 lb. 

(5 kg) on the grocery bag hooks.

Luggage mats

377

5-5. Using the storage features

5

In

te

rio

r f

ea

tu

re

s

Front

1

Pull the strap upwards and lift up 
the luggage mat.

2

Lift the luggage mat until it engages 
with the hook.

To return the luggage mat to its original 
position, push the hook and lower the 
luggage mat.

Auxiliary boxes are under the luggage 
mats.

1

Loosen the belt

2

Tighten the belt

Using a belt to hold an object

1

Loosen the belt

NOTICE

To prevent damage to the hook for 

the front luggage mat

Do not hang a grocery bag or any other 

object from the hook.

Auxiliary boxes

First-aid kit storage belt

Warning reflector storage belt

378

5-5. Using the storage features

2

Pass the belt through the clip

3

Tighten the belt

Depending on the size and shape of an 
object, such as the case of a warning 
reflector, the object may not be able to be 
secured with the belts or stowed in an aux-
iliary box.

Stowing the belt

1

Fold the belt

2

Secure the belt with the clip

To prevent damage to the warning reflec-
tor storage belt when it is not in use, stow 
the belt.

379

5-6. Using the other interior features

5

Interio

r fe

atures

5-6.Using the other interior features

The USB charging ports are used to 
supply 3.0 A of electricity at 5 V to 
external devices.
The USB charging ports are for 
charging only. They are not designed 
for data transfer or other purposes.
Depending on the external device, it 
may not charge properly. Refer to the 
manual included with the device 
before using a USB charging port.

Using the USB charging ports

Instrument panel

Console box

Armrest (vehicles without power 
rear seat)

Armrest (vehicles with power rear 
seat)

The USB charging ports can be used 

when

The power switch is in ACCESSORY or 

ON mode.

Situations in which the USB charging 

ports may not operate correctly

If a device which consumes more than 

3.0 A at 5 V is connected

If a device designed to communicate with 

a personal computer, such as a USB 

memory device, is connected

If the connected external device is turned 

off (depending on device)

If the temperature inside the vehicle is 

high, such as after the vehicle has been 

parked in the sun

About connected external devices

Depending on the connected external 

device, charging may occasionally be sus-

pended and then start again. This is not a 

malfunction.

Other interior features

USB charging ports

380

5-6. Using the other interior features

Vehicle without power rear seat

Pull the armrest down for use.

Vehicle with power rear seat

Pull the lock release lever and fold the 
rear seatback down.

An assist grip installed on the ceiling 
can be used to support your body 
while sitting on the seat.

WARNING

When using the USB charging ports 

on the instrument panel

When connecting to a USB charging 

port on the instrument panel, make sure 

that the charging cable will not interfere 

with the shifting operation. If the shift 

lever gets caught by the cable while shift-

ing, a mis-shift may occur, possibly lead-

ing to an accident.

NOTICE

To prevent damage to the USB 

charging ports

Do not insert foreign objects into the 

ports.

Do not spill water or other liquids into 

the ports.

Do not apply excessive force to or 

impact the USB charging ports.

Do not disassemble or modify the USB 

charging ports.

To prevent damage to external 

devices

Do not leave external devices in the 

vehicle. The temperature inside the 

vehicle may become high, resulting in 

damage to an external device.

Do not push down on or apply unnec-

essary force to an external device or 

the cable of an external device while it 

is connected.

To prevent 12-volt battery discharge

Do not use the USB charging ports for a 

long period of time with the hybrid sys-

tem stopped.

Armrest

NOTICE

To prevent damage to the armrest

Do not place too much strain on the arm-

rest.

Assist grips

381

5-6. Using the other interior features

5

In

te

rio

r f

ea

tu

re

s

To use the coat hook, push it on.

The GPS clock’s time is automatically 
adjusted by utilizing GPS time infor-
mation. For details, refer to “MULTI-
MEDIA OWNER’S MANUAL”.

The power outlet can be used for the 
following components:
12 V: Accessories that run on less than 
10 A.
120 VAC: Accessories that use less 
than 100 W.

12 V

Front

Open the lid.

Rear (if equipped)

Open the lid.

WARNING

Assist grip

Do not use the assist grip when getting in 

or out of the vehicle or rising from your 

seat.

Doing so could damage the assist grip, or 

could cause you to injure yourself by fall-

ing over.

NOTICE

To prevent damage to the assist grip

Do not hang any heavy object or put a 

heavy load on the assist grip.

Coat hooks

WARNING

Items that must not be hung on the 

hook

Do not hang a coat hanger or other hard 

or sharp object on the hook. If the SRS 

curtain shield airbags deploy, these items 

may become projectiles that cause death 

or serious injury.

Clock

Power outlets

382

5-6. Using the other interior features

120 VAC (if equipped)

Open the lid.

The power outlet can be used when

12 V

The power switch is in ACCESSORY or 
ON mode.

120 VAC

The power switch is in ON mode.

NOTICE

To avoid damaging the power outlet

Close the power outlet lid when the 

power outlet is not in use. 

Foreign objects or liquids that enter the 

power outlet may cause a short circuit.

To prevent the fuse from being blown

12 V

Do not use an accessory that uses more 
than 12 V 10 A.

120 VAC

Do not use a 120 VAC appliance that 
requires more than 100 W. If a 120 VAC 
appliance that consumes more than 100 
W is used, the protection circuit will cut 
the power supply.

To prevent incorrect operation of the 

vehicle

When turning the power switch off, make 

sure to disconnect accessories designed 

for charging, such as portable chargers, 

power banks, etc. from the power outlets.

If such an accessory is left connected, the 

following may occur:

The doors cannot be locked using the 

smart access system with push-button 

start or wireless remote control.

The opening screen will be displayed 

on the multi-information display.

The interior lights, instrument panel 

lights, etc. will illuminate.

To prevent 12-volt battery discharge

Do not use the power outlet longer than 

necessary when the hybrid system is off.

Appliances that may not operate 

properly (120 VAC)

The following 120 VAC appliances may 

not operate properly even if their power 

consumption is under 100 W.

Appliances with high initial peak watt-

age

Measuring devices that process pre-

cise data

Other appliances that require an 

extremely stable power supply

383

5-6. Using the other interior features

5

In

te

rio

r f

ea

tu

re

s

1

To set the visor in the forward posi-
tion, flip it down.

2

To set the visor in the side position, 
flip down, unhook, and swing it to 
the side.

3

To use the side extender, place the 
visor in the side position, then slide 
it backward.

Front

Slide the cover to open.

The vanity light turns on.

Rear

Press the button to open.

The vanity light turns on.

To prevent 12-volt battery discharge

If the vanity lights remain on when the 

power switch is turned off, the lights will go 

off automatically after 20 minutes.

The rear door/rear quarter sunshades 
can be extended and retracted using 
the driver’s power window switch and 
Rear Multi Operation Panel.

From driver’s seat

Operate the driver’s power window 
switch.

Sun visors

Vanity mirrors

NOTICE

When not in use

Keep the rear vanity mirror closed.

To prevent the 12-volt battery from 

being discharged

Do not leave the vanity lights on for 

extended periods while the hybrid sys-

tem is off.

Rear door/rear quarter sun-
shades (if equipped)

384

5-6. Using the other interior features

Rear quarter sunshade (if 
equipped)
Rear door sunshade

1

Extend

2

Retract

*

*

: If the driver’s power window switch is 

operated when a rear door sun-
shade/rear quarter sunshade is 
retracted or being retracted, the rear 
window will open.

From rear seat

The rear seat power window switches 
cannot be used to extend the rear door 
sunshades/rear quarter sunshades.

Rear shade/lamp control screen

1

Display the home screen and then 
touch “Shade/Lamp”. (

P.348)

2

To fully extend/retract a rear 
door/rear quarter sunshade, touch 
the respective button.

Shortcut screen

To fully extend/retract a rear door/rear 
quarter sunshade, touch the respective 
button.

Operating conditions

The power switch is in ON mode.

The rear side windows are fully closed.

Operation of rear door sunshades/rear 

quarter sunshades when extended

If a rear door power window switch is oper-

ated when the rear door sunshade/rear 

quarter sunshade is extended, the rear door 

sunshade/rear quarter sunshade will retract 

while the rear window is opening.

Operating the rear door/rear quarter 

sunshades after turning the hybrid sys-

tem off

The rear door/rear quarter sunshades can 

be operated for a while even after the 

power switch is turned to ACCESSORY 

mode or off.

However, they cannot be operated using 

the driver’s power window switch after 

either front door is opened.

Jam protection function

If an object becomes caught between a rear 

door sunshade and the window frame, the 

rear door sunshade will stop and then 

extend/retract slightly.

When reconnecting the 12-volt battery

The rear door/rear quarter sunshades will 

always be retracted the first time the button 

is pressed.

A

B

385

5-6. Using the other interior features

5

In

te

rio

r f

ea

tu

re

s

The rear sunshade can be can be 
extended and retracted using the rear 
sunshade switch and Rear Multi Oper-
ation Panel.

From front seat

Extend/retract

From rear seat

Vehicles without power rear seat

Extend/retract

Vehicles with power rear seat (Rear 
shade/lamp control screen)

1

Display the home screen and then 
touch “Shade/Lamp”. (

P.348)

2

To fully extend/retract a rear door 
sunshade, touch the respective but-
ton.

Vehicles with power rear seat 
(shortcut screen)

To fully extend/retract a rear door sun-

WARNING

When the rear door/rear quarter sun-

shades are being extended or 

retracted

Do not place fingers or other objects in 

the shade mechanism or in the opening 

as injury may result.

Jam protection function

Never use any part of your body to inten-

tionally activate the jam protection func-

tion.

NOTICE

To ensure normal operation of the 

sunshades

Observe the following precautions:

Do not place excessive load on the 

motor or other components.

Do not place objects where they may 

hinder opening and closing opera-

tions.

Do not attach items to the rear 

door/rear quarter sunshades.

Keep the opening clean and clear of 

obstructions.

Do not operate the rear door/rear 

quarter sunshades continuously for 

long periods of time.

Rear sunshade

386

5-6. Using the other interior features

shade, touch the respective button.

The rear sunshade can be used when

The power switch is in ON mode.

Operating the rear sunshade after turn-

ing the hybrid system off

The rear sunshade can be operated for a 

while even after the power switch is 

switched to ACCESSORY mode or turned 

off.

Reverse operation feature

To ensure adequate rear visibility, the rear 

sunshade automatically lowers when the 

shift position is shifted to R.
However, the rear sunshade is raised again 

if any of the following occurs:

The switch is pressed again.

The shift position is shifted to P.

The shift position is shifted out of P and R, 

and the vehicle reaches a speed of 9 mph 

(15 km/h).

If the hybrid system is turned off when the 

rear sunshade has been lowered due to the 

reverse operation feature, it will not be 

raised even when the hybrid system is 

turned on again and the vehicle reaches a 

speed of 9 mph (15 km/h). To raise the sun-

shade again, press the switch.

WARNING

When the rear sunshade is being 

extended or retracted

Do not place fingers or other objects in 

the shade mechanism or in the opening 

as injury may result.

NOTICE

To ensure normal operation of the 

sunshade

Observe the following precautions:

Do not place excessive load on the 

motor or other components.

Do not place objects where they may 

hinder opening and closing opera-

tions.

Do not attach items to the rear sun-

shade.

Keep the opening clean and clear of 

obstructions.

Do not operate the rear sunshade con-

tinuously for long periods of time.

387

5-6. Using the other interior features

5

Interio

r fe

atures

HomeLink

®

 programming procedure

The programming procedures can also be 

found at the following URL.
Website: www.homelink.com/lexus

For support, contact customer support at 

the following.
Help Line: 1-800-355-3515

The HomeLink

®

 wireless control sys-

tem in your vehicle has 3 buttons which 
can be programmed to operate 3 dif-
ferent devices. Refer to the program-
ming methods on the following pages 
to determine the method which is 
appropriate for the device.

Vehicles with auto anti-glare inside 
rear view mirror

HomeLink

®

 indicator light

Garage door operation indicators

HomeLink

®

 icon

Illuminates while HomeLink

®

 is operating.

Buttons

Vehicles with Digital Rearview Mir-
ror

HomeLink

®

 logo

Appears while HomeLink

®

 is operating. 

When the menu button (

P.141) is 

pressed, the logo disappears even while 
the HomeLink

®

 is operating.

Garage door operation indicators

HomeLink

®

 indicator light

Illuminates above each button selected.

Buttons

Garage door opener

The garage door opener can be 
programmed using the Home-
Link

®

 to operate garage doors, 

gates, entry doors, door locks, 
home lighting systems, security sys-
tems, and other devices.

System components

A
B
C

D

A

B
C

D

388

5-6. Using the other interior features

Codes stored in the HomeLink

®

 mem-

ory

The registered codes are not erased even 

if the 12-volt battery cable is discon-

nected.

If learning failed when registering a dif-
ferent code to a HomeLink

®

 button that 

already has a code registered to it, the 

already registered code will not be 

erased.

Before programming HomeLink

®

During programming, it is possible 
that garage doors, gates, or other 
devices may operate. For this rea-

son, make sure that people and 
objects are clear of the garage door 
or other devices to prevent injury or 
other potential harm.

It is recommended that a new bat-
tery be placed in the remote control 
transmitter for more accurate pro-
gramming.

Garage door opener motors manu-
factured after 1995 may be 
equipped with rolling code protec-
tion. If this is the case, you may need 
a stepladder or other sturdy, safe 
device to reach the “Learn” or 
“Smart” button on the garage door 
opener motor.

Programming HomeLink

®

Steps 

1

 through 

3

 must be performed 

within 60 seconds, otherwise the 
HomeLink

®

 indicator light will stop 

flashing and programming will not be 
successfully completed.

1

Press and release the HomeLink

®


button you want to program and 
check that the HomeLink

®

 indica-

tor light flashes (orange).

2

Point the remote control transmit-
ter for the device at the rear view 
mirror, 1 to 3 in. (25 to 75 mm) 
from the HomeLink

®

 buttons.

Keep the HomeLink

®

 indicator light in 

view while programming.

WARNING

When programming a garage door or 

other remote control device

The garage door or other device may 

operate, so ensure people and objects 

are out of danger to prevent potential 

harm.

Conforming to federal safety stan-

dards

Do not use the HomeLink

®

 compatible 

transceiver with any garage door opener 

or device that lacks safety stop and 

reverse features as required by federal 

safety standards.

This includes any garage door that can-

not detect an interfering object. A door 

or device without these features 

increases the risk of death or serious 

injury.

When operating or programming 
HomeLink

®

Never allow a child to operate or play 
with the HomeLink

®

 buttons.

Programming the HomeLink

®

389

5-6. Using the other interior features

5

Interio

r fe

atures

Vehicles with auto anti-glare inside 
rear view mirror

Vehicles with Digital Rearview Mir-
ror

3

Program a device.

Vehicles with auto anti-glare inside 
rear view mirror

Vehicles with Digital Rearview Mir-
ror

Programming a device other than 
an entry gate (for U.S.A. owners)

Press and hold the remote control 
transmitter button until the Home-
Link

®

 indicator light changes from 

slowly flashing orange to rapidly flash-
ing green (rolling code) or continu-
ously lit green (fixed code), then 
release the button.

Programming an entry gate (for 
U.S.A. owners)/Programming a 
device in the Canadian market

Press and release the remote control 
transmitter button at 2 second inter-
vals, repeatedly, until the HomeLink

®


indicator light changes from slowly 
flashing (orange) to rapidly flashing 
(green) (rolling code) or continuously 
lit (green) (fixed code).

4

Test the HomeLink

®

 operation by 

pressing the newly programmed 
button and observing the indicator 
light:

HomeLink

®

 indicator light illumi-

nates: Programming of a fixed code 
device has completed. The garage 
door or other device should operate 

390

5-6. Using the other interior features

when a HomeLink

®

 button is 

pressed and released.

HomeLink

®

 indicator light flashes 

rapidly: The garage door opener 
motor or other device is equipped 
with a rolling code. To complete 
programming, firmly press and hold 
the HomeLink

®

 button for 2 sec-

onds then release it.

If the garage door or other device 
does not operate, proceed to “Pro-
gramming a rolling code system”.

5

Repeat the steps above to program 
another device for any of the 
remaining HomeLink

®

 buttons.

Programming a rolling code sys-
tem

Two or more people may be necessary 
to complete rolling code program-
ming.

1

Locate the “Learn” or “Smart” but-
ton on the garage door opener 
motor in the garage.

This button can usually be found where the 

hanging antenna wire is attached to the 

unit. The name and color of the button may 

vary by manufacturer. Refer to the owner’s 

manual supplied with the garage door 

opener motor for details.

2

Press and release the “Learn” or 
“Smart” button.

Perform 

3

 within 30 seconds after per-

forming 

2

.

3

Press and hold the desired Home-
Link

®

 button (inside the vehicle) 

for 2 seconds and release it. Repeat 
this sequence (press/hold/release) 
up to 3 times to complete pro-
gramming.
If the garage door opener motor 
operates when the HomeLink

®


button is pressed, the garage door 
opener motor recognizes the 
HomeLink

®

 signal.

Vehicles with auto anti-glare inside 
rear view mirror

391

5-6. Using the other interior features

5

Interio

r fe

atures

Vehicles with Digital Rearview Mir-
ror

Enabling 2-way communication 
with a garage door (only available 
for compatible devices)

When enabled, 2-way communication 
allows you to check the status of the 
opening and closing of a garage door 
through indicators in your vehicle.
2-way communication is only available 
if the garage door opener motor used 
is a compatible device. (To check 
device compatibility, refer to 
www.homelink.com.)

1

Within 5 seconds after program-
ming the garage door opener has 
been completed, if the garage door 
opener motor is trained to Home-
Link

®

, both garage door operation 

indicators will flash rapidly (green) 
and the light on the garage door 
opener motor will blink twice, indi-
cating that 2-way communication is 
enabled.

If the indicators do not flash, perform 

2

 and 

3

 within the first 10 presses of the Home-

Link

®

 button after programming has been 

completed.

2

Press a programmed HomeLink

®


button to operate a garage door.

3

Within 1 minute of pressing the 
HomeLink

®

 button, after the 

garage door operation has 
stopped, press the “Learn” or 
“Smart” button on the garage door 
opener motor. Within 5 seconds of 
the establishment of 2-way com-
munication with the garage door 
opener, both garage door opera-
tion indicators in the vehicle will 
flash rapidly (green) and the light 
on the garage door opener motor 
will blink twice, indicating that 
2-way communication is enabled.

Reprogramming a single Home-
Link

®

 button

When the following procedure is per-
formed, buttons which already have 
devices registered to them can be 
overwritten:

1

Press and hold the desired Home-
Link

®

 button.

2

When the HomeLink

®

 indicator 

starts flashing orange, release the 
HomeLink

®

 button and perform 

“Programming HomeLink

®

” 

1

 (it 

takes 20 seconds for the Home-
Link

®

 indicator to start flashing).

Before programming

Install a new battery in the transmitter.

The battery side of the transmitter must 

be pointed away from the Home-
Link

®

buttons.

Press the appropriate HomeLink

®


Operating HomeLink

®

392

5-6. Using the other interior features

button. The HomeLink

®

 indicator light 

should turn on.
The status of the opening and closing 
of a garage door is shown by the 
garage door opener indicators.

Vehicles with auto anti-glare inside 
rear view mirror

Opening
Closing

Vehicles with Digital Rearview Mir-
ror

Opening
Closing

This function is only available if the garage 
door opener motor used is a compatible 
device. (To check device compatibility, 
refer to www.homelink.com.)

The indicators can operate within 
approximately 820 ft. (250 m) of the 
garage door. However, if there are 
obstructions between the garage door 
and the vehicle, such as houses and 
trees, feedback signals from the 
garage door may not be received.
To recall the previous door operation 
status, press and release either Home-
Link

®

 buttons 

 and 

 or 

 and 

 (vehicles with auto anti-glare 

inside rear view mirror), 

 and 

 or 

 and 


(vehicles with Digital Rearview Mirror), 
simultaneously. The last recorded sta-
tus will be displayed for 3 seconds.

Press and hold the 2 outside buttons 
for 10 seconds until the HomeLink

®


indicator light changes from continu-
ously lit (orange) to rapidly flashing 
(green).

If you sell your vehicle, be sure to erase the 
programs stored in the HomeLink

®

 mem-

ory.

A
B

A
B

Color

Status

Orange (flashing)

Currently open-

ing/closing

Green

Opening/closing has 

completed

Red (flashing)

Feedback signals 

cannot be received

Erasing the entire HomeLink

®


memory (all three codes)

393

5-6. Using the other interior features

5

Interio

r fe

atures

Vehicles with auto anti-glare inside 
rear view mirror

Vehicles with Digital Rearview Mir-
ror

394

5-6. Using the other interior features

395

6

6

Mai
nte

na

nc

e a

nd

 c

are

Maintenance and care

.

6-1. Maintenance and care

Cleaning and protecting the vehi-

cle exterior................................

396

Cleaning and protecting the vehi-

cle interior .................................

399

6-2. Maintenance

Maintenance requirements

........................................................

402

General maintenance.............

403

Emission inspection and mainte-

nance (I/M) programs .........

406

6-3. Do-it-yourself maintenance

Do-it-yourself service precautions

........................................................

407

Hood...............................................

409

Positioning a floor jack............

409

Engine compartment.................

411

12-volt battery..............................

418

Tires ................................................

420

Replacing the tire......................

428

Tire inflation pressure..............

432

Wheels...........................................

434

Air conditioning filter...............

435

Cleaning the hybrid battery (trac-

tion battery) air intake vents
........................................................

437

Electronic key battery.............

439

Checking and replacing fuses

.........................................................

441

Headlight aim..............................

444

Light bulbs....................................

445

396

6-1. Maintenance and care

6-1.Maintenance and care

Working from top to bottom, liber-
ally apply water to the vehicle body, 
wheel wells and underside of the 
vehicle to remove any dirt and dust.

Wash the vehicle body using a 
sponge or soft cloth, such as a 
chamois.

For hard-to-remove marks, use car 
wash soap and rinse thoroughly with 
water.

Wipe away any water.

Wax the vehicle when the water-
proof coating deteriorates.

If water does not bead on a clean surface, 
apply wax when the vehicle body is cool.

Self-restoring coat

The vehicle body has a self-restoring coat-

ing that is resistant to small surface 

scratches caused in a car wash etc.

The coating lasts for 5 to 8 years from 

when the vehicle is delivered from the 

plant.

The restoration time differs depending on 

the depth of the scratch and outside tem-

perature.

The restoration time may become 

shorter when the coating is warmed by 

applying warm water.

Deep scratches caused by keys, coins, 

etc. cannot be restored.

Do not use wax that contains abrasives.

Automatic car washes

Before washing the vehicle:

• Fold the mirrors

• Turn off the power trunk opener and 

closer

Start washing from the front of the vehicle. 

Extend the mirrors before driving.

Brushes used in automatic car washes 

may scratch the vehicle surface, parts 

(wheel, etc.) and harm your vehicle’s 

paint.

When it is necessary to set the power 

switch to ACCESSORY mode with the 

shift position held in N, refer to P.181.

High pressure car washes

As water may enter the cabin, do not bring 

the nozzle tip near the gaps around the 

doors or perimeter of the windows, or spray 

these areas continuously.

When using a car wash

If the door handle becomes wet while the 

electronic key is within the effective range, 

the door may lock and unlock repeatedly. In 

that case, follow the following correction 

procedures to wash the vehicle:

Place the key in a position 6 ft. (2 m) or 

more separate from the vehicle while the 

vehicle is being washed. (Take care to 

ensure that the key is not stolen.)

Set the electronic key to battery-saving 

mode to disable the smart access system 

with push-button start. (

P.115)

Wheels and wheel ornaments

Remove any dirt immediately by using a 

neutral detergent.

Wash detergent off with water immedi-

ately after use.

To protect the paint from damage, make 

sure to observe the following precau-

tions.

• Do not use acidic, alkaline or abrasive 

detergent

• Do not use hard brushes

• Do not use detergent on the wheels when 

they are hot, such as after driving or park-

ing in hot weather

Cleaning and protecting the 
vehicle exterior

Perform cleaning in a manner 
appropriate to each component 
and its material.

Cleaning instructions

397

6-1. Maintenance and care

6

Mai
nte

na

nc

e a

nd

 c

are

Brake pads and calipers

Rust may form if the vehicle is parked with 

wet brake pads or disc rotors, causing them 

to stick. Before parking the vehicle after it is 

washed, drive slowly and apply the brakes 

several times to dry the parts.

Bumpers and side moldings

Do not scrub with abrasive cleaners.

Front side windows water-repellent 

coating (if equipped)

The following precautions can extend the 

effectiveness of the water-repellent coating.

Remove any dirt, etc. from the front side 

windows regularly.

Do not allow dirt and dust to accumulate 

on the windows for a long period.

Clean the windows with a soft, damp 

cloth as soon as possible.

Do not use wax or glass cleaners that 

contain abrasives when cleaning the win-

dows.

Do not use any metallic objects to 

remove condensation build up.

Plated portions

If dirt cannot be removed, clean the parts as 

follows:

Use a soft cloth dampened with an 

approximately 5% solution of neutral 

detergent and water to clean the dirt off.

Wipe the surface with a dry, soft cloth to 

remove any remaining moisture.

To remove oily deposits, use alcohol wet 

wipes or a similar product.

Vehicles with Advanced Drive

As this vehicle is equipped with various sen-

sors, also refer to “Lexus Teammate 

Advanced Drive OWNER’S MANUAL” at 

Lexus.com when cleaning the vehicle.

WARNING

When washing the vehicle

Do not apply water to the inside of the 

engine compartment. Doing so may 

cause the electrical components, etc. to 

catch fire.

When cleaning the windshield

Set the wiper switch to off.

If the wiper switch is in “AUTO”, the wip-

ers may operate unexpectedly in the fol-

lowing situations, and may result in hands 

being caught or other serious injuries 

and cause damage to the wiper blades.

Off
AUTO

When the upper part of the windshield 

where the raindrop sensor is located is 

touched by hand

When a wet rag or similar is held close 

to the raindrop sensor

If something bumps against the wind-

shield

If you directly touch the raindrop sen-

sor body or if something bumps into 

the raindrop sensor

Precautions regarding the exhaust 

pipes

Exhaust gasses cause the exhaust pipes 

to become quite hot.

When washing the vehicle, be careful not 

to touch the pipes until it has cooled suffi-

ciently, as touching a hot exhaust pipes 

can cause burns.

Precaution regarding the front 

bumper (vehicles with Lexus Safety 

System + A)

If the paint of the front bumper is chipped 

or scratched, the Lexus Safety System + 

A may not function correctly. If this 

occurs, consult your Lexus dealer.

A

B

398

6-1. Maintenance and care

WARNING

Precaution regarding the rear 

bumper

If the paint of the rear bumper is chipped 

or scratched, the following systems may 

not function correctly. If this occurs, con-

sult your Lexus dealer.

Lexus Safety System + A (if equipped)

BSM

RCTA

PKSB

NOTICE

To prevent paint deterioration and 

corrosion on the body and compo-

nents (aluminum wheels, etc.)

Wash the vehicle immediately in the 

following cases:

• After driving near the sea coast

• After driving on salted roads

• If coal tar or tree sap is present on the 

paint surface

• If dead insects, insect droppings or 

bird droppings are present on the 

paint surface

• After driving in an area contaminated 

with soot, oily smoke, mine dust, iron 

powder or chemical substances

• If the vehicle becomes heavily soiled 

with dust or mud

• If liquids such as benzene and gasoline 

are spilled on the paint surface

If the paint is chipped or scratched, 

have it repaired immediately.

To prevent the wheels from corroding, 

remove any dirt and store in a place 

with low humidity when storing the 

wheels.

Cleaning the exterior lights

Wash carefully. Do not use organic 

substances or scrub with a hard brush.

This may damage the surfaces of the 

lights.

Do not apply wax to the surfaces of the 

lights.

Wax may cause damage to the lenses.

When using an automatic car wash

Set the wiper switch to the off position.

If the wiper switch is in “AUTO”, the wip-

ers may operate and the wiper blades 

may be damaged.

When using a high pressure car wash

When washing the vehicle, do not 

spray the camera or its surrounding 

area directly with a high pressure 

washer. Shock applied from high pres-

sure water may cause the device to not 

operate normally.

Do not spray water directly on the 

radar which is equipped behind the 

emblem. Otherwise it may cause the 

device to be damaged.

Do not bring the nozzle tip close to 

boots (rubber or resin manufactured 

cover), connectors or the following 

parts. The parts may be damaged if 

they come into contact with high-pres-

sure water.

• Traction related parts

• Steering parts

• Suspension parts

• Brake parts

Keep the cleaning nozzle at least 11.9 

in. (30 cm) away from the vehicle 

body. Otherwise resin section, such as 

moldings and bumpers, may be 

deformed and damaged.

Also, do not continuously hold the nozzle 

in the same place.

399

6-1. Maintenance and care

6

Mai
nte

na

nc

e a

nd

 c

are

Remove dirt and dust using a vac-
uum cleaner. Wipe dirty surfaces 
with a cloth dampened with luke-
warm water.

If dirt cannot be removed, wipe it off 
with a soft cloth dampened with 
neutral detergent diluted to approx-
imately 1%.
Wring out any excess water from 
the cloth and thoroughly wipe off 
remaining traces of detergent and 
water.

Shampooing the carpets

There are several commercial foaming-type 

cleaners available. Use a sponge or brush 

to apply the foam. Rub in overlapping cir-

cles. Do not use water. Wipe dirty surfaces 

and let them dry. Excellent results are 

obtained by keeping the carpet as dry as 

possible.

Handling the seat belts

Clean with mild soap and lukewarm water 

using a cloth or sponge. Also check the 

belts periodically for excessive wear, fraying 

or cuts.

When cleaning the carpeted portions of 

the glove box, console box, etc.

If a strong adhesive tape is used, there is a 

possibility that the surface of the carpet 

could be damaged.

NOTICE

Do not spray the lower part of the 

windshield continuously.

If water enters the air conditioning sys-

tem intake located near the lower part of 

the windshield, the air conditioning sys-

tem may not operate correctly.

Do not wash the underside of the vehi-

cle using a high pressure car washer.

Cleaning and protecting the 
vehicle interior

Perform cleaning in a manner 
appropriate to each component 
and its material.

Protecting the vehicle interior

400

6-1. Maintenance and care

WARNING

Water in the vehicle

Do not splash or spill liquid in the vehi-

cle, such as on the floor, in the hybrid 

battery (traction battery) air vents, and 

in the trunk. (

P.70)

Doing so may cause the hybrid battery, 

electrical components, etc. to mal-

function or catch fire.

Do not get any of the SRS components 

or wiring in the vehicle interior wet.

(

P.31)

An electrical malfunction may cause 

the airbags to deploy or not function 

properly, resulting in death or serious 

injury.

Cleaning the interior (especially 

instrument panel)

Do not use polish wax or polish cleaner. 

The instrument panel may reflect off the 

windshield, obstructing the driver’s view 

and leading to an accident, resulting in 

death or serious injury.

NOTICE

Cleaning detergents

Do not use the following types of 

detergent, as they may discolor the 

vehicle interior or cause streaks or 

damage to painted surfaces:

• Areas other than the seats and steer-

ing wheel: Organic substances such as 

benzene or gasoline, alkaline or acidic 

solutions, dye, and bleach

• Seats: Alkaline or acidic solutions, 

such as thinner, benzene, and alcohol

• Steering wheel: Organic substances, 

such as thinner, and cleaner that con-

tains alcohol

Do not use polish wax or polish 

cleaner. The instrument panel’s or 

other interior part’s painted surface 

may be damaged.

Preventing damage to leather sur-

faces

Observe the following precautions to 

avoid damage to and deterioration of 

leather surfaces:

Remove any dust or dirt from leather 

surfaces immediately.

Do not expose the vehicle to direct 

sunlight for extended periods of time. 

Park the vehicle in the shade, espe-

cially during summer.

Do not place items made of vinyl, plas-

tic, or containing wax on the uphol-

stery, as they may stick to the leather 

surface if the vehicle interior heats up 

significantly.

Water on the floor

Do not wash the vehicle floor with water.

Vehicle systems such as the audio system 

may be damaged if water comes into 

contact with electrical components such 

as the audio system above or under the 

floor of the vehicle. Water may also 

cause the body to rust.

When cleaning the inside of the wind-

shield

Do not allow glass cleaner to contact the 

lens. Also, do not touch the lens. 

(

P.200, 205)

Cleaning the inside of the rear win-

dow

Do not use glass cleaner to clean the 

rear window, as this may cause dam-

age to the rear window defogger 

heater wires or antenna. Use a cloth 

dampened with lukewarm water to 

gently wipe the window clean. Wipe 

the window in strokes running parallel 

to the heater wires or antenna.

Be careful not to scratch or damage 

the heater wires or antenna.

401

6-1. Maintenance and care

6

Mai
nte

na

nc

e a

nd

 c

are

Remove dirt using a water-damp-
ened soft cloth or synthetic chamois.

Wipe the surface with a dry, soft 
cloth to remove any remaining 
moisture.

Cleaning the areas with satin-finish 

metal accents

The metal areas use a layer of real metal for 

the surface. It is necessary to clean them 

regularly. If dirty areas are left uncleaned for 

long periods of time, they may be difficult to 

clean.

Remove dirt and dust using a vac-
uum cleaner.

Wipe off any excess dirt and dust 
with a soft cloth dampened with 
diluted detergent.

Use a diluted water solution of approxi-
mately 5% neutral wool detergent.

Wring out any excess water from 
the cloth and thoroughly wipe off all 
remaining traces of detergent.

Wipe the surface with a dry, soft 
cloth to remove any remaining 
moisture. Allow the leather to dry in 
a shaded and ventilated area.

Caring for leather areas

Lexus recommends cleaning the interior of 

the vehicle at least twice a year to maintain 

the quality of the vehicle’s interior.

Remove dirt and dust using a vac-
uum cleaner.

Wipe it off with a soft cloth damp-
ened with neutral detergent diluted 
to approximately 1%.

Wring out any excess water from 
the cloth and thoroughly wipe off 
remaining traces of detergent and 
water.

To remove dust from the fabric, use 
a vacuum cleaner or adhesive tape.

Use a cloth dampened with water to 
gently wipe the fabric clean.

Do not use detergents to clean the fabric.

Cleaning the areas with satin-fin-
ish metal accents

Cleaning the leather areas

Cleaning the synthetic leather 
areas

Cleaning fabric portions of the 
instrument panel

402

6-2. Maintenance

6-2.Maintenance

Repair and replacement

It is recommended that genuine Lexus parts 

be used for repairs to ensure performance 

of each system. If non-Lexus parts are used 

in replacement or if a repair shop other than 

a Lexus dealer performs repairs, confirm 

the warranty coverage.

Allow inspection and repairs to be per-

formed by a Lexus dealer

Lexus technicians are well-trained spe-

cialists and are kept up to date with the 

latest service information. They are well 

informed about the operation of all sys-

tems on your vehicle.

Keep a copy of the repair order. It proves 

that the maintenance that has been per-

formed is under warranty coverage. If any 

problem should arise while your vehicle is 

under warranty, your Lexus dealer will 

promptly take care of it.

General maintenance should be per-
formed on a daily basis. This can be 
done by yourself or by a Lexus dealer.

Scheduled maintenance should be 
performed at specified intervals 
according to the maintenance sched-
ule.

For details about maintenance items and 
schedules, refer to the “Warranty and Ser-
vice Guide”, “Owner’s Manual Supple-
ment” or “Scheduled Maintenance”.

Resetting the message indicating main-

tenance is required

After the required maintenance is per-

formed according to the maintenance 

schedule, please reset the message.

To reset the message, follow the procedure 

described below:

1

Press 

 or 

 of the meter control 

switch to select 

.

2

Press 

 or 

 to select “Vehicle Set-

tings” and then press 

.

Maintenance requirements

To ensure safe and economical driv-
ing, day-to-day care and regular 
maintenance are essential. It is the 
owner’s responsibility to perform 
regular checks. Lexus recommends 
the maintenance below.

WARNING

If your vehicle is not properly main-

tained

Improper maintenance could result in 

serious damage to the vehicle and possi-

ble death or serious injury.

Handling of the 12-volt battery

Engine exhaust, some of its constitu-

ents, and a wide variety of automobile 

components contain or emit chemicals 

known to the State of California to 

cause cancer and birth defects and 

other reproductive harm. Work in a 

well ventilated area.

Oils, fuels and fluids contained in vehi-

cles as well as waste produced by 

component wear contain or emit 

chemicals known to the State of Cali-

fornia to cause cancer and birth 

defects or other reproductive harm. 

Avoid exposure and wash any affected 

area immediately.

12-volt battery posts, terminals and 

related accessories contain lead and 

lead compounds which are known to 

cause brain damage. Wash your hands 

after handling. (

P.418)

General maintenance

Scheduled maintenance

403

6-2. Maintenance

6

Mai
nte

na

nc

e a

nd

 c

are

3

Press 

 or 

 to select “Scheduled 

Maintenance” and then press 

.

4

Press 

 or 

 to select “Yes” and 

then press 

.

A message will be displayed on the 

multi-information display when the reset 

procedure has been completed.

You can perform some maintenance 
procedures by yourself.
Please be aware that do-it-yourself 
maintenance may affect warranty cov-
erage.

The use of Lexus repair manuals is recom-
mended.
For details about warranty coverage, refer 
to the separate “Owner’s Guide”, “War-
ranty and Service Guide”, “Owner’s Man-
ual Supplement” or “Warranty Booklet”.

Do-it-yourself maintenance

General maintenance

Listed below are the general main-
tenance items that should be per-
formed at the intervals specified in 
the “Warranty and Service Guide” 
or “Owner’s Manual Supplement”. 
It is recommended that any prob-
lem you notice should be brought to 
the attention of your Lexus dealer 
or qualified service shop for advice.

WARNING

If the hybrid system is operating

Turn the hybrid system off and ensure 

that there is adequate ventilation before 

performing maintenance checks.

Engine compartment

Items

Check points

Brake fluid

Is the brake fluid at the 
correct level? 
(

P.416)

Engine/power 
control unit cool-
ant

Is the engine/power 
control unit coolant at 
the correct level? 
(

P.415)

Engine oil

Is the engine oil at the 
correct level? 
(

P.413)

Exhaust system

There should not be 
any fumes or strange 
sounds.

404

6-2. Maintenance

Radiator/con-
denser

The radiator and con-
denser should be free 
from foreign objects. 
(

P.416)

Washer fluid

Is there sufficient 
washer fluid? (

P.417)

Trunk

Items

Check points

12-volt battery

Check the connec-
tions. (

P.418)

Vehicle interior

Items

Check points

Accelerator 
pedal

• The accelerator 

pedal should move 
smoothly (without 
uneven pedal effort 
or catching).

Hybrid transmis-
sion “Park” mech-
anism

• When  parked  on  a 

slope and the shift 
position is in P, is the 
vehicle securely 
stopped?

Brake pedal

• Does the brake 

pedal move 
smoothly?

• Does the brake 

pedal have appro-
priate clearance 
from the floor?

• Does the brake 

pedal have the cor-
rect amount of free 
play?

Items

Check points

Brakes

• The vehicle should 

not pull to one side 
when the brakes are 
applied.

• The  brakes  should 

work effectively.

• The brake pedal 

should not feel 
spongy.

• The brake pedal 

should not get too 
close to the floor 
when the brakes are 
applied.

Head restraints

• Do  the  head 

restraints move 
smoothly and lock 
securely?

Indicators/buzz-
ers

• Do  the  indicators 

and buzzers function 
properly?

Lights

• Do all the lights 

come on?

• Are the headlights 

aimed correctly? 
(

P.444)

Parking brake

• Does the parking 

brake operate nor-
mally?

• When parked on a 

slope and the park-
ing brake is on, is the 
vehicle securely 
stopped?

Seat belts

• Do the seat belts 

operate smoothly?

• The seat belts should 

not be damaged.

Items

Check points

405

6-2. Maintenance

6

Mai
nte

na

nc

e a

nd

 c

are

Seats

• Do the seat controls 

operate properly?

Steering wheel

• Does the steering 

wheel rotate 
smoothly?

• Does the steering 

wheel have the cor-
rect amount of free 
play?

• There  should  not  be 

any strange sounds 
coming from the 
steering wheel.

Vehicle exterior

Items

Check points

Doors/trunk

• Do the doors/trunk 

operate smoothly?

Engine hood

• Does  the  engine 

hood lock system 
work properly?

Fluid leaks

• There  should  not  be 

any signs of fluid 
leakage after the 
vehicle has been 
parked.

Items

Check points

Tires

• Is the tire inflation 

pressure correct?

• The tires should not 

be damaged or 
excessively worn.

• Have the tires been 

rotated according to 
the maintenance 
schedule?

• The  wheel  nuts 

should not be loose.

Windshield wip-
ers

• The wiper blades 

should not show any 
signs of cracking, 
splitting, wear, con-
tamination or defor-
mation.

• The wiper blades 

should clear the 
windshield without 
streaking or skip-
ping.

Items

Check points

406

6-2. Maintenance

The OBD system determines that a 
problem exists somewhere in the emis-
sion control system. Your vehicle may 
not pass the I/M test and may need to 
be repaired. Contact your Lexus 
dealer to service the vehicle.

When the 12-volt battery is discon-
nected or discharged

Readiness codes that are set during ordi-
nary driving are erased.
Also, depending on your driving habits, the 
readiness codes may not be completely 
set.

When the fuel tank cap is loose

The malfunction indicator lamp comes on 
indicating a temporary malfunction and 
your vehicle may not pass the I/M test.

The error code in the OBD system will 
not be cleared unless the vehicle is 
driven 40 or more times.

Contact your Lexus dealer to prepare 
the vehicle for re-testing.

Emission inspection and 
maintenance (I/M) pro-
grams

Some states have vehicle emission 
inspection programs which include 
OBD (On Board Diagnostics) 
checks. The OBD system monitors 
the operation of the emission con-
trol system.

If the malfunction indicator lamp 
comes on

Your vehicle may not pass the 
I/M test in the following situa-
tions:

When the malfunction indicator 
lamp still remains on after sev-
eral driving trips

If your vehicle does not pass the 
I/M test

407

6-3. Do-it-yourself maintenance

6

Mai
nte

na

nc

e a

nd

 c

are

6-3.Do-it-yourself maintenance

Do-it-yourself service pre-
cautions

If you perform maintenance by 
yourself, be sure to follow the cor-
rect procedure as given in these 
sections.

Maintenance

Items

Parts and tools

12-volt battery 
condition 
(

P.418)

• Grease
• Conventional 

wrench (for terminal 
clamp bolts)

Brake fluid level 
(

P.416)

• FMVSS No.116 DOT 

3 or SAE J1703 
brake fluid
FMVSS No.116 DOT 
4 or SAE J1704 
brake fluid

• Rag  or  paper  towel
• Funnel (used only for 

adding brake fluid)

Engine/power 
control unit cool-
ant level 
(

P.415)

• “Toyota  Super  Long 

Life Coolant” or a 
similar high quality 
ethylene gly-
col-based non-sili-
cate, non-amine, 
non-nitrite and 
non-borate coolant 
with long-life hybrid 
organic acid tech-
nology
For the U.S.A.:
“Toyota Super Long 
Life Coolant” is 
pre-mixed with 50% 
coolant and 50% 
deionized water.
For Canada:
“Toyota Super Long 
Life Coolant” is 
pre-mixed with 55% 
coolant and 45% 
deionized water.

• Funnel  (used  only  for 

adding coolant)

Engine oil level 
(

P.413)

• “Toyota  Genuine 

Motor Oil” or equiv-
alent

• Rag or paper towel
• Funnel  (used  only  for 

adding engine oil)

Fuses (

P.441)

• Fuse  with  same 

amperage rating as 
original

Headlight aim 
(

P.444)

• Phillips-head screw-

driver

Radiator and con-
denser (

P.416)

Items

Parts and tools


Content      ..     10      11      12      13     ..