Lexus IS350 (2023 year). Manual in english - page 11
 

  Index      Manuals     Lexus IS350 (2023 year). Manual in english


Search            copyright infringement  


Content      ..     9      10      11      12     ..


Lexus IS350 (2023 year). Manual in english - page 11


342

7-2. Steps to take in an emergency

use the wrench or other tools.)

1

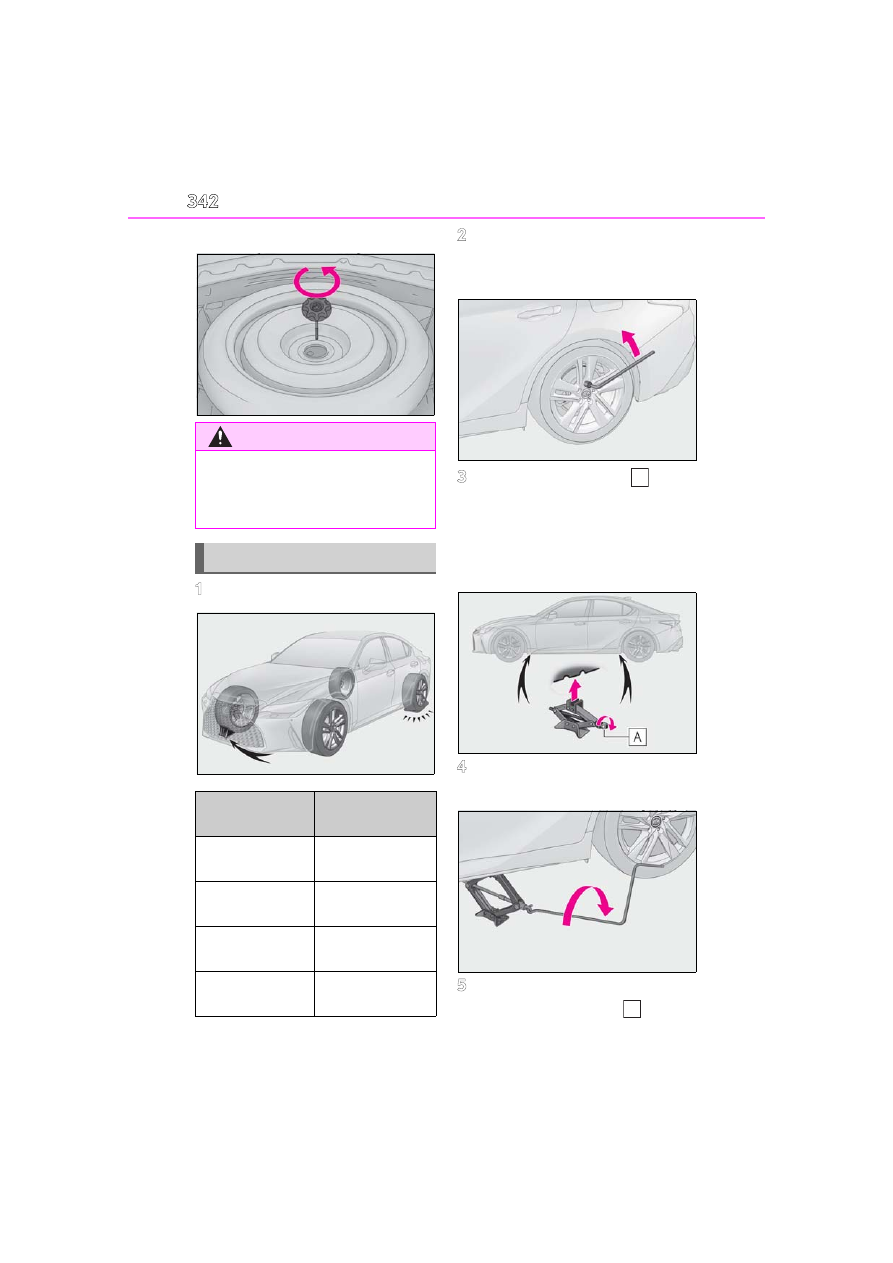
Chock the tires.

2

Using a wheel bolt wrench, slightly 
loosen the wheel bolts (approxi-
mately one turn).

3

Turn the tire jack portion   by 
hand until the notch of the jack is in 
contact with the jack point.

The jack point guides are located under 

the rocker panel. They indicate the jack 

point positions.

4

Raise the vehicle until the tire is 
slightly raised off the ground.

5

Remove the uppermost wheel bolt 
and install the guide pin   by 
hand.

WARNING

When storing the spare tire

Be careful not to catch fingers or other 

body parts between the spare tire and 

the body of the vehicle.

Replacing a flat tire

Flat tire

Wheel chock posi-

tions

Front left-hand side

Behind the rear 
right-hand side tire

Front right-hand 
side

Behind the rear 
left-hand side tire

Rear left-hand side

In front of the front 
right-hand side tire

Rear right-hand side

In front of the front 
left-hand side tire

A

A

343

7-2. Steps to take in an emergency

7

W

he

n t

ro

ub

le

 ar

ise

s

Turn the guide pin clockwise to tighten it 

until it stops.

6

Remove all the wheel bolts and the 
tire.

When resting the tire on the ground, place 

the tire so that the wheel design faces up to 

avoid scratching the wheel surface.

1

Remove any dirt or foreign matter 
from the wheel contact surfaces 
and wheel bolts.

If foreign matter is on the wheel contact 

surface, the wheel bolts may loosen while 

the vehicle is in motion, causing the tire to 

come off.

2

Align a wheel bolt hole on the spare 
tire with the guide pin, and set the 
spare tire on the guide pin.

Securely set the spare tire so that its wheel 

is touching the contact surface.

3

Loosely tighten each wheel bolt by 
hand or using a wheel bolt socket 

.

Push the spare tire to prevent it from falling.
Do not use the wheel bolt socket for any-

thing other than loosely tightening the 

wheel bolts by hand.

WARNING

Replacing a flat tire

Do not touch the disc wheels or the area 

around the brakes immediately after the 

vehicle has been driven. After the vehicle 

has been driven the disc wheels and the 

area around the brakes will be extremely 

hot. Touching these areas with hands, 

feet or other body parts while changing a 

tire, etc. may result in burns.

Installing the spare tire

A

344

7-2. Steps to take in an emergency

4

Remove the guide pin and loosely 
tighten the wheel bolt as in step 

3

.

5

Lower the vehicle.

6

Firmly tighten each wheel bolt in 
the order shown in the illustration 
two or three times.

Tightening torque:

103 ft•lbf (140 N•m, 14.3 kgf•m)

7

Stow the flat tire, tire jack and all 
tools.

The compact spare tire

The compact spare tire is identified by the 

label “TEMPORARY USE ONLY” on 

the tire sidewall.

Use the compact spare tire temporarily, 

and only in an emergency.

Make sure to check the tire inflation pres-

sure of the compact spare tire. (

P.370)

When using the compact spare tire

As the compact spare tire is not equipped 

with a tire pressure warning valve and trans-

mitter, low inflation pressure of the spare 

tire will not be indicated by the tire pressure 

warning system. Also, if you replace the 

compact spare tire after the tire pressure 

warning light comes on, the light remains 

on.

When the compact spare tire is 

equipped

The vehicle becomes lower when driving 

with the compact spare tire compared to 

when driving with standard tires.

If you have a flat rear tire on a road cov-

ered with snow or ice (vehicles with 

front and rear tires of the same size)

Install the compact spare tire on one of the 

front wheels of the vehicle. Perform the fol-

lowing steps and fit tire chains to the rear 

tires:

1

Replace a front tire with the compact 

spare tire.

2

Replace the flat rear tire with the tire 

removed from the front of the vehicle.

3

Fit tire chains to the rear tires.

WARNING

Installing the compact spare tire

Failure to follow these precautions could 

cause the wheel bolts to loosen and the 

tire to fall off, resulting in death or serious 

injury.

345

7-2. Steps to take in an emergency

7

W

he

n t

ro

ub

le

 ar

ise

s

WARNING

Never apply oil or grease to the wheel 

bolts or their contact surface on the 

wheel 

.

Doing so may cause the wheel bolts to 

be tightened excessively, leading to 

damage to the wheel bolts, the 

threaded portion the wheel bolts install 

to 

, or the wheel.

Also, the wheel bolts may come loose, 

possibly leading to the wheel coming 

off, causing a serious accident.

If oil or grease is attached to either of 

these parts, remove it.

Steel wheel

Aluminum wheel

When installing a wheel, use the same 

wheel bolts that were removed with 

the wheel. Also, do not use any wheel 

bolts other than Lexus Genuine wheel 

bolts.

Do not attach a heavily damaged 

wheel ornament, as it may fly off the 

wheel while the vehicle is moving.

If a wheel bolt hole in a wheel or the 

threads of a wheel bolt or the wheel 

hub are deformed, cracked, rusty or 

otherwise damaged, have the vehicle 

inspected by your Lexus dealer.

A

B

When tightening the wheel bolts

Do not tighten the wheel bolts exces-

sively. Doing so may cause the wheel 

bolts, the threads of the wheel hub, or the 

wheel to be damaged.

Guide pin

When removing or installing a tire, make 

sure to use the guide pin.

Also, the guide pin is made of resin. It 

may be damaged if the wheel is placed 

anywhere other than 

 or if a large 

amount of force is applied to the guide 

pin.

When using the compact spare tire

Remember that the compact spare tire 

provided is specifically designed for 

use with your vehicle. Do not use your 

compact spare tire on another vehicle.

Do not use more than one compact 

spare tires simultaneously.

Replace the compact spare tire with a 

standard tire as soon as possible.

Avoid sudden acceleration, abrupt 

steering, sudden braking and shifting 

operations that cause sudden engine 

braking.

When the compact spare tire is 

attached

The vehicle speed may not be correctly 

detected, and the following systems may 

not operate correctly:

• ABS & Brake assist

• VSC

• TRAC

A

346

7-2. Steps to take in an emergency

WARNING

• Dynamic radar cruise control with 

full-speed range

• PCS

• EPS

• Tire pressure warning system

• Adaptive Variable Suspension System 

(if equipped)

• LTA (Lane Tracing Assist)

• Lexus parking assist monitor

• Panoramic view monitor (if equipped)

• Intuitive parking assist (if equipped)

• PKSB (Parking Support Brake) (if 

equipped)

• BSM (Blind Spot Monitor)

• Navigation system (if equipped)

Also, not only can the following system 

not be utilized fully, but it may even nega-

tively affect the drive-train components:

• AWD system

Speed limit when using the compact 

spare tire

Do not drive at speeds in excess of 50 

mph (80 km/h) when a compact spare 

tire is installed on the vehicle.
The compact spare tire is not designed 

for driving at high speeds. Failure to 

observe this precaution may lead to an 

accident causing death or serious injury.

After using the tools and jack

Before driving, make sure all the tools 

and jack are securely in place in their 

storage location to reduce the possibility 

of personal injury during a collision or 

sudden braking.

NOTICE

Be careful when driving over bumps 

with the compact spare tire installed 

on the vehicle

When driving with the compact spare 

tire installed, the vehicle height will be 

different than when driving with standard 

tires. Be careful when driving over 

uneven road surfaces, etc.

Driving with tire chains and the com-

pact spare tire

Do not fit tire chains to the compact 

spare tire.

Tire chains may damage the vehicle body 

and adversely affect driving perfor-

mance.

When replacing the tires

When removing or fitting the wheels, 

tires or the tire pressure warning valve 

and transmitter, contact your Lexus 

dealer as the tire pressure warning valve 

and transmitter may be damaged if not 

handled correctly.

347

7-2. Steps to take in an emergency

7

When trouble

 ari

ses

One of the following may be the cause 
of the problem:

There may not be sufficient fuel in 
the vehicle’s tank.
Refuel the vehicle.

The engine may be flooded.
Try to restart the engine again fol-
lowing correct starting procedures. 
(

P.130)

There may be a malfunction in the 
engine immobilizer system. 
(

P.60)

One of the following may be the cause 
of the problem:

The battery may be discharged. 
(

P.351)

The battery terminal connections 
may be loose or corroded. 
(

P.292)

The engine starting system may be 
malfunctioning due to an electrical 
problem such as electronic key battery 
depletion or a blown fuse. However, an 
interim measure is available to start the 
engine. (

P.347)

One of the following may be the cause 
of the problem:

One or both of the battery terminals 
may be disconnected. (

P.292)

The battery may be discharged. 
(

P.351)

Contact your Lexus dealer if the problem 
cannot be repaired, or if repair procedures 
are unknown.

When the engine does not start, the 
following steps can be used as an 
interim measure to start the engine if 
the engine switch is functioning nor-
mally:

1

Push the parking brake switch to 
check that the parking brake is set. 
(

P.139)

Parking brake indicator will come on.

2

Shift the shift lever to P.

If the engine will not start

If the engine will not start even 
though correct starting procedures 
are being followed (

P.130), con-

sider each of the following points:

The engine will not start even 
though the starter motor oper-
ates normally.

The starter motor turns over 
slowly, the interior lights and 
headlights are dim, or the horn 
does not sound or sounds at a low 
volume.

The starter motor does not turn 
over

The starter motor does not turn 
over, the interior lights and head-
lights do not turn on, or the horn 
does not sound.

Starting the engine in an emer-
gency

348

7-2. Steps to take in an emergency

3

Turn the engine switch to ACCES-
SORY mode.

4

Press and hold the engine switch 
for about 15 seconds while 
depressing the brake pedal firmly.

Even if the engine can be started using 
the above steps, the system may be 
malfunctioning. Have the vehicle 
inspected by your Lexus dealer.

If you lose your keys

New genuine mechanical keys can 
be made by your Lexus dealer using 
another mechanical key and the 
key number stamped on your key 
number plate.

Keep the plate in a safe place such 
as your wallet, not in the vehicle.

NOTICE

When an electronic key is lost

If the electronic key remains lost, the risk 

of vehicle theft increases significantly. 

Visit your Lexus dealer immediately with 

all remaining electronic keys and the 

card key that were provided with your 

vehicle.

349

7-2. Steps to take in an emergency

7

W

he

n t

ro

ub

le

 ar

ise

s

Remove the cover inside the trunk and 
pull the lever.

When the electronic key does not work 

properly

Make sure that the smart access system 

with push-button start has not been deac-

tivated in the customization setting. If it is 

off, turn the function on.

Check if battery-saving mode is set. If it is 

set, cancel the function. (

P.98)

Doors

Use the mechanical key (

P.88) in 

order to perform the following opera-
tions:

If the fuel filler door cannot 
be opened

If the fuel filler door cannot be 
opened by pressing the center of 
the rear edge of the fuel filler door 
with the doors unlocked, the follow-
ing procedure can be used to open 
the fuel filler door.

Opening the fuel filler door

If the electronic key does not 
operate properly

If communication between the 
electronic key and vehicle is inter-
rupted (

P.98) or the electronic 

key cannot be used because the 
battery is depleted, the smart 
access system with push-button 
start and wireless remote control 
cannot be used. In such cases, the 
doors and trunk can be opened and 
the engine can be started by follow-
ing the procedure below.

NOTICE

In case of a smart access system with 

push-button start malfunction or 

other key-related problems

Take your vehicle with all the electronic 

keys provided with your vehicle to your 

Lexus dealer.

Locking and unlocking the 
doors, unlocking the trunk

350

7-2. Steps to take in an emergency

1

Locks all the doors

2

Unlocks the door

Turning the key rearward unlocks the 
driver’s door. Turning the key once again 
within 5 seconds unlocks the other doors.

Trunk

Turn the mechanical key clockwise to 
open. (

P.61)

Key linked functions

1

Closes the windows and moon roof

*


(turn and hold)

2

Opens the windows and moon roof

*


(turn and hold)

This setting must be customized at your 

Lexus dealer.

*

: If equipped

1

Ensure that the shift lever is in P and 
depress the brake pedal.

2

Touch the Lexus emblem side of the 
electronic key to the engine switch.

When the electronic key is detected, a 

buzzer sounds and the engine switch will 

turn to IGNITION ON mode.
When the smart access system with 

push-button start is deactivated in custom-

ization setting, the engine switch will turn 

to ACCESSORY mode.

3

Firmly depress the brake pedal and 
check that 

 is shown on the 

multi-information display.

4

Press the engine switch.

In the event that the engine still cannot 

WARNING

When using the mechanical key and 

operating the power windows or 

moon roof

Operate the power window or moon 

roof after checking to make sure that 

there is no possibility of any passenger 

having any of their body parts caught in 

the window or moon roof.

Also, do not allow children to operate the 

mechanical key. It is possible for children 

and other passengers to get caught in 

the power window or moon roof.

Starting the engine

351

7-2. Steps to take in an emergency

7

When trouble

 ari

ses

be started, contact your Lexus dealer.

Stopping the engine

Shift the shift lever to P and press the engine 

switch as you normally do when stopping 

the engine.

Replacing the key battery

As the above procedure is a temporary 

measure, it is recommended that the elec-

tronic key battery be replaced immediately 

when the battery is depleted. (

P.307)

Changing engine switch modes

Release the brake pedal and press the 

engine switch in step 

3

 above. The engine 

does not start and modes will be changed 

each time the switch is pressed. (

P.131)

If the vehicle battery is dis-
charged

The following procedures may be 
used to start the engine if the vehi-
cle’s battery is discharged.
You can also call your Lexus dealer 
or a qualified repair shop.

352

7-2. Steps to take in an emergency

If you have a set of jumper (or booster) 
cables and a second vehicle with a 
12-volt battery, you can jump start your 
vehicle by following the steps below.

1

Confirm that the electronic key is 
being carried.

When connecting the jumper (or booster) 

cables, depending on the situation, the 

alarm may activate and doors locked. 

(

P.62)

2

Open the hood. (

P.283)

3

IS500: Remove the engine cover.

Raise the rear of the engine cover to 

remove the rear clip, and then raise the 

front of the engine cover to remove the 

front clips.

4

Connect a positive jumper cable clamp to   on your vehicle and connect the 
clamp on the other end of the positive cable to   on the second vehicle. Then, 
connect a negative cable clamp to   on the second vehicle and connect the 
clamp at the other end of the negative cable to  .

IS350 AWD/IS350/IS300 AWD

Positive (+) battery terminal (your vehicle)
Positive (+) battery terminal (second vehicle)
Negative (-) battery terminal (second vehicle)
Solid, stationary, unpainted metallic point away from the battery and any mov-

Restarting the engine

A

B

C

D

A
B
C
D

353

7-2. Steps to take in an emergency

7

When trouble

 ari

ses

ing parts as shown in the illustration

IS300

Positive (+) battery terminal (your vehicle)
Positive (+) battery terminal (second vehicle)
Negative (-) battery terminal (second vehicle)
Solid, stationary, unpainted metallic point away from the battery and any mov-
ing parts as shown in the illustration

IS500

Positive (+) battery terminal (your vehicle)
Positive (+) battery terminal (second vehicle)
Negative (-) battery terminal (second vehicle)
Solid, stationary, unpainted metallic point away from the exclusive jump starting 
terminal and any moving parts as shown in the illustration

5

Start the engine of the second vehi-
cle. Increase the engine speed 
slightly and maintain at that level for 

approximately 5 minutes to 
recharge the battery of your vehi-
cle.

A
B
C
D

A
B
C
D

354

7-2. Steps to take in an emergency

6

Open and close any of the doors of 
your vehicle with the engine switch 
off.

7

Maintain the engine speed of the 
second vehicle and start the engine 
of your vehicle by turning the 
engine switch to IGNITION ON 
mode.

8

Once the vehicle’s engine has 
started, remove the jumper cables 
in the exact reverse order from 
which they were connected.

Once the engine starts, have the vehi-
cle inspected at your Lexus dealer as 
soon as possible.

Starting the engine when the battery is 

discharged

The engine cannot be started by push-start-

ing.

To prevent battery discharge

Turn off the headlights and the audio sys-

tem while the engine is off.

Turn off any unnecessary electrical com-

ponents when the vehicle is running at a 

low speed for an extended period, such 

as in heavy traffic.

Charging the battery

The electricity stored in the battery will dis-

charge gradually even when the vehicle is 

not in use, due to natural discharge and the 

draining effects of certain electrical appli-

ances. If the vehicle is left for a long time, 

the battery may discharge, and the engine 

may be unable to start. (The battery 

recharges automatically during driving.)

When recharging or replacing the bat-

tery

In some cases, it may not be possible to 

unlock the doors using the smart access 

system with push-button start when the 

battery is discharged. Use the wireless 

remote control or the mechanical key to 

lock or unlock the doors.

The engine may not start on the first 

attempt after the battery has recharged 

but will start normally after the second 

attempt. This is not a malfunction.

The engine switch mode is memorized by 

the vehicle. When the battery is recon-

nected, the system will return to the 

mode it was in before the battery was dis-

charged. Before disconnecting the bat-

tery, turn the engine switch off. If you are 

unsure what mode the engine switch was 

in before the battery discharged, be 

especially careful when reconnecting the 

battery.

WARNING

Avoiding battery fires or explosions

Observe the following precautions to 

prevent accidentally igniting the flamma-

ble gas that may be emitted from the bat-

tery:

Make sure each jumper cable is con-

nected to the correct terminal and that 

it is not unintentionally in contact with 

any other than the intended terminal.

Do not allow the other end of the 

jumper cable connected to the “+” ter-

minal to come into contact with any 

other parts or metal surfaces in the 

area, such as brackets or unpainted 

metal.

Do not allow the + and - clamps of the 

jumper cables to come into contact 

with each other.

Do not smoke, use matches, cigarette 

lighters or allow open flame near the 

battery.

Battery precautions

The battery contains poisonous and cor-

rosive acidic electrolyte, while related 

parts contain lead and lead compounds. 

Observe the following precautions when 

handling the battery:

355

7-2. Steps to take in an emergency

7

W

he

n t

ro

ub

le

 ar

ise

s

1

Stop the vehicle in a safe place and 
turn off the air conditioning system, 
and then stop the engine.

2

If you see steam:
Carefully lift the hood after the 
steam subsides.
If you do not see steam:
Carefully lift the hood.

3

After the engine has cooled down 
sufficiently, inspect the hoses and 
radiator core (radiator) for any 
leaks.

WARNING

When working with the battery, always 

wear safety glasses and take care not 

to allow any battery fluids (acid) to 

come into contact with skin, clothing 

or the vehicle body.

Do not lean over the battery.

In the event that battery fluid comes 

into contact with the skin or eyes, 

immediately wash the affected area 

with water and seek medical attention. 

Place a wet sponge or cloth over the 

affected area until medical attention 

can be received.

Always wash your hands after handling 

the battery support, terminals, and 

other battery-related parts.

Do not allow children near the battery.

NOTICE

When handling jumper cables

When connecting the jumper cables, 

ensure that they do not become entan-

gled in the cooling fans or engine drive 

belt.

If your vehicle overheats

The following may indicate that 
your vehicle is overheating.

The needle of the engine coolant 
temperature gauge (

P.69) 

enters the red zone or a loss of 
engine power is experienced. 
(For example, the vehicle speed 
does not increase.)

“Engine Coolant Temp High Stop 
in a Safe Place See Owner’s 
Manual” is shown on the 
multi-information display.

Steam comes out from under the 
hood.

Correction procedures

356

7-2. Steps to take in an emergency

IS350 AWD/IS350/IS300 
AWD/IS300

Radiator
Cooling fans

If a large amount of coolant leaks, immedi-
ately contact your Lexus dealer.

IS500

Radiator
Cooling fans

If a large amount of coolant leaks, immedi-
ately contact your Lexus dealer.

4

The coolant level is satisfactory if it 
is between the “FULL” or “F” and 
“LOW” or “L” lines on the reservoir.

Engine (IS350 
AWD/IS350/IS300 AWD)

Reservoir cap
“FULL” line
“LOW” line

Engine (IS300)

Reservoir cap
“FULL” line
“LOW” line

Engine (IS500)

Reservoir cap

A
B

A
B

A
B
C

A
B
C

A

357

7-2. Steps to take in an emergency

7

When trouble

 ari

ses

“FULL” line
“LOW” line

Intercooler (IS300)

Reservoir cap
“F” line
“L” line

5

Add coolant if necessary.

Water can be used in an emergency if 

coolant is unavailable.

Engine (IS350 
AWD/IS350/IS300 AWD)

Engine (IS300)

Engine (IS500)

Intercooler (IS300)

6

Start the engine and turn the air 
conditioning system on to check 
that the radiator cooling fans oper-
ate and to check for coolant leaks 
from the radiator or hoses.

The fans operate when the air conditioning 

system is turned on immediately after a 

cold start. Confirm that the fans are oper-

ating by checking the fan sound and air 

flow. If it is difficult to check these, turn the 

air conditioning system on and off repeat-

edly. (The fans may not operate in freezing 

temperatures.)

7

If the fans are not operating:
Stop the engine immediately and 
contact your Lexus dealer.
If the fans are operating:
Have the vehicle inspected at the 
nearest Lexus dealer.

8

Check if “Engine Coolant Temp 
High Stop in a Safe Place See 
Owner’s Manual” is shown on the 

B
C

A
B
C

358

7-2. Steps to take in an emergency

multi-information display.
If the message does not disappear:
Stop the engine and contact your 
Lexus dealer.
If the message is not displayed:
Have the vehicle inspected at the 
nearest Lexus dealer.

WARNING

When inspecting under the hood of 

your vehicle

Observe the following precautions.

Failure to do so may result in serious 

injury such as burns.

If steam is seen coming from under the 

hood, do not open the hood until the 

steam has subsided. The engine com-

partment may be very hot.

Keep hands and clothing (especially a 

tie, a scarf or a muffler) away from the 

fans and belts.

Failure to do so may cause the hands 

or clothing to be caught, resulting in 

serious injury.

IS350 AWD/IS350/IS300 AWD: 

Do not loosen the coolant inlet cap or 

coolant reservoir cap while the engine 

and radiator are hot. (The coolant inlet 

cap is located under the engine cover.)

High temperature steam or coolant 

could spray out.

IS300: Do not loosen the coolant inlet 

cap, coolant reservoir cap, or inter-

cooler reservoir cap while the engine 

and radiator are hot. High tempera-

ture steam or coolant could spray out.

IS500: Do not loosen the coolant inlet 

cap or coolant reservoir cap while the 

engine and radiator are hot. High tem-

perature steam or coolant could spray 

out.

NOTICE

When adding engine coolant

Add coolant slowly after the engine has 

cooled down sufficiently. Adding cool 

coolant to a hot engine too quickly can 

cause damage to the engine.

To prevent damage to the cooling sys-

tem

Observe the following precautions:

Avoid contaminating the coolant with 

foreign matter (such as sand or dust 

etc.).

359

7-2. Steps to take in an emergency

7

W

he

n t

ro

ub

le

 ar

ise

s

1

Stop the engine. Set the parking 
brake and shift the shift lever to P.

2

Remove the mud, snow or sand 
from around the rear wheels.

3

Place wood, stones or some other 
material under the rear wheels to 
help provide traction.

4

Restart the engine.

5

Shift the shift lever to D or R and 
release the parking brake. Then, 
while exercising caution, depress 
the accelerator pedal.

When it is difficult to free the vehicle

Press the 

 switch to turn off TRAC.

NOTICE

Do not use any coolant additive.

If the vehicle becomes stuck

Carry out the following proce-
dures if the tires spin or the vehicle 
becomes stuck in mud, dirt or snow:

Recovering procedure

360

7-2. Steps to take in an emergency

WARNING

When attempting to free a stuck vehi-

cle

If you choose to push the vehicle back 

and forth to free it, make sure the sur-

rounding area is clear to avoid striking 

other vehicles, objects or people. The 

vehicle may also lunge forward or lunge 

back suddenly as it becomes free. Use 

extreme caution.

When shifting the shift lever

Be careful not to shift the shift lever with 

the accelerator pedal depressed.

This may lead to unexpected rapid accel-

eration of the vehicle that may cause an 

accident resulting in death or serious 

injury.

NOTICE

To avoid damaging the transmission 

and other components

Avoid spinning the rear wheels and 

depressing the accelerator pedal 

more than necessary.

If the vehicle remains stuck even after 

these procedures are performed, the 

vehicle may require towing to be freed.

361

8

8

Vehi

cle

 spec

ifi

ca

tions

Vehicle specifications

.

8-1. Specifications

Maintenance data (fuel, oil level, 

etc.) ..............................................

362

Fuel information.........................

374

Tire information..........................

376

8-2. Customization

Customizable features............

386

8-3. Initialization

Items to initialize ........................

396

362

8-1. Specifications

8-1.Specifications

*1

: IS350 AWD/IS350/IS300 AWD/IS300

*2

: IS500

*3

: Unladen vehicles

*4

: 2WD  models

*5

: AWD  models

*6

: Vehicles with 235/45R18 or 235/40R19 rear tires

*7

: Vehicles with 265/35R19 rear tires

Vehicle identification number

The vehicle identification number 
(VIN) is the legal identifier for your 
vehicle. This is the primary identifica-
tion number for your Lexus. It is used in 

registering the ownership of your vehi-
cle.
This number is stamped on the top left 
of the instrument panel and in the 
engine compartment.

Maintenance data (fuel, oil level, etc.)

Dimensions and weight

Overall length

185.4 in. (4710 mm)

*1

187.3 in. (4758 mm)

*2

Overall width

72.4 in. (1840 mm)

Overall height

*3

56.5 in. (1435 mm)

*4

56.7 in. (1440 mm)

*5

Wheelbase

110.2 in. (2800 mm)

Tread

*1

Front

62.2 in. (1580 mm)

Rear

63.0 in. (1600 mm)

*6

61.8 in. (1570 mm)

*7

Vehicle capacity weight
(Occupants + luggage)

825 lb. (375 kg)

Seating capacity

Seating capacity

5 (Front 2, Rear 3)

Vehicle identification

363

8-1. Specifications

8

Vehi

cle

 spec

ifi

ca

tions

IS350 AWD/IS350/IS300 AWD

IS300

IS500

This number is also on the Certification 
Label.

Engine number

The engine number is stamped on the 
engine block as shown.

IS350 AWD/IS350/IS300 AWD

IS300

364

8-1. Specifications

IS500

IS350 AWD/IS350/IS300 AWD

IS300

IS500

Engine

Model

3.5 L 6-cylinder (2GR-FKS) engine

Type

6-cylinder V type, 4-cycle, gasoline

Bore and stroke

3.70 

 3.27 in. (94.0 

 83.0 mm)

Displacement

210.9 cu. in. (3456 cm

3

)

Valve clearance

Automatic adjustment

Drive belt tension

Automatic adjustment

Model

2.0 L 4-cylinder (8AR-FTS) engine

Type

4-cylinder in line, 4-cycle, gasoline (with tur-
bocharger)

Bore and stroke

3.39 

 3.39 in. (86.0 

 86.0 mm)

Displacement

121.9 cu. in. (1998 cm

3

)

Valve clearance

Automatic adjustment

Drive belt tension

Automatic adjustment

Model

5.0 L 8-cylinder (2UR-GSE) engine

Type

8-cylinder V type, 4-cycle, gasoline

Bore and stroke

3.70 

 3.52 in. (94.0 

 89.5 mm)

365

8-1. Specifications

8

Vehi

cle

 spec

ifi

ca

tions

Oil capacity (Drain and refill [Ref-
erence

*

])

*

: The engine oil capacity is a reference 

quantity to be used when changing the 
engine oil. Warm up and turn off the 
engine, wait more than 5 minutes, and 
check the oil level on the dipstick.

Engine oil selection (IS350 
AWD/IS350/IS300 
AWD/IS300)

“Toyota Genuine Motor Oil” is used in 
your Lexus vehicle. Use Lexus 
approved “Toyota Genuine Motor Oil” 
or equivalent to satisfy the following 
grade and viscosity.
Oil grade: ILSAC GF-6A multigrade 
engine oil
Recommended viscosity: SAE 0W-20
SAE 0W-20 is the best choice for 
good fuel economy and good starting 
in cold weather.
If SAE 0W-20 is not available, SAE 
5W-20 oil may be used. However, it 
must be replaced with SAE 0W-20 at 
the next oil change.

Displacement

303.2 cu. in. (4969 cm

3

)

Drive belt tension

Automatic adjustment

Fuel

Fuel type

Unleaded gasoline only

Octane Rating

91 (Research Octane Number 96) or higher

Fuel tank capacity
(Reference)

17.5 gal. (66.5 L, 14.6 Imp. gal.)

Lubrication system

With filter

IS350 (2WD)

6.0 qt. (5.7 L, 5.0 Imp. qt.)

IS350 AWD/IS300 
AWD (AWD)

6.8 qt. (6.4 L, 5.6 Imp. qt.)

IS300

4.9 qt. (4.6 L, 4.0 Imp. qt.)

IS500

9.1 qt. (8.6 L, 7.6 Imp. qt.)

Without fil-

ter

IS350 (2WD)

5.8 qt. (5.5 L, 4.8 Imp. qt.)

IS350 AWD/IS300 
AWD (AWD)

6.3 qt. (6.0 L, 5.3 Imp. qt.)

IS300

4.5 qt. (4.3 L, 3.8 Imp. qt.)

IS500

8.3 qt. (7.9 L, 7.0 Imp. qt.)

366

8-1. Specifications

Outside temperature

Oil viscosity (0W-20 is explained here 
as an example):
• The 0W in 0W-20 indicates the 

characteristic of the oil which allows 
cold startability. Oils with a lower 
value before the W allow for easier 
starting of the engine in cold 
weather.

• The 20 in 0W-20 indicates the vis-

cosity characteristic of the oil when 
the oil is at high temperature. An oil 
with a higher viscosity (one with a 
higher value) may be better suited if 
the vehicle is operated at high 
speeds, or under extreme load con-
ditions.

How to read oil container label:
The International Lubricant Specifica-
tion Advisory Committee (ILSAC) 
Certification Mark is added to some oil 
containers to help you select the oil you 
should use.

Engine oil selection (IS500)

“Toyota Genuine Motor Oil” is used in 
your Lexus vehicle. Use Lexus 
approved “Toyota Genuine Motor Oil” 
or equivalent to satisfy the following 
grade and viscosity.
Oil grade: ILSAC GF-6A multigrade 
engine oil
Recommended viscosity: SAE 5W-30
SAE 5W-30 is the best choice for 
good fuel economy and good starting 
in cold weather.
If SAE 5W-30 is not available, SAE 
10W-30 oil may be used. However, it 
should be replaced with SAE 5W- 30 
at the next oil change.

Outside temperature

Oil viscosity (5W-30 is explained here 
as an example):
• The 5W in 5W-30 indicates the 

characteristic of the oil which allows 

A

A

367

8-1. Specifications

8

Vehi

cle

 spec

ifi

ca

tions

cold startability. Oils with a lower 
value before the W allow for easier 
starting of the engine in cold 
weather.

• The 30 in 5W-30 indicates the vis-

cosity characteristic of the oil when 
the oil is at high temperature. An oil 
with a higher viscosity (one with a 
higher value) may be better suited if 
the vehicle is operated at high 
speeds, or under extreme load con-
ditions.

How to read oil container label:

The International Lubricant Specifica-
tion Advisory Committee (ILSAC) 
Certification Mark is added to some oil 
containers to help you select the oil you 
should use.

*

: The fluid capacity is a reference quantity.

If replacement is necessary, contact your Lexus dealer.

Cooling system

Capacity*

IS350 
AWD/IS350
/IS300 AWD

9.8 qt. (9.3 L, 8.2 Imp. qt.)

IS300

Engine

9.1 qt. (8.6 L, 7.6 Imp. qt.)

Intercooler

3.0 qt. (2.8 L, 2.5 Imp. qt.)

IS500

12.0 qt. (11.4 L, 10.0 Imp. qt.)

Coolant type

Use either of the following:

“Toyota Super Long Life Coolant”

Similar high-quality ethylene glycol-based non-silicate, 
non-amine, non-nitrite, and non-borate coolant with 
long-life hybrid organic acid technology

Do not use plain water alone.

368

8-1. Specifications

*

: The fluid capacity is a reference quantity.

If replacement is necessary, contact your Lexus dealer.

Ignition system (spark plug)

IS350 

AWD/IS350/IS300 

AWD

IS300

IS500

Make

DENSO FK20HBR8

NGK DILFR7K9G

DENSO FK20HBR-J8

Gap

0.031 in. (0.8 mm)

0.035 in. (0.9 mm)

0.031 in. (0.8 mm)

NOTICE

Iridium-tipped spark plugs

Use only iridium-tipped spark plugs. Do not adjust the spark plug gap.

Electrical system (battery)

Open voltage at 68°F (20°C):

12.3 V or higher
(Check the voltage 20 minutes after the engine 
and all lights are turned off.)
If the voltage is lower than the standard value, 
charge the battery.

Charging rates

5 A max.

Automatic transmission

Fluid capacity

*

IS350 (2WD)

10.0 qt. (9.5 L, 8.4 Imp. qt.)

IS350 
AWD/IS300 
AWD (AWD)

10.6 qt. (10.0 L, 8.8 Imp. qt.)

IS300

9.2 qt. (8.7 L, 7.7 Imp. qt.)

IS500

11.4 qt. (10.8 L, 9.5 Imp. qt.)

Fluid type

Toyota Genuine ATF WS

NOTICE

Automatic transmission fluid type

Using transmission fluid other than the above type may cause abnormal noise or vibra-

tion, or damage the transmission of your vehicle.

369

8-1. Specifications

8

Vehi

cle

 spec

ifi

ca

tions

*

: Your Lexus vehicle is filled with “Toyota Genuine Differential Gear Oil” at the factory. 

Use Lexus approved “Toyota Genuine Differential Gear Oil” or an equivalent oil of 
matching quality to satisfy the above specification. Please contact your Lexus dealer for 
further details.

IS350 AWD/IS350 (vehicles without LSD [Limited Slip Differential])/IS300 
AWD/IS300

IS500/IS350 (vehicles with LSD [Limited Slip Differential])

*

: Your Lexus vehicle is filled with “Toyota Genuine Differential Gear Oil” at the factory. 

Use Lexus approved “Toyota Genuine Differential Gear Oil” or an equivalent oil of 
matching quality to satisfy the above specification. Please contact your Lexus dealer for 
further details.

Front differential (AWD models)

Oil capacity

0.74 qt. (0.70 L, 0.61 Imp. qt.)

Oil type and viscosity

*

Toyota Genuine Differential gear oil GL-5 or equiva-
lent
Above 0°F (-18°C): SAE90
Below 0°F (-18°C): SAE80W or SAE80W-90

Rear differential

Oil capacity

1.42 qt. (1.35 L, 1.19 Imp. qt.)

Oil type and viscosity

*

Toyota Genuine Differential gear oil LT 75W-85 
GL-5 or equivalent

Oil capacity

1.42 qt. (1.35 L, 1.19 Imp. qt.)

Oil type and viscosity

*

Toyota Genuine Differential gear oil LX 75W-85 
GL-5 or equivalent

Brakes

Pedal clearance

*

IS350 

AWD/IS350/IS300 

AWD/IS300

2WD

3.8 in. (97 mm) Min.

AWD

4.2 in. (107 mm) Min.

IS500

3.8 in. (97 mm) Min.

370

8-1. Specifications

*

: Minimum pedal clearance when depressed with a force of 112.4 lbf (500 N, 51.0 kgf) 

while the engine is running.

Type A

Pedal free play

0.04 

 0.24 in. (1.0 

 6.0 mm)

Brake pad wear limit

0.04 in. (1 mm)

Parking brake lining wear limit

0.04 in. (1 mm)

Fluid type

SAE J1703 or FMVSS No. 116 DOT 3, or 
SAE J1704 or FMVSS No. 116 DOT 4

Steering

Free play

Less than 1.2 in. (30 mm)

Tires and wheels

Tire size

235/45R18 94Y, T155/70D17 110M (spare)

Tire inflation pressure
(Recommended cold tire 
inflation pressure)

Front: 35 psi (240 kPa, 2.4 kgf/cm

2

 or bar)

Rear: 35 psi (240 kPa, 2.4 kgf/cm

2

 or bar)

Spare: 60 psi (420 kPa, 4.2 kgf/cm

2

 or bar)

Driving at high speeds above 100 mph (160 km/h) (in 
countries where such speeds are permitted by law)

Add 4 psi (30 kPa, 0.3 kgf/cm

2

 or bar) to the front tires and 

rear tires. Never exceed the maximum cold tire inflation 
pressure indicated on the tire sidewall.

Wheel size

18 

 8 1/2J, 17 

 4T (spare)

Wheel bolt torque

103 ft•lbf (140 N•m, 14.3 kgf•m)

371

8-1. Specifications

8

Vehi

cle

 spec

ifi

ca

tions

Type B

Type C

Type D

Tire size

235/45R18 94V, T155/70D17 110M (spare)

Tire inflation pressure
(Recommended cold tire 
inflation pressure)

Front: 35 psi (240 kPa, 2.4 kgf/cm

2

 or bar)

Rear: 35 psi (240 kPa, 2.4 kgf/cm

2

 or bar)

Spare: 60 psi (420 kPa, 4.2 kgf/cm

2

 or bar)

Driving at high speeds above 100 mph (160 km/h) (in 
countries where such speeds are permitted by law)

Add 4 psi (30 kPa, 0.3 kgf/cm

2

 or bar) to the front tires and 

rear tires. Never exceed the maximum cold tire inflation 
pressure indicated on the tire sidewall.

Wheel size

18 

 8 1/2J, 17 

 4T (spare)

Wheel bolt torque

103 ft•lbf (140 N•m, 14.3 kgf•m)

Tire size

235/40R19 96Y, T155/70D17 110M (spare)

Tire inflation pressure
(Recommended cold tire 
inflation pressure)

Front: 35 psi (240 kPa, 2.4 kgf/cm

2

 or bar)

Rear: 36 psi (250 kPa, 2.5 kgf/cm

2

 or bar)

Spare: 60 psi (420 kPa, 4.2 kgf/cm

2

 or bar)

Wheel size

19 

 8 1/2J, 17 

 4T (spare)

Wheel bolt torque

103 ft•lbf (140 N•m, 14.3 kgf•m)

Tire size

235/40R19 92V, T155/70D17 110M (spare)

Tire inflation pressure
(Recommended cold tire 
inflation pressure)

Front: 35 psi (240 kPa, 2.4 kgf/cm

2

 or bar)

Rear: 36 psi (250 kPa, 2.5 kgf/cm

2

 or bar)

Spare: 60 psi (420 kPa, 4.2 kgf/cm

2

 or bar)

Wheel size

19 

 8 1/2J, 17 

 4T (spare)

Wheel bolt torque

103 ft•lbf (140 N•m, 14.3 kgf•m)

372

8-1. Specifications

Type E

Type F

Type G

Tire size

235/40R19 92Y, T155/70D17 110M (spare)

Tire inflation pressure
(Recommended cold tire 
inflation pressure)

Front: 35 psi (240 kPa, 2.4 kgf/cm

2

 or bar)

Rear: 36 psi (250 kPa, 2.5 kgf/cm

2

 or bar)

Spare: 60 psi (420 kPa, 4.2 kgf/cm

2

 or bar)

Wheel size

19 

 8 1/2J, 17 

 4T (spare)

Wheel bolt torque

103 ft•lbf (140 N•m, 14.3 kgf•m)

Tire size

Front tires: 235/40R19 92Y
Rear tires: 265/35R19 94Y
Spare tire: T155/70D17 110M

Tire inflation pressure
(Recommended cold tire 
inflation pressure)

Front: 35 psi (240 kPa, 2.4 kgf/cm

2

 or bar)

Rear: 36 psi (250 kPa, 2.5 kgf/cm

2

 or bar)

Spare: 60 psi (420 kPa, 4.2 kgf/cm

2

 or bar)

Wheel size

Front wheels: 19 

 8 1/2J

Rear wheels: 19 

 9 1/2J

Spare wheels: 17 

 4T

Wheel bolt torque

103 ft•lbf (140 N•m, 14.3 kgf•m)

Tire size

Front tires: 235/40R19 92V
Rear tires: 265/35R19 94V
Spare tire: T155/70D17 110M

Tire inflation pressure
(Recommended cold tire 
inflation pressure)

Front: 35 psi (240 kPa, 2.4 kgf/cm

2

 or bar)

Rear: 36 psi (250 kPa, 2.5 kgf/cm

2

 or bar)

Spare: 60 psi (420 kPa, 4.2 kgf/cm

2

 or bar)

Wheel size

Front wheels: 19 

 8 1/2J

Rear wheels: 19 

 9 1/2J

Spare wheels: 17 

 4T

Wheel bolt torque

103 ft•lbf (140 N•m, 14.3 kgf•m)

373

8-1. Specifications

8

Vehi

cle

 spec

ifi

ca

tions

Type H

A: Wedge base bulbs (amber)
B: Wedge base bulbs (clear)

*

: Light bulbs not listed in this table are LED bulbs.

Tire size

Front tires: 235/40R19 92Y
Rear tires: 265/35R19 94Y
Spare tire: T145/70D18 107M

Tire inflation pressure
(Recommended cold tire 
inflation pressure)

Front: 35 psi (240 kPa, 2.4 kgf/cm

2

 or bar)

Rear: 36 psi (250 kPa, 2.5 kgf/cm

2

 or bar)

Spare: 60 psi (420 kPa, 4.2 kgf/cm

2

 or bar)

Wheel size

Front wheels: 19 

 8 1/2J

Rear wheels: 19 

 9 1/2J

Spare wheels: 18 

 4T

Wheel bolt torque

103 ft•lbf (140 N•m, 14.3 kgf•m)

Light bulbs

*

Light bulbs

Bulb No.

W

Type

Exterior

Front turn signal lights (bulb type)

WY21W

21

A

Rear turn signal lights

21

A

Interior

Door courtesy lights

168

5

B

Vanity lights

8

B

Footwell lights

194

3.8

B

Trunk light

5

B


Content      ..     9      10      11      12     ..