Jeep Patriot (2017 year). Manual - part 10
 

  Index      Jeep     Jeep Patriot - service manual 2017 year in english


Search            copyright infringement  


Content   ..  8  9  10  11   ..


Jeep Patriot (2017 year). Manual - part 10


Premium System — If Equipped

The TPMS uses wireless technology with wheel rim
mounted electronic sensors to monitor tire pressure levels.
Sensors, mounted to each wheel as part of the valve stem,
transmit tire pressure readings to the receiver module.

NOTE:

It is particularly important for you to check the tire

pressure in all of your tires regularly and to maintain the
proper pressure.

The TPMS consists of the following components:

• Receiver Module
• Four Tire Pressure Monitoring Sensors
• Three Trigger Modules (mounted in three of the four

wheel wells)

• Various Tire Pressure Monitoring System Messages,

which display in the instrument cluster

• Tire Pressure Monitoring Telltale Light

Tire Pressure Monitoring Low Pressure Warnings

The Tire Pressure Monitoring Telltale Light will illuminate
in the instrument cluster and an audible chime will be
activated when one or more of the four active road tire
pressures are low. The audible chime will sound once every

ignition cycle for the first condition that it detects. In
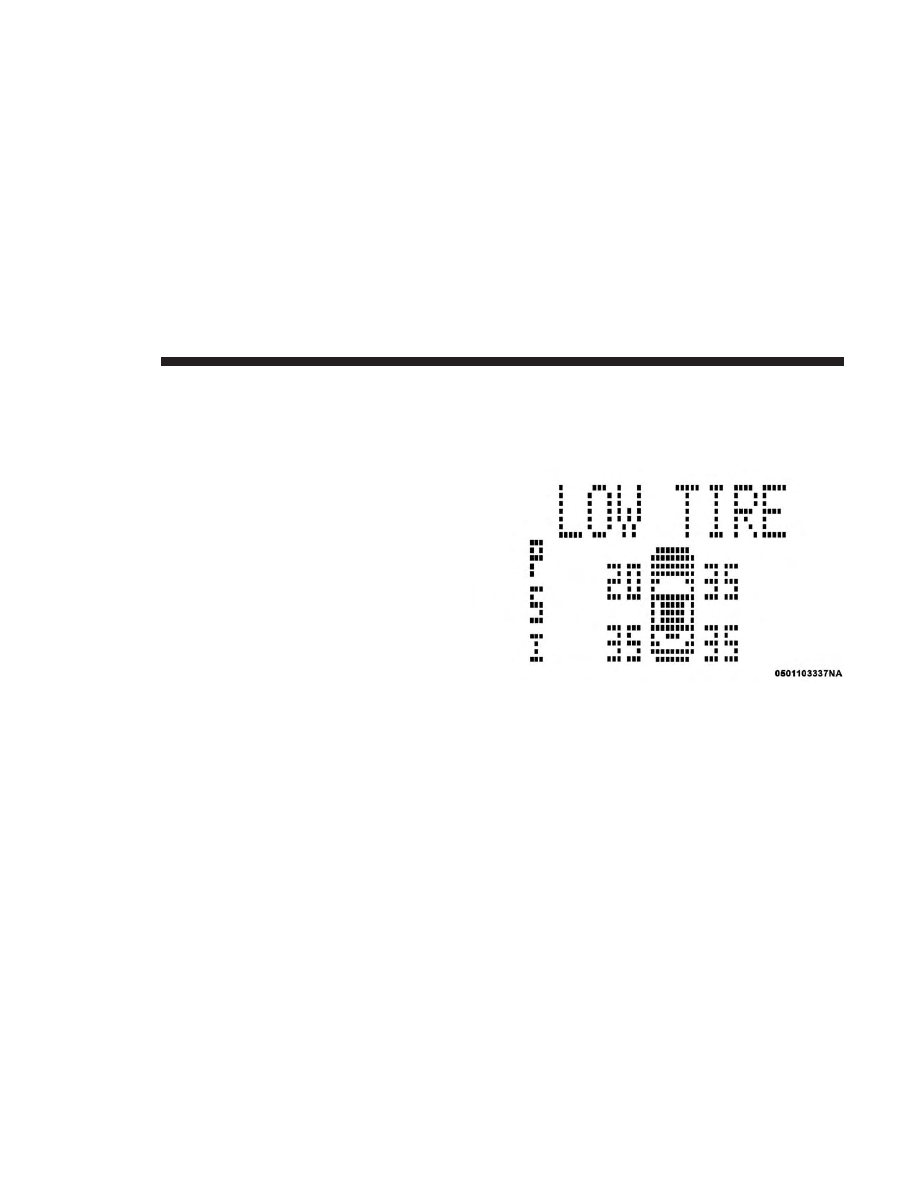
addition, the instrument cluster will display a “LOW
TIRE” text message for a minimum of five seconds and a
graphic of the pressure value(s) with the low tire(s) flash-
ing.

Should a low tire condition occur on any of the four active
road tire(s), you should stop as soon as possible and inflate
all tires that are flashing on the graphic display to the
vehicle’s recommended cold placard pressure value. The
system will automatically update, the “LOW TIRE” text
message will no longer be displayed, the graphic display of

Tire Pressure Monitoring Display

144

SAFETY

the pressure value(s) will stop flashing, and the Tire
Pressure Monitoring Light will extinguish once the up-
dated tire pressure(s) have been received.

NOTE:

When filling warm tires, the tire pressure may need

to be increased up to an additional 4 psi (30 kPa) above the
recommended cold placard pressure in order to turn the
Tire Pressure Monitoring Telltale Light off.
The vehicle may need to be driven for up to 10 minutes
above 15 mph (24 km/h) to receive this information.

Service TPMS Message

The Tire Pressure Monitoring Telltale Light will flash on
and off for 75 seconds, and remain on solid when a system
fault is detected. The system fault will also sound a chime.
The instrument cluster will display a “SERVICE TPM
SYSTEM” message for a minimum of five seconds. This
text message is then followed by a graphic display, with “-
-“ in place of the pressure value(s) indicating which Tire
Pressure Monitoring Sensor(s) is not being received.

If the ignition key is cycled, this sequence will repeat,
providing the system fault still exists. If the system fault no
longer exists, the Tire Pressure Monitoring Telltale Light
will no longer flash, the

⬙SERVICE TPM SYSTEM⬙ text

message will not be present, and a pressure value will be
displayed instead of dashes. A system fault can occur with
any of the following scenarios:

1. Jamming due to electronic devices or driving next to

facilities emitting the same radio frequencies as the TPM
sensors.

Tire Pressure Monitoring Display

5

SAFETY

145

2. Installing some form of aftermarket window tinting that

affects radio wave signals.

3. Snow or ice around the wheels or wheel housings.

4. Using tire chains on the vehicle.

5. Using wheels/tires not equipped with TPM sensors.

The instrument cluster will also display a

⬙SERVICE TPM

SYSTEM

⬙ message for a minimum of five seconds when a

system fault related to an incorrect sensor location fault is
detected. In this case, the

⬙SERVICE TPM SYSTEM⬙ mes-

sage is then followed with a graphic display with pressure
values still shown. This indicates that the pressure values
are still being received from the TPM sensors but they may
not be located in the correct vehicle position. The system
still needs to be serviced as long as the

⬙SERVICE TPM

SYSTEM

⬙ message is displayed.

NOTE:

Your vehicle is equipped with a compact spare

wheel and tire assembly.

1. The compact spare tire does not have a tire pressure

monitoring sensor. Therefore, the TPMS will not moni-
tor the tire pressure in the compact spare tire.

2. If you install the compact spare tire in place of a road tire

that has a pressure below the low-pressure warning

limit, upon the next ignition key cycle, a chime will
sound and the Tire Pressure Monitoring Telltale Light
will still turn ON due to the low tire. The “LOW TIRE”
text message and the graphic with the low tire pressure
flashing will be displayed.

3. However, after driving the vehicle for up to 10 minutes

above 15 mph (24 km/h), the Tire Pressure Monitoring
Telltale Light will flash on and off for 75 seconds and
then remain on solid. In addition, the instrument cluster
will display a “SERVICE TPM SYSTEM” message for a
minimum of five seconds and then display dashes (- -)
in place of the pressure values.

4. For each subsequent ignition key cycle, a chime will

sound and the Tire Pressure Monitoring Telltale Light
will flash on and off for 75 seconds and then remain on
solid, and the instrument cluster will display a “SER-
VICE TPM SYSTEM” message for a minimum of five
seconds and then display dashes (- -) in place of the
pressure values.

5. Once you repair or replace the original road tire and

reinstall it on the vehicle in place of the compact spare
tire, the TPMS will update automatically and the Tire
Pressure Monitoring Telltale Light will turn OFF, as long
as no tire pressure is below the low-pressure warning

146

SAFETY

limit in any of the four active road tires. The vehicle may
need to be driven for up to 10 minutes above 15 mph
(24 km/h) in order for the TPMS to receive this infor-
mation.

General Information

The following regulatory statement applies to all radio
frequency (RF) devices equipped in this vehicle:

This device complies with Part 15 of the FCC Rules and
with Industry Canada license-exempt RSS standard(s).
Operation is subject to the following two conditions:

(1) This device may not cause harmful interference, and

(2) This device must accept any interference received,
including interference that may cause undesired operation.

NOTE:

Changes or modifications not expressly approved

by the party responsible for compliance could void the
user’s authority to operate the equipment.

OCCUPANT RESTRAINT SYSTEMS

Some of the most important safety features in your vehicle
are the restraint systems.

Occupant Restraint Systems Features

• Seat Belt Systems
• Supplemental Restraint Systems (SRS) Air Bags
• Supplemental Active Head Restraints
• Child Restraints
Some of the safety features described in this section may be
standard equipment on some models, or may be optional
equipment on others. If you are not sure, ask your autho-
rized dealer.

Important Safety Precautions

Please pay close attention to the information in this section.
It tells you how to use your restraint system properly, to
keep you and your passengers as safe as possible.

Here are some simple steps you can take to minimize the
risk of harm from a deploying air bag:

1. Children 12 years old and under should always ride

buckled up in a vehicle with a rear seat.

2. If a child from 2 to 12 years old (not in a rear-facing child

restraint) must ride in the front passenger seat, move the
seat as far back as possible and use the proper child
restraint (Refer to “Child Restraints”).

5

SAFETY

147

3. Children that are not big enough to wear the vehicle seat

belt properly (Refer to

⬙Child Restraints⬙) should be

secured in a vehicle with a rear seat in child restraints or
belt-positioning booster seats. Older children who do
not use child restraints or belt-positioning booster seats
should ride properly buckled up in a vehicle with a rear
seat.

4. Never allow children to slide the shoulder belt behind

them or under their arm.

5. You should read the instructions provided with your

child restraint to make sure that you are using it
properly.

6. All occupants should always wear their lap and shoul-

der belts properly.

7. The driver and front passenger seats should be moved

back as far as practical to allow the front air bags room
to inflate.

8. Do not lean against the door or window. If your vehicle

has side air bags, and deployment occurs, the side air
bags will inflate forcefully into the space between occu-
pants and the door and occupants could be injured.

WARNING!

• Never place a rear-facing child restraint in front of an

air bag. A deploying passenger front air bag can
cause death or serious injury to a child 12 years or
younger, including a child in a rear-facing child
restraint.

• Only use a rear-facing child restraint in a vehicle

with a rear seat.

Seat Belt Systems

Buckle up even though you are an excellent driver, even on
short trips. Someone on the road may be a poor driver and
could cause a collision that includes you. This can happen
far away from home or on your own street.

Research has shown that seat belts save lives, and they can
reduce the seriousness of injuries in a collision. Some of the
worst injuries happen when people are thrown from the
vehicle. Seat belts reduce the possibility of ejection and the
risk of injury caused by striking the inside of the vehicle.
Everyone in a motor vehicle should be belted at all times.

148

SAFETY

Enhanced Seat Belt Use Reminder System (BeltAlert)

Driver and Passenger BeltAlert (If Equipped)

BeltAlert is a feature intended to remind the driver

and outboard front seat passenger (if equipped with
outboard front passenger seat BeltAlert) to buckle their
seat belts. The Belt Alert feature is active whenever the
ignition switch is in the START or ON/RUN position.

Initial Indication

If the driver is unbuckled when the ignition switch is first
in the START or ON/RUN position, a chime will signal for
a few seconds. If the driver or outboard front seat passen-
ger (if equipped with outboard front passenger seat
BeltAlert) is unbuckled when the ignition switch is first in
the START or ON/RUN position the Seat Belt Reminder
Light will turn on and remain on until both outboard front
seat belts are buckled. The outboard front passenger seat
BeltAlert is not active when an outboard front passenger
seat is unoccupied.

BeltAlert Warning Sequence

The BeltAlert warning sequence is activated when the
vehicle is moving above a specified vehicle speed range
and the driver or outboard front seat passenger is unbuck-
led (if equipped with outboard front passenger seat

BeltAlert) (the outboard front passenger seat BeltAlert is
not active when the outboard front passenger seat is
unoccupied). The BeltAlert warning sequence starts by
blinking the Seat Belt Reminder Light and sounding an
intermittent chime. Once the BeltAlert warning sequence
has completed, the Seat Belt Reminder Light will remain on
until the seat belts are buckled. The BeltAlert warning
sequence may repeat based on vehicle speed until the
driver and occupied outboard front seat passenger seat
belts are buckled. The driver should instruct all occupants
to buckle their seat belts.

Change Of Status

If the driver or outboard front seat passenger (if equipped
with outboard front passenger seat BeltAlert) unbuckles
their seat belt while the vehicle is traveling, the BeltAlert
warning sequence will begin until the seat belts are buck-
led again. The outboard front passenger seat BeltAlert is
not active when the outboard front passenger seat is
unoccupied. BeltAlert may be triggered when an animal or
other items are placed on the outboard front passenger seat
or when the seat is folded flat (if equipped). It is recom-
mended that pets be restrained in the rear seat (if
equipped) in pet harnesses or pet carriers that are secured
by seat belts, and cargo is properly stowed.

5

SAFETY

149

BeltAlert can be activated or deactivated by your autho-
rized dealer. FCA US LLC does not recommend deactivat-
ing BeltAlert.

NOTE:

If BeltAlert has been deactivated and the driver or

outboard front seat passenger (if equipped with outboard
front passenger seat BeltAlert) is unbuckled the Seat Belt
Reminder Light will turn on and remain on until the driver
and outboard front seat passenger seat belts are buckled.

Lap/Shoulder Belts

All seating positions in your vehicle are equipped with
lap/shoulder belts.

The seat belt webbing retractor will lock only during very
sudden stops or collisions. This feature allows the shoulder
part of the seat belt to move freely with you under normal
conditions. However, in a collision the seat belt will lock
and reduce your risk of striking the inside of the vehicle or
being thrown out of the vehicle.

WARNING!

• Relying on the air bags alone could lead to more

severe injuries in a collision. The air bags work with

(Continued)

WARNING! (Continued)

your seat belt to restrain you properly. In some
collisions, the air bags won’t deploy at all. Always
wear your seat belt even though you have air bags.

• In a collision, you and your passengers can suffer

much greater injuries if you are not properly buckled
up. You can strike the interior of your vehicle or
other passengers, or you can be thrown out of the
vehicle. Always be sure you and others in your
vehicle are buckled up properly.

• It is dangerous to ride in a cargo area, inside or

outside of a vehicle. In a collision, people riding in
these areas are more likely to be seriously injured or
killed.

• Do not allow people to ride in any area of your

vehicle that is not equipped with seats and seat belts.

• Be sure everyone in your vehicle is in a seat and

using a seat belt properly. Occupants, including the
driver, should always wear their seat belts whether
or not an air bag is also provided at their seating
position to minimize the risk of severe injury or
death in the event of a crash.

(Continued)

150

SAFETY

WARNING! (Continued)

• Wearing your seat belt incorrectly could make your

injuries in a collision much worse. You might suffer
internal injuries, or you could even slide out of the
seat belt. Follow these instructions to wear your seat
belt safely and to keep your passengers safe, too.

• Two people should never be belted into a single seat

belt. People belted together can crash into one an-
other in a collision, hurting one another badly. Never
use a lap/shoulder belt or a lap belt for more than one
person, no matter what their size.

• A lap belt worn too high can increase the risk of

injury in a collision. The seat belt forces won’t be at
the strong hip and pelvic bones, but across your
abdomen. Always wear the lap part of your seat belt
as low as possible and keep it snug.

• A twisted seat belt may not protect you properly. In

a collision, it could even cut into you. Be sure the seat
belt is flat against your body, without twists. If you
can’t straighten a seat belt in your vehicle, take it to
your authorized dealer immediately and have it
fixed.

(Continued)

WARNING! (Continued)

• A seat belt that is buckled into the wrong buckle will

not protect you properly. The lap portion could ride
too high on your body, possibly causing internal
injuries. Always buckle your seat belt into the
buckle nearest you.

• A seat belt that is too loose will not protect you

properly. In a sudden stop, you could move too far
forward, increasing the possibility of injury. Wear
your seat belt snugly.

• A seat belt that is worn under your arm is dangerous.

Your body could strike the inside surfaces of the
vehicle in a collision, increasing head and neck
injury. A seat belt worn under the arm can cause
internal injuries. Ribs aren’t as strong as shoulder
bones. Wear the seat belt over your shoulder so that
your strongest bones will take the force in a collision.

• A shoulder belt placed behind you will not protect

you from injury during a collision. You are more
likely to hit your head in a collision if you do not
wear your shoulder belt. The lap and shoulder belt
are meant to be used together.

(Continued)

5

SAFETY

151

WARNING! (Continued)

• A frayed or torn seat belt could rip apart in a collision

and leave you with no protection. Inspect the seat
belt system periodically, checking for cuts, frays, or
loose parts. Damaged parts must be replaced imme-
diately. Do not disassemble or modify the seat belt
system. Seat belt assemblies must be replaced after a
collision.

Lap/Shoulder Belt Operating Instructions

1. Enter the vehicle and close the door. Sit back and adjust

the seat.

2. The seat belt latch plate is above the back of the front

seat, and next to your arm in the rear seat (for vehicles
equipped with a rear seat). Grasp the latch plate and
pull out the seat belt. Slide the latch plate up the
webbing as far as necessary to allow the seat belt to go
around your lap.

3. When the seat belt is long enough to fit, insert the latch

plate into the buckle until you hear a “click.”

Pulling Out The Latch Plate

152

SAFETY

4. Position the lap belt so that it is snug and lies low across

your hips, below your abdomen. To remove slack in the
lap belt portion, pull up on the shoulder belt. To loosen
the lap belt if it is too tight, tilt the latch plate and pull
on the lap belt. A snug seat belt reduces the risk of
sliding under the seat belt in a collision.

5. Position the shoulder belt across the shoulder and chest

with minimal, if any slack so that it is comfortable and
not resting on your neck. The retractor will withdraw
any slack in the shoulder belt.

6. To release the seat belt, push the red button on the

buckle. The seat belt will automatically retract to its
stowed position. If necessary, slide the latch plate down
the webbing to allow the seat belt to retract fully.

Inserting Latch Plate Into Buckle

Positioning The Lap Belt

5

SAFETY

153

Lap/Shoulder Belt Untwisting Procedure

Use the following procedure to untwist a twisted lap/
shoulder belt.

1. Position the latch plate as close as possible to the anchor

point.

2. At about 6 to 12 inches (15 to 30 cm) above the latch

plate, grasp and twist the seat belt webbing 180 degrees
to create a fold that begins immediately above the latch
plate.

3. Slide the latch plate upward over the folded webbing.

The folded webbing must enter the slot at the top of the
latch plate.

4. Continue to slide the latch plate up until it clears the

folded webbing and the seat belt is no longer twisted.

Adjustable Upper Shoulder Belt Anchorage

In the driver and front passenger seats, the top of the
shoulder belt can be adjusted upward or downward to
position the seat belt away from your neck. Push or
squeeze the anchorage button to release the anchorage, and
move it up or down to the position that serves you best.

As a guide, if you are shorter than average, you will prefer
the shoulder belt anchorage in a lower position, and if you
are taller than average, you will prefer the shoulder belt
anchorage in a higher position. After you release the
anchorage button, try to move it up or down to make sure
that it is locked in position.

Adjustable Upper Shoulder Belt Anchorage

154

SAFETY

NOTE:

The adjustable upper shoulder belt anchorage is

equipped with an Easy Up feature. This feature allows the
shoulder belt anchorage to be adjusted in the upward
position without pushing or squeezing the release button.
To verify the shoulder belt anchorage is latched, pull
downward on the shoulder belt anchorage until it is locked
into position.

WARNING!

• Wearing your seat belt incorrectly could make your

injuries in a collision much worse. You might suffer
internal injuries, or you could even slide out of the
seat belt. Follow these instructions to wear your seat
belt safely and to keep your passengers safe, too.

• Position the shoulder belt across the shoulder and

chest with minimal, if any slack so that it is comfort-
able and not resting on your neck. The retractor will
withdraw any slack in the shoulder belt.

• Miss-adjustment of the seat belt could reduce the

effectiveness of the safety belt in a crash.

Second Row Center Seat Belt Operating Instructions

The second row center seat belt features a seat belt with a
mini-latch plate and buckle, which allows the seat belt to
detach from the lower anchor when the seat is folded. The
mini-latch plate and regular latch plate can then be stored
out of the way in the right side trim panel for added
convenience to open up utilization of the storage areas
behind the front seats when the seat is not occupied.

1. Remove the mini-latch plate and regular latch plate

from its stowed position in the right rear side trim panel.

Mini-Latch Stowage

5

SAFETY

155

2. Grasp the mini-latch plate and pull the seat belt over the

seat.

3. Route the shoulder belt to the inside of the right head

restraint.

4. When the seat belt is long enough to fit, insert the

mini-latch plate into the mini-buckle until you hear a
“click.”

5. Sit back in seat. Slide the regular latch plate up the

webbing as far as necessary to allow the seat belt to go
around your lap.

6. When the seat belt is long enough to fit, insert the latch

plate into the buckle until you hear a “click.”

7. Position the lap belt so that it is snug and lies low across

your hips, below your abdomen. To remove slack in the
lap belt portion, pull up on the shoulder belt. To loosen
the lap belt if it is too tight, pull on the lap belt. A snug
seat belt reduces the risk of sliding under the seat belt in
a collision.

8. Position the shoulder belt on your chest so that it is

comfortable and not resting on your neck. The retractor
will withdraw any slack in the seat belt.

9. To release the seat belt, push the red button on the

buckle.

10. To disengage the mini-latch plate from the mini-buckle

for storage, insert the regular latch plate into the black
button on the top of the mini-buckle. The seat belt will
automatically retract to its stowed position. If neces-
sary, slide the latch plate down the webbing to allow
the seat belt to retract fully. Insert the mini-latch plate
and regular latch plate into its stowed position.

Rear Center Seat Belt Buckled

156

SAFETY

WARNING!

• If the mini-latch plate and mini-buckle are not prop-

erly connected when the seat belt is used by an
occupant, the seat belt will not be able to provide
proper restraint and will increase the risk of injury in
a collision.

• When reattaching the mini-latch plate and mini-

buckle, ensure the seat belt webbing is not twisted.
If the webbing is twisted, follow the preceding

(Continued)

WARNING! (Continued)

procedure to detach the mini-latch plate and mini-
buckle, untwist the webbing, and reattach the mini-
latch plate and mini-buckle.

Seat Belt Extender

If a seat belt is not long enough to fit properly, even when
the webbing is fully extended and the adjustable upper
shoulder belt anchorage (if equipped) is in its lowest
position, your authorized dealer can provide you with a
Seat Belt Extender. The Seat Belt Extender should be used
only if the existing seat belt is not long enough. When the
Seat Belt Extender is not required for a different occupant,
it must be removed.

WARNING!

• ONLY use a Seat Belt Extender if it is physically

required in order to properly fit the original seat belt
system. DO NOT USE the Seat Belt Extender if,
when worn, the distance between the front edge of
the Seat Belt Extender buckle and the center of the
occupant’s body is LESS than 6 inches.

(Continued)

Detaching Mini-Latch And Buckle

5

SAFETY

157

WARNING! (Continued)

• Using a Seat Belt Extender when not needed can

increase the risk of serious injury or death in a
collision. Only use the Seat Belt Extender when the
lap belt is not long enough and only use in the
recommended seating positions. Remove and store
the Seat Belt Extender when not needed.

Seat Belts And Pregnant Women

Seat belts must be worn by all occupants including preg-
nant women: the risk of injury in the event of an accident
is reduced for the mother and the unborn child if they are
wearing a seat belt.

Position the lap belt snug and low below the abdomen and
across the strong bones of the hips. Place the shoulder belt
across the chest and away from the neck. Never place the
shoulder belt behind the back or under the arm.

Seat Belt Pretensioner

The front seat belt system is equipped with pretensioning
devices that are designed to remove slack from the seat belt
in the event of a collision. These devices may improve the
performance of the seat belt by removing slack from the
seat belt early in a collision. Pretensioners work for all size
occupants, including those in child restraints.

NOTE:

These devices are not a substitute for proper seat

belt placement by the occupant. The seat belt still must be
worn snugly and positioned properly.

The pretensioners are triggered by the Occupant Restraint
Controller (ORC). Like the air bags, the pretensioners are
single use items. A deployed pretensioner or a deployed air
bag must be replaced immediately.

Pregnant Women And Seat Belts

158

SAFETY

Energy Management Feature

This vehicle has a seat belt system with an Energy Man-
agement feature in the front seating positions that may
help further reduce the risk of injury in the event of a
collision. This seat belt system has a retractor assembly that
is designed to release webbing in a controlled manner.

Switchable Automatic Locking Retractor (ALR)

The seat belts in the passenger seating positions are
equipped with a Switchable Automatic Locking Retractor
(ALR) which is used to secure a child restraint system. For
additional information, refer to “Installing Child Restraints
Using The Vehicle Seat Belt” under the “Child Restraints”
section of this manual. The figure below illustrates the
locking feature for each seating position.

If the passenger seating position is equipped with an ALR
and is being used for normal usage, only pull the seat belt
webbing out far enough to comfortably wrap around the
occupant’s mid-section so as to not activate the ALR. If the
ALR is activated, you will hear a clicking sound as the seat
belt retracts. Allow the webbing to retract completely in
this case and then carefully pull out only the amount of
webbing necessary to comfortably wrap around the occu-
pant’s mid-section. Slide the latch plate into the buckle
until you hear a

⬙click.⬙

Automatic Locking Retractor (ALR) Locations

5

SAFETY

159


Content   ..  8  9  10  11   ..