Hyundai ix35 (2016 year). Manual - part 30
Maintenance
Low aspect ratio tyre (if equipped)
CAUTION
CAUTION
Low aspect ratio tyres, whose aspect
Because the sidewall of the low
•
It is not easy to recognize the
ratio is lower than 50, are provided
aspect ratio tyre is shorter than
tyre damage with your own
for sporty looks.
the normal, the wheel and tyre
eyes. But if there is the slight-
Because the low aspect ratio tyres
of the low aspect ratio tyre is
est hint of tyre damage, even
are optimized for handling and brak-
easier to be damaged. So, follow
though you cannot see the
ing, it may be more uncomfortable to
the instructions below.
tyre damage with your own
ride in and there is more noise com-
eyes, have the tyre checked or
- When driving on a rough road
pare with normal tyres.
replaced because the tyre
or off road, drive cautiously
damage may cause air leak-
because tyres and wheels may
age from the tyre.
be damaged. And after driving,
inspect tyres and wheels.
•
If the tyre is damaged by driv-
ing on a rough road, off road,
- When passing over a pothole,
pothole, manhole, or kerb
speed bump, manhole, or kerb
stone, it will not be covered by
stone, drive slowly so that the
the warranty.
tyres and wheels are not dam-
aged.
•
You can find out the tyre infor-
mation on the tyre sidewall.
- If the tyre is impacted, we rec-
ommend that you inspect the
tyre condition or contact a
HYUNDAI authorised repairer.
- To prevent damage to the tyre,
inspect the tyre condition and
pressure every
1,800 miles
(3,000 km).
7 43
Maintenance
FUSES
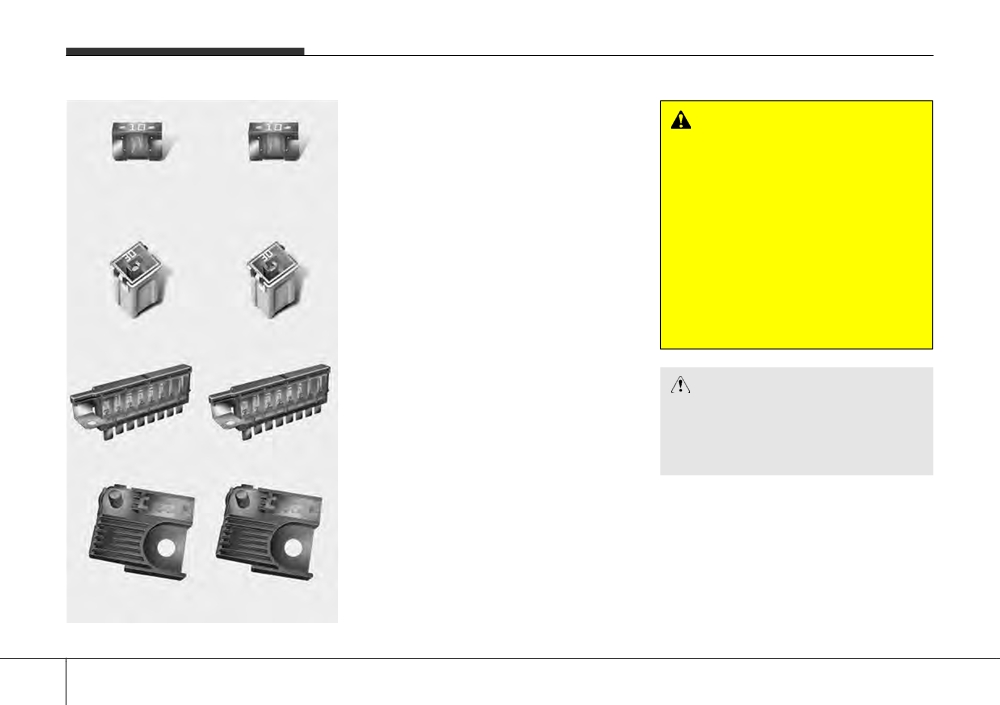
■ Blade type
A vehicle’s electrical system is protected
from electrical overload damage by
WARNING - Fuse replace-
fuses.
ment
This vehicle has 3 (or 4) fuse panels, one
•
Never replace a fuse with any-
Normal
Blown
located in the driver’s side panel bolster,
thing but another fuse of the
the other in the engine compartment
same rating.
near the battery.
•
A higher capacity fuse could
■ Cartridge type
If any of your vehicle’s lights, acces-
cause damage and possibly a
sories, or controls do not work, check the
fire.
appropriate circuit fuse. If a fuse has
•
Never install a wire or aluminium
blown, the element inside the fuse will be
foil instead of the proper fuse -
melted.
even as a temporary repair It may
If the electrical system does not work,
cause extensive wiring damage
Normal
Blown
first check the driver’s side fuse panel.
and a possible fire.
Before replacing a blown fuse, discon-
■ Multi fuse
nect the negative battery cable.
Always replace a blown fuse with one of
CAUTION
the same rating.
Do not use a screwdriver or any
If the replacement fuse blows, this indi-
other metal object to remove fuses
Normal
Blown
cates an electrical problem. Avoid using
because it may cause a short circuit
the system involved and we recommend
and damage the system.
■ BFT (Battery fuse terminal)
that you consult a HYUNDAI authorised
repairer.
Four kinds of fuses are used: blade type
✽ NOTICE
for lower amperage rating, cartridge type,
The actual fuse/relay panel label may
and fusible link for higher amperage rat-
differ from equipped items.
ings.
Normal
Blown
OLM079051N
7 44
Maintenance
CAUTION
•
When replacing a blown fuse or
relay with a new one, make sure
the new fuse or relay fits tightly
into the clips. The incomplete fas-
tening fuse or relay may cause
the vehicle wiring and electric
systems damage and a possible
fire.
•
Do not remove fuses, relays and
terminals fastened with bolts or
nuts. The fuses, relays and termi-
OLM079020R
OLM079021N
nals may be fastened incomplete-
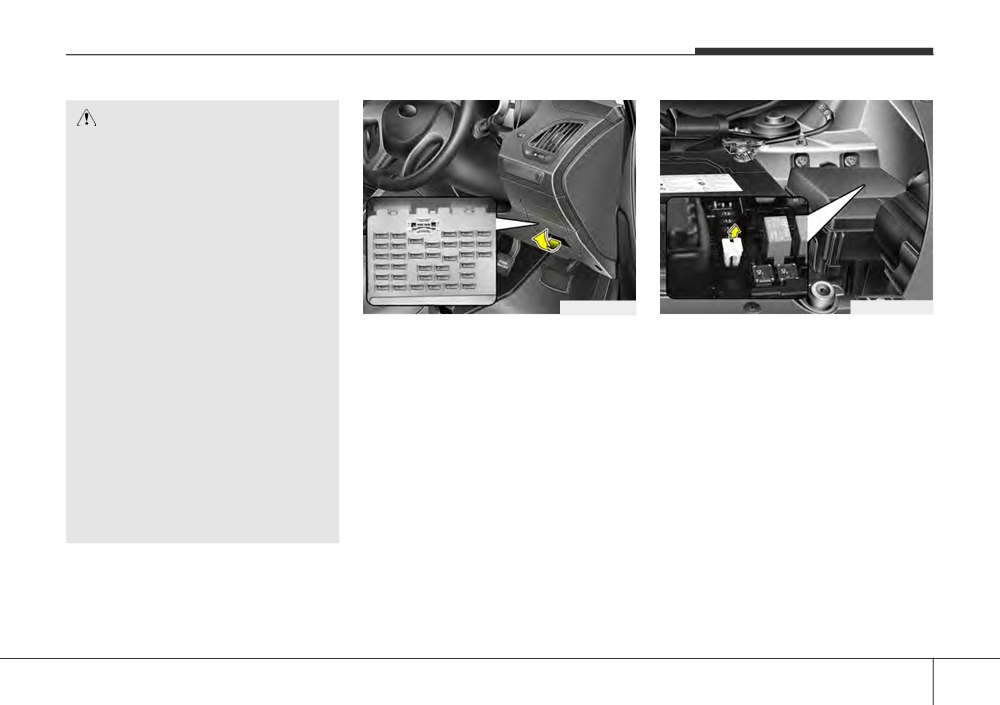
Inner panel fuse replacement
3. Pull the suspected fuse straight out.
ly, and it may cause a possible
1. Turn the ignition switch and all other
Use the removal tool provided in the
fire. If fuses, relays and terminals
engine compartment fuse panel.
switches off.
fastened with bolts or nuts are
2. Open the fuse panel cover.
4. Check the removed fuse; replace it if it
blown, we recommend that you
is blown.
consult with a HYUNDAI autho-
5. Push in a new fuse of the same rating,
rised repairer.
and make sure it fits tightly in the clips.
•
Do not input any other objects
If it fits loosely, we recommend that you
except fuses or relays into
consult a HYUNDAI authorised repairer.
fuse/relay terminals such as a
driver or wiring. It may cause con-
If you do not have a spare, use a fuse of
the same rating from a circuit you may
tact failure and system malfunc-
not need for operating the vehicle, such
tion.
as the cigar lighter fuse.
If the headlights or other electrical com-
ponents do not work and the fuses are
OK, check the fuse block in the engine
compartment. If a fuse is blown, it must
be replaced.
7 45
Maintenance
✽ NOTICE
•
If the memory fuse is pulled up from
the fuse panel, the warning chime,
audio, clock and interior lamps, etc.,
will not operate. Some items must be
reset after replacement. Refer to
“Battery” in this section.
•
Even though the memory fuse is
pulled up, the battery can still be dis-
charged by operation of the head-
lights or other electrical devices.
OLM079023N
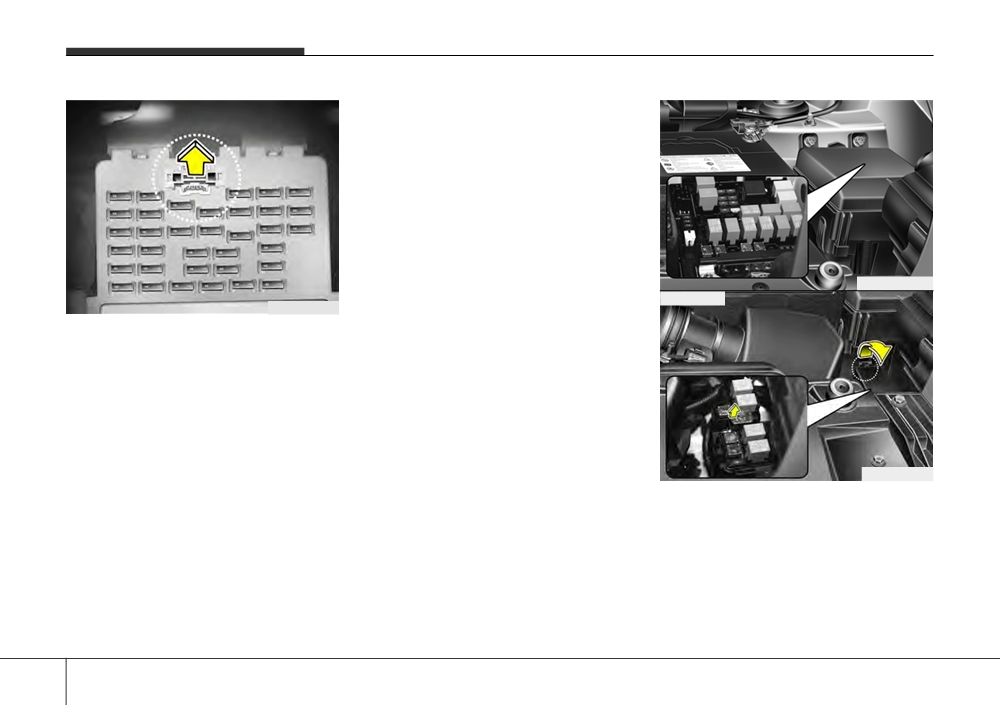
Diesel only
OLM079022
Memory fuse
Your vehicle is equipped with a memory
fuse to prevent battery discharge if your
vehicle is parked without being operated
for prolonged periods. Use the following
procedures before parking the vehicle for
prolonged periods.
1. Turn off the engine.
2. Turn off the headlights and tail lights.
OLM079024
3. Open the driver’s side panel cover and
Engine compartment panel fuse
pull out the memory fuse.
replacement
1. Turn the ignition switch and all other
switches off.
2. Remove the fuse box cover by press-
ing the tap and pulling up.
7 46
Maintenance
3. Check the removed fuse; replace it if it
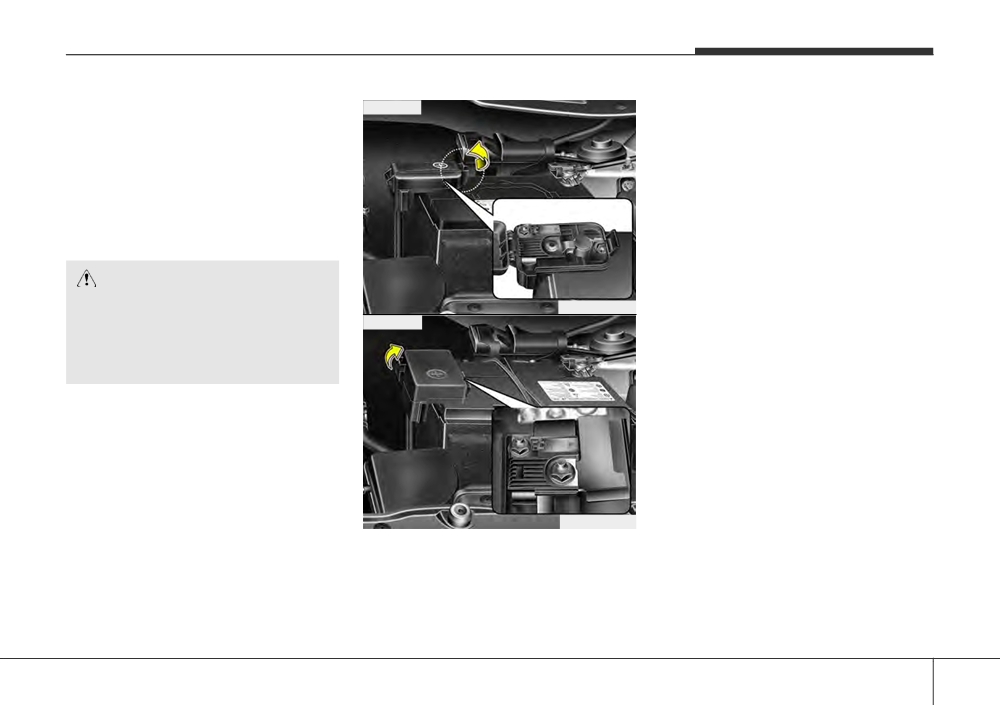
■ Type A
3. Remove the nuts shown in the picture
is blown. To remove or insert the fuse,
above.
use the fuse puller in the engine com-
4. Replace the fuse with a new one of the
partment fuse panel.
same rating.
4. Push in a new fuse of the same rating,
5. Reinstall in the reverse order of
and make sure it fits tightly in the clips.
removal.
If it fits loosely, we recommend that
you consult a HYUNDAI authorised
repairer.
CAUTION
After checking the fuse box in the
OLM079052R
engine compartment, securely
■ Type B
install the fuse box cover. If not,
electrical failures may occur from
water leaking in.
OEL070305R
Main fuse
If the main fuse is blown, it must be
removed as follows:
1. Turn off the engine.
2. Disconnect the negative battery cable.
7 47
Maintenance
✽ NOTICE
If the main fuse is blown, we recom-
mend that you consult a HYUNDAI
authorised repairer.
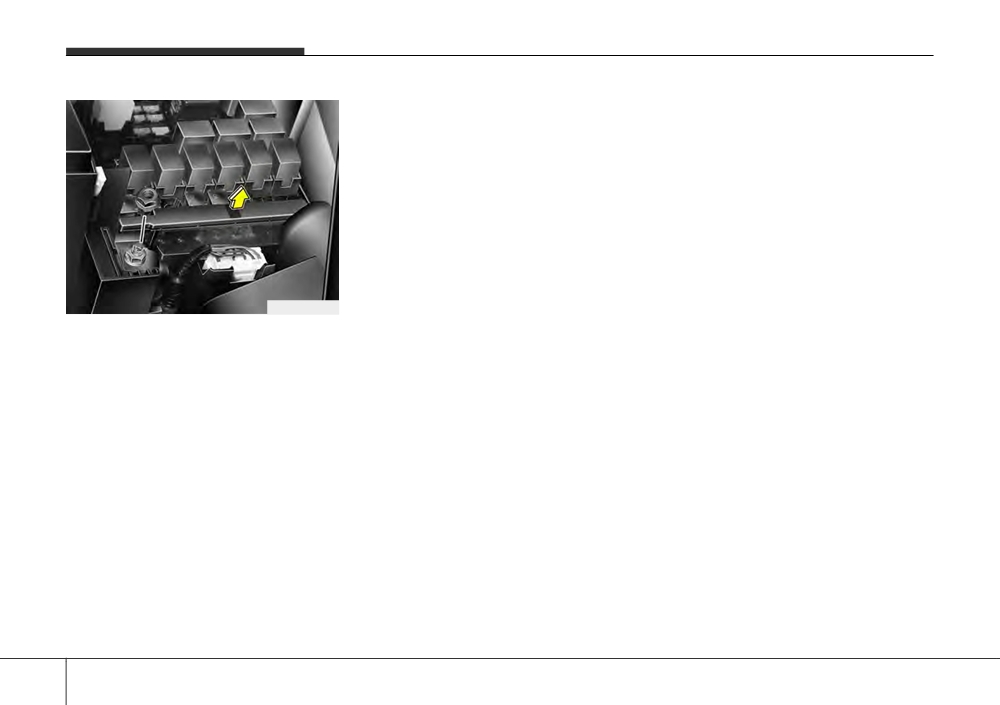
OLM079025
Multi fuse
If the multi fuse is blown, it must be
removed as follows:
1. Turn off the engine.
2. Disconnect the negative battery cable.
3. Remove the fuse panel on the right
side in the engine compartment.
4. Remove the nuts shown in the picture
above.
5. Replace the fuse with a new one of the
same rating.
6. Reinstall in the reverse order of
removal.
7 48
Maintenance
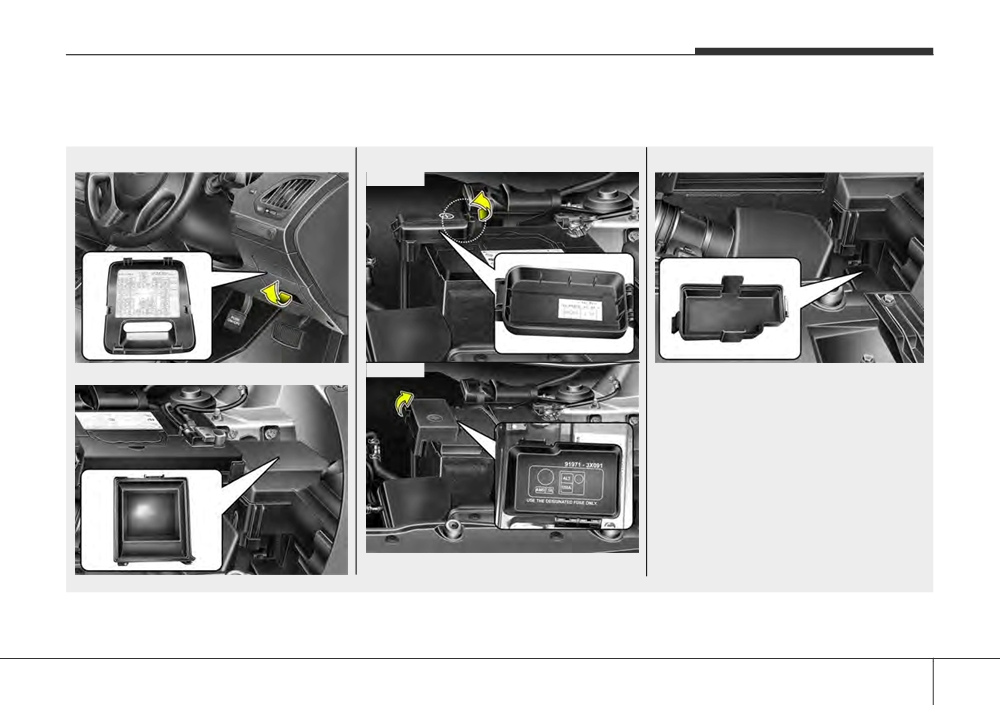
Fuse/Relay panel description
Inside the fuse/relay box covers, you can find the fuse/relay label describing fuse/relay name and capacity.
Driver’s side panel
Main fuse
Diesel only
■ Type A
Engine compartment
■ Type B
OLM079026R/OLM079053R/OLM079027/
OEL070306R/OLM079028
✽ NOTICE
Not all fuse panel descriptions in this manual may be applicable to your vehicle. It is accurate at the time of printing. When you
inspect the fuse box on your vehicle, refer to the fuse box label.
7 49
Maintenance
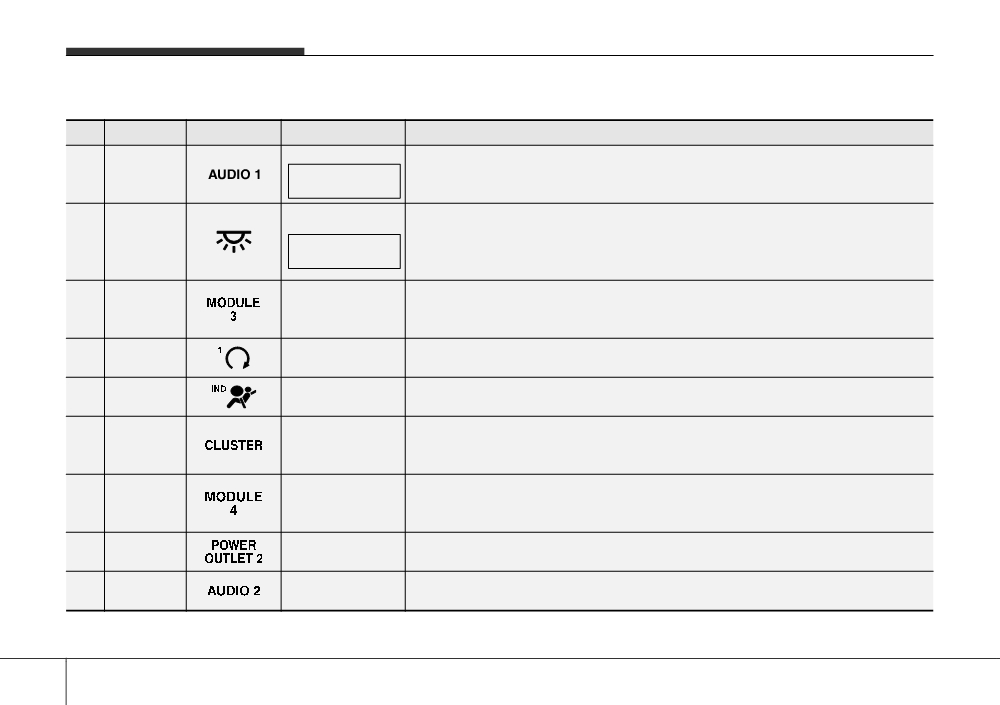
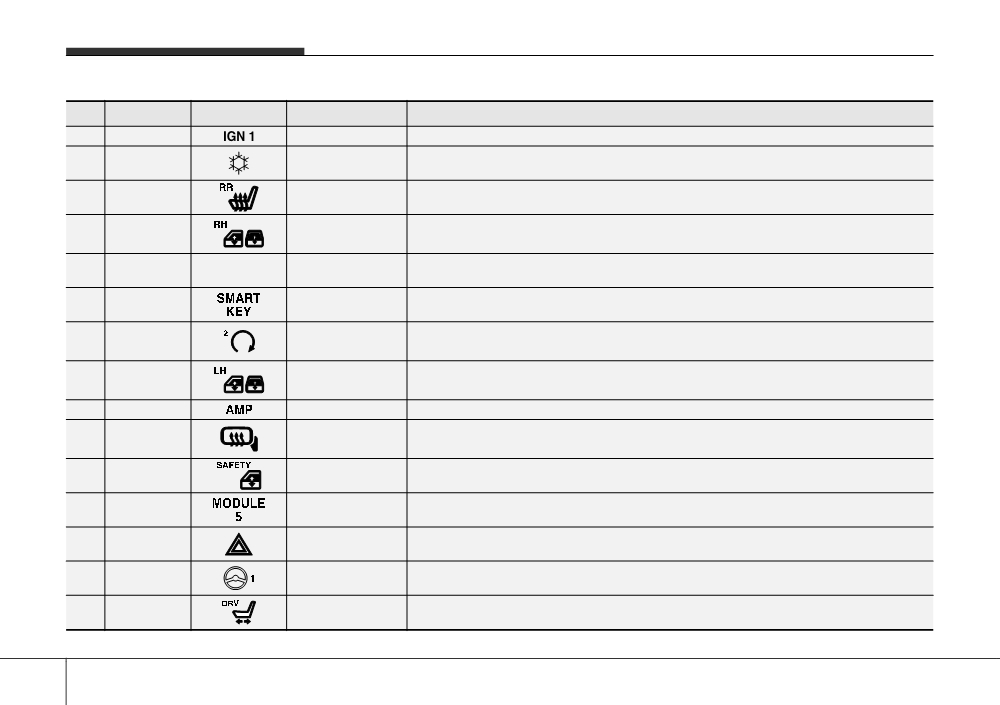
Inner fuse panel (Instrument panel)
No.
Fuse rating
Symbol
Fuse Name
Circuit Protected
AUDIO 1
1
10A
POWER
Audio, A/V & Navigation Head Unit, DC/DC Converter
CONNECTOR
ROOM LP
IPS Control Module (B+), BCM, A/C Control Module, Data Link Connector,
Instrument Cluster(IND), RF Receiver, Ignition Key ILL. & Door Warning Switch,
2
10A
POWER
Auto Light & Photo Sensor, MAP Lamp, Room Lamp,
CONNECTOR
Luggage Lamp, Driver/Passenger, Vanity Lamp
IPS Control Module (ON Input), Electro Chromic Mirror, BCM, PDM, Head Lamp
3
10A
MODULE 3
Levelling Device Switch, Head Lamp Levelling Device Actuator LH/RH,
ICM Relay Box (Rear Seat Warmer Relay Relay LH/RH)
E/R Fuse & Relay Box (RLY. 4 / 11 - Start / ATM P/N)
4
10A
START
Burglar Alarm Relay, ECM
5
10A
AIR BAG IND.
Instrument Cluster (IND.)
Instrument Cluster (IND.), Seat Belt Reminder Switch,
6
10A
CLUSTER
Console Switch, BCM, Smart Key Control Module, Audio,
A/V & Navigation Head Unit, ISG Switch, Alternator
E/R Fuse & Relay Box (RLY. 1 - Blower), Rain Sensor,
7
10A
MODULE 4
Diesel Box (RLY. 2, 3 - PTC Heater Relay #2, #3)
A/C Control Module, Cluster Ionizer, Sunroof Motor
POWER
8
25A
Cigarette Lighter & Front Power Outlet, Rear Power Outlet
OUTLET 2
Audio, A/V & Navigation Head Unit, AMP, PDM, BCM, Power Outside Mirror Switch,
9
10A
AUDIO 2
Smart Key Control Module, DC/DC Converter, Sunroof Motor
7 50
Maintenance
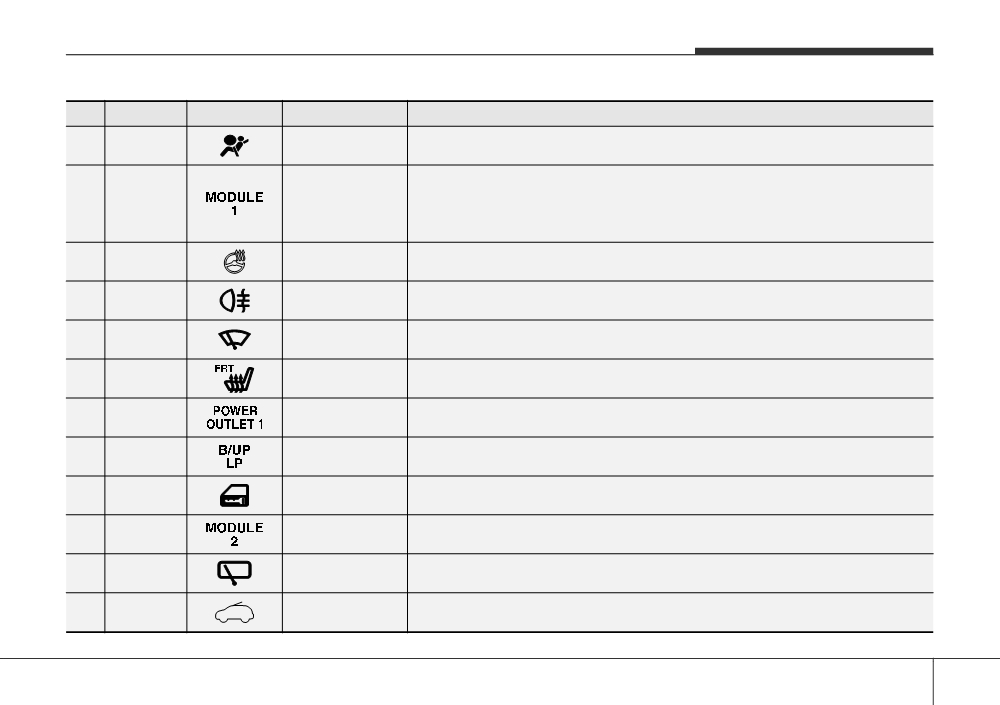
No.
Fuse rating
Symbol
Fuse Name
Circuit Protected
10
10A
AIR BAG
SRS Control Module, Passenger Air Bag Lamp
IPS Control Module (ON/START Input), 4WD ECM, ICM Relay Box (DBC Relay),
DBC Switch, Multifunction Switch (Light), Steering Angle Sensor, Stop Lamp Switch,
11
10A
MODULE 1
EPS Control Module, Tyre Pressure Monitoring Module, ESC Off Switch, E/R Fuse &
Relay Box (RLY. 8 - ESS), DC/DC Converter, Smart Parking Assist Control Module
12
15A
HANDLE HTD
Clock Spring (Steering Wheel Heater)
13
10A
FOG LP RR
ICM Relay Box (Rear Fog Lamp Relay)
E/R Fuse & Relay Box (RLY. 12 - Front Wiper LO, RLY. 13 - Rain Wiper)
14
25A
WIPER FRT
Front Wiper Motor, Multifunction Switch (Wiper)
15
15A
S/HEATER FRT
Console Switch
16
20A
POWER OUTLET 1
Cigarette Lighter & Front Power Outlet
Back-Up Lamp Relay
17
10A
BACK-UP LP
Rear Parking Assist Sensor LH/RH, Rear Parking Assist Sensor Centre LH/RH
18
15A
DR LOCK
Door Lock/Unlock Relay, Tail Gate Relay, ICM Relay Box (Dead Lock Relay)
19
7.5A
MODULE 2
BCM, Smart Key Control Module, PDM
20
15A
WIPER RR
ICM Relay Box (Rear Wiper Relay), Rear Wiper Motor, Multifunction Switch (Wiper)
21
15A
SUNROOF
Sunroof Motor
7 51
Maintenance
No.
Fuse rating
Symbol
Fuse Name
Circuit Protected
22
20A
IGN 1
E/R Fuse & Relay Box (FUSE - F23, F24, F25)
23
7.5A
A/CON
A/C Control Module (Auto)
24
15A
S/HEATER RR
ICM Relay Box (Rear Seat Warmer Relay LH/RH)
Power Window Main Switch, Passenger Power Window Switch(LHD),
25
25A
P/WDW RH
Rear Power Window Switch RH
FOLDING
26
10A
FOLDING MIRR
Power Outside Mirror Switch
MIRR
27
10A
SMART KEY
PDM, Smart Key Control ModuleFOB Holder, Start/Stop Button Switch
28
15A
PDM
PDM
Power Window Main Switch, Passenger Power Window Switch(RHD),
29
25A
P/WDW LH
Rear Power Window Switch LH
30
25A
AMP
AMP, DC/DC Converter
Rear Defogger Switch, ECM(G4FD)
31
7.5A
HTD MIRR
Driver/Passenger Power Outside Mirror
32
20A
SAFETY P/WDW
Driver Safety Power Window Module
33
7.5A
MODULE 5
ATM Shift Lever, Rear Parking Assist Buzzer, Tyre Pressure Monitoring Module
34
15A
HAZARD
ICM Relay Box (Flasher Sound Relay), BCM
35
10A
MDPS
MDPS Unit
36
20A
P/SEAT DRV
FRT DRV Seat
7 52
Maintenance
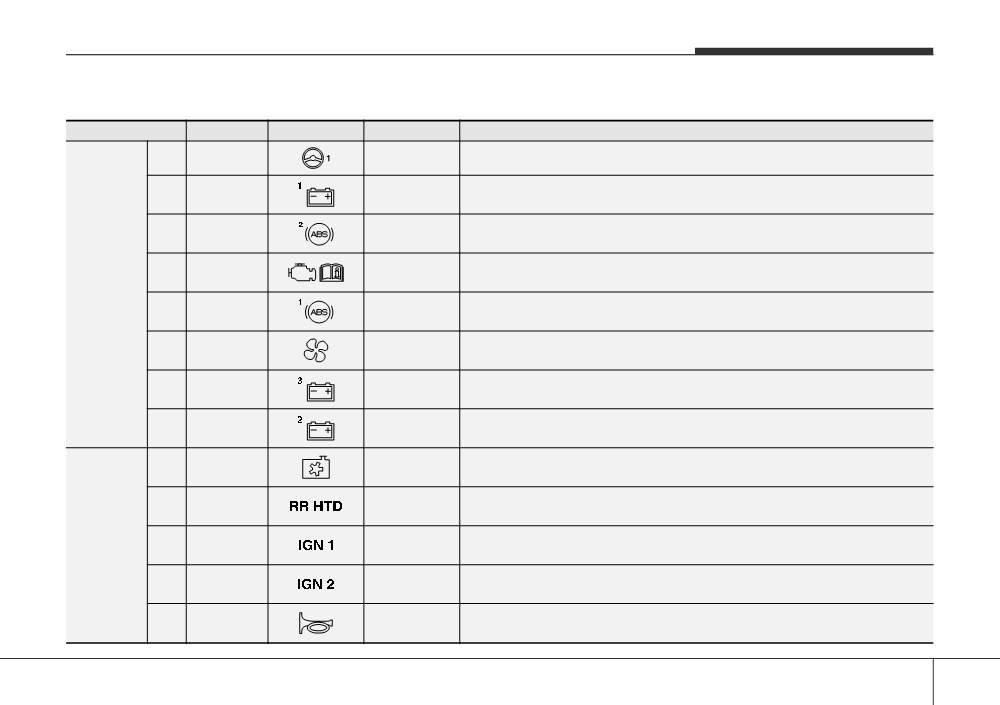
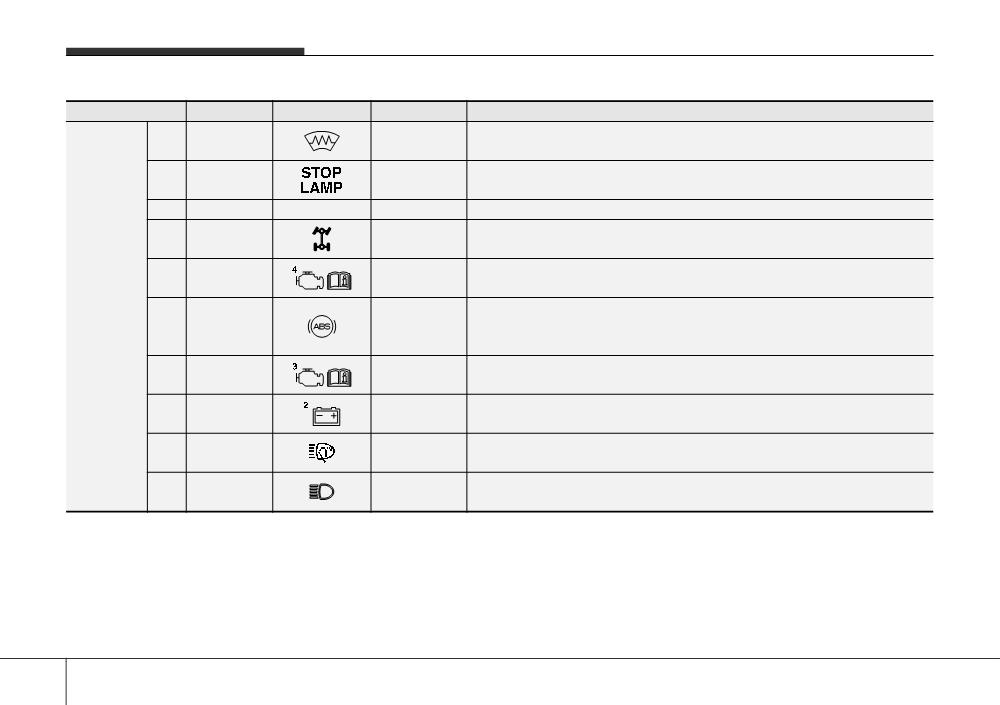
Engine compartment main fuse panel
No.
Fuse rating
Symbol
Fuse Name
Circuit Protected
1
80A
MDPS
EPS Control Module
Smart Junction Box (Fuse - F13 / F20 / F26 / F31 / F37, IPS 4 / IPS 5 / IPS 6
2
60A
B+1
/ IPS 7)
3
40A
ABS 2
ESC Control Module, ABS Control Module, Multipurpose Check Connector
4
40A
EMS
EMS Box (Fuse - F1 / F2 / F3 / F6)
MULTI
FUSE
5
40A
ABS 1
ESC Control Module, ABS Control Module, Multipurpose Check Connector
6
40A
BLOWER
RLY. 1 (Blower Relay)
7
60A
B+3
Smart Junction Box (Fuse - F30 / F35 / F36, Power Connector - F1 / F2)
Smart Junction Box (Power Window Relay, Fuse - F23 / F28 / F33, IPS 0 /
8
60A
B+2
IPS 1 / IPS 2 / IPS 3)
40A(50A)
COOLING
9
RLY. 3 (Cooling Fan Low Relay), RLY. 9 (Cooling Fan High Relay)
GSL(DSL)
FAN
HEATED
10
40A
RLY. 6 (Rear Defogger Relay)
GLASS RR
W/O Smart Key - Ignition Switch,
FUSE
11
30A
IGN 1
With Smart Key - PDM Relay Box (IGN1 Relay)
RLY. 4 (Start Relay), W/O Smart Key - Ignition Switch,
12
40A
IGN 2
With Smart Key - PDM Relay Box (IGN2 Relay)
13
15A
HORN
RLY. 2 (Horn Relay), RLY. 5 (Burglar Alarm Horn Relay)
7 53
Maintenance
No.
Fuse rating
Symbol
Fuse Name
Circuit Protected
14
15A
DEICER
RLY. 10 (Front Wiper Deicer Relay)
15
10A
STOP LAMP
Stop Lamp Switch, ICM Relay Box (DBC Relay)
16
10A
AMS
B+ SENSOR
Battery Sensor (G4KD/D4HA)
17
20A
4WD
4WD ECM
RLY. 11 (ATM P/N Relay), RLY. 4 (Start Relay), ECM/PCM,
18
7.5A
ECU 2
Multifunction Switch (G4KD), Mass Air Flow Sensor (D4FD/D4HA)
ESC Control Module, ABS Control Module, Multipurpose Check Connector,
FUSE
19
7.5A
ABS
Fuel Filter Warning Sensor (D4FD/D4HA), Glow Relay Unit (D4HA),
Diesel Box (RLY. 4 - Fuel Filter Heater Relay)(D4FD/D4HA)
20
7.5A
TCU 2
Transaxle Range Switch(G4KD/D4HA), TCM (D4HA), Vehicle Speed Sensor
21
30A
B+4
H/LP HI Fuse
H/LP
22
30A
RLY (H/LP WASHER)
WASHER
23
10A
H/LP HI
RLY (H/LP HI)
7 54
Maintenance
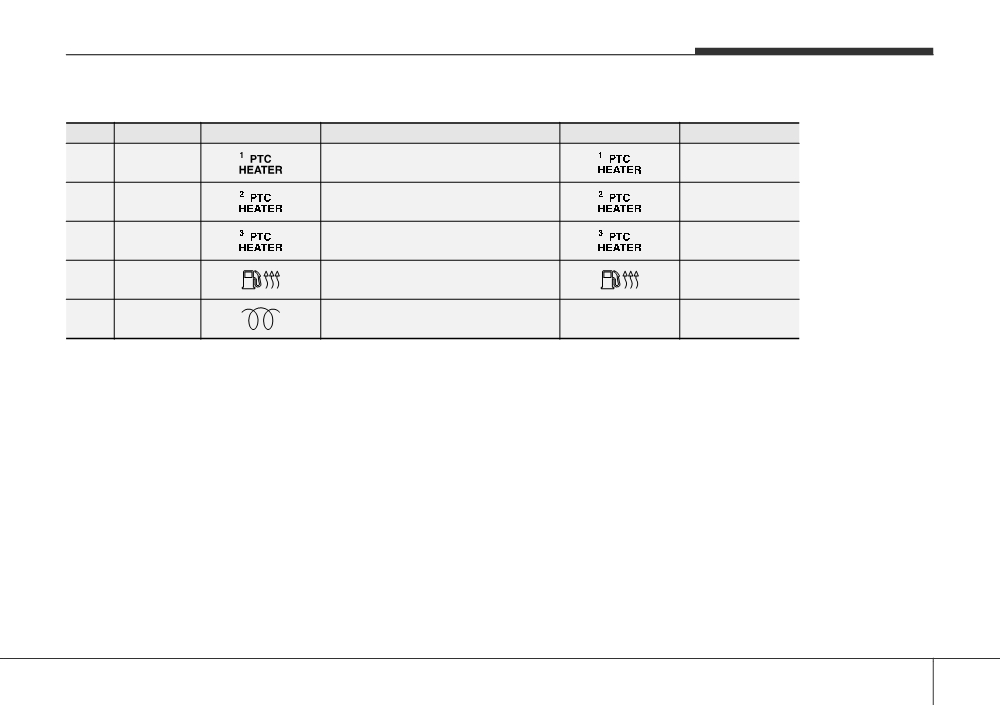
Engine compartment sub fuse panel (Disel Engine)
No.
Fuse rating
Fuse Symbol
Circuit Protected
Relay Symbol
Relay Type
1
50A
PTC Heater Relay #1
MICRO PLUG
2
50A
PTC Heater Relay #2
MICRO PLUG
3
50A
PTC Heater Relay #3
MICRO PLUG
4
30A
Fuel Filter Heater Relay
MICRO PLUG
5
80A
Glow Relay Unit
-
-
7 55
Maintenance
LIGHT BULBS
✽ NOTICE
WARNING - Working on
CAUTION
After heavy, driving rain or washing,
the lights
If you don’t have necessary tools,
headlight and taillight lenses could
Prior to working on the light, firmly
the correct bulbs and the expertise,
appear frosty. This condition is caused by
apply the parking brake, ensure
we recommend that you consult a
the temperature difference between the
that the ignition switch is turned to
HYUNDAI authorised repairer. In
lamp inside and outside. This is similar
the “LOCK” position and turn off
many cases, it is difficult to replace
to the condensation on your windows
the lights to avoid sudden move-
vehicle light bulbs because other
inside your vehicle during the rain and
parts of the vehicle must be
ment of the vehicle and burning
doesn’t indicate a problem with your
your fingers or receiving an electric
removed before you can get to the
vehicle. If water leaks into the lamp bulb
shock.
bulb. This is especially true if you
circuitry, we recommend that the system
have to remove the headlight
be checked by a HYUNDAI authorised
assembly to get to the bulb(s).
repairer.
Use only the bulbs of the specified
Removing/installing the headlight
wattage.
assembly can result in damage to
the vehicle.
CAUTION
Be sure to replace the burned-out
bulb with one of the same wattage
rating. Otherwise, it may cause
damage to the fuse or electric
wiring system.
7 56
Maintenance
4. Unsnap the headlight bulb retaining
wire by depressing the end and push-
ing it upward.
5. Remove the bulb from the headlight
assembly.
6. Install a new headlight bulb and snap
the headlight bulb retaining wire into
position by aligning the wire with the
groove on the bulb.
7. Connect the headlight bulb socket-
connector.
8. Install the headlight bulb cover by turn-
OEL073029
OEL074101
ing it clockwise.
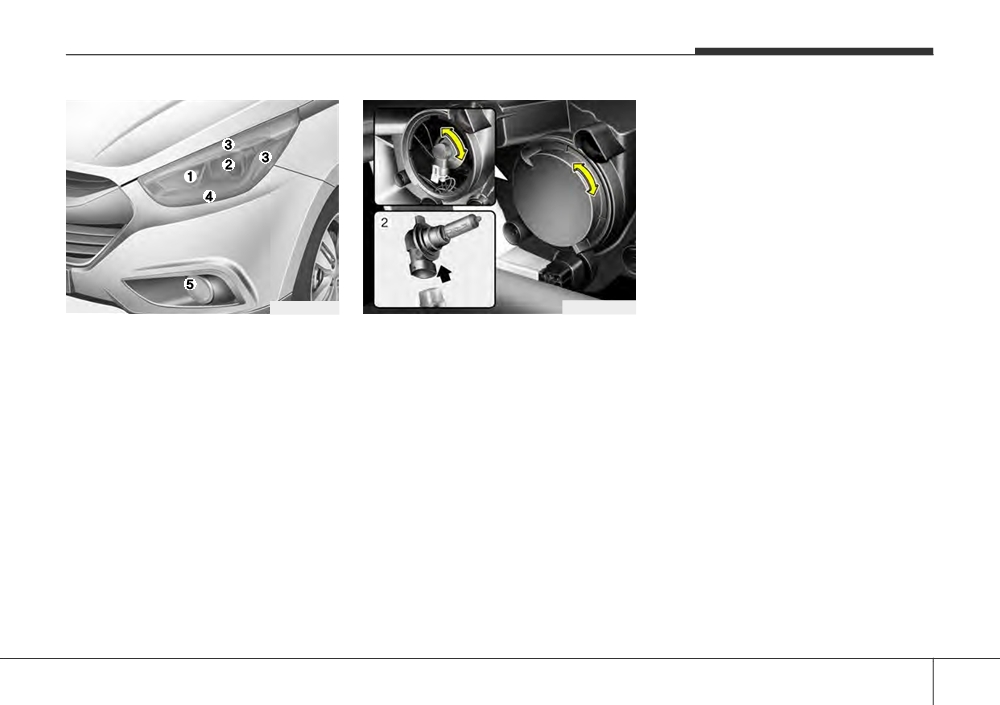
Headlight, position light, turn sig-
Headlight (High/Low)
nal light, front fog light bulb
1. Open the bonnet.
✽ NOTICE
replacement
2. Remove the headlight bulb cover by
We recommend that the headlight aim-
(1) Front turn signal light
turning it counterclockwise.
ing be adjusted after an accident or
(2) Headlight (High/Low)
3. Disconnect the headlight bulb socket-
after the headlight assembly is rein-
connector.
stalled at a authorized HYUNDAI deal-
(3) Position light (LED) (if equipped)
er.
(4) Position light (LED)/Daytime running
light (if equipped)
(5) Front fog light (if equipped)
7 57
Maintenance
❈ Traffic Change (For Europe)
Headlight (Low, HID type)
✽ NOTICE
The low beam light distribution is asym-
If the light does not operate, we recom-
HID lamps have superior performance
metric. If you go abroad to a country with
mend that the system be checked by a
vs. halogen bulbs. HID lamps are esti-
an opposite traffic direction, this asym-
HYUNDAI authorised repairer.
mated by the manufacturer to last twice
metric part will dazzle the oncoming driv-
as long or longer than halogen bulbs
er. To prevent dazzle, ECE regulations
depending on their frequency of use.
demand several technical solutions (ex.
WARNING - HID Headlight
They will probably require replacement
automatic change system, adhesive
low beam (if equipped)
at some point in the life of the vehicle.
sheet, down aiming). Headlamps are
Do not attempt to replace or
Cycling the headlamps on and off more
designed not to dazzle opposing drivers.
inspect the low beam (XENON bulb)
than typical use will shorten HID lamps
So you don´t need to change your head-
due to electric shock danger. If the
life. HID lamps do not fail in the same
lamps in a country with the opposite traf-
low beam (XENON bulb) is not
manner as halogen incandescent lamps.
fic direction.
working, we recommend that the
If a headlamp goes out after a period of
system be checked by a HYUNDAI
operation but will immediately relight
authorised repairer.
when the headlamp switch is cycled it is
likely the HID lamp needs to be
replaced. HID lighting components are
more complex than conventional halo-
gen bulbs thus have higher replacement
cost.
7 58
Maintenance
Turn signal light/Position light
(Continued)
Turn signal light
•
If a bulb becomes damaged or
1. Turn off the engine and open the bon-
cracked, replace it immediately
net.
and carefully dispose of it.
2. Remove the socket from the assembly
•
Wear eye protection when chang-
by turning the socket counterclockwise
ing a bulb. Allow the bulb to cool
until the tabs on the socket align with
down before handling it.
the slots on the assembly.
3. Remove the bulb from the socket by
pressing it in and rotating it counter-
clockwise until the tabs on the bulb
align with the slots in the socket. Pull
OHD076046
the bulb out of the socket.
4. Insert a new bulb by inserting it into
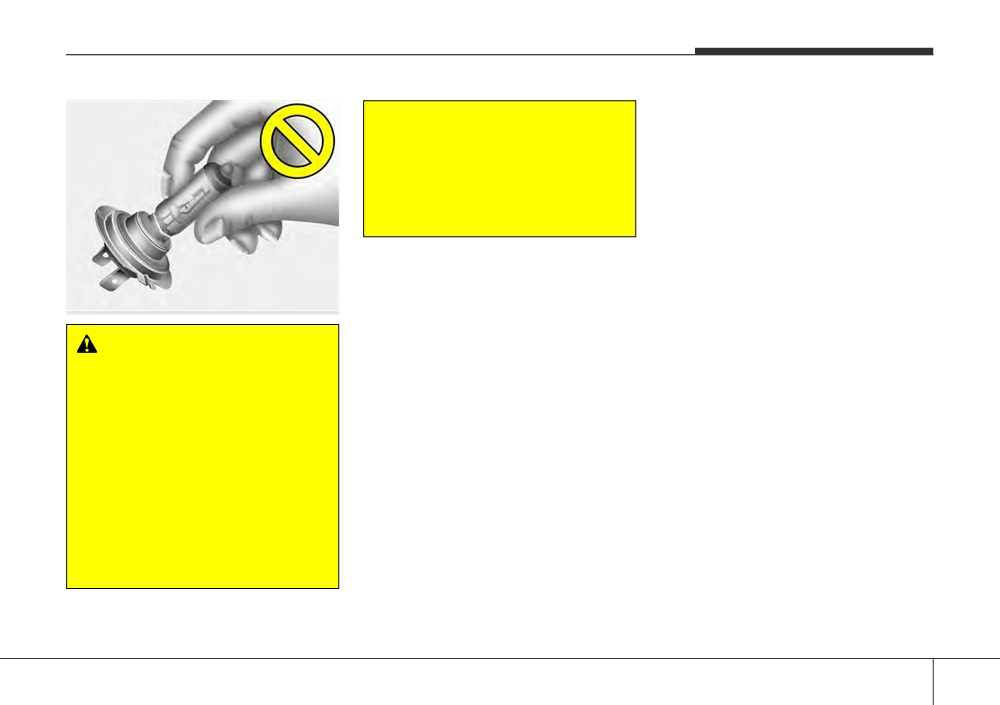
WARNING - Halogen bulbs
the socket and rotating it until it locks
•
Halogen bulbs contain pressur-
into place.
ized gas that will produce flying
5. Install the socket in the assembly by
pieces of glass if broken.
aligning the tabs on the socket with the
•
Always handle them carefully,
slots in the assembly. Push the socket
and avoid scratches and abra-
into the assembly and turn the socket
sions. If the bulbs are lit, avoid
clockwise.
contact with liquids. Never touch
the glass with bare hands.
Position light
Residual oil may cause the bulb
If the light bulb does not operate, we rec-
to overheat and burst when lit. A
ommend that the system be checked by
bulb should be operated only
a HYUNDAI authorised repairer.
when installed in a headlight.
(Continued)
7 59