Honda Prelude (2000 year). Manual - part 8
 

  Index      Honda     Honda Prelude - service manual 2000 year in english


Search            copyright infringement  


Content   ..  6  7  8  9   ..


Honda Prelude (2000 year). Manual - part 8


Audio System

Audio System Lighting
You can use the instrument panel

brightness control dial to adjust the il-
lumination of the audio system (see
page 

63

). The audio system

illuminates when the parking lights
are on, even if the radio is turned off.

Radio Frequencies
Your Honda's radio can receive the
complete AM and FM bands.

Those bands cover these frequen-

cies:

AM band:

530 to 1,710 kilohertz
FM band:
87.7 to 107.9 megahertz

Radio stations on the AM band are
assigned frequencies at least ten
kilohertz apart (530, 540, 550).
Stations on the FM band are
assigned frequencies at least 0.2

megahertz apart (87.9, 88.1, 88.3).

Stations must use these exact
frequencies. It is fairly common for
stations to round-off the frequency in
their advertising, so your radio could
display a frequency of 100.9 even
though the announcer may identify
the station as "FM101."

Radio Reception

How well your Honda's radio
receives stations is dependent on
many factors, such as the distance
from the station's transmitter,
nearby large objects, and atmos-
pheric conditions.

A radio station's signal gets weaker

as you get farther away from its
transmitter. If you are listening to an

AM station, you will notice the sound
volume becoming weaker, and the

station drifting in and out. If you are

listening to an FM station, you will

see the stereo indicator flickering off
and on as the signal weakens.
Eventually, the stereo indicator will

go off and the sound will fade
completely as you get out of range of
the station's signal.

Driving very near the transmitter of
a station that is broadcasting on a
frequency close to the frequency of
the station you are listening to can
also affect your radio's reception.
You may temporarily hear both
stations, or hear only the station you
are close to.

Comfort and Convenience Features

Main Menu

Table of Contents

Audio System

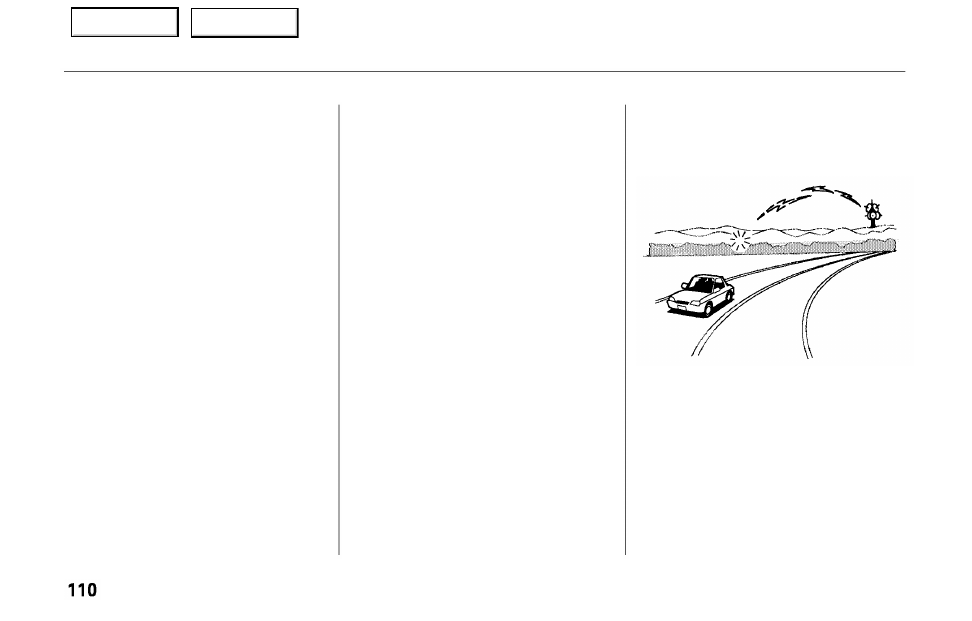
Radio signals, especially on the FM
band, are deflected by large objects
such as buildings and hills. Your
radio then receives both the direct
signal from the station's transmitter,
and the deflected signal. This causes
the sound to distort or flutter. This is
a main cause of poor radio reception
in city driving.

Radio reception can be affected by
atmospheric conditions such as
thunderstorms, high humidity, and
even sunspots. You may be able to
receive a distant radio station one
day and not receive it the next day
because of a change in conditions.

Electrical interference from passing

vehicles and stationary sources can

cause temporary reception problems.

As required by the FCC:

Changes or modifications not expressly

approved by the party responsible for
compliance could void the user's
authority to operate the equipment.

Comfort and Convenience Features

Main Menu

Table of Contents

Audio System

Operating the CD Player

You operate the CD player with the

same controls used for the radio.

With the ignition switch in
ACCESSORY (I) or ON (II), insert
the disc into the CD slot. Push the

disc in halfway, the drive will pull it
in the rest of the way and begin to
play. The number of the track that is
playing is shown in the display.

You can also play 3-inch (8-cm) discs
without using an adapter ring. Play

only standard round discs. Odd-
shaped CDs may jam in drive or
cause other problems.

When the system reaches the end of

the disc, it will return to the begin-
ning and play that disc again.

You can switch to the radio while a

CD is playing by pressing the  A M /
FM button. Press the CD button to

return to playing the CD. The CD
will begin playing where it left off.

CD SLOT

AM/FM  BUTTON

TUNE BAR

SEEK/SKIP

BAR

CD BUTTON

A. SEL/RDM BUTTON

Comfort and Convenience Features

RPT BUTTON

EJECT BUTTON

Main Menu

Table of Contents

Audio System

If you turn the system off while a CD
is playing, either with the PWR/VOL
knob or by turning off the ignition,
the disc will stay in the drive. When
you turn the system back on, the CD

will begin playing where it left off.

Press the eject button to remove the
disc from the drive.

If you eject the disc, but do not
remove it from the slot, the system
will automatically reload the disc
after 15 seconds and put the CD
player in pause mode. To begin
playing the disc, press the CD button.

You can use the TUNE and SEEK/

SKIP bars while a disc is playing to
select passages and change tracks.

To move rapidly within a track, press

and hold the TUNE bar. Press the

side to move forward. You will

see CUE in the display. Press the

side to move backward. You

will see REW displayed. Release the
bar when the system reaches the
point you want.

Each time you press the side of
the SEEK/SKIP bar, the system
skips forward to the beginning of the
next track. Press the side to
skip backward to the beginning of
the current track. Press it again to
skip to the beginning of the previous
track.

REPEAT — To activate the Repeat
feature, press and release the RPT
button. You will see RPT in the
display. The system continuously

replays the current track. Press the
RPT button again to turn it off.

RANDOM PLAY — This feature,
when activated, plays the tracks on
the CD in random order, rather than
in the order they are recorded on the.

CD. To activate Random Play, press
and release the A. SEL/RDM button.

You will see RDM in the display. The

system will then select and play

tracks randomly. This continues
until you deactivate Random Play by
pressing A. SEL/RDM again.

If the system is in Repeat mode, you
must turn it off by pressing the RPT
button before selecting Random Play.

Comfort and Convenience Features

Main Menu

Table of Contents

Audio System

Operating the CD  Changer

(Optional)

A Compact Disc changer is available

for your car. It holds up to six discs,
providing several hours of
continuous entertainment. You
operate this CD changer with the
same controls used for the in-dash
CD player.

Load the desired CDs in the
magazine and load the magazine in
the changer according to the
instructions that came with the unit.
Play only standard round discs. Odd-
shaped CDs may jam in the drive or
cause other problems.

AM/FM  BUTTON

TUNE BAR

A. SEL/RDM BUTTON

Comfort and Convenience Features

EJECT BUTTON

PRESET BUTTONS

RPTBUTTON

SEEK/SKIP

BAR

Main Menu

Table of Contents

Audio System

To select the CD changer, press the

CD button. The disc and track
numbers will be displayed.

To select a different disc, press the

appropriate preset button (1 — 6). If

you select an empty slot in the

magazine, the changer will, after
finding that slot empty, try to load
the CD in the next slot. This
continues until it finds a CD to load
and play.

If you load a CD in the in-dash player
while the changer is playing a CD,
the system will stop the changer and
begin playing the in-dash CD. To
select the changer again, press the
CD button. Play will begin where it
left off. Use the CD button to switch
between the player and the changer.

If you eject the in-dash CD while it is
playing, the system will automatically
switch to the CD changer and begin
play where it left off. If there are no
CDs in the changer, the display will
flash. You will have to select another
mode (AM or FM) with the button.

When you switch back to CD mode,
the system selects the same unit (in-

dash or changer) that was playing

when you switched out of CD mode.

To use the SKIP, REPEAT, and

RANDOM functions, refer to the in-
dash player operating instructions.

Comfort and Convenience  Features

Main Menu

Table of Contents

Audio System

Protecting Compact Discs

Handle a CD by its edges; never
touch either surface. Contamination

from fingerprints, liquids, felt-tip
pens, and labels can cause the CD to
not play properly, or possibly jam in
the drive.

When a CD is not being played, store
it in its case to protect it from dust
and other contamination. To prevent
warpage, keep CDs out of direct
sunlight and extreme heat.

To clean a disc, use a clean soft cloth.
Wipe across the disc from the center

to the outside edge.

A new CD may be rough on the

inner and outer edges. The small
plastic pieces causing this roughness
can flake off and fall on the re-
cording surface of the disc, causing
skipping or other problems. Remove
these pieces by rubbing the inner
and outer edges with the side of a
pencil or pen.

Never try to insert foreign objects in
the CD player or the magazine.

Comfort and  Convenience  Features

Main Menu

Table of Contents

Audio System

CD  Player Error Indications
If you see an error indication in the
display while operating the CD

player, find the cause in the chart to
the right. If you cannot clear the
error indication, take the car to your
Honda dealer.

Comfort  and  Convenience  Features

Main Menu

Table of Contents

Audio System

CD  Changer Error Indications
If you see an error indication in the
display while operating the CD
changer, find the cause in the chart

to the right. If you cannot clear the
error indication, take the car to your
Honda dealer.

Comfort and Convenience Features

Main Menu

Table of Contents

Audio System

Operating the Cassette Player

(Optional)

The cassette system features Dolby

B* noise reduction, automatic
sensing of chromium-dioxide (CrO

2

)

tape, and autoreverse for continuous
play.

Make sure the tape opening on the
cassette is facing to the right, then
insert the cassette most of the way
into the slot. The system will pull it
in the rest of the way, and begin to

play.

* Dolby noise reduction manufactured under

license from Dolby Laboratories Licensing Corpo-

ration. "DOLBY" and the double-D symbol

are trademarks of Dolby Laboratories

Licensing Corporation.

CONTINUED

Comfort and Convenience Features

REPEAT  BUTTON

NR  BUTTON

PROG  BUTTON

PLAY  BUTTON

CD  BUTTON

TUNE BAR SEEK/SKIP  BAR

TAPE  DIRECTION

INDICATOR

AM/FM

BUTTON

PWR/VOL KNOB

Main Menu

Table of Contents

Audio System

The tape direction indicator will light

to show you which side of the
cassette is playing. The indicates
the side you inserted facing upward
is now playing. If you want to play
the other side, press the PROG
button.

Dolby B noise reduction turns on
when you insert a cassette. If the
tape was not recorded with Dolby B
noise reduction, turn it off by
pressing the NR button.

Dolby remains off until you turn it on
by pressing the button again.

When the system reaches the end of
the tape, it will automatically reverse

direction and play the other side. If

you want to remove the cassette
from the drive, press the EJECT
button on the cassette player.

If you turn the system off while a
tape is playing, either with the PWR/

VOL knob or by turning off the

ignition, the cassette will remain in
the drive. When you turn the system
back on, the cassette player will be in
pause mode. To begin playing, press
the PLAY button.

To switch to the radio or CD player
while a tape is playing, press the
A M / F M , or CD button. To change

back to the cassette player, push the

CD button.

Tape Search Functions

With a cassette playing, you can use
the FF, REW, SKIP, or REPEAT
function to find a desired program.

FF/REW — Fast Forward and
Rewind move the tape rapidly. Press
and release the side of the

TUNE bar to fast forward the tape,

or the side to rewind. You will
see FF or REW flashing in the
display. To stop fast forward or
rewind, press either side of the

TUNE bar or the PLAY button. If the

system reaches the end of the tape

while in fast forward or rewind, it

automatically stops that function,
reverses direction, and begins to play.

Comfort and Convenience Features

Main Menu

Table of Contents

Audio System

SKIP — The skip function allows
you to find the beginning of a song

or passage. To activate SKIP, press

the SEEK/SKIP bar. Press the

side to advance to the

beginning of the next song or
passage, or the side to return to
the beginning of the current song or
passage. FF or REW will flash in the
display as the tape moves. When the
system reaches the beginning of the
next song or passage (FF), or the

beginning of the current one (REW),
it goes back to PLAY mode.

REPEAT — The Repeat function
continuously replays the current

song or passage. Press the REPEAT
button to activate it; you will see RPT
displayed as a reminder. When the
system reaches the end of the song
or passage currently playing, it will
automatically go into rewind. When

it senses the beginning of the same
song or passage, the system returns
to PLAY mode. It will continue to
repeat this same program until you
deactivate REPEAT by pressing the
button again.

The SKIP and REPEAT functions

use silent periods on the tape to find
the end of a song or passage. These
features may not work to your

satisfaction if there is almost no gap

between selections, a high noise
level between selections, or a silent
period in the middle of selection.

Comfort  and  Convenience  Features

Main Menu

Table of Contents

Audio System

Caring for the Cassette Player

The cassette player picks up dirt and

oxides from the tape. This contami-
nation builds up over time and
causes the sound quality to degrade.

To prevent this, you should clean the

player after every 30 hours of use.

Your dealer has a cleaning kit

available.

If you do not clean the cassette
player regularly, it may eventually
become impossible to remove the
contamination with a normal
cleaning kit.

Use 100-minute or shorter cassettes.
Cassettes longer than that use
thinner tape that may break or jam
the drive.

Look at the cassette before you
insert it. If the tape is loose, tighten
it by turning a hub with a pencil or

your finger.

If the label is peeling off, remove it
from the cassette or it could cause
the cassette to jam in the player.
Never try to insert a warped or
damaged cassette in the player.

When they are not in use, store

cassettes in their cases to protect
them from dust and moisture. Never
place cassettes where they will be
exposed to direct sunlight, high heat,
or high humidity. If a cassette is
exposed to extreme heat or cold, let
it reach a moderate temperature
before inserting it in the player.

Never try to insert foreign objects
into the cassette player.

If you see the error indication

on the display, press

the EJECT button and remove the
cassette from the unit. Make sure
the tape is not damaged. If the

cassette will not eject or the error
indication stays on after the cassette
ejects, take the car to your Honda
dealer.

Comfort and Convenience Features

Main Menu

Table of Contents

Audio System

Theft  Protection
Your car's audio system will disable

itself if it is disconnected from
electrical power for any reason. To
make it work again, the user must
enter a specific five-digit code in the
Preset buttons. Because there are

hundreds of number combinations
possible from five digits, making the
system work without knowing the
exact code is nearly impossible.

You should have received a card that
lists your audio system's code

number and serial number. It is best
to store this card in a safe place at
home. In addition, you should write
the audio system's serial number in
this Owner's Manual. If you should

happen to lose the card, you must
obtain the code number from your
Honda dealer. To do this, you will
need the system's serial number.

If your car's battery is disconnected
or goes dead, the audio system will
disable itself. If this happens, you

will see in the frequency

display the next time you turn on the
system. Use the Preset buttons to
enter the five-digit code. If it is
entered correctly, the radio will start

playing.

If you make a mistake entering the
code, do not start over or try to
correct your mistake. Complete the

five-digit sequence, then enter the
correct code. You have ten tries to

enter the correct code. If you are
unsuccessful in ten attempts, you
must then leave the system on for
one hour before trying again.

You will have to store your favorite

stations in the Preset buttons after
the system begins working. Your
original settings were lost when
power was disconnected.

Comfort  and  Convenience  Features

Main Menu

Table of Contents

124

Main Menu

Before Driving

Before you begin driving your Honda,

you should know what gasoline to
use, and how to check the levels of
important fluids. You also need to
know how to properly store luggage

or packages. The information in this
section will help you. If you plan to
add any accessories to your car,

please read the information in this

section first.

Break-in Period..............................

 126

Gasoline..........................................

 126

Service Station Procedures ..........

 127

Filling the Fuel Tank.................

 127

Opening the Hood.....................

 128

Oil Check................................

 130

Engine Coolant Check..........

 131

Fuel Economy................................

 132

Vehicle Condition......................

 132

Driving Habits............................

 132

Accessories and Modifications....

 133

Accessories.................................

 133

Modifications.............................

 134

Additional Safety Precaution....

 134

Carrying Cargo..............................

 135

Load Limit..................................

 136

Carrying Items in the Passenger

Compartment.........................

 136

Carrying Cargo in the Trunk or

on a Roof Rack.......................

 137

Before Driving

Main Menu


Content   ..  6  7  8  9   ..