Honda Insight (2019 year). Manual - part 15
 

  Index      Honda     Honda Insight - service manual 2019 year in english


Search            copyright infringement  


Content   ..  13  14  15  16   ..


Honda Insight (2019 year). Manual - part 15


Continued

223

uu

Interior Lights/Interior Convenience Items

u

Interior Convenience Items

Co
ntrols

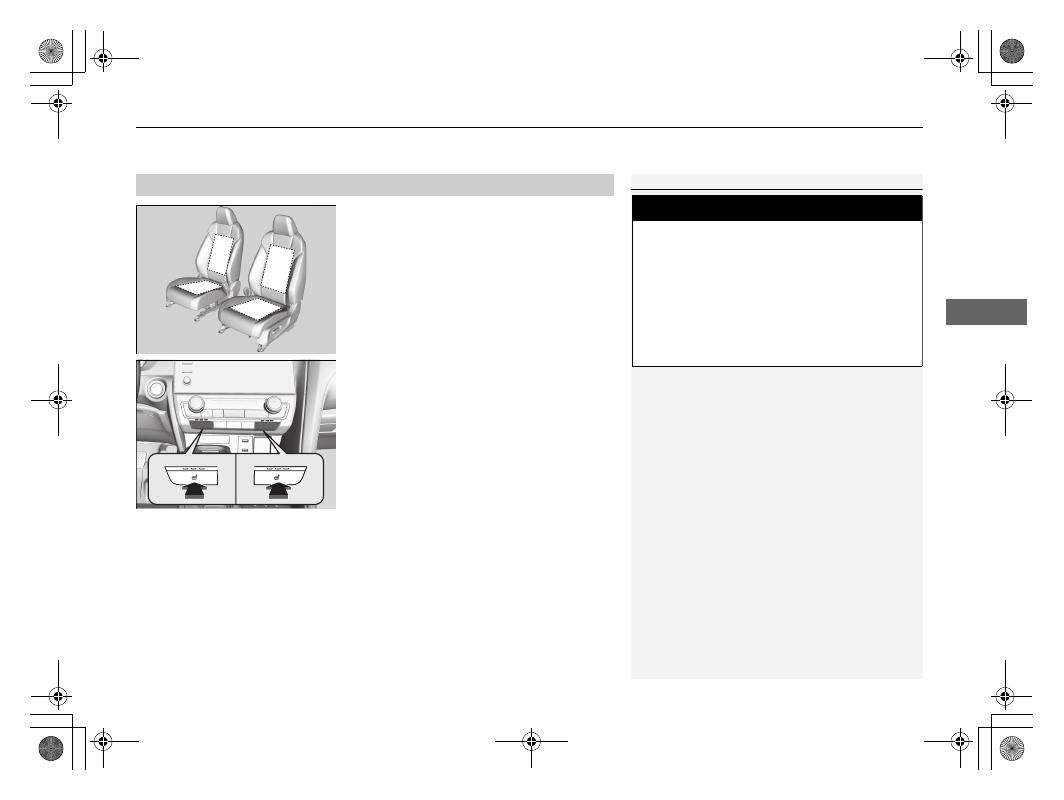
The power mode must be in ON to use the 
seat heaters.

Press the seat heater button:
Once - The HI setting (three indicators on)
Twice - The MID setting (two indicators on)
Three times - The LO setting (one indicator on)
Four times - The OFF setting (no indicators on)

When the power mode is turned on after it is 
turned off, the previous setting of front seat 
heaters is maintained.

Front Seat Heaters

*

1

Front Seat Heaters

*

Do not use the seat heaters even in LO when the 
power system is off. Under such conditions, the 12-
volt battery may be weakened, making the power 
system difficult to start.

After a certain period of time, the strength setting for 
the front seat heaters will automatically be reduced 
by one level at a time until the front seat heaters 
shuts off. The elapsed time varies according to the 
interior environment.

3

WARNING

Heat induced burns are possible when 
using seat heaters. 

Persons with a diminished ability to sense 
temperature (e.g., persons with diabetes, 
lower-limb nerve damage, or paralysis) or 
with sensitive skin should not use seat 
heaters.

* Not available on all models

uu

Interior Lights/Interior Convenience Items

u

Interior Convenience Items

224

Co
ntrols

The power mode must be in ON to use the 
seat heaters.

There is no heater in the rear center seating 
position.

While in HI, the heater cycles on and off.

u

The appropriate indicator will be on 
while the seat heater is on. Briefly press 
the switch on the opposite side to turn 
the heater off. The indicator will be off.

Rear Seat Heaters

*

1

Rear Seat Heaters

*

Do not use the seat heaters even in LO when the 
power system is off. Under such conditions, the 12-
volt battery may be weakened, making the power 
system difficult to start.

In the LO setting, the heater runs continuously and 
does not automatically turn off.

3

WARNING

Heat induced burns are possible when 
using seat heaters. 

Persons with a diminished ability to sense 
temperature (e.g., persons with diabetes, 
lower-limb nerve damage, or paralysis) or 
with sensitive skin should not use seat 
heaters.

* Not available on all models

225

Continued

Co
ntrols

Climate Control System

Using Automatic Climate Control

The automatic climate control system maintains the interior temperature you select. 
The system also selects the proper mix of heated or cooled air that raises or lowers 
the interior temperature to your preference as quickly as possible.

Use the system when the power system is on.
1. Press the AUTO button.
2. Adjust the interior temperature using the temperature control dial.
3. Press the 

 (ON/OFF) button to cancel.

1

Using Automatic Climate Control

If any buttons are pressed while using the climate 
control system in auto, the function of the button 
that was pressed will take priority.
The AUTO indicator will go off, but functions 
unrelated to the button that was pressed will be 
controlled automatically.

To prevent cold air from blowing in from outside, the 
fan may not start immediately when the AUTO 
button is pressed.

If the interior is very warm, you can cool it down 
more rapidly by partially opening the windows, 
turning the system on auto, and setting the 
temperature to low. Change the fresh air mode to 
recirculation mode until the temperature cools down.

When you set the temperature to the lower or upper 
limit, Lo or Hi is displayed.

Pressing the 

 button switches the climate 

control system between on and off. When turned on, 
the system returns to your last selection.

While ECON mode is active, the climate control 
system may have reduced cooling performance.

Floor and 
defroster 
vents

Floor vents

Dashboard 
and floor 
vents

Dashboard 
vents

AUTO Button

 (Recirculation) 

Button

Fan Control 
Dial

A/C (Air Conditioning) 
Button

 (ON/OFF) 

Button

Temperature 
Control Dial

Models without SYNC button

226

uu

Climate Control System

u

Using Automatic Climate Control

Co
ntrols

Use the system when the power system is on.
1. Press the AUTO button.
2. Adjust the interior temperature using the driver’s side or passenger’s side 

temperature control dial.

3. Press the 

 (ON/OFF) button to cancel.

Models with SYNC button

Floor and 
defroster 
vents

Floor vents

Dashboard 
and floor 
vents

Dashboard 
vents

 (ON/OFF) Button

Driver’s Side 
Temperature 
Control Dial

AUTO Button

A/C (Air Conditioning) 
Button

Passenger’s Side 
Temperature 
Control Dial

SYNC 
(Synchronization) 
Button

Fan Control Button

 (Recirculation) Button

227

uu

Climate Control System

u

Using Automatic Climate Control

Continued

Co
ntrols

Switching between the recirculation and fresh air modes

Press the 

 (recirculation) button and switch the mode depending on 

environmental conditions.
Recirculation mode (indicator on): Recirculates air from the vehicle’s interior through 
the system.
Fresh air mode (indicator off): Maintains outside ventilation. Keep the system in 
fresh air mode in normal situations.

uu

Climate Control System

u

Using Automatic Climate Control

228

Co
ntrols

Pressing the 

 button turns the air 

conditioning system on and automatically 
switches the system to fresh air mode.

Press the 

 button again to turn off, the 

system returns to the previous settings.

Defrosting the Windshield and Windows

1

Defrosting the Windshield and Windows

For your safety, make sure you have a clear view 
through all the windows before driving.

Do not set the temperature near the upper or lower 
limit.
When cold air hits the windshield, the outside of the 
windshield may fog up.

If the side windows fog up, adjust the vents so that 
the air hits the side windows.

Models without SYNC button

Models with SYNC button

Continued

229

uu

Climate Control System

u

Using Automatic Climate Control

Co
ntrols

To rapidly defrost the windows

1. Press the 

 button.

2. Press the 

 button.

1

To rapidly defrost the windows

After defrosting the windows, switch over to fresh air 
mode. If you keep the system in recirculation mode, 
the windows may fog up from humidity. This 
impedes visibility.

Models without SYNC button

Models with SYNC button

uu

Climate Control System

u

Using Automatic Climate Control

230

Co
ntrols

You can set the temperature synchronously for the driver’s side and the passenger’s 
side in synchronization mode.

1. Press the SYNC button.

u

The system will switch to the synchronization mode.

2. Adjust the temperature using the driver’s side temperature control dial.

Press the SYNC button or adjust the interior temperature using the passenger’s side 
temperature control dial to return to dual mode.

Synchronization Mode

*

1

Synchronization Mode

*

When you press the 

 button, the system changes 

to synchronization mode.

When the system is in dual mode, the driver’s side 
temperature and the passenger’s side temperature 
can be set separately.

Driver’s Side 
Temperature 
Control Dial

Passenger’s Side Temperature Control Dial

SYNC Button

* Not available on all models

231

uu

Climate Control System

u

Automatic Climate Control Sensors

Co
ntrols

Automatic Climate Control Sensors

The automatic climate control system is 
equipped with sensors. Do not cover or spill 
any liquid on them.

Sensor

Sensor

232

233

Features

This chapter describes how to operate technology features.

Audio System

About Your Audio System................ 234
USB Port(s) ....................................... 235
Audio System Theft Protection ......... 236
Audio Remote Controls.................... 237

Audio System Basic Operation ........ 241

Audio/Information Screen ................ 242
Adjusting the Sound ........................ 246
Display Setup ................................... 247
Playing AM/FM Radio ....................... 248
Playing an iPod ................................ 250
Playing Pandora®.............................. 253
Playing a USB Flash Drive ................. 255

Models with color audio

Playing Bluetooth® Audio................. 258
Siri® Eyes Free .................................. 261

Audio System Basic Operation ........ 262

Audio/Information Screen ................ 263
System Updates ............................... 278
Adjusting the Sound ........................ 284
Display Setup ................................... 285
Voice Control Operation .................. 287
Playing AM/FM Radio....................... 290
Playing SiriusXM® Radio

*

................. 294

Playing an iPod ................................ 305
Playing a USB Flash Drive ................. 308
Playing Bluetooth® Audio................. 311

Models with Display Audio

HondaLink® ..................................... 313
HondaLink® Service

*

........................ 317

Wi-Fi Connection............................. 322
Siri® Eyes Free .................................. 324
Apple CarPlay

TM

............................... 325

Android Auto

TM

............................... 328

Audio Error Messages ...................... 332
General Information on the Audio 

System ............................................. 337

Customized Features................ 359366
HomeLink® Universal Transceiver

*

..... 386

Bluetooth® HandsFreeLink®..... 389414
Refuel Recommend .............................. 439

* Not available on all models

234

Features

Audio System

About Your Audio System

The audio system features AM/FM radio and SiriusXM® Radio

*

 service. It can also 

play USB flash drives, and iPod, iPhone and Bluetooth® devices.

You can operate the audio system from the buttons and knobs on the panel, the 
remote controls on the steering wheel, or the icons on the touchscreen interface

*

.

1

About Your Audio System

iPod, iPhone and iTunes are trademarks of Apple Inc.

State or local laws may prohibit the operation of 
handheld electronic devices while operating a 
vehicle.

SiriusXM® Radio

*

 is available on a subscription basis 

only. For more information on SiriusXM® Radio

*

contact a dealer.

General Information on the Audio System 

P. 337

SiriusXM® Radio

*

 is available in the United States and 

Canada, except Hawaii, Alaska, and Puerto Rico.

SiriusXM®

*

 is a registered trademark of SiriusXM 

Radio

*

, Inc.

Remote Controls

iPod

USB Flash Drive

*1

*2

*1 : Models with Display Audio
*2 : Models with color audio

* Not available on all models

235

uu

Audio System

u

USB Port(s)

Features

USB Port(s)

Install the device USB connector or the USB flash drive to the USB port.

The USB port (1.0A) is for playing audio files 
on a USB flash drive, connecting a cellular 
phone and charging devices.

The USB ports (2.5A) are for charging devices, 
playing audio files and connecting compatible 
phones with Apple CarPlay or Android Auto.

1

USB Port(s)

Do not leave the iPod or USB flash drive in the 
vehicle. Direct sunlight and high temperatures may 
damage it.

We recommend using an extension cable with the 
USB port.

Do not connect the iPod or USB flash drive using a 
hub.

Do not use a device such as a card reader or hard 
disk drive, as the device or your files may be 
damaged.

We recommend backing up your data before using 
the device in your vehicle.

Displayed messages may vary depending on the 
device model and software version.

If the audio system does not recognize the iPod, try 
reconnecting it a few times or reboot the device. To 
reboot, follow the manufacturer’s instructions 
provided with the iPod or visit www.apple.com/ipod.

The USB port can supply up to 1.0A/2.5A of power. It 
does not output 1.0A/2.5A unless the device 
requests.
For amperage details, read the operating manual of 
the device that needs to be charged.
Set the power mode to ACCESSORY or ON first.

Under certain conditions, a device connected to the 
port may generate noise in the radio you are listening 
to.

USB charge

Models with 
color audio

Models with 
Display Audio

Models with color audio

Models with Display Audio

236

uu

Audio System

u

Audio System Theft Protection

Features

Audio System Theft Protection

The audio system is disabled when it is disconnected from the power source, such as 
when the 12-volt battery is disconnected or goes dead. In certain conditions, the 
system may display a code entry screen. If this occurs, reactivate the audio system.

Reactivating the audio system

1. Set the power mode to ON.
2. Turn on the audio system.
3. Press and hold the audio system power knob for more than two seconds.

u

The audio system is reactivated when the audio control unit establishes a 
connection with the vehicle control unit. If the control unit fails to recognize 
the audio unit, you must go to a dealer and have the audio unit checked.

237

uu

Audio System

u

Audio Remote Controls

Continued

Features

Audio Remote Controls

Allow you to operate the audio system while driving.

SOURCE Button
Cycles through the audio modes as follows:
FM1FM2AMUSB/iPodPandora®
Bluetooth® Audio

VOL

(

+/VOL

(

- (Volume) Buttons

Press VOL

(

+To increase the volume.

Press VOL

(

-To decrease the volume.

/

 (Seek/Skip) Buttons

• When listening to the radio

Press : 

To select the next preset radio station.

Press : 

To select the previous preset radio station.

Press and hold 

To select the next strong station.

Press and hold 

To select the previous strong station.

• When listening to an iPod, USB flash drive, or Bluetooth® Audio

Press : 

To skip to the next song.

Press : 

To go back to the beginning of the current or previous song.

• When listening to a USB flash drive, or Bluetooth® Audio

Press and hold 

To skip to the next folder/group.

Press and hold 

To go back to the previous folder/group.

• When listening to Pandora®

Press : 

To skip to the next track.

Press and hold 

To select the next station.

Press and hold 

To select the previous station.

1

Audio Remote Controls

Some modes appear only when an appropriate 
device or medium is used.

Depending on the Bluetooth® device you connect, 
some functions may not be operated.

Press the 

 (Hang-up/back) button to go back to 

the previous command or cancel a command.

Models with color audio

Models with color audio

/


(Seek/Skip) 
Buttons

SOURCE 
Button

VOL

(

+/VOL

(

- (Volume) Buttons

 (Hang-up/back) Button

uu

Audio System

u

Audio Remote Controls

238

Features

Allow you to operate the audio system while driving. The information is shown on 
the driver information interface.

VOL

(

+/VOL

(

- (Volume) Buttons

Press VOL

(

+To increase the volume.

Press VOL

(

-To decrease the volume.

Left Selector Wheel
• When selecting the audio mode

Press the 

 (home) button, then roll up or down to select Audio on the driver 

information interface, and then press the left selector wheel.

1

Audio Remote Controls

Press the 

 (back) button for the driver 

information interface to go back to the previous 
screen or cancel a command.

Press the 

 (home) button to go back to the home 

screen of the driver information interface.

Models with Display Audio

Models with Display Audio

/


(Seek/Skip) 
Buttons

VOL

(

+/VOL

(

- (Volume) Buttons

Left Selector Wheel

 (home) Button

 (back) 

button


Content   ..  13  14  15  16   ..