Honda CR-V (2018 year). Manual - part 30
 

  Index      Honda     Honda CR-V - service manual 2018 year in english


Search            copyright infringement  


Content   ..  28  29  30  31   ..


Honda CR-V (2018 year). Manual - part 30


uu

When Driving

u

Starting the Engine

464

Driving

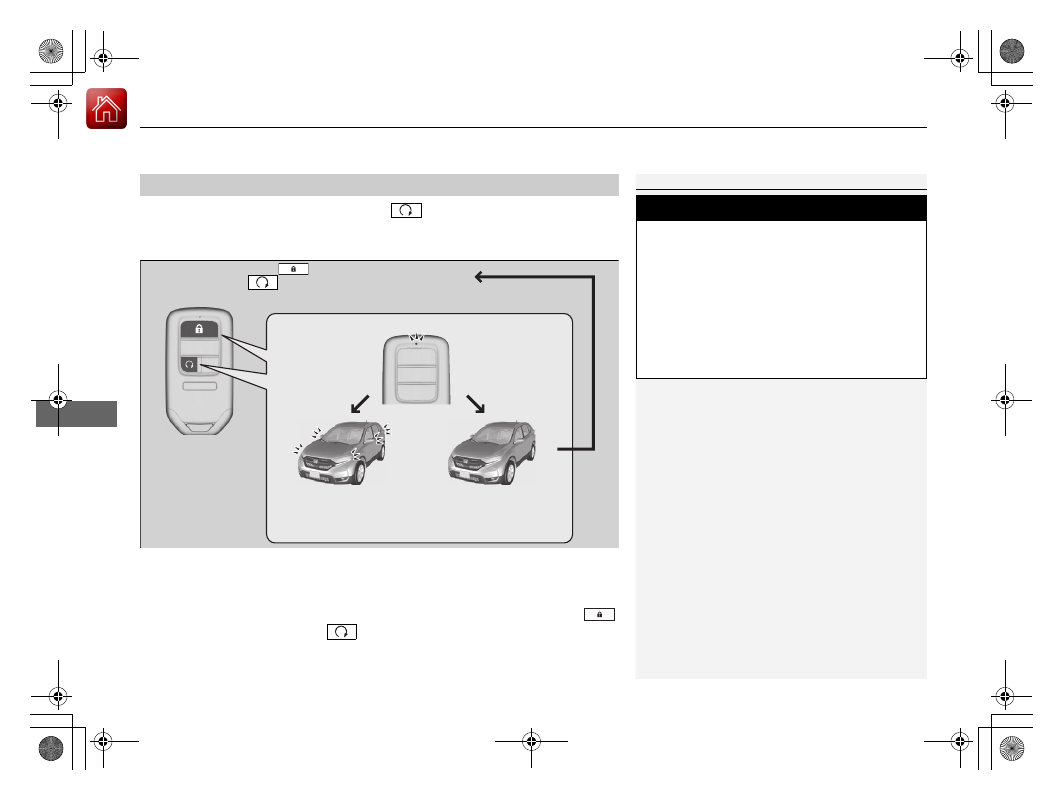
You can remotely start the engine using the 

 button on the smart entry remote.

To start the engine

When started remotely, the engine automatically shuts off after 10 minutes of idling 
and/or the brake pedal and ENGINE START/STOP button have not been pressed 
simultaneously.
To extend the run time for another 10 minutes during the first run, press the 


button, then press and hold the 

 button.

u

Some exterior lights flash six times if a 10-minute extension request was 
transmitted successfully.

Remote Engine Start with Vehicle Feedback

*

1

Remote Engine Start with Vehicle Feedback

*

The remote engine start may violate local laws.
Before using the remote engine start, check your 
local laws.

If there are buildings and obstacles between your 
vehicle and the remote, the range will be reduced.
The range may be less when the vehicle is running.
This distance may vary by external electrical 
interference.
The engine may not start by the remote engine start 
if:

You have disabled a remote engine start setting 
using the audio/information screen

*

.

The power mode is not in VEHICLE OFF (LOCK).

The gear is in a position other than 

(

P.

The hood is open, or any door or the tailgate is 
unlocked.

3

WARNING

Engine exhaust contains toxic carbon 
monoxide.

Breathing carbon monoxide can kill you or 
cause unconsciousness.

Never use the remote engine starter when 
the vehicle is parked in a garage or other 
area with limited ventilation.

Press the 

 button, then press and hold 

the  

button.

Some exterior lights flash once.

Go within the range, 
and try again.

LED: Blinks when any button is pressed.

Some exterior lights flash six 
times if the engine runs 
successfully.

Some exterior lights will not 
flash if the engine runs 
unsuccessfully.

* Not available on all models

Continued

465

uu

When Driving

u

Starting the Engine

Driving

To stop the engine

1

Remote Engine Start with Vehicle Feedback

*

You have already used the remote twice to start 
the engine.

Another registered smart entry remote is in the 
vehicle.

There is an antenna failure.

Door is unlocked with the built-in key.

The engine oil pressure is low.

The engine coolant temperature is extremely high.

The security system alarm is not set.

While the engine is running, the vehicle will 
automatically precondition inside the vehicle.
When it is warm outside:

The air conditioning is activated in recirculation 
mode.

When it is cold outside:

The defroster is activated at a moderately warm 
temperature.

The rear defogger and door mirror heaters are 
activated.

The seat and heated steering wheel are activated

*

Heated Steering Wheel

*1

 P. 222

Front Seat Heaters

*

 P. 223

Press and hold the 

 button for one 

second.

Go within the range, 
and try again.

The exterior lights flash once if the engine stops successfully.

The exterior lights will not flash when the remote is out of 
the smart entry system range.
The engine will not stop.

* Not available on all models

uu

When Driving

u

Starting the Engine

466

Driving

1. Depress the brake pedal and press the ENGINE START/STOP button 

simultaneously.

2. Put the shift lever in 

(

D. Select 

(

R when reversing.

3. With the parking brake is applied, release the brake pedal and gently depress the 

accelerator pedal.

u

Make sure the parking brake indicator goes off.

4. Gradually release the brake pedal and gently depress the accelerator pedal to pull 

away.

Hill start assist system

Hill start assist keeps the brake engaged briefly to help prevent the vehicle from 
rolling on inclines as you move your foot from the brake pedal to the accelerator.
Move the shift lever to 

(

D, 

(

S, or 

(

L when facing uphill, or 

(

R when facing 

downhill, then release the brake pedal.

Starting to Drive

1

Starting to Drive

The engine stops when the shift lever is moved out of 

(

P before the ENGINE START/STOP button is 

pressed. Follow step 1 when starting to drive.

You can also release the parking brake by pressing 
the electric parking brake switch while depressing the 
brake pedal. When facing downhill, you can start 
your vehicle more smoothly by manually releasing it 
with the electric parking brake switch than by 
releasing it with the accelerator pedal.

When the engine was started using the 

 button

*


on the smart entry remote

When the engine was started using the 

 button

*

 on the smart entry remote

When the engine was started in any case

1

Hill start assist system

Hill start assist may not prevent the vehicle from 
rolling downhill on a very steep or slippery slope, and 
does not operate on small inclines.

Hill start assist is not a replacement for the parking 
brake.

Hill start assist will operate even when VSA® is 
switched off.

* Not available on all models

467

uu

When Driving

u

Precautions While Driving

Driving

Precautions While Driving

Utility vehicles have a significantly higher rollover rate than other types of vehicles. 
To prevent rollovers or loss of control:
• Take corners at slower speeds than you would with a passenger vehicle.
• Avoid sharp turns and abrupt maneuvers whenever possible.
• Do not modify your vehicle in any way that you would raise the center of gravity.
• Roof load capacity is 165 lbs (75 kg), available roof racks/carriers may have lower 

capacities. Please check accessory's information (Honda accessory).

Avoid driving in deep water and on flooded roads. This can damage the engine or 
driveline, or cause electrical component failure.

If there is a strong impact with something under the vehicle, stop in a safe location. 
Check the underside of the vehicle for damage or any fluid leaks.

Driving Guidelines for Your Utility Vehicle

In Rain

Other Precautions

1

Precautions While Driving

NOTICE

Do not operate the shift lever while pressing the 
accelerator pedal. You could damage the 
transmission.

NOTICE

If you repeatedly turn the steering wheel at an 
extremely low speed, or hold the steering wheel in 
the full left or right position for a while, the electric 
power steering (EPS) system heats up. The system 
goes into a protective mode, and limits its 
performance. The steering wheel becomes harder 
and harder to operate. Once the system cools down, 
the EPS system is restored.
Repeated operation under these conditions can 
eventually damage the system.

468

uu

When Driving

u

Continuously Variable Transmission

Driving

Continuously Variable Transmission

The engine runs at a higher idle speed and creeping increases.
Keep the brake pedal firmly depressed when stopped.

Quickly depressing the accelerator pedal while driving uphill may cause the 
transmission to drop to a lower gear, unexpectedly increasing vehicle speed. Depress 
the accelerator pedal carefully, especially on slippery roads and curves.

Creeping

Kickdown

1

Precautions While Driving

If the ignition switch is turned to ACCESSORY 

(

q

*1


while driving, the engine will shut down and all 
steering and brake power assist functions will stop, 
making it difficult to control the vehicle.

Do not put the shift lever in 

(

N, as you will lose 

engine braking (and acceleration) performance.

During the first 600 miles (1,000 km) of operation, 
avoid sudden acceleration or full throttle operation so 
as to not damage the engine or powertrain.

Avoid hard braking for the first 200 miles (300 km). 
You should also follow this when the brake pads are 
replaced.

*1: Models with the smart entry system have an 
ENGINE START/STOP button instead of an ignition 
switch.

1

Driving Guidelines for Your Utility Vehicle

Failure to operate your vehicle correctly might result 
in a crash or a rollover.

Important Handling Information P. 36
Precautions While Driving P. 467

469

uu

When Driving

u

Shifting

Continued

Driving

Shifting

Change the shift position in accordance with your driving needs.

Shift lever positions

1

Shifting

You cannot turn the ignition switch to LOCK 

(

0

*1


and remove the key unless the shift lever is in 

(

P.

The vehicle may move forward very slightly even in 

(

N while the engine is cold.

Depress the brake pedal firmly and, when necessary, 
apply the parking brake.

*1: Models with the smart entry system have an 
ENGINE START/STOP button instead of an ignition 
switch.

Drive
Used for normal driving

Park
Used when parking or starting the engine

Reverse
Used when reversing

Neutral
Transmission is not locked

Drive (S)
Used:

For better acceleration

To increase engine braking

When going up or down hills

Release Button

Low

Used to further increase engine braking

Used when going up or down hills

uu

When Driving

u

Shifting

470

Driving

Shift Lever Operation

1

Shift Lever Operation

NOTICE

When you change the shift lever from 

(

D to 

(

R and 

vice versa, come to a complete stop and keep the 
brake pedal depressed.
Operating the shift lever before the vehicle has come 
to a complete standstill can damage the transmission.

Use the shift lever position indicator to check the 
lever position before pulling away.

If the transmission indicator 

(

D blinks when driving, 

in any shift position, there is a problem with the 
transmission.
Avoid sudden acceleration and have the transmission 
checked by a dealer as soon as possible.

The fuel supply may be cut off if you drive at engine 
speeds in or over the tachometer's red zone (engine 
speed limit). If this happens, you may experience a 
slight jolt.

It may not be possible to operate the shift lever if the 
brake pedal is applied while the shift lever release 
button is held down.
Depress the brake pedal first.

Tachometer's red zone

Shift Lever Position Indicator

Depress the brake pedal and press the 
shift lever release button to shift.

Shift without pressing the shift lever 
release button.

Press the shift lever release button 
and shift.

471

uu

When Driving

u

ECON Button

Driving

ECON Button

The ECON button turns the ECON mode on and off.
The ECON mode helps you improve your fuel economy by adjusting the 
performance of the engine, transmission, climate control system, and cruise control.

1

ECON Button

While in ECON mode, the climate control system has 
greater temperature fluctuations.

Models with information display

Models with driver information interface

472

uu

When Driving

u

Cruise Control

*

Driving

Cruise Control

*

Maintains a constant vehicle speed without having to keep your foot on the 
accelerator. Use cruise control on freeways or open roads where you can travel at a 
constant speed with little acceleration or deceleration.

1

Cruise Control

*

It may not be possible to maintain a constant speed 
when driving uphill or downhill.

When not using cruise control:
Turn off cruise control by pressing the CRUISE 
button.

While in the ECON mode, it may take relatively more 
time to accelerate to maintain the set speed.

3

WARNING

Improper use of the cruise control can lead 
to a crash.

Use the cruise control only when traveling 
on open highways in good weather.

Models with information display

Shift positions for cruise control:
In 

(

D or 

(

S

When to use

Always keep sufficient distance 
between you and the vehicle in 
front of you.

Vehicle speed for cruise control:
Desired speed in a range above 
roughly 25 mph (40 km/h) ~

How to use

CRUISE MAIN is on in the 
instrument panel.
Cruise control is ready to use.

Press the CRUISE button on 
the steering wheel.

* Not available on all models

473

uu

When Driving

u

Cruise Control

*

Continued

Driving

Take your foot off the pedal and press the −/SET button when you reach the desired 
speed. 

The moment you release the −/SET button, the set speed is fixed, and cruise control 
begins. The CRUISE CONTROL indicator comes on.

When you use cruise control, Straight Driving Assist (a feature of the Electric Power 
Steering system) is activated.
By enabling the steering system to automatically compensate for natural steering 
pull, Straight Driving Assist makes it easier for you to keep your vehicle in a straight 
line.

To Set the Vehicle Speed

−/SET 

Button

On when cruise control begins

Press and release

uu

When Driving

u

Cruise Control

*

474

Driving

Increase or decrease the vehicle speed using the RES/+ or −/SET buttons on the 
steering wheel.

• Each time you press the button, the vehicle speed is increased or decreased by 

about 1 mph (1.6 km/h).

• If you keep the button pressed, the vehicle speed increases or decreases until you 

release it. This speed is then set.

To cancel cruise control, do any of the 
following:
• Press the CANCEL button.
• Press the CRUISE button.
• Depress the brake pedal.
The CRUISE CONTROL indicator goes off.

To Adjust the Vehicle Speed

1

To Adjust the Vehicle Speed

You can set the vehicle speed using the −/SET button 
on the steering wheel when adjusting the speed with 
the accelerator and brake pedals.

To Cancel

To decrease speed

To increase speed

1

To Cancel

Resuming the prior set speed:
After cruise control has been canceled, you can still 
resume the prior set speed by pressing the RES/+ 
button while driving at a speed of at least 25 mph (40 
km/h) or more.

You cannot set or resume in the following situations:

When vehicle speed is less than 25 mph (40 km/h)

When the CRUISE button is turned off

At vehicle speeds of 22 mph (35 km/h) or less, cruise 
control is canceled automatically.

CANCEL 
Button

CRUISE 
Button

475

uu

When Driving

u

Cruise Control

*

Continued

Driving

Cruise Control

*

Maintains a constant vehicle speed without having to keep your foot on the 
accelerator. Use cruise control on freeways or open roads where you can travel at a 
constant speed with little acceleration or deceleration.

1

Cruise Control

*

It may not be possible to maintain a constant speed 
when driving uphill or downhill.

When not using cruise control:
Turn off cruise control by pressing the CRUISE 
button.

While in the ECON mode, it may take relatively more 
time to accelerate to maintain the set speed.

3

WARNING

Improper use of the cruise control can lead 
to a crash.

Use the cruise control only when traveling 
on open highways in good weather.

Models with driver information interface

Shift positions for cruise control:
In 

(

D or 

(

S

When to use

Always keep sufficient distance 
between you and the vehicle in 
front of you.

Vehicle speed for cruise control:
Desired speed in a range from 
about 25 mph (40 km/h) to 125 
mph (200 km/h)

How to use

CRUISE MAIN is on in the 
instrument panel.
Cruise control is ready to use.

Press the CRUISE button on 
the steering wheel.

* Not available on all models

476

uu

When Driving

u

Cruise Control

*

Driving

Take your foot off the pedal and press the −/SET button when you reach the desired 
speed. 

The moment you release the −/SET button, the set speed is fixed, and cruise control 
begins. The set speed is displayed. The CRUISE CONTROL indicator and set speed 
comes on.

When you use cruise control, Straight Driving Assist (a feature of the Electric Power 
Steering system) is activated.
By enabling the steering system to automatically compensate for natural steering 
pull, Straight Driving Assist makes it easier for you to keep your vehicle in a straight 
line.

To Set the Vehicle Speed

−/SET 

Button

On when cruise control begins

Press and release

Continued

477

uu

When Driving

u

Cruise Control

*

Driving

Increase or decrease the vehicle speed using the RES/+ or −/SET buttons on the 
steering wheel.

• Each time you press the button, the vehicle speed is increased or decreased by 

about 1 mph or 1 km/h accordingly.

• If you keep the button pressed, the speed limit increases or decreases in 

increments of 5 mph or 5 km/h every 0.5 second until system limit is reached.

• The vehicle may accelerate or decelerate until the set speed is reached.

To Adjust the Vehicle Speed

1

To Adjust the Vehicle Speed

You can set the vehicle speed using the −/SET button 
on the steering wheel when adjusting the speed with 
the accelerator and brake pedals.

To decrease speed

To increase speed

uu

When Driving

u

Cruise Control

*

478

Driving

To cancel cruise control, do any of the 
following:
• Press the CANCEL button.
• Press the CRUISE button.
• Depress the brake pedal.
The CRUISE CONTROL indicator goes off.

To Cancel

1

To Cancel

Resuming the prior set speed:
After cruise control has been canceled, you can still 
resume the prior set speed by pressing the RES/+ 
button while driving at a speed of at least 25 mph (40 
km/h) or more.

You cannot set or resume in the following situations:

When vehicle speed is less than 25 mph (40 km/h)

When the CRUISE button is turned off

At vehicle speeds of 22 mph (35 km/h) or less, cruise 
control is canceled automatically.

CANCEL 
Button

CRUISE 
Button

479

uu

When Driving

u

Front Sensor Camera

*

Continued

Driving

Front Sensor Camera

*

The camera, used in systems; such as RDM, LKAS, ACC with LSF and CMBS

TM

, is 

designed to detect an object that triggers any of the systems to operate their 
functions.

This camera is located behind the rearview 
mirror.

To help reduce the likelihood that high interior 
temperatures will cause the camera’s sensing 
system to shut off, when parking, find a shady 
area or face the front of the vehicle away from 
the sun. If you use a reflective sun shade, do 
not allow it to cover the camera housing. 
Covering the camera can concentrate heat on 
it.

Camera Location and Handling Tips

1

Front Sensor Camera

*

Never apply a film or attach any objects to the 
windshield, the hood, or the front grill that could 
obstruct the camera’s field of vision and cause the 
system to operate abnormally.
Scratches, nicks, and other damage to the windshield 
within the camera’s field of vision can cause the 
system to operate abnormally. If this occurs, we 
recommend that you replace the windshield with a 
genuine Honda replacement windshield. Making 
even minor repairs within the camera’s field of vision 
or installing an aftermarket replacement windshield 
may also cause the system to operate abnormally.
After replacing the windshield, have a dealer 
recalibrate the camera. Proper calibration of the 
camera is necessary for the system to operate 
properly.

Front Sensor 
Camera

* Not available on all models


Content   ..  28  29  30  31   ..