Honda Crosstour (2015 year). Manual - part 26
 

  Index      Honda     Honda Crosstour - service manual 2015 year in english


Search            copyright infringement  


Content   ..  24  25  26  27   ..


Honda Crosstour (2015 year). Manual - part 26


uu

Bluetooth® HandsFreeLink®

u

HFL Menus

400

Features

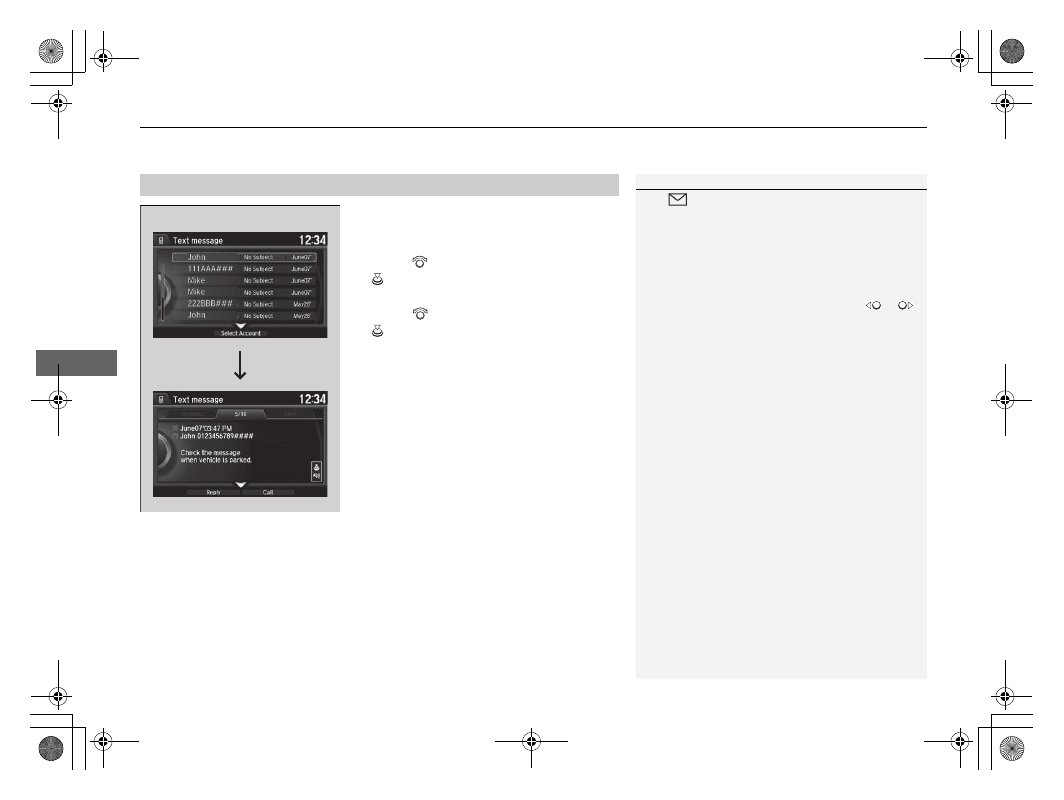
Displaying text messages

1. Press the PHONE button.
2. Press the MENU button.
3. Rotate 

 to select Text/Email, then press 

.

u

Select account if necessary.

4. Rotate 

 to select a message, then press 

.

u

The text message is displayed. The 
system automatically starts reading the 
message aloud.

Displaying Messages

1

Displaying Messages

The 

 icon appears next to an unread message.

If you delete a message on the phone, the message is 
also deleted in the system. If you send a message 
from the system, the message goes to your phone’s 
outbox.

To see the previous or next message, move 

 or 


on the text message screen.

Message List

Text Message

Continued

401

uu

Bluetooth® HandsFreeLink®

u

HFL Menus

Features

Displaying e-mails

1. Press the PHONE button.
2. Press the MENU button.
3. Rotate 

 to select Text/Email, then press 

.

4. Rotate 

 to select a folder, then press 

.

5. Rotate 

 to select a message, then press 

.

u

The e-mail message is displayed. The 
system automatically starts reading the 
message aloud.

1

Displaying e-mails

Received text messages and e-mail messages may 
appear in the message list screen at the same time. In 
this case, text messages are titled No subject.

Folder List

Message List

E-mail

uu

Bluetooth® HandsFreeLink®

u

HFL Menus

402

Features

Read or stop reading a message

1. Go to the text message or e-mail message 

screen.

u

The system automatically starts reading 
the message aloud.

Displaying Messages P. 400

2. Press 

 to stop reading.

Press 

 again to start reading the message 

from the beginning.

Reply to a message

1. Go to the text message or e-mail message 

screen.

u

The system automatically starts reading 
the message aloud.

Displaying Messages P. 400

2. Move   and rotate 

 to select Reply

then press 

.

3. Rotate 

 to select the reply message, then 

press .

u

The pop-up menu appears on the screen.

4. Select Send to send the message.

u

Complete appears on the screen when 
the reply message was successfully sent.

1

Reply to a message

The available fixed reply messages are as follows:

Talk to you later, I’m driving.

I’m on my way.

I’m running late.

OK

Yes

No

You cannot add, edit, or delete reply messages.

403

uu

Bluetooth® HandsFreeLink®

u

HFL Menus

Features

Making a call to a sender

1. Go to the text message screen.

u

The system automatically starts reading 
the message aloud.

Displaying text messages P. 400

2. Move   and rotate 

 to select Call, then 

press .

John 0123456789####

Reply

Call

404

Features

Compass

*

When you turn the ignition switch to ON 

(

w, the compass self-calibrates, and the 

compass display appears.

Compass Calibration

If the compass indicates the wrong direction, or the CAL indicator blinks, you need 
to manually calibrate the system.

1. Turn the ignition switch to ON 

(

w.

2. Press and hold the MENU button until the 

display shows the compass setting menu 
list.

3. Rotate  

to 

select 

CALIBRATION, then 

press .

4. When the display changes to PUSH CAL 

START, press  .

5. Drive the vehicle slowly in two circles.

u

The compass starts to show a direction 
after the calibration. The CAL indicator 
goes off.

1

Compass

*

Compass operation can be affected under the 
following conditions:

Driving near power lines or stations

Crossing a bridge

Passing a large vehicle, or driving near a large 
object that can cause a magnetic disturbance

When accessories such as antennas and roof racks 
are mounted by magnets

Canadian models

Models without audio touch screen

1

Compass Calibration

Calibrate the compass in an open area.

While setting the compass:

The RETURN button returns to the previous screen.

The MENU button cancels the setting mode.

These indications are used to show how to operate 
the selector knob.
Rotate 

 to select.

Press

 to enter.

Compass Setting Menu Items

* Not available on all models

405

uu

Compass

*

u

Compass Zone Selection

Features

Compass Zone Selection

1. Turn the ignition switch to ON 

(

w.

2. Press and hold the MENU button until the 

display shows the compass setting menu 
list.

3. Rotate 

 to select ZONE, then press  . 

The display shows the current zone 
number.

4. Rotate 

 to select the zone number of 

your area (See Zone Map), then press 

.

1

Compass Zone Selection

The zone selection is done to compensate the 
variation between magnetic north and true north.

If the calibration starts while the audio system is in 
use, the display returns to normal after the calibration 
is completed.

Zone Number

2

3

4

5

6 7 8 9

10 11

12

13

14

15

Zone Map

Guam Island: Zone 8
Puerto Rico: Zone 11

406

Features

Compass

*

When you turn the ignition switch to ON 

(

w

*1

, the compass self-calibrates, and the 

compass display appears.

Compass Calibration

If the compass indicates the wrong direction, or the CAL indicator blinks, you need 
to manually calibrate the system.

1. Turn the ignition switch to ON 

(

w

*1

.

2. On the top screen of any audio source, 

press and hold 

 for 5 seconds.

u

The display switches to the Compass 
Settings
 screen.

3. Rotate 

 to select Calibration, then press 

.

4. When the display changes to Calibration 

Start, press 

.

5. Drive the vehicle slowly in two circles.

u

The compass starts to show a direction 
after the calibration. The CAL indicator 
goes off.

*1: Models with the smart entry system have an ENGINE START/STOP button instead of an 
ignition switch.

Models with audio touch screen

1

Compass

*

Compass operation can be affected under the 
following conditions:

Driving near power lines or stations

Crossing a bridge

Passing a large vehicle, or driving near a large 
object that can cause a magnetic disturbance

When accessories such as antennas and roof racks 
are mounted by magnets

1

Compass Calibration

Calibrate the compass in an open area.

While setting the compass, press the BACK button to 
cancel the setting mode and return to the previous 
screen.

* Not available on all models

407

uu

Compass

*

u

Compass Zone Selection

Features

Compass Zone Selection

1. Turn the ignition switch to ON 

(

w

*1

.

2. On the top screen of any audio source, 

press and hold 

 for 5 seconds.

u

The display switches to the Compass 
Settings
 screen.

3. Rotate 

 to select Zone Adjust, then 

press .

u

The display shows the current zone 
number.

4. Rotate 

 to select the zone number of 

your area (See Zone Map), then press 

.

*1: Models with the smart entry system have an ENGINE START/STOP button instead of an 
ignition switch.

2

3

4

5

6 7 8 9

10 11

12

13

14

15

Zone Map

Guam Island: Zone 8

Puerto Rico: Zone 11

1

Compass Zone Selection

The zone selection is done to compensate the 
variation between magnetic north and true north.

If the calibration starts while the audio system is in 
use, the display returns to normal after the calibration 
is completed.

408

409

Driving

This chapter discusses driving, refueling, and information on items such as accessories.

Before Driving

Driving Preparation .......................... 410
Maximum Load Limit........................ 413

Towing a Trailer

Towing Preparation.......................... 415
Driving Safely with a Trailer .............. 418
Towing Your Vehicle ........................ 419

When Driving

Starting the Engine .......................... 420
Precautions While Driving................. 424
Automatic Transmission ................... 425
Shifting ............................................ 426

Cruise Control ................................. 432
Forward Collision Warning (FCW)

*

.. 435

Lane Departure Warning (LDW)

*

..... 439

Vehicle Stability Assist (VSA®), aka 

Electronic Stability Control (ESC), 
System ....................................... 442

LaneWatch

TM

*

.................................. 444

Tire Pressure Monitoring System (TPMS) .. 446
Tire Pressure Monitoring System (TPMS) - 

Required Federal Explanation ......... 447

Braking

Brake System ................................... 449

Anti-lock Brake System (ABS) ........... 451
Brake Assist System ......................... 452

Parking Your Vehicle

When Stopped ................................ 453

Rearview Camera ............................. 454
Multi-View Rear Camera.................. 455
Refueling

Fuel Information .............................. 456
How to Refuel ................................. 457

Fuel Economy.................................... 459

Improving Fuel Economy.................. 459

Accessories and Modifications ........ 460

* Not available on all models

410

Driving

Before Driving

Driving Preparation

Check the following items before you start driving.

• Make sure there are no obstructions on the windows, door mirrors, exterior 

lights, or other parts of the vehicle.

u

Remove any frost, snow, or ice.

u

Remove any snow on the roof, as this can slip down and obstruct your field of 
vision while driving. If frozen solid, remove ice once it has softened.

u

When removing ice from around the wheels, be sure not to damage the wheel 
or wheel components.

• Make sure the hood is securely closed.

u

If the hood opens while driving, your front view will be blocked.

• Make sure the tires are in good condition.

u

Check air pressure, and check for damage and excessive wear.

Checking and Maintaining Tires P. 497

• Make sure there are no people or objects behind or around the vehicle.

u

There are blind spots from the inside.

Exterior Checks

1

Exterior Checks

NOTICE

When doors are frozen shut, use warm water around 
the door edges to melt any ice. Do not try to force 
them open, as this can damage the rubber trim 
around the doors. When done, wipe dry to avoid 
further freezing.

Do not pour warm water into the key cylinder.
You will be unable to insert the key if the water 
freezes in the hole.

Heat from the engine and exhaust can ignite 
flammable materials left under the hood, causing a 
fire. If you’ve parked your vehicle for an extended 
period, inspect and remove any debris that may have 
collected, such as dried grass and leaves that have 
fallen or have been carried in for use as a nest by a 
small animal. Also check under the hood for leftover 
flammable materials after you or someone else has 
performed maintenance on your vehicle.

Continued

411

uu

Before Driving

u

Driving Preparation

Driving

• Store or secure all items on board properly.

u

Carrying too much cargo, or improperly storing it, can affect your vehicle’s 
handling, stability, stopping distance, and tires, and make it unsafe.

Maximum Load Limit P. 413

• Do not pile items higher than the seat height.

u

They can block your view and may be thrown forward in the event of sudden 
braking.

• Do not place anything in the front seat footwells. Make sure to secure the floor 

mat.

u

An object or unsecured floor mat can interfere with your brake and accelerator 
pedal operation while driving.

• If you have any animals on board, do not let them move around in the vehicle.

u

They may interfere with driving and a crash could occur.

• Securely close and lock all doors and the tailgate.

Locking/Unlocking the Doors from the Inside P. 99

• Adjust your seating position properly.

u

Adjust the head restraint, too.

Adjusting the Seats P. 133
Adjusting the Head Restraints P. 136

• Adjust the mirrors and steering wheel properly for your driving.

u

Adjust them while sitting in the proper driving position.

Adjusting the Steering Wheel P. 129
Adjusting the Mirrors P. 130

Interior Checks

1

Interior Checks

The headlight aim is set by the factory, and does not 
need to be adjusted. However, if you regularly carry 
heavy items in the cargo area or tow a trailer, have 
the aiming readjusted at a dealer or by a qualified 
technician.

412

uu

Before Driving

u

Driving Preparation

Driving

• Be sure items placed on the floor behind the front seats cannot roll under the 

seats.

u

They can interfere with the driver’s ability to operate the pedals, the operation 
of the seats, or the operation of the sensors under the seats.

• Everyone in the vehicle must fasten their seat belt.

Fastening a Seat Belt P. 35

• Make sure that the indicators in the instrument panel come on when you start the 

vehicle, and go off soon after.

u

Always have a dealer check the vehicle if a problem is indicated.

Indicators P. 70

413

uu

Before Driving

u

Maximum Load Limit

Continued

Driving

Maximum Load Limit

The maximum load for your vehicle is 850 lbs (385 kg).
See Tire and Loading Information label attached to the driver’s doorjamb.

This figure includes the total weight of all occupants, cargo, and 
accessories, and the tongue load if you are towing a trailer.
Steps for Determining Correct Load Limit -

(1) Locate the statement “The combined weight of occupants and 

cargo should never exceed XXX kg or XXX lbs.” on your 
vehicle’s placard.

(2) Determine the combined weight of the driver and passengers 

that will be riding in your vehicle.

(3) Subtract the combined weight of the driver and passengers 

from XXX kg or XXX lbs.

(4) The resulting figure equals the available amount of cargo and 

luggage load capacity. For example, if the “XXX” amount 
equals 1,400 lbs. and there will be five 150 lb. passengers in 
your vehicle, the amount of available cargo and luggage load 
capacity is 650 lbs.
(1,400 - 750 (5 x 150) = 650 lbs.)

1

Maximum Load Limit

Gross Vehicle Weight Rating (GVWR):
The maximum allowable weight of the vehicle, all 
occupants, all accessories, all cargo, and the tongue 
load.

Specifications P. 546548

Gross Axle Weight Rating (GAWR):
The maximum allowable weight of the vehicle axle.

Specifications P. 546548

3

WARNING

Overloading or improper loading 
can affect handling and stability 
and cause a crash in which you 
can be hurt or killed.

Follow all load limits and other 
loading guidelines in this manual.

Label Example

414

uu

Before Driving

u

Maximum Load Limit

Driving

(5) Determine the combined weight of luggage and cargo being 

loaded on the vehicle. That weight may not safely exceed the 
available cargo and luggage load capacity calculated in step 4.

(6) If your vehicle will be towing a trailer, load from your trailer will 

be transferred to your vehicle. Consult this manual to 
determine how this reduces the available cargo and luggage 
load capacity of your vehicle.

In addition, the total weight of the vehicle, all occupants, 
accessories, cargo, and trailer tongue load must not exceed the 
Gross Vehicle Weight Rating (GVWR) or the Gross Axle Weight 
Rating (GAWR). Both are on a label on the driver’s doorjamb.

Load Limits Example

Example1

Max Load 

850 lbs 

(385 kg)

Passenger Weight 

150 lbs x 2 = 300 lbs 

(68 kg x 2 = 136 kg)

Cargo Weight 

550 lbs 

(249 kg)

Example2

Max Load 

850 lbs 

(385 kg)

Passenger Weight 

150 lbs x 5 = 750 lbs

 (68 kg x 5 = 340 kg)

Cargo Weight 

100 lbs 
(45 kg)

415

Continued

Driving

Towing a Trailer

Towing Preparation

Your vehicle can tow a trailer if you carefully observe the load limits, use the proper 
equipment, and follow the towing guidelines. Check the load limits before driving.

Total trailer weight

Maximum allowable weight of the trailer, 
cargo, and everything in or on it must not 
exceed 1,500 lbs (680 kg) for 6-cylinder 
models and 1,000 lbs (453 kg) for 4-cylinder 
models. Towing loads in excess of this can 
seriously affect vehicle handling and 
performance and can damage the engine and 
drivetrain.

Tongue load

The weight of the tongue with a fully loaded 
trailer on the hitch should be approximately 
10% of the total trailer weight.
• Excessive tongue load reduces front tire 

traction and steering control. Too little 
tongue load can make the trailer unstable 
and cause it to sway.

• To achieve a proper tongue load, start by 

loading 60% of the load toward the front 
of the trailer and 40% toward the rear. 
Readjust the load as needed.

Towing Load Limits

1

Towing Load Limits

Check if all loads are within limits at a public scale.
If a public scale is not available, add the estimated 
weight of your cargo load to the weight of your 
trailer (as quoted by the manufacturer), and the 
tongue load.

Break-in Period
Avoid towing a trailer during your vehicle’s first 600 
miles (1,000 km).

Never exceed the gross weight ratings.
Gross weight information

Vehicle Specifications P. 546, 548

3

WARNING

Exceeding any load limit or improperly 
loading your vehicle and trailer can cause a 
crash in which you can be seriously hurt or 
killed.

Check the loading of your vehicle and 
trailer carefully before starting to drive.

Total Load

Tongue Load

Tongue Load


Content   ..  24  25  26  27   ..