Harley Davidson Sportster Models 2009. Service Repair Manual - page 68
ADAPTER (Part No. HD-46282-1A) into top footrest bracket
hole in frame. Place handle of tool on top of adapter.
2.
Shift transmission into neutral. Apply a few drops of
LOCTITE THREADLOCKER 262 (red) to the left-hand
threads of transmission sprocket nut (3). Apply a thin film
of clean Harley-Davidson 20W-50 engine oil to the back
face of the sprocket nut. Turn the nut counterclockwise
to install it onto main drive gear shaft.
a.
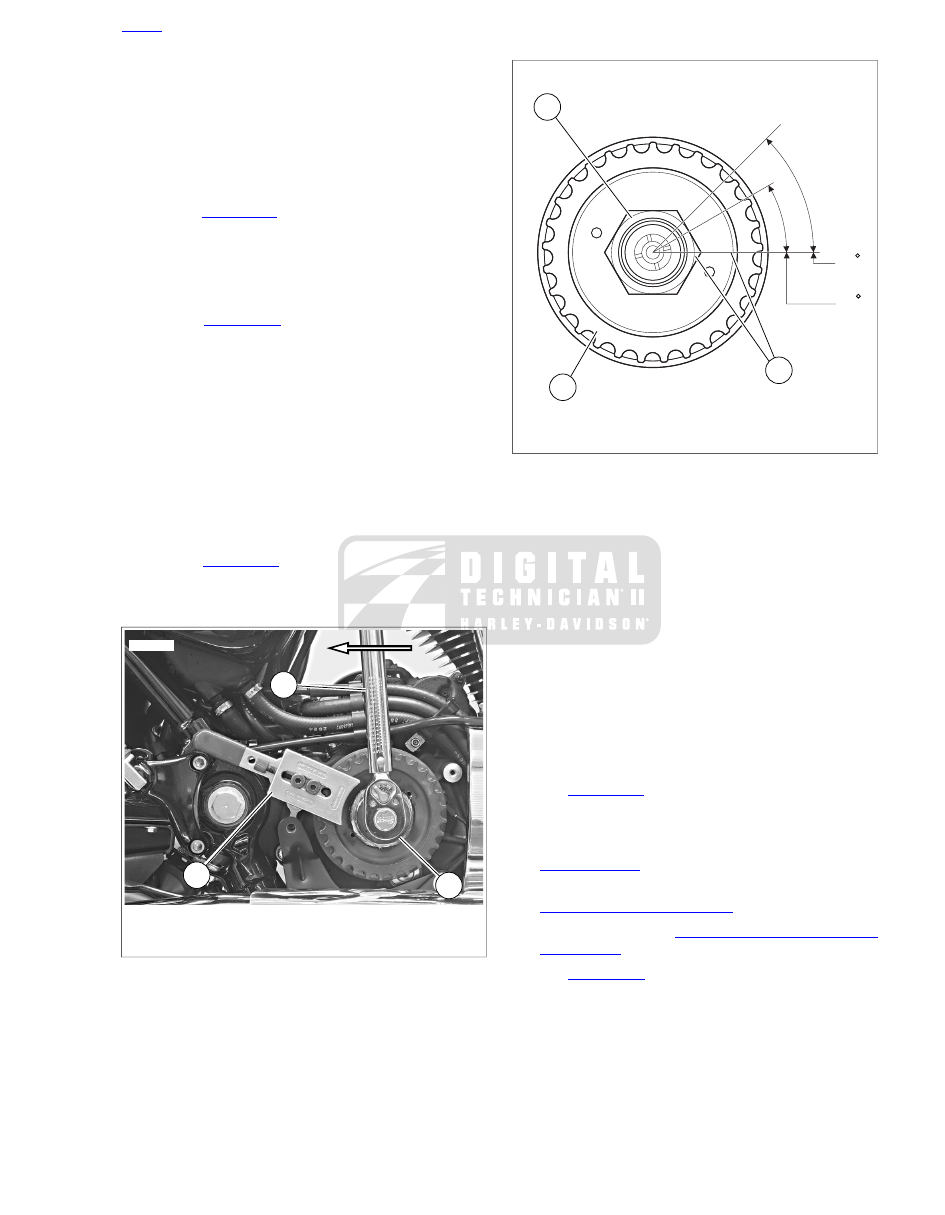
. Use TRANSMISSION SPROCKET
HOLDING TOOL (Part No. HD-46282) (1), MAIN-
SHAFT LOCK NUT WRENCH (Part No. HD-46288)
(2), and a torque wrench (3). Place handle of sprocket
holding tool on top of footrest bracket. Tighten nut to
50 ft-lbs (68 Nm) initial torque, ONLY.
b.
See
. Scribe a line on the transmission
sprocket nut and continue the line on the transmission
sprocket as shown.
c.
Tighten the transmission sprocket nut an additional
30° - 40°.
NOTE
The lockplate has four screw holes and can be turned to
either side, so you should be able to find a position without
having to additionally tighten the nut. If you cannot align
the screw holes properly, the nut may be additionally
TIGHTENED until the screw holes line up, but do not
exceed 45° as specified above. Never LOOSEN nut to
align the screw holes.
d.
See
. Install lockplate (4) over nut (3) so
that two of lockplate's four drilled holes (diagonally
opposite) align with sprocket's (2) two tapped holes.
1
2
3
sm01327
1.
Transmission sprocket holding tool
2.
Mainshaft lock nut wrench
3.
Torque wrench
Figure 5-111. Tightening Transmission Lock nut: All
Models (XL Model with Passenger Footrests Shown)
45
30
2
1
3
sm01470
1.
Transmission sprocket
2.
Sprocket nut
3.
Line scribed on nut and sprocket
Figure 5-112. Transmission Sprocket Nut Final Tightening
Procedure
NOTE
To maximize the lockplate's security, you must install BOTH
screws to secure the lockplate.
3.
Install socket head screws through two of the four holes
in lockplate, then into two corresponding tapped holes in
sprocket.
4.
Tighten socket head screws (5) to 90-110 in-lbs (10.2-
12.4 Nm).
5.
XR models and XL models without passenger
footrests: remove SPROCKET HOLDING TOOL
ADAPTER (Part No. HD-46282-1A).
XL Models
1.
See
. Install screw and washer (6) to secure
muffler interconnect bracket to engine crankcase. Tighten
to 30-33 ft-lbs (40.7-44.8 Nm).
2.
Install rear drive belt onto transmission sprocket. See
3.
Adjust rear belt deflection and rear wheel alignment. See
4.
Install belt guard. See
.
5.
See
. Install sprocket cover (1). Secure with
two screws (2, 3). Note that long screw goes in top hole,
short screw in bottom hole. Do not tighten screws at this
time.
6.
Install exhaust pipe clamp bracket (4), washer (5) and
screw (6). Tighten to 30-33 ft-lbs (40.7-44.8 Nm) . Now
tighten screws (2, 3) to 80-120 in-lbs (9.0-13.6 Nm).
2009 Sportster Service: Drive/Transmission 5-69