Harley Davidson 2013 Sportster Models. Electrical Diagnostics Manual - page 1
ABOUT THIS MANUAL
ments and any parts needed for the job before work begins.
GENERAL
Interrupting a job to locate tools or parts is a distraction and
This electrical diagnostic service manual has been prepared
causes needless delay.
with two purposes in mind. First, it will acquaint the user with
NOTES
the construction of the Harley-Davidson product and assist in
the performance of repair. Secondly, it will introduce to the
•
To avoid unnecessary disassembly, carefully read all
professional Harley-Davidson Technician the latest field-tested
related service information before repair work begins.
and factory-approved diagnostic methods. We sincerely believe
•
In figure legends, the number which follows the name of
that this manual will make your association with Harley-Dav-
a part indicates the quantity necessary for one complete
idson products more pleasant and profitable.
assembly.
HOW TO USE YOUR SERVICE MANUAL
•
When servicing a vehicle equipped with the Harley-Dav-
idson Smart Security System (H-DSSS), it must first be
Refer to the table below for the content layout of this manual.
disarmed. Keep the fob close to the vehicle or use
NO.
CHAPTER
DIGITAL TECHNICIAN II (Part No. HD-48650) to disable
the system. Activate the system after service is completed.
1
General Information
2
Initial Diagnostics and Serial Data
SERVICE BULLETINS
3
Starting and Charging
In addition to the information presented in this manual, Harley-
Davidson Motor Company will periodically issue service bul-
4
Instruments
letins to Harley-Davidson dealers. Service bulletins cover
5
Accessories, Horn, Lighting and Security
interim engineering changes and supplementary information.
6
Engine Management
Consult the service bulletins to keep your product knowledge
current and complete.
A
Appendix A Connector Repair
USE GENUINE REPLACEMENT PARTS
B
Appendix B Wiring
C
Appendix C Conversions
D
Appendix D Glossary
Harley-Davidson parts
and accessories are designed for
Use the TABLE OF CONTENTS (which follows this FORE-
Harley-Davidson motorcycles. Using non-Harley-Davidson
WORD) and the INDEX (at the back of this manual) to quickly
parts
or accessories can adversely affect performance,
locate subjects. Chapters and topics in this manual are
stability or handling, which could result in death or serious
sequentially numbered for easy navigation.
injury. (00001b)
For example, a cross-reference shown as
2.2
To achieve satisfactory and lasting repairs, carefully follow the
SPECIFICATIONS refers to chapter 2 CHASSIS, heading 2.2
service manual instructions and use only genuine Harley-
SPECIFICATIONS.
Davidson replacement parts. Behind the emblem bearing the
words GENUINE HARLEY-DAVIDSON stand more than 100
For quick and easy reference, all pages contain a chapter
years of design, research, manufacturing, testing and inspecting
number followed by a page number. For example, page 3-5
experience. This is your assurance that the parts you are using
refers to page 5 in Chapter 3.
will fit right, operate properly and last longer.
A number of acronyms and abbreviations are used in this
document. See the D.1 GLOSSARY for a list of acronyms,
WARNINGS AND CAUTIONS
abbreviations and definitions.
Statements in this manual preceded by the following words
are of special significance.
PREPARATION FOR SERVICE
PART NUMBER
TOOL NAME
HD-48650
DIGITAL TECHNICIAN II
WARNING indicates a potentially hazardous situation
which, if not avoided, could result in death or serious
injury. (00119a)
Stop the engine when refueling or servicing the fuel
system. Do not smoke or allow open flame or sparks near
CAUTION indicates a potentially hazardous situation
gasoline. Gasoline is extremely flammable and highly
which, if not avoided, may result in minor or moderate
explosive, which could result in death or serious injury.
injury. (00139a)
(00002a)
Good preparation is very important for efficient service work.
Start each job with a clean work area. This will allow the repair
to proceed as smoothly as possible. It will also reduce the
NOTICE indicates a potentially hazardous situation which,
incidence of misplaced tools and parts. Clean a motorcycle
if not avoided, may result in property damage. (00140b)
that is excessively dirty before work starts. Cleaning will occa-
sionally uncover sources of trouble. Gather any tools, instru-
I
NOTE
LOCTITE Sealing and THREADLOCKING
Refers to important information, and is placed in italic type. It
Products
is recommended that you take special notice of these items.
Some procedures in this manual call for the use of LOCTITE
Proper service and repair is important for the safe, reliable
products. If you have any questions regarding LOCTITE product
operation of all mechanical products. The service procedures
usage or retailer/wholesaler locations, contact Loctite Corp. at
recommended and described in this manual are effective
methods for performing service operations.
PRODUCT REGISTERED MARKS
Apple, Alcantara S.p.A., Allen, Amp Multilock, Bluetooth,
Brembo, Delphi, Deutsch, Dunlop, Dynojet, Fluke, G.E.
Always wear proper eye protection when using hammers,
Versilube, Garmin, Gunk, Hydroseal, Hylomar, iPhone, iPod,
arbor or hydraulic presses, gear pullers, spring com-
Kevlar, Lexan, Loctite, Lubriplate, Keps, K&N, Magnaflux,
pressors, slide hammers and similar tools. Flying parts
Marson Thread-Setter Tool Kit, MAXI fuse, Molex, Michelin,
could result in death or serious injury. (00496b)
MPZ, Mulitilock, nano, NGK, Novus, Packard, Pirelli, Permatex,
Some of these service operations require the use of tools
Philips, PJ1, Pozidriv, Robinair, S100, Sems, Snap-on, Teflon,
specially designed for the purpose. These special tools should
Threadlocker, Torca, Torco, TORX, Tufoil, Tyco, Ultratorch,
be used when and as recommended. It is important to note
Velcro, X-Acto, XM Satellite Radio, and zumo are among the
that some warnings against the use of specific service methods,
trademarks of their respective owners.
which could damage the motorcycle or render it unsafe, are
H-D MICHIGAN, INC. TRADEMARK
stated in this manual. However, remember that these warnings
are not all-inclusive. Inadequate safety precautions could result
INFORMATION
in death or serious injury.
Bar & Shield, Cross Bones, Digital Tech, Digital Technician,
Since Harley-Davidson could not possibly know, evaluate or
Digital Technician II, Dyna, Electra Glide, Evolution, Fat Bob,
advise the service trade of all possible ways in which service
Fat Boy, Forty-Eight, Glaze, Gloss, H-D, H-Dnet.com, Harley,
might be performed, or of the possible hazardous con-
Harley-Davidson, HD, Heritage Softail, Iron 883, Low Rider,
sequences of each method, we have not undertaken any such
Night Rod, Nightster, Night Train, Profile, Revolution, Road
broad evaluation. Accordingly, anyone who uses a service
Glide, Road King, Road Tech, Rocker, Screamin' Eagle, Sev-
procedure or tool which is not recommended by Harley-Dav-
enty-Two, Softail, Sportster, Street Glide, Street Rod, Sun Ray,
idson must first thoroughly satisfy himself that neither his nor
Sunwash, Super Glide, SuperLow, Switchback, SYN3, Tech-
the operator's safety will be jeopardized as a result. Failure
to
Link, TechLink II, Tour-Pak, Twin Cam 88, Twin Cam 88B,
do so could result in death or serious injury.
Twin Cam 96, Twin Cam
96B, Twin Cam 103, Twin Cam 103B,
Twin Cam 110, Twin Cam 110B, Ultra Classic, V-Rod, VRSC,
PRODUCT REFERENCES
XR1200X and Harley-Davidson Genuine Motor Parts and
Genuine Motor Accessories are among the trademarks of H-
D Michigan, Inc.
Read and follow warnings and directions on all products.
CONTENTS
Failure to follow warnings and directions can result in
All photographs, illustrations and procedures may not neces-
death or serious injury. (00470b)
sarily depict the most current model or component, but are
When reference is made in this manual to a specific brand
based on the latest production information available at the time
name product, tool or instrument, an equivalent product, tool
of publication.
or instrument may be substituted.
Since product improvement is our continual goal, Harley-Dav-
Kent-Moore Products
idson reserves the right to change specifications, equipment
or designs at any time without notice and without incurring
All tools mentioned in this manual with an "HD", "J" or "B"
obligation.
preface must be ordered through SPX Kent-Moore. For ordering
information or product returns, warranty or otherwise, visit
II FOREWORD
Speedometer and Tachometer
2-12
GENERAL INFORMATION
TSM, TSSM or HFSM
2-12
Data Link Connector (DLC)
2-12
1.1 SPECIFICATIONS AND COMPONENT
Communication DTCs and "Bus Er"
2-13
LOCATIONS
Diagnostic Tips
2-13
Specifications
1-1
2.3 DTC U1016, U1064, U1097, U1098, U1255
Component Locations
1-1
Description and Operation
2-14
1.2 DIAGNOSTIC TOOLS
Diagnostic Tips
2-14
Connector Information
2-14
How To Use Diagnostic Tools
1-7
DTC U1016
2-15
GRX-3110 HD Battery Diagnostic Station
1-7
1. Open Ground Test
2-15
HD-26792 Spark Tester
1-7
2. Switched Power Circuit Open Test
2-15
HD-34730-2E Fuel Injector Test Light
1-7
3. TSM, TSSM or HFSM Serial Data Circuit Continuity
HD-39978 Digital Multimeter (Fluke 78)
1-8
Test
2-15
HD-41199-3 IAC Test Light
1-8
4. Speedometer Serial Data Circuit Continuity Test
2-16
HD-41404 Harness Connector Test Kit
1-8
5. Tachometer Serial Data Circuit Continuity Test
2-16
HD-42682 Breakout Box
1-8
DTC U1064, U1255
2-16
HD-42682 Breakout Box (TSM, TSSM or HFSM)
1-9
1. Fuse Test
2-16
HD-43876 Breakout Box (ECM)
1-9
2. Loss of Battery Power Test
2-16
HD-44687 Ignition Coil Circuit Test Adapter
1-10
3. Loss of Ignition Power Test
2-16
HD-48650 Digital Technician II
1-10
4. Loss of Ground Test
2-16
5. Speedometer Serial Data Circuit Continuity Test
2-16
1.3 DIAGNOSTICS AND
6. Power Circuit Short to Ground Test
2-16
TROUBLESHOOTING
7. ECM Serial Data Circuit Continuity Test
2-17
Voltage Drop
1-11
8. Tachometer Serial Data Circuit Continuity Test
2-17
Voltage Drop Test
1-11
DTC U1097, U1255
2-17
Wiggle Test
1-12
1. Fuse Test
2-17
Relay Diagnostics
1-12
2. Loss of Power Test
2-17
Relay Variation
1-12
3. Loss of Ground Test
2-17
Relay Test
1-12
4. Speedometer Serial Data Circuit Continuity Test
2-17
Job/Time Codes Values
1-13
5. Power Circuit Short to Ground Test
2-17
6. ECM Serial Data
Circuit Continuity Test
2-17
INITIAL DIAGNOSTICS AND SERIAL
DTC U1098, U1255
2-18
1. Fuse Test
2-18
DATA
2. Loss of Power Test
2-18
3. Loss of Ground Test
2-18
2.1 INITIAL DIAGNOSTICS
4. Tachometer Serial Data Circuit Continuity Test
2-18
5. Power Circuit Short to Ground Test
2-18
Description and Operation
2-1
6. ECM Serial Data Circuit Continuity Test
2-18
Retrieving Trouble Codes
2-1
Odometer Self-Diagnostics
2-1
2.4 DTC U1300, U1301 OR BUS ER
Diagnostic Mode
2-1
Initial Diagnostics
2-1
Description and Operation
2-19
1. Verifying Current DTC Test
2-1
Diagnostic Tips
2-19
2. Battery Power Test
2-1
Connector Information
2-19
3. Ignition Power Test
2-1
DTC U1300
2-20
4. Engine Stop Switch Circuit Test
2-2
1. Serial Data Short to Ground Test
2-20
5. Security System Test
2-2
2. ECM Test
2-20
6. Starter System Test
2-2
3. TSM, TSSM or HFSM Test
2-20
7. Engine Running Test
2-2
4. Tachometer Test: XL (If Vehicle is not Equipped with
8. Verification Test
2-2
Tachometer, Go to Test 5.)
2-20
Diagnostics
2-2
5. Serial Data Short to Ground Test: XL
2-20
Diagnostic Tips
2-2
6. Speedometer Test: XR
2-20
Code Types
2-4
7. Serial Data Short to Ground Test: XR
2-20
Current
2-4
8. Serial Data Circuit Open Test
2-20
Historic
2-4
9. Intermittent Test
2-20
Multiple Trouble Codes
2-5
DTC U1301
2-21
Clearing DTCs
2-5
1. Serial Data Short to Voltage Test
2-21
Security Lamp
2-5
2. ECM Test
2-21
Check Engine Lamp
2-5
3. TSM, TSSM or HFSM Test
2-21
Symptoms
2-6
4. Tachometer Test: XL (If Vehicle is not Equipped with
Connector Information
2-7
Tachometer, Go to Test 5.)
2-21
5. Serial Data Short to Voltage Test: XL
2-21
2.2 SERIAL DATA COMMUNICATION
6. Speedometer Test: XR
2-21
Description and Operation
2-12
7. Serial Data Short to Ground Test: XR
2-21
Components
2-12
8. Serial Data Circuit Open Test
2-21
Electronic Control Module (ECM)
2-12
9. Intermittent Test
2-21
III
TABLE OF CONTENTS
5. Starter Solenoid Battery Side Voltage Drop Test
3-10
STARTING AND CHARGING
6. Starter Ground Circuit Voltage Drop Test
3-11
7. Starter Draw Test
3-11
3.1 BATTERY TESTING
8. Mechanical Binding Test
3-11
General
3-1
Starter Spins But Does Not Engage
3-11
Voltmeter Test
3-1
1. Pinion Gear and Clutch Shell Test
3-11
Battery Diagnostic Test
3-1
Starter Stalls or Spins Too Slowly
3-11
Load Test
3-1
1. Battery Test
3-11
2. Starter Stud Voltage Drop Test
3-11
3.2 STARTING SYSTEM
3. Starter Ground Circuit Voltage Drop Test
3-11
4. Starter Draw Test
3-11
Description and Operation
3-3
5. Starter Solenoid Voltage Drop Starter Side Test
3-12
Components
3-3
Starter
3-3
3.3 TESTING STARTER ON MOTORCYCLE
Starter Solenoid
3-3
Engine Stop Switch
3-3
Starter Current Draw Test
3-13
Start Switch
3-3
3.4 TESTING STARTER ON BENCH
Start Relay
3-3
Ignition Switch
3-3
Free Running Current Draw Test
3-14
Battery
3-4
Starter Solenoid
3-14
Grinding Noise Or Erratic Starting
3-4
Solenoid Pull-In Test
3-14
Job/Time Code Values
3-4
Solenoid Hold-In Test
3-14
Connector Information
3-4
Solenoid Return Test
3-15
Starter Troubleshooting
3-6
Starter Testing
3-7
3.5 CHARGING SYSTEM
1. Starting System Operational Test
3-7
Description and Operation
3-16
2. Audible Noise Test
3-7
Alternator
3-16
3. Starter Solenoid Test
3-7
Voltage Regulator
3-16
4. Start Switch Circuit Test
3-7
Troubleshooting
3-16
5. Start Switch Circuit Short to Voltage Test
3-7
Battery
3-16
6. Start Switch Test
3-7
Wiring
3-16
7. Start Relay Test
3-7
Voltage Regulator Inspection
3-16
Nothing Clicks
3-8
Job/Time Code Values
3-16
1. Battery Test
3-8
Connector Information
3-16
2. Fuse Test
3-8
Low or No Charging
3-17
3. Ignition Circuit Test
3-8
1. Battery Test
3-17
4. Ignition Switch Supply Voltage Test
3-8
2. Off Idle Voltage Test
3-17
5. Ignition Switch Test
3-8
3. AC Output Test
3-17
6. Start Switch Circuit Voltage Test
3-8
4. Stator Test
3-17
7. Start Switch Test
3-8
5. Rotor Inspection Test
3-17
8. Start Switch Circuit Continuity Test
3-8
6. Voltage Regulator Power Circuit Test
3-17
9. Start Relay Control Circuit Test
3-8
7. Voltage Regulator Ground Circuit Test
3-17
10. Start Relay Control Circuit Open Test
3-9
Overcharging
3-17
11. TSM, TSSM or HFSM Ground Test
3-9
1. Battery Voltage Test
3-17
12. Continuity at Neutral Switch Test
3-9
2. Voltage Regulator Ground Circuit Test
3-17
13. Neutral Switch Ground Circuit Test
3-9
Low Battery After Extended IGN OFF
3-18
14. Neutral Switch Wire Test
3-9
1. Battery Test
3-18
15. Start Relay Coil Control Circuit Short to Voltage
2. Amp Draw Test
3-18
Test
3-9
Battery Runs Down During Use
3-18
16. Engine Stop Switch Voltage Test
3-9
1. Total Current Draw Test
3-18
17. Relay Enable Circuit Continuity Test
3-9
2. Battery Test
3-18
18. Anti-Theft Tracking Module Test
3-9
Battery Charging Tests
3-18
Start Relay Clicks
3-9
Milliampere Draw Test
3-18
1. Battery Test
3-10
Total Current Draw and Output Test
3-19
2. Starter Solenoid Control Coil Voltage Test
3-10
Stator Test
3-20
3. Starter Solenoid Control Coil Continuity Test
3-10
AC Output Test
3-20
4. Start Solenoid Wiring Inspection Test
3-10
5. Starter Solenoid Test
3-10
3.6 DTC B0563, P0562, P0563
Starter Solenoid Clicks
3-10
Description and Operation
3-21
1. Battery Test
3-10
DTC B0563
3-21
2. Starter Voltage Test
3-10
DTC P0562 and P0563
3-21
3. Starter Ground Test
3-10
Diagnostics
3-21
4. Starter Solenoid Voltage Drop Starter Side Test
3-10
Diagnostic Tips
3-21
IV TABLE OF CONTENTS
TABLE OF CONTENTS
Connector Information
3-21
Speedometer (XL) or Tachometer (XR) Inoperative
4-8
DTC P0562
3-22
1. Battery and Ignition Function Test
4-8
1. Battery Test
3-22
2. Accessory Function Test
4-8
2. Charging System Test
3-22
3. Accessory Fuse Test
4-8
3. ECM Switched Voltage Test
3-22
4. Battery Fuse Test
4-9
4. ECM Switched Voltage Drop Test
3-23
5. Battery Circuit to Battery Fuse Test
4-9
5. ECM Ground Circuit Voltage Drop Test
3-23
6. Battery Circuit to Instrument Test
4-9
6. ECM Switched Power Circuit Resistance Test
3-23
7. Instrument Battery Circuit Short to Ground Test
4-9
7. Switched Power Circuit Resistance Test
3-23
8. Ignition Circuit Test
4-9
8. Ignition Circuit Resistance Test
3-23
9. Instrument Power Circuit Test
4-9
9. Engine Stop Switch Test
3-23
10. Ignition Fuse Test
4-9
10. Ignition Circuit Voltage Drop Test
3-23
11. Ignition Power to Ignition Fuse Test
4-9
11. Ignition Circuit Resistance Test
3-23
12. Ignition Power Short to Ground Test
4-9
12. Ignition Switch Battery Circuit Voltage Drop
13. Ground Circuit Test
4-9
Test
3-23
Speedometer Inoperative: XR
4-10
13. Repair Validation Test
3-23
1. Speedometer Function Test
4-10
DTC B0563, P0563
3-24
2. Speedometer Display Test
4-10
1. Charging System Test
3-24
3. Serial Data Circuit Test
4-10
2. Repair Validation Test
3-24
4. Battery Power Circuit Test
4-10
3.7 DTC B1006, B1007
4.5 INDICATOR LAMPS
Description and Operation
3-25
Description and Operation
4-11
DTC B1006 and B1007
3-25
Low Fuel Indicator
4-11
Diagnostic Tips
3-25
Neutral Indicator
4-12
DTC B1006, B1007
3-25
Oil Pressure Indicator
4-12
1. Charging System Test
3-25
Temperature Lamp: XR
4-13
2. Repair Validation Test
3-25
Turn Signal Indicators
4-13
High Beam Indicator
4-13
INSTRUMENTS
Connector Information
4-13
Low Fuel Lamp Always On
4-15
1. DTC Test
4-15
4.1 INSTRUMENTS
2. Fuel Level Test
4-15
Description and Operation
4-1
3. Low Fuel Switch Test
4-15
Trip Odometer Reset Switch Operation
4-1
4. Fuel Sender Resistor Assembly Test
4-15
Selecting Instrument Units: XR Models
4-1
Low Fuel Lamp Inoperative
4-15
Speedometer Theory of Operation
4-1
1. Low Fuel Switch Test
4-15
Tachometer Theory of Operation
4-2
2. Low Fuel Switch Circuit Test
4-16
Instrument Diagnostics
4-2
3. Fuel Sender Resistor Assembly Test
4-16
4. Low Fuel Switch Circuit Continuity Test
4-16
4.2 DTC B1004, B1005
Oil Pressure Lamp Always On
4-16
Description and Operation
4-3
1. Oil Pressure Lamp Function Test
4-16
Connector Information
4-4
2. Engine Running Test
4-16
DTC B1004
4-4
3. Oil Pressure Sensor Test
4-16
1. Low Fuel Lamp Circuit Resistance Test
4-4
4. Oil Pressure Circuit Test
4-16
2. Fuel Pump and Sender Assembly Test
4-4
5. Mechanical Test
4-16
3. Fuel Sender Resistor Assembly Test
4-4
Oil Pressure Lamp Inoperative
4-16
DTC B1005
4-5
1. Oil Pressure Lamp Function Test
4-17
1. Low Fuel Lamp Circuit Voltage Test
4-5
2. Oil Pressure Switch Test
4-17
2. Fuel Sender Resistor Assembly Test
4-5
3. Oil Pressure Circuit Test
4-17
3. Low Fuel Lamp Circuit Continuity Test
4-5
Neutral Lamp Always On
4-17
4. Ground Circuit Continuity Test
4-5
1. Neutral Lamp Function Test
4-17
2. Transmission Operation Test
4-17
4.3 DTC B1008
3. Neutral Switch Test
4-17
Description and Operation
4-6
4. TSM, TSSM or HFSM Test
4-17
Trip Odometer Reset Switch Closed
4-6
5. Neutral Switch Circuit Test
4-17
DTC B1008
4-6
Neutral Lamp Inoperative
4-17
1. Rubber Boot Test
4-6
1. Neutral Lamp Function Test
4-17
2. Trip Odometer Reset Switch Test
4-6
2. Neutral Switch Test
4-17
3. Neutral Switch Power Circuit Open Test
4-18
4.4 NO INSTRUMENT POWER
High Beam Indicator Lamp Inoperative
4-18
1. High Beam Indicator Function Test
4-18
Description and Operation
4-7
2. High Beam Indicator Circuit Test
4-18
Connector Information
4-7
TABLE OF CONTENTS V
TABLE OF CONTENTS
Turn Signal Indicator Inoperative
4-18
9. Left Turn Signal Short to Voltage Test
5-11
1. Turn Signal Function Test
4-18
10. Anti-Theft Tracking Module Test
5-11
2. Turn Signal Indicator Circuit Test
4-18
One Turn Signal Lamp Inoperative, No DTCs
5-11
1. Inoperative Signal Location Test
5-11
ACCESSORIES, HORN, LIGHTING
2. Right Front Turn Signal Bulb Test
5-11
3. Right Front Turn Signal Circuit Test
5-11
AND SECURITY
4. Right Front Turn Signal Ground Circuit Test
5-11
5. Left Front Turn Signal Bulb Test
5-11
5.1 ACCESSORIES
6. Left Front Turn Signal Circuit Test
5-11
7. Left Front Turn Signal Ground Circuit Test
5-12
Description and Operation
5-1
8. Right Rear Turn Signal Bulb Test
5-12
Components
5-1
9. Right Rear Turn Signal Circuit Test
5-12
P&A Connector
5-1
10. Right Rear Turn Signal Ground Circuit Test
5-12
5.2 HORN
11. Left Rear Turn Signal Bulb Test
5-12
12. Left Rear Turn Signal Circuit Test
5-12
Description and Operation
5-2
13. Left Rear Turn Signal Ground Circuit Test
5-12
Components
5-2
14. Right Rear Turn Signal Test: Single Stop Lamp
5-12
Horn Switch
5-2
15. Left Rear Turn Signal Test: Single Stop Lamp
5-12
Horn
5-2
16. Right Rear Turn Signal Test: Dual Stop Lamp
5-12
Symptoms
5-2
17. Right Rear Turn Signal Ground Test: Dual Stop
Diagnostic Tips
5-2
Lamp
5-13
Connector Information
5-2
18. Left Rear Turn Signal Test: Dual Stop Lamp
5-13
Horn Always On
5-3
19. Left Rear Turn Signal Ground Test: Dual Stop
1. Horn Switch Test
5-3
Lamp
5-13
Horn Inoperative
5-3
20. Right Rear Turn Signal Bulb Test
5-13
1. Accessory Circuit Open or Shorted Test
5-3
21. Right Rear Turn Signal Power [7] Circuit Test
5-13
2. Horn Test
5-4
22. Right Rear Turn Signal [7] Ground Test
5-13
3. Ground Circuit Open Test
5-4
23. Right Rear Turn Signal [18] Ground Test
5-13
4. Horn Switch Malfunction Test
5-4
24. Right Rear Turn Signal Power [18] Circuit Test
5-13
5. Horn Power Circuit Open Test
5-4
25. Left Rear Turn Signal Bulb Test
5-13
26. Left Rear Turn Signal Power [7] Circuit Test
5-13
5.3 TURN SIGNALS
27. Left Rear Turn Signal [7] Ground Test
5-14
Description and Operation
5-5
28. Left Rear Turn Signal [18] Ground Test
5-14
BAS Operation
5-5
29. Left Rear Turn Signal Power [18] Circuit Test
5-14
BAS Restart
5-5
Manual Cancellation
5-5
5.4 HEADLAMPS
Automatic Cancellation
5-5
Description and Operation
5-15
Four-Way Flashing
5-5
Diagnostic Tips
5-15
Diagnostic Tips
5-6
Connector Information
5-15
Connector Information
5-6
Headlamp Inoperative, No DTCs
5-16
Will Not Cancel Upon Turn Completion, No DTCs
5-9
1. Operational Test
5-16
1. TSM, TSSM or HFSM Mounting Test
5-9
2. High Beam Indicator Test
5-16
2. Correct Configuration Test
5-9
3. Headlamp Hi/Lo Switch Test
5-17
3. 4-Way Cancellation Test
5-9
4. High Beam Headlamp Test
5-17
4. Turn Signals Cancel Test
5-9
5. Headlamp Hi/Lo Switch Test
5-17
5. Speedometer Test
5-9
6. Low Beam Headlamp Test
5-17
Flash at Double Normal Rate, No DTCs
5-9
7. High Beam Indicator Test
5-17
1. Lamp Verification Test
5-9
8. Headlamp Test
5-17
2. Bulb Corrosion Test
5-9
9. Ignition Power Circuit Test
5-17
3. Lamp Connection Terminal Corrosion Test
5-9
10. Headlamp Hi/Lo Switch Test
5-17
4. Verification Test
5-10
11. Lights Fuse Test
5-17
5. Lamp Operation Test
5-10
12. Power Circuit Test
5-17
6. Lamp Assembly Test
5-10
13. Power Circuit Short to Ground Test
5-17
Both Turn Signal Lamps on One Side Inoperative, No
14. Tail Lamp Test
5-17
DTCs
5-10
15. Front Turn Signal Test
5-18
1. Left or Right Turn Signal Malfunction Test
5-10
16. Rear Turn Signal Test
5-18
2. Right Turn Signal Circuit Test
5-10
17. Low Beam Circuit Short to Ground Test
5-18
3. Right Turn Signal Switch Test
5-10
18. High Beam Circuit Short to Ground Test
5-18
4. Right Turn Signal Circuit Continuity Test
5-10
19. Indicator Short to Ground Test
5-18
5. Left Turn Signal Circuit Test
5-10
6. Left Turn Signal Switch Test
5-10
5.5 STOP LAMPS
7. Left Turn Signal Circuit Continuity Test
5-10
8. Right Turn Signal Short to Voltage Test
5-11
Description and Operation
5-19
VI TABLE OF CONTENTS
TABLE OF CONTENTS
Diagnostic Tips
5-19
4. Indicator Shorted Test
5-31
Connector Information
5-19
5. Shorted Turn Signal Circuit Test
5-31
Stop Lamp Inoperative
5-21
6. Turn Signal Circuit Open Test
5-31
1. Accessory Circuit Test
5-21
DTC B1122: HFSM
5-32
2. Accessories Fuse Test
5-21
1. Turn Signal Lamp Inspection Test
5-32
3. Accessory Circuit from Ignition Switch Test
5-21
2. Turn Signal Circuit Open Test
5-32
4. Ignition Switch Test
5-21
DTC B1122: TSM or TSSM
5-32
5. Accessory Circuit Resistance Test
5-21
1. Operational Test
5-32
6. Speedometer Test
5-21
2. Indicator Short to Voltage Test
5-32
7. Tachometer Test
5-21
3. TSM, TSSM or HFSM Short to Voltage Test
5-32
8. Stop Lamp Switch Test
5-21
4. Indicator Shorted Test
5-32
9. Tail Stop Lamp Test
5-21
5. Turn Signal Circuit Shorted Test
5-32
10. Stop Lamp Ground Test
5-22
6. Turn Signal Circuit Open Test
5-32
11. Rear Stop Lamp Switch Test
5-22
DTC B1123
5-33
12. Rear Stop Lamp Switch ACCY Circuit Test
5-22
1. Turn Signal Lamp Inspection Test
5-33
13. Front Stop Lamp Switch Test
5-22
2. Turn Signal Circuit Short to Ground Test
5-33
14. Front Stop Lamp Switch ACCY Circuit Test
5-22
3. Indicator Test
5-33
15. Stop Lamp Bulb Test
5-22
DTC B1124
5-33
16. Circuit Board Test
5-22
1. Turn Signal Lamp Inspection Test
5-33
17. Stop Lamp Verification Test
5-22
2. Turn Signal Circuit Short to Ground Test
5-33
18. Stop Lamp Circuit Test
5-22
3. Indicator Test
5-33
19. Stop Lamp Circuit Ground Test
5-22
DTC B1125
5-34
20. Stop Lamp Bulb Test
5-22
1. Turn Signal Circuit Short to Ground Test
5-34
21. Stop Lamp [7] Power Test
5-23
2. Indicator Test
5-34
22. Stop Lamp [7] Ground Test
5-23
DTC B1126
5-34
23. Stop Lamp [40] Ground Test
5-23
1. Turn Signal Circuit Short to Ground Test
5-34
24. Stop Lamp [40] Power Test
5-23
2. Indicator Test
5-34
5.6 RUNNING LAMPS
5.8 DTC B1135, B1136, B1141, B1142
Description and Operation
5-24
Diagnostics
5-35
Connector Information
5-24
DTC B1135 Accelerometer Fault
5-35
Position Lamp Inoperative: HDI
5-26
DTC B1136 Accelerometer Tip-Over Self-Test
1. Accessory Circuit Test
5-26
Fault
5-35
2. Position Lamp Test
5-26
DTC B1141 Ignition Switch Open/Low
5-35
3. Ground Circuit Test
5-26
DTC B1142 Internal Fault
5-35
Running Lamps Inoperative
5-26
DTC B1141
5-35
1. Lights Circuit Test
5-26
1. Ignition Circuit Open Test
5-35
2. Stop Lamp Test
5-26
3. Rear Running Lamps Test
5-26
5.9 SECURITY SYSTEM
4. Tail Lamp Bulb Test
5-26
Security Lamp
5-36
5. Running Lamps Circuit Test
5-26
Security Immobilization
5-36
6. Circuit Board Test
5-26
TSSM or HFSM Features
5-36
7. Running Lamp Verification Test
5-26
Security System Options: TSSM
5-37
8. Individual Lamp Test
5-27
Warnings
5-37
9. Lamp Circuit Ground Test
5-27
Arming: HFSM
5-37
10. Running Lamp Bulb Test
5-27
Indicator
5-37
11. Running Lamp [7] Power Test
5-27
Arming: TSSM
5-37
12. Running Lamp [7] Ground Test
5-27
Auto-Arming Function: TSSM
5-37
13. Running Lamp [40] Ground Test
5-27
Disarming: HFSM
5-38
14. Running Lamp [40] Power Test
5-27
Automatic Disarming
5-38
Disarming with a PIN
5-38
5.7 DTC B1121, B1122, B1123, B1124, B1125,
Disarming: TSSM
5-38
B1126
Alarm
5-39
Activation
5-39
Description and Operation
5-28
Deactivation
5-39
Connector Information
5-28
Alarm Sensitivity: TSSM
5-39
DTC B1121: HFSM
5-31
Sensitivity
5-39
1. Turn Signal Lamp Inspection Test
5-31
2. Turn Signal Circuit Open Test
5-31
5.10 KEY FOB
DTC B1121: TSM or TSSM
5-31
1. Operational Test
5-31
HFSM Fob
5-40
2. Indicator Short to Voltage Test
5-31
TSSM Fob
5-40
3. TSM or TSSM Short to Voltage Test
5-31
Arming the System
5-40
TABLE OF CONTENTS VII
TABLE OF CONTENTS
Disarming the System
5-40
3. Battery Circuit Test
5-55
Troubleshooting
5-40
4. Power Supply and Ground Test
5-56
Fob Assignment: HFSM
5-40
5. Alarm Signal Circuit Open Test
5-56
Fob Assignment: TSSM
5-40
6. Alarm Signal Short to Ground Test
5-56
7. Security Siren Resistance Test
5-56
5.11 SIREN
8. Security Siren Validation Test
5-56
DTC B1132
5-56
Description and Operation
5-42
1. Siren Verification Test
5-56
Siren Chirp Mode Confirmation: HFSM
5-42
2. Alarm Signal Circuit Short to Voltage Test
5-56
Chirpless Mode
5-42
3. Alarm Signal Short to Voltage Test
5-56
Chirp Mode
5-42
Switching Modes
5-42
5.15 DTC B1134
5.12 SERVICE AND EMERGENCY
Description and Operation
5-57
FUNCTIONS AND CONFIGURATIONS
Connector Information
5-57
DTC B1134
5-58
General
5-43
1. Relay Control Circuit Short to Voltage Test
5-58
Actuation: HFSM
5-43
2. Start Relay Test
5-58
Configuring a TSSM
5-43
Selecting a PIN
5-43
5.16 DTC B1143, B1144, B1145
Initial Pin Entry: HFSM
5-43
Description and Operation
5-59
Initial Pin Entry: TSSM
5-44
Connector Information
5-59
Changing the Pin
5-46
DTC B1143
5-59
Transport Mode
5-47
1. Security Antenna Visual Test
5-59
To Enter Transport Mode: HFSM
5-47
2. Security Antenna Short to Ground Test
5-59
To Exit Transport Mode: HFSM
5-47
DTC B1144
5-60
To Enter Transport Mode: TSSM
5-47
1. Security Antenna Visual Test
5-60
To Exit Transport Mode: TSSM
5-47
2. Security Antenna Short to Voltage Test
5-60
Service Mode
5-47
DTC B1145
5-60
Four-Way Flashing
5-47
1. Security Antenna Resistance Test
5-60
To Arm the HFSM with the Hazard Warning Flashers
2. Antenna B Circuit Open Test
5-60
ON
5-47
3. Antenna A Circuit Open Test
5-60
To Disarm the HFSM and Turn the Hazard Warning
Flashers OFF
5-47
5.17 DTC B1154, B1155
Storage Mode: TSSM
5-47
Power Disruption and Configuring: HFSM
5-48
Description and Operation
5-61
Power Disruption and Configuring: TSSM
5-49
Diagnostic Tips
5-61
Connector Information
5-61
5.13 FAILS TO DISARM
DTC B1154
5-62
1. Clutch Circuit Short to Ground Test
5-62
Description and Operation
5-50
2. Clutch Switch Circuit Test
5-62
HFSM
5-50
3. Clutch Switch Test
5-62
TSSM
5-50
DTC B1155
5-63
Diagnostic Tips
5-50
1. Neutral Circuit Short to Ground Test
5-63
Connector Information
5-50
2. Neutral Switch Short to Ground Test
5-63
Fails to Disarm: HFSM
5-53
1. Fob Test
5-53
ENGINE MANAGEMENT
2. Antenna Circuit Short to Ground Test
5-53
3. Antenna Circuit Open Test
5-53
4. Security System Antenna Test
5-53
6.1 EFI SYSTEM
5. Non-Functional Fob Test
5-53
General
6-1
Fails to Disarm: TSSM
5-53
EFI Operation
6-1
1. Key Fob Test
5-53
Symptom Diagnostics
6-1
2. Left Turn Signal Test
5-53
3. Fob Battery Test
5-53
6.2 ELECTRONIC CONTROL MODULE
4. TSSM Test
5-53
General
6-3
ECM
6-3
5.14 DTC B1131, B1132
32-2 Flywheel
6-3
Description and Operation
5-54
Crank Position Signal Synchronization
6-3
Diagnostic Tips
5-54
Engine Phase
6-3
Connector Information
5-54
Engine Run Mode
6-3
DTC B1131
5-55
1. Siren Verification Test
5-55
6.3 SENSORS AND DRIVERS
2. Alarm Signal Short to Ground Test
5-55
Description and Operation
6-4
VIII TABLE OF CONTENTS
TABLE OF CONTENTS
Sensors
6-4
6.6 DTC P0117, P0118
Crank Position (CKP) Sensor
6-4
Description and Operation
6-14
Throttle Position Sensor (TPS)
6-4
Diagnostic Tips
6-14
Jiffy Stand Sensor (JSS): HDI Only
6-4
Connector Information
6-14
Bank Angle Sensor (BAS)
6-4
DTC P0117
6-15
Clutch Switch
6-4
1. ET Sensor Test
6-15
Neutral Switch
6-4
2. ET Sensor Signal Wire Shorted to Ground Test
6-16
Engine Temperature (ET) Sensor
6-4
3. ET Sensor Signal Wire Shorted to Sensor Ground
Temperature Manifold Absolute Pressure (TMAP)
Test
6-16
Sensor
6-4
DTC P0118
6-16
Manifold Absolute Pressure (MAP) Sensor
6-4
1. ET Sensor Test
6-16
Intake Air Temperature (IAT) Sensor
6-4
2. ET Sensor Signal Wire Open Test
6-16
Vehicle Speed Sensor (VSS)
6-4
3. ET Sensor Open Ground Wire Test
6-16
O2 Sensor (Front and Rear)
6-5
4. ET Sensor Signal Wire Shorted to Sensor Power
Drivers
6-5
Test
6-16
Fuel Pump
6-5
Ignition Coils and Spark Plugs
6-5
6.7 DTC P0122, P0123
Fuel Injectors
6-5
Idle Air Control (IAC)
6-5
Description and Operation
6-17
Start Relay
6-5
Diagnostic Tips
6-17
Active Intake Solenoid (AIS): XR England, Japan
6-5
Connector Information
6-17
DTC P0122
6-19
6.4 DTC P0107, P0108
1. TPS Test
6-19
2. TPS Signal Voltage Test
6-19
Description and Operation
6-7
3. TPS Signal Wire Continuity Test
6-19
Diagnostic Tips
6-7
4. TPS Signal Wire Shorted to Ground Test
6-19
Connector Information
6-7
5. TPS Signal Wire Shorted to Sensor Ground Test...6-19
DTC P0107
6-9
6. TPS 5V Sensor Power Open Wire Test
6-19
1. MAP Sensor Test
6-9
DTC P0123
6-19
2. MAP Sensor Signal Voltage Test
6-9
1. TPS Test
6-19
3. MAP Sensor Signal Wire Continuity Test
6-9
2. TPS Signal Wire Short to 5V Test
6-19
4. MAP Sensor Signal Wire Shorted to Ground
3. TPS Signal Wire Short to Voltage Test
6-19
Test
6-9
4. TPS 5V Shorted to Battery Voltage Test
6-20
5. MAP Sensor Signal Wire Shorted to Sensor Ground
5. TPS Ground Wire Open Test
6-20
Test
6-9
6. MAP Sensor 5V Reference Wire Open Test
6-9
6.8 DTC P0131, P0132, P0134, P0151, P0152,
7. MAP Sensor 5V Reference Shorted to Signal Ground
P0154
Test
6-9
DTC P0108
6-9
Description and Operation
6-21
1. MAP Sensor Test
6-9
Diagnostic Tips
6-21
2. MAP Sensor Signal Wire Short to 5V Test
6-10
Connector Information
6-21
3. MAP Sensor Signal Wire Short to Voltage Test
6-10
DTC P0131
6-23
4. MAP Sensor 5V Reference Shorted to Battery Voltage
1. Front O2 Sensor Test
6-23
Test
6-10
2. Front O2 Sensor Signal Wire Shorted to Sensor Ground
5. MAP Sensor Ground Wire Open Test
6-10
Test
6-23
3. Front O2 Sensor Signal Wire Shorted to Ground
6.5 DTC P0112, P0113
Test
6-23
Description and Operation
6-11
4. Front O2 Sensor Operation Test
6-23
Diagnostic Tips
6-11
DTC P0132
6-23
Connector Information
6-11
1. Front O2 Sensor Operation Test
6-23
DTC P0112
6-12
DTC P0134
6-23
1. IAT Sensor Test
6-12
1. Front O2 Sensor Signal Wire Short Circuit Voltage
2. IAT Sensor Signal Wire Shorted to Ground Test
6-13
Test
6-23
3. IAT Sensor Signal Voltage High Test
6-13
2. Front O2 Sensor Open Sensor Ground Test
6-24
4. IAT Sensor Signal Wire Shorted to Sensor Ground
3. Front O2 Sensor Signal Wire Open Test
6-24
Test
6-13
DTC P0151
6-24
DTC P0113
6-13
1. Rear O2 Sensor Test
6-24
1. IAT Sensor Test
6-13
2. Rear O2 Sensor Signal Wire Shorted to Sensor Ground
2. IAT Sensor Signal Wire Open Test
6-13
Test
6-24
3. IAT Sensor Open Ground Wire Test
6-13
3. Rear O2 Sensor Signal Wire Shorted to Ground
4. IAT Sensor Signal Wire Shorted to Sensor Power
Test
6-24
Test
6-13
4. Rear O2 Sensor Operation Test
6-24
DTC P0152
6-24
TABLE OF CONTENTS IX
TABLE OF CONTENTS
1. Rear O2 Sensor Operation Test
6-24
2. VSS Signal Wire Short to Voltage Test
6-35
DTC P0154
6-25
3. VSS Ground Wire Open Test
6-35
1. Rear O2 Sensor Signal Wire Short Circuit Voltage
4. VSS Signal Wire Shorted to Sensor Power Test
6-36
Test
6-25
5. VSS Test
6-36
2. Rear O2 Sensor Open Sensor Ground Test
6-25
3. Rear O2 Sensor Signal Wire Open Test
6-25
6.12 DTC P0505
Description and Operation
6-37
6.9 DTC P0261, P0262, P0263, P0264
Diagnostic Trouble Code P0505: Loss of Idle Speed
Description and Operation
6-26
Control
6-37
Connector Information
6-26
Diagnostic Tips
6-37
DTC P0261
6-28
Connector Information
6-38
1. Front Fuel Injector Test
6-28
DTC P0505
6-39
2. Front Fuel Injector Power Wire Open Circuit Test...6-28
1. IAC Operational Test
6-39
3. Front Fuel Injector Power Wire Shorted to Ground
2. IAC Connector Test
6-39
Test
6-28
3. IAC Circuits Open Test
6-39
4. Fuel Injector/System Relay Test
6-28
4. IAC Circuits Shorted to Ground Test
6-39
5. Injector Resistance Test
6-28
5. IAC Circuits Short to Voltage Test
6-39
6. Driver Short to Ground Test
6-28
6. Short between IAC Circuits Test
6-39
DTC P0262
6-28
1. Front Fuel Injector Control Wire Shorted to Voltage
6.13 DTC P0603, P0605
Test
6-28
Description and Operation
6-40
2. Injector Resistance Test
6-28
DTC P0603 Test
6-40
DTC P0263
6-29
DTC P0605 Test
6-40
1. Rear Fuel Injector Test
6-29
2. Rear Fuel Injector Power Wire Open Circuit Test...6-29
6.14 DTC P0661, P0662
3. Rear Fuel Injector Power Wire Shorted to Ground
Description and Operation
6-41
Test
6-29
Connector Information
6-41
4. Fuel Injector/System Relay Test
6-29
DTC P0661, P0662
6-42
5. Injector Resistance Test
6-29
1. AIS Test
6-42
6. Driver Short to Ground Test
6-29
2. AIS Resistance Test
6-42
DTC P0264
6-29
3. AIS Open Ground Wire Test
6-42
1. Rear Fuel Injector Control Wire Shorted to Voltage
4. AIS
Low Short to
Ground Test
6-42
Test
6-29
5. AIS High Short to Ground Test
6-42
2. Injector Resistance Test
6-29
6. AIS Open Supply Wire Test
6-42
6.10 DTC P0373, P0374
6.15 DTC P1009, P1010
Description and Operation
6-30
Description and Operation
6-43
Diagnostic Tips
6-30
Password Problem
6-43
Connector Information
6-30
Connector Information
6-43
DTC P0373
6-31
DTC P1009, P1010
6-43
1. CKP Sensor Test
6-31
1. Incorrect Password Test
6-43
DTC P0374
6-32
2. TSM, TSSM or HFSM Replacement Test
6-43
1. CKP Sensor Connections Test
6-32
2. CKP Sensor Signal Wire Continuity Test
6-32
6.16 DTC P1001, P1002, P1003, P1004
3. CKP Sensor Ground Wire Continuity Test
6-32
Description and Operation
6-44
4. CKP Sensor Signal Wire Shorted to CKP Ground Wire
Connector Information
6-44
Test
6-32
DTC P1001
6-46
5. CKP Sensor Low Shorted to Ground Test
6-32
1. System Relay Test
6-46
6. CKP Sensor Output Test
6-32
2. System Relay Coil Power Circuit Test
6-46
7. CKP Sensor Signal Wire Shorted to Ground Test..6-32
3. System Relay Coil Control Short to Ground Test
6-46
6.11 DTC P0501, P0502
4. System Relay Coil Control Circuit Test
6-46
DTC P1002
6-46
Description and Operation
6-33
1. System Relay Test
6-46
Connector Information
6-33
2. System Relay Coil Short to Voltage Test
6-46
DTC P0501
6-35
DTC P1003
6-46
1. VSS Connections Test
6-35
1. System Relay Test
6-46
2. VSS Sensor Power Short to Ground Test
6-35
2. System Relay Power Supply Test
6-46
3. VSS Signal Wire Short to Ground Test
6-35
3. System Relay Switch Side Circuit Test
6-47
4. VSS Signal Wire Open Test
6-35
4. System Relay Power Supply Circuit Test
6-47
5. VSS Dirty or Damaged Test
6-35
DTC P1004
6-47
DTC P0502
6-35
1. System Relay Test
6-47
1. VSS Sensor Power Shorted to Voltage Test
6-35
2. System Relay Switch Side Short to Voltage Test
6-47
X TABLE OF CONTENTS
TABLE OF CONTENTS
3. System Relay Coil Short to Ground Test
6-47
6.21 NO ECM POWER
4. Rear Coil Short to Voltage Test
6-47
Description and Operation
6-60
5. Front Coil Short to Voltage Test
6-47
Connector Information
6-60
No ECM Power
6-62
6.17 DTC P1351, P1352, P1354, P1355
1. ECM Fuse Test
6-62
Description and Operation
6-48
2. IGN Fuse Test
6-62
Connector Information
6-48
3. ECM Connector Test
6-62
DTC P1351
6-50
4. ECM Battery Wire Test
6-62
1. Ignition Coil Test
6-50
5. ECM Switched Voltage Test
6-62
2. Ignition Coil Input Voltage Test
6-50
6. ECM Ground Wires Test
6-62
3. Ignition Coil Control Wire Continuity Test
6-50
7. Engine Stop Switch Battery Voltage Test
6-62
4. Ignition Coil Control Wire Shorted to Ground
8. Engine Stop Switch Test
6-62
Test
6-50
DTC P1352
6-50
6.22 STARTS, THEN STALLS
1. Ignition Coil Shorted to Voltage Test
6-50
Description and Operation
6-63
2. Ignition Coil Open Test
6-50
Diagnostic Tips
6-63
DTC P1354
6-50
Connector Information
6-63
1. Ignition Coil Test
6-50
Starts, Then Stalls
6-63
2. Ignition Coil Input Voltage Test
6-51
1. Throttle Test
6-63
3. Ignition Coil Control Wire Continuity Test
6-51
2. Jiffy Stand Test
6-63
4. Ignition Coil Control Wire Shorted to Ground
3. Neutral Switch Test
6-63
Test
6-51
4. Fuel System Test
6-63
DTC P1355
6-51
1. Ignition Coil Shorted to Voltage Test
6-51
6.23 HESITATION, LOSS OF POWER
2. Ignition Coil Open Test
6-51
Description and Operation
6-64
6.18 DTC P1501, P1502
Connector Information
6-64
Hesitation, Loss of Power Test
6-65
Description and Operation
6-52
1. Preliminary Engine Tests
6-65
Connector Information
6-52
2. Vacuum Leak Test
6-66
DTC P1501
6-54
3. Spark Present Test
6-66
1. JSS 5V Reference Open Circuit Test
6-54
4. Compression Test
6-66
2. JSS 5V Reference Shorted to
Ground Test
6-54
5. Fuel System
Test
6-66
3. JSS Signal Wire Shorted to Ground Test
6-54
4. JSS Signal Wire Open Circuit
Test
6-54
6.24 MISFIRE AT IDLE OR UNDER LOAD
DTC P1502
6-54
1. JSS Ground Wire Test
6-54
Description and Operation
6-67
2. JSS 5V Reference Wire Short to Voltage Test
6-54
Diagnostic Tips
6-67
3. JSS Signal Wire Short to Voltage Test
6-54
In-line Spark Tester
6-67
4. JSS 5V Reference and Signal Shorted Together
Connector Information
6-67
Test
6-54
Misfire At Idle or Under Load
6-69
Side Stand Displayed on Odometer
6-54
1. Power Ground Continuity Test
6-69
1. Starts, Then Stalls Test
6-55
2. Spark Test
6-69
2. Neutral Test
6-55
3. Spark Plug Cable Test
6-69
3. JSS Clearance Test
6-55
4. Carbon Tracking Inspection Test
6-69
5. Ignition Coil Primary Wire Continuity Test
6-69
6.19 DTC P1653, P1654
6. Battery to System Relay Voltage Drop Test
6-69
7. Battery to System Relay Contact Voltage Drop Test
Description and Operation
6-56
..................................................................................6-69
8. Battery to ECM Fuse Voltage Drop Test
6-69
6.20 ENGINE CRANKS, BUT WILL NOT
9. Battery to Fuse Block Voltage Drop Test
6-69
START
10. Battery to Fuse Block Voltage Drop Test
6-70
Description and Operation
6-57
11. Battery to Main Fuse Block Voltage Drop Test
6-70
Connector Information
6-57
Engine Cranks but Will Not Start
6-59
APPENDIX A CONNECTOR REPAIR
1. Preliminary Engine Tests
6-59
2. Check Engine Lamp Test
6-59
A.1 AUTOFUSE UNSEALED ELECTRICAL
3. Spark Present Test
6-59
CONNECTORS
4. Compression Test
6-59
5. Fuel Pump Voltage Test
6-59
Autofuse Unsealed Connector Repair
A-1
6. Fuel System Test
6-59
General
A-1
7. Fuel Pump Open Circuit Test
6-59
Disassembly
A-1
Assembly
A-1
TABLE OF CONTENTS XI
TABLE OF CONTENTS
A.2 BOSCH COMPACT 1.1M CONNECTOR
A.9 DELPHI METRI-PACK TERMINAL
Bosch Compact 1.1M Connector
A-2
REPAIR
General
A-2
Metri-Pack Terminal Crimps
A-11
Housings
A-2
Matching Terminal To Crimper
A-11
Removing Socket Terminal
A-2
Preparing Wire Lead
A-11
Installing Socket Terminal
A-2
Crimping Wire Core
A-11
Crimping Insulation/Seal
A-11
A.3 DELPHI 100W MICRO-PACK SEALED
Inspecting Crimps
A-12
CONNECTOR
A.10 DELPHI MICRO 64 SEALED
Delphi 100W Micro-Pack Sealed Connector Repair
A-3
General
A-3
CONNECTORS
Separating Socket Housing From ECM
A-3
Delphi Micro 64 Sealed Connector Repair
A-13
Mating Socket Housing To ECM
A-3
General
A-13
Removing Socket Terminal
A-3
Separating Pin and Socket Housings
A-13
Installing Socket Terminal
A-3
Mating Pin and Socket Housings
A-13
Crimping Terminals
A-4
Removing Terminal
A-13
Installing Terminal
A-14
A.4 DELPHI 150 METRI-PACK SEALED
Preparing Wire Leads for Crimping
A-14
CONNECTORS
Crimping Terminals
A-14
Delphi 150 Metri-Pack Sealed Connector Repair
A-5
Inspecting Crimps
A-14
General
A-5
A.11 DELPHI GT 150 SEALED
Separating Pin and Socket Housings
A-5
Mating Pin and Socket Housings
A-5
CONNECTORS
Removing Socket Terminal
A-5
Delphi GT 150 Sealed Connector Repair
A-16
Inserting Socket Terminal
A-5
General
A-16
Separating Pin and Socket Housings
A-16
A.5 DELPHI 280 METRI-PACK UNSEALED
Mating Pin and Socket Housings
A-16
CONNECTORS
Removing Socket Terminals
A-16
Fuse Block Repair
A-7
Installing Socket Terminals
A-16
Removing Socket Terminals
A-7
A.12 DELPHI GT 280 SEALED 73-TERMINAL
Installing Socket Terminals
A-7
Crimping Terminals
A-7
ECM CONNECTOR
Delphi GT 280 Sealed 73-Terminal ECM Connector
A-18
A.6 DELPHI 480 METRI-PACK UNSEALED
Separating Socket Housing From ECM
A-18
CONNECTORS
Mating Socket Housing To ECM
A-18
Socket Terminal
A-18
Delphi 480 Metri-Pack Unsealed Connector Repair
A-8
ECM Ground Terminal
A-18
General
A-8
Separating Pin and Socket Housings
A-8
A.13 DEUTSCH DT SEALED CONNECTORS
Mating Pin and Socket Housings
A-8
Removing Socket Terminals
A-8
Deutsch DT Sealed Connector Repair
A-20
Installing Socket Terminals
A-8
General
A-20
Separating Pin and Socket Housings
A-20
A.7 DELPHI 630 METRI-PACK UNSEALED
Mating Pin and Socket Housings
A-20
CONNECTORS
Removing Socket Terminals
A-20
Installing Socket Terminals
A-20
Delphi 630 Metri-Pack Unsealed Connector Repair
A-9
Removing Pin Terminals
A-22
Separating Pin and Socket Housings
A-9
Installing Pin Terminals
A-22
Mating Pin and Socket Housings
A-9
Crimping Terminals
A-23
Removing Socket Terminal
A-9
Installing Socket Terminal
A-9
A.14 DEUTSCH DT SEALED TERMINAL
A.8 DELPHI 800 METRI-PACK SEALED MAIN
REPAIR
FUSE HOUSING
Deutsch DT Sealed Terminal Crimps
A-24
Preparing Wire Leads for Crimping
A-24
Delphi 800 Metri-Pack Sealed Main Fuse Housing
Crimping Terminal to Lead
A-24
Repair
A-10
Inspecting Crimps
A-24
Removing Socket Terminals
A-10
Installing Socket Terminals
A-10
A.15 DEUTSCH DTM SEALED MINI
TERMINAL REPAIR
Deutsch DTM Sealed Mini Terminal Crimps
A-25
XII TABLE OF CONTENTS
TABLE OF CONTENTS
Preparing Wire Leads for Crimping
A-25
A.22 TYCO MCP SEALED CONNECTOR
Crimping a Mini Terminal to Wire Lead
A-25
Tyco MCP Sealed Connector
A-41
Inspecting Crimps
A-25
General
A-41
Housing
A-41
A.16 DEUTSCH DTM SEALED SOLID
Removing the Large Terminals
A-41
BARREL MINI TERMINAL REPAIR
Removing the Small Terminals
A-41
Deutsch DTM Sealed Solid Barrel Terminal Crimps
A-26
Installing Terminals
A-42
Preparing Wire Leads For Crimping
A-26
Crimping Terminals
A-42
Adjusting Crimper Tool
A-26
Crimping a Barrel Contact To Wire Lead
A-26
A.23 SEALED SPLICE CONNECTORS
Inspecting Crimps
A-26
Sealed Splice Connector Repair
A-43
General
A-43
A.17 JAE MX19 SEALED CONNECTORS
Preparing Wire Leads
A-43
JAE MX19 Sealed Connectors
A-28
Splicing Wire Leads
A-43
Connector Housings
A-28
Inspecting Seals
A-43
Removing Terminals
A-28
Installing Terminals
A-28
APPENDIX B WIRING
Crimping Terminals
A-28
B.1 CONNECTORS
A.18 MOLEX CMC SEALED CONNECTORS
Connector Locations
B-1
Molex CMC Sealed Connectors
A-29
Function/Location
B-1
Separating the Connector
A-29
Place and Color
B-1
Removing Terminals
A-29
Connector Number
B-1
Installing Terminals
A-29
Repair Instructions
B-1
Crimping Terminals
A-30
B.2 WIRING DIAGRAMS
A.19 MOLEX MX 150 SEALED
Wiring Diagram Information
B-4
CONNECTORS
Wire Color Codes
B-4
Molex MX 150 Sealed Connector Repair
A-31
Wiring Diagram Symbols
B-4
Separating Pin and Socket Housings
A-31
2013 Sportster Wiring Diagrams
B-6
Mating Pin and Socket Housings
A-31
Removing Terminals
A-31
APPENDIX C CONVERSIONS
Installing Terminals
A-31
Crimp Terminal to Lead
A-32
C.1 METRIC CONVERSION
Prepare Lead
A-32
Prepare Tool
A-32
Conversion Table
C-1
Position Terminal in the Punch/Die
A-33
C.2 FLUID CONVERSIONS
Insert Stripped Lead
A-33
Crimp Terminal to Lead
A-34
United States System
C-2
Inspect Crimp
A-34
Metric System
C-2
British Imperial System
C-2
A.20 TYCO 070 MULTILOCK UNSEALED
CONNECTOR
C.3 TORQUE CONVERSIONS
Tyco 070 Multilock Unsealed Connector Repair
A-35
United States System
C-3
General
A-35
Metric System
C-3
Separating Pin and Socket Housings
A-35
Mating Pin and Socket Housings
A-35
APPENDIX D GLOSSARY
Removing Terminals from Housing
A-35
Inserting Terminals into Housing
A-36
D.1 GLOSSARY
Preparing Wire Leads for Crimping
A-36
Acronyms and Abbreviations
D-1
Crimping Terminals to Leads
A-37
Inspecting Crimped Terminals
A-38
REFERENCE MATERIAL
A.21 TYCO GET 64 SEALED CONNECTOR
TOOLS
I
Tyco GET 64 Sealed Connector
A-39
General
A-39
TORQUE VALUES
IX
Housings
A-39
Removing Socket Terminals
A-39
INDEX
XI
Installing Socket Terminals
A-39
Crimping Terminals
A-40
TABLE OF CONTENTS XIII
TABLE OF CONTENTS
SUBJECT
PAGE NO.
1.1 SPECIFICATIONS AND COMPONENT LOCATIONS
1-1
1.2 DIAGNOSTIC TOOLS
1-7
1.3 DIAGNOSTICS AND TROUBLESHOOTING
1-11
HOME
SPECIFICATIONS AND COMPONENT
LOCATIONS
1.1
SPECIFICATIONS
Table 1-7. Starter Specifications
Table 1-1. Fuel System Specifications
STARTER
SPECIFICATIONS
FUEL SYSTEM
TYPE
Cranking current
200A
Intake
XL - side draft
Free speed
3000 rpm (min)
XR - down draft throttle body
Free current
90A
Recommended fuel
91 Octane
Stall torque
8.0 ft-lbs (10.8 Nm)
Table 1-2. Idle Speed Specifications
Table 1-8. Fuel Pump Pressure Specifications
ADJUSTMENT
RPM
RANGE
VALUE
Normal idle speed
800-1250 Nominal, non-
Normal
55-62 psi (380-425 kPA)
adjustable
Table 1-9. Alternator Specifications
Table 1-3. Battery Specifications
MEASUREMENT
VALUE
BATTERY
SPECIFICATIONS
AC voltage output
20-28 VAC per 1000 rpm
Size
12V/12 AH/225CCA
Stator coil resistance
0.1-0.3 Ohm
T
ype
Sealed, AGM
Table 1-10. Regulator Specifications
Table 1-4. Spark Plug Specifications
MEASUREMENT
VALUE
SPARK PLUG
SPECIFICATIONS
Amperes @ 3600 rpm
32A
Gap (XL)
0.038-0.043 in.
0.96-1.09 mm
Voltage @ 3600 rpm
14.3-14.7V @ 75 °F (24 °C)
Gap (XR)
0.032-0.038 in.
0.81-0.97 mm
T
orque with anti-seize
12-18 ft-lbs
16.3-24.4 Nm
applied to threads
Table 1-11. Fuse Specifications
Type (XL)
Harley-Davidson No. 6R12 (no
ITEM
RATING (AMPERES)
substitute)
ACCY fuse
15
Type (XR)
Harley-Davidson No. 10R12X (no
Battery fuse
15
substitute)
ECM fuse
15
Table 1-5. Spark Plug Cables
Ignition fuse
15
Lights fuse
15
SPECIFICATION
FRONT
REAR
Main fuse
30
Length in.
6.25-6.60
19.37-19.63
Length mm
158.7-167.6
491.9-498.6
COMPONENT LOCATIONS
Resistance-ohms
1563-4402
4843-13,093
Some components and connectors are not easily located on
the motorcycle. The following graphics show locations for these
components and connectors. The graphics are generally
Table 1-6. Ignition Coil Specifications
ordered from front to back around the motorcycle.
WINDING
RESISTANCE
Ignition
coil primary resistance
0.3-0.7 Ohm
at room temperature
Ignition coil secondary resist-
1500-2400 Ohms
ance at room temperature
2013 Sportster Diagnostics: General Information 1-1
HOME
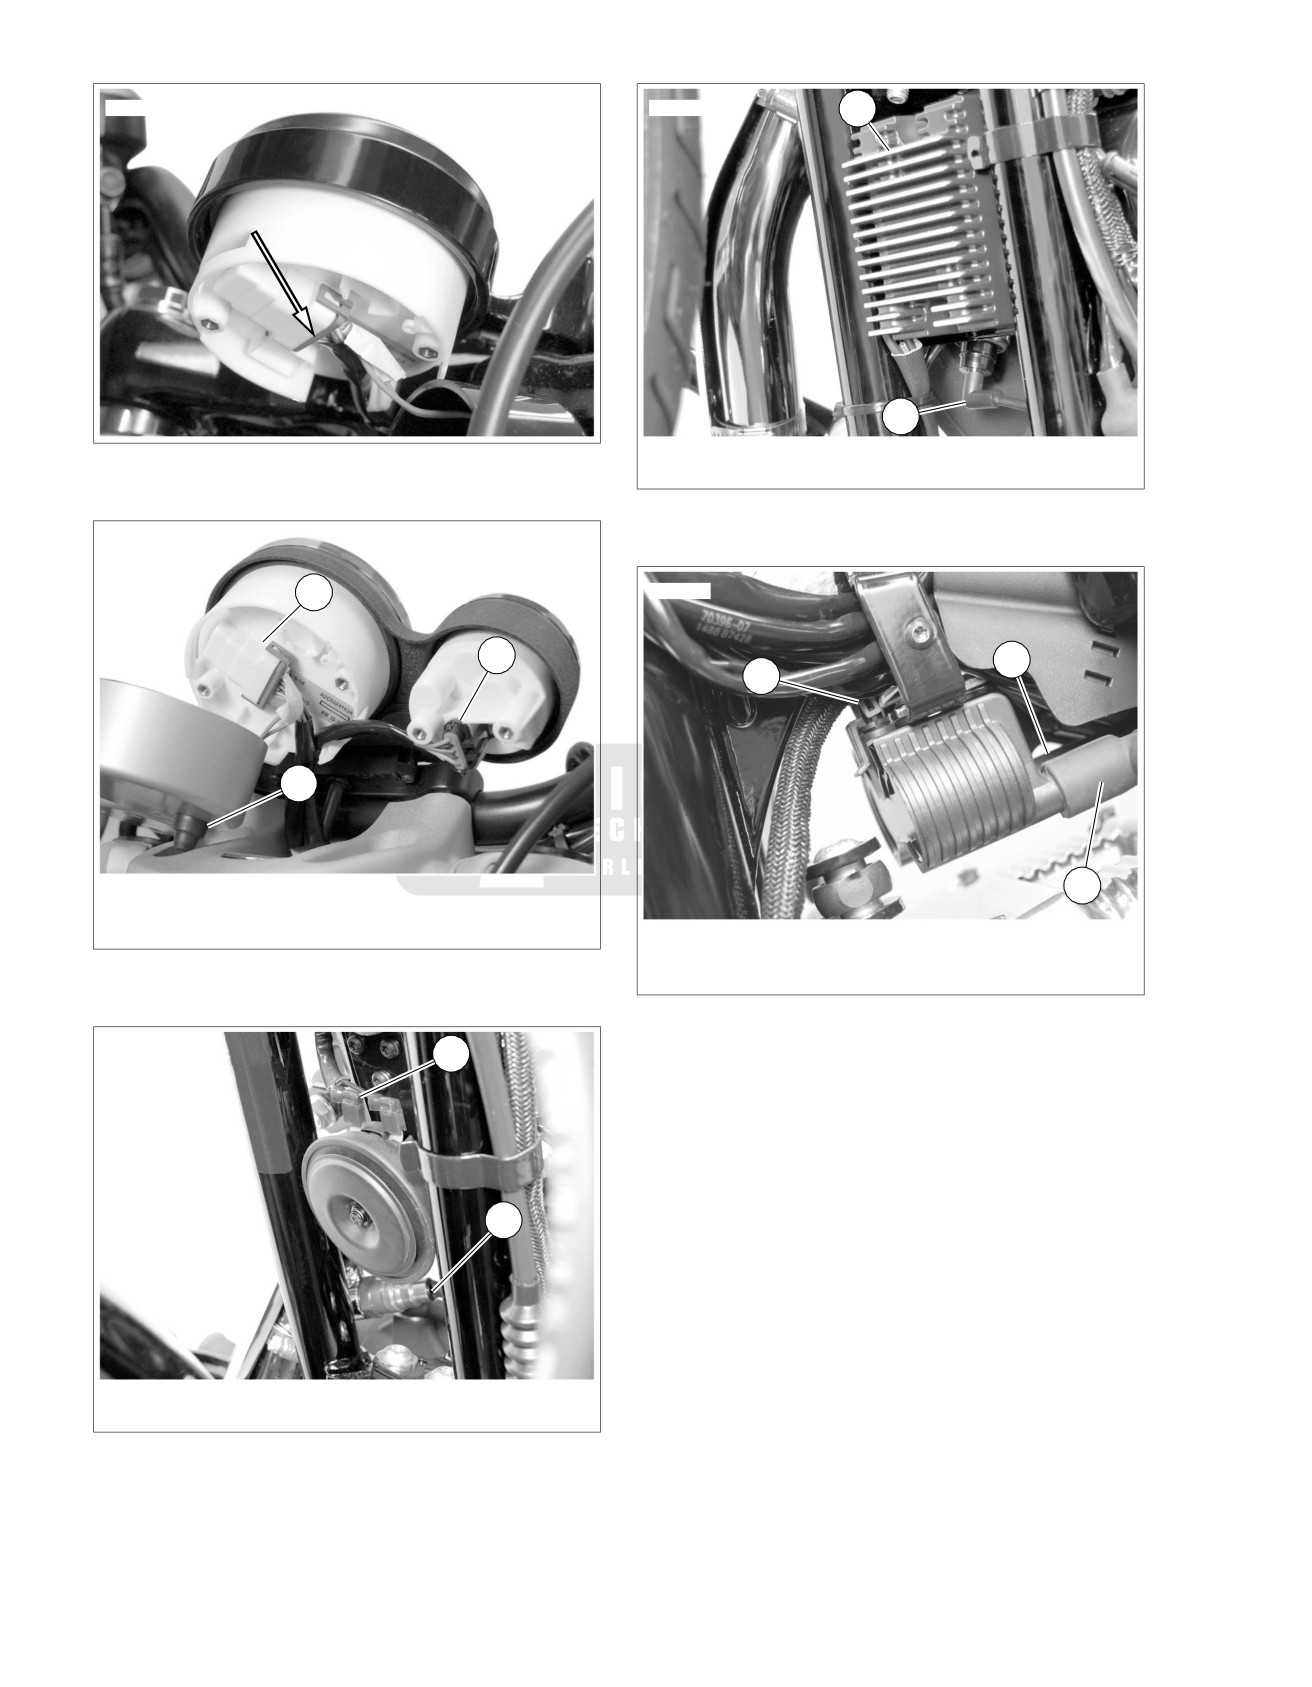
ed01991
ed01994
1
2
1. Voltage regulator
Figure 1-1. Speedometer [39]: XL
2. Oil pressure switch [120]
Figure 1-4. Voltage Regulator: XL
ed01992
1
ed01996
2
2
1
3
1. Tachometer [108]
3
2. Speedometer [39]
3. Trip odometer reset switch
1. Ignition coil [83]
2. Rear spark plug wire
Figure 1-2. Instruments: XR
3. Front spark plug wire
Figure 1-5. Ignition Coil
ed01993
1
2
1. Horn [122]
2. Front O2 sensor
Figure 1-3. Horn (Typical)
1-2 2013 Sportster Diagnostics: General Information
HOME
ed01995
ed01997
2
1
9
1
3
4
4
5
2
8
3
7
6
1. Voltage regulator [77]
1. Front turn signals [31]
2. CKP sensor [79]
2. Instruments [20]
3. JSS (HDI) [133]
3. Right hand controls [22]
4. Front O2 sensor [138]
4. IAC [87]
5. TMAP [80]
Figure 1-6. Lower Left Front
6. Rear fuel injector [85]
7. Front fuel injector [84]
8. Left hand controls [24]
ed03060
9. Headlamp [38]
1
Figure 1-8. Under Fuel Tank Left Side
ed01998
1
3
2
2
1. Voltage regulator to stator [47]
2. Neutral switch [136]
Figure 1-7. Lower Right Front
1. IAC [87]
2. Rear fuel injector [85]
3. Front fuel injector [84]
Figure 1-9. Between Cylinder Heads Left Side
2013 Sportster Diagnostics: General Information 1-3
HOME
ed03059
ed03052
3
2
1
2
1
4
6
6
3
5
5
4
1. ET sensor
1. ECM [78]
2. Rear fuel injector [85]
2. Security antenna [209]
3. IAC [87]
3. P&A battery [160]
4. Front fuel injector [84]
4. Fuel sender resistor assembly [200]
5. TPS [88]
5. Battery
6. TMAP sensor [80]
6. Engine sensor harness [145]
Figure 1-10. Between Cylinders Right Side
Figure 1-12. ECM: XR
ed03053
ed03055
1
2
1
3
2
9
3
4
8
5
7
1. Rear tire
6
2. HFSM antenna [208]
3. TSM, TSSM or HFSM [30]
Figure 1-13. TSM, TSSM or HFSM
1. Security antenna [209]
2. Right rear turn signal [18] (HDI)
3. Left rear turn signal [19] (HDI)
4. License plate lamp [40]
5. Tail lamp harness to main harness [7]
6. P&A battery [160]
7. Fuel sender resistor assembly [200]
8. Engine sensor harness [145]
9. Battery
Figure 1-11. Under Seat: XL (Typical)
1-4 2013 Sportster Diagnostics: General Information
HOME
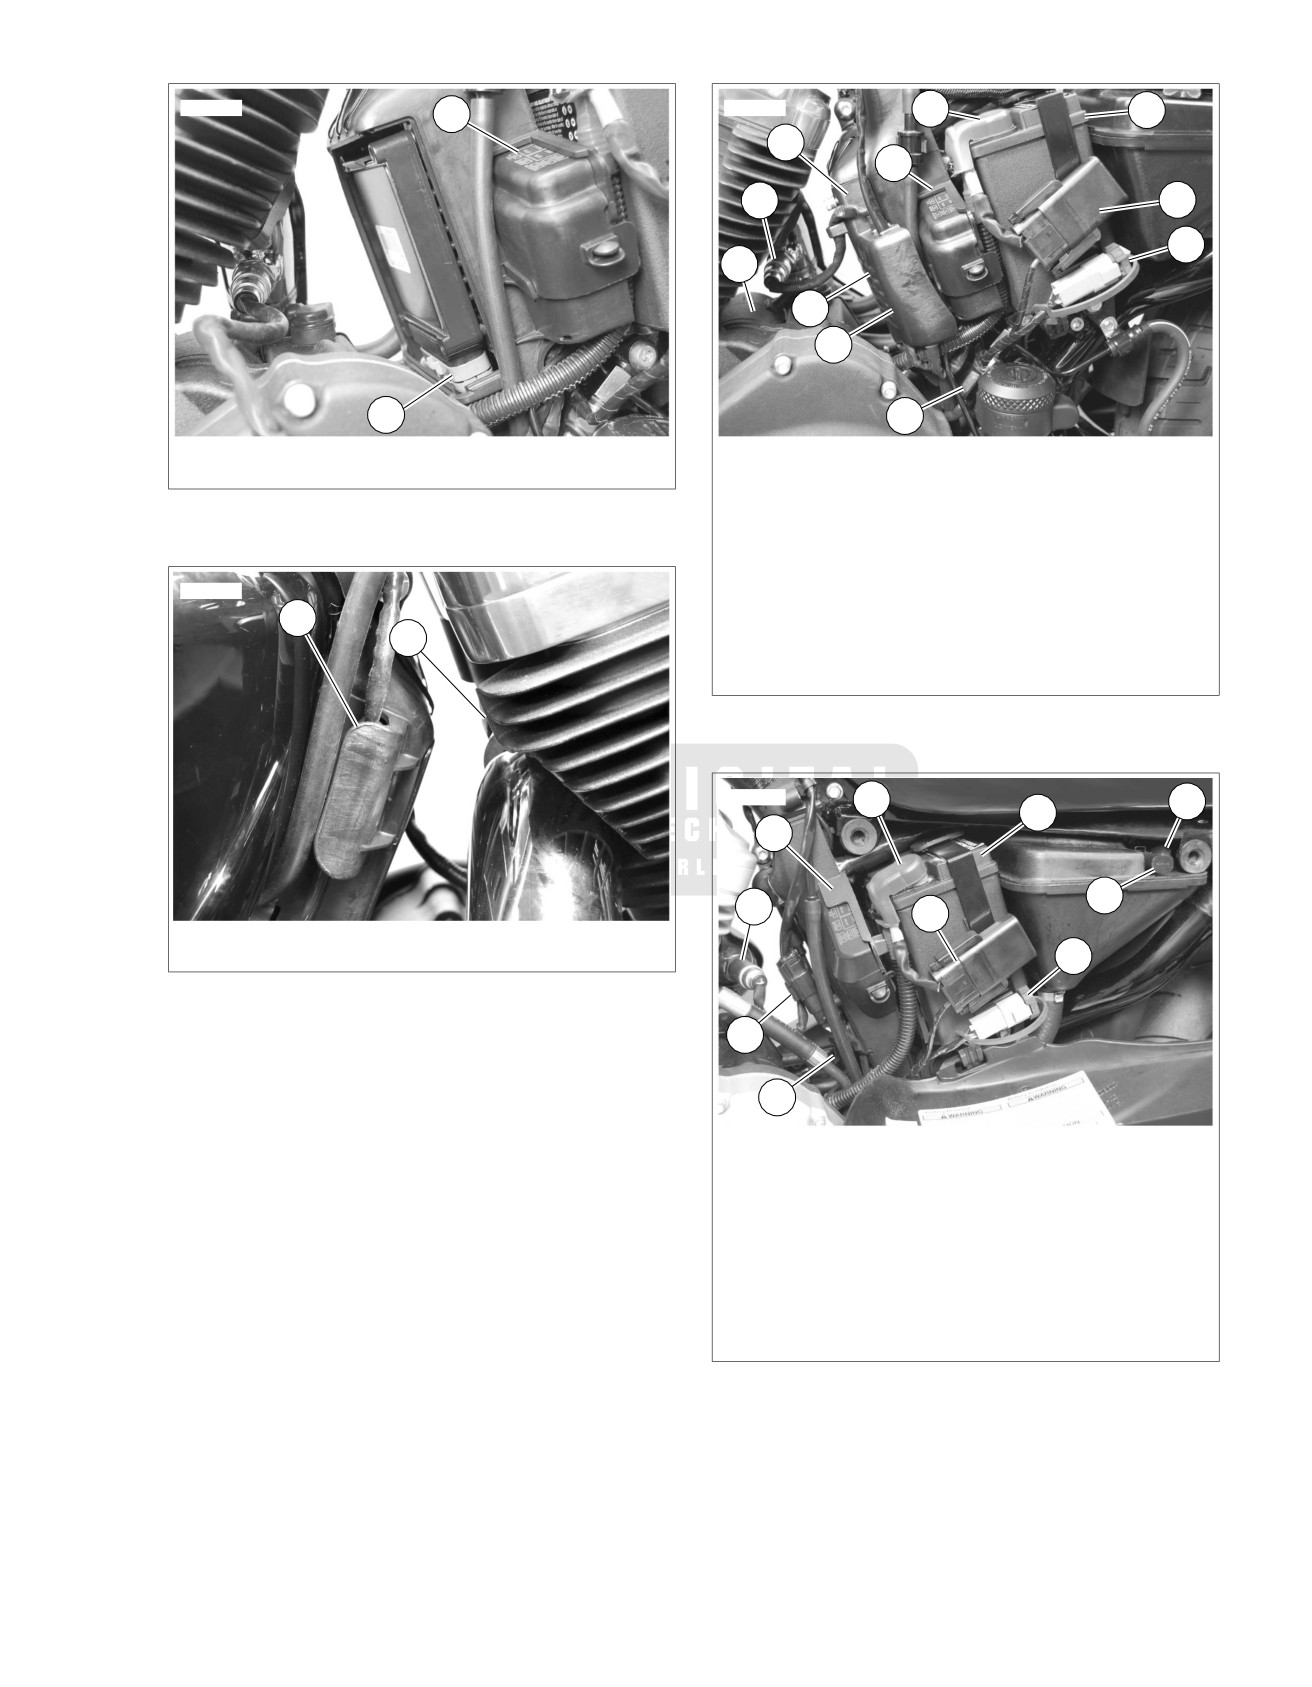
ed03051
ed01999
2
1
3
11
1
10
4
5
9
8
7
2
6
1. Fuse block [61]
1. Fuse block [61]
2. ECM [78]
2. Positive battery cable
3. Battery
Figure 1-14. ECM: XL
4. Main fuse [5]
5. DLC [91]
6. Rear stop lamp switch (XL models) [121]
ed03058
7. Fuel pump and low fuel switch [141]
8. Rear O2 sensor [137]
1
2
9. Starter
10. Rear O2 sensor
11. ECM
Figure 1-16. Under Left Side Cover: XL
ed03050
2
4
3
1
5
10
7
1.
ET sensor [90]
2.
Rear cylinder
6
Figure 1-15. ET Sensor [90]
9
8
1. Fuse block [61]
2. Positive battery cable
3. Battery
4. P&A battery [160]
5. Fuel sender resistor assembly [200]
6. DLC [91]
7. Main fuse [5]
8. Rear O2 sensor [137]
9. Fuel pump and low fuel switch [141]
10. Rear O2 sensor
Figure 1-17. Under Left Side Cover: XR
2013 Sportster Diagnostics: General Information 1-5
///////////////////////////////////////