Harley Davidson 2013 Sportster Models. Service Manual - page 26
REMOVAL
Mufflers and Exhaust Pipes
NOTE
See
. Vehicles with mid controls are equipped with
an extra heat shield (2) on the rear exhaust pipe.
1.
See
. Remove heat shields:
a.
Models with Mid Controls:
Remove worm drive
clamps (13) from heat shield (12) completely. Remove
bottom heat shield.
b.
All Models:
Open worm drive clamps (13) and
remove exhaust pipe heat shields (11, 12).
c.
HDI, England, Asia Pacific, India, Japan, Brazil
Models:
Open worm drive clamps (15) and remove
muffler heat shields (14).
2.
Unplug O2 sensor connectors (30). Front connector [138]
is mounted on left front frame downtube. Rear connector
[137] is attached to the ECM caddy on the left.
3.
Remove nuts (10) from front and rear cylinder head
exhaust studs.
4.
Remove flanged bolts (16) securing front and rear mufflers
(1, 2) to muffler interconnect bracket (5).
5.
Loosen Torca muffler clamp assemblies (6) on front and
rear mufflers. Remove mufflers. Discard muffler intercon-
nect gaskets (19).
6.
Remove and discard Torca clamps.
NOTE
New Torca muffler clamps have eliminated the need for silicone
or graphite tape during assembly. Always use new clamps
during installation to maintain sealing integrity and prevent
leakage.
7.
Remove nut (22) and screw (23) from exhaust pipe clamp
(20). Separate exhaust pipe clamp from clamp bracket
(21).
8.
Remove front and rear exhaust pipes (3, 4). Slide exhaust
pipe clamp off rear exhaust pipe.
9.
Remove exhaust port gasket (7), retaining ring (8) and
exhaust pipe flange (9) from each exhaust pipe. Discard
gasket.
10. Remove O2 sensor assemblies (27, 28) from front and
rear exhaust pipes. Discard seal rings (29). See
1
2
3
4
sm04380
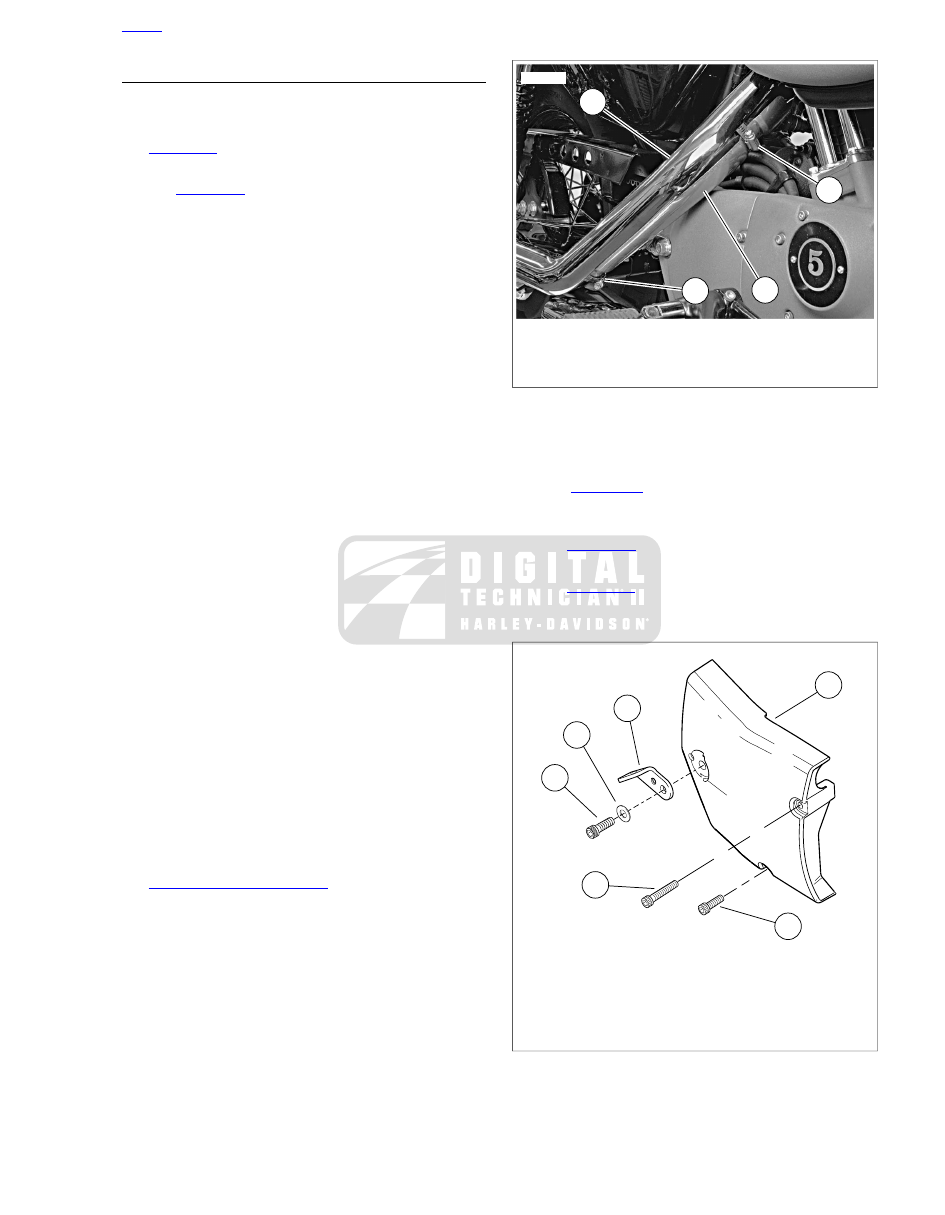
1. Top heat shield
2. Bottom heat shield
3. Upper worm drive clamp
4. Lower worm drive clamp
Figure 4-66. Rear Exhaust Pipe Heat Shields: Vehicles with
Mid Controls
Muffler Interconnect Bracket
1.
See
. Remove screw (6), washer (5) and
exhaust pipe clamp bracket (4). Remove two screws (2,
3). Remove sprocket cover (1).
2.
See
. Remove rear brake rod (1) at bell crank
(2).
3.
See
. Remove three screws (17) and washers
(18) securing muffler interconnect bracket (5) to engine
crankcase. Remove muffler interconnect bracket.
2
4
5
6
3
1
sm02202
1. Sprocket cover
2. Screw
3. Screw
4. Exhaust pipe clamp bracket
5. Washer
6. Screw
Figure 4-67. Sprocket Cover
2013 Sportster Service: Fuel System 4-43