Ford Orion. Manual - part 53
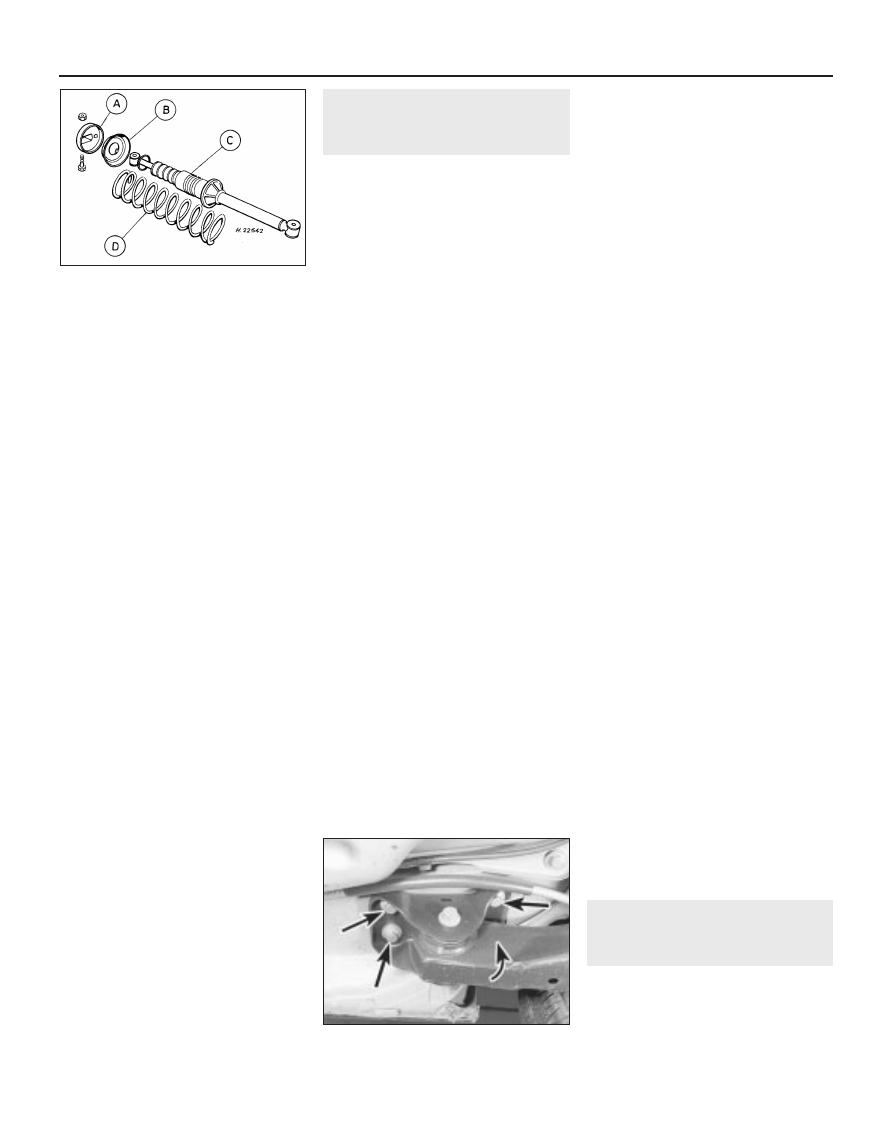
Dismantling
1 With the strut removed from the vehicle,
clean away all external dirt, then secure it in a
vice.
2 Fit the spring compressor tool (ensuring
that it is fully engaged) and compress the coil
spring until all tension is relieved from the
upper mounting.
3 Unscrew and remove the upper mounting
through-bolt and nut (see illustration).
4 Withdraw the upper mounting cup and the
spring seat.
5 The suspension strut and coil spring can
now be separated. If the coil spring or strut is
to be renewed, the original coil spring must be
released from the compressor. If it is to be re-
used, the coil spring can be left in
compression.
Examination
6 With the strut assembly now completely
dismantled, examine all components for wear,
damage or deformation, and check the
bearing for smoothness of operation. Renew
any of the components as necessary.
7 Examine the strut for signs of fluid leakage.
Check the strut piston for signs of pitting
along its entire length, and check the strut
body for signs of damage or elongation of the
mounting bolt holes. Test the operation of the
strut, holding it in an upright position, by
moving the piston through a full stroke, and
then through short strokes of 50 to 100 mm.
In both cases, the resistance felt should be
smooth and continuous. If the resistance is
jerky, or uneven, or if there is any visible sign
of wear or damage to the strut, renewal is
necessary.
Reassembly
8 Reassembly is a reversal of the dismantling
procedure but note the following points:
a)
When the spring is located over the
suspension strut, the spring seat, cup and
through-bolt fitted, tighten the retaining
bolt to the specified torque setting.
b)
When reassembled, check that the upper
and lower spring tails are correctly
engaged with their spring seats before
removing the spring compressor.
14 Rear axle (Hatchback,
Saloon and Estate models) -
removal and refitting
3
Removal
1 Chock the front wheels, then raise and
support the vehicle at the rear on axle stands.
Unbolt and remove the roadwheels.
2 Refer to Chapter 9 for details, and
disconnect the handbrake cable equaliser
from the primary cable. Detach the non-
adjustable cable circlip and the cable from the
underbody fastenings.
3 Disconnect the rear brake flexible hydraulic
brake hoses from their rigid line connections.
Clamp the hoses before disconnecting them,
to minimise the fluid loss and air entry into the
hydraulic system (see Chapter 9 for details).
4 On ABS-equipped models, undo the
retaining nut and detach the ABS load-
apportioning valve from the axle beam. Do not
remove the load-apportioning valve (see
Chapter 9).
Hatchback and Saloon models
5 Locate suitable jacks or axle stands under
the axle beam to support its weight (not to lift
it), then unscrew the mounting bracket bolts
each side (see illustration).
6 Unscrew and remove the strut-to-axle
mounting bolt each side.
7 Check that all associated fittings are clear,
then lower the axle and remove it from under
the vehicle.
8 If the twist beam axle has been damaged, it
must be renewed. Refer to Chapter 9 for
details on removing the rear brakes from the
axle. To remove the front mounting/pivot
brackets from the axle, unscrew the pivot bolt.
Estate models
9 Position a jack under the coil spring area of
the suspension arm (not under the axle beam)
each side, and raise them so that they just
take the weight of the trailing arms.
10 Unscrew and remove the shock absorber
retaining bolt from the lower attachment point
to the rear axle each side.
11 Slowly lower the jack under the
suspension arm each side, and allow the
trailing arms to drop and the compression in
the coil springs to be released.
12 With the coil springs fully relaxed,
withdraw them from their mounting locations
between the body and the suspension arms.
As they are removed, mark each for its
direction of fitting and side so that they are
refitted to their original locations.
13 Reposition the jacks, or place axle stands
under the axle beam to support its weight (not
to lift it), then unscrew the mounting bracket
bolts each side.
14 Check that all associated fittings are clear,
then lower the axle and remove it from under
the vehicle.
15 If the twist beam axle has been damaged,
it must be renewed. Refer to Chapter 9 for
details on removing the rear brakes from the
axle. To remove the front mounting/pivot
brackets from the axle, unscrew the pivot
bolt.
Refitting
All models
16 Refitting is a reversal of the removal
procedure, but note the following:
a)
Reconnect the axle at the front floor
mountings first, and tighten the retaining
bolts to the specified torque setting.
b)
On Hatchback and Saloon models,
reconnect the axle to the suspension
struts, but do not fully retighten the
securing bolts until after the vehicle is
lowered to the ground and is standing on
its wheels.
c)
On Estate models, when relocating the
coil springs between the body and the
suspension arm each side, ensure that
they are correctly orientated, and that
their tails abut against the stops. When
the coil springs are correctly located,
raise the jacks under the suspension
arms, and reconnect the shock absorber
each side.
d)
Ensure that all brake fluid line connections
are clean before reconnecting them. Refer
to the appropriate Sections in Chapter 9
for specific details on reconnecting the
brake lines, bleeding the brake hydraulic
system, and for reconnecting the
handbrake cable and its adjustment.
e)
When the vehicle is lowered and is
standing on its wheels, tighten the
suspension fastenings to the specified
torque wrench settings.
15 Rear axle pivot bushes
(Saloon and Estate models) -
renewal
3
1 Chock the front roadwheels, then raise and
support the vehicle at the rear on axle stands.
2 Position a suitable support (preferably
adjustable) under the axle twist beam so that
it is capable of carrying the weight of the axle
(not the weight of the vehicle).
10•10 Suspension and steering systems
14.5 Rear axle forward mounting bolts
(arrowed)
A
Upper mounting
cup
B Spring seat
C Suspension strut
D Spring
13.3 Rear suspension strut components
as fitted to Hatchback and Saloon models