Ford Crown Victoria (2010 year). Manual - part 51
 

  Index      Ford     Ford Crown Victoria - service manual 2010 year in english


Search            


Content   ..  49  50  51  52   ..


Ford Crown Victoria (2010 year). Manual - part 51


Tire change procedure

WARNING: When one of the front wheels is off the ground, the
transmission alone will not prevent the vehicle from moving or

slipping off the jack, even if the vehicle is in P (Park).

WARNING: To help prevent the vehicle from moving when you
change a tire, be sure the parking brake is set, then block (in

both directions) the wheel that is diagonally opposite (other side and
end of the vehicle) to the tire being changed.

WARNING: If the vehicle slips off the jack, you or someone else
could be seriously injured.

WARNING: Do not attempt to change a tire on the side of the
vehicle close to moving traffic. Pull far enough off the road to

avoid the danger of being hit when operating the jack or changing the
wheel.

Note: Passengers should not remain in the vehicle when the vehicle is
being jacked.

1. Block the diagonally opposite
wheel.

2. Remove any wheel trim. Insert
the tapered end of the lug nut
wrench behind wheel covers or
hubcaps and twist off.

3. Loosen each wheel metal lug nut
one-half turn counterclockwise but
do not remove them until the wheel
is raised off the ground.

Roadside Emergencies

205

2010 Crown Victoria (cro)
Owners Guide, 2nd Printing
USA 
(fus)

Before placing the jack under the vehicle, NOTE the jack location

markings:

JACK LOCATION

The jack location markings can be
found on the lower outer edge of
the body.
• Locate the jack locator mark (B)

on the body (C) near the tire you
are changing, then place the jack
(D) under the frame (A) of
the vehicle 
aligning it with the
mark (B).

• Position the jack according to the

following guides and turn the jack
handle clockwise until the wheel
is completely off the ground.

WARNING: To lessen risk
of personal injury, do not

put any part of your body under
the vehicle while changing a tire.
Do not start the engine when your
vehicle is on the jack. The jack is
ONLY meant for changing the tire.

• Never use the rear differential

as a jacking point.

4. Remove the metal lug nuts with the lug wrench.

5. Replace the flat tire/wheel assembly with the spare tire/wheel
assembly, making sure the valve stem is facing outward. Reinstall lug
nuts until the wheel is snug against the hub. Do not fully tighten the lug
nuts until the wheel has been lowered.

A

D

B

C

Roadside Emergencies

206

2010 Crown Victoria (cro)
Owners Guide, 2nd Printing
USA 
(fus)

6. Lower the vehicle by turning the jack handle counterclockwise.

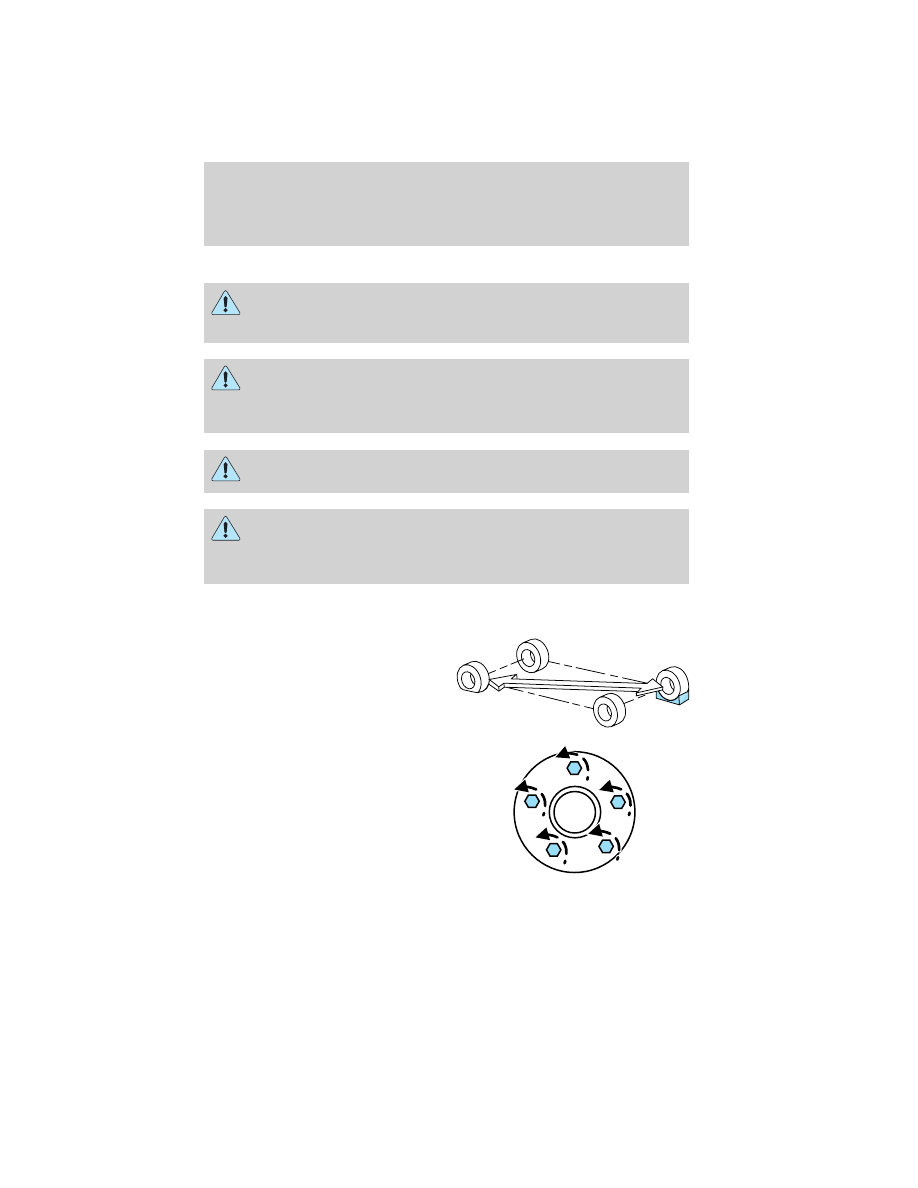
7. Remove the jack and fully tighten
the lug nuts in the order shown.
Refer to Wheel lug nut torque
specifications 
later in this chapter
for the proper lug nut torque
specification.

8. Install any wheel covers,
ornaments or hub caps. Make sure
they are snapped in place.

9. Put flat tire, jack and lug wrench
away.

10. Turn on the air suspension switch (if equipped).

WHEEL LUG NUT TORQUE SPECIFICATIONS

Retighten the lug nuts to the specified torque within 100 miles (160 km)
after any wheel disturbance (tire rotation, changing a flat tire, wheel
removal, etc.).

Bolt size

Wheel lug nut torque*

lb.ft.

N

m

1

2

x 20

100

135

* Torque specifications are for nut and bolt threads free of dirt and
rust. Use only Ford recommended replacement fasteners.

WARNING: When a wheel is installed, always remove any
corrosion, dirt or foreign materials present on the mounting

surfaces of the wheel or the surface of the wheel hub, brake drum or
brake disc that contacts the wheel. Ensure that any fasteners that
attach the rotor to the hub are secured so they do not interfere with
the mounting surfaces of the wheel. Installing wheels without correct
metal-to-metal contact at the wheel mounting surfaces can cause the
wheel nuts to loosen and the wheel to come off while the vehicle is in
motion, resulting in loss of control.

1

4

3

2

5

Roadside Emergencies

207

2010 Crown Victoria (cro)
Owners Guide, 2nd Printing
USA 
(fus)

Note: Inspect the wheel pilot hole
prior to installation. If there is
visible corrosion in wheel pilot hole,
remove loose particles by wiping
with clean rag and apply grease.
Apply grease only to the wheel pilot
hole surface by smearing a “dime”
(1 square cm) sized glob of grease
around the wheel pilot surface (1)
with end of finger. DO NOT apply
grease to lugnut/stud holes or
wheel-to-brake surfaces.

JUMP STARTING

WARNING: The gases around the battery can explode if
exposed to flames, sparks, or lit cigarettes. An explosion could

result in injury or vehicle damage.

WARNING: Batteries contain sulfuric acid which can burn skin,
eyes and clothing, if contacted.

Do not attempt to push-start your automatic transmission
vehicle. Automatic transmissions do not have push-start
capability. Attempting to push-start a vehicle with an automatic
transmission may cause transmission damage.

Preparing your vehicle

When the battery is disconnected or a new battery is installed, the
automatic transmission must relearn its shift strategy. As a result, the
transmission may have firm and/or soft shifts. This operation is
considered normal and will not affect function or durability of the
transmission. Over time, the adaptive learning process will fully update
transmission operation.

1. Use only a 12–volt supply to start your vehicle.

2. Do not disconnect the battery of the disabled vehicle as this could
damage the vehicle’s electrical system.

3. Park the booster vehicle close to the hood of the disabled vehicle making
sure the two vehicles do not touch. Set the parking brake on both vehicles
and stay clear of the engine cooling fan and other moving parts.

Roadside Emergencies

208

2010 Crown Victoria (cro)
Owners Guide, 2nd Printing
USA 
(fus)


Content   ..  49  50  51  52   ..