Ford C-MAX Hybrid / Energi (2016 year). Manual - part 53
 

  Index      Ford     Ford C-MAX Hybrid / Energi - service manual 2016 year in english


Search            


Content   ..  51  52  53  54   ..


Ford C-MAX Hybrid / Energi (2016 year). Manual - part 53


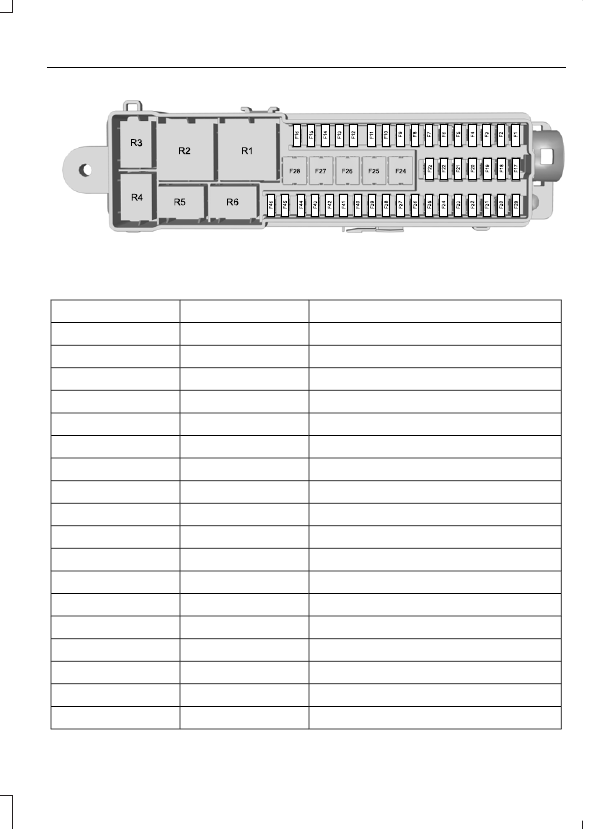
E129927

Protected components

Fuse amp rating

Fuse or relay number

Hands-free liftgate entry module.

5A

F1

Keyless vehicle module.

10A

F2

Keyless vehicle door handles.

5A

F3

Door control unit front left.

25A

F4

Door control unit front right.

25A

F5

Door control unit rear left.

25A

F6

Door control unit rear right.

25A

F7

Not used.

F8

Driver seat motor.

25A

F9

Heated rear window.

25A

F10

Ignition relay.

5A

F11

Battery electronics control module.

15A

F12

Not used.

F13

Charger (C-MAX Energi).

10A

F14

Not used.

F15

Not used.

F16

Battery electronics control module.

10A

F17

Battery electronics control module — fan.

15A

F18

Protected components

Fuse amp rating

Fuse or relay number

Charger fan (C-MAX Energi).

15A

F19

Not used.

F20

Smart datalink connector.

15A

F21

Active noise cancellation.

10A

F22

Not used.

F23

DC/AC power converter.

30A

F24

Power liftgate.

25A

F25

AC/DC charger (C-MAX Energi).

40A

F26

Luggage compartment outlet.

20A

F27

Not used.

F28

Not used.

F29

Parking aid module.

5A

F30

Rear view camera.

5A

F31

DC/AC power converter.

5A

F32

Not used.

F33

Driver seat heater.

20A

F34

Passenger seat heater.

20A

F35

Not used.

F36

Power sun shade.

20A

F37

Not used.

F38

Not used.

F39

Not used.

F40

Not used.

F41

Not used.

F42

Not used.

F43

Not used.

F44

Humidity sensor.

5A

F45

Protected components

Fuse amp rating

Fuse or relay number

Fuel system.

10A

F46

Rear 15 relay.

Power relay

R1

Heated rear window.

Mini relay

R2

Fuel door (C-MAX Energi).

Micro relay

R3

Not used.

R4

Not used.

R5

Rear wiper.

Micro relay

R6

CHANGING A FUSE

Fuses

WARNING

You must replace a failed fuse with
one that has the specified amperage
rating. If you use a fuse with a higher

amperage rating, you may cause severe
wire damage and may start a fire.

E142430

A fuse may fail if electrical components in
the vehicle are not properly working. A
broken wire inside the fuse indicates a
failed fuse. Check the appropriate fuses
before replacing any electrical
components.

GENERAL INFORMATION

Have your vehicle serviced regularly to help
maintain its roadworthiness and resale
value. There is a large network of
authorized dealers that are there to help
you with their professional servicing
expertise. We believe that their specially
trained technicians are best qualified to
service your vehicle properly and expertly.
They are supported by a wide range of
highly specialized tools developed
specifically for servicing your vehicle.

If your vehicle requires professional service,
an authorized dealer can provide the
necessary parts and service. Check your
warranty information to find out which
parts and services are covered.

Use only recommended fuels, lubricants,
fluids and service parts conforming to
specifications. Motorcraft® parts are
designed and built to provide the best
performance in your vehicle.

Precautions

Do not work on a hot engine.

Make sure that nothing gets caught in
moving parts.

Do not work on a vehicle with the
engine running in an enclosed space,
unless you are sure you have enough
ventilation.

Keep all open flames and other burning
material (such as cigarettes) away
from the battery and all fuel related
parts.

Working with the Engine Off

1.

Set the parking brake and shift to park
(P).

2. Switch off the engine.

3. Block the wheels.

Working with the Engine On

WARNING

To reduce the risk of vehicle damage
and/or personal burn injuries, do not
start your engine with the air cleaner

removed and do not remove it while the
engine is running.

1.

Set the parking brake and shift to park
(P).

2. Block the wheels.

OPENING AND CLOSING THE
HOOD

Opening the Hood

E142457

1.

Inside the vehicle, pull the hood release
handle located under the left-hand
side of the instrument panel.

2. Slightly lift the hood.

3. Release the hood latch by pushing the

secondary release lever to your
left-hand side.


Content   ..  51  52  53  54   ..