Ford Fiesta (1989-1995). Manual - part 53
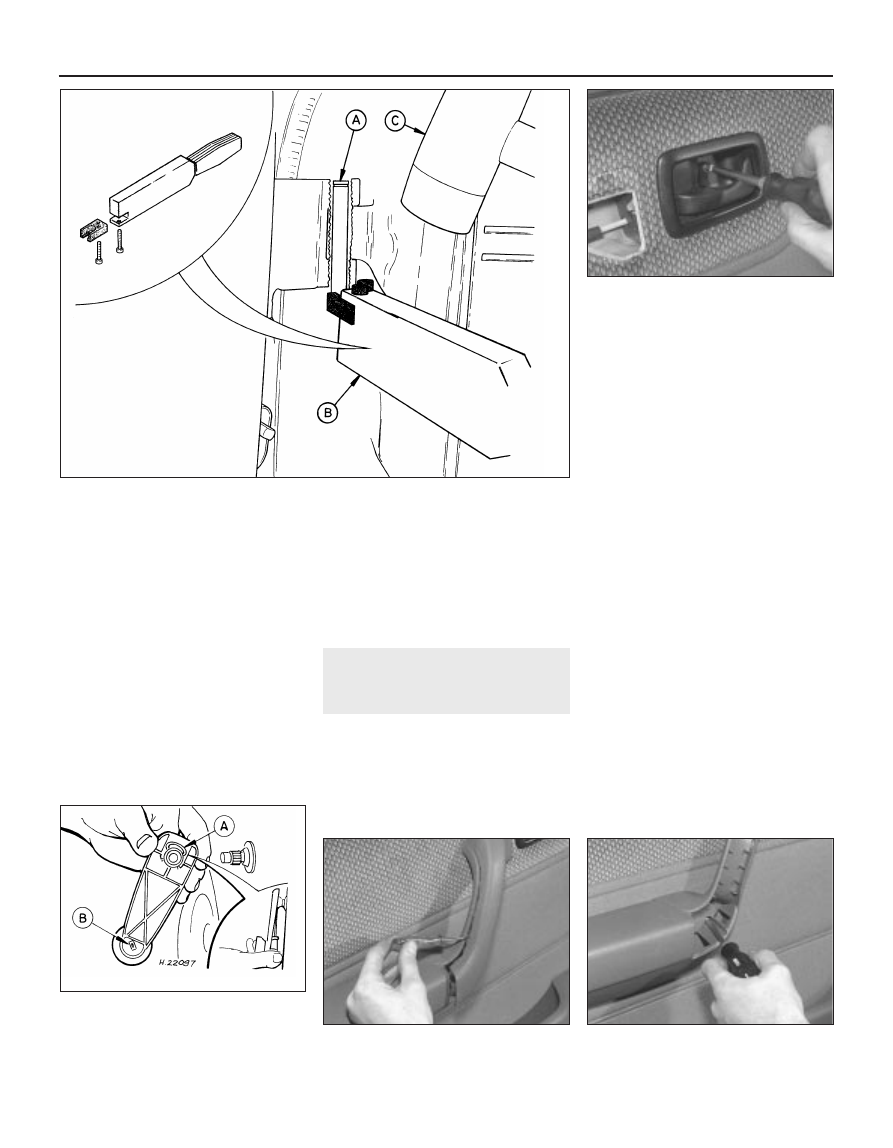
the special tool (see illustration), then strike
the main body of the tool with a soft-faced
hammer to extract the lower hinge pin from its
location.
6 With the help of an assistant to support the
door, remove the upper hinge pin from its
location, in a similar manner to that used for
the lower hinge pin, and then remove the door
assembly.
Refitting
7 To refit, align the door hinge sections to the
hinge sections on the body, and insert both
hinge pins as far as possible, by hand.
Ensuring that the hinge pins have entered all
three sections of hinge, tap them gently
through, with a soft-faced hammer, until their
retaining clips can be fitted. New retaining
clips should be used.
8 Reconnect the multi-plug and insert it to its
body location on the A- pillar, ensuring that it
seats correctly.
9 Refit the door check arm to its body
location. Press the door aperture weatherseal
back into position on its flange.
10 There should be no need to adjust the
door striker, or check door alignment.
21 Side door inner trim panel -
removal and refitting
1
Removal
1 Using a screwdriver with a broad flat blade,
carefully prise up and remove the interior
weatherstrip from its location at the top of the
door trim panel. Be careful not to kink or bend
it as it is being removed. On front doors, pull
the end of the weatherstrip out from under the
door mirror trim.
2 Detach the door interior release handle
bezel by removing its retaining screw (see
illustration).
3 Using a small thin screwdriver, release the
window regulator handle (where fitted) by
releasing its spring clip from behind and pulling
it from the regulator shaft (see illustration).
Remove its bezel also. On models with electric
front window switches in the door trim panel,
disconnect the switch wiring multi-plugs as the
trim panel is withdrawn.
4 Detach the armrest/doorpull assembly from
the door. Some models are fitted with an
armrest/doorpull secured by three screws,
two of which are concealed behind a
removable panel. Certain lower specification
vehicles have the door pull secured with only
two screws. (see illustrations)
5 On front doors, remove the three screws
securing the door stowage pocket/speaker
grille moulding, then pull the moulding upper
edge away from the door, and disengage the
hook fixings on its base from their locations
(see illustration).
6 Using a trim clip tool, release the retaining
clips around the base and the sides of the
panel, then raise it to free it from the door. If a
trim clip tool is unavailable, two thin flat-
bladed screwdrivers carefully inserted
between the trim panel and the door may
suffice. Place the screwdrivers on each side
of the clips and then apply gentle leverage.
11•10 Bodywork and fittings
21.4b Undoing armrest/doorpull retaining
screws
21.4a Detaching armrest/doorpull
removable panel
21.3 Window regulator handle. Inset
shows removal
A Spring clip
B Rotate the tag to remove the knob
21.2 Removing the door interior release
handle bezel (armrest/doorpull shown
removed)
1595Ford Fiesta Remake
20.5 Door hinge pin removal using Ford special tools
A Hinge pin B Removal tool C Soft-faced hammer