Ford Fiesta (1989-1995). Manual - part 3
4
Auxiliary drivebelt check and
renewal
2
General
1 The number of auxiliary drivebelts fitted and
their type depends on engine, and on whether
the vehicle is equipped with power steering.
The drivebelt(s) are located on the right-hand
end of the engine and will be either of the V-
belt type or the flat, multi-ribbed (or “polyvee”)
type. The belt drives the alternator, water
pump and, on CVH and Zetec engines with
power steering, the power steering pump
from the engine’s crankshaft pulley. On HCS
engines with power steering, one belt drives
the alternator and water pump and a separate
belt drives the power steering pump.
2 The good condition and proper tension of
the auxiliary drivebelt is critical to the
operation of the engine. Because of their
composition and the high stresses to which
they are subjected, drivebelts stretch and
deteriorate as they get older. They must,
therefore, be regularly inspected.
Check
3 With the engine switched off, open and
support the bonnet, then locate the auxiliary
drivebelt(s) on the right-hand end of the
engine (Be very careful, and wear protective
gloves to minimise the risk of burning your
hands on hot components, if the engine has
recently been running). For improved access,
jack up the front right-hand side of the
vehicle, support it securely on an axle
stand, remove the roadwheel, then (where
fitted) remove the auxiliary drivebelt lower
cover from inside the wheel arch (see
illustration).
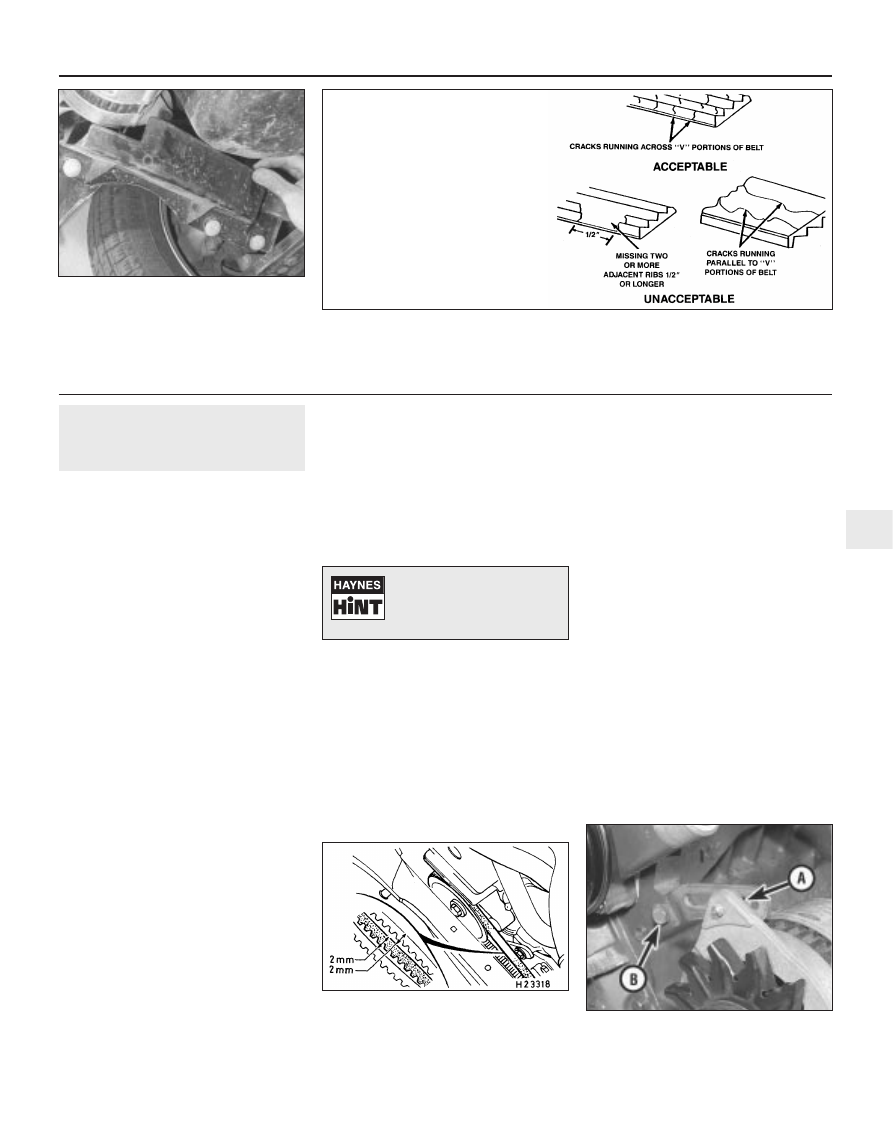
4 Using an inspection light or an electric
torch, and rotating the engine when necessary
with a spanner applied to the crankshaft
pulley bolt, check the whole length of the
drivebelt(s) for cracks, separation of the
rubber, and torn or worn ribs (see
illustration). Also check for fraying and
glazing, which gives the drivebelt a shiny
appearance. Both sides of the drivebelt(s)
should be inspected, which means you will
have to twist the drivebelt(s) to check the
underside. Feel the relevant drivebelt where
you can’t see it. If you are in any doubt as to
the condition of the drivebelt(s), renewal is
necessary (go to paragraph 23).
Drivebelt tension
5 The tension must be adjusted manually on
all V-belt type drivebelts, on flat “polyvee”
type drivebelts fitted to early Zetec engines,
and on “polyvee” type drivebelts fitted to HCS
engines to drive the power steering pump.
The “polyvee” type drivebelts used on later
Zetec engines and PTE engines are fitted with
an automatic tensioner to maintain the correct
belt adjustment.
6 For models on which the tension can be
adjusted manually, open the bonnet. Jack up
the front right-hand side of the vehicle, and
support it securely on an axle stand. Remove
the roadwheel, then (where fitted) remove the
auxiliary drivebelt lower cover from inside the
wheel arch.
7 Ford technicians use a special tension gauge
and various other special tools for checking
drivebelt adjustment, but for DIY purposes,
checking the belt tension using finger pressure
gives a good indication of correct adjustment.
Apply firm finger pressure midway between the
pulleys on the longest run of the belt, and look
for a deflection of approximately 2.0 mm (i.e. a
total drivebelt “swing” of approximately
4.0 mm) (see illustration).
8 If adjustment is necessary, proceed as
follows according to belt type.
V-belt with sliding arm type adjuster
9 Loosen off the alternator mounting bolts
and sliding arm adjustment bolts, pivot the
alternator as required to provide the correct
drivebelt tension, then retighten the bolts to
secure (see illustration).
10 Refit the auxiliary drivebelt cover (where
applicable) and roadwheel, then lower the
vehicle to the ground.
11 Run the engine for about five minutes,
then recheck the tension.
Every 10 000 miles (16 000 km) or 12 months,
whichever comes first
Every 10 000 miles or 12 months
1•11
4.9 Alternator sliding arm adjustment
bolt (A) and sliding arm mounting bolt (B) -
V-belt with sliding arm type adjuster
4.7 Checking drivebelt adjustment - V-belt
types
Note that the 4 mm dimension is the total belt
swing and is equal to 2 mm of deflection
4.3 Remove the auxiliary drivebelt lower
cover from inside the wheel arch
1
1595Ford Fiesta Remake
4.4 Check the auxiliary drivebelt for
signs of wear like these. Very small
cracks across the drivebelt ribs are
acceptable. If the cracks are deep,
or if the drivebelt looks worn or
damaged in any other way, renew it.
This is the “polyvee” type belt, but
the checks on the V-belt type are
the same
Turning the engine will be
much easier if the spark
plugs are removed first
(Section 21).