Citroen DS3 (2016 year). Manual - part 15
 

  Index      Citroen     Citroen DS3 - service manual 2016 year in english


Search            


Content   ..  13  14  15  16   ..


Citroen DS3 (2016 year). Manual - part 15


223

Practical information

DS3_en_Chap08_info-pratiques_ed02-2015

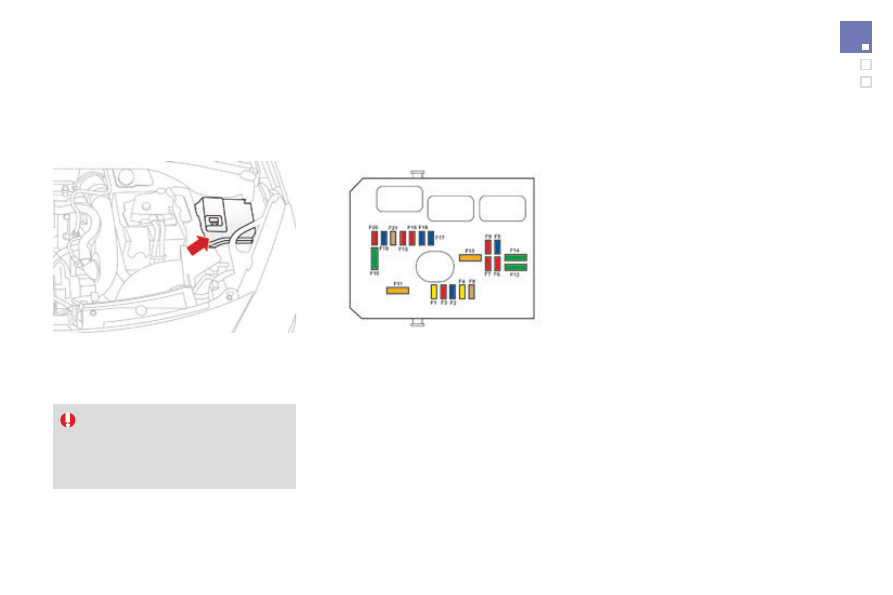
Engine compartment 
fusebox

The fusebox is located in the engine 
compartment near the battery (left-hand side).

Access to the fuses

F

  Unclip the cover.

F

  Change the fuse (see corresponding 

paragraph).

F  When you have finished, close the cover 

carefully to ensure the sealing of the fuse 
box.

All work on the fuses in the box 
located on the battery, must be done 
by a CITROËN dealer or a qualified 
workshop.

DS3_en_Chap08_info-pratiques_ed02-2015

Fuse table

Fuse n°

Rating

Functions

F1

20 A

Engine control unit supply, cooling fan unit control relay, multifunction engine control main relay, injection pump 
(Diesel).

F2

15 A

Horn.

F3

10 A

Front / rear screenwash.

F4

20 A

LED lamps.

F5

15 A

Diesel heater (Diesel), particle filter additive pump (Diesel), air flow sensor (Diesel), EGR electrovalve (Diesel), 
blow-by heater and electrovalves (petrol).

F6

10 A

ABS/DSC control unit, secondary stop switch.

F7

10 A

Electric power steering, automatic gearbox.

F8

25 A

Starter control.

F9

10 A

Switching and protection unit (Diesel).

F10

30 A

Fuel heater (Diesel), blow-by heater (Diesel), fuel pump (petrol), injectors and ignition coils  
(petrol).

F11

40 A

Heater blower.

225

Practical information

DS3_en_Chap08_info-pratiques_ed02-2015

Fuse n°

Rating

Functions

F12

30 A

Windscreen wipers slow / fast speed.

F13

40 A

Built-in systems interface supply (ignition  
positive).

F14

30 A

Valvetronic supply (petrol).

F15

10 A

Right-hand main beam headlamps.

F16

10 A

Left-hand main beam headlamps.

F17

15 A

Left-hand dipped beam headlamps.

F18

15 A

Right-hand dipped beam headlamps.

F19

15 A

Oxygen sensors and electrovalves (petrol), electrovalves 
(Diesel), EGR electrovalve (Diesel).

F20

10 A

Pumps, electronic thermostat (petrol), timimg electrovalve 
(THP), water in fuel sensor (Diesel).

F21

5 A

Fan assembly control supply, ABS/DSC, turbo pump (THP).

DS3_en_Chap08_info-pratiques_ed02-2015

Table of maxi-fuses

Fuse n°

Rating

Functions

MF1*

60 A

Fan assembly.

MF2*

30 A

ABS / DSC pump.

MF3*

30 A

ABS / DSC electrovalves.

MF4*

60 A

Built-in Systems Interface (BSI) supply.

MF5*

60 A

Built-in Systems Interface (BSI) supply.

MF6*

30 A

Additional cooling fan unit (THP).

MF7*

80 A

Dashboard fusebox.

MF8*

-

Not used.

*  The maxi-fuses provide additional protection for the electrical systems. All work on the maxi-fuses must be carried out by a CITROËN dealer or a 

qualified workshop.

227

Practical information

DS3_en_Chap08_info-pratiques_ed02-2015

12 V battery

The battery is located under the bonnet.
To gain access to it:
F

  open the bonnet using the interior release 

lever, then the exterior safety catch,

F  secure the bonnet stay,
F

  lift the plastic cover on the (+) terminal.

Access to the battery

Procedure for starting the engine using another battery or charging a discharged battery.

general points

Lead-acid starter batteries

Batteries contain harmful substances 
such as sulphuric acid and lead.
They must be disposed of in 
accordance with regulations and must 
not, in any circumstances, be discarded 
with household waste.
Take used remote control batteries and 
vehicle batteries to a special collection 
point.

Versions equipped with Stop & 
Start are fitted with a 12 V lead-acid 
battery of specific technology and 
specification.
Its replacement should be carried 
out only by a CITROËN dealer or a 
qualified workshop.

Protect your eyes and face before 
handling the battery.
All operations on the battery must be 
carried out in a well ventilated area and 
away from naked flames and sources 
of sparks, so as to avoid the risk of 
explosion or fire.
Wash your hands afterwards.

If you have an electronic or automatic 
gearbox, never try to start the engine 
by pushing the vehicle.

The (-) battery terminal is not accessible.
A remote earthing point is located on the front 
left-hand wing panel.

DS3_en_Chap08_info-pratiques_ed02-2015

Some functions, including Stop & Start, 
are not available if the battery is not 
sufficiently charged.

Never try to start the engine by 
connecting a battery charger.
Never use a 24 V or higher battery 
booster.
First check that the slave battery has a 
nominal voltage of 12 V and a capacity 
at least equal to that of the discharged 
battery.
The two vehicles must not be in contact 
with each other.
Switch off the electrical consumers on 
both vehicles (audio system, wipers, 
lighting, ...).
Ensure that the jump lead cables do 
not pass close to moving parts of the 
engine (cooling fan, belts, ...).
Do not disconnect the (+) terminal when 
the engine is running.

Starting using another 
battery

When your vehicle's battery is discharged, the 
engine can be started using a slave battery 
(external or on another vehicle) and jump lead 
cables or a battery booster.

F

  Raise the plastic cover on the (+) terminal, 

if your vehicle has one.

F  Connect the red cable to the positive 

terminal (+) of the flat battery A (at the 
metal elbow) then to the positive terminal 
(+) of the slave battery B or the booster.

F

  Connect one end of the green or black 

cable to the negative terminal (-) of the 
slave battery B

 or the booster (or earth 

point on the other vehicle).

F

  Connect the other end of the green or black 

cable to the earth point C

 on the broken 

down vehicle.

F

  Start the engine of the vehicle with the 

good battery and leave it running for  
a few minutes.

F

  Operate the starter on the broken down 

vehicle and let the engine run.

If the engine does not start straight away, 
switch off the ignition and wait a few moments 
before trying again.

F

  Wait until the engine returns to idle then 

disconnect the jump lead cables in the 
reverse order.

F

  Refit the plastic cover to the (+) terminal, if 

your vehicle has one.

F

  Allow the engine to run for at least 

30 minutes, by driving or with the vehicle 
stationary, so that the battery reaches an 
adequate state of charge.

229

Practical information

DS3_en_Chap08_info-pratiques_ed02-2015

If you envisage charging your vehicle's 
battery yourself, use only a charger 
compatible with lead-acid batteries of a 
nominal voltage of 12 V.

If this label is present, it is essential 
to use only a 12 V charger, to avoid 
causing irreversible damage to the 
electrical components related to the 
Stop & Start system.

Follow the instructions for use provided 
by the manufacturer of the charger.
Never reverse polarities.

Charging the battery using 
a battery charger

For optimum service life of the battery, it is 
essential to maintain an adequate state of 
charge.
In some circumstances it may be necessary to 
charge the battery:

if you use your vehicle essentially for short 
journeys,

-  if the vehicle is to be taken off the road for 

several weeks.

Contact a CITROËN dealer or a qualified 
workshop.

It is not necessary to disconnect the 
battery.

F

  Switch off the ignition.

F

  Switch off all electrical consumers (audio 

system, lighting, wipers, ...).

F

  Switch off the charger B before connecting 

the cables to the battery, so as to avoid any 
dangerous sparks.

F

  Ensure that the charger cables are in good 

condition.

F

  Connect the charger B cables as follows:

-  the positive (+) red cable to the (+) 

terminal of the battery A,

-  the negative (-) black cable to the earth 

point C

 on the vehicle.

F

  At the end of the charging operation, switch 

off the charger B before disconnecting the 
cables from the battery A

.

Never try to charge a frozen battery.
If the battery has been frozen, have 
it checked by a CITROËN dealer or 
a qualified workshop, who will check 
that the internal components have not 
been damaged and the casing is not 
cracked, which could cause a leak of 
toxic and corrosive acid.

DS3_en_Chap08_info-pratiques_ed02-2015

Disconnecting the battery

In order to maintain an adequate state 
of charge for starting the engine, it is 
recommended that the battery be disconnected 
if the vehicle is taken out of service for a long 
period.
Wait 2 minutes after switching off the ignition 
before disconnecting the battery:
F

  close all openings (doors, boot, windows, 

roof (for Cabrio versions)),

F

  switch off all electrical consumers (audio 

system, wipers, lighting, ...),

F

  switch off the ignition and wait for 

four minutes.

Having exposed the battery, it is only 
necessary to disconnect the (+) terminal.

Following reconnection of the 
battery

After reconnecting the battery, switch on the 
ignition and wait 1 minute before starting to 
allow initialisation of the electronic systems.
However, if minor problems persist following 
this operation, contact a CITROËN dealer or a 
qualified workshop.
Referring to the corresponding section, you 
must yourself reinitialise or reset certain 
systems, such as:

the remote control,

the electric windows

the date and time,

-  the radio preset stations.

Quick release terminal

Disconnecting the (+) terminal

F  Raise the lever A fully to release the 

clamp B

.

Reconnecting the (+) terminal

F  Position the open clamp B of the cable on 

the positive post (+) of the battery.

F  Press down on the clamp to position it 

correctly on the battery post.

F

  Lock the clamp by lowering the lever A.

The Stop & Start system may not be 
operational during the trip following the 
first engine start.
In this case, the system will only be 
available again after a continuous 
period of immobilisation of the vehicle, 
a period which depends on the ambient 
temperature and the state of charge of 
the battery (up to about 8 hours).

Do not force the lever as locking 
will not be possible if the clamp is 
not positioned correctly; start the 
procedure again.

231

Practical information

DS3_en_Chap08_info-pratiques_ed02-2015

Load reduction mode

System which manages the use of certain 
functions according to the level of charge 
remaining in the battery.
When the vehicle is being driven, the load 
reduction function temporarily deactivates 
certain functions, such as the air conditioning, 
the heated rear screen...
The deactivated functions are reactivated 
automatically as soon as conditions permit.

Energy economy mode

System which manages the period of use of certain functions to conserve a sufficient level of 
charge in the battery.
After the engine has stopped, you can still use functions such as the audio equipment, windscreen 
wipers, dipped beam headlamps, courtesy lamps, etc. for a maximum combined period of 
thirty minutes.

This period may be greatly reduced if 
the battery is not fully charged.

A flat battery prevents the engine from 
starting.

If the telephone is being used at the 
same time, it will be interrupted after  
10 minutes.

Switching to economy mode

Once this period has elapsed, a message 
appears in the screen indicating that the 
vehicle has switched to economy mode and the 
active functions are put on standby.

Exiting economy mode

These functions are reactivated automatically 
the next time the vehicle is driven.
F  In order to resume the use of these 

functions immediately, start the engine and 
let it run for a few minutes.

The time available to you will then be double 
the period for which the engine is left running. 
However, this period will always be between 
five and thirty minutes.

DS3_en_Chap08_info-pratiques_ed02-2015

Changing a front or rear wiper blade

Procedure for replacing a worn wiper blade with a new one without the use of tools.

Before removing a front 
wiper blade

F

  Within one minute after switching off the 

ignition, operate the wiper stalk to position 
the wiper blades in the vertical position.

This position must be used in order to avoid 
damaging the wiper blade and the bonnet.

Removal

F

  Raise the corresponding wiper arm.

F

  Unclip the wiper blade and remove it.

Fitting

F

  At the front, check the size of the wiper 

blade as the shorter blade is fitted to the 
passenger side of the vehicle.

F

  Put the corresponding new wiper blade in 

place and clip it.

F

  Fold down the wiper arm carefully.

After fitting a front wiper 
blade

F

  Switch on the ignition.

F

  Operate the wiper stalk again to park the 

wiper blades.

233

Practical information

DS3_en_Chap08_info-pratiques_ed02-2015

Towing the vehicle

Procedure for having your vehicle towed or for towing another vehicle using a removable towing eye.

The towing eye is installed in the boot under 
the floor.
To gain access to it:
F  open the boot,
F  raise the floor,
F

  remove the polystyrene storage box,

F

  remove the towing eye from the holder.

Access to the tools

general recommendations

Observe the legislation in force in your country.
Ensure that the weight of the towing vehicle is higher than that of the towed vehicle.
The driver must remain at the wheel of the towed vehicle and must have a valid driving licence.
When towing a vehicle with all four wheels on the ground, always use an approved towing 
arm; rope and straps are prohibited.
The towing vehicle must move off gently.
When towing a vehicle with the engine off, there is no longer any power assistance for 
braking or steering.
In the following cases, you must always call on a professional recovery service:
-  vehicle broken down on a motorway or fast road,

four-wheel drive vehicle,

-  when it is not possible to put the gearbox into neutral, unlock the steering, or release 

the parking brake,

-  towing with only two wheels on the ground,
-  where there is no approved towing arm available...

DS3_en_Chap08_info-pratiques_ed02-2015

F  On the front bumper, unclip the access flap 

by pulling successively on the two lugs, 
using a screwdriver.

F

  Rotate the flap.

F  Completely remove the flap, by 

compressing the plastic diamond shape 
located in the lower section.

F

  Store the flap in the boot.

F

  Screw the towing eye in fully.

F

  Install the towing arm.

F  On the rear bumper, unclip the cover by 

pressing at the bottom.

F

  Screw the towing eye in fully.

F

  Install the towing arm.

F

  Switch on the hazard warning lamps on 

both vehicles.

F

  Move off gently and drive for a short 

distance only.

Towing your vehicle

Towing another vehicle

Failure to observe this instruction could 
result in damage to certain components 
(braking, transmission...) and the 
absence of braking assistance the next 
time the engine is started.

F

  Unlock the steering by turning the key one 

notch in the ignition switch and release the 
parking brake.

F

  Switch on the hazard warning lamps on 

both vehicles.

F

  Move off gently and drive for a short 

distance only.

F

  Place the gear lever in neutral (position n 

for an electronic or automatic gearbox).

235

Practical information

DS3_en_Chap08_info-pratiques_ed02-2015

Distribution of loads

F  Distribute the load in the trailer so that the 

heaviest items are as close as possible to 
the axle and the nose weight approaches 
the maximum permitted without 
exceeding it.

Air density decreases with altitude, thus 
reducing engine performance. Above 
1 000 metres, the maximum towed load must 
be reduced by 10 % for every 1 000 metres of 
altitude.

Refer to the "Technical data" section for 
details of the weights and towed loads 
which apply to your vehicle.

Towing a trailer

Your vehicle is primarily designed for 
transporting people and luggage, but it may 
also be used for towing a trailer.

We recommend the use of genuine 
CITROËN towbars and their harnesses 
that have been tested and approved 
from the design stage of your vehicle, 
and that the fitting of the towbar is 
entrusted to a CITROËN dealer or a 
qualified workshop.
If the towbar is not fitted by a 
CITROËN dealer, it must still be 
fitted in accordance with the vehicle 
manufacturer's instructions.

Driving with a trailer places greater 
demands on the towing vehicle and the 
driver must take particular care.

Driving advice

DS3_en_Chap08_info-pratiques_ed02-2015

Towing with the PERFORMANCE version

Your vehicle cannot be fitted with a 
towbar. The space occupied by the 
sport diffuser prevents this.

Side wind

F

  Take into account the increased sensitivity 

to side wind.

Cooling

Towing a trailer on a slope increases the 
temperature of the coolant.
As the fan is electrically controlled, its cooling 
capacity is not dependent on the engine speed.
F

  To lower the engine speed, reduce your 

speed.

The maximum towed load on a long incline 
depends on the gradient and the ambient 
temperature.
In all cases, keep a check on the coolant 
temperature.

F

  If the warning lamp and the 

STOP

 warning lamp come on, 

stop the vehicle and switch off 
the engine as soon as possible.

Braking

Towing a trailer increases the braking distance.
To avoid overheating of the brakes on a long 
mountain type of descent, the use of engine 
braking is recommended.

Tyres

F

  Check the tyre pressures of the towing 

vehicle and of the trailer, observing the 
recommended pressures.

Lighting

F

  Check the electrical lighting and signalling 

on the trailer.

The rear parking sensors will be 
deactivated automatically if a genuine 
CITROËN towbar is used.

237

Practical information

DS3_en_Chap08_info-pratiques_ed02-2015

Textured paint

Recommendations on the care and maintenance your vehicle are given in the maintenance and warranty guide.

Observe the following recommendations to avoid damaging the paint finish:
-  Choose a high pressure wash, or at least a high water delivery; roller brush washing is 

compatible.

-  Gently wipe the body with a clean microfibre cloth.
-  Carefully wipe off any fuel spilt on the body using a soft cloth, then allow to dry.
-  Clean off any minor marks (for example, finger marks...), using the product in the 

"TECHNATURE" range intended for removing insects.

On the other hand:
-  Do not use a wash programme that includes a final hot wax cycle.
-  Do not use waterless cleaning.
-  Never polish the vehicle.
-  Do not use paint restorers, abrasive or polishing products, or bright paint preservers 

(wax polish, for example).

It is always preferable to have paint repairs carried out by a CITROËN dealer or a qualified 
workshop.

Advice on care and maintenance

The textured paint reacts to light with variations 
of appearance and finish that emphasise 
the car's lines and form. This paint contains 
particles that remain visible and create 
a unique satin effect with relief. Its lightly 
granulated texture gives it a surprising feel.

DS3_en_Chap08_info-pratiques_ed02-2015

Leather

Leather is a natural product. Appropriate 
regular care and cleaning is essential for its 
durability.

Refer to your vehicle's maintenance 
and warranty guide for information on 
the special precautions to observe.

Care of the expressive 
stickers

These styling stickers are treated to give good 
resistance to ageing and tearing.
They have been designed to allow you to 
customise your vehicle's bodywork.
Available also as accessories, we recommend 
that you have them fitted by a CITROËN dealer 
or a qualified workshop.

When using a high pressure jet wash, 
keep the end of the lance at least 
30 centimetres from the stickers


Content   ..  13  14  15  16   ..