Citroen C-Crosser (2012 year). Manual - part 3
 

  Index      Citroen     Citroen C-Crosser - service manual 2012 year in english


Search            


Content   ..  1  2  3  4   ..


Citroen C-Crosser (2012 year). Manual - part 3


I

31 

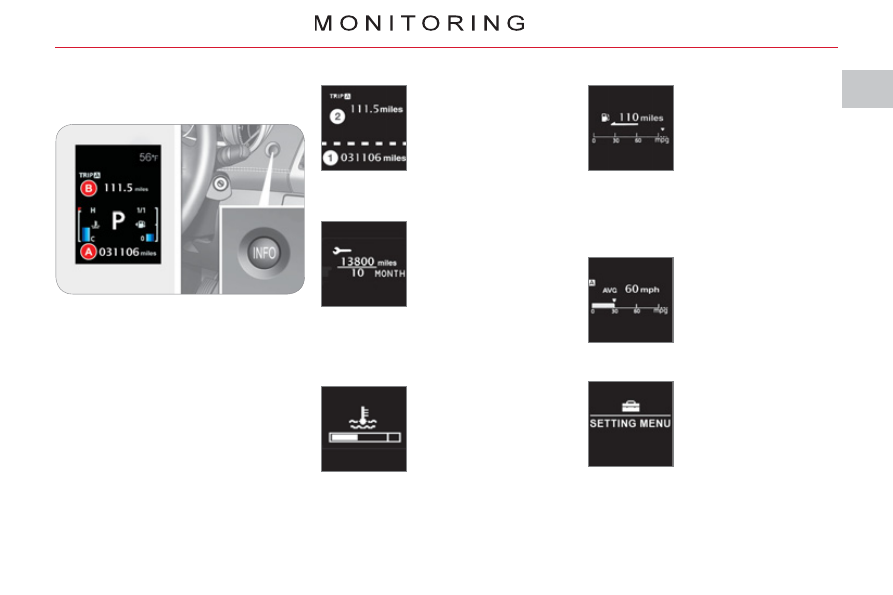
 The total distance is dis-

played in zone  1  of the 

screen and the trip dis-

tance in zone  2  (refer to 

the "Distance recorders" 

section).  

  Distance recorder (A and B) 

INFORMATION IN THE
INSTRUMENT PANEL SCREEN 
Information display 

 With the ignition on, press the  

INFO  

button, located on the dashboard to the 

right of the instrument panel, to display 

the various information in succession: 
   -  distance 

recorder 

A, 

  -  

distance recorder B, 

  -  service 

indicator, 

  -  coolant 

temperature, 

  -  range, 
  -  trip 

computer, 

  -  setting 

menu. 


 This displays the dis-

tance and the number of 

months remaining before 

the next service in line 

with with the manufac-

turer’s servicing sched-

ule (refer to the "Service 

indicator" section).  

  Service indicator 

 When the engine is run-

ning, this indicates the 

temperature of the cool-

ant (refer to the "Coolant 

temperature indicator" 

section).  

  Coolant temperature 

 When the engine is 

running, this indicates 

the number of miles 

(kilometres) which can 

still be travelled with the 

fuel remaining in the tank 

based on the average 

fuel consumption over 

the last few miles (kilometres) travelled 

(refer to the "Range" section).  

  Range 

 This indicates the aver-

age fuel consumption, 

the average speed and 

the current fuel con-

sumption (refer to the 

"Trip computer" section).  

  Trip computer 

  When the vehicle is sta-

tionary , this allows the 

user to change the follow-

ing settings (refer to the 

"Setting menu" section): 
   -   the display language, 
  -  the temperature dis-

play units, 

  -  

the fuel consumption units, 

  -   the option to reset the average 

fuel consumption and the average 

speed, 

  -  

the break (rest) reminder display in-

terval.    

  Setting menu 

I

!

!

M O N I T O R I N G

32

 The total distance is 

displayed in zone  

1   of 

the screen and the trip 

distance in zone  2 . 

DISTANCE RECORDERS (A/B) 

 System for measuring the total distance 

travelled by the vehicle during its 

service life and the distance travelled in 

a day or other period until it is reset to 

zero by the driver. 

Zero reset 

 With the ignition on, press the  

INFO 

 button for more than 2 seconds until 

zeros appear.  

 When the engine is 

running, this indicates 

the temperature of the 

coolant. 

COOLANT TEMPERATURE

 If the bar is close to the  critical  position 

located on the right, the temperature is 

too high. 

 The symbol fl ashes when your engine 

is overheating. 
  You must stop your vehicle as soon 

as it is safe to do so.  
  Wait a few minutes before switching 

off the engine.  

 Wait for the engine to cool before 

topping up the level. The cooling 

system is pressurised. 

  When the engine is 

running , this indicates 

the distance which can 

still be travelled with the 

fuel remaining in the tank 

based on the average 

fuel consumption over the 

last few miles/kilometres 

travelled. 

RANGE

 When the range is less than  30 miles 

(50 km) , dashes are displayed. 
 Refuel as soon as possible. The display 

of the range is updated. 

 To avoid any risk of scalding, unscrew 

the cap by two turns to allow the 

pressure to drop. 
 When the pressure has dropped, 

remove the cap and top up the level, if 

necessary. 
 Contact a CITROËN dealer or a 

qualifi ed workshop. 

 This fi gure may increase following a 

change in the style of driving or the 

relief, resulting in a reduction in the 

current fuel consumption. 
 If you only add a few litres, the 

value displayed will be incorrect. 

Therefore, you must fi ll the tank 

whenever possible. 

 When you disconnect the 

battery, the previous fuel 

consumption data is lost and the 

value displayed will be different from 

that displayed before the battery was 

disconnected. The distance displayed 

must be considered an approximate 

indication. 

I

M O N I T O R I N G

33 

SERVICE INDICATOR

Resetting the service indicator 

to zero

 Your CITROËN dealer or a qualifi ed 

workshop carries out this operation 

after each service. 
 If you have carried out your vehicle's 

service yourself, the zero reset 

procedure is the following: 
   )   switch off the ignition. 
  )   press the  INFO  button several times 

in succession until the service indi-

cator is displayed. 

  )   press and hold the  INFO  button for 

a few seconds until the  

spanner 

fl ashes . 

  )  press the  

INFO  button while the 

spanner is fl ashing to change the dis-

play  "---"  to  "CLEAR"  then the time 

remaining before the next service is 

due is displayed.  

  Service overdue

Operation

 When the ignition is switched on, you 

must press the  

INFO  button several 

times in succession until the service 

indicator is displayed. The distance 

recorder display line indicates the 

number of miles (kilometres) remaining 

and the time elapsed line indicates the 

number of months remaining before the 

next service is due. 

 After a certain distance and a certain 

time, the display of  "---"  is reinitialised 

and the display indicates the time 

remaining before the next service is 

due.  

 System which informs the driver when 

the next service is due in accordance 

with the manufacturer's servicing 

schedule. 
 The point at which the next service is 

due is calculated from the last service 

indicator zero reset. 
 It is determined by two parameters: 
   -  

the distance travelled (in miles (km)), 

  -   the time elapsed since the last ser-

vice (in months).  

 The distance remaining to be travelled 

may be weighted by the time factor, 

depending on the user's driving habits. 

  Example:  the display indicates that 

7 300 miles (kilometres) remain before 

the next service is due. 

 The symbol  

"--"  remains displayed 

until the fi rst service of a new vehicle 

has been carried out.  

  Example:  the display indicates that the 

service is overdue. This service must 

be carried out by a CITROËN dealer or 

a qualifi ed workshop.  

 Each time the ignition is switched on, 

the display  "PERIODIC INSPECTION"  

is displayed for a few seconds to 

indicate that the service must be carried 

out without delay. 

I

M O N I T O R I N G

34

TRIP COMPUTER 

Average fuel 

consumption (l/100 km 

or km/l or mpg)

 This is the average fuel 

consumption since the 

last zero reset. 

 This  fi gure may change following a 

change in the style of driving or the 

relief resulting in a change in the cur-

rent fuel consumption.  

  Average speed (km/h 

or mph) 

 This is the average 

speed calculated since 

the last zero reset.  

Resetting the information to zero 

 When the ignition is switched on, the 

zero reset switches automatically from 

manual mode to automatic mode. 

 If dashes "---" are displayed for long 

periods in place of the digits while 

driving, contact a CITROËN dealer or 

a qualifi ed workshop.  

  Current fuel

consumption (l/100 km

or km/l or mpg)

 This is the average fuel 

consumption during the 

last few seconds of driving.  

Information display

 With the ignition on, press the  

INFO  

button on the dashboard, to the right 

of the instrument panel, several times 

in succession to display the different 

information: 
   -  

average fuel consumption, 

  -  average 

speed, 

  -  

current fuel consumption.  

 When the required information is 

displayed, press the  

INFO  button for 

more than two seconds to reset all of 

the information to zero. 

  Automatic 
 If the ignition key remains in the 

OFF position for more than 4 hours, 

the information is reset to zero 

automatically.   

I

!

M O N I T O R I N G

35 

  When the vehicle is 

stationary , it allows 

the user to change the 

following settings: 
   -  resetting average fuel 

consumption and av-

erage speed, 

  -  

the fuel consumption units, 

  -  

the temperature display units, 

  -  

the display language, 

  -   activation/deactivation of the  INFO  

button sound, 

  -  

the break (rest) reminder display in-

terval, 

  -  

restore factory settings.  

 SETTING MENU

 System which provides access to the 

settings of certain functions. 

 To change the settings, you 

must stop the vehicle and switch 

on the ignition. 

 Apply the parking brake and place 

the gear lever in neutral. 

  When the vehicle is moving , the 

setting menu screen is not displayed 

when you press the  INFO  button. 

 The various menus may differ for the 

type 1 instrument panel and the type 2 

instrument panel. 
  With the ignition on , press the  INFO  

button on the dashboard, to the right of 

the instrument panel, several times in 

succession until the "SETTING MENU" 

screen is displayed. 

  Operation

   )   press and hold the  INFO  button for 

a few seconds to display the menu 

screen. 

 Press and hold the  

INFO  button 

for a few seconds to return to the 

previous screen. 
 When the menus screen is 

displayed, if no operation is carried 

out within 15 seconds, the setting 

menu screen is displayed.  

  )   on the menu screen, press the  INFO  

button to select a function from the 

list:  

  MENU   2/3:  
   -  

 a/b  (option of displaying a different 

language in the instrument panel 

screen and the navigation screen), 

  -  

 activation/deactivation of the 

INFO   button sound , 

  -  

 ALARM  (changing the "BREAK RE-

MINDER" display interval), 

  -   choice of the direction indicators 

sound, 

  -  

 activation/deactivation of current 

fuel consumption,   

  MENU   1/3 :   
   -  

 1 - 2  (options for resetting aver-

age fuel consumption and average 

speed), 

  -  

 UNIT  (choice of the fuel consump-

tion units), 

  -   choice of the  temperature display 

unit  s , 

  -  

 LANGUAGE  (choice of display lan-

guage),  

  MENU 3/3:  
   -  

 RESET  (restore factory settings).  

I

M O N I T O R I N G

36

Choice of fuel consumption 

units

 You can choose between different units 

for displaying fuel consumption. 

 On the menu screen: 
   )  press the  

INFO  button to select 

 "UNIT" . 

  )   press and hold the  INFO  button for 

a few seconds to display the  "UNIT"  

screen. 

  )   press the  INFO  button to scroll the 

units (km/L, L/100 km, mpg(US), 

mpg(UK) and RETURN) in succes-

sion. 

  )   press and hold the  INFO  button for 

a few seconds to confi rm your se-

lection.  

 In this case, the distance, speed and 

quantity of fuel units will also be changed 

in accordance with your choice of fuel 

consumption unit. 

 If the battery is disconnected, the 

settings memory is cleared and 

the default unit (km/L) is restored 

automatically.  

  Choice of temperature display

units

 You can choose between different units 

for displaying the temperature. 

 On the menu screen: 

   )   press the  INFO  button to se-

lect the temperature unit set-

ting symbol (thermometer). 

  )   press and hold the  INFO  button for 

a few seconds to alternate between 

the units (°C and °F).  

 The mode selected is confi rmed. 

 If the battery is disconnected, the 

settings memory is cleared and the 

default unit (°C) is restored automati-

cally.  

  Options for resetting average 

fuel consumption and average

speed 

 You can choose between two average 

fuel consumption and average speed 

resetting modes: 
   -  

automatic reset ( choice 1) , 

  -  

manual reset  (choice 2) .  

 On the menu screen: 
   )   press the  INFO  button to select: 

  )   press and hold the  INFO  button for a 

few seconds to switch in succession 

from resetting mode  1    (automatic)  

to resetting mode  2 (manual) .  

 The mode selected is confi rmed.  

I

M O N I T O R I N G

37 

Choice of display language

(LANGUAGE) 

 You can choose between different 

languages for the screen. 

 On the menus screen: 
   )  press the  

INFO  button to select 

 "LANGUAGE" . 

  )  press and hold the  

INFO  button 

for a few seconds to display the 

 "LANGUAGE"  screen. 

  )  press the  

INFO  button to scroll 

through the languages (Japonais, 

English, Deutsch, Français, Espa-

nol, Italiano, "---" and RETURN) in 

succession. 

  )   press and hold the  INFO  button for 

a few seconds to confi rm your se-

lection.  

 If you select the "---" setting, no 

message will be displayed in 

message display situations. 

 If the battery is disconnected, the 

settings memory is cleared and 

the default language (ENGLISH) is 

restored automatically.  

  Activation/deactivation of the

"INFO" button sound

 You can activate or deactivate the  INFO  

button sound. 
 On the menus screen: 

   )  press the  

INFO  button to 

select the  

INFO  button 

sound activation/deactiva-

tion symbol  

(located on 

menu 2/3) . 

  )   press and hold the  INFO  button for 

a few seconds to alternate between 

the choices (ON, OFF).  

 The mode selected is confi rmed. 

 If the battery is disconnected, the 

settings memory is cleared and 

the default choice (ON) is restored 

automatically.  

  Changing the display interval

of the "BREAK REMINDER" 

message 

 You can change the display interval of 

the  "BREAK REMINDER"  message. 
 On the menu screen: 
   )  press the  

INFO  button to select 

 "ALARM" (located on menu 2/3) . 

  )  press and hold the  

INFO  button 

for a few seconds to display the 

 "ALARM"  screen. 

  )  press the  

INFO  button to select 

the display interval of the  "BREAK 

REMINDER"  message. 

  )   press and hold the  INFO  button for 

a few seconds to confi rm.  

 If the battery is disconnected, the 

settings memory is cleared and 

the default value (OFF) is restored 

automatically.  

I

M O N I T O R I N G

38

Choice of the direction 

indicators sound

 You can choose the sound of the 

direction indicators, on the type 2 

instrument panel only. 
 On the menus screen: 
   )  press the  

INFO  button to select 

sound 1 or 2  

(located on menu 

2/3) .   

   Functions   

   Factory setting   

  Resetting average 

fuel consumption 

and average 

speed  

   1  (automatic)  

  Fuel consumption 

units  

   L/100 km   

  Temperature 

display unit  

   °C   

  Display language  

   ENGLISH   

  INFO button 

sound  

   ON  (activated)  

  Display of 

the "BREAK 

REMINDER" 

message  

   OFF (deactivated)  

  Activation/deactivation of the 

current fuel consumption 

 You can activate or deactivate the 

current fuel consumption, on the type 2 

instrument panel only. 
 On the menu screen: 
   )   press the  INFO  button to select the 

current fuel consumption activation/

deactivation symbol  

(located on 

menu 2/3) . 

  )  press the  

INFO  button for a few 

seconds to alternate between the 

choices (ON, OFF).   

  Restoring factory settings

(RESET)

 You can restore all of the factory settings 

for all of the functions. 
 On the menu screen: 
   )  press the  

INFO  button to select 

 "RESET"   (located on menu 2/2 or 

3/3 depending on the instrument 

panel) . 

 The factory settings are: 

  )   press and hold the  INFO  button for 

 at least 5 seconds .  

 An audible signal is heard and all of the 

factory settings are restored for all of 

the functions. 

I

M O N I T O R I N G

39 

MONOCHROME SCREEN

  This provides the following information: 
   -  the 

time, 

  -   audio system information (refer to 

the "Audio and Telematics" section).   

  Setting the time

 The digital clock can be set in  automatic 

mode  or in  manual mode . 

  Selecting the Setting 

 Select the  

automatic mode  or the 

 manual mode  as follows: 

   )   Press button  A  "PWR" to switch on 

the audio system. 

  )   Access the setting mode by pressing 

button  B  "TUNE" for approximately 

2 seconds. 

  )  Press button  

B  "TUNE" several 

times to scroll through the various 

menus and select the  

CT menu  

(clock time).  

 The order of the menus is the following: 

AF/CT/REG/TP-S/PTY display language/

SCV/PHONE/Functions setting mode 

OFF. 

  Automatic mode 
 This mode permits automatic setting 

of the local time using the signal from 

RDS stations. 
 The symbol  "CT"  appears on the screen.  

  Manual mode 
 This mode permits manual setting of 

the time using the audio equipment 

buttons. 
 It can also be used when the "Automatic 

mode" displays an inaccurate time, when 

the local RDS stations are broadcasting 

from a different time zone.   

I

M O N I T O R I N G

40

 Set the time using the buttons as 

indicated below: 
   )   with the ignition on or in the ACC 

(Accessories) position, press and 

hold the  

CLOCK  button until the 

time display fl ashes. 

  )   Press the appropriate button to set 

the time:  

  Button   H:  to set the hours 
 The hours digits scroll when you press 

this button. 
  Button M:  to set the minutes 
 The minutes digits scroll when you 

press this button. 
  Button 00:  to reset the minutes to zero. 
   -  from 


1 to 29 min :   rounded down to 

the previous hour, 

  -  from 


30 to 59 min:  rounded up to 

the next hour.  

Manual mode

Automatic mode

 In this mode, setting is automatic using 

the signal from the RDS radio stations.  

   )  After setting the time, press the 

 DISP  button; the time display stops 

fl ashing.  

 The digital clock does not display 

seconds. 
 When the "minutes" display is set or 

reset to zero, the clock starts at the 

zero second of the minute selected. 
 The time setting is lost if the battery 

is disconnected.  

   )   Turn button  B  "TUNE" to the left or 

to the right to select  "CT ON"  (auto-

matic mode) or  "CT OFF"  (manual 

mode). 

  )   After selecting the mode, you can 

exit the "Functions setting mode" 

menu by pressing button  B  "TUNE" 

for approximately 2 seconds.  

 If no action is carried out within 

10 

seconds, the system will exit 

the "Functions setting mode" menu 

automatically.  

I

M O N I T O R I N G

41 

COLOUR SCREEN 

  This permits display of the following 

main menus: 

 On the control panel, press button  

(SET)  to access the  "Settings"  screen 

and select: 
   -  

 "Display Off"  to switch off the display, 

  -  

 "Sound control"  for the sound dis-

tribution or volume, the type of music 

and the sound fi eld (surround), 

  -  

 "Picture control"  to set the colour, 

the intensity, the brightness, the 

contrast and the level of black, 

  -  

 "System"  to change the time zone, 

the language, the units and other 

settings, 

  -  

 "Wide Screen"  to change the size 

of the DVD picture to 4/3 format, 

wide screen mode, centred wide 

screen mode or enlargement, 

  -  

 "Equipment"  to set certain equip-

ment offered in the vehicle, 

  -  

 "Colour Contrast"  to select the 

contrast of the display in relation 

to the ambient light (Day, Night or 

Auto), 

  -  

 "TP standby"  to activate or deacti-

vate the traffi c information.   

  "Audio-video" menu 

  "Navigation-guidance" menu 

 On the control panel, press button  

(MODE)  to access the  

"AV mode"  

screen and select: 
   -  

radio (FM, MW, LW), 

  -  

CD (audio, MP3 or WMA), 

  -  Music 

Server, 

  -  DVD. 


  "Settings" menu 

 On the control panel, press button  

(MENU)  to access the  "Menu"  screen 

and select: 
   -  

 "Address/Junction"  to search for 

a location using the address or the 

name of the street, 

  -  

 "POI name"  to search for a location 

using the name of a point of interest 

(POI), 

  -  

 "Advanced search"  to search for a 

location using an advanced search 

based on a POI, 

  -  

 "Previous 20"  to search for a loca-

tion using one of the 20 previous 

destinations, 

  -  

 "Address book"  to search for a 

location using a stored address, 

  -  

 "Home"  to navigate to your home 

address, 

  -  

 "Navigation settings"  to set func-

tions linked with the navigation, 

  -  

 "Navigation tools"  to access the 

basic information or a pre-set dem-

onstration.   

 The "CD" and "DVD" buttons are 

active if you insert a CD or DVD in 

the player.  

I

42

Setting the time 

 The digital clock is set  automatically . 
 This mode enables the system to set 

the local time automatically using the 

signal from the RDS stations. 
   )   On the control panel, press button  A  

 (SET)  to access the  

"Settings"  

menu. 

  )   On the touch screen, press button  B  

to access the  "System"  menu.  

 The system settings screen is displayed. 

  "Info" menu 

 On the control panel, press button  

(INFO)  to access the  "Info"  screen and 

consult: 
   -  

 "Support info"  to display the soft-

ware and data versions, 

  -  

 "Vehicle position"  to display the 

GPS location of the vehicle, 

  -  

 "Calendar"  to make a note of 

events, birthdays, etc., 

  -  

 "Journey"  to display the average 

speed, fuel consumption, distances 

and driving time, 

  -  

 "Environment"  to display the alti-

tude, the atmospheric pressure, the 

exterior temperature (the ice symbol 

is displayed if there is a risk of ice), 

  -  

 "Air conditioning"  to display the 

information relating to the air condi-

tioning, 

  -  

 "Mobile phone"  to enter a number, 

delete a character, make or receive 

a call.   

  "Route" menu 

 On the control panel, press button  

(NAVI)  to access the  

"Route Menu"  

screen and select: 
   -  

 "Detour"  to make a detour through 

a specifi ed region, 

  -  

 "Itinerary"  to change the route, 

  -  

 "View route"  to display a route in 

different ways, 

  -  

 "Delete route"  to delete a route, 

  -  

 "Nearby POI"  to search for the 

POIs in the surrounding area.    

I

M O N I T O R I N G

43 

   1.    RDS Auto Correct:    
  Activate/deactivate automatic ad-

justment. 

  2.    GMT/GMT+1/GMT+2    
 

Select the time zone. 

  3.    Summer Time:    
 

Summer time On/Off.  

   )   Press button  D  to confi rm and re-

turn to the previous menu.  

   )   Press button  C  to access the  "Time" 

menu .  

 You must deactivate automatic 

adjustment (RDS Auto Correct) to 

change the time zone and summer 

time settings. 
 On each screen, you can return to 

the previous screen by pressing 

button  D "Return" .  

 Once this menu has been selected, you 

can access the following functions: 

LIGHTING RHEOSTAT

 With the lighting on or off, press the 

button to change the intensity of the 

lighting of the instruments and controls 

in "day" or "night" mode. 

 When the lighting reaches the maximum 

setting, press again to change to the 

minimum setting. 
 When the lighting reaches the required 

intensity, release the button. 
 The setting is saved when the ignition 

switch is turned to OFF.  

 An audible signal is heard and the 

intensity of the lighting increases 

each time the button is pressed. 

  System for manual adjustment of the 

brightness of the instruments and 

controls in relation to the exterior 

brightness. 

II

C O M F O R T

44

 For even air distribution, take care not 

to obstruct the exterior air intake grille 

located at the bottom of the windscreen, 

the vents, the air outlets under the front 

seats and the air extractor located be-

hind the fl aps in the boot. 

 The water formed by the air conditioning 

condensation is discharged via an open-

ing provided for this purpose. Therefore, 

a puddle of water may form underneath 

the vehicle when stationary. 
 If the system does not produce cold air, 

do not use it and have it checked by a 

CITROËN dealer or a qualifi ed  work-

shop. 

AUTOMATIC REGULATION OF 
THE DIGITAL AIR CONDITIONING 

 Do not cover the temperature and hu-

midity sensor  2  and the sunshine sen-

sor  7 . 
 They are required for regulation of the 

air conditioning. 

  Advice on operation 

 In hot weather, in order to obtain in-

tense ventilation, it is advisable to 

use vents  1  and  4  only. 
 If, when the vehicle has been parked 

in the sun for a long time, the interior 

temperature remains very high, fi rst 

ventilate the passenger compart-

ment for a few minutes. 

 Switch off the air conditioning 

when the climatic conditions 

permit.  

 Use of the automatic regulation of the 

air conditioning is recommended. It per-

mits automatic and optimised control of 

all of the following functions: air fl ow, 

passenger compartment temperature 

and air distribution, by means of various 

sensors (ambient temperature, interior 

temperature, sunshine), so preventing 

the need for you to change your set-

tings other than the value displayed. 

 In certain cases of particularly arduous 

use (towing the maximum load on a 

steep gradient in hot weather), switch-

ing off the air conditioning saves engine 

power and therefore improves the tow-

ing capacity. 

 Close the windows to benefi t from the 

full effectiveness of the air conditioning. 

 Ensure that the passenger compart-

ment  fi lter is in good condition. Have 

the fi lter elements replaced periodically. 

If you drive in a dusty environment, re-

place it twice as often. 

 The air conditioning system does not 

contain chlorine and is not harmful to 

the ozone layer. 
 Operate the air conditioning system for 

5 to 10 minutes, once or twice a month, 

to keep it in good working order. 

   1.  Central vents. 
  2.  Temperature sensor. 
  3.   Air outlet to passenger footwells. 
  4.  Side vents. 
  5.   Front window demisting/defrosting 

vents. 

  6.   Windscreen demisting/defrosting vents. 
  7.  Sunshine sensor. 


II

45 

II

C O M F O R T

46

AUTOMATIC AIR
CONDITIONING 

  Automatic operation 

   )   Set the temperature control dial  3  to 

the temperature required. 

  )   Place the air fl ow control dial  2  in 

the  "AUTO"  position. 

  )   Place the air distribution adjustment 

dial  1  in the  "AUTO"  position.  

 When the engine is cold, to avoid an 

excessive distribution of cold air, the 

ventilation will reach its optimum lev-

el gradually. 
 On entering the vehicle, the interior 

temperature may be much colder (or 

warmer) than the comfort tempera-

ture. There is no need to change the 

temperature displayed in order to 

reach the comfort required rapidly. 
 The automatic regulation of the air 

conditioning will operate to correct 

the temperature difference as quickly 

as possible.  

    1.   Air distribution adjustment 
  2.  Air fl ow adjustment 
  3.  Temperature adjustment 
  4.   Rear screen demisting/defrosting 
  5.   Air conditioning On/Off 
  6.   Intake of exterior air/Recirculation 

of interior air  

 In automatic mode: 
   )   when the temperature is set to max-

imum (Rapid heating), the intake of 

exterior air is activated and the air 

conditioning stops. 

  )   when the temperature is set to mini-

mum (Rapid cooling), the air recircula-

tion is activated and the air conditioning 

operates.  

 The system controls the air distribu-

tion, air fl ow, temperature and air intake 

to ensure the level of comfort and ad-

equate air circulation in the passenger 

compartment. No further action on your 

part is required. 


Content   ..  1  2  3  4   ..