Citroen C5 (2017 year). Manual - part 12
 

  Index      Citroen     Citroen C5 - service manual 2017 year in english


Search            


Content   ..  10  11  12  13   ..


Citroen C5 (2017 year). Manual - part 12


7

Practical information

175

C5_en_Chap07_info-pratiques_ed01-2016

Fuel tank

Capacity of the tank: approximately 71 litres*.

Low fuel level

When the low fuel level in the 
tank is reached, this warning 
lamp comes on in the instrument 
panel, accompanied by an 
audible warning and a message 
in the display screen. When it 
first comes on, there remains 
around 5 litres of fuel in the tank.

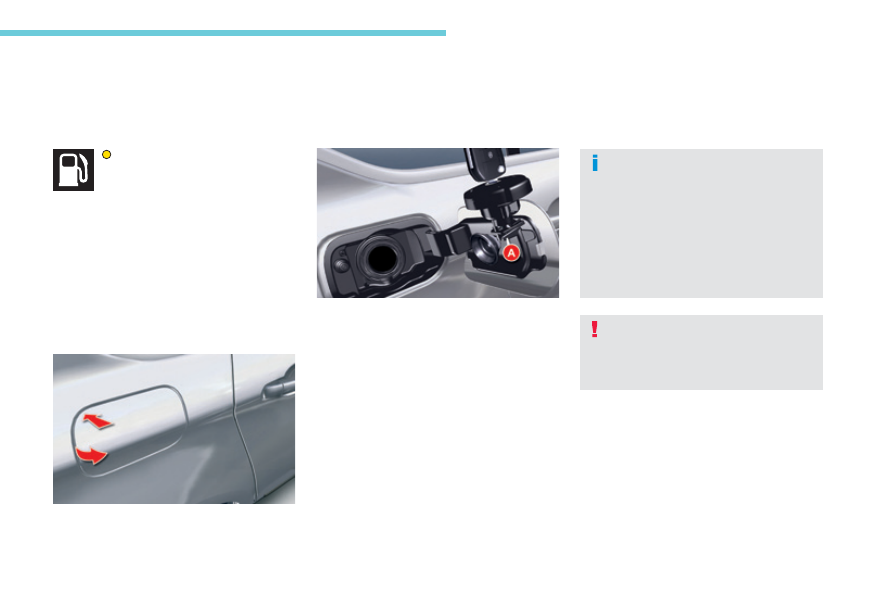
F  Press at the top left corner, then pull on its 

edge.

While you are refuelling, the engine must be 
stopped and the ignition switched off.
F

  Turn the key a quarter turn to lock and 

unlock the filler cap.

F

  When refuelling, place the cap on hook A.

F

  Fill the tank, but do not persist after the 

third cut-off

; this could cause your vehicle 

to malfunction.

For a petrol engine with a catalytic 
converter,
 the use of unleaded fuel is 
compulsory.
The filler neck is narrower to ensure that only 
unleaded petrol nozzles can be put in.

Opening the fuel flap

Refuelling

Additions of fuel must be of at least 
5 litres to be taken into account by the 
fuel gauge.
Opening the filler cap may create a 
noise of an inrush of air. This vacuum, 
which is entirely normal, is caused by 
the sealing of the fuel system.

With Stop & Start, never refuel with the 
system in STOP mode; you must switch 
off the ignition with the key.

* 55 litres for Slovakia.

You must refuel to avoid running out of fuel.

Practical information

176

C5_en_Chap07_info-pratiques_ed01-2016

Fuel used for petrol engines

The petrol engines are compatible with 
bio-fuels that conform to current and future 
European standards and can be obtained from 
filling stations:

Fuel used for Diesel 
engines

The Diesel engines are compatible with 
biofuels that conform to current and future 
European standards and can be obtained from 
filling stations:

The only Diesel additives authorised for 
use are those that meet the B715000 
standard.

-  Petrol that meets the EN228 

standard, mixed with a bio-
fuel meeting the EN15376 
standard.

The only petrol additives authorised for 
use are those that meet the B715001 
standard.

The use of any other type of (bio)
fuel (vegetable or animal oils, pure 
or diluted, domestic fuel...) is strictly 
prohibited (risk of damage to the engine 
and fuel system).

-  Diesel fuel that meets 

standard EN590 mixed with 
a biofuel that meets standard 
EN14214 (possibly containing 
up to 7 % Fatty Acid Methyl 
Ester),

-  Diesel fuel that meets 

standard EN16734 mixed with 
a biofuel that meets standard 
EN14214 (possibly containing 
up to 10 % Fatty Acid Methyl 
Ester),

Paraffinic Diesel fuel that 
meets standard EN15940 
mixed with a biofuel that 
meets standard EN14214 
(possibly containing up to 7 % 
Fatty Acid Methyl Ester).

The use of B20 or B30 fuel 
meeting standard EN16709 
is possible in your Diesel 
engine. However, this use, 
even occasional, requires 
strict application of the special 
servicing conditions referred to as 
"Arduous conditions".

For more information, contact a CITROËN 
dealer or a qualified workshop.

Travelling abroad

Certain fuels could damage the 
engine of your vehicle. In certain 
countries, the use of a particular fuel 
may be required (specific octane 
rating, specific sales name…) to 
ensure correct operation of the 
engine.
For any additional information, contact 
your dealer.

7

Practical information

177

C5_en_Chap07_info-pratiques_ed01-2016

Misfuel prevention (Diesel)*

When a petrol filler nozzle is introduced into the 
fuel filler neck of your Diesel vehicle, it comes 
into contact with the flap. The system remains 
closed and prevents filling.
Do not persist but introduce a Diesel type 
filler nozzle.

Mechanical device which prevents filling the tank of a Diesel vehicle with petrol. It avoids the risk of 
engine damage that can result from filling with the wrong fuel.
Located in the filler neck, the misfuel prevention device appears when the filler cap is removed.

Operation

It remains possible to use a fuel can to 
fill the tank.
In order to ensure a good flow of fuel, 
do not place the nozzle of the fuel can 
in direct contact with the flap of the 
misfuel prevention device and pour 
slowly.

* Depending on the country of sale.

Travelling abroad

As Diesel fuel pump nozzles may 
be different in other countries, the 
presence of the misfuel prevention 
device may make refuelling impossible.
Not all Diesel vehicles are fitted with 
misfuel protection, so before travelling 
abroad, we recommend that you check 
with the CITROËN dealer network, 
whether your vehicle is suitable for the 
fuel pumps in the country in which you 
intend to travel.

Practical information

178

C5_en_Chap07_info-pratiques_ed01-2016

Snow chains

In wintry conditions, snow chains improve traction as well as the behaviour of the vehicle when braking.

The snow chains must be fitted only 
to the front wheels. They must never 
be fitted to "space-saver" type spare 
wheels.

Take account of the legislation in force 
in your country on the use of snow 
chains and the maximum running speed 
authorised.

Avoid driving with snow chains on roads 
that have been cleared of snow, to 
avoid damaging your vehicle's tyres and 
the road surface. If your vehicle is fitted 
with alloy wheels, check that no part of 
the chain or its fixings is in contact with 
the wheel rim.

Advice on installation

F

  If you have to fit the chains during a 

journey, stop the vehicle on a flat surface 
on the side of the road.

F

  Apply the parking brake and position any 

wheel chocks to prevent movement of your 
vehicle.

F

  Fit the chains following the instructions 

provided by the manufacturer.

F

  Move off gently and drive for a few 

moments, without exceeding 30 mph 
(50 km/h).

F

  Stop your vehicle and check that the snow 

chains are correctly tightened.

Use only the chains designed to be fitted to the 
type of wheel fitted to your vehicle:

Original tyre size

Chain specification

225/60 V16

Maximum link size: 

9 mm

225/55 W17

245/45 W18

These tyres cannot 

be fitted with chains

245/40 Y19

For more information on snow chains, contact a 
CITROËN dealer or a qualified workshop.

It is strongly recommended that before 
you leave, you practise fitting the snow 
chains on a level and dry surface.

7

Practical information

179

C5_en_Chap07_info-pratiques_ed01-2016

Energy economy mode

System which manages the duration of use of 
certain functions to conserve a sufficient level 
of charge in the battery.
After the engine has stopped, you can still use 
functions such as the audio and telematics 
system, windscreen wipers, dipped beam 
headlamps, courtesy lamps, etc. for a 
maximum combined duration of about forty 
minutes.

Switching to economy mode

A message appears in the instrument panel 
screen indicating that the vehicle has switched 
to economy mode and the active functions are 
put on standby.

If a telephone call is being made at this 
time, it will be maintained for around 
10 minutes with the Bluetooth

®

 hands-

free system of your audio system.

Exiting economy mode

These functions are reactivated automatically 
next time the vehicle is driven.
In order to restore the use of these functions 
immediately, start the engine and let it run:
-  for less than ten minutes, to use the 

equipment for approximately five minutes,

-  for more than ten minutes, to use the 

equipment for up to approximately 
thirty minutes.

Let the engine run for the duration specified to 
ensure that the battery charge is sufficient.
Do not repeatedly and continuously restart the 
engine in order to charge the battery.

A flat battery prevents the engine from 
starting.
For more information on the 
12 V battery

, refer to the corresponding 

section.

Practical information

180

C5_en_Chap07_info-pratiques_ed01-2016

Towing a trailer

Your vehicle is primarily designed for transporting people and luggage, but it may also be used for towing a trailer.

Side wind

F

  Take into account the increased sensitivity 

to side wind.

When towing

We recommend the use of genuine 
CITROËN towbars and their harnesses 
that have been tested and approved 
from the design stage of your vehicle, 
and that the fitting of the towbar is 
entrusted to a CITROËN dealer or a 
qualified workshop.
If the towbar is not fitted by a 
CITROËN dealer, it must still be 
fitted in accordance with the vehicle 
manufacturer's instructions.

Distribution of loads

F  Distribute the load in the trailer so that the 

heaviest items are as close as possible to the 
axle, and the nose weight approaches the 
maximum permitted without exceeding it.

Air density decreases with altitude, thus 
reducing engine performance. Above 
1 000 metres, the maximum towed load must 
be reduced by 10 % for every 1 000 metres of 
altitude.

For more information on Weights, refer 
to the corresponding section.

Driving with a trailer places greater 
demands on the towing vehicle and the 
driver must take particular care.
For more information on Driving 
advice

, particularly when towing, refer 

to the corresponding section.

You must observe the maximum trailer 
weight, indicated on the registration 
certificate or in the technical 
specification for your vehicle.

For more information on Weights (and 
the towed loads which apply to your 
vehicle) refer to the corresponding 
section.

7

Practical information

181

C5_en_Chap07_info-pratiques_ed01-2016

Blanking cover

When towing, you must remove the blanking 
cover in the front bumper as well as the bonnet 
seal if fitted.
Contact a CITROËN dealer or a qualified 
workshop for this.

Tyres

F

  Check the tyre pressures of the towing 

vehicle and of the trailer, observing the 
recommended pressures.

Lighting

F

  Check the electrical lighting and signalling 

on the trailer and the headlamp beam 
height of your vehicle.

For more information on Adjusting the 
headlamps

, refer to the corresponding section.

The rear parking sensors will be 
deactivated automatically to avoid the 
audible signal if a genuine CITROËN 
towbar is used.

Braking

Towing a trailer increases the braking distance.
To avoid overheating of the brakes, the use of 
engine braking is recommended.

Cooling

Towing a trailer on a slope increases the 
temperature of the coolant.
As the fan is electrically controlled, its cooling 
capacity is not dependent on the engine speed.
F

  To lower the engine speed, reduce your 

speed.

The maximum towed load on a long incline 
depends on the gradient and the exterior 
temperature.
In all cases, keep a check on the coolant 
temperature.

F

  If the warning lamp and the 

STOP

 warning lamp come on, 

stop the vehicle and switch off 
the engine as soon as possible.

Practical information

182

C5_en_Chap07_info-pratiques_ed01-2016

Roof bars

The design of your vehicle requires the use 
of roof bars that are tested and approved by 
CITROËN, for your safety and to avoid damage 
to the roof and tailgate.
Regardless of the type of loading equipment 
to be transported on the roof (bicycle carrier, 
ski carrier...), it is imperative that you add 
transverse roof bars. Any securing or lashing to 
components other than the roof bars is strictly 
prohibited.

Recommendations

F

  Distribute your load evenly, avoiding 

overloading on one side.

F

  Arrange the heaviest part of the load as 

close as possible to the roof.

F  Anchor the load securely and draw 

attention to it if any part of it is 
overhanging.

F

  Drive gently, as the vehicle will be more 

liable to the effects of side winds (vehicle 
stability may be altered).

F

  Remove the roof bars as soon as they are 

no longer needed.

Maximum load that can be distributed 
on the roof bars (for a loading height 
not exceeding 40 cm; except bicycle 
carrier): 80 kg.
If the height exceeds 40 cm, adapt your 
speed to the profile of the road to avoid 
damaging the roof bars and the fixings 
on the roof.

Please refer to national legislation in 
order to comply with the regulations 
concerning the transportation of objects 
which are longer than the vehicle.

7

Practical information

183

C5_en_Chap07_info-pratiques_ed01-2016

Very cold climate protection*

HDi 160 Diesel engine

Normal position

The flap 2 is in a horizontal position in the air 
duct 3

.

Snow position

F

  Push and rotate the knob 1 by 90 ° in the 

direction of the arrow in order to position 
the flap 2 in a vertical position in the air 
duct 3

.

To return to the normal position, push the 
knob 1 then rotate in the opposite direction.

It is essential to remove the very cold 
protection when:

the exterior temperature exceeds 10 °C.

-

  driving at speeds of over 75 mph 

(approximately 120 km/h).

Adjustable device which prevents the intake of snow particles, which could obstruct the air filter.

* Depending on the country of sale.

Practical information

184

C5_en_Chap07_info-pratiques_ed01-2016

Cold climate screen*

Fitting

F

  Offer up the 2 sections of the snow guard 

to the upper and lower sections of the front 
bumper.

F  Press on the surround to clip in one by one 

the fixing clips.

Remove

F

  Using a screwdriver, lever each fixing clip 

in turn to disengage them.

Before fitting

After fitting

Don't forget to remove the very cold climate 

screen when:

-  the exterior temperature exceeds 

10 °C,

-

  towing,

-

  When driving at speeds of over 75 mph 

(approximately 120 km/h).

Removable screen which prevents the accumulation of snow at the radiator cooling fan.

* Depending on the country of sale.

7

Practical information

185

C5_en_Chap07_info-pratiques_ed01-2016

Bonnet

Opening

F  At the front of the bonnet, lift the safety catch B

 and raise the bonnet.

F  Unclip the stay C

 from its housing and pivot 

it to insert it in the notch D indicated by a 
yellow arrow.

F

  Fix the stay in the notch to hold the bonnet 

open.

Closing

F

  Take the stay out of the support notch.

F

  Clip the stay in its housing.

F

  Lower the bonnet then slam it firmly at the 

end of its travel.

F

  Pull on the bonnet to check that it is fully 

closed.

F

  Open the front left-hand door.

F  Pull the interior bonnet release lever A

located at the bottom of the door frame.

Before doing anything under the 
bonnet, deactivate the Stop & Start 
system to avoid any risk of injury 
resulting from an automatic change to 
START mode.

The location of the interior release lever 
prevents opening of the bonnet while 
the front left-hand door is closed.
This operation must only be carried out 
when the vehicle is stationary.
Avoid opening the bonnet in strong 
winds.

When the engine is hot, handle the 
safety catch and bonnet stay with care 
(risk of burns).

Because of the presence of electrical 
equipment under the bonnet, it is 
recommended that exposure to water 
(rain, washing, ...) be limited.

The cooling fan may start after 
switching off the engine: take care 
with articles and clothing that might 
be caught by the fan blades.

Practical information

186

C5_en_Chap07_info-pratiques_ed01-2016

The various caps and covers allow access for 
checking fluid levels and for replacing certain 
components.

THP

Petrol engines

1.

  Screenwash and headlamp wash fluid 

reservoir.

2.

  Power steering fluid reservoir

 or
 

or power steering and Hydractive III + 
suspension fluid reservoir.

3.

  Engine coolant header tank.

4.

  Engine oil dipstick.

5.

  Engine oil filler cap.

6.

  Brake fluid reservoir.

7.

  Battery.

8.

  Air filter.

7

Practical information

187

C5_en_Chap07_info-pratiques_ed01-2016

Diesel engines

HDi 160

BlueHDi 150 / BlueHDi 180

The various caps and covers allow access 
for checking fluid levels, for replacing certain 
components and for priming the fuel system.

1.

  Screenwash and headlamp wash fluid 

reservoir.

2.

  Power steering fluid reservoir

 or
 

power steering and Hydractive III + 
suspension fluid reservoir.

3.

  Engine coolant header tank.

4.

  Engine oil dipstick.

5.

  Engine oil filler cap.

6.

  Air filter.

7.

  Brake fluid reservoir.

8.

  Battery.

The Diesel fuel system operates under 

high pressure:

-  Never carry out any work on this 

system yourself.

-  HDi engines make use of advanced 

technology.

All maintenance and repairs require 
specially trained staff, which only a 
CITROËN dealer can provide.

Practical information

188

C5_en_Chap07_info-pratiques_ed01-2016

Checking levels

Engine oil level

The check is carried out either when 
the ignition is switched on using the 
oil level indicator in the instrument 
panel for vehicles so equipped, or 
using the dipstick.

Check all of these levels regularly, in line with the manufacturer's service schedule. Top them up if necessary, unless otherwise indicated.
If a level drops significantly, have the corresponding system checked by a CITROËN dealer or a qualified workshop.

If you find that the level is above the A

 mark or 

below the B

 mark, do not start the engine.

If the level is above the MAX

 mark (risk 

of damage to the engine), contact a 
CITROËN dealer or a qualified workshop.

If the level is below the MIN

 mark, you 

must top-up the engine oil.

Take care when working under the 
bonnet, as certain areas of the engine 
may be extremely hot (risk of burns) and 
the cooling fan could start at any time 
(even with the ignition off).

To ensure that the reading is correct, your 
vehicle must be parked on a level surface 
with the engine having been off for more than 
30 minutes.

It is normal to top-up the oil level between 
two services (or oil changes). CITROËN 
recommends that you check the level, and top-
up if necessary, every 3 000 miles (5 000 kms).

Checking using the dipstick

The location of the dipstick is shown in the 
corresponding underbonnet layout view.
F

  Take the dipstick by its coloured grip and 

remove it completely.

F

  Wipe the end of the dipstick using a clean 

non-fluffy cloth.

F

  Refit the dipstick and push fully down, then 

pull it out again to make the visual check: 
the correct level is between the marks A 
and B

.

A = MAX

B = MIN

7

Practical information

189

C5_en_Chap07_info-pratiques_ed01-2016

Oil grade

Before topping-up the oil or changing the oil, 
check that the oil is the correct grade for your 
engine and conforms to the manufacturer's 
recommendations.

Topping-up the engine oil level

The location of the oil filler cap is shown in the 
corresponding underbonnet layout view.
F  Unscrew the oil filler cap to reveal the filler 

aperture.

F

  Add oil in small quantities, avoiding any 

spills on engine components (risk of fire).

F

  Wait a few minutes before checking the 

level again using the dipstick.

F

  Add more oil if necessary.

F

  After checking the level, carefully refit the 

oil filler cap and the dipstick in its tube.

After topping-up the oil, the check when 
switching on the ignition with the oil 
level indicator in the instrument panel 
is not valid during the 30 minutes after 
topping-up.

Engine oil change

Refer to the manufacturer's service schedule 
for details of the interval for this operation.
In order to maintain the reliability of the engine 
and emission control system, never use 
additives in the engine oil.

Practical information

190

C5_en_Chap07_info-pratiques_ed01-2016

Brake fluid level

The brake fluid level should be close 
to the "MAX" mark. If it is not, check 
the brake pad wear.

Changing the fluid

Refer to the manufacturer's service schedule 
for details of the interval for this operation.

Fluid specification

The brake fluid must conform to the 
manufacturer's recommendations.

Power steering or power 
steering and suspension 
fluid level

For topping up, it is necessary to go 
to a CITROËN dealer or a qualified 
workshop.

Coolant level

The coolant level should be close 
to the "MAX" mark but should never 
exceed it.

Fluid specification

The coolant must conform to the 
manufacturer's recommendations.

The cooling fan may start after switching 
off the engine: take care with articles and 
clothing that might be caught by the fan 
blades.

In addition, as the cooling system is 
pressurised, wait at least one hour after 
switching off the engine before carrying out any 
work.
To avoid any risk of scalding, unscrew the cap 
by two turns to allow the pressure to drop. 
When the pressure has dropped, remove the 
cap and top-up the level.

When the engine is warm, the temperature of 
the coolant is regulated by the fan.


Content   ..  10  11  12  13   ..