Citroen C4 (2016 year). Manual - part 6
 

  Index      Citroen     Citroen C4 - service manual 2016 year in english


Search            


Content   ..  4  5  6  7   ..


Citroen C4 (2016 year). Manual - part 6


2

Access

79

C4-2_en_Chap02_ouvertures_ed02-2015

Boot

Opening

Complete unlocking

F

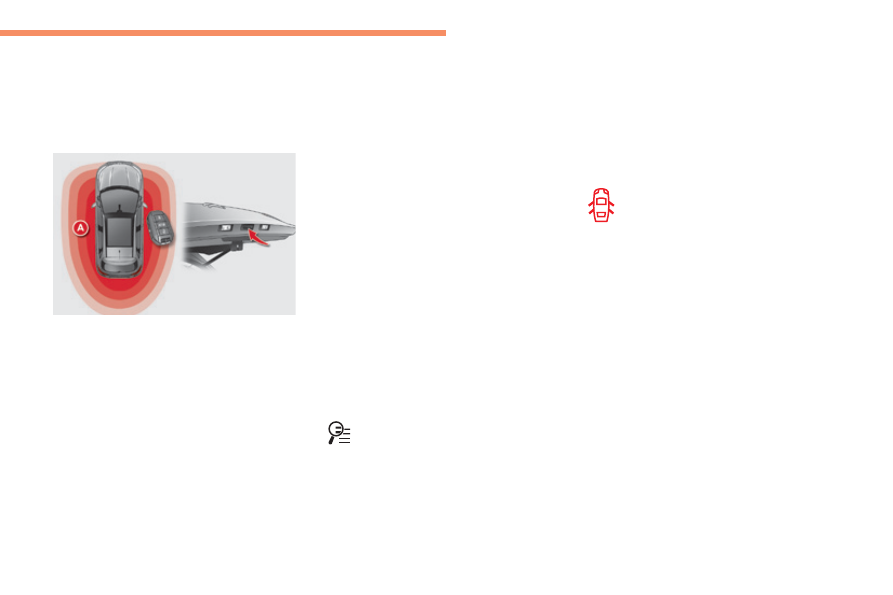
  After unlocking the vehicle or the boot with 

the Keyless Entry and Starting system 
electronic key on your person in the 
recognition zone A, press the boot opening 
control then raise the tailgate.

Selective unlocking

When unlocking of the boot only is activated:

F

  With the electronic key on your person and 

in the recognition zone A, press the boot 
unlocking control to unlock just the boot, 
then raise the tailgate.

By default, complete unlocking is activated.
This setting is done in the "Driving" menu, 
then "Vehicle settings" and "Vehicle 
access"

.

The vehicle or just the boot is unlocked, 
depending on the setting.

Use this button for access to 
additional information.

Closing

F

  Lower the tailgate using one of the interior 

grab handles.

If the boot is not closed correctly:

-  with the engine running or the 

vehicle moving (speed below 
6 mph (10 km/h)), this warning 
lamp comes on, accompanied by 
the display of an alert message 
for a few seconds.

-  with the vehicle moving (speed above 

6 mph (10 km/h)), in addition to the warning 
lamp and alert message, there is an an 
audible signal for a few seconds.

Unlocking is signalled by rapid flashing of the 
direction indicators for a few seconds.

Access

80

C4-2_en_Chap02_ouvertures_ed02-2015

Tailgate release

Unlocking

F

  Fold back the rear seats to gain access to 

the lock from inside the boot.

F

  Insert a small screwdriver into hole A of the 

lock to unlock the tailgate.

F

  Move the latch to the left.

Locking after closing

If the fault persists after closing again, the boot 
will remain locked.

System allowing the mechanical unlocking 
of the boot in the event of a battery or central 
locking system malfunction.

3

Ease of use and comfort

81

C4-2_en_Chap03_ergonomie-et-confort_ed02-2015

Front seats

Manual adjustments

Forwards-backwards

Seat height

Seat backrest angle

F  Raise the control and slide the seat 

forwards or backwards.

F

  Release the control to lock the position.

F  Pull the control upwards to raise or push 

it downwards to lower, as many times as 
necessary, to obtain the position required.

F

  Turn the control knob to adjust the seat 

backrest angle.

As a safety measure, seat adjustments 
should only be done when stationary.

Before moving the seat backwards, ensure that there is nothing that might prevent the full 
travel of the seat, so as to avoid the risk of of jamming the seat caused by the presence of 
objects on the floor behind the seat or rear passengers. If the seat jams, stop the movement 
immediately.

Ease of use and comfort

82

C4-2_en_Chap03_ergonomie-et-confort_ed02-2015

Driver's seat electric adjustments

Forwards-backwards

F  Tilt the rear part of the control upwards or 

downwards to obtain the required height.

F  Tilt the front part of the control upwards or 

downwards to obtain the required angle.

Cushion height and angle

F  Tilt the control forwards or rearwards to 

adjust the angle of the seat backrest.

Seat backrest angle

F  Push the control forwards or rearwards to 

slide the seat.

Before moving the seat backwards, ensure that there is nothing that might prevent the full 
travel of the seat, so as to avoid the risk of of jamming the seat caused by the presence of 
objects on the floor behind the seat or rear passengers. If the seat jams, stop the movement 
immediately.

The electrical functions of the driver's seat 
are deactivated approximately one minute 
after the ignition is switched off.
To reactivate them, switch on the ignition.

3

Ease of use and comfort

83

C4-2_en_Chap03_ergonomie-et-confort_ed02-2015

Additional adjustments

Head restraint height and angle

F

  To raise a head restraint, pull it upwards.

F

  To lower the head restraint, press the lug A 

and the head restraint at the same time.

F

  To adjust the angle of the head restraint, tilt 

its lower part forwards or rearwards.

Heated seats control

With the engine running, the front seats can be 
heated separately.
F

  Use the adjustment dial, placed on the side 

of each front seat, to switch on and select 
the level of heating required:


0

: Off.


1

: Low.


2

: Medium.


3

: High.

Removing a head restraint

F

  To remove the head restraint, press the 

lug A and pull the head restraint upwards.

F

  To put the head restraint back in place, 

engage the head restraint stems in the 
openings keeping them in line with the seat 
back and press the lug A at the same time.

The head restraint is fitted with a frame 
with notches which prevents it from 
lowering; this is a safety device in case 
of impact.
The adjustment is correct when the 
upper edge of the head restraint is 
level with the top of the head.

Never drive with the head restraints 
removed; they must be in place and 
adjusted correctly.

Ease of use and comfort

84

C4-2_en_Chap03_ergonomie-et-confort_ed02-2015

Manual lumbar adjustment

F

  Turn the knob to obtain the desired level of 

lumbar support.

This function provides a back massage; it only 

operates when the engine is running.

F

  Press the switch to activate the function.

The warning lamp on the switch comes on and 

the massage function is activated for a period 

of 60 minutes. During this time, massage is 

performed in 6 cycles of 10 minutes each cycle 

(6 minutes of massage followed by 4 minutes 

break).

After an hour, the function is automatically 

deactivated. The warning lamp in the switch 

goes off.

Deactivation

You can deactivate the massage function at 
any time by pressing the switch. The movement 
in progress continues until the initial non-
massage position is reached.

Massage function

Electric lumbar adjustment

F  Press the front or rear of the control to 

obtain the desired lumbar support.

3

Ease of use and comfort

85

C4-2_en_Chap03_ergonomie-et-confort_ed02-2015

Storing driving positions

Storing a position

Using buttons M / 1 / 2

F

  Switch on the ignition.

F

  Adjust your seat and the door mirrors.

F  Press button M, then press button 1 or 2 

within four seconds.


An audible signal indicates that the position 
has been stored.

Recalling a stored position

Ignition on or engine running

F  Press button 1 or 2 to recall the 

corresponding position.


An audible signal confirms that adjustment 
is complete.

System which registers the electrical settings 
of the driver's seat and door mirrors. It enables 
you to store and recall two positions using the 
buttons on the side of the driver's seat.

Storing a new position cancels the 
previous position.

You can interrupt the current movement 
by pressing button M1 or 2 or by using 
one of the seat controls.
A stored position cannot be recalled 
while driving.
Recalling stored positions is 
deactivated 45 seconds after switching 
off the ignition.

Ease of use and comfort

86

C4-2_en_Chap03_ergonomie-et-confort_ed02-2015

Steering wheel adjustment

F  When stationary, pull the control lever to 

release the adjustment mechanism.

F

  Adjust the height and reach to suit your 

driving position.

F

  Push the control lever to lock the 

adjustment mechanism.

As a safety measure, these operations 
should only be carried out with the 
vehicle stationary.

3

Ease of use and comfort

87

C4-2_en_Chap03_ergonomie-et-confort_ed02-2015

Mirrors

Each fitted with an adjustable mirror glass 
permitting the lateral rearward vision necessary 
for overtaking or parking.
They can also be folded for parking in confined 
spaces.

Demisting / Defrosting

Adjustment

F  Move control A

 to the right or to the left to 

select the corresponding mirror.

F  Move control B in all four directions to 

adjust.

F  Return control A

 to the central position.

Folding

F

  From outside: lock the vehicle using the 

remote control or the key.

F

  From inside: with the ignition on, pull the 

control A

 in the central position rearwards.

If your vehicle is fitted with heated 
mirrors, the demisting-defrosting 
operates by switching on the 
heated rear screen.

As a safety measure, the mirrors should 
be adjusted to reduce the blind spots.

The objects observed are, in reality, 
closer than they appear.
Take this into account in order to 
correctly judge the distance of vehicles 
approaching from behind.

If the mirrors are folded using control A
they will not unfold when the vehicle is 
unlocked. Pull again on control A.

Door mirrors

For more information on demisting and 
defrosting the rear screen, refer to the 
corresponding section.

Ease of use and comfort

88

C4-2_en_Chap03_ergonomie-et-confort_ed02-2015

Automatic tilting in reverse gear

System which provides a view of the ground 
during parking manoeuvres in reverse gear.

Programming

F

  With the engine running, engage reverse 

gear.

F

  Select and adjust the left-hand and right-

hand mirrors in succession.

The adjustment is stored immediately.

Switching on

F

  With the engine running, engage reverse 

gear.

F  Move control A

 to the right or to the left to 

select the corresponding mirror.

The glass of the mirror selected tilts 
downwards, in accordance with its 
programming.

Switching off

F

  Exit reverse gear and wait ten seconds.

 or
F  Return control A

 to the central position.

The mirror glass returns to its initial position.
The mirror glass also returns to its initial 
position:
-  if the speed exceeds 6 mph (10 km/h),
-  if the engine is switched off.

Unfolding

F

  From outside: unlock the vehicle using the 

remote control or the key.

F

  From inside: with the ignition on, pull the 

control A

 in the central position rearwards.

If necessary the mirrors can be folded 
manually.

The folding and unfolding of the door 
mirrors using the remote control can be 
deactivated by a CITROËN dealer or a 
qualified workshop.

3

Ease of use and comfort

89

C4-2_en_Chap03_ergonomie-et-confort_ed02-2015

Automatic day/night model

By means of a sensor, which measures the 
light from the rear of the vehicle, this system 
automatically and progressively changes 
between the day and night uses.

Rear view mirror

Manual day/night model

Adjustment

F

  Adjust the mirror so that the glass is  

directed correctly in the "day" position.

Day/night position

F

  Pull the lever to change to the "night" anti-

dazzle position.

F

  Push the lever to change to the  

normal "day" position.

In order to ensure optimum visibility 
during your manoeuvres, the mirror 
lightens automatically when reverse 
gear is engaged.

Adjustable mirror providing a central rearward view.
Equipped with an anti-dazzle system, which darkens the mirror glass and reduces the nuisance to 
the driver caused by the sun, headlamps from other vehicles...

Ease of use and comfort

90

C4-2_en_Chap03_ergonomie-et-confort_ed02-2015

Ventilation / Heating

Air intake

The air circulating in the passenger 
compartment is filtered and originates either 
from the outside via the grille located at the 
base of the windscreen or from the inside in air 
recirculation mode.

Air treatment

The incoming air follows various routes 
depending on the controls selected by the 
driver:
-  direct arrival in the passenger 

compartment (air intake),

-  passage through a heating circuit (heating),
-  passage through a cooling circuit (air 

conditioning).

Control panel

The controls of this system are grouped 
together on control panel A on the centre 
console.

Air distribution

1.

  Windscreen demisting-defrosting vents.

2.

  Front side window demisting-defrosting 

vents.

3.

  Side adjustable air vents.

4.

  Central adjustable air vents.

5.

  Air outlets to the front footwells.

6.

  Air nozzles to the front footwells.

7.

  Air outlets to the rear footwells.

3

Ease of use and comfort

91

C4-2_en_Chap03_ergonomie-et-confort_ed02-2015

Stop & Start

The heating and air conditioning 
systems only work when the engine is 
running.
To maintain a comfortable temperature 
in the passenger compartment, you can 
temporarily deactivate the Stop & Start 
system.
For more information on Stop & Start, 
refer to the corresponding section.

In order for these systems to be fully effective, follow the operation and maintenance 
guidelines below:
F

  To obtain an even air distribution, take care not to obstruct the exterior air intake grilles 

located at the base of the windscreen, the nozzles, the vents and the air outlets, as well 
as the air extractor located in the boot.

F

  Do not cover the sunshine sensor, located on the dashboard; this is used for regulation 

of the air conditioning system.

F

  Operate the air conditioning system for at least 5 to 10 minutes, once or twice a month 

to keep it in perfect working order.

F

  Ensure that the passenger compartment filter is in good condition and have the filter 

elements replaced regularly.


We recommend the use of a combined passenger compartment filter. Thanks to its 
special active additive, it contributes to the purification of the air breathed by the 
occupants and the cleanliness of the passenger compartment (reduction of allergic 
symptoms, bad odours and greasy deposits).

F

  To ensure correct operation of the air conditioning system, you are also advised to have 

it checked regularly as recommended in the maintenance and warranty guide.

F

  If the system does not produce cold air, switch it off and contact a CITROËN dealer or a 

qualified workshop.

When towing the maximum load on a steep gradient in high temperatures, switching off the 
air conditioning increases the available engine power and so improves the towing ability.

The condensation created by the air 
conditioning results in a discharge 
of water under the vehicle which is 
perfectly normal.

If after an extended stop in sunshine, 
the interior temperature is very 
high, first ventilate the passenger 
compartment for a few moments.
Put the air flow control at a setting high 
enough to quickly change the air in the 
passenger compartment.
The air conditioning system does not 
contain chlorine and does not present 
any danger to the ozone layer.

Recommendations for ventilation and air conditioning

Ease of use and comfort

92

C4-2_en_Chap03_ergonomie-et-confort_ed02-2015

Advice

Digital air conditioning:

 use the automatic mode in preference by pressing the "AUTO" button.

I require...

Heating or Manual air conditioning

Air distribution

Air flow

Recirculation of interior air / 

Intake of exterior air

Temperature

Manual AC

HOT

COLD

DEMISTING 

 DEFROSTING

Interior settings

3

Ease of use and comfort

93

C4-2_en_Chap03_ergonomie-et-confort_ed02-2015

Manual air conditioning

The air conditioning system operates only with the engine running.

F  Turn the dial to select a 

position between blue (cold) 
and red (hot) so as to adjust 
the temperature to your 
requirements.

1. Temperature adjustment

This dial is used to increase or 
decrease the speed of the air 
booster fan.

2. Air flow adjustment

3. Air distribution adjustment

Windscreen and side windows.

Windscreen, side windows and 
footwells.

Footwells.

Central and side vents.

The air distribution can be 
adapted by placing the dial in an 
intermediate position.

F

  Turn the dial from position 1 to position 5 to 

obtain a comfortable air flow.

This dial is used to arrange the distribution of 
air in the passenger compartment by combining 
several air outlets.

F  If you place the air flow control 

in position 0

, the system is 

deactivated. However, a slight flow 
of air, due to the movement of the 
vehicle, can still be felt.

Avoid driving too long with the 
ventilation off (risk of misting and 
deterioration of air quality).

Ease of use and comfort

94

C4-2_en_Chap03_ergonomie-et-confort_ed02-2015

4. Air intake / Air recirculation

5. Air conditioning On / Off

The air conditioning is designed to 
operate effectively in all seasons, 
with the windows closed.

It enables you to:
-  lower the temperature, in summer,
-  increase the effectiveness of the demisting 

in winter, above 3 °C.

Switching on

F  Press the "A/C"

 button, the button's 

indicator lamp comes on.

Switching off

F  Press the "A/C"

 button again, the button's 

indicator lamp goes off.

Switching off may affect comfort levels 
(humidity, condensation).

The intake of exterior air prevents the formation 
of mist on the windscreen and side windows.
The recirculation of interior air isolates the 
passenger compartment from exterior odours 
and smoke.

F  Press the button to recirculate 

the interior air. The indicator 
lamp comes on to confirm this.

F

  Press the button again to permit the intake 

of exterior air. The indicator lamp goes off 
to confirm this.

Return to exterior air intake as soon as possible 
to prevent deterioration of the the air quality 
and the formation of mist.

This function allows hot or cold air to be 
delivered selectively and more quickly.

The air conditioning does not operate 
when the air flow adjustment control 2 
is in position "0

".

To obtain cooled air more quickly, you 
can use recirculation of interior air for a 
few moments. Then return to fresh air 
intake.


Content   ..  4  5  6  7   ..