Citroen C3 Picasso (2016 year). Manual - part 6
 

  Index      Citroen     Citroen C3 Picasso - service manual 2016 year in english


Search            


Content   ..  4  5  6  7   ..


Citroen C3 Picasso (2016 year). Manual - part 6


5

Visibility

79

C3Picasso_en_Chap05_visibilite_ed01-2015

Wiper controls

Manual controls

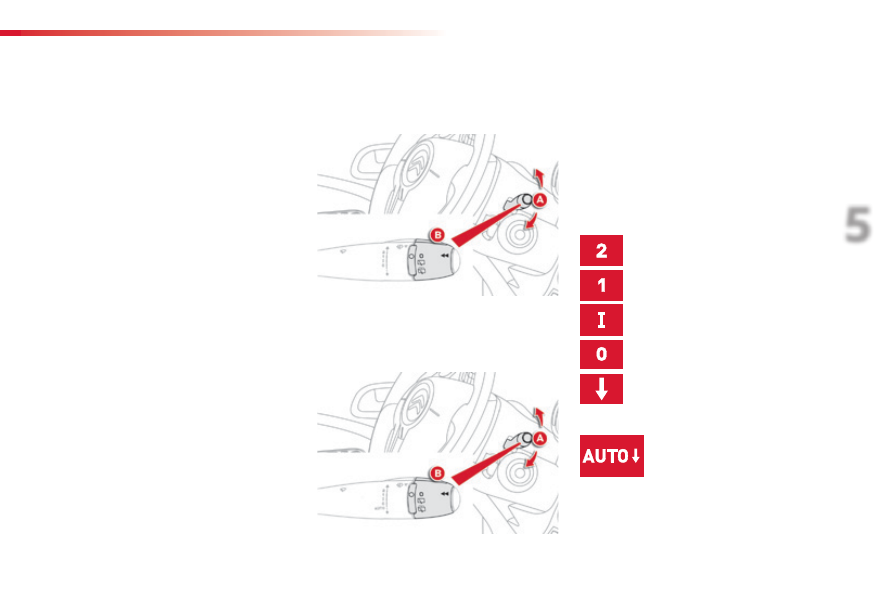
The wiper commands are issued directly by the 
driver by means of the stalk A and the ring B.

Model with intermittent wiping

Model with AUTO wiping

Fast (heavy rain).

Normal (moderate rain).

Intermittent (proportional to the 
speed of the vehicle).

Automatic, then single wipe.
Refer to the corresponding 
section.

Off.

Single wipe (press down and 
release).

Programming

You can modify the settings for the following 
functions:
-  automatic rain sensitive windscreen wipers,
-  rear wiping on engaging reverse gear.

Windscreen wipers

A.  Wiping speed selection stalk.

or

The vehicle's front and rear wipers are 
designed to improve the driver's visibility 
progressively according to the weather 
conditions.

Visibility

80

C3Picasso_en_Chap05_visibilite_ed01-2015

Windscreen wash

Pull the wiper stalk towards you. The 
windscreen wash, then the windscreen wipers, 
operate for a pre-determined time.

B.

  Rear wiper selection ring:

park,

intermittent wipe,

wash-wipe (set duration).

Reverse gear

When reverse gear is engaged, the rear wiper 
will operate if the windscreen wipers are 
operating.

Programming

The function is activated or deactivated via the 
multifunction screen configuration menu.
This function is activated by default.

Rear wiper

Wiping zone

The curved shape of the rear screen results in 
a smaller wiping zone.

If a significant accumulation of snow or 
ice is present, or when using a tailgate 
bicycle carrier, deactivate the automatic 
rear wiper via the multifunction screen 
configuration menu.

5

Visibility

81

C3Picasso_en_Chap05_visibilite_ed01-2015

Vertical windscreen wiper 
position

Automatic rain sensitive 
windscreen wipers

The windscreen wipers operate automatically, 
without any action on the part of the driver, if rain 
is detected (sensor behind the rear view mirror), 
adapting their speed to the intensity of the rainfall.

Activation

This is controlled manually by the driver by 
pushing the stalk downwards to the "AUTO" 
position.
It is accompanied by a message in the screen.

This position allows the wiper blades to be lifted 
for winter parking, cleaning or replacement 
without damaging the bonnet.
In the minute following switching off of the 
ignition, any action on the wiper stalk positions 
the wipers vertically.
To park the wipers after this has been done, 
switch on the ignition and operate the wiper stalk.

Switching off

This is controlled manually by the driver by 
moving the stalk upwards then returning it to 
position "0".

Operating fault

If an automatic wiping malfunction occurs, the 
wipers will operate in intermittent mode.
Have it checked by a CITROËN dealer or a 
qualified workshop.

It is accompanied by a message in the 
screen.
The automatic rain sensitive wipers 
must be reactivated if the ignition has 
been off for more than one minute, by 
pushing the stalk downwards.

Do not cover the rain sensor, linked with 
the sunshine sensor and located in the 
centre of the windscreen behind the rear 
view mirror.
Switch off the automatic rain sensitive 
wipers when using an automatic car wash.
In winter, to avoid damaging the wiper 
blades, it is advisable to wait until the 
windscreen is completely clear of ice 
before activating the automatic rain 
sensitive wipers.

To retain the effectiveness of the flat 
wiper blades, it is advisable to:
-  handle them with care,

clean them regularly using soapy 
water,

not use them to hold a sheet of 
cardboard against the windscreen,

replace them at the first signs of 
wear.

Visibility

82

C3Picasso_en_Chap05_visibilite_ed01-2015

Courtesy lamps

Selection and control of the various passenger compartment lamps.

1.  Front courtesy lamp
2.
  Map reading lamps
3.
  Rear courtesy lamp

Front and rear courtesy lamps

Map reading lamps

F  With the ignition on, press the 

corresponding switch.

In this position, the courtesy lamp 
comes on gradually:

Permanently off.

Permanent lighting.

It switches off gradually:
-  when the vehicle is locked,
-  when the ignition is switched on,

30 seconds after the last door is closed.

-  when the vehicle is unlocked,
-  when the key is removed from the ignition,
-  when a door is opened,
-  when the remote control locking button is 

pressed, in order to locate your vehicle.

In permanent lighting mode, different 
lighting times are available:

-  with the ignition off, approximately 

ten minutes,

in energy economy mode, 

approximately thirty seconds,

-  with the engine running, unlimited.

5

Visibility

83

C3Picasso_en_Chap05_visibilite_ed01-2015

Courtesy lamp with mood 
lighting LED

Present or not depending on equipment, a 
mood lighting LED in the front courtesy lamp 
improves visibility inside the vehicle when the 
light is poor.

Switching on

The LED comes on with illumination - manual 
or automatic - of the sidelamps or dipped or 
main beam.

Switching off

The courtesy lamp LED goes off:
-  when the sidelamps or dipped or main 

beam are switched off manually (lighting 
control stalk in position "0"),

-  when the level of ambient light is sufficient 

(lighting control stalk in position "AUTO").

The LED comes on independently of 
the front courtesy lamp or the map 
reading lamps.

Illumination of the LED can not be 
deactivated.

This comes on automatically when the boot is 
opened and goes off automatically when the 
boot is closed.

Boot lamp

The lighting time varies according to the 
circumstances:
-  when the ignition is off, 

approximately ten minutes,

in energy economy mode, 
approximately thirty seconds,

-  when the engine is running, no limit.

Fittings

84

C3Picasso_en_Chap06_amenagement_ed01-2015

Front interior fittings

1.  Sun visor.
2.  Child surveillance mirror.
3.

  Grab handle with coat hook.

4.  Navigation screen and scented air 

freshener.

 or
 Storage
5.  Storage compartments.
6.

  Glove box.

7.  Storage pockets.
8.  Open storage compartment at side of 

passenger seat.

9.  Ticket holder.
10.

  12 volt socket (100 W max).

11.

  USB port / auxiliary socket.

12.  Cup holder.

6

Fittings

85

C3Picasso_en_Chap06_amenagement_ed01-2015

Child surveillance mirror

Sun visor

Provides protection against sunlight from the 
front or the side.

The sun visors are fitted with a courtesy mirror 
with concealing flap and a ticket holder.

Glove box

This has areas for storing a bottle of water, the 
vehicle's handbook, ...
F

  To open the glove box, pull the handle 

towards you.

A child surveillance mirror is installed above 
the interior rear view mirror. This allows you 
to monitor the vehicle’s rear passengers, or it 
can facilitate conversation between the front 
and rear passengers without the need to move 
the rear view mirror. It can be folded away to 
eliminate dazzle.

Fittings

86

C3Picasso_en_Chap06_amenagement_ed01-2015

Storage drawer

It is located under the front passenger seat.

12 V accessory socket

F

  To use the 12 V socket (max power: 

100 Watts), lift the cap and connect the 
accessory.

Opening

F

  Raise the front of the drawer and pull it.

Do not place heavy objects in the 
drawer.

The connection of an electrical device 
not approved by CITROËN, such as a 
USB charger, may adversely affect the 
operation of vehicle electrical systems, 
causing faults such as poor telephone 
reception or interference with displays 
in the screens.

6

Fittings

87

C3Picasso_en_Chap06_amenagement_ed01-2015

Mats

Removable carpet protection.

Refitting

To refit the mat on the driver's side:
F  position the mat correctly,
F

  refit the fixings by pressing,

F  check that the mat is secured correctly.

Fitting

When fitting the mat for the first time, on the 
driver's side use only the fixings provided in the 
wallet attached.
The other mats are simply placed on the 
carpet.

Removal

To remove the mat on the driver's side:
F  move the seat as far back as possible,
F

  unclip the fixings,

F  remove the mat.

Ticket holder

To avoid any risk of jamming of the 
pedals:
-  only use mats which are suited to 

the fixings already present in the 
vehicle; these fixings must be used,

never fit one mat on top of another.

The use of mats not approved by 
CITROËN may interfere with access to 
the pedals and hinder the operation of 
the cruise control / speed limiter.

It is located at the top of the dashboard centre 
panel.
It can be used to hold toll or parking tickets.

Fittings

88

C3Picasso_en_Chap06_amenagement_ed01-2015

Rear interior fittings

There is a cup holder located at the rear of the 
centre console.

They are located on the back of the front seats.

Lift the catch to release the table and unfold it.

Seat pockets

Cup holder

Aircraft style tables

Do not place hard or heavy objects 
on the table. They could become 
dangerous projectiles in the event of 
sharp braking or impact.
As a safety precaution, if too much 
pressure is exerted the table will fold 
downwards.

6

Fittings

89

C3Picasso_en_Chap06_amenagement_ed01-2015

Reading lamps are built into the back of the 
front seats, behind the tables. 

Individual reading lamps

Blinds are available for the side windows.
Pull the side blind longways by the tab to use it.
Always guide the blind slowly using the tab.

Side blinds

Storage tray

When unfolded, this provides a storage area 
split into 2 sections, completing the storage 
spaces available at the rear of the vehicle.

With the ignition on, they illuminate the top 
of the table without inconveniencing other 
passengers.
They are only accessible if the table is 
unfolded.
F

  Press the button to switch the lamp on or 

off.

Fittings

90

C3Picasso_en_Chap06_amenagement_ed01-2015

Opening

F

  Lower the storage shelf.

F  Press the flap opening control.
F

  Lower the flap.

F  Check that the adjustable boot floor is in 

the high position.

F  Load the objects from inside the boot.

Ski flap

Device for storing and transporting long 
objects.

6

Fittings

91

C3Picasso_en_Chap06_amenagement_ed01-2015

Boot fittings

1.  Open storage compartments.
2.  Adjustable boot floor.
3.  Carrier bag hook.
4.  Securing rings.
5.  Storage space under boot carpet
6.  Rear parcel shelf.

Fittings

92

C3Picasso_en_Chap06_amenagement_ed01-2015

2-position adjustable boot

The two-position adjustable boot floor allows 
you to:
-  maximise the volume of the boot,
-  partition the boot (stowing the rear shelf...),

obtain a flat floor from the boot opening to 
the front seats, when the rear bench seat is 
in the folded and fully back position.

Placing the adjustable boot floor 

in the low position

F  Lift the adjustable boot floor by pulling on 

the strap.

F

  Move the adjustable boot floor rearwards 

and then down, following the guides on the 
sides.

Placing the adjustable boot floor 

in the high position

F  Lift the adjustable boot floor by pulling the 

strap.

F

  Move the adjustable boot floor rearwards 

then up to its high position.

In the high position, the adjustable boot floor 
allows stowing of the rear parcel shelf and 
fragile objects.

The adjustable boot floor is fitted with four 
stowing rings to secure your loads using the net 
available as an accessory.

Ensure that your boot is empty before 
handling the adjustable boot floor.

6

Fittings

93

C3Picasso_en_Chap06_amenagement_ed01-2015

Hooks

The hooks can be used to hold shopping bags.

2-panel rear parcel shelf

The rear section is attached to the tailgate by 
two cords.

Removing the shelf

From the boot:
F

  unhook the two cords,

F

  pull the shelf towards you to unclip it,

F  lift the shelf to remove it.

Refitting the shelf

From the boot:
F

  position the shelf so that the two notches 

are directly above the fixing pins,

F

  push the shelf towards the inside of the 

vehicle to clip it in place,

F

  attach the two cords.

It can be stored under the adjustable boot floor, 
if this is in its high position.

Child safety

94

C3Picasso_en_Chap07_securite-enfants_ed01-2015

General points relating to child seats

*  The regulations on carrying children are 

specific to each country. Refer to the 
legislation in force in your country.

For maximum safety, please observe the 
following recommendations:
-  in accordance with European regulations, 

all children under the age of 12 or less 
than one and a half metres tall must 
travel in approved child seats suited to 
their weight

, on seats fitted with a seat 

belt or ISOFIX mountings*,

statistically, the safest seats in your 
vehicle for carrying children are the 
rear seats,

a child weighing less than 9 kg must 
travel in the
 rearward facing position 
both in the front and in the rear.

CITROËN recommends that children 
should travel on the rear seats of your 
vehicle:

rearward facing up to the age of 3,

forward facing over the age of 3.

Although one of CITROËN main criteria when designing your vehicle, the safety of your children 
also depends on you.


Content   ..  4  5  6  7   ..