Citroen C1 Dag (2010 year). Manual - part 4
 

  Index      Citroen     Citroen C1 Dag - service manual 2010 year in english


Search            


Content   ..  2  3  4  5   ..


Citroen C1 Dag (2010 year). Manual - part 4


4

49

ACCESS

IMMOBILISER 

 This locks the engine management sys-
tem  as  soon  as  the  ignition  has  been 
switched  off  and  therefore  prevents 
starting  of  the  vehicle  by  anyone  who 
does not have the key. 
 The ignition key has an electronic chip 
which has a special code. When the ig-
nition is switched on, the code must be 
recognised for starting to be possible. 
 In the event of a malfunction, your ve-
hicle will not start. 
 Contact a CITROËN dealer or a quali-

fi ed workshop. 

             Changing the remote control 
battery 

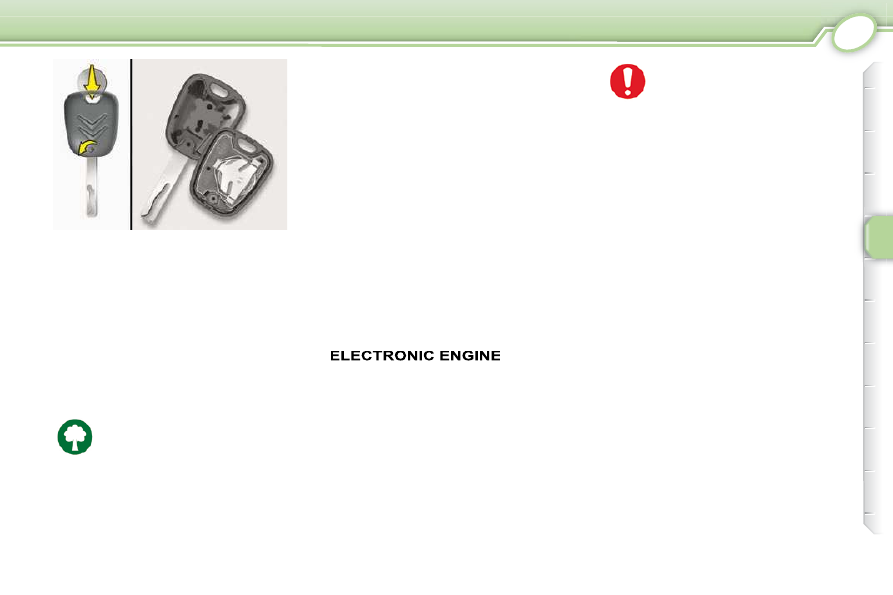
 To  change  the  battery,  remove  the 
screw  then  unclip  the  housing  using 
a coin inserted at the ring. 
 Battery CR 2016/3 volts. 
 If  the  remote  control  does  not  work 
after  the  battery  has  been  changed, 
reinitialise it. 

  Reinitialising the remote 
control 

 Following replacement of the remote 
control battery or in the event of a re-
mote  control  fault,  it  may  be  neces-
sary to reinitialise the system. 
      Switch off the ignition. 
     Switch the ignition on again. 
     Press  one  of  the  remote  control 

buttons  immediately  for  a  few 
seconds. 

     Switch off the ignition and remove 

the key from the ignition lock.  

 The  remote  control  is  now  working 
again. 
 If the fault persists, contact a CITROËN 

dealer or a qualifi ed workshop.  

 Driving with the doors locked 
may make access to the pas-
senger  compartment  by  the 
emergency  services  more 

diffi cult in an emergency. 

 As  a  safety  measure  (with  children 
on  board),  remove  the  key  from  the 
ignition  when  leaving  the  vehicle, 
even for a short time. 
 Do not make any modifi cations to the 

electronic immobiliser system. 

 Do  not  discard  the  remote 
control batteries, they contain 
metals  which  are  harmful  to 
the environment. 

 Take them to a CITROËN dealership, 
or  to  any  other  approved  collection 
point.  

 The high frequency remote control is 
a sensitive system; do not operate it 
in your pockets as there is a risk that 
it may unlock the vehicle without you 
being aware of this. 
 Avoid  pressing  the  buttons  of  your 
remote  control  out  of  range  of  your 
vehicle, you risk rendering it inopera-
tive.  It  would  then  have  to  be  reini-
tialised. 

4

49

ACCESS

IMMOBILISER 

 This locks the engine management sys-
tem  as  soon  as  the  ignition  has  been 
switched  off  and  therefore  prevents 
starting  of  the  vehicle  by  anyone  who 
does not have the key. 
 The ignition key has an electronic chip 
which has a special code. When the ig-
nition is switched on, the code must be 
recognised for starting to be possible. 
 In the event of a malfunction, your ve-
hicle will not start. 
 Contact a CITROËN dealer or a quali-

fi ed workshop. 

             Changing the remote control 
battery 

 To  change  the  battery,  remove  the 
screw  then  unclip  the  housing  using 
a coin inserted at the ring. 
 Battery CR 2016/3 volts. 
 If  the  remote  control  does  not  work 
after  the  battery  has  been  changed, 
reinitialise it. 

  Reinitialising the remote 
control 

 Following replacement of the remote 
control battery or in the event of a re-
mote  control  fault,  it  may  be  neces-
sary to reinitialise the system. 
      Switch off the ignition. 
     Switch the ignition on again. 
     Press  one  of  the  remote  control 

buttons  immediately  for  a  few 
seconds. 

     Switch off the ignition and remove 

the key from the ignition lock.  

 The  remote  control  is  now  working 
again. 
 If the fault persists, contact a CITROËN 

dealer or a qualifi ed workshop.  

 Driving with the doors locked 
may make access to the pas-
senger  compartment  by  the 
emergency  services  more 

diffi cult in an emergency. 

 As  a  safety  measure  (with  children 
on  board),  remove  the  key  from  the 
ignition  when  leaving  the  vehicle, 
even for a short time. 
 Do not make any modifi cations to the 

electronic immobiliser system. 

 Do  not  discard  the  remote 
control batteries, they contain 
metals  which  are  harmful  to 
the environment. 

 Take them to a CITROËN dealership, 
or  to  any  other  approved  collection 
point.  

 The high frequency remote control is 
a sensitive system; do not operate it 
in your pockets as there is a risk that 
it may unlock the vehicle without you 
being aware of this. 
 Avoid  pressing  the  buttons  of  your 
remote  control  out  of  range  of  your 
vehicle, you risk rendering it inopera-
tive.  It  would  then  have  to  be  reini-
tialised. 

4

50

ACCESS

       Electric windows 

 The driver and front passenger each 
have an electric window. 
 After  the  ignition  has  been  switched 
on, press or pull control  1 . The window 
stops when you release the control. 

 Always remove the key from 
the  ignition  when  leaving 
the  vehicle,  even  for  a  short 
time. 

 The driver must ensure that the front 
passenger uses their electric window 
correctly. 
 Be aware of children when operating 
the windows.  

DOORS 

  Driver's door open 

 If the driver's door is open, 
the  courtesy  lamp  remains 
on if the button is in this po-
sition.  

  Locking/unlocking a door 
from the inside 

  Normal locking/unlocking: the doors 
lock/unlock independently.
  
 To lock/unlock a door, press/pull but-
ton  A . 

           Central locking/unlocking: the 
doors and tailgate are locked/
unlocked simultaneously. 

 To lock/unlock the vehicle, press/pull 
button  A  on the driver's door. 
 For  the  other  doors,  carry  out  the 
same operation as for normal locking/
unlocking.   

             Child lock 

 This prevents the opening of either of 
the rear doors from the inside. 
 Push control   towards the outside of 
the vehicle. 

  Check the status of this safe-
ty device before switching on 
the ignition. 
  This  system  is  independent 
of the central locking. 

 Always remove the key from the ignition 
when leaving the vehicle.  

  Operating  the  handle  does 
not unlock the door, pull but-
ton  A  to unlock.   

4

51

ACCESS

BOOT 

 Locking/Unlocking the boot 
using the remote control *  

REAR WINDOWS (5-DOOR) 

 To  partially  open  the  rear  windows, 
pull the lever then push the window. 
 To close the window, pull then press 
the lever to lock the window. 

  *   According to version.  

  The  boot  is  locked/unlocked  using 
the buttons on the remote control. 
 Then,  to  open,  press  button   C   and 
raise the tailgate. 

  The  boot  can  be  locked/un-
locked using control  A  on the 
driver's door.   

  Locking/unlocking using 
the key *  

 To open, operate the lock  B  using the 
key and raise the tailgate.  

4

51

ACCESS

BOOT 

 Locking/Unlocking the boot 
using the remote control *  

REAR WINDOWS (5-DOOR) 

 To  partially  open  the  rear  windows, 
pull the lever then push the window. 
 To close the window, pull then press 
the lever to lock the window. 

  *   According to version.  

  The  boot  is  locked/unlocked  using 
the buttons on the remote control. 
 Then,  to  open,  press  button   C   and 
raise the tailgate. 

  The  boot  can  be  locked/un-
locked using control  A  on the 
driver's door.   

  Locking/unlocking using 
the key *  

 To open, operate the lock  B  using the 
key and raise the tailgate.  

4

52

ACCESS

BOOT FITTINGS  

  2.  Spare wheel/Additional storage 

compartments 

 Located under the carpet and a plas-
tic  cover,  this  contains  the  tools  for 
wheel changing and towing.  

 There are two shelf storage options: 
   -  

either behind the rear seats, 

  -   or fl at in the boot.   

  1. Rear parcel shelf 

 To remove the shelf: 

   -   unhook the shelf from its fi xing  A , 
  -  

pull upwards on each side to de-

tach it from its fi xings, 

  -  

raise  then  tilt  the  shelf  slightly  to 
remove it.  

  In  order  to  obtain  additional 
space,  the  spare  wheel  can 
be 

removed 

temporarily 

(boot tray available as an ac-
cessory).   

4

53

ACCESS

FUEL TANK 

    

   Open the fuel fi ller fl ap. 

     Insert  the  key,  turn  it  slightly  to 

the  left  then  return  to  the  right. 
The key returns to its initial posi-
tion and the cap is unlocked. 

  Low fuel level 

 When  the  low  fuel  level  is 

reached, the last bar fl ashes, 

accompanied  by  an  audible 
signal. 
   You  have  approximately 
5 litres remaining.
  

 In  certain  driving  conditions  and  de-
pending  on  the  engine,  the  distance 
which  can  be  travelled  with  the  fuel 
remaining may be less than 30 miles 
(50 km). 

 When  the  frequency  of  the  fl ashing 

increases,  you have approximately 
3 litres remaining
 . 

     Unscrew the cap and hook it onto 

the  clip  located  on  the  inside  of 

the fl ap.  

 A  label  affi xed  on  the  inside  of  the 

fl ap  reminds  you  which  type  of  fuel 

to use. 
 When  you  fi ll  the  fuel  tank,  do  not 

continue  after  the  3rd  cut-off  of  the 
pump.  This  could  cause  malfunc-
tions.  

      Remove the key.  

  If  you  run  out  of  fuel,  the 
emission 

control 

system 

warning  lamp  may  come  on 
in the instrument panel. It will 

go  off  automatically  after  the  engine 
has been started a few times.  

  The  fuel  tank  must  be  fi lled 

 with  the  engine  switched 
off
 .  

   The  capacity  of  the  fuel  tank  is 
approximately 35 litres.
  
   

   After  fi lling  the  fuel  tank,  screw 

the  cap  back  on  fully  to  the  right 

until it clicks and close the fl ap.    

4

54

ACCESS

             Quality of the fuel used for 
petrol engines 

  The petrol engines are perfectly com-
patible  with  E10  type  petrol  biofuels 
(containing  10 %  ethanol),  conform-
ing  to  European  standards  EN  228 
and EN 15376. 
 E85 type fuels (containing up to 85 % 
ethanol) are reserved exclusively for 
vehicles marketed for the use of this 
type  of  fuel  (BioFlex  vehicles).  The 
quality  of  the  ethanol  must  comply 
with European standard EN 15293. 
 For  Brazil  only,  special  vehicles  are 
marketed  to  run  on  fuels  containing 
up to 100 % ethanol (E100 type).   

5

55

VISIBILITY

LIGHTING STALK 

   1.   Lamps off 

  2.   Sidelamps 

  3.   Dipped headlamps/

Main beam head-
lamps   

  Dipped/Main beam headlamps 

  Dipped  beam  headlamps:   pull  the 
stalk. 
  Main  beam  headlamps:   push  the 
stalk.  

  Lighting on audible warning 

 When  the  driver's  door  is  opened 
with the ignition off, a continuous au-
dible  signal  is  heard  if  you  have  left 
your lighting on.  

  Rear foglamp 

 With  the  dipped  head-
lamps  on,  selection  is 
by rotation of ring  B  for-
wards  to  switch  on  and 
rearwards  to  switch  off. 

The status is displayed by the indicator 
lamp in the instrument panel. 

  In  clear  weather  or  in  rain, 
both  day  and  night,  the  rear 
foglamp  is  dazzling  and  its 
use is prohibited.  

  Direction indicators 
(flashers) 

  Left:  stalk downwards. 
  Right:  stalk upwards.  

  Headlamp flash 

 Pull the stalk fully towards you.  

  Front and rear lamps 

 Selection is by rotation of ring  A . 

  Switching to sidelamps does 
not  switch  off  the  rear  fo-
glamp if it is on.  

 Do not forget to switch them off when 
they are no longer needed.  

5

56

VISIBILITY

WINDSCREEN WIPER STALK 

  When  using  a  car  wash,  switch 
off  the  ignition  and  ensure  that 
the wiper blade is in the low posi-
tion.  

  Windscreen wash 

 Pull the wipers stalk towards you.  

  Rear wiper and wash-wipe 

 Turn ring   to  "ON"  for a steady wipe. 

 Turn  it  forwards  to  trigger 
the wash during wiping.  

  Rear wash 

 Ring   at  "OFF"  (wiper off). 

 Turn it towards you to trigger 
a wash operation.  

  Windscreen wiper 

  MIST   Single wipe. 
 

  For a single wipe of the 
windscreen, push the control 
upwards then release it. 

  OFF    Off. 
  INT    Intermittent wipe. 
  LO   

Normal wipe (moderate rain). 

  HI   

Fast wipe (heavy rain). 

 In winter, you are advised to wait until 
the  windscreen  has  been  defrosted 
fully before operating the windscreen 
wiper stalk.  

5

57

VISIBILITY

HEADLAMP 
ADJUSTMENT 

 To avoid causing a nuisance to other 
road  users,  the  height  of  the  head-
lamps should be adjusted in relation 
to the load in the vehicle. 
  0.    1 or 2 people in the front seats. 
  -.    3 people. 
  1.    4 people. 
  2.    4 people + maximum authorised 

load. 

  3.    Driver + maximum authorised 

load. 

 The initial setting is position  "0" . 

  In  this  position,  it  comes 
on  on  opening  the  driver's 
door. 

 The courtesy lamp is deacti-
vated and is permanently off. 

COURTESY LAMP 

 Permanently on.  

6

58

SAFETY

 HORN 

 Press one of the spokes of the steer-
ing wheel. 

 HAZARD WARNING LAMPS 

 Press the button, the direction indica-

tors fl ash. 
 They can operate with the ignition off. 

ANTI-LOCK BRAKING 
SYSTEM (ABS) AND 
BRAKING SYSTEMS 
(EBFD AND CSC * ) 

 When the vehicle is being driv-
en,  illumination  of  this  warning 
lamp indicates that the parking 
brake is still on or has not been 
properly released. 

  When  parking  on  a  slope, 
direct your wheels towards 
the  pavement  and  pull  the 
parking brake
   on  .    

PARKING BRAKE  

  Applying 

 Pull  the  parking  brake  to  immobilise 
your vehicle.  

  When 

changing 

wheels 

(tyres), make sure that these 
are approved. 

 The anti-lock braking system comes 
into  operation  automatically  when 
there is a risk of wheel lock.  

  Releasing 

 Pull on the handle and press the button 
to release the parking brake. 

  *    The  CSC  system  is  linked  with  the 

EBFD on vehicles which are not fi tted 

with ASR/ESP systems.  

EMERGENCY BRAKING 
ASSISTANCE  

  The ABS, in conjunction with the EBFD 
and CSC *  braking systems, increases 
the  stability  and  manoeuvrability  of 
your vehicle on braking and provides 
improved control, in particular on poor 
or slippery road surfaces. 
 The ABS  prevents  wheel  lock  in  the 
event of emergency braking. 
 The  EBFD  and  CSC *   systems  pro-
vide  full  control  of  the  braking  pres-
sure  wheel  by  wheel.  A  distribution 
between: 
   -  

the front and the rear in the case 
of  the  EBFD  (Electronic  Brake 
Force Distribution), 

  -  

the  left  and  the  right  in  the  case 
of  the  CSC *   (Cornering  Stability 
Control).  

  In an emergency, this system enables 
you  to  reach  the  optimum  braking 
pressure more quickly and therefore 
reduce the stopping distance. 
 It is triggered by the speed at which 
the  brake  pedal  is  pressed.  This  is 
felt  by  a  reduction  in  the  resistance 
of  the  pedal  and  an  increase  in  the 
effectiveness of the braking.   

6

58

SAFETY

 HORN 

 Press one of the spokes of the steer-
ing wheel. 

 HAZARD WARNING LAMPS 

 Press the button, the direction indica-

tors fl ash. 
 They can operate with the ignition off. 

ANTI-LOCK BRAKING 
SYSTEM (ABS) AND 
BRAKING SYSTEMS 
(EBFD AND CSC * ) 

 When the vehicle is being driv-
en,  illumination  of  this  warning 
lamp indicates that the parking 
brake is still on or has not been 
properly released. 

  When  parking  on  a  slope, 
direct your wheels towards 
the  pavement  and  pull  the 
parking brake
   on  .    

PARKING BRAKE  

  Applying 

 Pull  the  parking  brake  to  immobilise 
your vehicle.  

  When 

changing 

wheels 

(tyres), make sure that these 
are approved. 

 The anti-lock braking system comes 
into  operation  automatically  when 
there is a risk of wheel lock.  

  Releasing 

 Pull on the handle and press the button 
to release the parking brake. 

  *    The  CSC  system  is  linked  with  the 

EBFD on vehicles which are not fi tted 

with ASR/ESP systems.  

EMERGENCY BRAKING 
ASSISTANCE  

  The ABS, in conjunction with the EBFD 
and CSC *  braking systems, increases 
the  stability  and  manoeuvrability  of 
your vehicle on braking and provides 
improved control, in particular on poor 
or slippery road surfaces. 
 The ABS  prevents  wheel  lock  in  the 
event of emergency braking. 
 The  EBFD  and  CSC *   systems  pro-
vide  full  control  of  the  braking  pres-
sure  wheel  by  wheel.  A  distribution 
between: 
   -  

the front and the rear in the case 
of  the  EBFD  (Electronic  Brake 
Force Distribution), 

  -  

the  left  and  the  right  in  the  case 
of  the  CSC *   (Cornering  Stability 
Control).  

  In an emergency, this system enables 
you  to  reach  the  optimum  braking 
pressure more quickly and therefore 
reduce the stopping distance. 
 It is triggered by the speed at which 
the  brake  pedal  is  pressed.  This  is 
felt  by  a  reduction  in  the  resistance 
of  the  pedal  and  an  increase  in  the 
effectiveness of the braking.   

6

59

SAFETY

  When  this  warning  lamp 
comes  on,  it  indicates  that 
there is a fault with the ABS, 
which  could  cause  a  loss  of 
control  of  the  vehicle  when 
braking. 

 Contact  a  CITROËN  dealer  or  a 

qualifi ed workshop.  

  When  these  warn-
ing  lamps  come  on 
simultaneously, 

it 

indicates  that  there 

is  a  fault  with  the  braking  system  or 
that  the  parking  brake  has  not  been 
released  fully,  which  can  cause  a 
loss  of  control  of  the  vehicle  when 
braking. 
  You must stop as soon as it is safe 
to do so.
  
 Contact  a  CITROËN  dealer  or  a 

qualifi ed workshop.  

  Normal operation of the ABS 
may  make  itself  felt  by  slight 
vibrations of the brake pedal.  

   In 

emergency 

braking, 

press  very  fi rmly  without 

releasing the pressure.    

ANTI-SLIP REGULATION 
(ASR) AND ELECTRONIC 
STABILITY PROGRAMME 
(ESP)  

  Operating check 

  Operation of the ASR and ESP 
systems 

 When  one  of  these  two  sys-
tems is operating, this warning 
lamp comes on.  

 If  a  fault  occurs  with  the 
systems,  this  warning  lamp 
comes on. 

  The  ASR/ESP  systems  of-
fer  exceptional  safety  dur-
ing  normal  driving,  but  this 
should  not  encourage  the 

driver  to  take  extra  risks  or  drive  at 
high speed. 
 Correct  operation  of  these  systems 
depends on observation of the manu-
facturer's recommendations regarding 
the wheels (tyres and rims), the brak-
ing  components  and  the  electronic 
components as well as the repair pro-
cedures use by a CITROËN dealer or 

qualifi ed workshop. 
 After an impact, have these systems 
checked  by  a  CITROËN  dealer  or  a 

qualifi ed workshop.   

 Contact  a  CITROËN  dealer  or  a 

qualifi ed  workshop  to  have  the  sys-

tems checked.  

  These  systems  are  linked  and  sup-
plement the ABS. 
 The  ASR  system  optimises  drive  to 
prevent the wheels skidding, by act-
ing on the brakes of the driving wheels 
and on the engine. It also allows the 
directional  stability  of  the  vehicle  to 
be improved on acceleration. 
 If there is a variation between the tra-
jectory  followed  by  the  vehicle  and 
that  required  by  the  driver,  the  ESP 
system  automatically  acts  on  the 
brake of one or more wheels and on 
the engine to put the vehicle back on 
course,  within  the  limits  of  the  laws 
of physics.  

6

59

SAFETY

  When  this  warning  lamp 
comes  on,  it  indicates  that 
there is a fault with the ABS, 
which  could  cause  a  loss  of 
control  of  the  vehicle  when 
braking. 

 Contact  a  CITROËN  dealer  or  a 

qualifi ed workshop.  

  When  these  warn-
ing  lamps  come  on 
simultaneously, 

it 

indicates  that  there 

is  a  fault  with  the  braking  system  or 
that  the  parking  brake  has  not  been 
released  fully,  which  can  cause  a 
loss  of  control  of  the  vehicle  when 
braking. 
  You must stop as soon as it is safe 
to do so.
  
 Contact  a  CITROËN  dealer  or  a 

qualifi ed workshop.  

  Normal operation of the ABS 
may  make  itself  felt  by  slight 
vibrations of the brake pedal.  

   In 

emergency 

braking, 

press  very  fi rmly  without 

releasing the pressure.    

ANTI-SLIP REGULATION 
(ASR) AND ELECTRONIC 
STABILITY PROGRAMME 
(ESP)  

  Operating check 

  Operation of the ASR and ESP 
systems 

 When  one  of  these  two  sys-
tems is operating, this warning 
lamp comes on.  

 If  a  fault  occurs  with  the 
systems,  this  warning  lamp 
comes on. 

  The  ASR/ESP  systems  of-
fer  exceptional  safety  dur-
ing  normal  driving,  but  this 
should  not  encourage  the 

driver  to  take  extra  risks  or  drive  at 
high speed. 
 Correct  operation  of  these  systems 
depends on observation of the manu-
facturer's recommendations regarding 
the wheels (tyres and rims), the brak-
ing  components  and  the  electronic 
components as well as the repair pro-
cedures use by a CITROËN dealer or 

qualifi ed workshop. 
 After an impact, have these systems 
checked  by  a  CITROËN  dealer  or  a 

qualifi ed workshop.   

 Contact  a  CITROËN  dealer  or  a 

qualifi ed  workshop  to  have  the  sys-

tems checked.  

  These  systems  are  linked  and  sup-
plement the ABS. 
 The  ASR  system  optimises  drive  to 
prevent the wheels skidding, by act-
ing on the brakes of the driving wheels 
and on the engine. It also allows the 
directional  stability  of  the  vehicle  to 
be improved on acceleration. 
 If there is a variation between the tra-
jectory  followed  by  the  vehicle  and 
that  required  by  the  driver,  the  ESP 
system  automatically  acts  on  the 
brake of one or more wheels and on 
the engine to put the vehicle back on 
course,  within  the  limits  of  the  laws 
of physics.  

6

60

SAFETY

SEAT BELTS  

  Pretensioning front seat 
belts with force limiter 

 Safety  in  the  event  of  front 
impacts  has  been  improved 

by  means  of  the  introduction  of  pre-
tensioning  seat  belts  with  force  lim-
iter for the front seats. Depending on 
the  force  of  the  impact,  the  preten-
sioning system instantly tightens the 
seat belts and pulls them against the 
body of the occupants. 
 The pretensioning seat belts are ac-
tive when the ignition is on. 
 The force limiter reduces the pressure 
of the seat belt on the chest of the oc-
cupant, increasing their protection.  

   3-door   

   5-door   

  Rear seat belts 

 The rear seats are equipped with two 
three-point inertia reel seat belts. 
 You can store the seat belt buckles in 
the housing  A .   

  Fastening/Unfastening the seat 
belts 

 Pull the strap, then insert the buckle 
into the stalk. 
 Check  that  the  seat  belt  is  fastened 
correctly by pulling the strap. 
 To unfasten the seat belts, press the 
button on the stalk.  


Content   ..  2  3  4  5   ..