Citroen Jumpy Multispace Dag (2008 year). Manual - part 3
 

  Index      Citroen     Citroen Jumpy Multispace Dag - service manual 2008 year in english


Search            


Content   ..  1  2  3  4   ..


Citroen Jumpy Multispace Dag (2008 year). Manual - part 3


 3

3

   Instruments and controls   

R

E

A

D

Y

 T

O

 S

E

T

 O

F

F

2

 The points at which a service is due are 
calculated from the last indicator zero reset. 

 The point at which a service is due is 
determined by two parameters: 

   -  

the distance travelled, 

  -  

the time which has elapsed since the 
last service.  

 A few seconds after the ignition is switched 
on, the oil level is displayed, then the total 
distance recorder resumes normal operation 
showing the total and trip distances.  

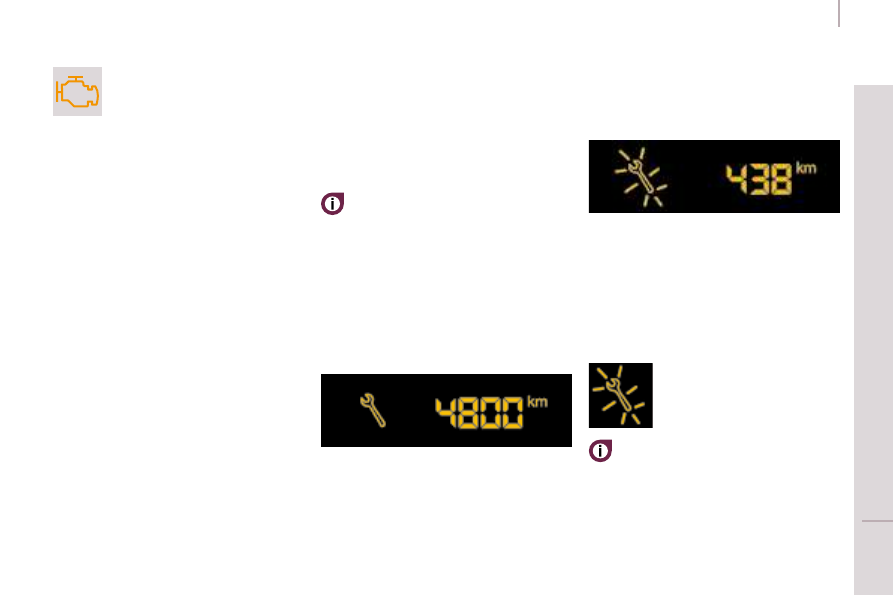
  Less than 1 000 miles/km before the next 
service is due 

 Each time the ignition is switched on and for a few 
seconds, the spanner fl ashes and the number of 
miles/kilometres remaining is displayed: 

 A few seconds after the ignition is switched 
on, the oil level is displayed, then the total 
distance recorder resumes normal operation 
and the spanner remains lit. This indicates 
that a service should be carried out shortly.  

  Service overdue 

  With the engine running the spanner 
remains lit until the service has been 
carried out. 

 First of the two terms reached: the spanner 
also lights up if the two-year interval has 
elapsed.   

 The distance remaining before the next 
service may be weighted by the time 

factor, depending on the driver's driving 
habits.  

  More than 1 000 miles/km before the next 
service is due 

  Example:  4 800 miles/km remain before 
the next service is due. When the ignition 
is switched on and for a few seconds, the 
display shows: 

 SERVICE INDICATOR 

 This programmes service intervals according 
to the use of the vehicle.  

 EMISSION CONTROL 

 Therefore, the driver is warned of any 
malfunction of this emission control system 
by the lighting of this specific warning light 
on the instrument panel. 

 There is a risk of damage to the catalytic 
converter.  Have it checked by a CITROËN dealer.  

  EOBD (European On Board 
Diagnosis) is a diagnostics system 
which complies with, among 
others, the standards concerning 
authorised emissions of: 

   -  

CO (carbon monoxide), 

  -  

HC (unburnt hydrocarbons), 

  -  

NOx (nitrogen oxides) or particles, 
detected by oxygen sensors placed 
upstream and downstream of the 
catalytic converters.  

 Each time the ignition is switched 
on and for a few seconds, the 
spanner fl ashes and the excess 
distance is displayed. 

  Operation 

 A few moments after the ignition has been 
switched on, the spanner indicating a 
service operation lights up; the display for 
the total distance recorder tells you (in round 
figures) the distance remaining before the 
next service. 

 3

3

   Instruments and controls   

R

E

A

D

Y

 T

O

 S

E

T

 O

F

F

2

 The points at which a service is due are 
calculated from the last indicator zero reset. 

 The point at which a service is due is 
determined by two parameters: 

   -  

the distance travelled, 

  -  

the time which has elapsed since the 
last service.  

 A few seconds after the ignition is switched 
on, the oil level is displayed, then the total 
distance recorder resumes normal operation 
showing the total and trip distances.  

  Less than 1 000 miles/km before the next 
service is due 

 Each time the ignition is switched on and for a few 
seconds, the spanner fl ashes and the number of 
miles/kilometres remaining is displayed: 

 A few seconds after the ignition is switched 
on, the oil level is displayed, then the total 
distance recorder resumes normal operation 
and the spanner remains lit. This indicates 
that a service should be carried out shortly.  

  Service overdue 

  With the engine running the spanner 
remains lit until the service has been 
carried out. 

 First of the two terms reached: the spanner 
also lights up if the two-year interval has 
elapsed.   

 The distance remaining before the next 
service may be weighted by the time 

factor, depending on the driver's driving 
habits.  

  More than 1 000 miles/km before the next 
service is due 

  Example:  4 800 miles/km remain before 
the next service is due. When the ignition 
is switched on and for a few seconds, the 
display shows: 

 SERVICE INDICATOR 

 This programmes service intervals according 
to the use of the vehicle.  

 EMISSION CONTROL 

 Therefore, the driver is warned of any 
malfunction of this emission control system 
by the lighting of this specific warning light 
on the instrument panel. 

 There is a risk of damage to the catalytic 
converter.  Have it checked by a CITROËN dealer.  

  EOBD (European On Board 
Diagnosis) is a diagnostics system 
which complies with, among 
others, the standards concerning 
authorised emissions of: 

   -  

CO (carbon monoxide), 

  -  

HC (unburnt hydrocarbons), 

  -  

NOx (nitrogen oxides) or particles, 
detected by oxygen sensors placed 
upstream and downstream of the 
catalytic converters.  

 Each time the ignition is switched 
on and for a few seconds, the 
spanner fl ashes and the excess 
distance is displayed. 

  Operation 

 A few moments after the ignition has been 
switched on, the spanner indicating a 
service operation lights up; the display for 
the total distance recorder tells you (in round 
figures) the distance remaining before the 
next service. 

3

4

   Instruments and controls   

 After this operation, if you wish to 
disconnect the battery, lock the vehicle 

and wait for at least five minutes, otherwise 
the zero re-set will not be registered.  

  Zero re-set 

   Your  CITROËN  dealer carries out this 
operation after each service. 

 However, if you carry out the service 
yourself, the re-set procedure is as follows: 

   -  

switch off the ignition, 

  -  

press and hold the trip recorder reset 
button, 

  -  

switch on the ignition.  

 The display begins a countdown. 

 When the display shows  "=0" , release the 
button; the spanner disappears. 

  Engine oil level indicator 

 When the ignition is switched on, the engine 
oil level is indicated for a few seconds, after 
the service information. 

  Oil level correct  

  Lack of oil 

 Flashing of  "OIL" , linked 
with the service warning 
light, accompanied by 
an audible signal and a 

message on the display, indicates a lack of 
oil which could damage the engine. 

 If the lack of oil is confirmed by a check 
using the dipstick, it is essential that the 
level is topped up.  

  Oil level gauge fault 

  Flashing of  "OIL --"  
indicates a malfunction 
of the engine oil level 
gauge.

 Consult a CITROËN dealer.  

  The level read will only be correct if 
the vehicle is on level ground and the 
engine has been off for more than 
15 minutes.  

  Dipstick 

  A  = maximum, never exceed 
this level as a surplus of oil may 
damage the engine. 

 Contact a  CITROËN  dealer 
without delay. 

  B  = minimum, top up the level via 
the oil filler cap, using the type of 
oil suited to your engine.   

  Trip recorder zero reset 
button 

 With the ignition on, press the 
button until the zeros appear.  

  Lighting rheostat 

 With the lights on, press the 
button to vary the intensity of 
the lighting of the instruments 
and controls. When the 

lighting reaches the minimum (or maximum) 
setting, release the button then press it 
again to increase (or reduce) the brightness. 

 As soon as the lighting is of the required 
brightness, release the button.  

3

4

   Instruments and controls   

 After this operation, if you wish to 
disconnect the battery, lock the vehicle 

and wait for at least five minutes, otherwise 
the zero re-set will not be registered.  

  Zero re-set 

   Your  CITROËN  dealer carries out this 
operation after each service. 

 However, if you carry out the service 
yourself, the re-set procedure is as follows: 

   -  

switch off the ignition, 

  -  

press and hold the trip recorder reset 
button, 

  -  

switch on the ignition.  

 The display begins a countdown. 

 When the display shows  "=0" , release the 
button; the spanner disappears. 

  Engine oil level indicator 

 When the ignition is switched on, the engine 
oil level is indicated for a few seconds, after 
the service information. 

  Oil level correct  

  Lack of oil 

 Flashing of  "OIL" , linked 
with the service warning 
light, accompanied by 
an audible signal and a 

message on the display, indicates a lack of 
oil which could damage the engine. 

 If the lack of oil is confirmed by a check 
using the dipstick, it is essential that the 
level is topped up.  

  Oil level gauge fault 

  Flashing of  "OIL --"  
indicates a malfunction 
of the engine oil level 
gauge.

 Consult a CITROËN dealer.  

  The level read will only be correct if 
the vehicle is on level ground and the 
engine has been off for more than 
15 minutes.  

  Dipstick 

  A  = maximum, never exceed 
this level as a surplus of oil may 
damage the engine. 

 Contact a  CITROËN  dealer 
without delay. 

  B  = minimum, top up the level via 
the oil filler cap, using the type of 
oil suited to your engine.   

  Trip recorder zero reset 
button 

 With the ignition on, press the 
button until the zeros appear.  

  Lighting rheostat 

 With the lights on, press the 
button to vary the intensity of 
the lighting of the instruments 
and controls. When the 

lighting reaches the minimum (or maximum) 
setting, release the button then press it 
again to increase (or reduce) the brightness. 

 As soon as the lighting is of the required 
brightness, release the button.  

 3

5

   Gearboxes and steering wheel   

R

E

A

D

Y

 T

O

 S

E

T

 O

F

F

2

 STEERING WHEEL HEIGHT AND 
DEPTH ADJUSTMENT 

 When the vehicle is stationary, unlock the 
steering wheel by lowering the lever. 

 Adjust the height and depth of the steering 
wheel, then lock by pushing the lever fully 
upwards. 

  To change gear easily, always press the 
clutch pedal fully. 

 To prevent the mat from becoming caught 
under the pedal: 

   -  

ensure that the mat is positioned 
correctly, 

  -  

never fit one mat on top of another.  

 When driving, avoid leaving your hand on 
the gear knob as the force exerted, even if 
slight, may wear the internal components of 
the gearbox over time.   

 GEARBOXES AND STEERING
WHEEL  

  5 - speed gearbox  

  6 - speed gearbox

  Reverse gear 

 In the 6-speed configuration, raise the collar 
under the gear knob to engage reverse gear. 

 Never engage reverse gear before the 
vehicle is completely stationary. 

 The lever should be moved slowly to reduce 
the noise on engaging reverse gear.  

   Starting and stopping   

 STARTING AND STOPPING 

  Key 

 Take care to prevent the key from coming 
into contact with grease, dust, rain or a 
damp environment. 

 A heavy object attached to the key 
(key ring, ...) weighing the key down in the 
ignition switch may cause a malfunction.  

  Starting position.  

 The starter is operated, the engine turns 
over, release the key. 

  STOP position:  steering lock. 

 The ignition is off. Turn the steering wheel 
until the steering locks. Remove the key. 

  Good practice when starting 

 If this comes on, a door or the 
bonnet is not closed correctly, 
check!  

  Diesel pre-heating warning light 

  If the temperature is high enough, 
the warning light comes on for 
less than one second, you can 
start without waiting. 

 In cold weather, wait for this warning light to 
switch off then operate the starter (Starting 
position) until the engine starts.   

  Good practice when stopping 

  Minimise engine and gearbox wear 

 When switching off the ignition, let the 
engine run for a few seconds to allow the 
turbocharger (Diesel engine) to return to idle. 

 Do not press the accelerator when switching 
off the ignition. 

 There is no need to engage a gear after 
parking the vehicle.   

  Running and accessories position.  

 To unlock the steering, turn the steering 
wheel gently while turning the key, without 
forcing. In this position, certain accessories 
can be used. 

  Door or bonnet open warning light 

 3

7

   Steering wheel controls   

E

R

G

O

N

O

M

IC

S

 a

n

d

 C

O

M

F

O

R

T

3

  Dipped beam/main beam change 

 Pull the stalk fully towards you.  

 Automatic lights 

 If your vehicle is fitted with a 
brightness sensor. 

 Lights off 

 Dipped beam (green) 

 Main beam (blue) 

 LIGHTING CONTROL 

 STEERING WHEEL CONTROLS 

 Side lights 

  Lights-on buzzer 

 When the ignition is switched off, when the 
driver's door is opened, a buzzer sounds if 
you have left your lights on.   

  DIRECTION INDICATORS  
(green flashing) 

  Left:  downwards passing 
the point of resistance. 

  Right:  upwards passing 
the point of resistance.  

  Front and rear lights 

 Selection is by turning ring  A . 

 Checking by means of the indicator 
lights on the instrument panel is 

described in the "Instruments and controls" 
section of chapter 2. 

3

8

   Steering wheel controls   

 Front fog lights (green) 
and rear fog lights (amber, 
2nd rotation of the ring 
forwards). 

  To switch off the front and rear fog 
lights, turn the ring rearwards twice in 
succession. 

  In clear weather or in rain, both day 
and night, rear fog lights dazzle and 
are prohibited. 

 Do not forget to switch them off when they 
are no longer needed. 

 Automatic switching on of the lights switches 
off the rear fog lamps, but the front fog 
lamps remain on.  

  Daytime lights 

 Depending on the country in which the 
vehicle is sold, the vehicle may be equipped 
with daytime lights. The dipped headlamps 
come on when the vehicle is started. 

 The instruments and controls 
(instrument panel, display, air 

conditioning control panel, ...) are only lit 
on switching to the automatic switching on 
of the lights mode or when the lights are 
switched on manually. 

  Front and rear fog lights 

 Rotate ring  B  forwards to switch on and 
rearwards to switch off. The status is 
confirmed by the light on the instrument 
panel. 

 These operate with the side lights and the 
dipped beam headlamps. 

 Front fog lights (green, 
1st rotation of the ring forwards). 

 This warning light comes on on 
the instrument panel. 

 3

9

   Steering wheel controls   

E

R

G

O

N

O

M

IC

S

 a

n

d

 C

O

M

F

O

R

T

3

  Automatic switching on of the lights 

  Activation 

 Turn the ring to the  AUTO  position. The 
activation of this function is accompanied by 
a message on the display.  

  If the brightness sensor does not 
function correctly,
  the lights come on 
accompanied by the service warning light, 
an audible signal and a message on the 
display. 

  Consult a CITROËN dealer.    

 HEADLAMP BEAM 

 Depending on the load in your vehicle, the 
beam setting must be adjusted. 

  0  - 1 or 2 people in the front seats. 

  1  - 5 people. 

  2  - 6 to 9 people. 

  3  - Driver + maximum authorised loads. 

 Do not cover the brightness sensor 
located on the windscreen, behind the 

mirror. It is used for the automatic switching 
on of the lights and for the automatic wipers. 

 The side lights and dipped 
beam headlamps switch 
on automatically if the light 
is poor, or during operation 

of the windscreen wipers. They switch off as 
soon as the light becomes bright enough or 
the windscreen wipers stop. 

 This function is not compatible with the 
daytime lights. 

  Deactivation 

 Turn the ring forwards or rearwards. The 
deactivation of this function is accompanied 
by a message on the display. 

 The function is deactivated temporarily when 
you use the manual lights stalk. 

  Initial setting is position 0.  

 In foggy weather or in snow, the 
brightness sensor can detect sufficient 

light. As a consequence, the lights will 
not come on automatically. If necessary, 
you must switch on the dipped headlamps 
manually. 

4

0

   Steering wheel controls   

 WINDSCREEN WIPER STALK 

  Manual windscreen wipers 

  2   Fast wipe (heavy rain). 

  1   Normal wipe (moderate rain). 

  l  

Intermittent wipe. 

  0   Off. 

    Single wipe  

(press downwards). 

 Do not cover the rain sensor, 
located in the centre of the 
windscreen, behind the mirror. 

 In the  AUTO  position, the windscreen wipers 
operate automatically and adapt their speed 
to the   intensity   of the rainfall. 

 When not in  AUTO  mode, for the other 
positions, refer to the manual windscreen 
wipers section. 

 In the  I ntermittent position, the wiping speed 
is in proportion to the vehicle speed. 

   Wash-wipe and headlamp wash  

 Pull the stalk towards you, the wash-wipe 
is accompanied by a timed sweep of the 
wipers. 

 The headlamp wash is linked with the wash-
wipe, it is triggered if the dipped headlamps 
are on. 

 To top up the levels, refer to the 
"Levels" section of chapter 7.  

  Automatic windscreen wipers 

 Whenever the ignition has been switched 
off for more than one minute,  with the 
windscreen wiper stalk in  position  ,  1  or  I , 
the stalk must be reactivated: 

   -  

move the stalk to any position, 

  -  

then move it back to the required 
position.   

 4

1

   Steering wheel controls   

E

R

G

O

N

O

M

IC

S

 a

n

d

 C

O

M

F

O

R

T

3

  Special position of the windscreen 
wipers 

 In the minute following switching off of the 
ignition, any action on the stalk positions the 
wipers against the windscreen uprights. 

 This action enables you to position the 
wiper blades for winter parking, cleaning or 
replacement. 

 Refer to the "Changing a windscreen 
wiper blade" section of chapter 8. 

 To park the wipers in their normal position 
after this has been done, switch on the 
ignition and move the stalk.  

  When using an automatic car wash, 
switch off the ignition to avoid 
triggering of the automatic wiping. 

 In winter, it is advisable to wait for the 
windscreen to completely clear of ice before 
operating the automatic wipe.   

  Rear windscreen wiper 

 Turn the ring to the first notch.  

  Rear windscreen wash 

  Turn the ring past the first notch: 
the windscreen wash then the 
windscreen wiper operate for a 
fixed time. 

 In winter, in the event of a considerable 
amount of snow or ice, switch on the 

rear screen demister. Once de-icing is 
complete, remove the snow or ice which has 
accumulated on the rear wiper blade. You 
can then operate the rear windscreen wiper.  

  Activation 

 Press the control downwards. Activation of 
the function is accompanied by a message 
on the display. 

  The automatic windscreen wipers function 
must be reactivated  if the ignition has been 
switched off for more than one minute, by 
pressing the stalk downwards.  

  Deactivation/Switching off 

 Place the windscreen wipers stalk in position 
 I ,  1  or  2 . Deactivation of the function is 
accompanied by a message on the display. 

 In the event of   malfunction of the automatic 
windscreen wipers, the windscreen wipers 
will operate in intermittent mode. 

   Contact a  CITROËN  dealer to have the 
system checked. 

4

2

   Steering wheel controls   

 CRUISE CONTROL "CRUISE" 

 In order for it to be programmed or activated, 
the vehicle speed must be greater than 25 mph 
(40 km/h) with at least 4th gear engaged.

 Function selected, 

 displaying of the "Cruise 
Control" symbol. 

 Function deactivated, 

  OFF  (example at 107 km/h).

  Function activated 

 (example at 107 km/h). 

 Vehicle speed above 
(e.g. 118 km/h), 

 the programmed speed 
is displayed flashing. 

 Operating fault detected, 

  OFF  - the dashes flash. 

  This cruise control shows the function 
selection status on the instrument panel and 
displays the programmed speed: 

 "This is the speed at which the driver wishes 
to drive". 

 This aid to driving in free-flowing traffic 
enables the vehicle to maintain the speed 
programmed by the driver, unless a steep 
gradient makes this impossible. 

 4

3

   Steering wheel controls   

E

R

G

O

N

O

M

IC

S

 a

n

d

 C

O

M

F

O

R

T

3

  Selecting the function 

   -  

Place the switch in the  CRUISE  position. 
The cruise control is selected but is 
not yet active and no speed has been 
programmed.   

  First activation/
programming a speed 

   -    Reach the chosen 

speed by pressing the 
accelerator. 

  -  

Press the  SET -  or  SET +  button.  

 This programmes/activates the reference 
speed and the vehicle will maintain this 
speed.  

  Temporary 
exceeding of the speed 

 It is possible to  accelerate  and drive 
momentarily at a speed greater than the 
programmed speed. The value programmed 
flashes. 

 When the accelerator pedal is released, the 
vehicle will return to the programmed speed.  

  Reactivation 

   -  

Following deactivation of the cruise 
control, press this button.  

 Your vehicle will return to the last programmed 
speed. 

 Alternatively, you can repeat the "first 
activation" procedure.  

  Deactivation (off) 

   -   Press this button or the 

brake or clutch pedal.   

4

4

   Steering wheel controls   

  Switching the function off 

   -  

Place the dial in position  0  or switch off 
the ignition to switch everything off.   

  Good practice 

 When changing the programmed reference 
speed by means of a maintained press, 
pay attention as the speed can increase or 
decrease rapidly. 

 Do not use the cruise control on slippery 
roads or in heavy traffic. 

 In the event of a steep slope, the cruise 
control cannot prevent the vehicle from 
exceeding the programmed speed. 

 In any event, the cruise control cannot 
replace the need to observe the speed 
limits, nor can it replace the need for 
vigilance and responsibility on the part of the 
driver. 

 It is advisable to leave your feet near the 
pedals. 

 To avoid any jamming under the pedals: 

   -  

ensure that the mat and its fixings on the 
floor are positioned correctly, 

  -  

never place one mat on top of another.   

  Changing the 
programmed speed 

 There are two methods of 
memorising a speed higher 
than the previous one: 

 Without using the accelerator: 

   -  

press the  Set +  button.  

 A brief press increases the speed by 1 mph (km/h). 

 A maintained press increases the speed in 
steps of 5 mph (km/h). 

  Operating fault 

 The programmed speed is cleared then 
replaced by three dashes. Contact a 
 CITROËN  dealer to have the system 
checked.  

 Using the accelerator: 

   -  

exceed the memorised speed until the 
speed required is reached, 

  -  

press the  Set +  or  Set -  button.  

 To memorise a speed lower than the 
previous one: 

   -  

press the  Set -  button.  

 A brief press decreases the speed by 1 mph (km/h). 

 A maintained press decreases the speed in 
steps of 5 mph (km/h).  

  Cancelling the programmed 
reference speed 

 When the vehicle becomes stationary, after 
switching off the ignition, the system no 
longer memorises a speed.  

 4

5

   Steering wheel controls   

E

R

G

O

N

O

M

IC

S

 a

n

d

 C

O

M

F

O

R

T

3

 SPEED LIMITER "LIMIT" 

 However, pressing the pedal beyond this 
point of resistance to the floor permits 
exceeding of the programmed speed. To 
resume use of the limiter, simply reduce 
the pressure on the accelerator pedal 
gradually and return to a speed below that 
programmed. 

 Function selected, 

 displaying of the 
"Speed Limiter" symbol. 

 Function deactivated, 

 last programmed 
speed -  OFF   
 (example at 65 mph (107 km/h). 

 Function activated 

 (example at 65 mph (107 km/h).

  Vehicle speed above 

 (example 70 mph (118 km/h), 

 the programmed speed 
is displayed flashing. 

 Operating fault detected, 

  OFF  - the dashes flash. 

 This speed limiter shows the function 
selection status on the instrument panel and 
displays the programmed speed: 

  The operating actions may be carried out 
when stationary, with the engine running, 
or with the vehicle moving.
  

 "This is the selected speed which the driver 
does not wish to exceed". 

 This selection is made with the engine 
running while stationary or with the vehicle 
moving. The minimum speed which can be 
programmed is 20 mph (30 km/h). 

 The speed of the vehicle responds to the pressure 
of the driver's foot as far as the accelerator 
pedal point of resistance which indicates that the 
programmed speed has been reached. 

4

6

   Steering wheel controls   

  Selecting the function 

   -  

Place the dial in the  LIMIT  position. 
The limiter is selected but is not yet 
active. The display indicates the last 
programmed speed.   

  Programming a speed 

 A speed can be programmed without activating 
the limiter but with the engine running. 

 To memorise a speed higher than the 
previous one: 

   -  

press the  Set +  button.  

 A brief press increases the speed by 1 mph (km/h). 

 A maintained press increases the speed in 
steps of 5 mph (km/h). 

  Activation/Deactivation (off) 

 Pressing this button once activates the limiter, 
pressing the button again deactivates it (OFF).  

 To memorise a speed lower than the 
previous one: 

   -  

press the  Set -  button.  

 A brief press decreases the speed by 1 mph (km/h). 

 A maintained press decreases the speed in 
steps of 5 mph (km/h).  


Content   ..  1  2  3  4   ..