Citroen C-Crosser Dag (2008 year). Manual - part 12
 

  Index      Citroen     Citroen C-Crosser Dag - service manual 2008 year in english


Search            


Content   ..  10  11  12  13   ..


Citroen C-Crosser Dag (2008 year). Manual - part 12


A

B

C

A4

A3

A2

A1

A6

A5

B1

B2

B3

B4

B5

C1

C2

C3

C4

C5

C6

C7

C8

A U D I O   E Q U I P M E N T   a n d   T E L E M A T I C S

XI

174 

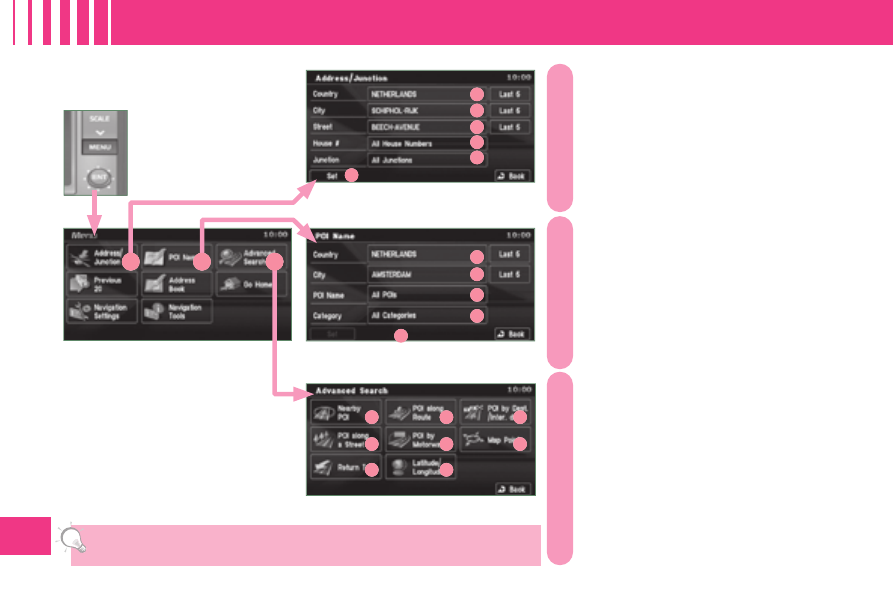
 B   -  Select  a  location  using  the  name  of  a 

point    of interest (POI). 
 Select: 

 B1  - the country, 
 B2  - the city, 
 B3  - the name of a stored POI, 
 B4  -  a  POI  category  (airport,  bowling  alley, 

bus  station,  car  park,  service  station, 
hotel, cinema, ...), 

 B5  - a detailed POI list. 

 C   -  Select  a  location  using  an  advanced 

search based on a POI: 

 C1  - around the current location, 
 C2  - on the current route, 
 C3  - in the vicinity of the destination, 
 C4  - on a chosen street, 
 C5  -  along a motorway or in the vicinity of the 

exit, 

 C6  - by scrolling the map, 
 C7  -  taking  the  point  of  departure  of  the 

current route, 

 C8  -  specifying the latitude/longitude coordinates.  

 A   -  Select  a  location  using  the  address  or 

street name of the destination. Select: 

 A1  - the country, 
 A2  - the city, 
 A3  - the street, 
 A4 - the house number, 
 A5  - the name of a junction, 
 A6  -  to  select  the  search  using  either  a 

number or a junction. 

 You  have  a  maximum  of  100 points  of  interest  (POI)  within  a 

radius of approximately 60 miles (100 km). 

                      Searching for a destination 
using an address or points of 
interest (POI) 

E2

E1

E3

D

E

F

A U D I O   E Q U I P M E N T   a n d   T E L E M A T I C S

XI

175 

  Searching using previous destinations, a stored address or a return home 

 E   -  Select a location using an address 

stored  in  the  address  book.  Sort 
by: 

 E1  - Icon, 
 E2  - Name, 
 E3  - Date. 

 D   -  Select  a  location  using  one  of  the 

20 previous destinations. 

 F   -  Select  a  return  home  directly.  

Press YES to store your home ad-

dress (the fi rst time).  

G

H

G1

G2

G3

G4

G5

H1

H2

H3

H4

A U D I O   E Q U I P M E N T   a n d   T E L E M A T I C S

XI

176 

  Navigation settings and 
information 

 G   -  Select  the  settings  of  functions 

linked with the navigation to: 

 G1  -  set the screen display parameters 

 such as:  
- display 1 or 2 maps,  
-  display or do not display the POIs 

on  the  map,  display  selected 
icons,  

- change the colours of the map,  
-  display  or  do  not  display  the 

name of the current street.  

-  display  or  do  not  display  the 

address of the current street. 

 G2  - set route conditions, 
 G3  -  set  the  route  guidance  mode  and 

the displaying of the results of the 
route search. 

 G4  -  save,  change  or  delete  a  location 

in the address book, 

 G5 

 -  display  and  select  the  traffi c 

information such as traffi c jams or 

road works. 

 H   -  Select basic information relating to 

the navigation as well as a pre-set 
route demonstration to: 

 H1  -  choose to divert your route to avoid 

certain areas, 

 H2  -  select a location using an advanced 

search  based  on  a  POI  along  a 
motorway  or  in  the  vicinity  of  the 

motorway exit, 

 H3  - start/stop the demonstration, 
 H4  - recall a stored map screen.  

A U D I O   E Q U I P M E N T   a n d   T E L E M A T I C S

XI

177 

                         Selecting points of interest (POI) 
icons displayed on the map 

 You  can  select  up  to  40  types  of  point 
of interest icon which are displayed on 
your map screen. 
 Press 

the 

MENU 

button 

then 

[Navigation/Settings]. 

 Press [Screen] then [Select] on the POI 
line. 
 Press [] which is displayed. 

 Press each POI required. 
 At each contact with a POI, the display-
ing of [] changes ( = the POI will be 
displayed on the screen). 

 General 

 Town centre 

 Locality 

 Shops, fi nance and businesses 

(Green) 

 Major companies 

 Shopping centre 

 Vehicles and travel (Dark blue) 

  CITROËN  

 Airport 

 Bus stop 

 Vehicle hire 

 Suburban station / station 

 Ferry terminal 

 Hotel 

 Park and ride 

 Car park (press +) 

 Service station 

 Rest area 

 Toll booth 

 Tourist information 

 Railway station 

 Restaurant (Orange) 

 Night life / night club 

 Restaurant 

 Public places and emergency 

services (Brown) 

 Town Hall 

 Community centre 

 Convention / exhibition centre 

 Hospital 

 University / college 

 Entertainment and attractions (Blue) 

 Theme park 

 Bowling alley 

 Casino 

 Cinema 

 Golf course 

 Historical monument 

 Skating rink 

 Marina 

 Museum 

 Flying club 

 Leisure area 

 Ski station 

 Sports centre 

 Theatre / opera 

 Tourist attraction 

 Vineyard / wine and spirit store 


A U D I O   E Q U I P M E N T   a n d   T E L E M A T I C S

XI

178 

 Press 

 Explanations 

 Result 

 Press the MENU button. 

 Press [Address/Junction]. 

 Press [Country] and enter the name of the country using the touch key-
pad. 
 When a character of the name of the country is entered, if 5 countries or 
fewer  are  recognised,  you  can  select  a  country  from  a  list  which  is  dis-
played or press [List]. 

 You  can  select  one  of  the  5  most  recently  selected  countries  by 
pressing [Last 5] on the “Country” line. 

 Press [City] then [Keyword] and enter the name of the city using the touch 
keypad. 
 When a character of the name of the city is entered, if 5 cities or fewer are 
recognised, you can select a city from a list which is displayed or press 
[List]. 

 You can select a city using the post code. 
 Press [Post Code] and enter the number. 

 You can select one of the 5 most recently selected cities by press-
ing [Last 5] on the “City” line.  

  Entering an address and activating guidance (1/2) 

/

A U D I O   E Q U I P M E N T   a n d   T E L E M A T I C S

XI

179 

  Entering an address and activating guidance (2/2) 

 Press 

 Explanations 

 Result 

 Press [Street] and enter the name of a street using the touch keypad. 
 When a character of the name of the street is entered, if 5 streets or fewer 
are recognised, you can select a street from a list which is displayed or 
press [List]. 

 Press [House #] and enter the number of the house using the touch key-
pad. 

 You can enter the name of a junction instead of the number 
of the street. Press [Junction] and select the name from a 
list which is displayed. 

 This is what you obtain once all of the information has been entered: 

 If you agree with the information press [Set], otherwise press one of the 
buttons to correct. 

 Press [Start] to start the navigation.  

A U D I O   E Q U I P M E N T   a n d   T E L E M A T I C S

XI

180 

AUDIO-VIDEO 

  What is the RDS? 

  RDS station following 

  Traffi c information function 

 Your radio automatically checks 
and  selects  the  best  frequency 
for  the  radio  station  to  which  it 

is  tuned  (if  the  station  broadcasts  on 
several transmitters or frequencies). 
 The frequency of a radio station covers 

approximately  30  miles  (50  km).  The 

change from one frequency to another 

explains the loss of reception during a 

journey. 
 If the station to which you are listening 
does  not  have  several  frequencies  in 
the  region  in  which  you  are  currently 
located, 

you 

can 

deactivate 

the 

automatic frequency following.  

  Radio, RDS, AF, REG, TP, PTY 

 The  Radio  Data  System  (RDS) 
function  on  the  FM  waveband 

permits: 
   -  

tuning  to  the  same  station  while 
travelling  through  different  regions 
(if  the  transmitters  of  this  station 
cover  the  area  through  which  you 
are travelling), 

  -   temporary tuning to traffi c information 

announcements, 

  -  

access to the displaying of the name 
of the station, etc ...  

 Most FM stations use the RDS. 
 These  stations  transmit  non-audible 
data in addition to their programmes. 
 The data transmitted in this way allows 
you access to various functions, mainly 
displaying  of  the  name  of  the  station, 

temporary  tuning  to  traffi c  information 

announcements  or  automatic  station 
following. 
 The RDS allows you to continue listening 
to  the  same  station  by  means  of  the 
frequency 

following. 

However, 

in 

certain  conditions,  this  RDS  frequency 
following cannot be provided throughout 
the country. Radio stations do not cover 

the  whole  country,  which  explains  the 

loss  of  reception  of  the  station  during 
a journey.  

 The Traffic Program (TP) function 

permits  automatic  and  tempo-
rary  switching  to  an  FM  station 

broadcasting traffi c information. 
 The radio station or the source that you 
are listening to at this point is paused. 
 Once the traffi c information has ended, 

the  system  switches  back  to  the  radio 
station  or  the  source  that  you  were 
listening to initially.  

  Regional following mode 

 Some  stations  are  organised  in 
a network. 
 In different regions, they broadcast 

different or shared programmes depending 
on the time of day. 
 You can follow: 
   -  

a regional station only, 

  -  

the entire network, with the possibility 
that you will be listening to a different 
programme.   

  Programme types 

 Some  stations  offer  the  option 
of  listening  to  a  themed  type 
of  programme  as  a  priority, 

selected from the list available below: 
 NEWS,  AFFAIRS,  INFOS,  SPORT, 
EDUCATE, 

DRAMA, 

CULTURE, 

SCIENCE,  VARIED,  POP  M,  ROCK 
M,  EASY  M,  LIGHT  M,  CLASSICS, 
OTHER  M,  WEATHER,  FINANCE, 
CHILDREN, 

SOCIAL, 

RELIGION, 

PHONE IN, TRAVEL, LEISURE, JAZZ, 
COUNTRY, NATION M, OLDIES, FOLK 
M, DOCUMENT.   

A

B

C

D

E

G

H

I

J

K

L

M

N

F

A U D I O   E Q U I P M E N T   a n d   T E L E M A T I C S

XI

181 

                Information displayed in Radio mode 

   A.   A pre-set number is displayed when 

a pre-set channel has been selected. 

  B.   The name of the station is displayed 

during the reception of RDS data. If 
the name has not been transmitted, 
the frequency is displayed. 

  C.   Stereo  is  displayed  when  a  stereo 

transmission is received. 

  D.   AF is displayed when the AF control 

function is activated. 

  E.   PTY (programme type) is displayed if 

the RDS data received is displayed.  
TRAFINF  is  displayed,  during  an 

interruption,  for  traffi c  information.  

ALARM  is  displayed,  during  an 
interruption, for urgent information. 

  F.   Displaying of 6 stored stations. 

  G.   To  receive  the  stored  station.  

Press and hold to store a station. 

  H.   To change the frequency step by step.  

Press  and  hold  for  scrolling  of  the 
frequency. 

  I.   To  search  for  currently  broadcast-

ing  stations  which  can  be  received 
in the current location, until a station 
is found. 

  J.   To  display  the  programme  types 

pre-setting screen, e.g.: sport, rock, 
classical, news, ... Press PTY again 

to exit. 

  K.   Press  this  button  to  display  the 

secondary menu. 

  L.   REG is displayed during the reception 

of regional frequencies data. 

  M.   RDS is displayed during the reception 

of RDS data. 

  N.  

TP  is  displayed  when  the  traffi c 

information is in standby mode.   

A U D I O   E Q U I P M E N T   a n d   T E L E M A T I C S

XI

182 

  Radio, selecting an FM station and storing 

 Press the MODE button. 

 Press 

 Explanations 

 Result 

     You  can  select  [    Seek]  or  [Seek    ]  to  start  a  continuous 
search until the stations which can be received in the current 
location are detected. 

 Press FM. By default the display shows the FM1 stations. 

   Press [   

 Tune] to decrease the frequency or [ Tune     ] to increase the 

frequency. The frequency is changed in steps of 0.1 MHz. 
 Continue to press to tune to a station automatically. 

 Once the frequency has been selected, a maintained press on the station 
(e.g. 3) will store it. 
 The name of the station (e.g. PS name 1) is displayed if it is available. 

 You can start automatic storing on FM3 for 6 stations, which 
can  be  received  in the current  location, by pressing  [^] then 
[Auto-Store].  

 You can also start a search by type of programme by pressing 
[PTY]. 

A U D I O   E Q U I P M E N T   a n d   T E L E M A T I C S

XI

183 

  Radio, RDS settings 

 Press 

 Explanations 

 Result 

 Press the MODE button. 

 Press FM. By default the display shows the stations on FM1. 

 Press [^]. 

 Press [RDS Settings]. 
 Press [On] or [Off] to activate or deactivate the functions: 

   -  

AF: automatic search for the best frequency, 

  -  

REG: switch to the regional frequencies, 

  -   TP: automatic selection of stations broadcasting traffi c information.   

A U D I O   E Q U I P M E N T   a n d   T E L E M A T I C S

XI

184 

                      General notes on CDs 

  Playing an audio CD 

 When  the  audio  CD  is 
inserted  in  the  player, 
playing  of  the  tracks  is 
automatic  and  they  can 
be  recorded  onto  the 
hard disc. 

 Simultaneous  access  to  the  music 
recognition  service  “Gracenote  CDDB” 
on  the  hard  disc  permits  displaying  of 
the title information.  

 Switching  off  the  engine  or  removing 
the CD during recording will result in the 
tracks being faulty. 
 The operation of the navigation system 
may slow down during recording. 
 The  recording  speed  may  be  slower 

than 4x due to the processing load on 

the  equipment  or  the  condition  of  the 
audio CD. 
 If jumps or other errors occur, return to 
the beginning of the track and start the 
recording again. 
 Even  if  there  is  no  gap  between  the 
tracks on the CD, a brief silence between 
tracks is stored on the hard disc.  

  What is the Gracenote CDDB? 

 The  title  information  for  the 
track  currently  being  played 
can  be  obtained  from  the 
“Gracenote  CDDB”  database 
stored on the hard disc. 
 The Gracenote company uses 

this  standard  to  identify  the  music  and 
the associated information such as: 
   -  

the title of the album, 

  -  

the name of the artist, 

  -  

the title of the tracks, 

  -  

the genre, ...  

 For  further  details,  consult  the  site: 
www.gracenote.com. 
 The 

Gracenote 

CDDB 

database 

incorporated  in  this  equipment  cannot 
guarantee  the  content  of  the  data 
100%.  You  can  update  this  database 
using a DVD sold separately.  

  Copyright 
 Your Audio equipment may allow you to 
listen to music which is usually protected 
by copyright in accordance with current 
national  and  international  standards. 
Please  consult  these  standards  and 
comply with them.   

  Recording onto the music server 

 The  tracks  of  audio  CDs  (not 
MP3/WMA)  can  be  recorded 

onto  the  hard  disc  at  approxi-

mately 4x speed (e.g.: 60 minutes con-

verted to 15 minutes) and stored on the 
music server. 
 The  sounds  recorded  may  be  altered 
by the noise present and the quality of 
the sound may differ from the original. 
 The  tracks  recorded  on  the  music 
server cannot be reproduced on another 
medium (CD-R/RW, HDD, etc ...). 
 Previously  recorded  tracks  cannot  be 
recorded again from the same CD. 

A

B

C

D

E

F

G

H

I

J

K

L

M

A U D I O   E Q U I P M E N T   a n d   T E L E M A T I C S

XI

185 

  Information displayed in CD mode and recording a CD 

   A.   The name of the album is displayed 

for the track currently being played. 

  B.   The name of the artist is displayed for 

the album currently being played. 

  C.   The  playing  time  of  the  track 

currently being played is displayed. 

  D.   The playing mode currently selected 

is displayed. 

  E.   Position  of  the  cursor  and  total 

number of tracks on the album. 

  F.   Displays the item currently selected. 
  G.   To  scroll  up  or  down  through  the 

tracks.   Press and hold for rewind or 
fast forwards playing of a track. 

  H.   Displays the number and the name 

of  the  track.  While  driving,  they 
are  not  available  and  cannot  be 
selected. 

  I.   To display the secondary menu. 
  J.   Move  the  cursor  onto  the  track 

currently being played. 

  K.   The  number  and  the  name  of  the 

track  currently  being  played  are 
displayed. 

  L.   During  recording,  this  symbol  is 

displayed  in  red  and  it  switches  off 
when  all  recording  operations  are 
complete. The number indicates the 
percentage  of  the  total  number  of 
tracks  on  the  CD  already  recorded 
onto the hard disc. 00% when only 
one track has been recorded. 

  M.   The  tracks  which  have  not  been 

recorded  are  displayed  in  blue.  
No  symbol  is  displayed  for  tracks 
which have been recorded.   

 The CD button is only active if the play-
er contains a CD. 

 Press Open to return the display to the 
vertical position. 

A U D I O   E Q U I P M E N T   a n d   T E L E M A T I C S

XI

186 

                   Playing a CD 

 Press the MODE button then CD, if the player already contains a CD. 

 Press 

 Explanations 

 Result 

 Otherwise, insert a CD in the player, play begins automatically. 

   Press [    Track] to select the previous track or return to the beginning of 
the track currently being played. 
 Press and hold for rewind play. 

   Press [ Track  

  ] to select the next track. 

 Press and hold for fast forwards play. 

 Press [^] to access the secondary menu. 

 Press [Repeat] to play the track in a loop (repetition). 
 Press [^] then [Repeat] to stop. 

 Press  [Scan]  to  play  the  beginning  of  each  track  for  approximately  9 

seconds  (scan).  Press  [^]  then  [Scan]  to  stop  or  press  the  current  track 
(during the 9 seconds) and play begins. 

 Press  [Random]  to  play  the  tracks  in  random  order.  Press  [^]  then 
[Random] to stop.  

  Selecting a track  

  Changing the play mode  

A U D I O   E Q U I P M E N T   a n d   T E L E M A T I C S

XI

187 

                   Recording a CD onto the music server (1/3) 

 Press 

 Explanations 

 Result 

 All of the tracks are recorded automatically when a CD is inserted. 
 This  automatic  recording  is  programmed  by  default  on  leaving  the 
factory. 

  Automatic recording of all of the tracks 

 If you have changed the recording mode (manual or fi rst track), while a 

CD is being played press [^] to access to secondary menu. 

 Press [REC. Setting]. 

 Press [Auto REC.] and confi rm by pressing [Back]. 

 Next,  eject  the  CD  currently  being  played  then  insert  a  CD  and  the 

recording of all of the tracks begins. 

 If you wish to record the CD which is currently being played, press [^] to 
access the secondary menu and press [REC. Start]. 

 If  another  track  (already  recorded)  is  selected  during  recording,  the 
recording continues and the new track selected is played. 
 If  another  track  (not  recorded)  is  selected,  the  recording  which  is  in 
progress stops and the recording of the new track selected begins. This 
track is played during recording.   

A U D I O   E Q U I P M E N T   a n d   T E L E M A T I C S

XI

188 

  Recording a CD onto the music server (2/3) 

 Press 

 Explanations 

 Result 

  Manual recording of individual tracks 

 You can record the tracks manually, one by one. 
 After inserting a CD and while it is being played, press [^] to access the 
secondary menu. 

 Press [REC. Setting]. 

 Press [Manual REC.] and confi rm by pressing [Back]. 

 Once the manual programming has been carried out, select the track to 
be recorded then press [^]. 

 Press [REC. Start], the recording of the track selected begins. 

 If another track is selected during recording, the recording stops and the new 
track selected is played.   

A U D I O   E Q U I P M E N T   a n d   T E L E M A T I C S

XI

189 

  Recording a CD onto the music server (3/3) 

 Press 

 Explanations 

 Result 

  Automatic recording of the fi rst track 

 You can programme the automatic recording of the fi rst track when a CD 

is inserted. 
 After inserting a CD and while it is being played, press [^] to access the 
secondary menu. 

 Press [REC. Setting] then [Single REC.] and confi rm by pressing [Back]. 

 Next, eject the CD which is currently being played then insert a CD and 

the recording of the fi rst track begins. 

 If  you  wish  to  record  the  fi rst  track  of  the  CD  which  is  currently  being 

played, press[^] to access the secondary menu and press [REC. Start]. 

 If another track is selected during recording, the recording stops and the 
track selected is played.  

  Stopping automatic or manual recording 

 During the recording of a CD or of a track on a CD, press [^] to access the 
secondary menu. 

 Press [REC. Stop], the recording stops.   


Content   ..  10  11  12  13   ..