Citroen C6 Dag (2008 year). Manual - part 8
 

  Index      Citroen     Citroen C6 Dag - service manual 2008 year in english


Search            


Content   ..  6  7  8  9   ..


Citroen C6 Dag (2008 year). Manual - part 8


116

IV

1

4

6

2

3

5

S

7

A

D

H

E

C

J

I

K

U

Q

O

F

N

M

L

R

P

V

W

B

G

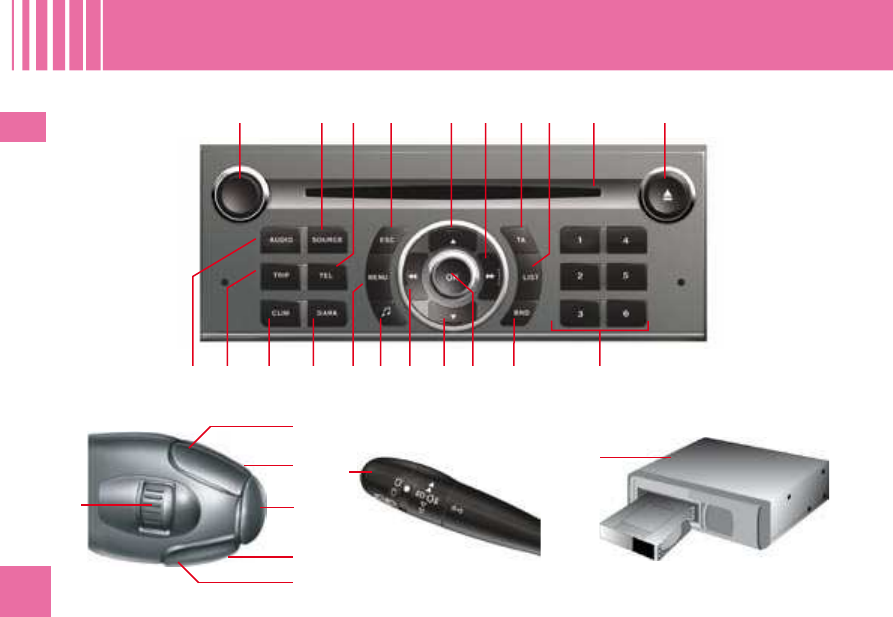
R D S   A U D I O   C O M P A C T   D I S C   S Y S T E M

117

IV

A

On/Off.

Volume adjust.

B

CD eject.

C

CD aperture.

D

SOURCE

Selection of sound source (Radio, CD, CD changer).

E

TEL

One  press:  Display  of  information  concerning  the  Bluetooth

®

system if your vehicle is so equipped.

  Display  of  information  concerning 

F

Call-up of audio adjustments.

G

LIST

Radio source:

Short press: Display of the list of radio stations available 

(30 maximum).

 Display of the list of radio stations available 

 Display of the list of radio stations available 

Long press: Update of list of stations.

CD source: Display of list of tracks of the CD.

H

ESC

Short press: Cancel the current operation or delete a superim-

posed display.

Long press: Return to the permanent display.

I

TA

Short press: TA function (road information).

Long press: PTY function (eélection of programme type).

TA function (road information).

TA function (road information).

J

Radio source: Manual search of higher frequencies.

CD/MP3  changer  source:

 Manual search of higher frequencies.

  Selection  of  the  next  CD/next 

 Manual search of higher frequencies.

 Manual search of higher frequencies.

CD-cover.

CD/MP3  changer 

CD/MP3 

Other sources: Scrolling in the Main Menu.

K

Radio source: Automatic search of higher frequencies.

CD  source,  CD  changer  source  and MP3  source:

Automatic search of higher frequencies.

  Forward 

search for tracks.

CD  source,  CD  changer 

Long press: Fast forward with accelerated sound.

Other sources:

Long press: 

 In the menus, choice of your adjustments.

If your vehicle has the Bluetooth

®

 In the menus, choice of your adjustments.

 In the menus, choice of your adjustments.

 system: Selection of characters.

®

L

OK

Button  for  validation  and  activation/deactivation  of  certain 

functions.

If  your  vehicle  has  the  Bluetooth

®

  system:  Answer  call,  end 

®

call.

M

Radio source: Manual search of lower frequencies.

CD/MP3 changer source: Go to previous CD/CD-cover.
Other sources: Scrolling in the Main Menu.

N

Radio source: Automatic search of lower frequencies.

CD source, CD changer source and MP3 source:

Automatic search of lower frequencies.

 Reverse 

search for tracks.

CD source, CD changer 

CD source, CD 

Long press: Rapid reverse with accelerated sound.

Other sources:

Long press:

Long press:

 In the menus, choice of your adjustments.

If your vehicle has the Bluetooth

 In the menus, choice of your adjustments.

 In the menus, choice of your adjustments.

®

 In the menus, choice of your adjustments.

 In the menus, choice of your adjustments.

 system: Selection of characters.

 In the menus, choice of your adjustments.

 In the menus, choice of your adjustments.

®

 In the menus, choice of your adjustments.

 In the menus, choice of your adjustments.

O

MENU

Display of the Main Menu.

In certain countries, this control is deactivated while the vehicle 

is moving.

P

1 6

1 6

Radio source:

Short press: Recall of pre-set stations.

Long press: Memorisation.

CD changer source:

Long press:

 Selecting a CD.

Q

DARK

Short successive presses:

One press: Display of radio, time and temperature only.
Two presses: Display off (blank display).
Three presses: Return to the standard display.


R

BND

Short  press:  Selection  of  frequency  bands  and  memory 

banks.

Long press: Automatic pre-set function (Autostore).

S

CD changer.

U

CLIM

Permanent display of air conditioning information.

V

TRIP

Permanent display of trip computer information.

W

AUDIO

Permanent display of audio source information.

B U T T O N   C O N T R O L S

118

IV

1

Radio source:

Scrolling of pre-set stations.

CD changer source:

Selection of CD.

CD changer source:

Other sources:

Within a menu, selection of a choice.

2

Radio source:

Manual search of higher frequencies.

CD and CD changer source:

Forward search for tracks.

CD and CD changer source:

Fast forward with accelerated sound.

If  your  vehicle  has  the  Bluetooth

®

  system:

®

  Selection  of 

characters.


3

Radio source:

Search of lower frequencies.

CD and CD changer source:

Reverse search for tracks.

CD and CD changer source:

CD and CD changer source:

Rapid reverse with accelerated sound.

If  your  vehicle  has  the  Bluetooth

®

  system: 

®

Selection  of 

characters.


4

Volume increase.

5

SRC

To  change  from  one  source  to  another:  Radio,  CD,  CD 

changer.

Within a menu, validation of your choice.

changer.

changer

6

Volume decrease.

Colour screen C

Technical specifi cations

Your Bluetooth

®

 compatible radio possesses:

®

3 wavebands (MW/LW/FM).
Dual tuner with RDS EON PTY, display of the 

PS name, RDS programme search, TA traffi c 

information, 24 pre-selections (18 FM - 6 MW/LW), 
automatic memorisation of the AST strongest 
stations.
An MP3- compatible CD reader.
Audio power of 4X35 W.


C O N T R O L S   A T   T H E   S T E E R I N G   W H E E L

The  controls  at  the  steering  wheel  give  you  access  to  certain  functions,  without  you  needing  to  use  the  radio-CD 
control panel.

4+6

Simultaneous  press  on  both  buttons:  Mute  (temporary 

sound pause.

7

If your vehicle has the Bluetooth

®

 system:

®

Short press on the end: 

If your vehicle has the Bluetooth

If your vehicle has the Bluetooth

Activation/deactivation of the 

If your vehicle has the Bluetooth

If your vehicle has the Bluetooth  system:

 system:

Voice Commands function if your vehicle has the Bluetooth

®

system.

119

IV

ON/OFF

With  the  key  in  Drive  position M
press  on  control A  to  switch  the 
radio on or off.
Note:

If the radio was on the last time 
you switched off the ignition, 
it will resume automatically 
when you switch on the ignition 
again. You will not have to 
press on control 
A.
After switching off the ignition, 
you can still operate the audio 
system even without the 
ignition key being present. 
Simply press on button 
A. The 
system will turn itself off 
after 
approx. 30 minutes
.

ANTI-THEFT SYSTEM

This  radio  is  coded  in  such  a  way 
as to function only on your particu-
lar vehicle. It would be unusable if 
installed on any other vehicle.
Note:  The  anti-theft  system  is 
automatic  and  requires  no  action 
on your part.

G E N E R A L   F U N C T I O N S   - 

A U D I O   A D J U S T M E N T S

SELECTION OF SOURCE

To  select  either  Radio,  CD  (CD 
already inserted and Radio source 
activated),  or  CD  changer  source, 
press on control D.
When you insert a CD it automati-
cally starts being read.
Note:  When  the  radio  is  switched 
off,  the  source  selected  is  memo-
rised.

VOLUME ADJUSTMENT

Rotate  control A  to  increase  or 
decrease the sound volume.
You can also increase or decrease 
the volume using controls 4 and 6
at the steering wheel.
Note:

The sound volume when you 
switch off the radio will be the 
same when you switch it on 
again.
The radio sound volume 
automatically adjusts to the 
vehicle speed, provided the 
"volume adjustment" function 
is activated.

TEMPORARY SOUND PAUSE

Press  simultaneously  on  buttons  4
and 6 at the steering wheel to acti-
vate this function.
The  sound  will  be  paused,  regard-
less of the source selected.
To  restore  the  audio  output,  press 
one  of  the  controls  at  the  steering 
wheel.

SOUND ADJUSTMENTS

Each  press  on  button F  brings 
up  the  parameter  to  be  adjusted: 

choice  of  predefi ned  sound  ambi-

ances, bass, treble, loudness, fade 
(front/rear  sound  distribution),  bal-
ance  (left/right  sound  distribution) 
and  volume  adjusted  to  vehicle 
speed.
Press buttons K or 

K

N to modify the 

values for the function displayed.
Note:

The selection of a sound 
ambiance automatically adjusts 
bass and treble. These can be 

modifi ed.
To restore the original 
adjustments for the musical 
ambiances, reset bass and 
treble to zero.
Adjustment of loudness, as well 
as bass and treble when they 

are available, are specifi c to 

each sound source and to each 
musical ambiance.
If you leave the audio system 
un-actioned for a few seconds, 
it will revert to the normal 
display.

120

IV

NOTES ON RADIO 
RECEPTION

Your radio will be subject to certain 
phenomena  that  are  not  encoun-
tered by domestic systems.
The  reception  of AM  and FM  sig-
nals  may  suffer  from  interference, 
which is caused by the nature and 
propagation  of  the  signals  and 

does  not  refl ect  on  the  quality  of 

your radio installation.
In AM,  the  reception  may  be 
affected when passing under power 
lines or bridges, or when travelling 
through tunnels.
In FM  mode,  the  reception  may  be 
affected  by  the  distance  from  the 

station  transmitter,  the  refl ecting  of 

signals  off  obstacles  (mountains, 
hills, tower blocks) and radio blacks-
pots  (no  coverage  from  the  station 
transmitter).

SELECTION OF RADIO 
SOURCE

Press button D to select the source.
You  can  also  do  this  by  means  of 
control 5 at the steering wheel.

R A D I O   S O U R C E

SELECTION OF 
FREQUENCIES AND 
MEMORY BANKS

Press  button R  successively  to  go 
through  the  memory  banks  FM1, 
FM2  and  FM3,  for  the  FM  wave-
band,  and  the  memory  banks 
MW/LW, for the AM waveband.

MANUAL SEARCH

Manual  search  is  via  buttons J
or M.
By keeping button J or M pressed, 
you  will  be  able  to  scroll  through 
the  waveband.  Scrolling  will  stop 
as soon as you release the button. 
The  radio  will  remain  tuned  to  the 
frequency that is displayed.

TUNING SENSITIVITY

Automatic searches can be carried 
out according to two levels of sen-
sitivity:

To capture the most powerful 
transmitters, choose the local 
search mode "LO" (default 
option).
To capture the weakest or most 
distant transmitters, choose the 
sensitive search mode "DX".

Search  for  a  station  is  done  fi rst 

in  "LO"  (local)  sensitivity,  then  in 
"DX" (distant) sensitivity.
To  commence  a  search  in  sensi-
tivity  "DX"  (distant)  immediately, 
press  twice  in  succession  on  one 
of the buttons K or N.

AUTOMATIC SEARCH

A short press on one of the buttons 
K or N will tune into higher or lower 
radio  stations  respectively,  within 
the chosen waveband.
By keeping button K or N pressed, 
you  will  be  able  to  scroll  through 
the  waveband.  The  scrolling  will 

stop at the fi rst station it fi nds once 

the button is released.
You  can  also  do  this  by  means  of 
the controls 2 and 3 at the steering 
wheel.
If the automatic search is unable to 
tune  into  a  known  frequency  (per-
haps owing to very weak reception), 
it is possible to search manually to 

fi nd this station.

121

IV

DISPLAY AND SELECTION 
OF A STATION AVAILABLE 
IN THE AREA IN WHICH 
YOU ARE TRAVELLING

Briefl y  press  on  button  G  to  bring 

up a list of stations, this is updated 
every 10 minutes.
You  can  also  update  this  list  at 
any time by giving a long press on 
button G.
To  listen  to  one  of  these  stations, 
select  by  pressing  buttons  J  or  M
and validate using button L.

MANUAL PRE-SETTING

Select the waveband and memory 
bank required using button R.
Select  a  station  using  either  auto-
matic or manual search.
Keep  pressing  for  more  than  two 
seconds on one of the pre-selection 
buttons 1 to 6 on the keypad P.
The  sound  momentarily  cuts  off, 
then returns to its previous level to 

confi rm that it has memorised the 

station.

R A D I O   S O U R C E

AUTOMATIC 
MEMORISATION OF 
TRANSMITTERS 
(AUTOSTORE FUNCTION)

In FM,  if  you  hold  down  button R
for  more  than  two  seconds,  your 
radio  will  automatically  memorise 
the 6 strongest stations on the FM3 
memory bank.
The display shows "FM AST".
The radio memorises the 6 strong-
est transmitters, deleting the 6 pre-
viously memorised.
After  the  memorisation,  the  radio 
goes directly to memory 1 of mem-
ory bank FM3.
Note:

If the traffi c information 

function has been activated 
(see RDS SYSTEM), the 
stations offering this facility will 
be memorised as priority.
If it is unable to memorise 
any new stations, the system 
will retain the previously 
memorised stations.
If the system is unable to fi nd 

6 stations, the unfi lled memory 

slots will remain free.

RECALL OF PRE-SET STATIONS

Press button R

 briefl y to select the 

required  waveband  and  memory 
bank.
A short press on one the pre-selec-
tion buttons 1 to 6 on the keypad P
recalls  the  corresponding  memo-
rised  station. You  can  also  do  this 
using  the  control 1  at  the  steering 
wheel.
If it is a RDS station, the frequency 
appears some seconds before the 
name appears.
For  RDS  stations,  recall  of  a  sta-
tion may prompt a search for a fre-
quency corresponding to the region 
where you happen to be (see RDS 
system).

122

IV

USING THE RDS (RADIO 
DATA SYSTEM) FUNCTION 
ON FM

The  majority  of  FM  radio  stations 
use the RDS system. The radio in 
your vehicle has this system.
The RDS  system  enables  these 
stations  to  transmit  non-audible 
data in addition to the broadcasting 
of their programmes. The data pro-
vides  access  to  various  functions 
described in this chapter, such as: 
display  of  the  station  name,  inter-

mittent  traffi c  information  fl ashes 

or  automatic  scanning  of  stations. 
This  enables  you  to  continue  lis-
tening to your chosen radio station, 
regardless of the different frequen-
cies it uses in the regions through 
which you are travelling.

SCANNING OF RDS 
STATIONS

Your radio keeps the best possible 
reception by continuously looks for 
any other frequencies on which the 
selected radio station is broadcast, 
automatically  choosing  the  fre-
quency offering the best reception 
(if  the  station  broadcasts  on  more 
than one transmitter or frequency.

R D S   S Y S T E M

ACTIVATION/DEACTIVATION 
OF THE RDS FUNCTIONS

The RDS functions can be accessed 
via the following two menus:

Main menu (press button O).
AUDIO menu (press button L).

To activate/deactivate the 
functions RDS

1. Press button O.
2. Select the AUDIO icon using 

buttons J or M.

3. 

Confi rm your choice with a 

press on button L.

4. Select the sub-menu for the FM 

waveband, via buttons J or M

Confi rm your choice with a 

press on button L.

5. Select scanning for RDS 

stations, via buttons J or M.

6. Validate your choice with a 

press on button L.

7. Using control L, select/deselect 

to activate/deactivate the 
function.

8. Validate your choice by 

selecting "OK" on the display.


Note:

If the RDS function is active.
The "
RDS" on the display will 

"

light up provided the station 
being received uses the RDS 
system with scanning of 
frequencies.
The "
RDS" on the display is 

"

barred if the station received 
uses the RDS system without 
frequency search.

If your RDS function is deactivated, 
the  "RDS"  on  the  display  will  be 
absent in all cases.
The display will indicate the "NAME"
for  the  stations  that  use  the RDS 
system  and  the  frequency  for  sta-
tions that do not use it.


123

IV

REGIONAL SEARCH MODE

Some  stations,  when  they  are 
organised  in  networks,  broadcast 
regional  programmes  at  certain 
times  of  day,  and  national  pro-
grammes at other times.
It is possible to search.

Either for a regional station 
only.
Or across the whole network 

in order to fi nd a different 

programme.

To activate/deactivate this function, 
proceed  as  for  Scanning  of RDS 
stations.
Note: When this mode is activated, 
the system will remain tuned to one 

specifi c regional station.

TA TRAFFIC 
INFORMATION (TRAFFIC 
ANNOUNCEMENTS)

Some stations allow broadcasting, 
only  in FM,  of  these  messages 
thanks to the "TA" function.
You  can  activate  the  "TA"  func-
tion  by  pressing  on  button I.  This 
allows  you,  even  though  you  are 
listening  to  another  audio  source 
or  to  a  radio  programme  not  itself 

providing  traffi c  messages,  to 

receive  traffi c  information  fl ashes 

from  an FM  station  which  broad-
casts them.

R D S   S Y S T E M

While  the  messages  are  being 
broadcast  the  original  source  is 
paused  and  when  the  messages 
have  ended  your  radio  will  auto-
matically  revert  to  the  music  pro-
gramme you were listening to.
Note:

You have to be in FM wave 
band.
The station being listened to 
should indicate via the RDS 

system that it broadcasts traffi c 

information.
Stations organised in a 
network (EON) have regional 
transmitters that send their 
own programmes: while 
you are listening to one of 
these stations the system 
will switch automatically to 
a station on the network 

that is broadcasting traffi c 

information.
You can stop listening to a 
message by pressing button 
I.

SOUND VOLUME 
ADJUSTMENT FOR 
TRAFFIC INFORMATION

The sound volume for traffi c infor-

mation  operates  separately  from 
that for the rest of the system, and 
can be adjusted independently.
Rotate button A

 while a traffi c infor-

mation  message  is  being  broad-
cast.
This  volume  adjustment  is  memo-
rised.

SELECTING A PROGRAMME 
TYPE

Certain  stations  offer  the  possibil-
ity  of  listening  to  a  particular  pro-
gramme  type,  selected  from  a  list 
(PTY).
press  for  more  than  two  seconds 
on button I.
Press  on  buttons J  or M  to  scroll 
through and select the programme 
type you prefer, then press on but-
ton L to validate your choice.

SEARCHING FOR A 
STATION BROADCASTING 
THIS PROGRAMME TYPE

When  you  have  chosen  a  pro-
gramme  type,  the  list  of  corre-
sponding  stations  appears  on  the 
display, press on buttons J or M to 
scroll  down  and  select  the  station 
you  want,  then  press  on  button L
to validate your choice.

QUITTING PTY MODE

To  quit  "PTY"  mode,  select  the 
function  to  deactivate  "PTY"  in 
the  list  of the  different  programme 
types.

RADIO TEXT VIA 
CONTEXTUAL MENU

This  function  allows  to  view  the 
information  broadcast  by  the  sta-
tion,  concerning  the  programme 
you are currently listening to.
To activate/deactivate this function, 
proceed  as  for  Scanning  of RDS 
stations.

124

IV

SELECTING CD SOURCE

After inserting a CD, with the printed 
side facing upwards, the player will 
start playing the CD automatically.
To change manually to CD source 
(CD  already  inserted),  press  but-
ton  D  until  you  obtain  the  source 
you require.
You  can  also  do  this  by  means  of 
control 5 at the steering wheel.

EJECTING A CD

Press  button  B  to  eject  the  CD, 
the audio system will automatically 
switch to radio source.
If the CD is not removed within 10 
to  15  seconds  of  being  ejected,  it 
will  automatically  be  taken  back 
into  the  CD  player,  although  it  will 
not be played.

SELECTING A TRACK

Press  button  K  once  to  play  the 
next track.
Press  button  N  once  to  return  to 
the  beginning  of  the  track  currently 
being played, press a second time to 
go  back  to  the  start  of  the  previous 
track.
Press  the  buttons  successively  to 
skip several tracks at a time.
This can also be done via the con-
trol G.  As  the  list  of  tracks  is  dis-
played  on  the  screen,  select  the 
desired track using buttons J or M
then validate using button L.

C D   S O U R C E

You  can  also  do  this  via  the  con-
trols 2 and 3 at the steering wheel.

FAST FORWARD AND 
RAPID REVERSE WITH 
ACCELERATED SOUND

To  move  swiftly  through  the  CD, 
press  and  keep  pressed  button  K
or  N,  respectively  for  fast  forward 
or  rapid  reverse  with  accelerated 
sound.
Play resumes as normal when the 
button is released.

MENU

This  menu  allows  activation/deac-
tivation of two options:

Playback of the fi rst 7 seconds 

(approx.) of each track of the CD.
Random playback of the CD 
tracks.

This can be accessed in two ways:

Either by pressing button O
and proceeding as for 
Scanning of RDS stations – 
the sub-menu for Audio 
Preferences.
Or, provided you are in 
CD source, by pressing 
onbutton L. You can then 
access the Audio menu.

Note:  If  one  of  these  options  is 
active,  it  remains  active  for  CD 
changer source.

SAFETY PRECAUTIONS

For safety, do not use a CD player 
if  the  cabin  temperature  is  higher 
than +60 °C or lower than -10 °C.
If  the  temperature  becomes  too 
high,  an  automatic  safety  device 
will  prevent  the  CD  player  from 
working  until  an  acceptable  tem-
perature is restored.

HANDLING OF CDS

Do not drop them.
Store the CDs so that they are 
kept of dust. Avoid touching the 
disc surface as any scratches 
may adversely affect the sound 
quality.
Do not attach any stickers to 
the discs.
Do not write on them.
Do not use damaged or 
deformed discs.
Do not expose them to heat or 
direct sunlight.


If the surface of the com-
pact disc is dirty, it can be 
wiped with a soft, clean 
cloth. Always wipe from 
the  centre  of  the  disc 
outwards.

125

IV

MP3 CDS

The MP3 format (MPEG 1,2 & 2,5 
Audio  Layer  3)  is  an  audio  com-
pression  standard  that  permits 
recording  of  10  times  as  many 

musical fi les on one CD.
Your radio only plays back fi les which 

have  the  extension  ".mp3".  Other 

types  of  fi les  (.wav,  .mpg4,  .ogg, 

midi...) cannot be played back.
When  you  insert  an  MP3  CD,  the 
radio  searches  all  the  musical 
tracks. Playback may require some 
tens of seconds before starting.
Playback  of  the  MP3  CD  is  opti-
mised  if  the  level  of  the  cover  is 
limited to 2.

Burning format

Some  cut  CDs  cannot  be  read  by 
your  equipment  (quality,  speed  of 
recording, etc.).
When you burn a CD-R or CD-RW, 
select  the  burning  standard  ISO 
9660  level  1,2  or  Joliet.  Playback 
of  other  formats  may  not  occur 
correctly.
Use  the  Joliet  standard  to  burn 
multi-session CDs.
On  a  given  CD,  always  use  the 
same burning standard.
To obtain the best possible acous-
tic  quality,  select  the  lowest  burn-
ing speed.
It can handle transmission speeds 
of 8  to 320  kbits/s  and  playback 
of 22.05 to 44.1 kHz.

C D   S O U R C E

MP3 CD PLAYER

Your  Audio  CD  system  may  be 
MP3 compatible.
As  you  insert  a  CD  recorded  in 
MP3 format, playback starts of the 

fi rst song of the fi rst CD-cover.
You  can  select  a  particular  track 
by  using  buttons N  or K  and  CD-
covers using buttons J or M.

TO SELECT A TRACK

To  display  the  list  of  CD-covers, 
press on button G.
Use  buttons J  or M  to  select  the 
CD-cover you wish to listen to.
To open a CD-cover, press L.
Use  buttons N  or K  to  select  the 
track you wish to listen to.
Validate with a press on L.

MENU

This  menu  is  for  activation/deacti-
vation of three options:

Playback of the fi rst 7 seconds 

(approx.) of each track of the 
CD.
Repetition of the current 
CD-cover.
Random playback of CD-cover 
tracks by CD-cover.

This can be accessed in two ways:

Either by pressing button O
and proceeding as for 
Scanning of RDS stations – 
the sub-menu for Audio 
Preferences.
Or, provided you are in 
CD source, by pressing 
onbutton L. You can then 
access the Audio menu.

Note:  The  CD  changer  (if  there  is 
one) is not MP3 compatible.

Your Audio equipment may enable you to listen to musical works. 
Musical work is protected by law. Non-respect of the law can 
lead to prosecutions.

126

IV

CD CHANGER

This  equipment S  (if  present)  is 
located  in  the  vehicle  boot  and 
comprises  a  magazine  that  holds 
up to 6 CDs.

TO INSERT/REMOVE A CD

1.  Remove the magazine from 

the CD changer

1.  Remove the mag

Remo

Open the sliding door of the CD 

changer.
Press on the "EJECT" button 

to eject the magazine partially.
Remove the magazine carefully.
Close the sliding door.

2.  Removing a compartment

Take out just one drawer at a 

time.

3.  Inserting/removing a CD

Insert a single CD, printed side 

upwards. Otherwise the CD 

Insert a single CD, printed sid

a single CD, printed s

changer will not operate.
Pull out the CD by pulling on 

the part that is showing.

4.  Repositioning the 

compartment

Refi t the drawer by pushing it 

into the magazine. Do not push 

directly on the CD.

into the magazine. D

gazine

5.  Repositioning the magazine

Open the sliding door.
Hold the magazine, narrow side 

towards the opening of the CD 

Hold the magazine, narrow side 

, narrow sid

changer.
Push the magazine gently into 

the aperture of the changer until 

Push the magazine gently into 

agaz

there is a click.
Reclose the sliding door to 

prevent entry of dust or of 

Reclose the sliding door to 

 sliding door to 

foreign bodies.

prevent entry of dust or of 

prevent entry of dust or of 


C D   C H A N G E R   S O U R C E

SELECTING CD CHANGER 
SOURCE

Press  on  button D  until  you  reach 
CD changer.
After the magazine engages, play-

back of the fi rst track of the fi rst CD 

will begin.
You  can  also  do  this  by  means  of 
control 5 at the steering wheel.

SELECTING A CD

To select a CD, either press one of 
the pre-selection buttons 1 to 6 on 
the  keypad P,  or  scroll  using  but-
tons J or M.
The CD will start to play automati-
cally.
You  can  also  do  this  by  means  of 
control 1 at the steering wheel.
After  each  change  of  source,  on 
return to CD changer source, play-
back will resume at the same point 
where it had been interrupted.

SELECTING A TRACK

Press  button  K  once  to  play  the 
next track.
Press  button  N  once  to  return  to 
the beginning of the track currently 
being  played,  press  a  second 
time  to  go  back  to  the  start  of  the 
previous track.
Press  the  buttons  successively  to 
skip several tracks at a time.
You  can  also  do  this  by  means  of 
the controls 2 and 3 at the steering 
wheel.

FAST FORWARD AND 
RAPID REVERSE WITH 
ACCELERATED SOUND

Press  and  keep  pressed  one  of 
the buttons K or N respectively for 
fast  forward  or  rapid  reverse  with 
accelerated  sound.  Play  resumes 
as  normal  when  the  button  is 
released.

MENU

This  menu  is  for  activation/deacti-
vation of three options:

Playback of the fi rst 7 seconds 

(approx.) of each track of the CD.
Repetition of the current CD.
Random playback of tracks, 
CD by CD.

This can be accessed in two ways:

Either by pressing button O
and proceeding as for 
Scanning of RDS stations – 
the sub-menu for Audio 
Preferences.
Or if you are in CD changer 
source by pressing button L
You then have access to the 
AUDIO menu.

Note:  If  one  of  these  options  is 
active,  it  remains  active  for  CD 
source.


127

IV

NoteRefer  to  the  user  instruc-
tions to familiarise yourself with the 
features of twinning.

The telephone detects the 
Bluetooth

®

 system on your 

®

vehicle. "C6

vehicle. "

vehicle. "

" displays on your 

telephone.

You  should  then  select "C6"  on 
your  telephone  controls.  Next  you 
have to accept or decline this twin-
ning.
Note: If the 4 twinning memories are 
already being used, you must select 
a memory that is already attributed 
although  the  telephone  twinned  to 
this location will no longer be.

Next the telephone asks you to 

enter an identifi cation code: 1234.
Validate.

Note: This entry may be demanded 
earlier in the twinning sequence.
The telephone  is  now  twinned  to 
your Bluetooth

®

 system. For imme-

®

diate  access  to  the  Bluetooth

®

functions,  it  may  be  necessary  to 
make  a  connection  (see  following 
page 

Confi guration: Connecting 

a twinned mobile telephone).
Once

the twinning is fi nished, you 

will  be  able  to  connect  your  tele-
phone via the 

"Main menu".

CONNECTING A TWINNED 

TELEPHONE

Each  time  you  enter  the  vehicle, 
after  switching  on  the  audio  sys-
tem,  your  telephone  is  detected 
automatically.  If  more  than  one 
telephone  is  present,  the  last  tel-
ephone to have been connected is 

the fi rst to be recognised.

Note:  Disconnections  may  occur. 

You may have to make a new con-
nection  (see  following  page,  
Con-

fi guration: Connecting a twinned 

mobile telephone).

mobile telephone

mobile telephone

Remarks:

In the event of a problem, it is 
recommended to switch your 
telephone off and then on again.
If you switch off your telephone 

within the fi eld of reception of 

the Bluetooth

®

 system on your 

®

vehicle, the next connection 
will not be automatic. To 
restore automatic connection, 
you will have to connect your 
telephone manually(see 
following page, 

Confi guration: 

Connecting a twinned mobile 

telephone).
If you are already in telephone 
communication when the audio 
system is turned on, the latter 
detects the telephone.
To avoid interference, you are 
advised not to place your mobile 
telephone close to your radio.

TO ACCEPT AN INCOMING 

CALL

Use button L.

Your 

audio 

system 

may 

be 

BLUETOOTH

®

 compatible. It allows 

®

you to connect a 

mobile telephone

for  use 

"hands  free"  and  even  to 

use its directory.
It permits you to twin up to four tel-
ephones,  to  be  able  then  to  con-
nect whichever one you choose.
The Bluetooth

®

 functions available 

®

and  the  content  of  the  display  are 
dependent  on  the  type  of  mobile 
telephone, its settings and the type 
of contract you have. For this rea-
son it is advisable to make enquir-
ies with your telephone provider.
Prior to any operation:

Your display should be lit up 
(key in position M).
Your telephone's Bluetooth

®

system must be activated.

TWINNING A TELEPHONE

Twinning  a  telephone  consists 
of  having  it  recognised  by  the 
BLUETOOTH

®

  system  on  your 

®

vehicle.  This  then  permits  an 
instantaneous connection.
Twinning  can  only  be  performed 
with 

ignition switched on, display 

illuminated, engine stopped. No 

other  telephone  should  be  con-
nected.

The twinning must be 
performed with the telephone 
and its Bluetooth

®

 system 

®

activated.

B L U E T O O T H

®

128

IV

MAIN MENU

Press  on  the  Menu  button O  to 
access  to  Main  menu,  then  select 
the  "Telephone"  icon  using  but-
tons J  ou M),  then  validate  the 
selection via button L.
You have access:

To the Directory.
To Confi guration.
To Communication 
Management.

You  access  your  choices  via  (J
ou M), then you validate them with 
a press on L.
This  main  menu  can  also  be 
accessed  by  pressing  button E
then button L.

FOLDER

This menu lets you open:

The telephone Directory of the 
telephone that is connected.
The Calls List.

Telephone directory

The  starting  of  a  telephone  call 
can  be  done  independently  of  the 
telephone  or  of  the  audio  system, 
thanks to the directory.
The  directory  is  displayed.  Select 
the  number  via J  or M,  then  vali-
date with a press on L.


Remarks:

The directory displayed 
updates itself automatically.
If the person to be called does 

not fi gure in the directory, the 

call can only be made starting 
from the telephone.
If you have information 
recorded in the Vcard format, 
you must select the person you 
wish to call, then validate. A list 
of 4 numbers maximum can 
be displayed with the following 
labels: "Home"

"Offi ce"

"Mobile" and "Car".

Calls list

After selecting this component and 
then validating, the calls list is dis-
played with a maximum of: 10 calls 
made  (arrow  pointing  upward), 10
calls 

received 

(arrow 

pointing 

downward)  and 10  calls  not  con-
nected.
It  is  possible  to  make  a  call  start-
ing from this list: Select the number 
via J  or M,  then  validate  with  a 
press on L.

CONFIGURATION

This menu allows you to:

Deleting a twinning. Using J
or M, select this choice, then 
validate on L. Select in the 
list the telephone that you no 
longer wish to have twinned. 
Validate.
Consulting the list of 
twinnings.
 The list of 
telephones twinned is 
displayed.
Connecting a mobile 
telephone that is twinned.
Select the telephone that 
you wish to connect. This 
access allows you to make a 
connection manually.

CALL MANAGEMENT

This  menu  is  accessible  during 
your calls, permitting you to:

Swap a call if there is another 
call incoming.
End a call.
Be in Secret mode.

Remark:
If  you  are  in  telephone  conversa-
tion, you have access to this menu 

"Confi guration" by pressing L.


B L U E T O O T H

®

129

IV

B L U E T O O T H

®

VOICE RECOGNITION

A short press on the end of the con-
trol  stalk 7  starts  telephone  voice 
recognition.
Voice  recognition  allows  you  to 
make a call to a number for which 
you  have  recorded  a  label  on  the 
mobile  telephone  that  is  twinned 
and connected.
Remark:
It  is  possible  to  stop  the  call,  pro-
vided the dialling has not yet com-
menced, with a short press on the 
end of the lighting control stalk 7.
Remarks:

While you are on a call, the 
audio source currently being 
listened to is paused.
Some ring tones on your 
mobile telephone may not be 
recognised by the Bluetooth

®

system on your vehicle. A 
different ring tone will be 
chosen by the system.

DISPLAYS

A  press  on  the  "TEL"  button  dis-
plays the telephone information on 
the right on your screen.
"Telephone" symbol appears on 
your  display  when  you  connect  a 
mobile telephone.
"Battery" symbol appears at the 
bottom  of  the  display  to  indicate 
the  range  of  the  mobile  telephone 
connected.
An "Envelope" symbol appears at 
the bottom of the display to indicate 
the presence of an unread SMS on 
the mobile telephone connected.
A  "Sound  track"  symbol  appears 
at the bottom of the display to indi-
cate the presence of a message on 
the mobile telephone connected.

Swapping a call

During  a  telephone  conversation, 
the  system  is  able  to  tell  you  of  a 
second call incoming. To accept it, 
validate.  To  change  from  one  call 
to the other, select this choice.

End a call

This  choice  enables  you  to  end  a 
telephone  conversation,  for  exam-
ple if there is another call incoming.

Secret mode

Select  this  choice.  This  allows 
you  not  to  be  heard  by  the  other 
person.  To  restore  sound  to  the 
other  person,  select  deactivation 
of Secret mode in the menu "Call 
Management"
.
Note: If you wish to transfer a call 
from the audio system to the mobile 
telephone (for example when leav-
ing your vehicle), refer to the user 
instructions for the latter.

130

IV

H I - F I   J B L   S Y S T E M

Your vehicle may be equipped with a Hi-Fi system, specially designed to fi t in with your cabin interior.

ADJUSTMENT IN CD OR RADIO MODE

The basic functions remain the same as those for the radio.
No extra adjustment is necessary.
However, to profi t fully from your JBL audio system, you are recommended to adjust the audio functions: bass (Bass), 

treble  (Treb),  front/rear  balance  (Fad),  left/right  balance  (Bal)  to  position O,  Loudness  (Loud)  to  position ON  for 
listening to a CD and position OFF for listening to the radio.

131

IV

F R E Q U E N T L Y- A S K E D   Q U E S T I O N S

Q

UESTION

A

NSWER

S

OLUTION

There is a discrepancy in sound 
quality between the different audio 
sources (radio, CD, CD changer 
etc.).

To achieve an optimum listening quality, the audio adjust-
ments (Volume, Bass, Treble, Ambiance, Loudness) can 
be adapted to each of the different sound sources, which 
can produce audible shifts when you change the source 
(radio, CD, CD changer etc.).

Check that the audio adjustments (Volume, Bass, 
Treble,  Ambiance,  Loudness)  are  adapted  to 
your preferences for each of the sources being 
listened to.

The CD immediately ejects.

The  CD  is  the  wrong  way  up,  is  unplayable,  does  not 
contain audio data or contains an audio format that the 
radio cannot play back.

Check that you have inserted the CD the right 
way up in the CD player.

Check the condition of the CD: the CD cannot 
be played back if it is too damaged.

Check the contents if it is a burnt CD: refer to the 
advice given in the chapter on Audio System.

For reasons of poor quality, some burnt CDs will 
not be played back by the audio system.

The CD changer does not play back DVDs.

The CD changer does not play back MP3 CDs.

The  CD  player  sound  is  down-
graded.

The CD is scratched or of poor quality.

Insert only CDs of good quality and keep them 
in good condition.

The pre-set stations do not work 

(no sound, 87,5 Mhz is displayed, 

etc.).

The waveband selected is not the correct one.

Press  on  the  button  BND  to  retrieve  the  wave 
band (AM, FM1, FM2, FMAST) where the stations 
have been memorised.

The table below brings together the answers to the questions that are the most frequently asked.


Content   ..  6  7  8  9   ..