Citroen C6 Dag (2008 year). Manual - part 2
 

  Index      Citroen     Citroen C6 Dag - service manual 2008 year in english


Search            


Content   ..   1  2  3   ..


Citroen C6 Dag (2008 year). Manual - part 2


20

IN

 BR

IEF

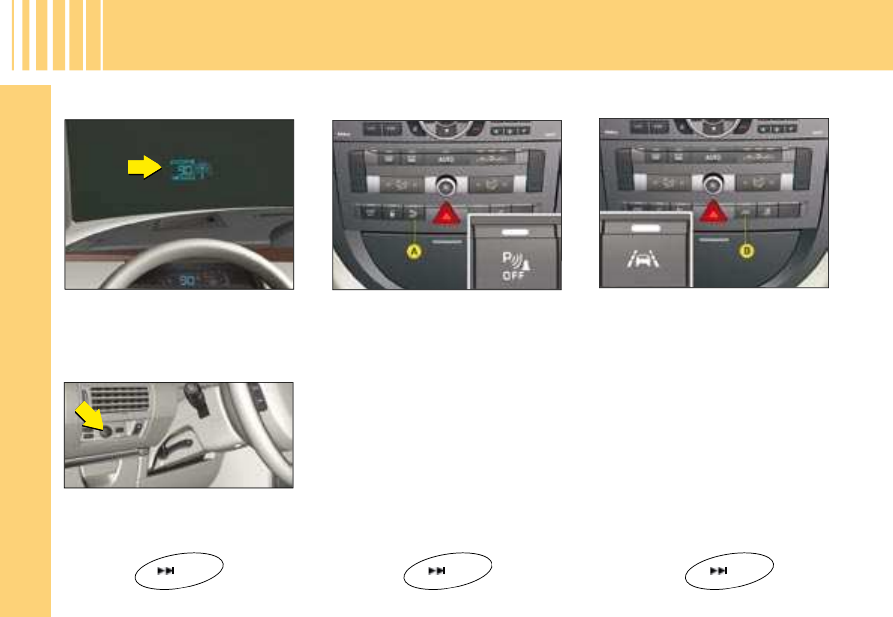
You  can  activate/deactivate  the 
parking  assistance  by  pressing 
button A. When the parking assist-
ance is inactive, the warning lamp 
on button A is lit up.

PARKING ASSISTANCE

LANE DEPARTURE 
WARNING SYSTEM

This  driving  assistance  device 
warns  you  when  you  unwittingly 
cross a lane marking (either a con-
tinuous or a dotted line on the road 
surface).  It  is  designed  for  use  on 
motorways and dual carriageways, 
operating  only 

above  speeds  of 

approx. 80 km/h (50 mph).
A  press  on  button B  activates  the 
function,  the  warning  lamp  on  the 
button lights up.

HEAD-UP DISPLAY

The 

Head-up 

display 

projects 

essential  driving  data  into  the 

driver's fi eld of vision. This enables 

the  driver  never  to  take  his  eyes 
off the road
.

The  controls  for  the  Head-up  dis-
play  are  located  beneath  the  air 
vent on the driver's side.

78

76

35

D R I V I N G

21

II

A

B

D

C

R E M O T E   C O N T R O L

Note:

The simultaneous use of other 
high frequency equipment 
(mobile telephones, domestic 
alarms, etc.) may momentarily 
hinder the operation of the 
remote control.
If there is a permanent fault, 
the remote control has to be 
reinitialised. See "Changing 
remote control batteries".

CENTRAL UNLOCKING

A press on button A unlocks your vehicle.
This operation is confi rmed by the rapid fl ashing of the direction indicators 

and the lighting of the interior lamp (if the function is activated). It can also 

deploy the exterior rear view mirrors.

CENTRAL LOCKING - CLOSING OF WINDOWS AND SUN 
ROOF - DEADLOCKING

short press on button B locks your vehicle.
long press on button B

 locks your vehicle and closes the windows 

and the sun roof.
Two successive presses on button B

 deadlocks the vehicle. It is then 

impossible to open the doors from either inside or outside the vehicle.

This operation is confi rmed by the direction indicators illuminating for approx. 

2 seconds and by the interior lamp switching off. This also folds the exterior 

rear view mirrors.
If any of the doors, or the boot, is open or not properly closed, the central 

locking does not operate.


If closing the windows and sun roof using the remote control, 
the  user  must  make  sure  that  no  person  is  preventing  the 
windows and/or sun roof from closing properly.
It  is  dangerous  to  operate  the  deadlocking  when  a  person 
is in the vehicle as unlocking is impossible from the inside 
(without the remote control).

22

II

R E M O T E   C O N T R O L

FOLDING AND EJECTING THE KEY

Button D

 is for folding and ejecting the key from its housing in the remote 

control.
If you do not press on button D, you could damage the key mechanism.

Changing the remote control battery

Unclip the cover to gain access to the battery.
Battery:

 CR 0523 of 3 V.

After  a  change  of  battery,  it  may  be  necessary  to  re-initialise  the  remote 

control. To do that, switch on the ignition and immediately action button B

on your remote control to trigger the action desired. This may take some ten 

seconds.
Note: Make a careful note of the numbers for the keys and for the remote 
control on the ASSISTANCE card. Keep this in a safe place.
Do  not  throw  away  the  old  batteries.  They  should  be  returned  to  a 
CITROËN  dealer

Do  not  throw  away 

Do  not  throw 

 or deposited at a recognised collection point (a camera 

dealer

shop, for example).

Except when reinitialising, the remote control cannot function while the key is in the ignition, even 
when switched off.
Warning: by inadvertently actioning the remote control, when for example it is in your pocket, you 
can unlock the vehicle without your realising it.
However, if none of the doors is opened within thirty seconds following an unlocking, the doors 
will automatically relock.
Warning: there is a risk of damage if the replacement battery is not the correct one.
Only use batteries that are identical or equivalent to those approved by CITROËN.

GUIDE-ME-HOME LIGHTING

A  press  on  button C  operates  the 

guide-me-home  lighting  (illumina-

tion  of  the  sidelamps  and  dipped 

beams for approx. one minute).
A second press prior to the end of 

this  timing  cancels  the  guide-me-

home lighting.

LOCATING OF THE VEHICLE

To locate the vehicle on a carpark, 

press  button B

,  the  interior  lamps 

come  on  and  the  direction  indica-

tors  fl ash  for  a  few  seconds.  The 

vehicle remains locked.

23

II

K E Y S

It is dangerous to operate the deadlocking when a person is in the vehicle as unlocking is impos-
sible from the inside (without the remote control).
The key number is on the label attached to the key.
Should you lose your key or remote control, a CITROËN dealer can supply replacements.
If  you  unlock  your  vehicle  using  the  key  because  of  a  problem  with  the  battery,  be  aware  that 
opening/closing a door with the window closed can seriously damage the glass, even to the point 
of breaking it. See "Access".

ELECTRONIC IMMOBILISER 
KEY

The  key  operates  all  the  vehicle’s 

locks as well as the ignition.
Note: For safety reasons, a buzzer 
will sound if you have switched off 
the  ignition  and  opened  the  driv-
er’s  door  without  having  removed 
the ignition key.
The key can be used to deactivate 

the  front  passenger’s  airbag.  See 

"Airbags".

CENTRAL LOCKING USING THE KEY

A brief action with the key locks the vehicle.

Deadlocking: Central locking using the key

A second action straightaway with the key deadlocks the vehicle. It is then 

impossible to open the doors from either inside or outside the vehicle.
Note:

With the vehicle stationary and the engine switched off, locking is 

signalled by the fl ashing of the interior locking control warning lamp.
If any of the doors, or the boot, is open or not properly closed, the 
central locking does not operate.

ELECTRONIC IMMOBILISER

The ELECTRONIC IMMOBILISER device locks the engine supply system.
The system activates automatically as the key is removed from the ignition.
All the vehicle’s keys contain an electronic immobiliser device.
After you switch on the ignition, a dialogue starts between the key and the 

electronic immobiliser device.
If the key is not recognised, you cannot start the vehicle.
If  this  occurs,  leave  your  vehicle  immobilised  and  contact  a  CITROËN 

dealer.

24

II

A

A N T I - I N T R U S I O N  A L A R M

Your vehicle may be equipped with 

an ANTI-INTRUSION ALARM. This 

provides:

Exterior perimeter protection 

by means of detectors on the 

vehicle access points (doors, 

boot, bonnet) as well as on the 

electrical supply.
Interior volumetric protection 

by means of ultrasonic sensors 

(detecting movement inside the 

passenger compartment). This 

can be deactivated using the 

control 1.

The  installation  also  has  a  siren, 

and  a  warning  lamp  on  the  con-

trol 1

 which is visible from outside 

the  vehicle,  indicating  the  three 

possible statuses of the alarm:

Alarm not active (disarmed), 

warning lamp off.

Alarm active (armed), the 

warning lamp fl ashes slowly.

Alarm triggered (signalling an 

intrusion), the warning lamp 

fl ashes rapidly if the alarm is 

deactivated by a press on the 

control A

. It stops as soon as 

you switch on the ignition.

Note:  If  there  is  a  malfunction, 
the  warning  lamp  remains  perma-
nently on.

DEACTIVATION OF THE 
ALARM USNG THE REMOTE 
CONTROL

The  alarm  is  disarmed  when  you 

unlock the vehicle (with a press on 

button A

 on the remote control).

DEACTIVATION OF THE 
ALARM WITH THE KEY

Unlock the doors with the key. The 

siren  triggers.  Enter  the  vehicle, 

insert  the  key  in  the  ignition  and 

turn it to the drive position to stop 

the  siren.  Otherwise  the  siren 

will  continue  for  approximately 

30 seconds.

25

II

A

B

A N T I - I N T R U S I O N  A L A R M

OPERATING THE ALARM

First make sure all the doors are closed.
The alarm is armed by pressing button B on the remote 

control.
With the alarm armed, the protections are active after 

5 seconds (perimeter) and 45 seconds (volumetric).
When  the  alarm  is  armed  (on  standby),  any  intrusion 

will  trigger  the  siren  for  30  seconds,  accompanied  by 

the direction indicators lighting up.
The alarm then goes back on standby, but the trigger-

ing  remains  memorised  and  is  signalled  by  the  rapid 

fl ashing of the warning lamp on control 1 after you have 

deactivated  the  alarm  with  a  press  on  the  unlocking 

button A

.  The  fl ashing  stops  when  you  switch  on  the 

ignition.
The  siren  is  also  triggered  if  there  is  a  cutting  of  the 

electrical supply. To stop it, restore the electrical supply 

then press on the unlocking button A.
Note:

If you want to lock your vehicle without arming the 
alarm, just lock with the key only.
If you lock your vehicle and a door, or the boot, is 
still open, the central locking does not operate but 
the alarm will arm itself after approx. 45 seconds.

Note: The siren is automatically deactivated (for exam-
ple for disconnecting the battery) as soon as the vehicle 
is unlocked using the remote control.

Deactivating the volumetric detection

You  can  operate  the  alarm  with  perimeter  protection 

only,  by  deactivating  the  volumetric  protection  (if  for 

example you wish to leave an animal in the vehicle).
For this, switch off the ignition then immediately press 

button 1

 for at least one second.

The  warning  lamp  on  button 1  should  come  perma-

nently on. It will start to fl ash when the alarm is armed.
Arm the alarm by locking your vehicle with the remote 

control.
It is recommended to deactivate the volumetric detec-

tion when washing the vehicle in order to prevent the 

random triggering of the alarm.

Automatic activation (according to destination)

The alarm is armed automatically, 2 minutes after the 

last door, or the boot, has been closed.
In order to prevent the alarm from triggering when you 

open one of the doors or the boot, it is essential to press 

the unlocking button A again on the remote control.

26

II

S T E E R I N G   L O C K   –   I G N I T I O N   –   S TA R T E R

NEVER  REMOVE  THE  IGNITION  KEY  BEFORE  THE  ENGINE 
HAS COME TO A COMPLETE STOP.
IT IS ESSENTIAL ALWAYS TO DRIVE WITH THE ENGINE RUN-
NING, SO AS TO RETAIN STEERING AND BRAKING ASSISTANCE 

(risk of the steering lock engaging and loss of safety features).
When stationary, having removed the key, carefully turn the steering 
wheel if you wish to lock the steering.

S: STEERING LOCK

To unlock the steering, gently move 

the steering wheel while turning the 

key, without exerting undue force.
When  you  remove  the  key,  turn 

your  steering  wheel  to  lock  the 

steering.  The  key  can  only  be 

removed when in position S.

M: DRIVE POSITION

The steering is unlocked (by turn-

ing the key in position M, if neces-

sary move the steering wheel).

STARTING AND STOPPING 
THE ENGINE

See "Driving".

ECONOMY MODE

In  order  not  to  discharge  the  bat-

tery  while  the  engine  is  stopped, 

your vehicle goes automatically 
into economy mode after a max-
imum  of 

30  minutes.  Economy 

mode  is  indicated  by  a  message 

on the screen.
The electrical components relating 

to comfort and also the headlamps 

(not  sidelamps  or  hazard  warning 

lamps)  cut  out  automatically.  To 

reactivate them, it is necessary to 

start the engine.

Depending  on  your  vehicle  ver-

sion,  the  following  warning  lamps 

are tested:

If one of these warning lamps does 

not  light  up,  this  indicates  a  mal-

function.

D: STARTING

Release  the  key  as  soon  as  the 

engine  starts.  Never  turn  it  while 

the engine is running.

27

II

DO NOT RUN THE ENGINE IN A CLOSED SPACE OR IN ONE 
THAT IS INSUFFICIENTLY VENTILATED.

PETROL

Starting the engine

Do not touch the accelerator.
Turn the key to the drive position.
Action 

the 

starter 

until 

the 

engine  starts  up  (not  more  than 

10 seconds).
If the engine does not start at the 

fi rst attempt, switch off the ignition. 

Wait  10  seconds,  then  action  the 

starter again as above.

DIESEL

Starting the engine

Turn the key to the drive position.
Wait for the preheater warning lamp 

to go out, if it is on, then action the 

starter  until  the  engine  starts  (not 

more than 10 seconds).
If the engine does not start, switch 

off the ignition.
Recommence the operation.
Note: During starting, do not touch 
the accelerator.

ADVICE

Diesel vehicle with 
turbochargers

Never  stop  the  engine  without 

fi rst  having  allowed  it  to  idle  for  a 

few  seconds,  this  being  the  time 

required  for  the  turbochargers  to 

return to a normal speed.
Do not "fl ick" the accelerator at the 

moment you switch off the ignition 

as this could seriously damage the 

turbochargers.

Check that the automatic gear selector is in position P or N.

D R I V I N G   –   S TA R T I N G   T H E   E N G I N E

28

II

STOP

STOP

A

D

B

C

A

ST

ST

B

K

J

I

H

G

F

E

B

K

J

I

H

G

F

E

B

C

A

B

D

A

B

I N S T R U M E N T   PA N E L

Remark:

 Certain types of screen may adversely affect the readability of the instrument panel.

Signalling warning lamps

Operational warning lamps

Cruise control/speed limiter information

Fuel gauge

Trip mileage recorder

Total mileage recorder, maintenance indicator

Speed indicator

Display of automatic gearbox information

Display of suspension sport mode

J  Rev counter

Reset button for trip mileage recorder and 

maintenance indicator

INSTRUMENT PANEL - PETROL VERSION

INSTRUMENT PANEL - DIESEL VERSION

34

II

B

A

C

D

NIGHT DRIVING

A fi rst press on the DARK button puts the display on standby. Only the 

time and the temperature remain displayed.
A second press

 switches off the display and the instrument panel, 

except for information concerning:

The speed indicator.

The automatic gearbox.

Cruise control/Speed limiter if this has been activated.

Note:

Temporary lighting of the display for modifi cation of audio-CD 

adjustments and air conditioning.
The display lights up if any of the other buttons on the display is 
pressed. To revert to night driving, press just once on button DARK.

DARK

DARK

All the displays come on if there is an alert.

A third press

 returns you to normal lighting.

-

-

-

-

-

-

DASHBOARD BRIGHTNESS

With lamps switched on, press on 

button C  or D  to  alter  the  intensity 

of the dashboard lighting.
In  the  "Main  menu",  you  have  a 

"Confi guration" menu, in which you 

can  adjust  the  display  brightness. 

See  "Display"  and  the  NaviDrive 

instructions.
For  enhanced  visual  comfort,  you 

can  also  adjust  the  orientation  of 

the  NaviDrive  display  by  pressing 

buttons A

 and B.

I N S T R U M E N T   PA N E L   –   D I S P L AY

29

II

I N S T R U M E N T   PA N E L

W A R N I N G   L A M P S

  These warning lamps may be accompanied by a message and/or a sound signal  

ESP/ASR

Operating

If either of the ESP or ASR 

systems  is  active,  the  warning 

lamp fl ashes.

For a malfunction

When  the  vehicle  is  moving,  the 

lighting  of  this  warning  lamp  indi-

cates a system malfunction.
Contact a CITROËN dealer.

Deactivation

The  lighting  of  the  warning  lamp 

and  of  the  button  ESP  indicates 

that the system is deactivated.

Electric parking 
brake

When  the  engine  is  run-

ning,  this  warning  lamp 

lights up to indicate a malfunction-

ing  of  the  electric  parking  brake. 

The  brake  is  not  working  prop-

erly. Place the gearbox in the Park 

position (P).
Consult  a  CITROËN  dealer  as 

soon as possible.

ABS

The  ABS  warning  lamp 

lights up when you switch 

on the ignition: it should go 

out after a few seconds. If it does 

not  go  out,  there  could  be  a  sys-

tem malfunction. See "Brakes".

Puncture(s)

If this warning lamp comes 

on, it indicates a puncture 

on one or more wheels.

The  screen  displays  an  image 

which  shows  you  which  wheel 

is  affected.  Contact  a  CITROËN 

which  shows  you  which  wheel 

which  shows  you  which  wheel 

dealer.

Door open

If this warning lamp comes 

on while the engine is run-

ning, it tells you that one of 

the doors and/or the boot is open.

Electric parking 

brake, brake fl uid 

level, braking 
distribution 

malfunction

With the engine running, the light-

ing of this warning lamp indicates 

that the parking brake is on or not 

properly  released,  that  the  brake 

fl uid level is low or that the braking 

system is malfunctioning.
If  the  warning  lamp  remains  on 

even after you have released the 

parking  brake,  stop  immediately 

and contact a CITROËN dealer.

parking  brake,  stop  immediately 

parking  brake,  stop  immediately 

See "Brakes".

SERVICE

This  warning  lamp 

remains  on  for  a 

serious  fault.  Con-

sult  a  CITROËN  dealer  as  soon 

as possible.
This warning lamp remains on only 

for a short time for faults that are 

minor. Contact a CITROËN dealer 

if necessary.
To  learn  the  origin  of  the  corre-

sponding  alert,  refer  to  the  log  of 

alerts  (See  chapter  "Multifunction 

screen" or your NaviDrive instruc-

tions).

STOP warning 
lamp

If this warning lamp 

comes  on,  it  is 

imperative to stop the vehicle and 

to switch the engine off. The warn-

ing  lamp  is  accompanied  by  the 

STOP  symbol  on  the  screen  as 

well as on the Head-up display.
Contact  a  CITROËN  dealer  as 

soon as possible.

30

II

I N S T R U M E N T   PA N E L

W A R N I N G   L A M P S

Front passenger's 
airbag deactivation

See "Airbags".

Left hand direction 
indicator

See "Signalling".

Right hand direction 
indicator

See "Signalling".

If the hazard lamps are activated, this means that the direction indica-

tors fl ash on both sides at the same time.

Sidelamps

See "Signalling".

Front foglamps

See "Signalling".

Dipped beams

If this warning lamp fl ashes, 

it  indicates  that  the  direc-

tional  headlamps  are  mal-

functioning.
Contact a CITROËN dealer.

Foglamps (rear)

See "Signalling".

Main beams

See "Signalling".

Driver's seat belt not 
fastened

If this warning lamp comes 

on,  it  is  reminding  the 

driver to fasten his seat belt. While 

the vehicle is stationary it remains 

on until the belt is fastened.
See "Seat belt not fastened warn-

ing lamp".

Depollution system

If this warning lamp fl ashes 

or  lights  up  while  you  are 

driving,  this  indicates  a 

problem  with  the  depollu-

tion system.
Consult  a  CITROËN  dealer  as 

soon as possible.

Diesel engine preheater

See  method  for  starting 

the engine.

See "Driving".

Fuel low

If this warning lamp comes 

on,  permanently  on  level 

ground, 

there 

remain 

around 9 l of fuel for a Petrol vehi-

cle, or around 8 l of fuel for a Die-

sel vehicle.

31

II

I N S T R U M E N T   PA N E L

An  incorrect  engine  oil  level  can  seriously  damage  your 
engine. 
See "Levels".

On switching on the ignition, the 

instrument panel indicates:

Firstly, in suceesion:

Maintenance indicator. See 

"Maintenance indicator".

The engine oil level indicator.

Secondly:

The total and trip mileage 

counters.

-

-

-

ENGINE OIL LEVEL INDICATOR

This  display  indicates  normal 

operation.

Flashing  of  "OIL"  indicates  an  oil 

level that is below the minimum.
Check  using  the  manual  dipstick. 

See "Levels".
Check the engine oil level on hori-

zontal  ground  with  the  engine 
having  been  switched  off  for  at 
least 15 minutes.
Contact a CITROËN dealer.

A fl ashing of "OIL – –" indicates 

malfunctioning of the indicator.
Contact a CITROËN dealer.

32

II

I N S T R U M E N T   PA N E L

MAINTENANCE INDICATOR

It informs you when the next routine service is due in accordance with the vehicle servicing schedule in the Main-

tenance Guide. This information is dependent on two parameters: the mileage covered, and the time elapsed since 

the last visit.

Operation

From  switching  on  the  ignition 

and for a few seconds, the  span-

ner  symbolising  maintenance 
operations  lights  up

;  the  instru-

ment  panel  tells  you  the  distance 

remaining to the next service.
Example:

  there  remain  up  to  the 

next service:

A few seconds after this, the engine 

oil level indicator is displayed, then 

the total mileage recorder resumes 

its  normal  role.  The  instrument 

panel  gives  the  total  and  trip 

mileages.

Operation if the distance to 
the next service is less than 
1 000 km (600 miles)

Each  time  you  switch  on  the  igni-

tion  and  for  5  seconds,  the  span-

ner and the distance fl ash.
Example:

  there  remain  up  to  the 

next  service:  500  km  (300  miles). 

On switching on the ignition and for 

5  seconds,  the  instrument  panel 

indicates:

A few seconds after this, the engine 

oil level indicator is displayed, then 

the total mileage recorder resumes 

its  normal  role  and  the  mainte-

nance symbol remains lit up.
This  is  a  warning  to  you  that  a 

service must be carried out at the 

earliest opportunity.
The  instrument  panel  gives  the 

total and trip mileages.

Operation if the service 
interval has been passed

Each  time  you  switch  on  the  igni-

tion, the maintenance symbol and 

the  distance  covered  (preceded 

by  a  minus)  beyond  the  recom-

mended interval fl ash.
Example:

  You  have  exceeded 

the  service  interval  by  300 km 

(300 miles).
The  routine  service  on  your  vehi-

cle needs to be carried as soon as 

possible.

A  few  seconds  after  switching 

on  the  ignition,  the  total  mile-

age  recorder  resumes  its  normal 

role  and  the  maintenance  symbol 

remains lit up.

33

II

0

0

0

0

A

A

I N S T R U M E N T   PA N E L

Maintenance intervals

If  you  use  your  vehicle  in  par-

ticularly  diffi cult  conditions,  it  is 

essential  to  have  recourse  to  the 

service schedule for "special condi-

tions"  comprising  shorter  intervals 

between  services.  See  "Mainte-

nance Guide".

Reset to zero

Your  CITROËN  technician  resets 

the  indicator  to  zero  after  each 

service.  However,  if  you  do  your 

own  servicing,  the  procedure  for 

resetting to zero is as follows:

1. 

Switch off the ignition.

2. 

Press on button A and keep it 

pressed.

3. 

Switch on the ignition.

4. Keep button A

 pressed down 

until the screen indicates "=0"

and the maintenance symbol 

disappears.

Note:  If  the  maximum  time 
between  two  oil  changes  is 
reached  before  the  mileage 

has  been  covered,  the  mainte-
nance  spanner  lights  up  and  the 
instrument panel indicates "0".

MILEAGE RECORDER

Display

When  the  driver's  door  is  opened 

or the vehicle is unlocked with the 

remote control, for around 30 sec-

onds  there  is  display  of  the  mile-

age recorders

 and sometimes the 

maintenance spanner.

Trip mileage recorder reset

This can operate when the ignition 

is switched on.
With  a  long  press

  on  the  zero 

reset button A

, the trip mileage dis-

played resets to zero.

FUEL GAUGE

If the fuel low warning lamp comes 

on  permanently  on  horizontal 

ground,  accompanied  by  a  sound 

signal,  there  remain  around  9 l  of 

fuel  (petrol  version)  or  8 l  of  fuel 

(Diesel version).
When  the  second-to-last  bar  dis-

appears, you still have approx. 5 l

of fuel.

REV COUNTER

When  you  approach  maximum 

engine speed, crossing into the red 

zone indicates the need to engage 

a higher gear.

35

II

2

1

4

3

H E A D - U P   D I S P L AY

The  Head-up  display  projects 

essential  driving  data  into  the 

driver's fi eld of vision. This enables 

the driver never to take his eyes 

off the road.

ACTIVATION/DEACTIVATION

To activate/deactivate the Head-up 

display:  when  you  switch  on  the 

ignition, press on button 1.
The function status (activated/deac-

tivated) when you stop the engine 

is retained when you restart.

ADJUSTMENTS OF THE 
HEAD-UP DISPLAY

Height adjustment

To adjust the height for the Head-up 

display, press on buttons 2 and 3.
It  is  recommended  to  adjust  it  as 

low as possible.

Brightness adjustment

The Head-up display has a bright-

ness sensor so that the information 

can be seen to the best advantage, 

whatever the ambient brightness.
You  can  enhance  the  display 

brightness  at  any  time  by  rotating 

the control 1.

Note:

In certain extreme weather 
conditions (rain and/or snow, 
strong sunlight), the Head-up 
display may be momentarily 
subject to interference.
When emerging from a tunnel, 
there is a certain delay before 
the system can re-adapt the 
display brightness to the 
outside conditions.

Remark: 

Certain  types  of  specta-

cles may disperse the light coming 

from the Head-up display.

There is memorisation of 
driving positions as well 
as those for the Head-up 
display

The  adjustments  you  have  made 

for  the  Head-up  display  are 

adopted alongside the driving posi-

tion  memorisations  (see  "Memori-

sation"): they are:

Height adjustment.

Brightness.

The types of information selected.


If the Head-up display cannot be 

seen, it is recommended to adjust 

it for height (buttons 2 and 3) and to 

check that it is activated (button 1).

The  controls  for  the  Head-up  dis-

play  are  located  beneath  the  air 

vent on the driver's side.


Content   ..   1  2  3   ..