Citroen C4 Picasso Dag (2009 year). Manual - part 12
 

  Index      Citroen     Citroen C4 Picasso Dag - service manual 2009 year in english


Search            


Content   ..  10  11  12  13   ..


Citroen C4 Picasso Dag (2009 year). Manual - part 12


143 

IX

D R I V I N G

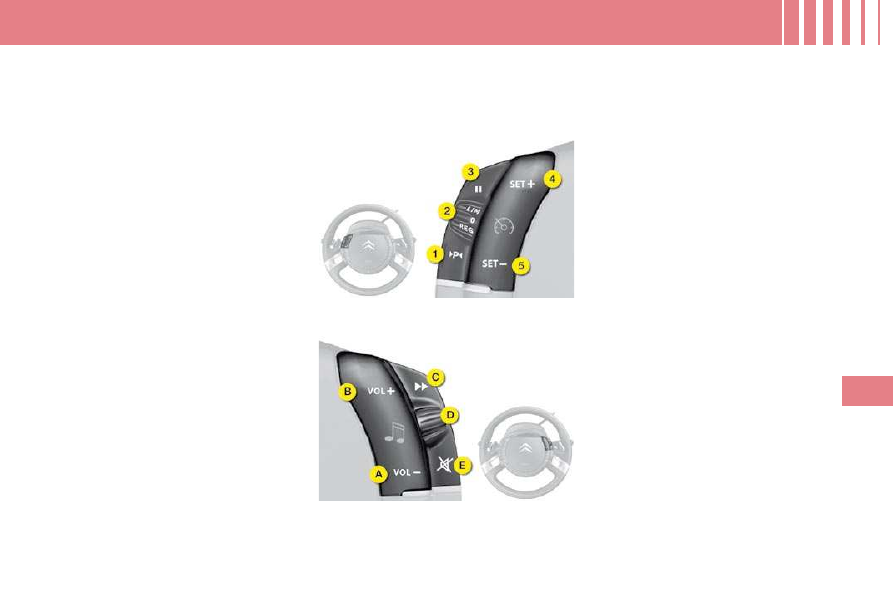
     FIXED CENTRED CONTROLS STEERING WHEEL 

  Cruise control/speed limiter 
and parking space function 
controls 

   1.   Selection of parking space

function. 

  2.   Selection of cruise control or 

speed limiter. 

  3.   Activation/Deactivation of speed 

limiter.  


Deactivation/Reactivation of 
cruise control. 

  4.   Increase speed/Activation of 

cruise control. 

  5.   Decrease speed/Activation of 

cruise control.   

  Audio system controls 

   A.   Volume decrease. 
  B.   Volume increase. 
  C.   Search of higher frequencies. 
  D.   Scrolling of pre-set stations. 
  E.   Mute.  
 (see chapter "Audio and Telematics")  

144 

IX

D R I V I N G

  Optional function controls 

   1.   Pick up/Hang up the telephone (see 

chapter "Audio and Telematics"). 

  2.   Rheostat for dashboard lighting. 
  3.   Start  of  voice  recognition  (see 

chapter "Audio and Telematics"). 

  4.   Personalisation button: 

   -   courtesy lamp on/off or 
  -   diagnostics or 
  -   personalisation of the displaying 

of  information  on  the  instrument 
panel or 

  -   choice  of  background  colour 

for the instrument panel.  

  To  view  the  personalisation 

menu  via  this  button,  press  it 
for more than two seconds.  

  5.   Air recirculation.   

  Multifunction screen controls 

   A.   Selection of the type of informa-

tion  to  be  displayed  on  the  right 
of the screen (radio, trip compu-
ter, navigation/guidance…).  


For  the  multifunction  screen  A, 
choice  of  activation/deactivation 
of your functions and adjustment 
choices. 

  B.   Access to the "Main Menu" * . 
  C.

   Confi rmation of the function cho-

sen or of the value modifi ed.  


Pick  up/Hang  up  (see  chapter 
"Audio and Telematics"). 

  D.   Scrolling  in  the  multifunction 

screen. 

  E.   Cancellation of the current opera-

tion or return to the previous dis-
play.   

  *   


To  comply  with  legislation  in  certain 
countries, the "Menu" control may be de-
activated while the vehicle is in motion.  

145 

D R I V I N G

     SPEED LIMITER 

 System  which  prevents  the  vehi-
cle  from  exceeding  the  speed  pro-
grammed by the driver. 
 Once  the  limit  speed  has  been 
reached,  the  accelerator  pedal  no 
longer has any effect. 
 The  speed  limiter  is  switched  on 
manually: a speed of at least 20 mph 
(around  30  km/h)  must  be  pro-
grammed. 

 The speed limiter controls are located 
on  the  left-hand  side  of  the  steering 
wheel.  

 The  programmed  information  is 
grouped  together  in  zone   A   of  the 
instrument panel display.  

  Steering wheel controls 

  Displays on the instrument panel 

  Programming 

 Rotate the control  1  to the  "LIM"  po-
sition. 

  With  the  engine  running,  you  can 
adjust  the  memorised  maximum 
speed,  by  means  of  short  or  long 
presses on: 
      button   4   to  increase  the  memo-

rised maximum speed, 

     button  2  to decrease the memo-

rised maximum speed.  

 Successive  presses  will  modify  the 
maximum  speed  in  steps  of  1  mph 
and  a  sustained  press  in  steps  of
3 mph.  

  Activation 

 When  the  desired  maximum  speed 
is  displayed,  press  button   3   so  that 
the limitation is activated. 

 On  selection  of  the 
function,  the  previous 
memorised  speed  and 
the  information   "OFF"  
are  displayed  on  the 
instrument panel.  

 The  information   "OFF"  
then disappears from the 
instrument panel display. 

 While  the  function  is  active,  pressing 
the  accelerator  pedal  will  not  enable 
the  programmed  speed  to  be  ex-
ceeded, except if you press the pedal 
hard down to beyond the end-of-travel 
switch. 
 The speed of your vehicle may vary 
slightly in relation to that memorised.  

 The speed limiter cannot, in any circum-
stances,  take  the  place  of  the  observ-
ance of speed limits or of the vigilance 
and responsibility of the driver. 

146 

IX

D R I V I N G

  Deactivation 

 Press on button  3 . 

 This  action  causes  the 
information   "OFF"   to 
appear  on  the  instru-
ment panel display. 

 This  action  does  not  cancel  the 
memorised  maximum  speed  which 
remains  displayed  in  zone   A   of  the 
instrument panel.  

  Override of the programmed 
speed 

 The  accelerator  pedal  is  equipped 
with  an  end-of-travel  switch.  If  you 
action  this  switch  by  pressing  the 
pedal  hard  down,  you  can  exceed 
the  memorised  maximum  speed  at 
any time. 
 During  the  time  the  speed  is  be-
ing  exceeded,  the  displayed  speed 

fl ashes. 
 You  have  only  to  release  the  ac-
celerator  pedal  to  return  below  the 
maximum  speed  and  render  the 
function active again. 

  Return to normal driving 

      By moving the control  1  from po-

sition  "LIM"  to position  0 . 

     By the engine stopping.  
 The speed previously chosen is still 
memorised.  

  Operating fault 

 If  there  is  a  speed  limiter  malfunc-
tion, a message will display accom-
panied  by  an  audible  signal  and 
lighting of the service warning lamp. 
 Have  it  checked  by  a  CITROËN 
dealer. 

 If during the operation of the speed 
limiter,  the  system  is  unable  to 
keep  within  the  maximum  speed 
(for  example  on  a  steep  descent  or 
under  heavy  acceleration)  then  the 

speed fl ashes. Adapt your speed as 

necessary. 
 The  function  will  re-engage  when 
your  speed  returns  below  the  de-
sired maximum speed.  

 On  a  steep  downhill  gradi-
ent  or  on  sharp  accelera-
tion,  the  speed  limiter  will 

not  be  able  to  prevent  the  vehicle 
from  exceeding  the  programmed 
speed. 
 Use of fl oor mats that are not ap-

proved  by  CITROËN  may  hinder 
access  to  the  accelerator  pedal 
and thus interfere with the function-
ing of the speed limiter. 
 To avoid any risk of interfering with 
the pedals: 
   -   check that the fl oor mat is cor-

rectly positioned, 

  -   never use more than one fl oor 

mat.   

147 

IX

D R I V I N G

     CRUISE CONTROL 

 System  which  automatically  main-
tains the vehicle speed programmed 
by  the  driver,  without  any  action  on 
the accelerator pedal. 
 The  cruise  control  is  switched  on 
manually: the vehicle speed must be 
at  least  25  mph  (approx.  40  km/h) 
and you must engage: 
   -  

fourth gear on a manual gearbox, 

  -  

second gear, in sequential mode, 
on  an  electronic  gearbox  or  au-
tomatic gearbox, 

  -  

position   A   on  an  electronic  gear-
box or  D  on an automatic gearbox.  

  Steering wheel controls 

 The  cruise  control  switches  are  lo-
cated  on  the  left-hand  side  of  the 
steering wheel.  

 The  programmed  information  is 
grouped  together  in  zone   A   of  the 
instrument panel display.  

  Displays on the instrument panel 

  Activation 

 You can then release the accelerator 
pedal. The  vehicle  will  automatically 
keep to the speed chosen. 
 The speed of your vehicle may vary 
slightly  in  relation  to  that  memo-
rised. 
 You can adjust the memorised speed 
on  the  instrument  panel  display  by 
pressing on: 
      button  4  to increase the speed, 
     button  2  to decrease the speed.  
 Successive  presses  modify  the 
cruise speed in steps of 1 mph and a 
sustained press in steps of 3 mph.  

  Deactivation 

      Either  by  pressing  on  the  brake 

pedal or on the clutch pedal. 

     Or by pressing button  3 . 
     Or  if  either  the  ESP  or  the ASR 

system is active.  

 The cruise control is not active if the 
gear lever is in neutral. 

 On  selection  of  the 
function  via  control   1, 
no  cruise  speed  has 
yet been memorised.
  

  Programming 

 Rotate  the  control   1   to  the   "REG"  
position.  

 Once  the  desired  speed  has  been 
reached using the accelerator, press 
button   2   or  button   4 .  The  cruise 
speed  is  then  memorised.  It  is  dis-
played  in  zone   A   of  the  instrument 
panel. 

 These  actions  cause 
the  information   "OFF"  
to appear on the instru-
ment panel display. 
 These 

actions 

do 

not  cancel  the  cruise 
speed  which  remains 
displayed in the instru-
ment panel.  

 The cruise control cannot, in any circum-
stances,  take  the  place  of  the  observ-
ance of speed limits or of the vigilance 
and responsibility of the driver. 

148 

IX

D R I V I N G

  Reactivation 

       By  recall  of  the  memorised 

speed    


After a disengagement, press on 
button   3 . Your  vehicle  automati-
cally  returns  to  the  memorised 
cruise  speed  which  is  displayed 
in zone  A .   


If  the  memorised  cruise  speed 
is higher than the current speed, 
the  vehicle  will  accelerate  to 
reach the former. 

      By  selection  of  the  current 

speed    


Press on button  2  or  4  once the 
desired speed has been reached. 
The  information   "OFF"   will  then 
disappear  from  the  instrument 
panel display.   

  Overriding the programmed 
speed 

 During  the  operation  of  cruise  con-
trol, it is  always  possible  to use  the 
accelerator  to  go  faster  than  the 
cruise  speed  (for  example  to  over-
take  another  vehicle).  The  speed 
displayed in zone  A

  fl ashes. 

 You have only to release the accel-
erator  pedal  to  return  to  the  cruise 
speed.  

 If  during  the  operation  of  cruise 
control,  the  system  is  unable  to 
keep  within  the  memorised  speed 
(for  example  on  a  steep  descent), 

then the speed fl ashes. Adapt your 

speed as necessary. 

  Return to normal driving 

  Operating fault 

  If there is a malfunction,  a message 
will  display  accompanied  by  an  au-
dible signal and lighting of the serv-
ice warning lamp. 
 Have  it  checked  by  a  CITROËN 
dealer.  

 Cruise  control  should  only 
be  used  when  the  driving 
conditions allow you to drive 
at a constant speed. 

 Do not use it in heavy traffi c, or on 

dangerous or slippery roads. 
 The  driver  must  remain  attentive 
and in full control of his vehicle. 
 You are recommended to keep your 
feet within range of the pedals. 
 To avoid any risk of interfering with 
the pedals: 
   -   check that the fl oor mat is cor-

rectly positioned, 

  -   never use more than one fl oor 

mat.  

      By an action on the control  1  from 

position  "REG"  to position  0 . 

     By the engine stopping.  
 

The  cruise  speed  previously 
chosen is no longer memorised.   

149 

IX

D R I V I N G

     PARKING SPACE SENSOR 

 System which measures the parking 
space  available  between  two  vehi-
cles  or  obstacles.  It  measures  the 
size  of  the  space  and  gives  you  in-
formation on: 
   -   the  possibility  of  fi tting  into  a  free 

space, depending on the dimensions 
of  your  vehicle  and  the  distances 
necessary for your manoeuvring, 

  -   the  level  of  diffi culty  of  the  ma-

noeuvre to be performed.  

 The system does not measure spac-
es which are clearly much smaller or 
larger than the size of the vehicle. 

  Displays on the instrument 
panel 

 The  parking  space  sensor 
function  warning  lamp  can 
have three different states: 

   -  

 off:  the function is not selected, 

  -  


on fi xed:  the function is selected 

but the conditions for measuring 
are  not  yet  met  (direction  indi-
cator  not  operating,  speed  too 
high) or the measuring phase is 
terminated. 

  -  


fl ashing:   the  measuring  is  in 

progress  or  the  message  is  be-
ing displayed.  

 You  can  select  the  "parking  space 
sensor" function by pressing button  A.  

The fi xed lighting of the warning lamp 

indicates that the function is selected.  

150 

IX

D R I V I N G

  Operation 

 You have identifi ed a parking space: 
      Press button  A  to select the function. 
     Activate  the  direction  indicator 

on the side where the space is to 
be measured. 

     During  the  measuring,  go  for-

ward the length of the space, at 
a  speed  less  than  12  mph  (ap-
prox.  20  km/h),  to  prepare  for 
your manoeuvre.  


The  system  then  measures  the 
size of the space. 

     The system informs you of the level 

of  diffi culty  of  the  manoeuvre  via 

a  message  on  the  multifunction 
screen accompanied by a gong. 

     Depending  on  the  message  is-

sued by the system, you may or 
may  not  be  able  to  perform  the 
manoeuvre.  

  Parking possible  


Parking diffi cult  

  Parking not advised  

 The  function  displays  the  following 
types of message: 

 The  function  deselects  itself  auto-
matically: 
   -  

when you engage reverse gear, 

  -  

when you switch off the ignition, 

  -  

if measuring is not requested, 

  -   within fi ve minutes of selection of 

the function, 

  -  

if the vehicle speed exceeds the 
threshold  of  45  mph  (approx.
70 km/h) for one minute.  

 If  there  is  a  malfunction, 
have  the  system  checked 
by a CITROËN dealer.  

 If  the  lateral  distance  between  your 
vehicle and the parking space is too 
large, the system may not be able to 
measure the space. 
   -  

The  function  remains  available 
after  each  measurement  and 
thus  can  measure  more  than 
one space during your search. 

  -  

In  bad  weather  conditions  or  in 
winter,  make  sure  that  the  sen-
sors  are  not  covered  by  dirt,  or 
by ice or snow. 

  -  

The  parking  space  sensor  func-
tion  deactivates  the  front  park-
ing  assistance  during  the  space 
measuring  phase  when  you  are 
in forward gear.  

151 

IX

D R I V I N G

     LANE DEPARTURE 
WARNING SYSTEM 

 System  which  detects  the  involun-

tary  crossing  of  longitudinal  traffi c 

lane  markings  on  the  ground  (solid 
or broken line). 
 Sensors,  fi tted  below  the  front 

bumper, trigger a warning if the vehi-
cle drifts over a lane marking (speed 
higher than 50 mph (80 km/h)). 

 This system is particularly useful on 
motorways and main roads. 

  Activation 

      Press  button   A ,  the  indicator 

lamp comes on.   

  Deactivation 

      Press button  A  again, the indicator 

lamp switches off.  

 The  status  of  the  system  remains 
in  the  memory  when  the  ignition  is 
switched off.  

  Detection 

 You  are  warned  by  the  vibration  of 
the driver's seat cushion: 
   -  

on  the  right-hand  side,  if  the 
marking on the ground has been 
crossed on the right, 

  -  

on the left-hand side, if the marking 
on the ground has been crossed on 
the left.  

 No warning is transmitted while the direc-
tion  indicator  is  active  and  for  approxi-
mately  20  seconds  after  the  direction 
indicator is switched off. 
 A warning may be transmitted if a direc-
tion marking (e.g. arrow) or non-standard 

marking (e.g. graffi ti) is crossed.  

  Operating fault 

 In  the  event  of  a  malfunction,  the 
service  warning  lamp  comes  on,  ac-
companied by an audible signal and a 
message on the multifunction screen. 
 Consult a CITROËN dealer. 

 The lane departure warning system 
cannot,  in  any  circumstances,  re-
place the need for vigilance and res-
ponsibility on the part of the driver. 

 The detection may be impeded: 
   -  

if the sensors are dirty (mud, snow...), 

  -  

if  the  markings  on  the  ground 
are worn, 

  -  

if there is little contrast between 
the markings on the ground and 
the road surface.   

152 

IX

D R I V I N G

     AUDIBLE AND/OR 
VISUAL REAR PARKING 
ASSISTANCE 

 System  consisting  of  four  proximity 
sensors, located in the rear bumper. 
 This  detects  any  obstacle  (person, 
vehicle,  tree,  gate,  etc.)  behind  the 
vehicle,  except  obstacles  located 
just below the bumper. 
 An  object,  such  as a stake,  a road-
works  cone  or  any  other  similar 
object may be detected at the begin-
ning  of  the  manoeuvre,  but  may  no 
longer be detected when the vehicle 
comes close to it.   

  Programming 

 You  can  activate  or  deactivate  the 
system  by  means  of  the  multifunc-

tion screen confi guration menu. The 

system  state  is  memorised  when 
switching off the ignition. 
 For  more  information  on  access  to 
the parking assistance menu, refer to 

the section on vehicle confi guration 

for your screen under "Multifunction 
screens". 
 The system will be deactivated auto-
matically  when  towing  a  trailer  or 

when a bicycle carrier is fi tted (vehi-

cle fi tted with a towbar or bicycle car-

rier recommended by CITROËN).  

cle fi tted with a towbar or bicycle car-

cle fi tted with a towbar or bicycle car-

  Activation 

 The system is activated as soon as 
reverse gear is engaged, accompa-
nied by an audible signal. The proxi-
mity information is given by: 
-  

an  audible  signal,  which  beco-
mes  more  rapid  as  the  vehicle 
approaches the obstacle, 

-  

a  graphic  on  the  multifunction 
screen,  with  blocks  which  be-
come  increasingly  closer  to  the 
vehicle.  

 When  the  distance  between  the 
rear of the vehicle and the obstacle 
is  less  than  thirty  centimetres,  the 
audible  signal  becomes  continuous 
and  the  "Danger"  symbol  appears 
on the multifunction screen. 
 On  completion  of  the  manoeuvre, 
when you exit reverse gear, the system 
becomes inactive.  

The  parking  assistance  system 
cannot, in any circumstances, take 
the place of the vigilance and res-
ponsibility of the driver.

  Operating faults 

 If there is an operating fault, 
when  reverse  gear  is  en-
gaged  this  warning  lamp 
comes  on  in  the  instrument 

panel,  accompanied  by  an  audible 
signal  (short  beep)  and  a  message 
on the multifunction screen. 
 In bad or wintry weather, ensure that 
the  sensors  are  not  covered  with 
mud, frost or snow.  

153 

IX

D R I V I N G

  The  parking  assistance  system 
cannot,  in  any  circumstances,  re-
place  the  need  for  vigilance  and 
responsibility  on  the  part  of  the 
driver.   

       AUDIBLE AND VISUAL 
FRONT AND REAR PARKING 
ASSISTANCE 

 System  consisting  of  four  proximity 
sensors, installed in the front and/or 
rear bumper. 
 It detects any obstacle (person, ve-
hicle, tree, barrier...) located in front 
of and behind the vehicle, except for 
obstacles  located  immediately  be-
low the bumper. 
 An  object,  such  as a stake,  a road-
works cone or any other similar ob-
ject  may  be  detected  at  the  start  of 
the  manoeuvre  but  may  no  longer 
be detected when the vehicle moves 
nearer to it. 

 The parking assistance is  switched 
on
 : 
   -  

by engaging reverse gear, 

  -  

at a speed below 6 mph (10 km/h) 
in forward gear.  

 This  is  accompanied  by  an  audible 
signal and/or displaying of the vehi-
cle on the multifunction screen. 
 The proximity information is indicated 
by: 
   -  

an  audible  signal  which  be-
comes more rapid as the vehicle 
approaches the obstacle, 

  -  

a  diagram  on  the  multifunction 
screen,  with  blocks  which  move 
closer to the vehicle.  

 The obstacle is located in relation to 
the emission of the audible signal by 
the speakers; front or rear and right 
or left. 
 When  the  distance  between  the  ve-
hicle  and  the  obstacle  is  less  than 
approximately thirty centimetres, the 
audible  signal  becomes  continuous 
and/or the "Danger" symbol appears, 
depending 

on 

the 

multifunction 

screen version.  

 The parking assistance is  switched 
off
 : 
   -  

when you exit reverse gear, 

  -  

when  the  speed  is  higher  than 
6 mph (10 km/h) in forward gear, 

  -  

when the vehicle has been station-
ary for more than three seconds in 
forward gear.  

154 

IX

D R I V I N G

 In bad weather or in winter, ensure 
that  the  sensors  are  not  covered 
with  mud,  ice  or  snow.  When  re-
verse gear is engaged, an audible 
signal  (long  beep)  indicates  that 
the sensors may be dirty. 
 When the vehicle is being driven at 
a speed below approximately 6 mph 
(10  km/h),  certain  sources  of  noise 
(motorcycles, 

lorries, 

pneumatic 

drills...)  may  trigger  the  parking  as-
sistance audible signals.   

       Press button  A  again, the warn-

ing lamp switches off, the system 
is reactivated.    

  Reactivation 

       Press button  A , the warning lamp 

comes on, the system is fully de-
activated.  

 The  system  will  be  deactivated  au-
tomatically  when  a  trailer  is  being 
towed  or  when  a  bicycle  carrier  is 

fi tted  (vehicle  fi tted  with  a  towbar 

or  bicycle  carrier  recommended  by 
CITROËN).   

  Operating fault 

  Deactivation 

  If  an  operating  fault  occurs, 
this  warning  lamp  is  dis-
played  on  the  instrument 
panel and/or a message ap-

pears  on  the  multifunction  screen, 
accompanied  by  an  audible  signal 
(short  beep),  when  reverse  gear  is 
engaged. 
 Consult a CITROËN dealer. 

155 

IX

D R I V I N G

       PNEUMATIC SUSPENSION 

  Grand C4 

Picasso  

  C4 Picasso  

 The rear pneumatic suspension en-
hances driving comfort by maintain-
ing a constant body height whatever 
the vehicle load. 

  Operation 

   -  

If  there  is  an  increase  in  vehi-
cle load, a sinking of the rear of 
the  vehicle  is  detected  and  the 

pneumatic  springs  infl ate  in  or-

der  to  compensate  for  the  extra 
weight. 

  -  

If  there  is  a  decrease  in  load,  a 
rising of the rear of the vehicle is 
detected  and  so  the  pneumatic 

springs defl ate to return the ve-

hicle to its nominal height. 

  -  

If  the  vehicle  has  been  unused 
for a long period, the pneumatic 

springs may infl ate if necessary 

when you unlock or open a door, 
so as to return  the vehicle  to its 
nominal height.  

 If  you  do  not  reactivate  the  system 
manually,  the  automatic  correction 
will be activated as soon as the ve-
hicle starts to move. During the cor-
rection,  the  service  warning  lamp 
lights  up  and  a  message  on  the 
screen  reminds  you  not  to  exceed 
10 km/h (6 mph). 
 The  automatic  correction  does  not 
function if the doors or the boot are 
open. 
 The  automatic  correction  operates 
even  if  your  vehicle  is  in  power 
economy mode. 

  Activation/Deactivation 
 The automatic correction can be de-
activated: 
      press on the button  B  for approx-

imately two seconds, 

     release the button when you hear 

a beep. Deactivation is confi rmed 

by the lighting of the indicator lamp 
on the button  B .  

  In  the  event  of  the  system  mal-
functioning, 

alert 

messages, 

always  in  association  with  the 
service  warning  lamp,  will  dis-
play  in  the  instrument  panel
 . 
Consult a CITROËN dealer.   

 It is essential that you should deactivate 
the system in the following instances: 
   -  

working under the vehicle, 

  -  

changing a wheel, 

  -  

transporting  the  vehicle  on  a 
truck or on a boot.  

 To  reactivate  the  automatic  correc-
tion: 
      press  again  on  the  button   B   for 

approximately two seconds, 

     release the button when you hear 

a  beep.  Activation  is  confi rmed 

by the extinction of the indicator 
lamp on the button  B .  

156 

IX

D R I V I N G

  Loading/unloading 
assistance 

  Grand C4 

Picasso  

  C4 Picasso  

 The  pneumatic  suspension  has  an 
additional  function  associated  with 
it:  the  possibility  to  raise  or  lower 
the  height of the  rear of the  vehicle 
when stationary, in order to facilitate 
loading/unloading of the boot. 

  Increasing the height of the boot 

fl oor 
      Press  continuously  at  the  top  of 

the control  A , which is located in 
the boot, on the left-hand side.  

 This  action  will  be  accompanied  by 
an  audible  signal. You  can  stop  the 
movement  at  any  time  by  releasing 
the control. 
 3 beeps will confi rm that the move-

ment has gone as far as it can. 

  Returning to the   normal   height  
   

   Press briefl y twice at the bottom 

of the control  A .   

  Decreasing the height of the boot 

fl oor 
      Press continuously at the bottom 

of the control  A .  

 This  action  will  be  accompanied  by 
a  sound  signal.  You  can  stop  the 
movement  at  any  time  by  releasing 
the control. 
 3 beeps will confi rm that the move-

ment has gone as far as it can. 

  Returning to the   normal   height  
   

   Press  briefl y  twice  at  the  top  of 

the control  A .  

 Driving  with  the  boot  in  a 
low  position  may  damage 
the components located un-
der the bodyshell.   

  Special features  
   -  

If  you  start  the  vehicle  without 
having  returned  it  to  the  normal 
height,  automatic  correction  will 
activate  as  soon  as  the  vehicle 
starts  to  move.  During  the  cor-
rection, the service warning lamp 
lights  up  and  a  message  on  the 
screen  reminds  you  not  to  ex-
ceed 10 km/h (6 mph). 

  -  

The  loading  assistance  does  not 
function in the following instances: 

   -   If the button  B  is lit up, 
  -   in power economy mode,  

  -   when  you  fi rst  use  the  function, 

press  for  two  seconds  on  the 
control  A  to initialise the system. 
All  subsequent  actions  will  be 
followed  immediately  by  the  de-
sired results.  

158 

X

C H E C K S

         BONNET 

 Protects the components of the en-
gine and provides access for check-
ing levels. 

  Opening 

     Push the exterior safety catch  B  

to the left and raise the bonnet. 

     Unclip the stay  C  from its housing. 
     Fix the stay in the notch to hold 

the bonnet open.  

  Closing 

      Take the stay out of the support 

notch. 

     Clip the stay in its housing. 
     Lower  the  bonnet  then  slam  it 

home at the end of its travel. 

     Pull on the bonnet to check that 

it is fully closed.   

 The location of the interior release 
lever  prevents  opening  of  the 
bonnet  while  the  driver's  door  is 
closed. 
 This operation must only be carried 
out when the vehicle is stationary. 
 Avoid opening the bonnet in strong 
winds. 
 When the engine is hot, take care 
when  handling  the  exterior  safety 
catch  and  the  bonnet  stay  (risk  of 
burns).  

      Open the driver's door. 
     Pull  the  interior  release  lever   A , 

located at the bottom of the door 
frame. 

159 

X

C H E C K S

       BLEEDING THE DIESEL 
FILTER 

  Protective cover 

  Removal  

      Remove  the  protective  cover  by 

unclipping  fi rst  point   1 ,  then   3  

and  4 . 

     Unclip  point   2   pulling  towards 

you, then lift.  

  Refi tting  

      Clip point  2

  fi rst. 

     Lower the cover, centring it. 
     Clip points  1  and  4 , pushing ver-

tically and slightly rearwards. 

     Clip point  3 , pushing vertically.   

  Bleeding water from the fuel 
filter 

 Bleed  on  a  regular  basis  (at  every 
oil change). 
 To  evacuate  the  water,  slacken  the 
bleed  screw  or  the  water-in-diesel-
fuel  sensor,  which  is  located  at  the 

base of the fi lter. 

 Persist  until  water  ceases  to  fl ow 

out. 
 Then  retighten  the  bleed  screw  or 
the water-in-diesel-fuel sensor.  


Content   ..  10  11  12  13   ..