Citroen C4 Picasso Dag (2009 year). Manual - part 4
 

  Index      Citroen     Citroen C4 Picasso Dag - service manual 2009 year in english


Search            


Content   ..  2  3  4  5   ..


Citroen C4 Picasso Dag (2009 year). Manual - part 4


48 

III

C O M F O R T

  6.  Demisting/defrosting of 

the rear screen 

 This  operates  only  if  the  engine  is 
running. 
      Press on button  6  to activate/de-

activate  the  electric  demisting/
defrosting of the rear screen and 
the  exterior  rear  view  mirrors. 
The warning lamp lights up.  

  7.  Rapid demisting/defrosting 

of front and rear windows 
and rear view mirrors 

      Press  on  button   7 .  The  warning 

lamp lights up.  

 This  function  simultaneously  acti-
vates: 
   -  

front demisting/defrosting, 

  -   optimum fl ow of air, 
  -  

recirculation prohibition, 

  -  

demisting/defrosting of rear view 
mirrors and heated rear screen, 

  -  

air conditioning, if necessary.  

 To stop the function, press again on 
button  7 .  

  8.  Adjustment of the air 

blower temperature 

 This  control  is  for  adjusting  the  tem-
perature  of  the  air  in  the  passenger 
compartment.  It  can  be  used  in  cold 
weather as well as in hot weather, pro-
vided the air conditioning is active. 
 The adjustment of the temperature is 
continuous  and  progressive  starting 
from left to right.  

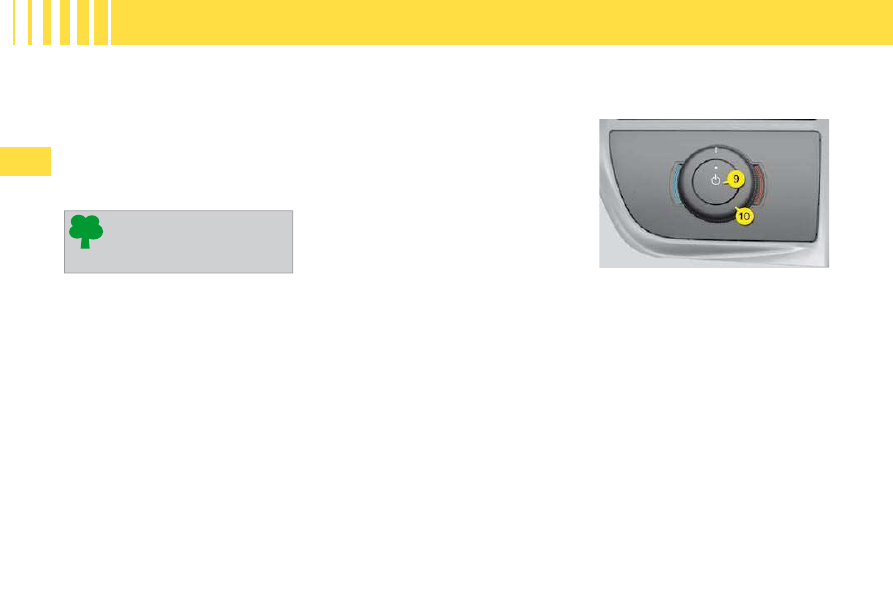
 B.  PASSENGER’S CONTROL 

PANEL 

  Adjustment of temperature 

      Press  on  button   9   to  take  over 

control  of  the  temperature.  The 
warning lamp lights up. 

     Rotate  button   10   to  adjust  your 

temperature.  

 The adjustment of the temperature is 
continuous  and  progressive  starting 
from left to right.  

 The 

demisting/defrosting 

switches  off  automatically 
to  prevent  excessive  con-
sumption of power.  

54 

III

C O M F O R T

         RECOMMENDED INTERIOR SETTINGS 

   -  

 Heating/Manual air conditioning   

 To make the best use of the system, we recommend: 

   -  

 Automatic air conditioning   

 With automatic air conditioning, you are recommended to choose AUTO operation. 

  Action  

  To have  


   Cold   


  or  


   Max. cold   to 

start with,  

 then personal 

  adjustments   

   Max. to start 

with, then 

personal 

adjustments   

   ON   

   ON to start 

with, 

then OFF   

   Hot   


  or  


   Max. hot to 

start with, 

then personal 

adjustments   

   Max. to start 

with, then 

personal 

adjustments   


   ON to start 

with, 

then OFF   

   Demisting    

 Defrosting   


   Max. hot   


   OFF   

49 

III

C O M F O R T

                 AUTOMATIC AIR 
CONDITIONING 

 A.  DRIVER’S CONTROL 

PANEL 

  1.  Automatic comfort 

regulation 

 A press on this button, con-

fi rmed by the display of the 

 A/C   warning  lamp  and  of 
 AUTO   on  the  screen,  pro-

vides automatic control, at the tem-
perature selected, of all the following 
5 functions: 
   -   air fl ow, 
  -  

cabin  temperature,  on  left  hand 
side and right hand side, 

  -  

air distribution, 

  -  

air conditioning, 

  -  

automatic air recirculation.  

 For  this  facility  to  operate,  it  is  rec-
ommended to keep all the air vents 
open. 
 Using  the   AUTO   mode  will  prevent 
the formation of mist inside the vehicle 
in cold or humid weather. 
 When starting from cold, in order to 
avoid  a  rush  of  cold  air,  the  blower 
attains  its  optimum  level  progres-
sively. 

  2. Adjustment of temperature 

 To  display  the  desired  temperature, 
press button: 
   -  

   to decrease the temperature, 

  -  

 +  to increase the temperature.  

 An  adjustment  around  21  will  pro-
vide an agreeable temperature level. 
However, depending on your prefer-
ence,  anything  between  18  and  24 
is quite normal. 
 For  optimum  comfort,  it  is  recom-
mended to avoid an adjustment dif-
ference greater than 3 between right 
and left. 
 Actual temperatures experienced in 
the passenger compartment are de-
pendent  on  external  factors  and  for 
this reason might not be identical to 
those displayed. 
 On  entering  the  vehicle,  the  inside 
temperature may be much colder (or 
hotter) than would be comfortable. It 
serves no purpose to alter the tem-
perature  displayed  in  an  attempt  to 
attain  your  preference  more  rapidly. 
The  system  automatically  uses  its 
maximum  performance  to  make  up 
the  difference  in  temperature  as 
soon as possible.  

  Manual  resumption  of  one  or 
more functions 
    
It  is  possible  to  adjust  each  of  the 
functions   3,  4 ,   6   and   10   manually. 
The display of the  "AUTO"  function 
will then go off. 

  Resumption  by  the  driver  of  the 
adjustment of cabin temperatures
  
(for the front and rear passengers) 
  A long press on the "AUTO" but-
ton cancels all personal settings, 
including  the  passenger's  tem-
perature,  and  
  returns    the  system 
to automatic operation.
   

50 

III

C O M F O R T

  3.  Adjustment of the air 

blower speed 

 The  air  blower  operates  only  when 
the  engine  is  running  (except  when 
the REST function is activated). 
 To adjust the fl ow of air, press on the 

button: 

 to increase the air fl ow, 

 to decrease the air fl ow (this 

button  also  has  the  REST 
function). 

 The level of air fl ow is indicated on 

the display by the progressive fi lling 

of the ventilator blades. 
 If  you  place  the  air  blower  on  posi-
tion   0 ,  the  system  is  deactivated. 
The air blower display will be empty, 
with the indication OFF. 

  Function 

for 

retaining 

ventilation with the engine 
switched off
  
  The REST function is avail-

able when you switch on the ignition 
and when you stop the engine.
  
 This function allows you to retain ventilation 
in  the  passenger  compartment  for  a  few 
minutes, even with the engine stopped. 
 When  you  leave  the  vehicle,  any 
passengers  present  can  still  have 

the  benefi t  of  air  circulation,  even 

though the engine is not running. 

  Engine stopped, ignition switched 
on:
  
   -  

The  displays  will  light  up,  with 
the  air  blower  shown  empty  as 
long as the function is available. 

  -  

A press on the REST button acti-
vates the function for a timing of 
just a few minutes. Two blades of 

the  blower  will  fi ll  to  signify  that 

the function is active. 

  -  

It can be deactivated and reacti-
vated during the timed period. 

  -  

At  the  end  of  the  timed  period, 
the display will go off.  

 This button does not activate the air 
conditioning, only the air blowers. In 

the REST function, the air fl ow and 

distribution  are  controlled  automati-
cally and you cannot modify them.  

  On stopping the engine:  
   -  

The  displays  remain  lit  up,  the 
blower  is  shown  empty  and  the 
function  can  be  activated  for 
30 seconds. 

  -  

A press on the REST button dur-
ing the next 30 seconds activates 
the function for a timing of several 
minutes. The  duration  and  avail-
ability of the function are variable 
according  to  the  state  of  charge 
of  the  battery  (a  protection  to 
guarantee  engine  starting).  Two 

blower blades fi ll up to signify that 

the  function  is  active.  It  remains 
active, even after the doors have 
been locked, until the end of the 
timing. 

  -  

A  further  press  before  the  end  of 
the timed period stops the function 

defi nitively.  

  4.  Adjustment of the air 

distribution 

       Press on button  4  so that 

the  air  fl ows  scroll  suc-

cessively on the display.  

 The air distribution you have chosen 

is  confi rmed  by  the  lighting  of  the 

corresponding warning lamps in the 
display. 
 There are 7 possible adjustments.  

51 

III

C O M F O R T

  5. Air recirculation 

      Press  on  button   5   to  close  off  the 

entry of air from outside and to ac-
tivate recycling of the air in the cab-
in. the warning lamp comes on.  

 Whilst  retaining  the  other  adjust-
ments,  this  position  enables  the 
driver at any time to exclude any dis-
agreeable  odours  or  fumes  coming 
from  outside  the  vehicle.  It  should 
be cancelled as soon as possible to 
permit  renewal  of  cabin  air  and  to 
prevent misting. 
      Press again on button  5  to allow 

entry of air from the outside. The 
warning lamp goes out.  

 The air recirculation can also be ac-
cessed by means of a press on the 
control,  located  on  the  lower  left  of 
the  steering  wheel  (see  "§  Fixed 
centred controls steering wheel").  

  6.  Adjustment mode for the 

rear passengers 

 This button decides whether 
or  not  the  rear  passengers 
may  use  their  adjustment 
controls. 

 There  are  three  possible  states  for 
this button: 

  Locking  of  the  rear 
passenger controls
  

  Authorisation of the 
rear passenger con-
trols
  

  Reduction  of  the 

air fl ow for the rear 

passengers  

 With  additional  air  conditioning,  in 
cold  weather  you  are  advised  to 
close  the  supply  of  air  to  the  rear 
passengers  (no  hot  air  distribution 
possible via these air vents).  

 The  rear  passengers  can  use  their 
adjustment  controls  at  their  con-
venience. 

 The  driver  imposes  his  adjustment 
on the rear passengers. In this case, 
the rear passenger controls are de-
activated. 

  7.  Panel display mode: 

black panel function 

 This  function  turns  the  dis-
plays and panel backlighting 
on or off. 

   -  

Function  activated,  a  press  on 
any button will light up the screen 
temporarily. 

  -  

press  on  button   7   deactivates 
the  function,  lighting  of  buttons 
and screen is again permanent.  

 This  function  optimises  notably  the 
visual comfort for driving at night.  

  8.  Demisting/defrosting of 

the rear screen 

 This can only operate when the en-
gine is running. 
      Press  on  button   8   to  activate/

deactivate  the  electric  demist-
ing/defrosting of the rear screen 
and, according to version, of the 
exterior  rear  view  mirrors.  The 
warning  lamp  lights  up  and  the 
symbol appears on the display.  

 It switches off automatically 
to  prevent  excessive  con-
sumption of power.  

 This button activates the recir-
culation  of  air  within  the  pas-
senger compartment and also 
has an automatic function. 

52 

C O M F O R T

  9.  Rapid demisting/defrosting 

of the front and rear 
windows 

   -  

Press  on  button   9 .  The  warning 
lamp lights up.  

 This  function  gives  a  rapid 
demisting/defrosting  of  the 
vehicle simultaneously with: 

   -  

front demisting/defrosting at opti-
mum temperature, 

  -   optimum air fl ow, 
  -  

recirculation prohibition, 

  -  

demisting/defrosting  of  the  rear 
view  mirrors  and  heated  rear 
screen, 

  -  

air conditioning, if necessary.  

 Press again on button  9  or on  AUTO  
to stop the function. Demisting/defrost-
ing of the rear view mirrors and heated 
rear screen remains activated.  

  10. Air conditioning 

      Press  on  button   10   to  activate 

the air conditioning.  

 The  A/C  warning lamp lights up.  

 B.  PASSENGER CONTROL 

PANELS 

  11. Front passenger 

 The front passenger can adjust their 
temperature  control  independently 
at  any  time  by  pressing  buttons   +  
and  - . 

 The  front  passenger  con-
trols  the  adjustment  of  their 
own temperature. 

 The  temperature  for  the 
passenger  is  aligned  with 
that for the driver.  

  12.  Rear passengers (right/left) 

 By  default,  in   AUTO  
position,  the  adjust-

ment of the air fl ow is 

aligned  on  the  front 
ventilation. 
       Rotate  the  but-

ton  to  decrease 
or increase the air 

fl ow.  

 You can adjust the air fl ow only if this 

is enabled by the driver (see button  
 of the driver’s control panel).  

54 

III

C O M F O R T

         RECOMMENDED INTERIOR SETTINGS 

   -  

 Heating/Manual air conditioning   

 To make the best use of the system, we recommend: 

   -  

 Automatic air conditioning   

 With automatic air conditioning, you are recommended to choose AUTO operation. 

  Action  

  To have  


   Cold   


  or  


   Max. cold   to 

start with,  

 then personal 

  adjustments   

   Max. to start 

with, then 

personal 

adjustments   

   ON   

   ON to start 

with, 

then OFF   

   Hot   


  or  


   Max. hot to 

start with, 

then personal 

adjustments   

   Max. to start 

with, then 

personal 

adjustments   


   ON to start 

with, 

then OFF   

   Demisting    

 Defrosting   


   Max. hot   


   OFF   

51 

III

C O M F O R T

  5. Air recirculation 

      Press  on  button   5   to  close  off  the 

entry of air from outside and to ac-
tivate recycling of the air in the cab-
in. the warning lamp comes on.  

 Whilst  retaining  the  other  adjust-
ments,  this  position  enables  the 
driver at any time to exclude any dis-
agreeable  odours  or  fumes  coming 
from  outside  the  vehicle.  It  should 
be cancelled as soon as possible to 
permit  renewal  of  cabin  air  and  to 
prevent misting. 
      Press again on button  5  to allow 

entry of air from the outside. The 
warning lamp goes out.  

 The air recirculation can also be ac-
cessed by means of a press on the 
control,  located  on  the  lower  left  of 
the  steering  wheel  (see  "§  Fixed 
centred controls steering wheel").  

  6.  Adjustment mode for the 

rear passengers 

 This button decides whether 
or  not  the  rear  passengers 
may  use  their  adjustment 
controls. 

 There  are  three  possible  states  for 
this button: 

  Locking  of  the  rear 
passenger controls
  

  Authorisation of the 
rear passenger con-
trols
  

  Reduction  of  the 

air fl ow for the rear 

passengers  

 With  additional  air  conditioning,  in 
cold  weather  you  are  advised  to 
close  the  supply  of  air  to  the  rear 
passengers  (no  hot  air  distribution 
possible via these air vents).  

 The  rear  passengers  can  use  their 
adjustment  controls  at  their  con-
venience. 

 The  driver  imposes  his  adjustment 
on the rear passengers. In this case, 
the rear passenger controls are de-
activated. 

  7.  Panel display mode: 

black panel function 

 This  function  turns  the  dis-
plays and panel backlighting 
on or off. 

   -  

Function  activated,  a  press  on 
any button will light up the screen 
temporarily. 

  -  

press  on  button   7   deactivates 
the  function,  lighting  of  buttons 
and screen is again permanent.  

 This  function  optimises  notably  the 
visual comfort for driving at night.  

  8.  Demisting/defrosting of 

the rear screen 

 This can only operate when the en-
gine is running. 
      Press  on  button   8   to  activate/

deactivate  the  electric  demist-
ing/defrosting of the rear screen 
and, according to version, of the 
exterior  rear  view  mirrors.  The 
warning  lamp  lights  up  and  the 
symbol appears on the display.  

 It switches off automatically 
to  prevent  excessive  con-
sumption of power.  

 This button activates the recir-
culation  of  air  within  the  pas-
senger compartment and also 
has an automatic function. 

52 

C O M F O R T

  9.  Rapid demisting/defrosting 

of the front and rear 
windows 

   -  

Press  on  button   9 .  The  warning 
lamp lights up.  

 This  function  gives  a  rapid 
demisting/defrosting  of  the 
vehicle simultaneously with: 

   -  

front demisting/defrosting at opti-
mum temperature, 

  -   optimum air fl ow, 
  -  

recirculation prohibition, 

  -  

demisting/defrosting  of  the  rear 
view  mirrors  and  heated  rear 
screen, 

  -  

air conditioning, if necessary.  

 Press again on button  9  or on  AUTO  
to stop the function. Demisting/defrost-
ing of the rear view mirrors and heated 
rear screen remains activated.  

  10. Air conditioning 

      Press  on  button   10   to  activate 

the air conditioning.  

 The  A/C  warning lamp lights up.  

 B.  PASSENGER CONTROL 

PANELS 

  11. Front passenger 

 The front passenger can adjust their 
temperature  control  independently 
at  any  time  by  pressing  buttons   +  
and  - . 

 The  front  passenger  con-
trols  the  adjustment  of  their 
own temperature. 

 The  temperature  for  the 
passenger  is  aligned  with 
that for the driver.  

  12.  Rear passengers (right/left) 

 By  default,  in   AUTO  
position,  the  adjust-

ment of the air fl ow is 

aligned  on  the  front 
ventilation. 
       Rotate  the  but-

ton  to  decrease 
or increase the air 

fl ow.  

 You can adjust the air fl ow only if this 

is enabled by the driver (see button  
 of the driver’s control panel).  

54 

III

C O M F O R T

         RECOMMENDED INTERIOR SETTINGS 

   -  

 Heating/Manual air conditioning   

 To make the best use of the system, we recommend: 

   -  

 Automatic air conditioning   

 With automatic air conditioning, you are recommended to choose AUTO operation. 

  Action  

  To have  


   Cold   


  or  


   Max. cold   to 

start with,  

 then personal 

  adjustments   

   Max. to start 

with, then 

personal 

adjustments   

   ON   

   ON to start 

with, 

then OFF   

   Hot   


  or  


   Max. hot to 

start with, 

then personal 

adjustments   

   Max. to start 

with, then 

personal 

adjustments   


   ON to start 

with, 

then OFF   

   Demisting    

 Defrosting   


   Max. hot   


   OFF   

53 

III

C O M F O R T

 ADDITIONAL AIR 
CONDITIONING 

 Additional air conditioning allows you 
to  optimise  comfort  levels  in  warm 
weather  conditions.  It  produces  ad-
ditional  fresh  air  which  is  supplied 
using the rear air vents. The supply 
of  warm  air  via  the  rear  air  vents  is 
not possible using this system. 

 C. REAR PASSENGER 

CONTROL PANELS 
(RIGHT/LEFT) 

  13.  Adjustment of 

temperature 

 The rear passengers can adjust their 
temperature  controls  independently 
via buttons  +  and  - . 
 Their  preference  cannot  be  great-
er  than  that  of  the  driver  by  more 
than 2.  The  reaching  of  this  maxi-

mum preference is confi rmed by the 

fl ashing of its display.  

  14.  Adjustment of air blower 

speed 

 The  air  blower  operates  only  when 
the engine is running. 
 To  adjust  the  fl ow  of  air,  press  on 

button: 

 to increase the air fl ow, 

 to decrease the air fl ow. 

 The level of air fl ow is indicated on 

the display by the progressive fi lling 

of the ventilator blades. 
 By  reducing  the  fl ow  to  minimum, 

you  deactivate  the  air  conditioning 
system (OFF). 
 You can adjust the temperature and 

the air fl ow only if the driver enables 

you  to  (see  button   6   of  the  driver’s 
control panel). 

 This  warning  lamp  signifi es 

that  the passenger controls 
are  locked,
   you  can  adjust 
neither  the  temperature  nor 

the air fl ow, which remain aligned on 

the preferences of the driver. 

 This  warning  lamp  indi-
cates that the  supply of air 
is cut off
 . 

 This  position  is  recommended  in 
cold  weather  conditions,  as  the  air 
vents do not supply warm air.  

55 

III

C O M F O R T

       SCENTED AIR FRESHENER 

 The  scented  air  freshener  releases 
a fragrance into the passenger com-
partment via the central air vents. 

      Rotate  the  button   A   to  adjust 

(to the left to reduce, to the right 
to increase) or stop (maximum to 

the left) the fl ow of scented air.  

 The  central  air  vents  have  to  be 
open. 

      Press  the  button   A ,  rotating  it  a 

quarter turn to the left as far as it 
will go. 

     Remove  the  air  freshener  from 

the dashboard. 

     Replace 

the 

cartridge 

(see 

§ "Changing the cartridge").   

 After fi tting or changing a cartridge: 
      Place  the  air  freshener  back  in 

its housing. 

     Rotate  it  a  quarter  turn  to  the 

right.   

  Adjustment of flow 

  To remove the air freshener 

  To insert the air freshener 

 The  air  freshener  contains  an 
empty cartridge when your vehicle 
is delivered. You therefore need to 
insert  a  cartridge  in  order  to  use 
the air freshener. 

 A  cartridge  lasts  on  average 
3 months,  based  on  one  hour’s 
usage per day.  

56 

III

C O M F O R T

 The  recharge  for  the  air  freshener 
consists  of  a  cartridge   B   and  its 
sealed container  C . 
   

   Remove the protective fi lm  D . 

     Place the head of the cartridge  B  on 

the button  A  of the air freshener. 

     Rotate  it  a  quarter  turn  to  lock 

it  on  the  button  and  remove  the 
container. 

     Insert  the  air  freshener  into  its 

housing.  

 You  can  change  cartridges  at  any 
time, keeping the used cartridges in 
their original containers.  

 The  air  freshener  button   A   is  inde-
pendent of the cartridge. Cartridges 
are supplied without the air freshener 
button  A . 
 The button of the air freshener  A  can 

only  be  fi xed  into  the  central  dash-

board with a cartridge attached. 
 Therefore always keep the air fresh-
ener button  A  and one cartridge. 
 Recharges are available, depending 
on country, either on the Internet site 
or from a CITROËN dealer. 
 Stowage  points  are  provided  in  the 
glovebox  for  storing  of  cartridges 
and containers.  

  For safety, use only cartridges that 
are provided for this purpose. 
   Retain  the  containers  for  the  stor-
age of used cartridges. 
Do not attempt to take cartridges apart. 
 Never  recharge  the  cartridges 
with  fragrances  not  supplied  by 
CITROËN. 
 Keep them out of reach of children 
and animals. 
 Avoid all contact with the skin and 
with the eyes. 
 In the event of swallowing, consult 
a doctor and show him the product 
packaging or label. 
 Do not install or remove a cartridge 
while you are driving.  

  Replacing a cartridge 

  Air freshener button 

57 

III

C O M F O R T

             FRONT SEATS 

 MANUAL ADJUSTMENTS 

  1.  Forwards-backwards 

adjustment 

 Raise the control bar, then slide the 
seat to the position desired.  

  2. Lumbar support 

 Rotate  the  control  until  you  attain 
the position desired.  

  3. Seat height adjustment 

 Raise  or  lower  the  the  control  the 
number of times necessary to obtain 
the position desired.  

  4. Backrest angle 

 Action the control and adjust the angle 
of the backrest. 
 It  is  possible  to  incline  the  backrest 
45° rearwards by tilting it until it locks; 
to unlock it, lift the control. 

  5. Armrest 

 To adjust the position of the armrest, 
pull  it  up  and  then  fully  down,  and 
then raise it to the desired position.  

  6. Head restraint 

 To raise it, pull it upwards. To lower 
it, press on the control as well as on 
the head restraint.   
The adjustment is correct when the 
top of the head restraint is level with 
the top of the head.   
It  can  also  be  adjusted  for  tilt  (de-
pending on version). 
 To remove it, press on the unlocking 
button and pull it upwards. 
 To  adjust  the  head  restraint  for-
wards/backwards, move the base of 
the head restraint to obtain the posi-
tion desired. 

 Never  drive  without  the  head  re-

straints  fi tted.  They  must  be  in 

place and adjusted correctly.  

58 

III

C O M F O R T

       FRONT SEATS 

  1. 


Adjustment of the 
seat height and angle, 
forwards-backwards 

  2. 


Adjustment of backrest 
angle and lumbar support 

 The seats can also be adjusted elec-
trically for a short period: 
   -  

on opening one of the front doors, 

  -  

after switching off the ignition.  

        Heated seats control 

 ELECTRIC ADJUSTMENTS 

 Raise  or  lower  the  front  of 
control   1   to  raise  or  lower 
the  front  of  the  seat  base 
(on driver’s seat). 

 Raise  or  lower  the  rear  of 
control   1   to  raise  or  lower 
the seat. 

 Action control  1  forwards or 
rearwards  to  slide  the  seat 
forwards/backwards.  

 Push  the  top  of  control   2  
 forwards or rearwards to ad-
just the backrest angle. 

 Raise  or  lower  control   2   to 
increase  or  decrease  the 
lumbar support.  

  With  the  engine  running,  the  front 
seats can be heated separately. 
      Use  the  corresponding  adjust-

ment wheel, placed on the inner 
side of each front seat, to switch 
on and select the level of heating 
required:  


0:  Off. 


1:  Low. 


2:  Medium. 


3:  High.   

59 

III

C O M F O R T

  Storing driving positions 

 System which takes into account the 
electrical settings of the driver's seat 
and  exterior  mirrors.  It  enables  you 
to store up to two positions using the 
buttons  on  the  side  of  the  driver's 
seat. 

  Storing a position  

  Using buttons M/1/2 
      Switch on the ignition. 
     Adjust your seat and the exterior 

mirrors. 

     Press  button   M ,  then  press  but-

ton  1  or  2  within four seconds.   


An  audible  signal  is  heard  indi-
cating that the position has been 
stored.  

 Storing  a  new  position  cancels  the 
previous position. 

  Recalling a stored position  

  Ignition on or engine running 
   

   Briefl y press button  1  or  2  to re-

call the corresponding position.  

 An audible signal is heard indicating 
the end of the adjustment. 
 When  the  ignition  is  on,  after  a  few 
consecutive  position  recalls,  the 
function will be deactivated until the 
engine  is  started,  to  prevent  dis-
charging of the battery.  

  Vehicle moving 
      Press  and  hold  button   1   or  2  

until 

the 

audible 

signal 

is 

heard  indicating  the  end  of  the 
adjustment.   


 Do not try to store a driving position 
while driving.  


Content   ..  2  3  4  5   ..