Citroen C4 Picasso Dag (2009 year). Manual - part 1
 

  Index      Citroen     Citroen C4 Picasso Dag - service manual 2009 year in english


Search            


Content   ..    1  2   ..


Citroen C4 Picasso Dag (2009 year). Manual - part 1


F

A

M

I

L

I

A

R

I

S

A

T

I

O

N

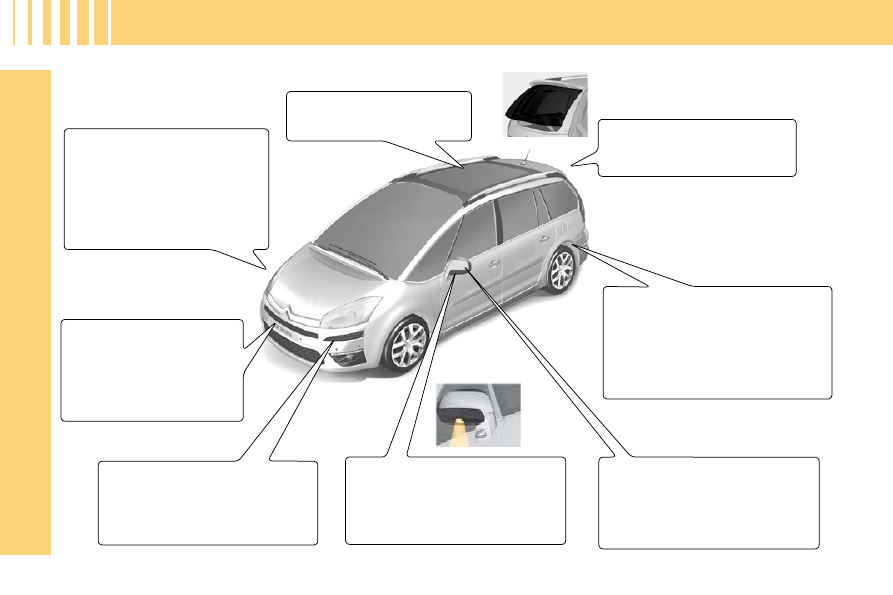
  Panoramic glass roof  

     81  

  Xenon directional 
headlamps
  
 Whether  on  dipped  or  main 
beam, this function allows the 
lighting to follow the direction 
of the road ahead. 

     88  

  Opening rear screen  

     80  

  Pneumatic rear suspension  
 This enhances driving comfort and 
maintains a constant body height, 
whatever the vehicle load. 

     155  

  Exterior side spotlamps  
 These  light  up  the  zones  fac-
ing the driver’s and passenger’s 
doors. 

     87  

  Front/rear parking 
assistance
  
 Sensors,  located  in  the 
bumpers, detect obstacles. 

     153  

  Parking space sensor  
 This  measures  the  size  of  a 
space  and  advises  whether  or 
not parking is possible. 

     149  

  Exterior rear view mirrors  
 With electric foldback. 
 Automatically  tilts  in  reverse 
gear. 

     66  

 E X T E R I O R 

F

A

M

I

L

I

A

R

I

S

A

T

I

O

N

   A.   Central locking 
  B.   Unlocking 
  C.   Guide-me-home lighting 
  D.   Key release/storage   

 Press  control   A ,  located  on  the  switch 
panel to the left of the dashboard. The 

fuel fl ap automatically opens up fully. 
 Insert  the  nozzle  so  as  to  push  in  the 

metal fl ap  B . 

 Push the fuel fl ap to close it. 

  After  switching  off  the  ignition,  con-
trol  A  is only active for a few minutes. 
If  necessary,  switch  on  the  ignition 
again to reactivate it.  

  Bonnet stay:  detach the stay and pivot it 
upwards to insert it into the notch. 

     68   

  Bonnet opening/closing 

 To unlock, pull the control located under 
the dashboard towards you. 

    158   

     82   

  Opening 

 Using the multifunction screen, you can 
choose from the following options when 
opening  your  vehicle  with  the  remote 
control: 
   -  

either  all  of  the  doors  and  the  tail-
gate, 

  -   or the driver’s door with a fi rst press, 

then  all  of  the  other  doors  with  a 
second press.  

  To close:  move the stay back to 
its initial position, lower the bon-
net, then allow it to slam shut at 
the end of its travel. 

 O P E N I N G 

  Remote control key 

  Fuel tank 

  Capacity: approximately 60 litres.  

F

A

M

I

L

I

A

R

I

S

A

T

I

O

N

 This opening gives easy access to the 
boot, even if you are parked close to a 
wall or to another vehicle.  

  Opening rear screen 

  Opening  

      Press  control   2.   The  handhold   4   is 

in line with the rear wiper.  

  Closing 

      Lower the rear screen.  

     80   

      Press control  1 .  
 You cannot open the tailgate if the rear 
screen is already open.  

      Lower the tailgate, using one of the 

handholds  3 , located on the interior 
tailgate trim. 

     Past  the  balancing  point,  allow  the 

tailgate to close itself (do not assist 
it or slow it down).   

  Load: 22 kg maximum.  
 The  Modubox  is  composed  of  a  shop-

ping trolley and a fl exible bag which can 

be  used  independently  of  each  other 
depending on your needs. 

     100   

 O P E N I N G 

  Opening the tailgate 

  Closing the tailgate 

  Modubox 
(CITROËN C4 Picasso) 

F

A

M

I

L

I

A

R

I

S

A

T

I

O

N

  CITROËN     Grand C4 Picasso  

 Torch 

  Pneumatic rear 

suspension  

 Allows the height of the rear 

of the vehicle to be adjusted 

 Access to 

spare wheel 

  Temporary puncture repair kit 

 Depending on model, the kit is located either in the boot well or in the compartment under the left hand 

second-row passenger (open the fl ap by turning the screw a quarter turn). 
 This kit is a complete system for a temporary repair; it is made up of a compressor and a sealing product. 

 Luggage cover blind 

 Luggage cover 

in two sections 

 Torch 

     99  

     100  

     171  

     155  

    167  

     104  

  CITROËN     C4 Picasso  

 Refer also to the section "Practical information - § Changing a wheel". 

     170   

F

A

M

I

L

I

A

R

I

S

A

T

I

O

N

  6-speed electronic gearbox 
 This  offers  a  fully  automatic  mode,  a 

manual mode and an auto-sequential 

mode  which  combines  the  advan-
tages  of  the  automatic  and  manual 
modes, using the paddles behind the 
steering wheel. 

    134   

  Speed limiter/Cruise control 
 These  functions  control  the  speed  of 
the vehicle to the value that you have 
programmed. 

    145, 147   

  Electric parking brake 
 For holding and releasing the vehicle. 
Operation  is  automatic  with  manual 
operation  possible  using  the  dash-
board control. 

     126   

  Scented air freshener 
 This  diffuses  the  fragrance  that  you 
have chosen throughout the passen-
ger  compartment  from  its  location  in 
the ventilation system. 

     55   

  Ambiance lighting 
 This  soft  lighting  of  the  passenger 
compartment improves visibility inside 
the vehicle when the light is poor. 

     92    

 I N T E R I O R  

F

A

M

I

L

I

A

R

I

S

A

T

I

O

N

 Fold  the  concertina  boards  ( 1  2  3 )  ar-
ranged  above  each  of  the  third-row 
seats. 
 Pull on the black strap  F , located on the 
seat backrest. 

     64   

  Before  moving  the  third-row  seats, 
do not forget to lock in the rigid pan-

els  fi rst  (located  at  the  base  of  the 

second-row seat backrests).  

  Installing the seats 

 Put the three sections of the concertina 
boards ( 1 2 3 ) to their vertical position, 
then pull on the red strap  G . 
 Before moving the third-row seats, return 
the  rigid  panels  to  the  upright  position 
and lock them. 

 Pull  on  control   E ,  located  at  the  top  of 
the second-row seats backrest. 

     63   

 I N T E R I O R 

  Stowing the seats 

  Access to third-row seats 

 Do not leave objects either on or un-
derneath the second-row seats when 
you are folding them.  

 THIRD - ROW SEATS CITROËN 
GRAND C4 PICASSO 

10 

F

A

M

I

L

I

A

R

I

S

A

T

I

O

N

  Folding the seats 

  From the boot - whilst loading, 
for example (CITROËN Grand 
C4 Picasso)  

 Take  care  to  attach  the  third-row  pas-
senger seat belts to the rings provided 
for this purpose. 
  Do  not  attach  the  belts  to  the  load 
anchorage points marked with a red 
cross (see illustration above).
  

  Stowing  the  tongue  of  the  third-row 
seat belt
  

 SECOND - ROW SEATS 

    120   

  Advice on third-row passenger 
seat belts 

  From outside  

   

   Pull  fi rmly  upwards  on  strap   C ,  as 

indicated by the red arrow, to unlock 
the seat; keep pulling until the seat 
is fully folded.    

      Slide  latch   A   of  the  panel  down-

wards, to unlock it. 

     Return the panel to the upright posi-

tion,  then  slide  latch   A   upwards  to 
lock it.  

 Before deploying the rigid panels, check 
that  the  second  row  seats  are  in  their 
fully rear position. 

     62   

 I N T E R I O R 

 THIRD - ROW SEATS CITROËN 
GRAND C4 PICASSO 

 Having  fi rstly  folded  the  third-row 

seats. 
      Pull  on  strap   D  to  unlock  the  re-

quired seat.   

  Repositioning the seats 

 Return  the  rigid  panels  of  the  second-
row seats to their initial (upright) position 
and  lock  them  in  position  (CITROËN 
Grand C4 Picasso). 
 Raise  the  backrest  and  push  it  back-
wards until it locks in position.  

  Rigid panel 
(CITROËN Grand C4 Picasso) 

 A rigid panel is attached to each second-
row seat backrest.   

  Unlocking/Locking the rigid panel  

11 

F

A

M

I

L

I

A

R

I

S

A

T

I

O

N

 SECOND - ROW SEATS 

 The 3 second-row seats are independ-
ent of each other and are all the same 
width.  They  can  all  be  adjusted  to  the 
"comfort" position.   

  Placing a seat in the "comfort" 
position  

  Returning the seat to its original position  

     60   

  Longitudinal adjustment 

 Lift up control  A , located at the front of 
the  seat,  and  adjust  the  seat  into  the 
desired position.  

      Insert  tongue   C   into  the  buckle  on 

the  right,  then  insert  the  second 
tongue  D  into the buckle on the left.  

    119   

 I N T E R I O R 

  "Comfort" position 

      Pull on strap  B.   
 The backrest reclines and the seat base 
pivots slightly.   

      Pull  on  strap   B   and  guide  the  seat 

forwards.  

  Positioning the central seat belt 

12 

F

A

M

I

L

I

A

R

I

S

A

T

I

O

N

 D A S H B O A R D 

13 

F

A

M

I

L

I

A

R

I

S

A

T

I

O

N

  13.  Controls: 

       Trip mileage recorder reset 

button 

      Lighting rheostat 
      CHECK or COLOR (choice of 

background colour) 

      Personalisation  

  14.  Warning lamps display (NaviDrive) 

  15.  Central air vents 

  16.  Electric parking brake 

  17.  Instrument panel 

  18.  Hazard warning lamps 

  19.  Right hand upper storage 

  20.  Front passenger’s airbag 

  21.  Loudspeaker (Tweeter) 

(right and left) 

  22.  Passenger’s air conditioning 

controls 

  23.  Lower glovebox: 

       Air freshener clips 
      Various storage  

  24.  Key switch: 

       Front passenger’s airbag 

activation/deactivation  

  25.  Central locking button 

  26.  Audio and telematics system 

  27.  Scented air freshener 

  28.  Refrigerated storage 

  29.

  12 V accessories socket or USB port 

  30.  Removable ashtray 

  31.

  12 V accessories socket or lighter 

  32.  ESP deactivation button 

  33.  Ambiance lighting control 

  34.  Steering lock - Ignition switch 

  35.  Controls for multifunction screen 

(on steering wheel) 

  36.  Horn 

  37.  Optional function controls 

(on steering wheel) 

  38.

  Fusebox access fl ap 

  39.  Controls: 

       Fuel fl ap 
      Parking assistance 
      Lane departure warning system 
      Volumetric alarm deactivation 
      Headlamps adjustment  

  40.  Bonnet release  

   1.   Controls: 

       Rear view mirrors 
      Windows 
      Child safety  

  2.   Side air vent 

  3.   Driver’s air conditioning controls 

  4.   Controls: 

       Lighting 
      Direction indicators 
      Front and rear foglamps  

  5.   Paddles for automatic gearbox or 

6-speed electronic gearbox 

  6.   Cruise control and speed limiter 

(controls on steering wheel) 

  7.   Driver’s front airbag 

  8.   Direction indicator warning lamps 

  9.   Left hand upper storage 

  10.  Audio and telematics system 

controls on steering wheel 

  11.  Selector for automatic gearbox or 

6-speed electronic gearbox 

  12.  Controls: 

       Windscreen wipe 
      Screen wash 
      Rear screen wipe 
      Trip computer  

 D A S H B O A R D 

14 

F

A

M

I

L

I

A

R

I

S

A

T

I

O

N

  Front seats 

  Head restraint  

  Backrest angle  

  Seat height adjustment  

  Lumbar support  

  Longitudinal adjustment  

  Armrest  

  Electric adjustments   

  Manual adjustments  

     58  

  Heated  seat  control   (lo-
cated  on  the  inside  of  the 
front seats) 

     57    

  1.   Adjustment  of  seat  height,  angle 

and longitudinal position 

  2.   Adjustment  of  backrest  angle  and 

lumbar support 

  3.   Driver:  memorisation  of  driving  po-

sitions 

 The  seats  can  also  be  adjusted  on  a 
temporary basis: 
   -  

on opening one of the front doors, 

  -  

after switching on the ignition.  

 G E T T I N G   S T A R T E D 

15 

F

A

M

I

L

I

A

R

I

S

A

T

I

O

N

  Adjusting the steering wheel 

 The steering wheel can be adjusted for 
height and reach. 
 Unlock the steering wheel by pulling le-
ver  A  towards you. 
 Adjust  the  position  of  the  steering 
wheel then lock it pushing the lever fully 
back. 

     67   

 It 

automatically 

and 

progressively 

changes  between  day  use  and  night 
use. 

 This operates with the ignition switched on. 
 From  the  driver’s  seat,  select  the  rear 
view  mirror  by  moving  control   1   to  the 
left  or  right,  then  adjust  the  rear  view 

mirror as required in four directions us-

ing control  2 . 
 Demisting-defrosting  of  the  rear  view 
mirrors  is  linked  to  that  of  the  rear 
screen.  

     93   

     66   

  For  safety  reasons,  these  adjust-
ments must not be carried out whilst 
driving.  

  Child monitoring mirror 

 This  additional  mirror   1   allows  you  to 
monitor the rear passengers. It can be 
tilted to eliminate dazzle. 

  Rear view mirrors foldback 

 When  the  vehicle  is  parked,  the  rear 
view  mirrors  can  be  folded  back  either 
manually or automatically. 

 G E T T I N G   S T A R T E D 

  Automatic photochromic 
interior rear view mirror 

  Rear view mirrors adjustment 

     67   

16 

F

A

M

I

L

I

A

R

I

S

A

T

I

O

N

  Adjusting the seat belt height 

 To  adjust  the  seat  belt,  squeeze  the 

control  and  slide  it  in  the  direction  re-

quired. 

     118   

 From  the  driver’s  seat  position,  the 
controls  located  on  the  door  are  used 
to operate the electric windows. 

     76   

      Slide the blind on the visor to the de-

sired position by pushing the area  A .  


The blinds are extended on the sun 
visor rails. 

     Fold  the  visor  downwards,  to  pre-

vent being dazzled.  

  Panoramic glass roof blind 

 Opening (positions  1  to  9 ) 
 Closing (position  0 ) 
 The blind has an anti-pinch system. 

     81   

 G E T T I N G   S T A R T E D 

  Electric windows controls 

  Sliding sun visors 

     93   

17 

F

A

M

I

L

I

A

R

I

S

A

T

I

O

N

  Ring B  

  Ring D: rear screen wipe 

 Stop. 

 Intermittent. 

 Timed wash and wipe. 

  Fixed centred controls steering 
wheel  

  Lighting stalk 

  Ring A  

     85    

  Stalk C: windscreen wipe  

     89    

 D R I V I N G 

   1.   Off 
  2.   Automatic lighting 
  3.   Sidelamps 
  4.   Dipped beam/Main beam  

 Front foglamps 
 Rear foglamp 

  Wiper stalk 

   1.   Optional function controls 
  2.   Cruise  control/speed  limiter  and 

parking space sensor 

  3.   Audio system controls 
  4.   Multifunction screen controls  

  143  

  5.   Horn  

  113  

  6.   Warning  lamps  for  direction  indica-

tors and vehicle lamps  

  27   

     84    

  Switching on "AUTO" mode 
      Press the stalk down and release.   

  Switching off "AUTO" mode 
      Press  the  stalk  up  and  return  it  to 

position  "0" .  

 Automatic  wipe  must  be  reactivated 
each time the vehicle is started.  

  Under  certain  climatic  conditions 
(low  temperature,  humid),  the  pres-
ence  of  condensation  on  the  inner 
surfaces  of  the  headlamps  and  rear 
lamps is not an indication of a fault; 
this  disappears  afew  minutes  after 
switching on the lamps. 

     174    

18 

F

A

M

I

L

I

A

R

I

S

A

T

I

O

N

  6-speed electronic gearbox 
system 

  R   Reverse 
  N   Neutral 
  A   Automatic mode 
  M   Manual mode 
 Using control paddles  1 "+"  and  2 "-" : 
   -  

gear changing in manual mode, 

  -  

temporary manual operation in auto-
matic mode.   

  P   Park 
  R   Reverse 
  N   Neutral 
  D   Automatic mode 
  M

   Sequential mode 

 Using control paddles  1 "+"  and  2 "-" : 
   -   gear changing in sequential mode, 
  -  

temporary manual operation in auto-
matic mode.   

  Starting 

      Check that the selector  3  is in neutral 

(position  N ). 

  

   Press fi rmly on the brake pedal and 

turn the ignition key.  

     134   

  Starting 

      Check that the selector  3  is in posi-

tion  P  or  N  and turn the ignition key.  

 To  exit  position   P ,  press  on  the  brake 
pedal before moving the selector. 

     139   

 D R I V I N G 

  Automatic gearbox 

19 

F

A

M

I

L

I

A

R

I

S

A

T

I

O

N

     149  

  Electric parking brake 

  Before  leaving  the  vehicle,  check 
that the electric parking brake warn-
ing lamp  P  (red) is permanently on. 
 If you leave the vehicle with the en-
gine  running,  manually  apply  the 
parking brake. 
 Never leave a child alone inside the 
vehicle  with  the  ignition  on,  as  they 
could release the parking brake. 

  Parking space sensor  

 You can select this function by pressing 
button  A . 
 Once the space has been measured, the 
system displays the following messages: 

 < 12 mph (20 km/h) 

  Parking possible  


Parking diffi cult  

  Parking not advised  

 This device combines: 
   -  

automatic  functions:  Automatic  ap-
plication when the engine stops and 
automatic release on use of the ac-
celerator  (automatic  operation  by 
default); 

  -  

manual use: Manual application/re-
lease  of  parking  brake  is  possible 
by operating control lever  A .  

 When  in  automatic  mode,  it  remains 
possible to apply or release the parking 
brake at any time: 
      To apply it, pull on the lever  A . 
     To release it, pull then release lever  A .   

  Hill start assist 

 To aid starting on a gradient, your vehicle 

is equipped with a system which keeps 

it  immobilised  for  about  2  seconds,  the 
approximate time it takes to move your 
foot  from  the  brake  pedal  to  the  accel-
erator pedal. 

    133   

 D R I V I N G 

     126   


Content   ..    1  2   ..