Chery Tiggo 5 (T21). Service manual - part 413
 

  Index      Chery     Chery Tiggo 5 (T21) - service and repair manual 2014 year


Search            copyright infringement  


Content   ..  411  412  413  414   ..


Chery Tiggo 5 (T21). Service manual - part 413


36–

35

36

Rear Washer Nozzle Assembly

Removal

1. Turn off all the electrical equipment and ignition switch.
2. Disconnect the negative battery cable.
3. Remove the back door protector assembly (

See page 47-47

).

4. Remove the rear spoiler assembly (

See page 48-43

).

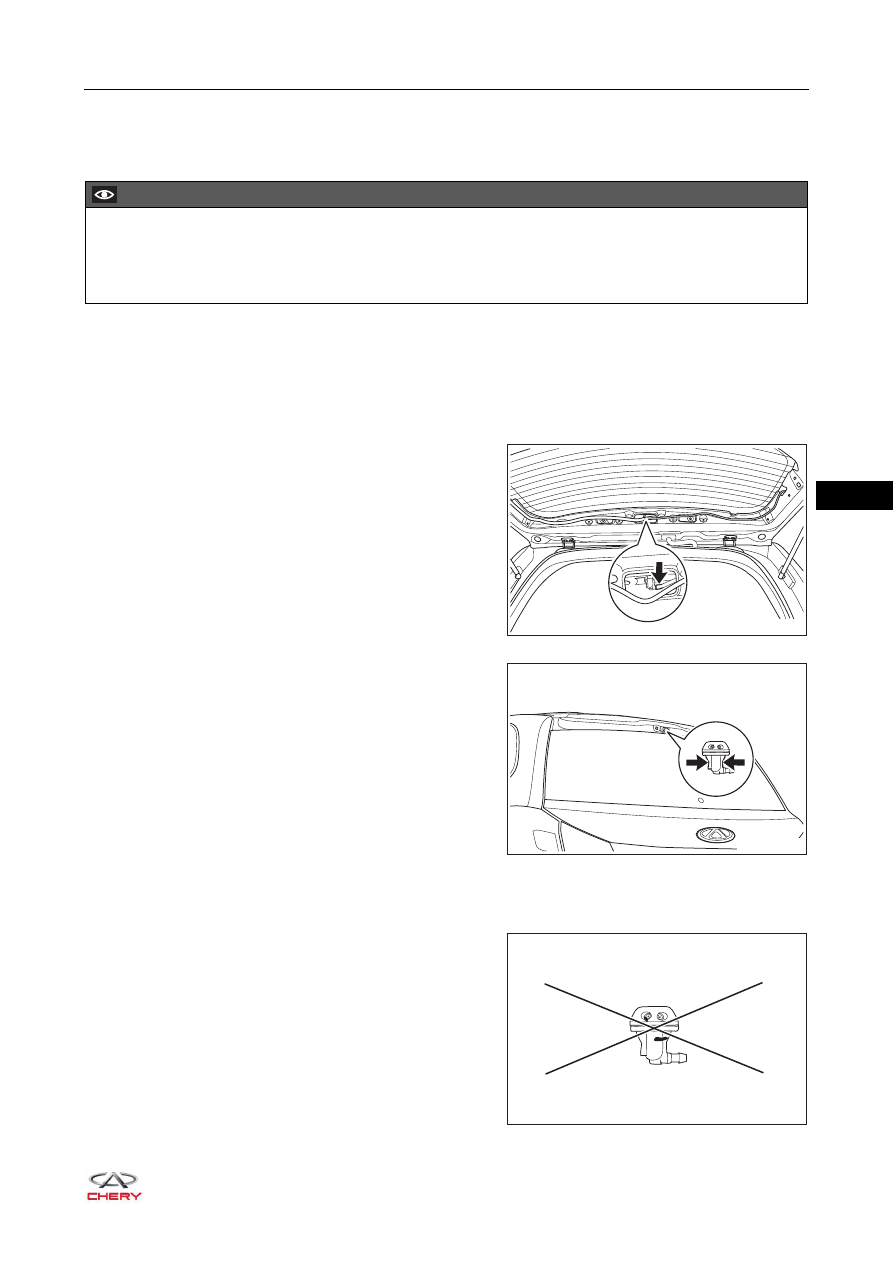
5. Remove the rear washer nozzle assembly.

a. Disconnect the joint (arrow) between washer line and 

rear washer nozzle assembly.

b. As shown in the illustration, press the rear washer 

nozzle assembly claws (arrow) and remove the rear 
washer nozzle assembly.


Inspection

1. Check rear washer nozzle assembly.

a. Check rear washer nozzle assembly for blockage, 

deformation or damage. Replace rear washer nozzle 
if necessary.

CAUTION

 Be sure to wear safety equipment to prevent accidents when removing rear washer nozzle assembly.
 Appropriate force should be applied when removing rear washer nozzle assembly. Be careful not to 

operate roughly.

RT21360220

RT21360230

RT21360240

36–

36

36

Installation

Installation is in the reverse order of removal.

CAUTION

 Always operate carefully to prevent components from being damaged when installing rear washer nozzle 

assembly.

 Install washer line joint in place when installing rear washer nozzle assembly.
 Check rear washer nozzle for proper operation after installing rear washer nozzle assembly. 

36–

37

36

Washer Pump Assembly

Removal

1. Turn off all the electrical equipment and ignition switch.
2. Disconnect the negative battery cable.
3. Remove the front bumper assembly (

See page 48-11

).

4. Remove the front/rear washer pump assembly.

a. Disconnect the front washer pump connector (1) and 

rear washer pump connector (2).

b. Disconnect the joint (3) between washer line and front 

washer pump, and the joint (4) between washer line 
and rear washer pump.

c. Using a screwdriver wrapped with protective tape, 

remove the front washer pump assembly (1) and rear 
washer pump assembly (2).

CAUTION

 Be sure to wear safety equipment to prevent accidents when removing washer pump assembly.
 Appropriate force should be applied when removing washer pump assembly. Be careful not to operate 

roughly.

 Try to prevent body paint surface from being scratched when removing washer pump assembly.

CAUTION

 Put a container under washer pump to collect washer fluid before removing washer pump assembly.

1

2

4

3

RT21360260

RT21360270

1

2

36–

38

36

Installation

Installation is in the reverse order of removal.

Inspection

1. Check front/rear washer pump assembly.

a. Fill washer fluid reservoir assembly with washer fluid.
b. Connect positive (+) battery lead to terminal 1 of 

washer pump and negative (-) battery lead to terminal 
2.

c. Check that washer fluid flows out of washer pump.
OK: Washer fluid flows out of washer pump.
If result is not as specified, replace washer pump assembly.

CAUTION

 Always operate carefully to prevent components from being damaged when installing washer pump 

assembly.

 Install washer line joint in place when installing washer pump assembly.
 Check washer system for proper operation after installing washer pump assembly.

RT21360280

2

1


Content   ..  411  412  413  414   ..