Chery Tiggo 5 (T21). Service manual - part 345
 

  Index      Chery     Chery Tiggo 5 (T21) - service and repair manual 2014 year


Search            copyright infringement  


Content   ..  343  344  345  346   ..


Chery Tiggo 5 (T21). Service manual - part 345


31–

84

31

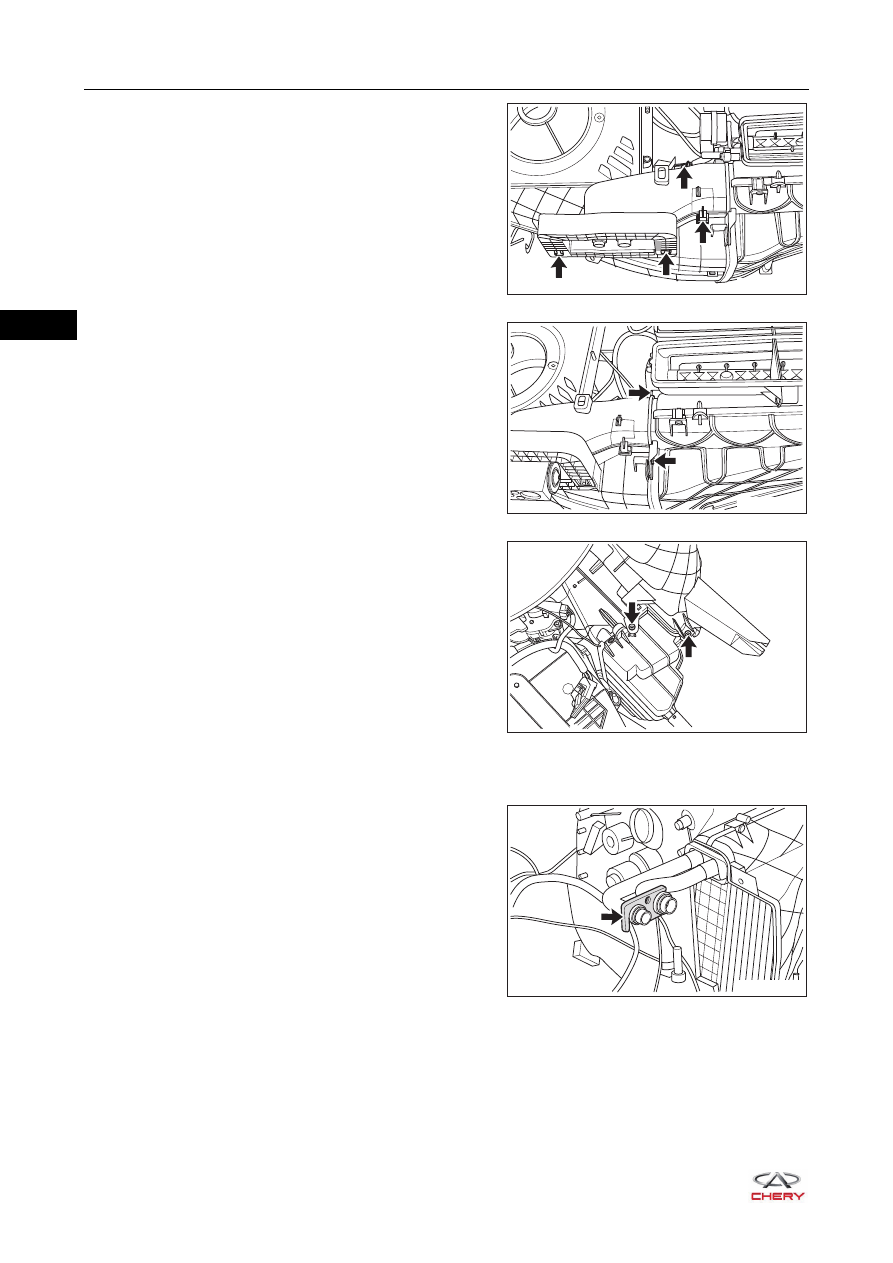
d. Detach the fixing claws (arrow) from the expansion 

valve cover plate and remove the expansion valve 
cover plate. 

e. Remove 2 fixing screws (arrow) between blower case 

assembly and the upper part of evaporator tank 
assembly.

(Tightening torque: 2.5 ± 0.5 N·m)

f. Remove 2 fixing screws (arrow) between blower case 

assembly and the lower part of evaporator tank 
assembly.

(Tightening torque: 2.5 ± 0.5 N·m)

g. Detach the blower case assembly from the evaporator tank assembly.

14.Remove the evaporator core assembly.

a. Remove the expansion valve mounting pressure plate 

(arrow) from the evaporator core line.

RT21310470

RT21310480

RT21310490

RT21310500

31–

85

31

b. Remove 4 fixing screws (arrow) from the bottom of 

evaporator tank assembly.

(Tightening torque: 2.5 ± 0.5 N·m)

c. Take out the evaporator core (arrow) from the 

evaporator tank assembly carefully.

15.Remove the evaporator temperature sensor.

a. Disconnect the evaporator temperature sensor 

connector (arrow).

b. Remove the evaporator temperature sensor (arrow) 

from the evaporator core.

RT21310510

RT21310520

RT21310530

RT21310540

31–

86

31

16.Remove the heater core assembly.

a. Remove the heater core line grommet (arrow).

b. Remove the heater core line pressure plate fixing 

screw (arrow).

(Tightening torque: 2.5 ± 0.5 N·m)

c. Remove 2 fixing screws (arrow) from the evaporator 

case.

(Tightening torque: 2.5 ± 0.5 N·m)

d. Remove 2 fixing screws (arrow) from the heater core 

line cover plate.

(Tightening torque: 2.5 ± 0.5 N·m)

RT21310550

RT21310560

RT21310570

RT21310580

31–

87

31

e. Remove the heater core outlet pipe fixing clamp 

(arrow).

f. Take out the heater core assembly carefully. 

17.Remove the A/C drain pipe.

a. Remove the A/C drain pipe (arrow) from the bottom of 

evaporator tank assembly. 

18.Remove the mode damper adjustment mechanism set. 

a. Remove 4 fixing screws (arrow) from the mode 

damper adjustment mechanism set.

(Tightening torque: 2.5 ± 0.5 N·m)

RT21310590

RT21310600

RT21310610

RT21310620


Content   ..  343  344  345  346   ..