Dodge Stratus Sedan (2005 year). Instruction - part 1


  Index      Dodge     Dodge Stratus Sedan (2005 year) - instruction in english


Search            copyright infringement  


Content      ..       1      2      ..


Dodge Stratus Sedan (2005 year). Instruction - part 1


WARNINGS AND CAUTIONS
This instruction contains WARNINGS against operating
procedures which could result in an accident or bodily
injury. It also contains CAUTIONS against procedures
which could result in damage to your vehicle. If you do
not read this entire instruction you may miss important
information. Observe all Warnings and Cautions.

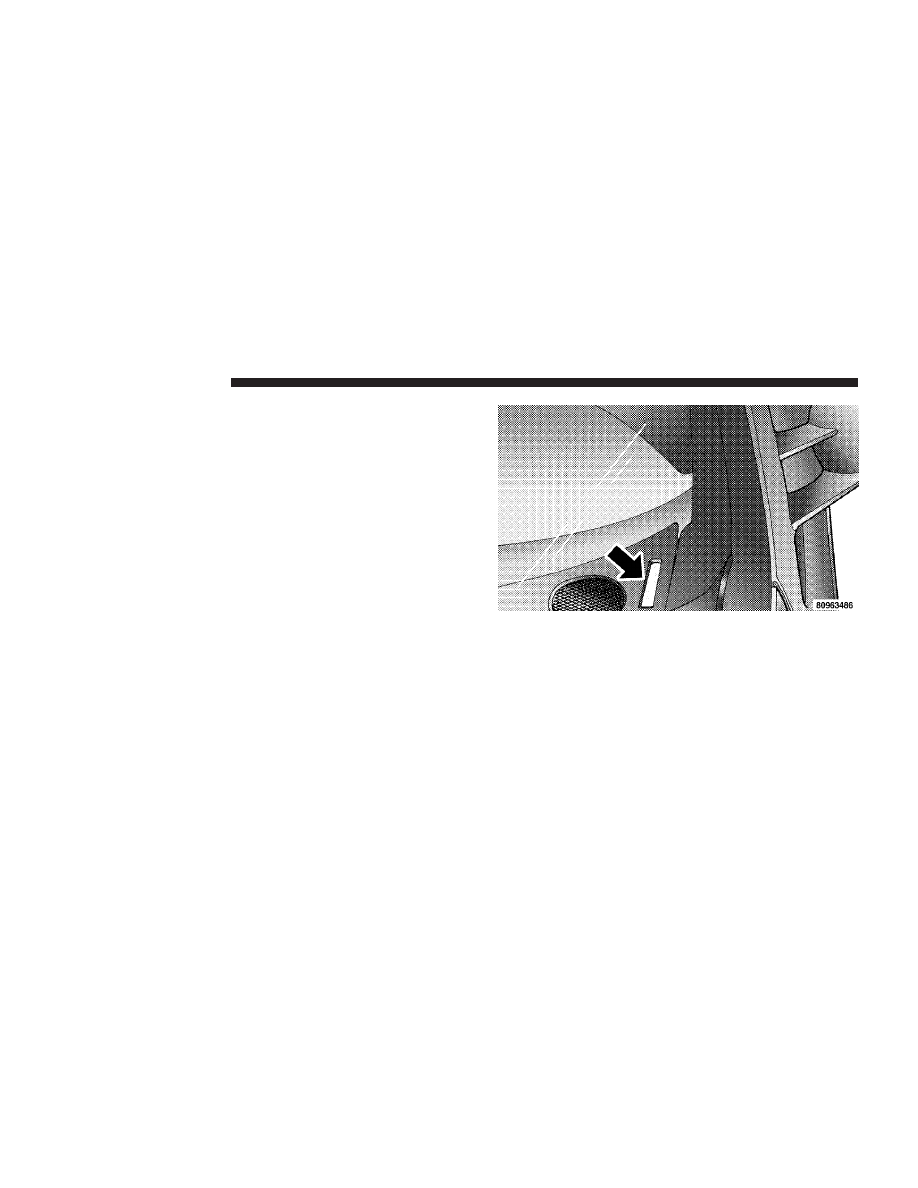
VEHICLE IDENTIFICATION NUMBER
The vehicle identification number (VIN) is on a stamped
plate on the left front corner on the body of the vehicle,
visible through the windshield. This number also ap-
pears on the Automobile Information Disclosure Label
affixed to a window on your vehicle. Save this label as a
convenient record of your vehicle identification number
and optional equipment.

Vehicle Identification Number

6

INTRODUCTION

Partial Zero Emission Vehicle (PZEV) for 2.4L — If
Equipped

NOTE:

If the 8th digit of the vehicle identification

number (VIN) contains a

⬙J⬙ then your vehicle is

equipped with the Partial Zero Emissions Vehicle (PZEV)
package.

NOTE:

There are specific instructions regarding when

to change the ignition cables and spark plugs with the
PZEV package. Please refer to the Maintenance Sched-
ules section in your owner’s instruction for specific mainte-
nance instructions.

VEHICLE MODIFICATIONS / ALTERATIONS

WARNING!

Any modifications or alterations to this vehicle
could seriously affect its roadworthiness and safety
and may lead to an accident resulting in serious
injury or death.

INTRODUCTION

7

1

THINGS TO KNOW BEFORE STARTING YOUR VEHICLE

CONTENTS

䡵 A Word About Your Keys . . . . . . . . . . . . . . . . .11

▫ Ignition Key Removal . . . . . . . . . . . . . . . . . . .11
▫ Automatic Transaxle Ignition Interlock System . .12
▫ Instruction Transaxle . . . . . . . . . . . . . . . . . . . . . .12
▫ Key-In-Ignition Reminder . . . . . . . . . . . . . . . .12

䡵 Sentry Key — If Equipped . . . . . . . . . . . . . . . .13

▫ Replacement Keys . . . . . . . . . . . . . . . . . . . . . .14
▫ Customer Key Programming . . . . . . . . . . . . . .14
▫ General Information . . . . . . . . . . . . . . . . . . . .15

䡵 Illuminated Entry System . . . . . . . . . . . . . . . . .15
䡵 Door Locks . . . . . . . . . . . . . . . . . . . . . . . . . . .15

▫ Power Door Locks . . . . . . . . . . . . . . . . . . . . .16
▫ Central Locking — If Equipped . . . . . . . . . . . .17
▫ Door Ajar Warning . . . . . . . . . . . . . . . . . . . . .17
▫ Automatic (Rolling) Door Locks . . . . . . . . . . . .17
▫ Automatic Unlock On Exit — Only Available If

Automatic Door Locks Are Enabled . . . . . . . . .18

▫ “Child Protection” Door Lock System

(Rear Doors) . . . . . . . . . . . . . . . . . . . . . . . . . .18

䡵 Remote Keyless Entry — If Equipped . . . . . . . .19

▫ To Unlock The Doors . . . . . . . . . . . . . . . . . . .19
▫ To Lock The Doors . . . . . . . . . . . . . . . . . . . . .20
▫ To Unlock The Trunk . . . . . . . . . . . . . . . . . . . .20

2

▫ Panic Alarm . . . . . . . . . . . . . . . . . . . . . . . . . .21
▫ To Use The Panic Alarm . . . . . . . . . . . . . . . . .21
▫ To Program Additional Transmitters . . . . . . . . .21
▫ General Information . . . . . . . . . . . . . . . . . . . .21
▫ Transmitter Battery Service . . . . . . . . . . . . . . .22

䡵 Vehicle Theft Alarm . . . . . . . . . . . . . . . . . . . . .23

▫ Tamper Alert . . . . . . . . . . . . . . . . . . . . . . . . .23
▫ Security System Instruction Override . . . . . . . . . . .23

䡵 Trunk Lock And Release . . . . . . . . . . . . . . . . . .24
䡵 Trunk Safety Warning . . . . . . . . . . . . . . . . . . . .24

▫ Trunk Internal Emergency Release . . . . . . . . . .25

䡵 Windows . . . . . . . . . . . . . . . . . . . . . . . . . . . . .25

▫ Power Windows . . . . . . . . . . . . . . . . . . . . . . .25

䡵 Occupant Restraints . . . . . . . . . . . . . . . . . . . . .26

▫ Lap/Shoulder Belts . . . . . . . . . . . . . . . . . . . . .27
▫ Seat Belt Pretensioners . . . . . . . . . . . . . . . . . . .31
▫ Enhanced Driver Seat Belt Reminder System

(BeltAlert) . . . . . . . . . . . . . . . . . . . . . . . . . . .32

▫ Seat Belts And Pregnant Women . . . . . . . . . . . .33
▫ Seat Belt Extender . . . . . . . . . . . . . . . . . . . . . .33
▫ Driver And Right Front Passenger Supplemental

Restraint System (SRS) - Airbag . . . . . . . . . . . .34

䡵 Engine Break-In Recommendations . . . . . . . . . .48
䡵 Safety Tips . . . . . . . . . . . . . . . . . . . . . . . . . . . .49

▫ Exhaust Gas . . . . . . . . . . . . . . . . . . . . . . . . . .49
▫ Safety Checks You Should Make Inside The

Vehicle . . . . . . . . . . . . . . . . . . . . . . . . . . . . . .49

▫ Periodic Safety Checks You Should Make Outside

The Vehicle . . . . . . . . . . . . . . . . . . . . . . . . . .50

10

THINGS TO KNOW BEFORE STARTING YOUR VEHICLE

A WORD ABOUT YOUR KEYS
You can insert the double sided keys into the locks with
either side up.

The dealer that sold you your new vehicle has the key
code numbers for your vehicle locks. These numbers can
be used to order duplicate keys from your dealer. Ask
your dealer for these numbers and keep them in a safe
place.

Ignition Key Removal

Place the shift lever in PARK and make sure that the
gearshift knob push button has returned to the out
position. Turn the key to the Lock position and remove
the key.

NOTE:

If you try to remove the key before you place

the lever in PARK, the key may become trapped tempo-
rarily in the key cylinder. If this occurs, rotate the key
clockwise slightly, then remove the key as described. If a
malfunction occurs, the system may trap the key in the

Ignition Key Positions

THINGS TO KNOW BEFORE STARTING YOUR VEHICLE

11

2

ignition cylinder to warn you that this safety feature is
inoperable. The engine can be started and stopped but
the key cannot be removed until you obtain service.

WARNING!

Leaving children in a vehicle unattended is danger-
ous for a number of reasons. A child or others could
be injured. Children should be warned not to touch
the parking brake, brake pedal or the gear selector
lever. Don’t leave the keys in the ignition. A child
could operate power windows, other controls, or
move the vehicle.

CAUTION!

An unlocked car is an invitation to thieves. Always
remove key from the ignition and lock all doors
when leaving the vehicle unattended.

Automatic Transaxle Ignition Interlock System
This system prevents the key from being removed unless
the shift lever is in PARK. It also prevents shifting out of
PARK unless the key is in the OFF or RUN positions.

Instruction Transaxle
Depress and hold the release button located between the
ignition switch and the instrument panel. Turn the igni-
tion key to the LOCK position and remove the key.

Key-In-Ignition Reminder
Opening the driver’s door when the key is in the ignition
and is in the OFF, LOCK, or ACC position, sounds a
signal to remind you to remove the key.

12

THINGS TO KNOW BEFORE STARTING YOUR VEHICLE

SENTRY KEY — IF EQUIPPED
With this system, an electronically coded ignition key
sends a signal to the vehicle electronics. If the electronics
recognizes the signal, the vehicle will start and continue
to run. If the system does not recognize the signal the
vehicle will start and run for 2 seconds then shut off. The
system will allow the engine to be started and run (for 2
seconds) up to six times after which the starter motor will
be disabled and the engine will not crank.

NOTE:

• The Sentry Key Immobilizer System is not compatible

with remote starting systems. Use of these systems
may result in vehicle starting problems and loss of
security protection.

• Additional Sentry Keys or Mobil Speed Pass™ devices

held too close to the ignition key when starting the
vehicle may cause problems when attempting to start
the vehicle. These devices cannot damage the Sentry

Key System, but can cause a momentary problem
when attempting to start the engine. If a problem
occurs, remove the Sentry Key from the key ring and
restart the vehicle. Pagers, cell phones, walkmans, etc.,
have no effect on this system.

The Theft Alarm Light, located on the instrument cluster
to the right of the fuel gauge, will illuminate for about 3
seconds when the ignition switch is first turned to the On
position. If the vehicle electronics do not receive a valid
signal from the ignition key, the theft alarm light will
flash continuously to signal that the vehicle has been
immobilized. If the Theft Alarm Light remains On during
vehicle operation, it indicates a fault in the system
electronics.

All of the keys provided with your new vehicle have
been programmed to the vehicle electronics.

THINGS TO KNOW BEFORE STARTING YOUR VEHICLE

13

2

Replacement Keys

NOTE:

Only keys that have been programmed to the

vehicle electronics can be used to start the vehicle. Once
a Sentry Key has been programmed to a vehicle, it can
not be programmed to any other vehicle.

At the time of purchase, the original owner is provided
with a four digit PIN number. This number is required
for dealer replacement of keys. Duplication of keys may
be performed at an authorized dealer or by using the
Customer Key Programming procedure. This procedure
consists of programming a blank key to the vehicle
electronics. A blank key is one which has never been
programmed.

NOTE: When having the Sentry Key System serviced,
bring all vehicle keys to the dealer.

Customer Key Programming
You can program new keys to the system if you have two
valid keys by doing the following:

1. Insert the first valid key into the ignition and turn the
ignition On for at least 3 seconds but no longer than 15
seconds.

Turn the ignition Off and remove the first key.

2. Insert the second valid key and switch the ignition On
within 15 seconds. After ten seconds a chime will sound
and the Theft Alarm Light will begin to flash.

Turn the ignition Off and remove the second key.

3. Insert a blank Sentry Key into the ignition and switch
the ignition On within 60 seconds. After 10 seconds a
single chime will sound. The Theft Alarm Light will stop
flashing, turn on for 3 seconds; then turn off.

The new Sentry Key has been programmed. Repeat this
process to program up to a total of 8 keys.

14

THINGS TO KNOW BEFORE STARTING YOUR VEHICLE

General Information
The Sentry Key system complies with FCC rules part 15.
Operation is subject to the following two conditions:

1. this device may not cause harmful interference

2. this device must accept any interference that may be
received, including interference that may cause undes-
ired operation

ILLUMINATED ENTRY SYSTEM
The interior lights will come on when you open any door,
unlock the vehicle with the remote keyless entry (if so
equipped) or central unlock (if so equipped). They will
remain on for about 30 seconds after all doors are closed
then fade to off.

The lights also will turn off if you turn on the ignition
after you close all doors.

DOOR LOCKS

WARNING!

For personal security and safety in the event of an
accident, lock the vehicle doors as you drive and
when you park and leave the vehicle.

WARNING!

When leaving the vehicle always remove the key
from the ignition lock, and lock your vehicle. Do not
leave children unattended in the vehicle, or with
access to an unlocked vehicle. Unsupervised use of
vehicle equipment may cause severe personal inju-
ries and death.

THINGS TO KNOW BEFORE STARTING YOUR VEHICLE

15

2

Power Door Locks
There is a door lock switch on each front door trim panel
located to the front of the door handle. Press this switch
to lock or unlock the four doors.

If you press the door lock switch while the keys are in the
ignition switch, and the driver’s door is open, the doors
will not lock.

If the door lock plunger is down when you shut the door,
the door will lock. Therefore, make sure that the keys are
not inside the vehicle before closing the door.

The rear doors cannot be opened from inside the vehicle
until you pull up the lock plungers.

Power Door Lock Switch

Door Lock Plunger

16

THINGS TO KNOW BEFORE STARTING YOUR VEHICLE

Central Locking — If Equipped
All vehicle doors are locked with the first turn of the key
to the LOCK position. The double activation feature
requires you to turn the key in the cylinder lock two
times within five seconds to UNLOCK all vehicle doors
at once.

Door Ajar Warning
If you move the vehicle and a door is not completely
closed, the word DOOR will replace the odometer dis-
play and a chime will sound once. The odometer display
will reappear once the door is closed.

Automatic (Rolling) Door Locks
The doors will lock automatically, as programmed from
the factory, if:

1. The transaxle is in gear,

2. All doors are closed,

3. Vehicle speed is above 15 mph (24 km/h),

4. The accelerator pedal is depressed.

The Automatic Door Locks can be disabled or re-enabled
by performing the following procedure:

1. Close all doors and place the key in the ignition.

2. Cycle the ignition switch between OFF and ON/RUN
and back to OFF 4 times ending up in the OFF position.

Ignition Key Position

THINGS TO KNOW BEFORE STARTING YOUR VEHICLE

17

2

3. Depress the power door lock switch to lock the doors.

4. A single chime will indicate the completion of the
programming.

Automatic Unlock on Exit — Only Available if
Automatic Door Locks are Enabled
This feature will unlock all the doors when the driver’s
door is opened and the ignition switch is in the LOCK
position. This function is disabled as delivered from the
factory. Automatic Unlock on Exit can be enabled or
disabled by performing the following procedure:

1. Close all doors and place the key in the ignition.

2. Cycle the ignition switch between OFF and ON/RUN
and back to OFF 4 times ending up in the OFF position.

3. Depress the power door lock switch to unlock the
doors.

4. A single chime will indicate the completion of the
programming.

“Child Protection” Door Lock System (Rear
Doors)
To provide a safer environment for small children riding
in the rear seat, the rear doors of your vehicle have the
“child-protection” door lock system.

To use the system, open each rear door and use a key to
move the control near the door latch UP to the “Engage”
position as shown on the door label. When the system on
a door is engaged, that door can be opened only by using
the outside door handle. This will occur even though the
inside door lock is in the unlocked position.

Power Door Lock Switch

18

THINGS TO KNOW BEFORE STARTING YOUR VEHICLE

WARNING!

Avoid trapping anyone in the vehicle in a collision.
Remember that the rear doors can only be opened
from the outside when the child protection locks are
engaged.

NOTE:

For emergency exit with the system engaged,

move the lock plunger up (unlocked position), lower the
window and open the door with the outside door handle.

REMOTE KEYLESS ENTRY — IF EQUIPPED
This system allows you to lock or unlock the doors or
open the trunk from distances up to 23 feet (7 meters)
using a transmitter. You don’t have to point the transmit-
ter at the vehicle to activate the system.

To unlock the doors:
Press and release the UNLOCK button once to unlock the
driver’s door. Press the button twice within 5 seconds to
unlock all doors. If your vehicle is equipped with Illumi-
nated Entry, the interior lights also come on and remain
on for about 30 seconds, when you unlock the doors.

NOTE:

The system may be programmed to unlock all

the doors upon the first press of the Unlock button. To
toggle between the first press unlock of the driver’s door
to unlock of all doors, perform the following procedure:

Child Lock Control

Keyless Entry Transmitter

THINGS TO KNOW BEFORE STARTING YOUR VEHICLE

19

2

1. Press and hold the Unlock button on the transmit-
ter.

2. Continue to hold the Unlock button, wait at least 4
but no longer than 10 seconds, then press the LOCK
button.

3. Release both buttons.

The headlights will flash twice to acknowledge the
unlock signal.

NOTE:

The Lamp Flash can be enabled or disabled by

performing the following procedure:

1. Press and hold the Lock button on the transmitter.

2. Continue to hold the Lock button, wait at least 4 but
no longer than 10 seconds, then press the Trunk
button.

3. Release both buttons.

To lock the doors:
The horn will chirp and the headlamps will flash once to
acknowledge the lock signal.

NOTE:

The horn chirp can be enabled or disabled by

the following procedure:

1. Press and hold the Lock button on the transmitter.

2. Continue to hold the Lock button, wait at least 4 but
no longer than 10 seconds, then press the Unlock
button.

3. Release both buttons.

To unlock the trunk:
Press and hold the Trunk button on the transmitter to
unlatch the trunk.

NOTE:

The transmitter can be programmed to unlatch

the trunk immediately upon activation of the Trunk
button (without pressing and holding) by performing the
following procedure:

1. Press and hold the Unlock button on the transmit-
ter.

20

THINGS TO KNOW BEFORE STARTING YOUR VEHICLE

2. Continue to hold the Unlock button, wait at least 4
but no longer than 10 seconds, then press the Trunk
button.

3. Release both buttons.

Panic Alarm
The panic mode unlocks the driver’s door, turns on the
interior lights, flashes the headlights, and sounds the
horn for about 3 minutes or until the alarm is turned off.

To use the Panic Alarm:
Press and hold the Panic Button for at least 1 second to
activate the panic alarm. Press and hold the panic button
a second time or unlock the door with the key (if
equipped with central locking) to deactivate the alarm.
The alarm will also shut itself off after 3 minutes, or when
the vehicle speed reaches 15 MPH (24 km/h).

To Program Additional Transmitters:
Up to 4 transmitters can be programmed to your vehicle.
To program a transmitter, perform the following proce-
dure:

1. With the vehicle in Park, turn the ignition switch to the
ON/RUN position.

2. Using a currently programmed transmitter, press the
Unlock button on the transmitter. Continue to hold the
Unlock button, wait at least 4 but no longer than 10
seconds, then press and hold the Panic button for at least
one second. Release both buttons simultaneously. You
will hear a chime to signal that you can proceed with
programming the new transmitter.

3. Press and release the Lock and Unlock buttons simul-
taneously, followed by a press and release of ANY button
on each new transmitter to be programmed as well as the
original transmitter. You will hear a chime when a
transmitter has been successfully programmed. You will
have 30 seconds to finish programming all new transmit-
ters. A chime will sound when the 30 seconds is over or
the ignition switch is turned to the LOCK position.

General Information
This transmitter complies with FCC rules part 15 and
with RS-210 of Industry Canada. Operation is subject to
the following two conditions:

1. This device may not cause harmful interference

THINGS TO KNOW BEFORE STARTING YOUR VEHICLE

21

2


Content      ..       1      2     ..