Lancia FLAVIA. Instruction - part 3
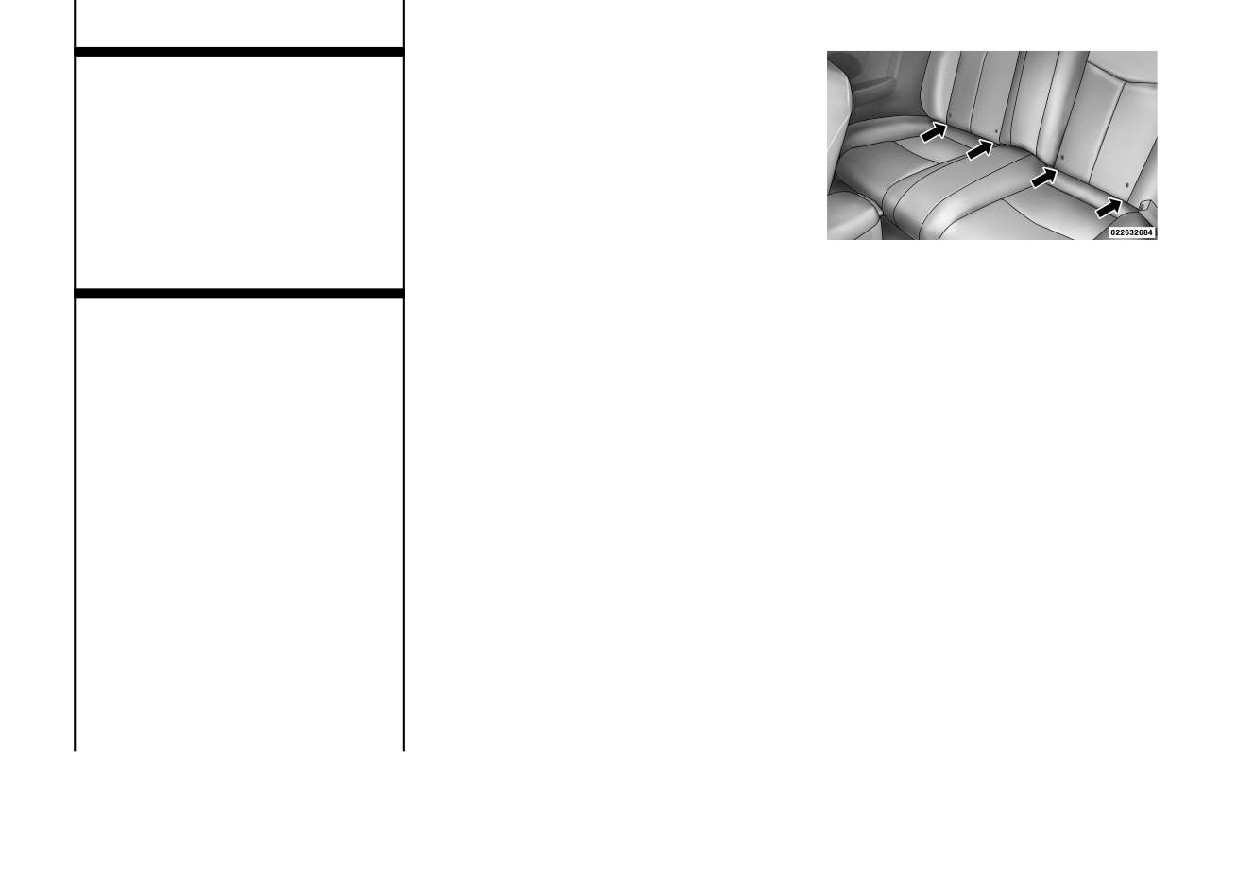
ISOFIX-compatible child seats such
WARNING!
that two seats share a common lower
When your child restraint is not in
anchorage. If you are installing
use, secure it in the vehicle with the
ISOFIX-compatible child restraints in
seat belt or remove it from the ve-
adjacent rear seating positions, you
hicle. Do not leave it loose in the
can use the ISOFIX anchors or the
vehicle. In a sudden stop or colli-
vehicle's seat belts. If your child re-
sion, it could strike the occupants
straints are not ISOFIX-compatible,
or seatbacks and cause serious per-
you can only install the child re-
Rear Seat ISOFIX Anchors
sonal injury.
straints using the vehicle's seat belts.
Because the lower anchorages are to
For typical installation instructions,
ISOFIX — Child Seat Anchorage
be introduced to passenger carrying
refer to
“Installing The ISOFIX-
System
vehicles over a period of years, child
Compatible Child Restraint System”.
restraint systems having attachments
Your vehicle is equipped with the
for those anchorages will continue to
child restraint anchorage system
Rear Seat ISOFIX Anchors
have features for installation in ve-
called ISOFIX. The ISOFIX system
Child restraints systems having at-
hicles using the lap or lap/shoulder
provides for the installation of the
tachments designed to connect to the
belt. They will also have tether straps,
child restraint without using the vehi-
lower anchorages are now available.
and you are urged to take advantage
cle's seat belts. The two rear seating
Child restraints having tether straps
of all of the available attachments
positions have lower anchorages that
and hooks for connection to the top
provided with your child restraint in
are capable of accommodating
tether anchorage, have been available
any vehicle.
ISOFIX-compatible child seats hav-
for some time. In fact, many child
ing flexible, webbing-mounted lower
restraint manufacturers will provide
attachments or fixed lower attach-
add-on tether strap kits for some of
ments. Regardless of the specific type
their older products.
of lower attachment, never install
43
NOTE: When using the ISOFIX
Installing The ISOFIX-
covers in the carpet covering the back of
attaching system to install a child
Compatible Child Restraint
the seat where you see this symbol.
restraint, please ensure that all
System
Many, but not all, restraint systems
seat belts not being used for occu-
We urge you to carefully follow the
will be equipped with separate straps
pant restraints are stowed and out
directions of the manufacturer when
on each side, with each having a hook
of reach of children. It is recom-
installing your child restraint. Not all
or connector for attachment to the
mended that before installing the
child restraint systems will be in-
lower anchorage and a means of ad-
child restraint, buckle the seat belt
stalled as described here. Again, care-
justing the tension in the strap.
so the seat belt is tucked behind
fully follow the installation instruc-
Forward-facing toddler restraints and
the child restraint and out of
tions that were provided with the
some rear-facing infant restraints will
reach. If the buckled seat belt in-
child restraint system.
also be equipped with a tether strap, a
terferes with the child restraint in-
hook for attachment to the tether
stallation, instead of tucking the
The rear seat lower anchor-
strap anchorage and a means of ad-
seat belt behind the child re-
ages are round bars, located
justing the tension of the strap.
straint, route the seat belt through
at the rear of the seat cush-
the child restraint belt path and
ion where it meets the seat-
You will first loosen the child seat
then buckle it. This should stow
back, and are just visible when you
adjusters on the lower straps and on
the seat belt out of the reach of an
lean into the rear seat to install the
the tether strap so that you can more
inquisitive child. Remind all chil-
child restraint. You will easily feel
easily attach the hooks or connectors
dren in the vehicle that the seat
them if you run your finger along the
to the vehicle anchorages. Next, at-
belts are not toys and should not be
intersection of the seatback and seat
tach the lower hooks or connectors
played with, and never leave your
cushion surfaces.
over the top of the seat cover material.
child unattended in the vehicle.
Then, rotate the tether anchorage
In addition, there are tether
cover directly behind the seat where
strap anchorages behind
you are placing the child restraint,
each rear seating position.
push the tether strap and hook
Access ports to the tether an-
through the access port and down into
chors are located in the panel between
the trunk. Open the access cover on
the rear seat and the rear window. The
the carpet covering the back of the
tether anchors are underneath access
seat and attach the tether strap hook
44
to the anchor. Be careful to route the
the child restraint belt path and
System (CRS). These types of seat
tether strap to provide the most direct
then buckle it. This should stow
belts are designed to keep the lap por-
path between the anchor and the child
the seat belt out of the reach of an
tion of the seat belt tight around the
restraint. Finally, tighten all three
inquisitive child. Remind all chil-
child restraint so that it is not neces-
straps as you push the child restraint
dren in the vehicle that the seat
sary to use a locking clip. The ALR
rearward and downward into the seat,
belts are not toys and should not be
will make a ratcheting noise if you
removing slack in the straps accord-
played with, and never leave your
extract the entire belt from the retrac-
ing to the child restraint manufactur-
child unattended in the vehicle.
tor and then allow the belt to retract
er's instructions.
into the retractor. For additional in-
WARNING!
formation on ALR, refer to “Auto-
NOTE: When using the ISOFIX
Improper installation of a child re-
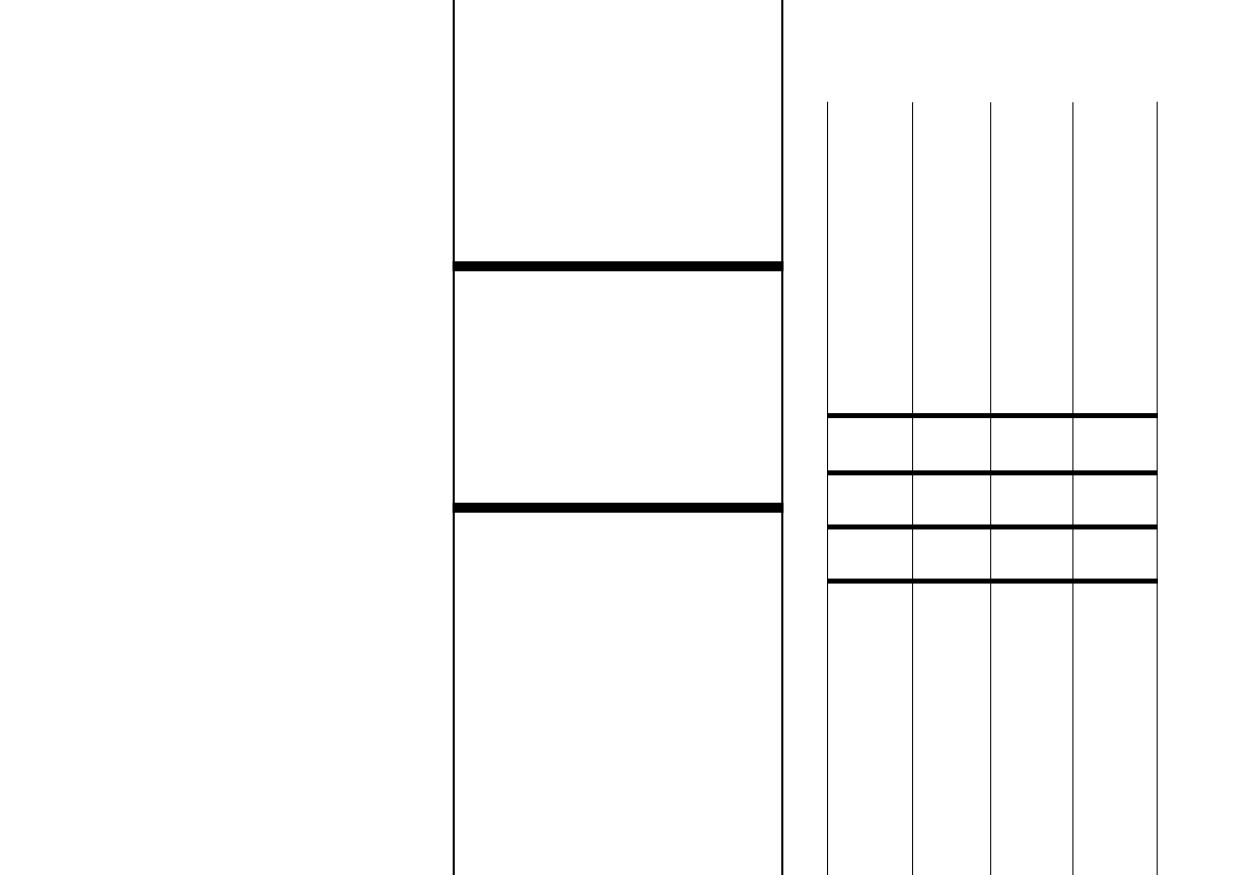
matic Locking Mode”. The chart be-
attaching system to install a child
straint to the ISOFIX anchorages
low defines the seating positions with
restraint, please ensure that all
can lead to failure of an infant or
an Automatic Locking Retractor
seat belts not being used for occu-
child restraint. The child could be
(ALR) or a cinching latch plate.
pant restraints are stowed and out
badly injured or killed. Follow the
of reach of children. It is recom-
Driver
Center
Pas-
manufacturer's directions exactly
mended that before installing the
when installing an infant or child
senger
child restraint, buckle the seat belt
restraint.
First
N/A
N/A
N/A
so the seat belt is tucked behind
Row
the child restraint and out of
Installing Child Restraints Using
Second
ALR
N/A
ALR
reach. If the buckled seat belt in-
The Vehicle Seat Belts
Row
terferes with the child restraint in-
The seat belts in the rear passenger
stallation, instead of tucking the
• N/A — Not Applicable
seating positions are equipped with
seat belt behind the child re-
an Automatic Locking Retractor
• ALR — Automatic Locking
straint, route the seat belt through
(ALR) to secure a Child Restraint
Retractor
45
Installing a Child Restraint with an
from the buckle and twist the short
ALR:
buckle-end belt several times to
shorten it. Insert the latch plate into
1. To install a child restraint with
the buckle with the release button
ALR, first, pull enough of the seat belt
facing out.
webbing from the retractor to route it
through the belt path of the child re-
•
If the belt still can’t be tightened, or
straint. Slide the latch plate into the
if pulling and pushing on the re-
buckle until you hear a “click.” Next,
straint loosens the belt, disconnect
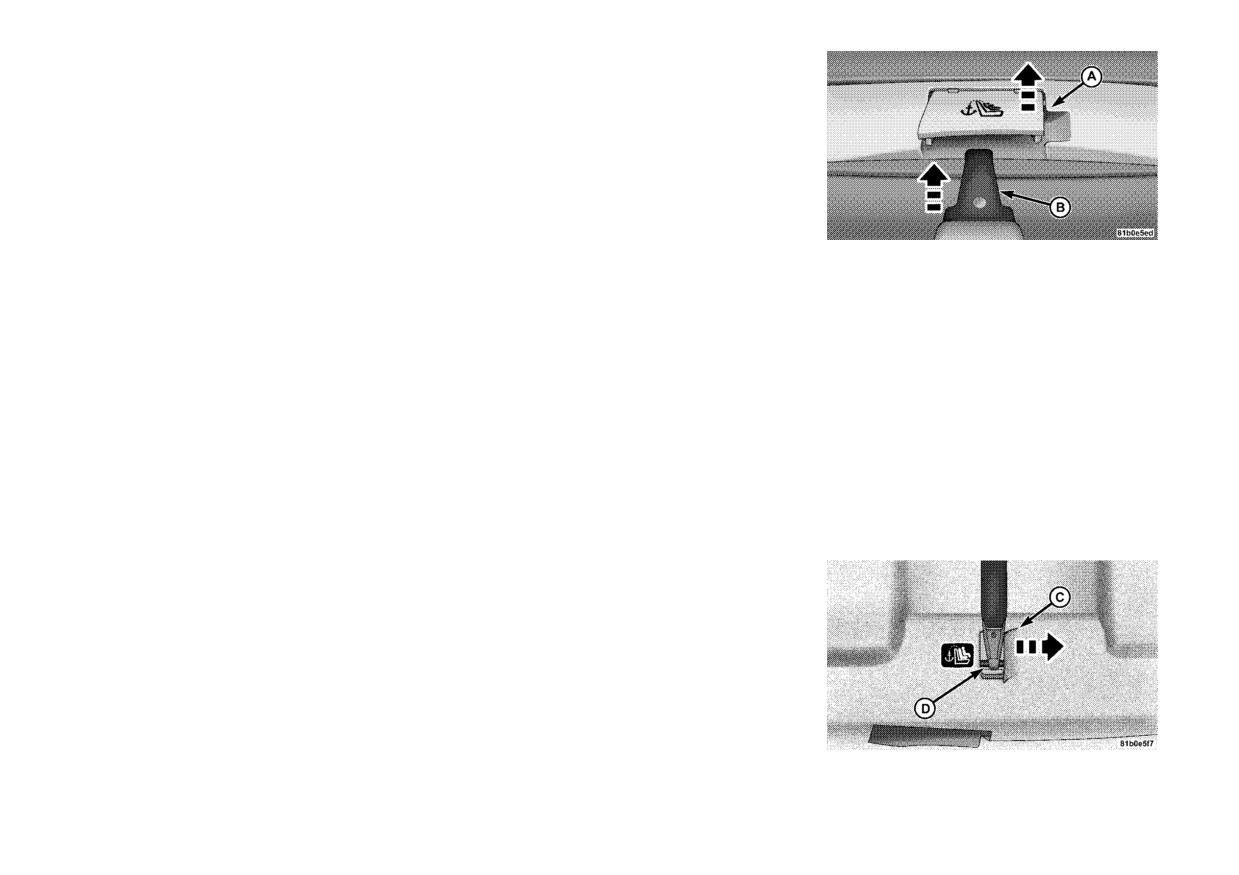
Child Tether Access Port Cover
extract all the seat belt webbing out of
the latch plate from the buckle,
3. Push the tether strap and hook (B)
the retractor and then allow the belt to
turn the buckle around, and insert
through the access port and down into
retract into the retractor. As the belt
the latch plate into the buckle
the trunk.
retracts, you will hear a ratcheting
again. If you still can’t make the
sound. This indicates the safety belt is
child restraint secure, try a differ-
NOTE: Route the tether strap to
now in the Automatic Locking mode.
ent seating position.
provide the most direct path from
2. Finally, pull on any excess web-
To attach a child restraint tether
the child seat to the anchor.
bing to tighten the lap portion around
strap:
4. Open the access cover (C) on the
the child restraint. Any seat belt sys-
1. If lowered, raise the convertible top.
carpet covering the back of the seat
tem will loosen with time, so check the
and attach the tether strap hook (D)
belt occasionally, and pull it tight if
NOTE: The convertible top must
to the anchor.
necessary.
be in the UP position to access the
tether anchor.
• In the rear seat, you may have
trouble tightening the lap/shoulder
2. Open the access port cover (A) be-
belt on the child restraint because
hind the seat where you are placing
the buckle or latch plate is too close
the child restraint.
to the belt path opening on the re-
straint. Disconnect the latch plate
Child Tether Anchor
46

5. Remove slack in the tether strap
Drive moderately during the first
SAFETY TIPS
according to the child restraint manu-
500 km. After the initial 100 km, speeds
facturer's instructions.
up to 80 or 90 km/h are desirable.
Transporting Passengers
While cruising, brief full-throttle ac-
NEVER TRANSPORT PASSENGERS
WARNING!
celeration within the limits of local
IN THE CARGO AREA.
An incorrectly anchored tether strap
traffic laws contributes to a good
could lead to increased head motion
break-in. Wide-open throttle accel-
WARNING!
and possible injury to the child. Use
eration in low gear can be detrimental
• Do not leave children or animals
only the anchor positions directly
and should be avoided.
inside parked vehicles in hot
behind the child seat to secure a
weather. Interior heat build-up
child restraint top tether strap.
The engine oil installed in the engine at
may cause serious injury or death.
the factory is a high-quality energy con-
• It is extremely dangerous to ride
Transporting Pets
serving type lubricant. Oil changes
in a cargo area, inside or outside
should be consistent with anticipated
Air Bags deploying in the front seat
of a vehicle. In a collision, people
climate conditions under which vehicle
could harm your pet. An unrestrained
riding in these areas are more
pet will be thrown about and possibly
operations will occur. For the recom-
likely to be seriously injured or
mended viscosity and quality grades,
injured, or injure a passenger during
killed.
refer to “Maintenance Procedures” in
panic braking or in a collision.
• Do not allow people to ride in any
“Maintaining Your Vehicle”. NON-
area of your vehicle that is not
Pets should be restrained in the rear
DETERGENT OR STRAIGHT MIN-
equipped with seats and seat
seat in pet harnesses or pet carriers
ERAL OILS MUST NEVER BE USED.
belts.
that are secured by seat belts.
A new engine may consume some oil
• Be sure everyone in your vehicle is
during its first few thousand kilome-
in a seat and using a seat belt
ENGINE BREAK-IN
ters of operation. This should be con-
properly.
RECOMMENDATIONS
sidered a normal part of the break-in
A long break-in period is not required
and not interpreted as an indication of
for the engine and drivetrain (trans-
difficulty.
mission and axle) in your vehicle.
47
Exhaust Gas
The best protection against carbon
Safety Checks You Should
monoxide entry into the vehicle body
Make Inside The Vehicle
WARNING!
is a properly maintained engine ex-
haust system.
Seat Belts
Exhaust gases can injure or kill.
They contain carbon monoxide
Whenever a change is noticed in the
Inspect the belt system periodically,
(CO), which is colorless and odor-
sound of the exhaust system, when
checking for cuts, frays, and loose
less. Breathing it can make you un-
exhaust fumes can be detected inside
parts. Damaged parts must be re-
conscious and can eventually poi-
the vehicle, or when the underside or
placed immediately. Do not disas-
son you. To avoid breathing (CO),
rear of the vehicle is damaged, have a
semble or modify the system.
follow these safety tips:
competent mechanic inspect the com-
Front seat belt assemblies must be
• Do not run the engine in a closed
plete exhaust system and adjacent
replaced after a collision. Rear seat
garage or in confined areas any
body areas for broken, damaged, de-
belt assemblies must be replaced after
longer than needed to move your
teriorated, or mispositioned parts.
a collision if they have been damaged
vehicle in or out of the area.
Open seams or loose connections
(i.e., bent retractor, torn webbing,
• If you are required to drive with
could permit exhaust fumes to seep
etc.). If there is any question regard-
the trunk/liftgate open, make
into the passenger compartment. In
ing belt or retractor condition, replace
sure that all windows are closed
addition, inspect the exhaust system
the belt.
and the climate control BLOWER
each time the vehicle is raised for lu-
switch is set at high speed. DO
brication or oil change. Replace as
NOT use the recirculation mode.
required.
• If it is necessary to sit in a parked
vehicle with the engine running,
adjust your heating or cooling
controls to force outside air into
the vehicle. Set the blower at high
speed.
48
Air Bag Warning Light
Floor Mat Safety Information
WARNING! (Continued)
The light should come on
Always use floor mats designed to fit
• Never put floor mats or other floor
and remain on for four to
the footwell of your vehicle. Use only
coverings on top of already in-
eight seconds as a bulb
floor mats that leave the pedal area
stalled floor mats. Additional floor
check when the ignition
unobstructed and that are firmly se-
mats and other coverings will re-
switch is first turned ON. If the light is
cured so that they cannot slip out of
duce the size of the pedal area and
not lit during starting, see your autho-
position and interfere with the pedals
interfere with the pedals.
rized dealer. If the light stays on,
or impair safe operation of your ve-
• Check mounting of mats on a
flickers, or comes on while driving,
hicle in other ways.
regular basis. Always properly re-
have the system checked by an autho-
install and secure floor mats that
rized dealer.
WARNING!
have been removed for cleaning.
Pedals that cannot move freely can
• Always make sure that objects
Defroster
cause loss of vehicle control and
cannot fall into the driver foot-
Check operation by selecting the de-
increase the risk of serious personal
well while the vehicle is moving.
frost mode and place the blower con-
injury.
Objects can become trapped un-
trol on high speed. You should be able
• Always make sure that floor mats
der the brake pedal and accelera-
to feel the air directed against the
are properly attached to the floor
tor pedal causing a loss of vehicle
windshield. See your authorized
mat fasteners.
control.
dealer for service if your defroster is
• Never place or install floor mats
• If required, mounting posts must
inoperable.
or other floor coverings in the ve-
be properly installed, if not
hicle that cannot be properly se-
equipped from the factory.
cured to prevent them from mov-
Failure to properly follow floor mat
ing and interfering with the
installation or mounting can cause
pedals or the ability to control the
interference with the brake pedal
vehicle.
and accelerator pedal operation
causing loss of control of the vehicle.
(Continued)
49
Periodic Safety Checks You
Door Latches
Should Make Outside The
Check for positive closing, latching,
Vehicle
and locking.
Tires
Fluid Leaks
Examine tires for excessive tread wear
Check area under vehicle after over-
and uneven wear patterns. Check for
night parking for fuel, engine coolant,
stones, nails, glass, or other objects
oil, or other fluid leaks. Also, if gaso-
lodged in the tread or sidewall. Inspect
line fumes are detected or if fuel,
the tread for cuts and cracks. Inspect
power steering fluid (2500/3500), or
sidewalls for cuts, cracks and bulges.
brake fluid leaks are suspected, the
Check the wheel nuts for tightness.
cause should be located and corrected
Check the tires (including spare) for
immediately.
proper cold inflation pressure.
Lights
Have someone observe the operation
of brake lights and exterior lights
while you work the controls. Check
turn signal and high beam indicator
lights on the instrument panel.
50
3
UNDERSTANDING THE FEATURES OF YOUR
VEHICLE
•
CONVERTIBLE TOP OPERATION
55
• POWER CONVERTIBLE TOP USAGE
PRECAUTIONS
56
• CARGO SHIELD
58
• POWER CONVERTIBLE TOP CONTROLS
59
• LOWERING THE POWER
CONVERTIBLE TOP
59
• RAISING THE POWER CONVERTIBLE TOP . . .59
• WIND STOP
60
• POWER CONVERTIBLE TOP OPERATION
AND WARNING MESSAGES
62
• EMERGENCY BYPASS MODE (TO RAISE THE
TOP ONLY)
65
•
MIRRORS
65
• AUTOMATIC DIMMING MIRROR
65
• OUTSIDE MIRRORS
66
• POWER MIRRORS
66
• HEATED MIRRORS
66
• VANITY MIRROR
67
51
•
UCONNECT™ PHONE
67
• COMPATIBLE PHONES
68
• OPERATION
68
• PHONE CALL FEATURES
73
• UCONNECT™ PHONE FEATURES
74
• ADVANCED PHONE CONNECTIVITY
77
• Things You Should Know About Your
Uconnect™ Phone
78
•
VOICE COMMAND
85
• VOICE COMMAND SYSTEM OPERATION
85
• COMMANDS
86
• VOICE TRAINING
88
•
SEATS
88
• POWER SEATS
88
• HEATED SEATS
89
• RECLINER ADJUSTMENT
90
• LUMBAR SUPPORT
90
• EASY ENTRY SYSTEM
91
• HEAD RESTRAINTS
91
•
TO OPEN AND CLOSE THE HOOD
93
•
LIGHTS
94
• MULTIFUNCTION LEVER
94
• HEADLIGHTS AND PARKING LIGHTS
94
• LIGHTS-ON REMINDER
94
• AUTOMATIC HEADLIGHTS
94
• HEADLIGHTS WITH WIPERS (AVAILABLE
WITH AUTOMATIC HEADLIGHTS ONLY)
94
52
• HEADLIGHT TIME DELAY
95
• INSTRUMENT PANEL DIMMER
95
• FOG LIGHTS
95
• Rear Fog Lights
96
• TURN SIGNALS
96
• LANE CHANGE ASSIST
96
• HIGH/LOW BEAM SWITCH
96
• FLASH-TO-PASS
96
• INTERIOR LIGHTS
96
• Headlight Leveling System
97
• BATTERY SAVER FEATURE
97
•
WINDSHIELD WIPERS AND WASHERS
97
• INTERMITTENT WIPER SYSTEM
98
• WINDSHIELD WASHERS
98
• MIST FEATURE
99
• HEADLIGHTS WITH WIPERS FEATURE
(AVAILABLE WITH AUTOMATIC
HEADLIGHTS ONLY)
99
•
TILT/TELESCOPING STEERING COLUMN
99
•
ELECTRONIC SPEED CONTROL
100
• TO ACTIVATE
100
• TO SET A DESIRED SPEED
100
• TO DEACTIVATE
101
• TO RESUME SPEED
101
• TO VARY THE SPEED SETTING
101
• TO ACCELERATE FOR PASSING
101
•
ELECTRICAL POWER OUTLETS
102
53
• CIGAR LIGHTER AND ASH RECEIVER
(for versions/markets, where provided)
103
• CUPHOLDERS
103
• FRONT SEAT CUPHOLDER
103
• REAR SEAT CUPHOLDERS
104
• STORAGE
104
• GLOVE BOX STORAGE COMPARTMENT
104
• CONSOLE FEATURES
104
• Storage
104
• REAR WINDOW FEATURES
105
• REAR WINDOW DEFROSTER
105
54
CONVERTIBLE TOP
When operating the power convert-
WARNING!
ible top, the trunk lid will pivot at the
OPERATION
The convertible top does not pro-
rear of the vehicle, swing open by the
vide the structural protection that a
rear window, and then pivot back-
CAUTION!
reinforced metal roof does and the
ward. This allows room for the top to
Failure to follow these cautions may
fabric top cannot be expected to
retract into or unfold from its stowage
cause interior water damage, stains
prevent the ejection of the occu-
area in the trunk.
or mildew on the top material:
pants in a collision. Therefore, it is
• Avoid high-pressure car washes,
important that all occupants wear
When lowering the top, the system
as they can damage the top mate-
their seat belts at all times. Death or
extends the hard tonneau cover,
serious injuries could occur if you
which stows conveniently underneath
rial. Also, increased water pres-
are ejected from the vehicle during
the trunk lid. The tonneau cover
sure may force water past the
a collision.
closes the area between the rear seats
weather strips.
and the trunk lid to conceal the top
• Remove any standing water from
You can lower or raise the power con-
when stowed.
the top and dry the surface before
vertible top from inside the vehicle or
opening it. Operating the top,
When raising the top, the system re-
lower the top remotely using the Re-
opening a door or lowering a win-
mote Keyless Entry (RKE) transmit-
tracts the hard tonneau cover back
dow while the top is wet may al-
ter. Either operation takes approxi-
into its stowage area underneath the
low water to drip into the vehicles
mately 30 seconds. The entire process,
trunk lid.
interior.
including unlatching or latching the
To complete either operation, the
• Use care when washing the vehicle,
top at the windshield header is auto-
trunk lid returns to its normal posi-
water pressure directed at the
matic.
tion and then latches.
weather strip seals may cause water
The top does take up some space in
to leak into the vehicles interior.
Spring-loaded flipper doors, which
the trunk when retracted. However,
provide clearance for the linkage,
the trunk will still hold a significant
close off notches in the quarter trim
amount of cargo.
panels when the top is down.
55
POWER CONVERTIBLE
• Opening and closing the top
CAUTION! (Continued)
consecutively without the engine
TOP USAGE PRECAUTIONS
• Do not use the area on top of the
running may run the battery
tonneau cover for storage.
NOTE:
down.
Failure to follow these cautions can
•
The convertible top will not op-
• If a fluttering noise is heard from
cause damage to the convertible top
erate unless the vehicle is sta-
the rear seat belts while driving
components, trunk contents, cargo
tionary, the cargo shield is posi-
with the top down, safely bring
shield, and the vehicle interior.
tioned correctly, and the trunk
the vehicle to a stop and buckle
lid is closed and latched. In ad-
the rear seat belts over the empty
CAUTION!
dition, the system is prohibited
seats. This will keep tension on
Before operating the power top:
from opening when the ambient
the seat belts and remove the
• Always check on top of the ton-
temperature is below 18°C.
fluttering condition.
neau cover area to be sure that it
•
The top system is prohibited
is clear of debris or other items.
CAUTION!
from closing when the ambient
• Make sure the ambient tempera-
• Correctly position the cargo
temperature is below 40°C.
ture is above 18°C.
shield in the trunk before stowing
• Never attempt to lower a frozen
•
Do not attempt to lower the top
the top. Doing so closes a switch
convertible top. Wait until the top
when frost, ice, or snow may be
that allows top operation (stow-
is thawed before lowering it into
present, this could cause dam-
ing) to proceed. If the switch is
the stowage compartment. Low-
age or prevent the top from stow-
not closed, a warning message
ering a cloth top at temperatures
ing completely.
displays in the instrument cluster
below 0°C should be avoided.
to notify the driver.
•
The Power Top Control Module
• Make sure the convertible top is dry
• Always place items carefully into
(PTCM) monitors and controls
before lowering it into the stowage
the trunk.
lowering and raising of the top.
compartment. Lowering the top
• Do not push items too far into the
A series of micro-switches verify
when damp, wet, or dirty can cause
trunk, particularly when the top
that operations are complete be-
stains, mildew, and damage to the
is retracted into its stowage area
fore allowing the next stage of
inside of your vehicle.
in the trunk.
lowering or raising operation.
(Continued)
(Continued)
56

CAUTION! (Continued)
CAUTION! (Continued)
WARNING!
• Make sure there is sufficient
• Always use a normal ice scraper
Failure to follow these warnings
clearance of at least 2.2 m for the
to remove snow or ice from the
can result in injuries that are seri-
top to move up.
rear window. Use of a sharp ob-
ous or fatal to you, your passengers,
• To prevent striking a low ceiling
ject or other tools could scratch
and others around you:
or automatic door opener with
the panels (hard top) or tear the
• Before operating the power top,
the top, it is strongly recom-
fabric (soft top) when removing
make sure that no moving parts
mended that you do not operate
snow or ice.
of the convertible top can injure a
the power top inside a garage or
• Always close the top when leaving
person or animal.
parking structure.
your vehicle so as not to leave the
• Never place any extremities
Failure to follow these cautions can
interior exposed to potentially
(hands, feet, etc.) near the con-
cause damage to the convertible top
damaging outdoor conditions.
vertible top components, the up-
components, trunk contents, and
• Do not leave the top lowered for
per windshield area, the shelf
the vehicle interior.
several weeks at a time. Close it
area behind the rear seats, or the
occasionally to prevent discolor-
convertible top stowage area
ation in the folds of the fabric and
while raising or lowering the con-
CAUTION!
to allow the creases to smooth
vertible top.
• Do not operate the power top with
out. This is especially important
• When using the power top button
the hydraulic pump valve open.
if the top was stowed when not
on RKE transmitter, if potential
• Do not allow the top to remain in
completely dry.
danger exists while lowering the
the suspended position. After ap-
Failure to follow these cautions can
top, release the button immedi-
proximately
10 minutes in the
cause damage to the convertible top
ately to interrupt the operation.
suspended position, the hydraulic
components, trunk contents, and
• When using the power top switch
pressure will release, which will
the vehicle interior.
on the instrument panel, if poten-
allow the top and the trunk lid to
tial danger exists while lowering
lower. Pressing the power top
the top, release the switch imme-
switch will cancel this operation.
diately to interrupt the operation.
(Continued)
(Continued)
57
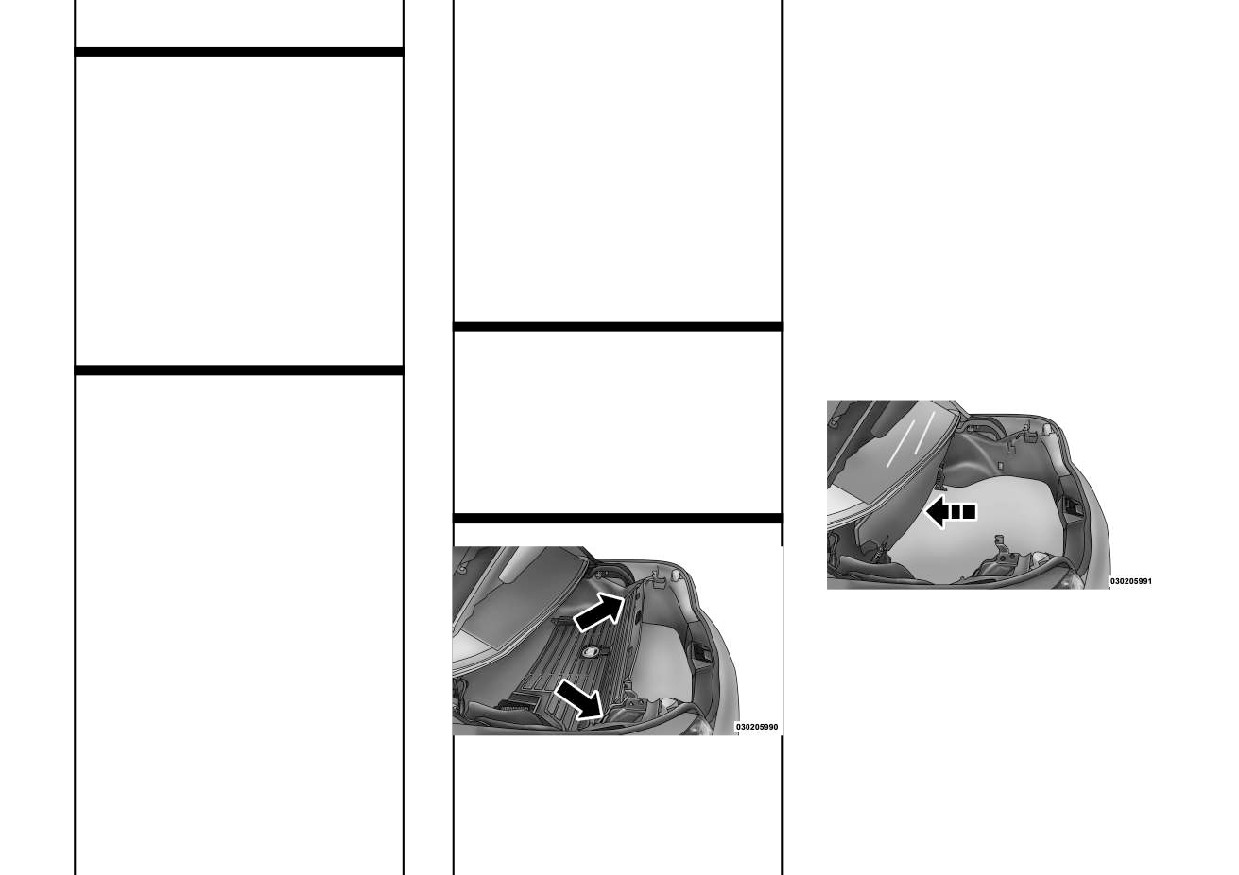
Positioning The Cargo Shield For
Positioning The Cargo Shield For
WARNING! (Continued)
Top Operation
Cargo Storage
• When using the power top switch
on the instrument panel, if poten-
Pull the cargo shield toward you to
To maximize the storage space in the
tial danger exists while raising the
begin unfolding the panels. Grasp the
trunk, the cargo shield can be stowed
top, release the switch immedi-
handle in the center of the outermost
in the forward portion of the trunk.
ately to interrupt the operation.
(top) panel and raise the cargo shield.
To stow the cargo shield, grasp the
• Only drive the vehicle with the
Then, align and seat the tabs at each
handle of the upright panel of the
convertible top completely closed
end of the cargo shield in the V slots in
cargo shield, lifting the pins out of the
and latched or fully lowered into
the trunk liner as shown in the illus-
V slots in the trunk trim. Continue
its stowage compartment.
tration.
folding the upright panel forward
• Do not operate the power top
onto the horizontal panel, then grasp
when the vehicle is in motion.
CAUTION!
both panels and lift them to the for-
Do not place items on top of the
ward, upright position in the trunk.
CARGO SHIELD
cargo shield. Items placed on cargo
protector will interfere with the top
The cargo shield is located in the
during operation and cause exces-
trunk. Before lowering the convertible
sive damage to the top and cargo
top, you must unfold the cargo shield
shield.
and seat the tabs at each end of the
cargo shield in the V slots in the trunk
liner. Doing so closes a switch that
allows top operation. If the switch is
not closed, a warning message dis-
Stowed Cargo Shield
plays in the instrument cluster to no-
NOTE: The convertible top will
tify the driver.
NOT operate with the cargo shield
in the stowed position.
Cargo Shield
58