MG ZS. Instruction - part 8
 

  Index      Instructions     MG ZS. Instruction


Search            copyright infringement  


Content      ..     6      7      8      9     ..


MG ZS. Instruction - part 8


AIR CONDITIONING AND AUDIO SYSTEMS

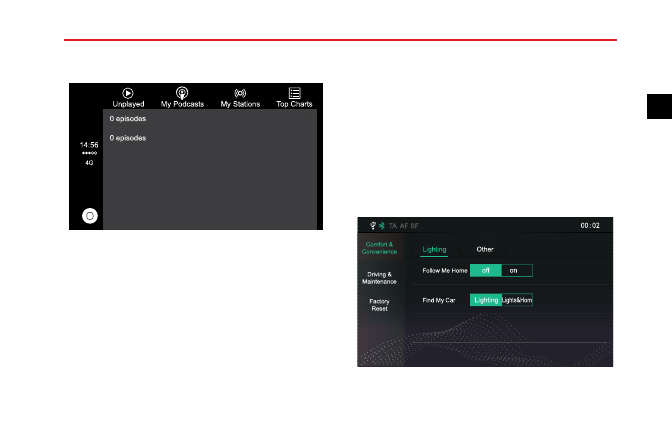
Third-party Applications of Apple CarPlay

Apple CarPlay also supports Podcast, Audiobook,
iHeartRadio, AtBat and other third-party applications.
Refer to the operating instructions of corresponding
software for speciic operation method.

Vehicle Settings

With the ignition switch in the ON position, touch
[Vehicle] in the main interface to enter the Vehicle Settings
interface.

Comfort and Convenience
After entering the Comfort and Convenience interface in
the Vehicle Settings, [Lights] and [Others] can be set.

Lighting

113

2

-------------------------------------------------------------------------------------------------------------------------------------------------------------

AIR CONDITIONING AND AUDIO SYSTEMS

• Follow Me Home: Select to turn on/off Follow Me

Home function as required.

• Find My Car: Set the way in which the car can be

identiied: [Lights only] or [Lights + Horn].

Others

In the [Lights] interface, touch [Others] to set function of
the “*” button on the steering wheel.

The steering wheel “*” button can be set as the shortcut
key of [Carplay], [Vehicle Settings] or [Main Interface].

Driving and Maintenance
In the Vehicle Settings interface, touch [Driving and
Maintenance] to enter the Driving and Maintenance
Settings interface.

• The level of power steering assistance can be set as

[Urban], [Normal] or [Dynamic].

Factory Settings
In the Vehicle Settings interface, touch [Factory Settings]
to enter Restore Factory Settings interface.

114

-------------------------------------------------------------------------------------------------------------------------------------------------------------

AIR CONDITIONING AND AUDIO SYSTEMS

Touch [Reset] in the Factory Settings interface, the
on-board entertainment system will be reset to its original
settings and all data in the Vehicle Settings system will be
deleted. Please use with caution.

A/C Display

For vehicles equipped with automatic A/C, when adjusting
A/C, the status bar will automatically pop up at the bottom
of the main interface.

1 Air Conditioning On/Off Display

2 Temperature Display

3 Air Distribution Mode Display

To "Face".

To "Face" + "Foot well".

To "Footwell".

To "Footwell"+ "Defrost".

4 Blower Speed Display

5 Air External Circulation Mode Display:

External

Circulation

6 Air Internal Circulation Mode Display:

Internal

Circulation

115

2

-------------------------------------------------------------------------------------------------------------------------------------------------------------

AIR CONDITIONING AND AUDIO SYSTEMS

Settings

Volume Setting
Touch the setting area in the main interface to enter the
Volume Setting interface.

• System Prompt Tone

Touch to adjust system prompt tone volume.

• Keypad Tone

Touch to turn on/off keypad tone.

• Loudness Compensation

When enabled this will help compensate for deiciencies
in the bass and treble ranges at low volume.

• Speed Volume Control (SVC)

The speed volume has 3 levels: low, medium and high.
Select as required, or turn it off.

116

-------------------------------------------------------------------------------------------------------------------------------------------------------------

AIR CONDITIONING AND AUDIO SYSTEMS

EQ Setting

Touch [EQ Setting] to enter EQ Setting interface. You are
able to chose between 6 preset equaliser levels to suit your
own preference.

The preset EQ has 6 options: Classic, Pop, Jazz, Vocal,
Rock, and Custom.

Touch and drag the marker

to customize the EQ

parameters.

When the value of any band of the EQ is being changed,
custom is automatically highlighted, which indicates that it

is selected. When exiting the EQ setting, the setting will
be automatically saved.

Note: The EQ setting only works on media-type
audios, so please use volume knob or steering wheel
buttons to adjust the volume of other audios.

Sound Stage Setting

Touch [Sound Stage] to enter Sound Stage interface. You
can choose a balance setting that provides an ideal listening
environment in all occupied seats.

Touch

to adjust the central position of sound ield.

117

2

-------------------------------------------------------------------------------------------------------------------------------------------------------------

AIR CONDITIONING AND AUDIO SYSTEMS

Touch

to select single or multiple mode,

or cancel 3D sound ield mode.

RDS DAB Setting
In the settings interface, touch [RDS/DAB], and enter the
RDS/DAB settings interface.

• Touch [DAB Station List Order] to select the way in

which the station list is sorted and displayed.

Touch [by Ensemble] to sort the station list by ensemble
name and then stations in alphabetical order.

Touch [by Station] to display the station list in
alphabetical order.

• Touch [FM Trafic Announcements] to turn on/off the

TA function.

118

-------------------------------------------------------------------------------------------------------------------------------------------------------------

AIR CONDITIONING AND AUDIO SYSTEMS

Selecting TA [On] allows the system to analyse and
communicate trafic messages to the driver.

This

information may be in the form of voice messages.

Select [Off] to inhibit trafic announcements.

• Touch [Alternative Frequency] to turn on/off the AF

function.

AF is alternative frequency

,when the signal is below a

certain level, AF will automatic search for an alternative
frequency of the current station if the current station
supports this function.

• Touch [Service Following] to turn on/off the Service

following function.

Service Following is the term applied to maintaining the
same audio or data content that the user has selected
in varying reception conditions if the current station
supports this function.

• Touch [Enhanced Other Networks]

,you can select LO

or DX states.

EON - Enhanced Other Networks enables the system
to obtain information from other networks as well

as the one selected. Select LO for Local or DX for
networks further aield.

• Touch [Regional] to turn on/off the Regional tracking

mode function.

• Touch [DAB Announcements]

, there are 11

Announcements types to choose from.

Touch the check box to select.

Time and Date Setting
In the setting interface, touch [Time] to enter the Time
and Date Setting interface.

119

2

-------------------------------------------------------------------------------------------------------------------------------------------------------------

AIR CONDITIONING AND AUDIO SYSTEMS

Date and Time Setting

Move the corresponding number up or down to set the
system time. The set time will be synchronised with, and
displayed in the information centre of instrument pack.

Time Format

You can select 12-hour format or 24-hour format
according to your preference.

Auto Time

You can select the method by which the time is updated
[Auto Time] via GPS, DAB or Instruction according to your
preference.

Daylight Saving Time

You can turn on/off the function of Daylight Saving Time
according to your preference.

Connection Setting
Touch [Bluetooth] to enter the Bluetooth Switch interface.
For details refer to "Bluetooth Phone" in this section.

Display Setting
Touch [Display] to enter the Display Setting interface, you
are able to adjust the display to your personal preference.

Brightness

When the brightness mode is [Day] or [Night], touch and
drag the cursor to adjust the backlight brightness of the

120

-------------------------------------------------------------------------------------------------------------------------------------------------------------

AIR CONDITIONING AND AUDIO SYSTEMS

screen. When the brightness mode is [Auto], the system
will display the default brightness value.

Backlight Mode

You can choose [Auto], [Day] or [Night] mode to adjust
the screen brightness as required.

System Settings
Touch [System] on the Setting interface to enter
the System Settings interface, where you can view
software/hardware levels and set some basic states and
functions of the system.

Help File

Touch [Open], to view the brief operating instructions of
the system.

Factory Reset

Touch [Start] to enter Restore Factory Settings interface,
and restore [All], [Audio Setting], [Station Storage] and
[Others] to default factory settings as required. A dialog
box will be displayed asking "Are you sure to restore
factory settings?".

After

restoring

factory

settings,

the

on-board

entertainment system is reset to its original settings and all
data in the entertainment system will be deleted. Please
use with caution.

In the [System] interface, you can view [Software version],
[Hardware version], [Serial No] and other data.

On models itted with navigation you are able to perform
navigation updates.

121

2

-------------------------------------------------------------------------------------------------------------------------------------------------------------

-------------------------------------------------------------------------------------------------------------------------------------------------------------

-------------------------------------------------------------------------------------------------------------------------------------------------------------

SEATS & RESTRAINTS

Seats

Overview

To avoid personal injuries due to the loss of
control, DO NOT adjust the seats while the
car is moving.

The vehicle is equipped with 6-direction or 4-direction
adjustable front seats and 60/40 split rear seats with
foldable backrests.

An ideal position of the seat should make sure your driving
position is comfortable, which allows you to hold the
steering wheel with your arms and legs slightly bent and
control all the equipment. Make sure your driving position
is comfortable and enables you to maintain full control
of the vehicle. Take care when adjusting the height of
front seats - the feet of the rear passenger could become
trapped when the seat is lowered.

Do not incline the front-seat backrest excessively.
Optimum beneit is obtained from the seat belt with the
backrest angle set to approximately 25° from the upright
(vertical). The driver and front passenger seats should

be positioned as far rearward as practical. A properly
adjusted seat helps reduce the risk of injury from sitting
too close to an inlating airbag.

124

-------------------------------------------------------------------------------------------------------------------------------------------------------------

SEATS & RESTRAINTS

Head Restraints

Adjust the height of the head restraint so that
the top of it is in line with the top of the
occupant's head. This location may reduce
the risk of head and neck injuries in the event
of a collision. DO NOT adjust or remove the
head restraints while the car is moving.

DO NOT hang anything on any head restraint
or head restraint rod.

The head restraint is designed to prevent rearward
movement of the head in the event of a collision or
emergency braking, thereby reducing the risk of head and
neck injuries.

The front headrests have 4 positions to adjust the height,
while those of rear seats have 2 positions to adjust he
height.

When adjusting a head restraint from low to high position,
pull the head restraint directly upward, and gently press
it downward after it reaches the desired position to
make sure that it is locked in position. To remove the
head restraint, press and hold the guide sleeve button (as
indicated by the arrow) on the left of the head restraint,
then pull the head restraint upward to remove it.

When adjusting a head restraint from high to low position,
press the guide sleeve button (as indicated by the arrow) on
the left of the head restraint, and press the head restraint

125

3

-------------------------------------------------------------------------------------------------------------------------------------------------------------

SEATS & RESTRAINTS

downward; release the button after it reaches the desired
position, and gently press the head restraint downward to
make sure that it is locked in position.

Instruction Adjustment of Seats

• Forward/Backward Adjustment

Lift the lever (1) under the seat cushion, slide the seat
into an appropriate position and release the lever. Make
sure that the seat is locked in place.

• Cushion Height Adjustment

*

Lift the lever (2) repeatedly to raise the seat cushion,
and press the lever downward to lower the seat
cushion.

• Backrest Adjustment

Lift the lever (3), adjust the backrest until it moves into
a satisiable position , and put down the lever.

126

-------------------------------------------------------------------------------------------------------------------------------------------------------------

SEATS & RESTRAINTS

Rear Seats

Folding Rear Seats
To increase luggage space, irst fully lower (or remove) all
the rear seat head restraints, and then pull up the backrest
unlock straps on both sides respectively and fold the seat
backrests forward.

Note: When the head restraint of the rear seat is
not fully lowered or the backrest of the front seat is

inclined backward excessively, the folding of the rear
seat is very likely to damage the back of the front seat,
small storage compartment or head restraint of the
rear seat.

Unfolding and Locking Rear Seat Backrests
When returning the rear seat backrest to the upright
position, pull up the backrest unlock straps to release
the locked state, push the backrest until it reaches an
appropriate position, and the backrest is locked when you
hear a click.

Note: When returning the rear seat backrest to the
desired position, make sure that the rear seat belt is
not trapped.

127

3

-------------------------------------------------------------------------------------------------------------------------------------------------------------

SEATS & RESTRAINTS

Seat Belts

It is important that all seat belts are worn
correctly. Always check that all passengers
are wearing seat belts.

DO NOT carry

passengers that are unable to wear correctly
positioned seat belts. Wearing seat belts
incorrectly may cause serious injury or even
death in the event of a collision.

Airbags can not replace seat belts. Airbags
can only provide extra support when
triggered, and not all trafic accidents
will trigger airbags. Whether airbags are
triggered or not, seat belts can reduce the
risks of serious injury or death in accidents.
Therefore, seat belts must be worn properly.

NEVER unfasten a seat belt whilst driving,
serious injury or death may occur in the case
of an accident or emergency braking.

NEVER fasten the driver seat belt or use
a buckle replacement when the driver
seat is vacant or when exiting the vehicle.
This could cause the engine to restart
automatically.

This vehicle is equipped with seat belt warning

lamp to remind you to fasten your seat belt.

During driving, seat belts must be fastened

,this is because:

• You can never predict if you will be involved in a collision

accident and how serious it may be.

• In many cases of collision accidents, passengers with

seat belts properly fastened are well-protected, while
passengers with seat belts not fastened suffer from
serious injury or even death.

Therefore, all passengers must wear seat belts correctly,
even during short-distance journeys.

128

-------------------------------------------------------------------------------------------------------------------------------------------------------------


Content      ..     6      7      8      9     ..