MG GS. Instruction - part 4
 

  Index      Instructions     MG GS. Instruction


Search            copyright infringement  


Content      ..     2      3      4      5     ..


MG GS. Instruction - part 4


INSTRUMENTS AND CONTROLS

Sunvisor

The vanity mirror on the driver side should
only be used when the car is stationary.

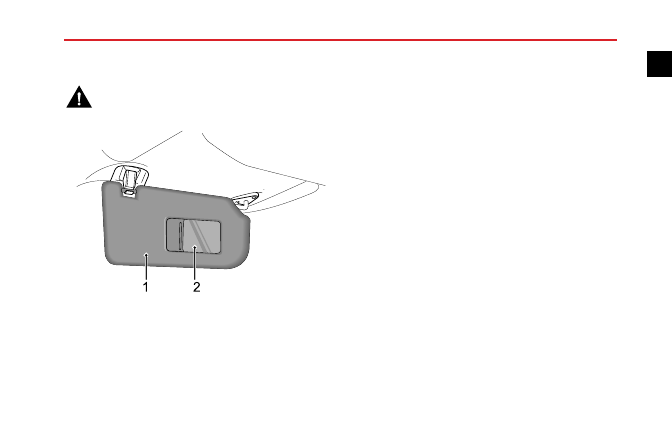
Sunvisors (1) are arranged on the roof ahead of both the
driver and the front passenger. Some models have vanity
mirror (2), depending on the vehicle configuration.

For the models which have vanity mirror. Pull the sunvisor
downward to use the vanity mirror.

49

1

-------------------------------------------------------------------------------------------------------------------------------------------------------------

INSTRUMENTS AND CONTROLS

Windows

Power Operated Window Switch

1 Front Left Window Switch

2 Front Right Window Switch

3 Rear Left Window Switch

4 Rear Right Window Switch

5 Rear Window Isolation Switch

Window Operation

Ensure children are kept clear when raising or
lowering a window.

Improper use or activation of the electric
windows

or

sunroof

by

children

could

cause serious harm or even death.

It is

the responsibility of the driver and adult
passengers to ensure that when carrying
children the necessary steps are taken to
isolate the window and sunroof operation.
This should include the removal of the
ignition key when children are left alone in
the vehicle.

Special care should be taken if operating any
form of automatic global opening or closing
function. It is essential to check that all items
that will be operated are clear of obstruction.
Failure to ensure this could result in serious
injury.

50

-------------------------------------------------------------------------------------------------------------------------------------------------------------

INSTRUMENTS AND CONTROLS

Press the switch (1-4) to open the window, pull the switch
to close the window, The window will stop moving as soon
as the switch is released (unless the ‘One-Touch’ function
is active).

Note: The front and rear passenger windows can also
be operated by individual window switches, mounted
on each door.

The rear window switches will not

function if the rear window isolation switch (5) on the
driver door has been activated.

Note: When the ignition switch is in position I or II,
the power window can be operated (For safety: doors
should be closed).

Rear Window Isolation Switch

Press the switch (5) to isolate the rear window controls (an
indicator lamp in the switch illuminates), and press again to
restore control.

Note: It is recommended that you ISOLATE the rear
window switches when carrying children.

One Touch Down

*

Short press the window control switch (1 to 4) to the
"2" position and release.

The corresponding window

automatically descends to fully open. Window movement
can be stopped at desired position at any time by briefly
pulling up the corresponding switch during descent.

One Touch Up with Anti - Trap

The front right window ( 2 ) has the "one-touch" up
function, the operating manner of this function is the same
with that of the "one-touch" down function.

Window

movement can be stopped at desired position at any time
by briefly pressing the switch again.

The ‘Anti-Trap’ function is a safety feature which prevents
the window from fully closing if an obstruction is sensed -
if this happens the window will open slightly to allow the
obstruction be removed.

Note: Do not operate the power window controls
continuously for more than 20 seconds, otherwise the
power window controls may be disabled to protect

51

1

-------------------------------------------------------------------------------------------------------------------------------------------------------------

INSTRUMENTS AND CONTROLS

the motor. If this occurs, please wait until the motor
cools down.

Note: If the battery is disconnected, the ‘One-Touch’
and ‘Anti-Trap’ features will be lost, the message
centre will display 'Please Initialise Driver Window'.
To restore this feature, fully open and then fully close
the window holding the switch for 5 seconds in the
closed position.

52

-------------------------------------------------------------------------------------------------------------------------------------------------------------

INSTRUMENTS AND CONTROLS

Interior Light

Front Courtesy and Map Reading Lights

2

1

2

Instruction Operation

Press the switch (1) to turn the courtesy light on, press
again to turn off. Press one of the switches (2) to turn on
a map reading light, press again to turn off.

Automatic Operation

Courtesy light illumination occurs automatically whenever
the following occur.

• The car is unlocked.

• Any door or the tail gate is opened.

• The ignition is switched off, providing the sidelights have

been illuminated during the previous 30 seconds.

Note: If a door or the tailgate is left open for longer
than 15 minutes, a ‘time-out' function will extinguish
the interior lights automatically to prevent the battery
from discharging.

If necessary, the automatic illumination features described
above can be switched off, as follows:

When the ignition is in positions I or II, press and hold
the courtesy light switch (1) for 5 seconds. The interior
lights will flash and then extinguish. Automatic operation
is suspended (instruction operation is still available). To restore
automatic operation, repeat the above process.

53

1

-------------------------------------------------------------------------------------------------------------------------------------------------------------

INSTRUMENTS AND CONTROLS

Rear Courtesy Light

Press the switch (arrowed) to illuminate the courtesy light,
press again to switch off.

54

-------------------------------------------------------------------------------------------------------------------------------------------------------------

INSTRUMENTS AND CONTROLS

Power Socket

Front Console Power Socket

Please ensure the socket lid is inserted when
the power socket is not in use.

This will

ensure no debris or foreign objects enter
the socket preventing its use or cause short
circuits.

The front console power socket is located below the
hazard warning lamp switch. When the ignition switch is
in position I or II, raise the ashtray cover plate and extract
the plug to use the socket.

Please fit the power socket plug after use.

Note: The voltage of the front console power socket is
12 volt, and the power rating is 120 watt.

Note: Extended use of the accessory power socket
when the engine is switched off will cause premature
discharging of the vehicle battery.

55

1

-------------------------------------------------------------------------------------------------------------------------------------------------------------

INSTRUMENTS AND CONTROLS

Rear Loadspace Power Socket

*

The rear loadspace power socket is located at the left of
the rear loadspace. When the ignition switch is in position
I or II, extract the plug to use the socket.

Please fit the power socket plug after use.

Note: The voltage of the rear loadspace power socket
is 12 volt, and the power rating is 120 watt.

Note: Extended use of the accessory power socket
when the engine is switched off will cause premature
discharging of the vehicle battery.

56

-------------------------------------------------------------------------------------------------------------------------------------------------------------

INSTRUMENTS AND CONTROLS

Storage Devices

Instructions

• Please close all storage devices when the car in motion.

Leaving these storage devices open may cause personal
injuries in cases of a sudden start-off, emergency braking
and a car accident.

• Do not place flammable materials such as liquid or

lighters in any storage devices.

The heat in hot

conditions may ignite flammable materials and lead to
a fire.

Glove Box

Pull the handle on the glove box cover to open the glove
box, the glove box light

*

will automatically illuminate.

Some cars are equipped with glove box cold storage

*

. Set

the air conditioning to cool and rotate the knob located at
the top of the glove box interior to use this function.

57

1

-------------------------------------------------------------------------------------------------------------------------------------------------------------

INSTRUMENTS AND CONTROLS

Push the lid forward to close the glove box. Make sure the
glove box is fully closed when the car is driving.

Storage Box – Centre

The storage box is situated at the front end of the centre
console. The storage box cover

*

is model dependant.

If a cover is provided, gently press the front edge of the
cover to open the storage box.

Storage Box – Driver Side

Located at the lower side of the instrument panel on the
driver side.

58

-------------------------------------------------------------------------------------------------------------------------------------------------------------

INSTRUMENTS AND CONTROLS

Cubby Box

Lift the armrest (arrowed) to open the compartment cover.
Put the cover down to close it.

59

1

-------------------------------------------------------------------------------------------------------------------------------------------------------------

INSTRUMENTS AND CONTROLS

Cup Holder

Do not place hot drinks in the cup holder
whilst driving. Spillage may result in personal
injury or damage.

Centre Console Cup Holder

The centre console cup holder is situated at the front end
of the centre console armrest assembly, and is used to hold
a cup or beverage bottle.

Rear Armrest and Rear Cup Holder

Fold forward to open the rear armrest. There are cup
holders at the front end of the rear armrest to hold
beverage cups etc.

60

-------------------------------------------------------------------------------------------------------------------------------------------------------------

INSTRUMENTS AND CONTROLS

Roof Luggage Rack

*

Roof loads MUST NOT exceed the maximum
authorised load. This may lead to injury or
vehicle damage.

Loose or improperly fixed loads may fall from
the roof luggage rack and lead to an accident
or cause injury.

When heavy or large items are carried
on the roof luggage rack it may lead
to

changes

in

steering,

handling

and

braking characteristics. Please avoid sharp
maneuvers, heavy braking and excessive
acceleration.

Pay attention to the followings when using the roof luggage
rack:

• Secure loads at the front of the roof as far as possible.

distribute loads evenly.

• DO NOT use automatic car washes with loads on the

roof luggage rack.

• The overall height of the car is different when loads are

fitted to the roof luggage rack. Please ensure there is
adequate clearance when entering tunnels and garages.

• Ensure the loads carried by the roof luggage rack do

not impede operation of the sunroof, roof antenna of
tailgate opening.

• When installing or removing a piece of loading

equipment, follow the instructions provided by the
manufacturer of the loading equipment.

Maximum Authorised Load for the Roof

The maximum authorised load for the roof is 50 kg, this
includes the weight of the roof loads and that of the loading
equipment installed.

Ensure you are aware of the weight of loads, and weigh
them when necessary.

Never exceed the maximum

authorised load for the roof.

Periodical Check

Alway check the condition of bolt connectors and fasteners
before using the rack luggage rack. Periodically check the
condition of bolt connectors and fasteners.

61

1

-------------------------------------------------------------------------------------------------------------------------------------------------------------

-------------------------------------------------------------------------------------------------------------------------------------------------------------

-------------------------------------------------------------------------------------------------------------------------------------------------------------

AIR CONDITIONING AND AUDIO SYSTEMS

Ventilation

2

2

2

2

5

5

1

1

3

3

4

4

6

6

1 Side Vents
2 Windscreen Vents
3 Centre Vent
4 Front Seat Feet Vents
5 Front Side Window Vents
6 Centre Console Vents

*

There are also 2 rear seat feet vents,
respectively on the floor under the
front seats (not shown in the figure).

64

-------------------------------------------------------------------------------------------------------------------------------------------------------------


Content      ..     2      3      4      5     ..