MINI Paceman (2016 year). Instruction - part 2


  Index      MINI     MINI Paceman (2016 year) - instruction in english


Search            copyright infringement  


Content      ..      1      2      3      ..


MINI Paceman (2016 year). Instruction - part 2


-------------------------------------------------------------------------------------------------------------------------------------------------------------
Opening and closing
CONTROLS
Arming and disarming the alarm system
General information
When the vehicle is locked and unlocked, the
alarm system is armed and disarmed at the
same time.
Door lock and armed alarm system
Unlocking via the door lock will trigger the
LEDs pulse or LED flashes: system is armed.
alarm on some market-specific versions.
One LED flashes at short intervals: the
To stop this alarm, unlock the vehicle with the
doors, hood, or tailgate is not properly
remote control or switch on the ignition.
closed.
Tailgate with armed alarm system
Even if these are not closed fully, the re-
maining items are locked and the LEDs
The tailgate, refer to page 24, can also be
pulse after approx. 10 seconds for approx.
opened when the alarm system is armed.
16 minutes; afterwards, one LED flashes.
The interior motion sensor is not activated.
Press the button on the remote con-
trol.
The LEDs go out after the vehicle is un-
locked: the vehicle has not been tampered
When you subsequently close the tailgate, it is
with in the meantime.
again locked and monitored.
The LEDs flash after the vehicle is unlocked
Unlocking via the door lock will trigger the
until the remote control is inserted in the
alarm on some market-specific versions.
ignition, but for no longer than approx.
5 minutes: the vehicle has been tampered
Switching off the alarm
with in the meantime.
Unlock the vehicle using the remote con-
trol, refer to page 22.
Panic mode
Insert the remote control all the way into
the ignition lock.
You can trigger the alarm system if you find
yourself in a dangerous situation.
With Comfort Access and if you are carrying
the remote control with you, push the but-
Press the button on the remote control
ton on the door lock.
for at least two seconds.
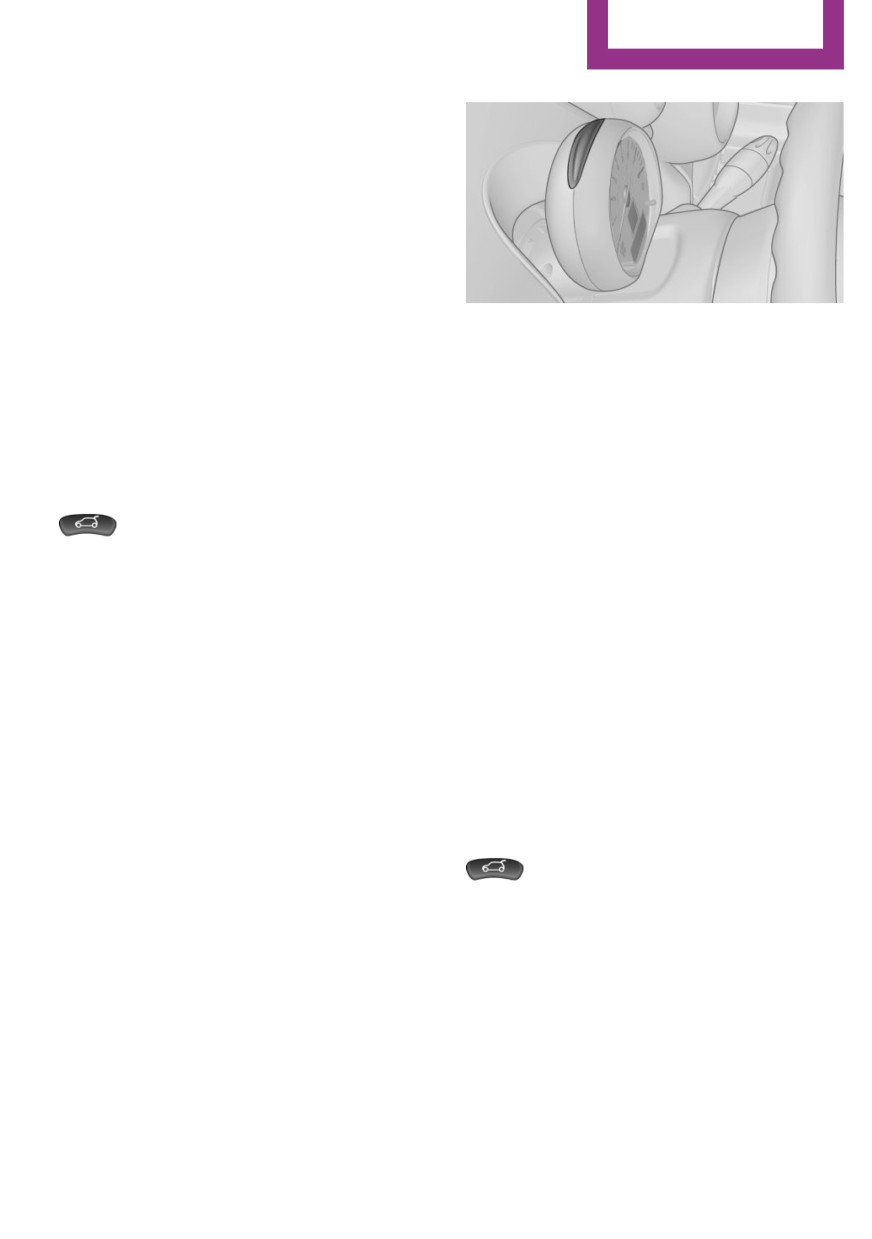
Display on the tachometer
To switch off the alarm: press any button on the
remote control.
When the alarm system is being armed, all LEDs
pulse like a heartbeat. One LED flashes after
Tilt alarm sensor
approx. 16 minutes.
The tilt of the vehicle is monitored.
The alarm system responds in situations such as
attempts to steal a wheel or tow the car.
31

-------------------------------------------------------------------------------------------------------------------------------------------------------------

CONTROLS
Opening and closing
Interior motion sensor
Opening and closing of doors or windows.
For the interior motion sensor to function prop-
Shifting the selector lever into neutral.
erly, the windows and the glass sunroof must
Using vehicle equipment.
be closed.
There is risk of accidents or injuries. Do not
leave children or animals unattended in the ve-
Avoiding unintentional alarms
hicle. Carry remote control along when exiting
The tilt alarm sensor and interior motion sensor
and lock the vehicle.
can be switched off together, such as in the fol-
lowing situations:
Convenient operation via:
In duplex garages.
Door lock, refer to page 25
During transport on car-carrying trains, at
Comfort Access, refer to page 29
sea or on a trailer.
When animals are to remain in the vehicle.
Switching off the tilt alarm sensor and
interior motion sensor
Press the button on the remote
control twice in succession.
Lock the vehicle twice with the integrated
key.
Tilting the glass sunroof
The LEDs flash in short succession for approx.
MINI Countryman:
2 seconds. The tilt alarm sensor and interior
motion sensor remain switched off until the ve-
Press the switch back to the resistance
hicle is unlocked and locked again.
point and hold.
Both glass sunroofs are raised.
Releasing stops the motion.
Glass sunroof, electrical
With the ignition switched on, press the
switch back past the resistance point.
General information
Both closed glass sunroofs are raised fully.
WARNING
Pressing again stops the motion.
Body parts can be jammed on operating
MINI Paceman:
the glass sunroof. There is risk of injuries. Make
sure that the area of movement of the glass
Press the switch back to the resistance
sunroof is clear during opening and closing.
point and hold.
The front glass sunroof is raised.
WARNING
Releasing stops the motion.
Unattended children or animals can move
With the ignition switched on, press the
the vehicle and endanger themselves and traf-
switch back past the resistance point.
fic, e.g. with the following actions:
The front glass sunroof is fully raised.
Pressing the Start/Stop button.
Pressing again stops the motion.
Releasing the parking brake.
32

-------------------------------------------------------------------------------------------------------------------------------------------------------------

Opening and closing
CONTROLS
Opening, closing
Power windows
MINI Countryman:
In the raised position with the ignition
General information
switched on, press the switch back and
WARNING
hold.
When operating the windows, body parts
The front glass sunroof is opened. The rear
and objects can be jammed. There is risk of in-
glass sunroof is closed.
juries or risk of property damage. Make sure
Releasing stops the motion.
that the area of movement of the windows is
The same method is used to close the glass
clear during opening and closing.
sunroof, in this case by pressing the switch for-
WARNING
ward.
Unattended children or animals can move
The front glass sunroof remains in the raised
the vehicle and endanger themselves and traf-
position. The rear glass sunroof is raised. Press-
fic, e.g. with the following actions:
ing again closes both sunroofs completely.
Pressing the Start/Stop button.
MINI Paceman:
Releasing the parking brake.
In the raised position with the ignition
switched on, press the switch back and
Opening and closing of doors or windows.
hold.
Shifting the selector lever into neutral.
The front glass sunroof is opened.
Using vehicle equipment.
Releasing stops the motion.
There is risk of accidents or injuries. Do not
The same method is used to close the glass
leave children or animals unattended in the ve-
sunroof, in this case by pressing the switch for-
hicle. Carry remote control along when exiting
ward.
and lock the vehicle.
The front glass sunroof remains in the raised
If, after having been opened and closed a num-
position. Pressing again closes the roof com-
ber of times in close succession, a window can
pletely.
only be closed, the system is overheated. Let
the system cool down for several minutes with
Roller sunblind
the ignition switched on or the engine running.
The roller sunblind can be opened and closed
separately from the glass sunroof.
Opening, closing
Front windows
After a power failure
After a power failure, it could happen that the
sunroof can only be raised. In this case, have
the system initialized. The manufacturer of your
MINI recommends that this work be performed
by a dealer’s service center or another qualified
service center or repair shop.
To open:
33

-------------------------------------------------------------------------------------------------------------------------------------------------------------

CONTROLS
Opening and closing
Press the switch to the resistance point. The
Pinch protection system
window opens while the switch is held.
If the closing force exceeds a specific value as a
Press the switch beyond the resistance
window closes, the closing action is inter-
point. The window opens automatically in
rupted.
the radio ready state and higher.
The window reopens slightly.
Press again briefly to stop the opening pro-
WARNING
cedure.
When operating the windows, body parts
To close:
and objects can be jammed. There is risk of in-
Pull the switch to the resistance point. The
juries or risk of property damage. Make sure
window closes while the switch is held.
that the area of movement of the windows is
Pull the switch beyond the resistance point.
clear during opening and closing.
The window closes automatically.
WARNING
Pressing the switch stops the motion.
Accessories on the windows such as an-
tennas can impact jam protection. There is risk
MINI Countryman: rear windows
of injuries. Do not install accessories in the area
of movement of the windows.
Closing without the pinch protection
system
WARNING
When operating the windows, body parts
and objects can be jammed. There is risk of in-
juries or risk of property damage. Make sure
that the area of movement of the windows is
To open:
clear during opening and closing.
Press the switch to the resistance point. The
If there is an external danger or, for example, if
window opens while the switch is held.
ice on the windows prevents a window from
Press the switch beyond the resistance
closing normally, the window can be closed
point. The window opens automatically in
instructionly.
the radio ready state and higher.
1. Pull the switch past the resistance point and
To close:
hold it there. Pinch protection is limited and
Pull the switch to the resistance point. The
the window reopens slightly if the closing
window closes while the switch is held.
force exceeds a certain value.
Pull the switch beyond the resistance point.
2. Pull the switch past the resistance point
The window closes automatically.
again within approx. 4 seconds and hold it
Pressing the switch stops the motion.
there.
The window closes without pinch protec-
After the ignition is switched off
tion.
The windows can be operated for approx. 1 mi-
nute after the remote control is removed or the
ignition is switched off.
34

-------------------------------------------------------------------------------------------------------------------------------------------------------------

Opening and closing
CONTROLS
MINI Countryman: safety switch
With the safety switch, the rear windows are
prevented from being opened or closed via the
switches in the rear passenger area, such as by
children.
Press the button. The LED lights up if the safety
function is switched on.
WARNING
When operating the windows, body parts
and objects can be jammed. There is risk of in-
juries or risk of property damage. Make sure
that the area of movement of the windows is
clear during opening and closing.
35

-------------------------------------------------------------------------------------------------------------------------------------------------------------

CONTROLS
Adjusting
Adjusting
There is risk of injuries or danger to life. Adjust
Vehicle features and op-
the seat prior to starting the trip. Adjust the
tions
backrest in an as upright position as possible
and do not adjust again while driving.
This chapter describes all standard, country-
specific and optional features offered with the
WARNING
series. It also describes features that are not
There is risk of jamming when moving the
necessarily available in your car, e. g., due to
seats. There is risk of injuries or risk of property
the selected options or country versions. This
damage. Make sure that the area of movement
also applies to safety-related functions and sys-
of the seat is clear prior to any adjustment.
tems.
When using the features and systems described
Front seat adjustment
here, adhere to local regulations.
Forward/backward
Sitting safely
The ideal seating position can make a vital con-
tribution to relaxed, fatigue-free driving.
The seating position plays an important role in
an accident in combination with:
Safety belts, refer to page 38
Head restraints, refer to page 41.
Airbags, refer to page 74.
Pull the lever, arrow 1, and slide the seat into
the desired position, arrows 2.
After releasing the lever, move the seat forward
Seats
or back slightly to make sure it engages prop-
erly.
Note before adjusting
WARNING
Seat adjustments while driving can lead
to unexpected movements of the seat. Vehicle
control could be lost. There is risk of an acci-
dent. Only adjust the side on the driver's side
when the vehicle is stationary.
WARNING
With a backrest inclined too far to the
rear, the protective effect of the safety belt
cannot be ensured anymore. There is a danger
of sliding under the safety belt in an accident.
36

-------------------------------------------------------------------------------------------------------------------------------------------------------------

Adjusting
CONTROLS
Height
Lumbar support
You can also adjust the contour of the backrest
to obtain additional support in the lumbar re-
gion.
The upper hips and spinal column receive sup-
plementary support to help you maintain a re-
laxed, upright sitting position.
Pull the lever up or push it down repeatedly, ar-
rows 1, until the desired height is reached, ar-
rows .
Backrest
MINI Countryman:
The graphic shows the MINI Countryman as an
example.
Turn the wheel to increase or decrease the cur-
vature.
MINI Countryman: rear seat adjustment
Forward/backward
Pull the lever, arrow 1, and apply your weight
to the backrest or lift it off, as necessary.
MINI Paceman:
Pull the lever and slide the seat into the desired
position.
Release the lever and move the seat slightly
forward or back so that it engages properly.
Pull the lever, arrow 1, and apply your weight
to the backrest or lift it off, as necessary, ar-
Backrest
rows 2.
Adjust the backrest tilt, refer to page 102.
37

-------------------------------------------------------------------------------------------------------------------------------------------------------------

CONTROLS
Adjusting
MINI Paceman: entry in the rear
Seat heating
1. Pull the lever on the back of the seat up-
ward, arrow 1.
Switching on
The temperature setting progresses one step
The backrest folds forward.
through its control sequence each time you
2. Push against the backrest to move the seat
press the button. The maximum temperature is
forward, arrow 2.
reached when three LEDs are lit.
To make it easier to enter the car in the rear,
If the trip is continued within approx. 15 mi-
push back the safety belt on the lower belt
nutes, the seat heating is activated automati-
guide rail if necessary.
cally with the temperature set last.
The temperature is reduced, if need be, down
Restoring the original seat position
to no heat in order to reduce the load on the
The driver's seat has a mechanical memory
battery. The LEDs remain lit.
function for the forward/backward seat setting
and the backrest setting.
Switch off
1. Push the seat back to the original position.
Press the button longer.
Do not fold back the backrest until the seat
is in its original position; otherwise, the seat
will engage in its current position. If this
Safety belts
happens, adjust the forward/backward po-
sition instructionly, refer to page 36.
Number of safety belts
2. Fold back the backrest to lock the seat.
Your vehicle has been fitted with four or five
WARNING
safety belts for the safety of you and your pas-
sengers.
There is risk of jamming when moving the
seats. There is risk of injuries or risk of property
However, they can only offer protection when
damage. Make sure that the area of movement
adjusted correctly.
of the seat is clear prior to any adjustment.
Information
WARNING
Always make sure that safety belts are being
Unexpected movements of the backrest
worn by all occupants before driving away.
while driving may occur due to an unlocked
Although airbags enhance safety by providing
backrest. Vehicle control could be lost. There is
added protection, they are not a substitute for
risk of injuries. Fold back and lock the backrests
safety belts.
before driving.
38

-------------------------------------------------------------------------------------------------------------------------------------------------------------

Adjusting
CONTROLS
The shoulder strap's anchorage point will be
Buckling the belt
correct for adult seat occupants of every build if
MINI Countryman:
the seat is correctly adjusted.
WARNING
If the safety belt is used by more than
one person, the protective effect of the safety
belt cannot be ensured anymore. There is risk
of injuries or danger to life. Do not allow more
than one person to wear a single safety belt. In-
fants and children are not allowed in an occu-
pant's lap, but must be transported and respec-
tively secured in designated child restraint
MINI Paceman:
systems.
WARNING
The protective effect of the safety belts
can be limited or lost when safety belts are fas-
tened incorrectly. An incorrectly fastened safety
belt can cause additional injuries, e.g. in the
event of an accident or during braking and eva-
sive maneuvers. There is risk of injuries or dan-
ger to life. Make sure that all occupants are
wearing safety belts correctly.
Make sure you hear the latch plate engage in
the belt buckle.
WARNING
The shoulder strap's anchorage point will be
With a rear backrest that is not locked,
correct for adult seat occupants of every build if
the protective function of the middle safety belt
the seat is correctly adjusted, refer to page 36.
is not guaranteed. There is risk of injuries or
danger to life. If you are using the middle safety
Unbuckling the belt
belt, lock the wider rear backrest.
1. Hold the belt firmly.
2. Press the red button in the belt buckle.
Correct use of safety belts
Wear the belt twist-free and as tight to your
3. Guide the belt back into its reel.
body as possible over your lap and should-
ers.
Securing the buckle tongues
Wear the belt deep on your hips over your
If the front passenger seat is not occupied, slide
lap. The belt may not press on your stom-
the buckle tongue up to the belt stop knob with
ach.
the clip.
Do not wear the belt on your throat, rub it
When the outer rear seats are not occupied, the
on sharp edges, guide it or jam it in across
buckle tongues of the rear seats can be slid up
hard or fragile objects.
to the cargo area trim with the clip.
Avoid thick clothing.
This helps avoid annoying noises when driving.
Re-tighten the belt frequently upward
around your upper body.
39

-------------------------------------------------------------------------------------------------------------------------------------------------------------

CONTROLS
Adjusting
MINI Countryman: center safety belt of
Opening
rear seat
Press the red button on the small belt buckle 3
The belt buckle embossed with the word CEN-
with buckle tongue 1.
TER is intended exclusively for use by passen-
When the center safety belt is locked:
gers riding in the center position.
Press the red button 3 with the buckle tongue
If the center safety belt in the rear is used, the
of the outer left safety belt.
backrests must be locked, refer to page 103.
The safety belt will not have a restraining effect
Putting on the belt
if the backrest is not locked.
Belt holder in the headliner
The holder for the safety belt is located in the
headliner.
1
Large buckle tongue
2
Small buckle tongue
3
Small belt buckle
4
Large belt buckle
1
Opening for the safety belt
Buckle tongue 1 must be inserted in belt
2
Holder for the small buckle tongue
buckle 4. Make sure you hear the buckle
tongue engage in the belt buckle.
Take the small buckle tongue out of the holder.
Move both buckle tongues downward.
Insert the buckle tongue into the belt buckle in
such a way that the belt lies smoothly against
Closing
the body of the buckled person and is not
twisted.
Stowing the center safety belt
If the center seat is not occupied, insert the belt
buckles 3 and 4 into the respective holders, ar-
rows.
Insert the small buckle tongue 2 of the safety
belt into the small belt buckle 3.
40

-------------------------------------------------------------------------------------------------------------------------------------------------------------

Adjusting
CONTROLS
dealer’s service center or another qualified
service center or repair shop.
Head restraints
Information
WARNING
Move the buckle tongues to the belt holder on
A missing protective effect due to re-
the headliner, refer to page 40, and insert them
moved or not correctly adjusted head restraints
into the provided holders.
can cause injuries in the head and neck area.
There is risk of injuries. Install head restraints
Safety belt reminder for driver's seat
on occupied seats prior to driving and make
and front passenger seat
sure that the center of the head restraint sup-
ports the back of the head at eye level.
The indicator lamps light up and a sig-
nal sounds. Check whether the safety
WARNING
belt has been fastened correctly.
Objects on the head restraint reduce the
protective effect in the head and neck area.
Damage to safety belts
There is risk of injuries.
In the case of strain caused by accidents or
Do not use seat or head restraint covers.
damage:
Do not hang objects, e.g., clothes hangers,
Have the safety belts, including the safety belt
directly on the head restraint.
tensioners, replaced and have the belt anchors
Only use accessories that have been deter-
checked.
mined to be safe for attachment to a head
WARNING
restraint.
The protective effect of the safety belts
Do not use any accessories, e.g. pillows,
may not be fully functional or fail in the follow-
while driving.
ing situations:
Correctly set head restraint
Safety belts are damaged, soiled or
changed in any other way.
A correctly adjusted head restraint reduces the
risk of spinal injury in the event of an accident.
Safety belt buckle is damaged or heavily
soiled.
Height
Belt tensioners or belt retractors were
Adjust the head restraint so that its center is
modified.
approx. at ear level.
Safety belts can be imperceptibly damaged in
MINI Countryman: the center rear head re-
the event of an accident. There is risk of injuries
straint is not height adjustable.
or danger to life. Do not modify safety belts,
safety belt buckles, belt tensioners, belt retrac-
tors or belt anchors and keep them clean. After
an accident, have the safety belts checked by a
41

-------------------------------------------------------------------------------------------------------------------------------------------------------------

CONTROLS
Adjusting
Height adjustment
4. Pull out the head restraint.
5. Fold back the backrest.
Rear
1. Pull the head restraint upward as far as
possible.
2. Fold the backrest forward slightly.
3. Press button 1 and pull out the head re-
straint all the way to the stop.
MINI Countryman: additionally press but-
To raise: pull.
ton 2 using a suitable tool.
To lower: press the button, arrow 1, and push
4. Pull out the head restraint completely.
the head restraint down until it engages.
5. Fold back the rear seat backrest.
MINI Countryman: additionally press button 2
on the rear head restraints only if you wish to
remove them.
Mirrors
Removing
Exterior mirrors
Only remove the head restraint if no one will be
sitting in the seat in question.
General information
The mirror on the passenger side is more
curved than the driver's mirror.
WARNING
Objects reflected in the mirror are closer
than they appear. The distance to the traffic
behind could be incorrectly estimated, e.g.
while changing lanes. There is risk of an acci-
dent. Estimate the distance to the traffic behind
by looking over your shoulder.
Front
1. Pull the head restraint upward as far as
possible.
2. MINI Countryman: tilt the backrest back
slightly.
MINI Paceman: fold the backrest forward if
necessary.
3. Press button 1 and pull out the head re-
straint all the way to the stop.
MINI Countryman: additionally press but-
ton 2 using a suitable tool.
42

-------------------------------------------------------------------------------------------------------------------------------------------------------------

Adjusting
CONTROLS
Overview
CAUTION
Depending on the vehicle width, the ve-
hicle can be damaged in car washes. There is
risk of property damage. Before washing, fold
in the mirrors by hand or with the button.
Automatic heating
Both exterior mirrors are heated automatically
while the engine is running or the ignition is
switched on when the external temperature is
1
Adjusting
below a certain value.
2
Selecting the left/right mirror
Interior rearview mirror
3
Folding the mirror in and out
Selecting a mirror
To change to the other mirror: slide the
mirror switch over.
Adjusting electrically
The setting corresponds to the direction
in which the button is pressed.
To reduce the blinding effect from the rear
when driving at night: turn the knob.
Adjusting instructionly
If an electrical malfunction occurs, for example,
Interior rearview and exterior mirrors,
press the edges of the mirror glass.
automatic dimming feature
Folding the mirror in and out
Press button 3.
The mirror can be folded in up to a vehicle
speed of approx. 20 mph/30 km/h.
For example, this is advantageous
In car washes.
In narrow streets.
For folding back mirrors that were folded
Two photocells are used for control:
away instructionly.
In the mirror frame, see arrow.
On the back of the mirror.
For proper operation:
Keep the photocells clean.
43

-------------------------------------------------------------------------------------------------------------------------------------------------------------

CONTROLS
Adjusting
Do not cover the area between the inside
rearview mirror and the windshield.
Do not apply stickers to the windshield in
front of the mirror.
Steering wheel
Adjusting
WARNING
Steering wheel adjustments while driving
can lead to unexpected steering wheel move-
ments. Vehicle control could be lost. There is
risk of an accident. Adjust the steering wheel
while the vehicle is stationary only.
1. Fold the lever down.
2. Move the steering wheel to the preferred
height and angle to suit your seating posi-
tion.
3. Fold the lever back.
44

-------------------------------------------------------------------------------------------------------------------------------------------------------------

Transporting children safely
CONTROLS
Transporting children safely
when safety belts are fastened incorrectly. An
Vehicle features and op-
incorrectly fastened safety belt can cause addi-
tions
tional injuries, e.g. in the event of an accident
or during braking and evasive maneuvers.
This chapter describes all standard, country-
There is risk of injuries or danger to life. Secure
specific and optional features offered with the
persons shorter than 5 ft, 150 cm using suitable
series. It also describes features that are not
restraint systems.
necessarily available in your car, e. g., due to
the selected options or country versions. This
Accident research shows that the safest place
also applies to safety-related functions and sys-
for children is on the rear seat.
tems.
Only transport children younger than 12 years
When using the features and systems described
of age (13 years of age) or shorter than 5 ft,
here, adhere to local regulations.
150 cm in the rear in child restraint systems
suitable for the age, weight and size of the
child.
The right place for chil-
Children 13 years of age or older must wear a
dren
safety belt as soon as a suitable child restraint
system can no longer be used due to their age,
weight and size.
Information
WARNING
Children on the front passenger seat
Unattended children or animals can move
Should it be necessary to use a child restraint
the vehicle and endanger themselves and traf-
fixing system on the front passenger seat,
fic, e.g. with the following actions:
make sure that the front and side airbags on
Pressing the Start/Stop button.
the front passenger side are deactivated, refer
to page 75.
Releasing the parking brake.
Opening and closing of doors or windows.
Information
Shifting the selector lever into neutral.
WARNING
Using vehicle equipment.
Active front-seat passenger airbags can
There is risk of accidents or injuries. Do not
injure a child in a child restraint system when
leave children or animals unattended in the ve-
the airbags are activated. There is risk of inju-
hicle. Carry remote control along when exiting
ries. Make sure that the front-seat passenger
and lock the vehicle.
airbags are deactivated and that the PASSEN-
GER AIRBAG OFF indicator lamp lights up.
Children should always be in the rear
WARNING
WARNING
The stability of the child restraint system
Persons shorter than 5 ft, 150 cm cannot
is limited or compromised with incorrect seat
correctly fasten the safety belt without suitable
adjustment or improper installation of the child
additional restraint systems. The protective ef-
seat. There is risk of injuries or danger to life.
fect of the safety belts can be limited or lost
Make sure that the child restraint system fits
45

-------------------------------------------------------------------------------------------------------------------------------------------------------------

CONTROLS
Transporting children safely
securely against the backrest. If possible, adjust
On the front passenger seat
the backrest tilt for all affected backrests and
correctly adjust the seats. Make sure that seats
Deactivating the airbags
and backrests are securely engaged. If possible,
After installing a child restraint fixing system on
adjust the height of the head restraints or re-
the front passenger seat, ensure that the front,
move them.
side, and knee airbags on the front passenger
side are deactivated.
Installing child re-
Seat position and height
Before installing a child restraint fixing system,
straint fixing systems
move the front passenger seat as far back as
possible and adjust its height to the highest po-
Before mounting
sition to obtain the best possible position for
MINI Countryman: before mounting a child re-
the belt and to offer optimal protection in the
straint fixing system on the rear seats, move
event of an accident.
the seats into the rearmost positions.
Do not change this seat position once it has
Adjust the inclination of the center backrest to
been set.
that of the respective outer backrest.
After mounting the child restraint fixing system
Child seat security
on the respective outer rear seat, adjust the
backrest forward, if necessary, to ensure that
the backrest is in contact with the child re-
straint fixing system. Rear seat backrests, refer
to page 102.
Information
Pay attention to the specifications of the child
restraint system manufacturer when selecting,
installing, and using child restraint systems.
The graphic shows the MINI Countryman as an
WARNING
example.
The stability of the child restraint system
The rear safety belts and the safety belt for the
is limited or compromised with incorrect seat
front passenger can be locked to prevent ex-
adjustment or improper installation of the child
tension in order to permit attachment of child
seat. There is risk of injuries or danger to life.
restraint fixing systems.
Make sure that the child restraint system fits
securely against the backrest. If possible, adjust
To lock the safety belt
the backrest tilt for all affected backrests and
correctly adjust the seats. Make sure that seats
1. Secure the child restraint fixing system with
and backrests are securely engaged. If possible,
the belt.
adjust the height of the head restraints or re-
2. Pull out the belt webbing completely.
move them.
3. Allow the belt webbing to be pulled in and
pull it taut against the child restraint fixing
system.
The safety belt is locked.
46

-------------------------------------------------------------------------------------------------------------------------------------------------------------

Transporting children safely
CONTROLS
To unlock the safety belt
MINI Countryman
1. Open the belt buckle.
2. Remove the child restraint fixing system.
3. Allow the belt webbing to be pulled in com-
pletely.
Center safety belt: unlock belt buckle 3 in
addition, refer to page 40.
Guide the safety belt to the holder on the
headliner.
The mounts for the lower LATCH anchors are
located at the points indicated by the arrows.
LATCH child restraint fix-
ing system
MINI Paceman
LATCH: Lower Anchors and Tethers for Children.
Information
Pay attention to the operating and safety infor-
mation of the child restraint system manufac-
turer when installing and using LATCH child re-
straint fixing system.
Mounts for the lower LATCH anchors
The lower anchors may be used to attach the
The mounts for the lower LATCH anchors are
CRS to the vehicle seat up to a combined child
located at the points indicated by the arrows.
and CRS weight of 65 lb/30 kg when the child is
restrained by the internal harnesses.
The corresponding symbol shows the
mounts for the lower LATCH anchors.
WARNING
If the LATCH child restraint fixing systems
are not correctly engaged, the protective effect
of the LATCH child restraint fixing system can
be limited. There is risk of injuries or danger to
Mounting LATCH child restraint fixing
life. Make sure that the lower anchors are se-
systems
curely engaged and that the LATCH child re-
1. Mount the child restraint fixing system; re-
straint fixing system fits securely against the
fer to the operating instructions of the sys-
backrest.
tem.
Before installing the child seat, pull the belt out
2. Ensure that both LATCH anchors are prop-
of the area for the child restraint fixing system.
erly connected.
47


Content      ..      1      2      3      ..