Snowmobile Polaris ProStar S4, Indy XC 129 / 137, Indy Adventure 137, Voyageur 146, Nordic Pro 146. Owner’s Manual (2024) - page 2
 

  Index      Manuals     Snowmobile Polaris ProStar S4, Indy XC 129 / 137, Indy Adventure 137, Voyageur 146, Nordic Pro 146. Owner’s Manual (2024)


Search            copyright infringement  


Content      ..      1      2      3      ..


Snowmobile Polaris ProStar S4, Indy XC 129 / 137, Indy Adventure 137, Voyageur 146, Nordic Pro 146. Owner’s Manual (2024) - page 2


TOOLS

The following tools are provided with the snowmobile.

• Tool Kit Pouch

Torx Wrench, T-30

5/8 in Spark Plug Wrench, T-30

• Driven Clutch L-Wrench
• Spare Belt Holder

TOOL KIT

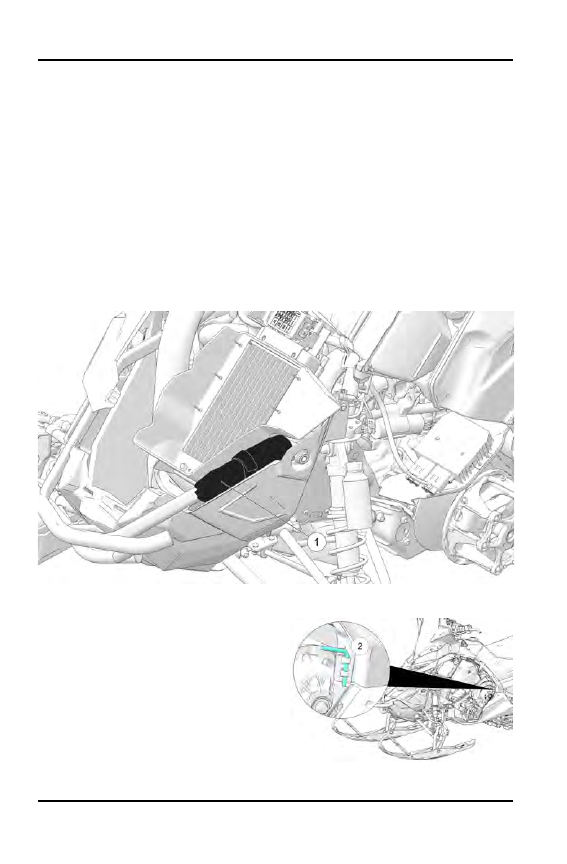
When not in use, the tool kit pouch

q

is located under the hood, secured to the

front bumper by a velcro strap. To access the tool kit, remove both side panels
and the hood. See the Maintenance chapter for side panel and hood removal
procedures.

L-WRENCH

The L-wrench

w

is used to open and

close the driven clutch when working
with the drive belt. To retrieve the
L-wrench, rotate it counterclockwise
and slide it upward from the bracket.
When not in use, slide the L-wrench
down into the bracket and rotate
clockwise until it snaps securely into the
housing.

38
FEATURES

CARGO STORAGE

Never hang heavy items or fuel
containers from the rear of the tunnel.
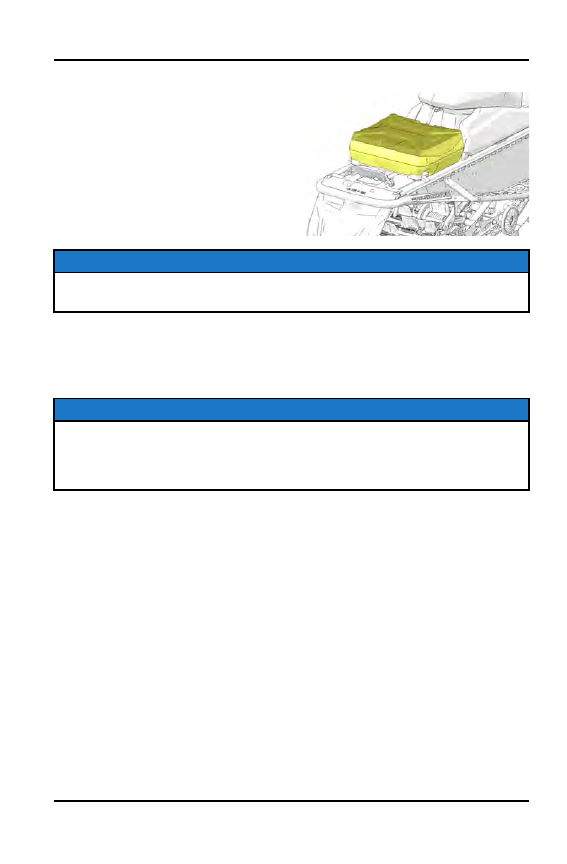
Cargo may be stowed only in the tunnel
storage bag (if equipped) or under the
seat.

The maximum weight capacity for the
tunnel is 15 lbs. (7 kg). Include the
weight of the cargo bag when
determining cargo weight.

NOTICE

Exceeding the tunnel cargo weight capacity could result in tunnel and or

suspension pad damage. Do not exceed the weight limit.

RAIL SCRATCHERS

Some models are equipped with rail scratchers to help prevent overheating
when riding on ice or hard-packed snow.

NOTICE

Do not install accessory bogie wheels on the inside of the rail beams if your

model is equipped with a remote reservoir rear track shock or damage will

occur. The rail scratchers must be removed as they interfere with the

accessory bogie wheels.

ACCESSORIES

POLARIS offers a wide range of accessories for your snowmobile to help make
each ride more enjoyable.

Use only POLARIS parts and accessories on your POLARIS snowmobile. Use
of unapproved parts and accessories may result in:

• Non-compliance with government/industry requirements
• Voiding of warranty
• Injury to self or others

This applies to, but is not limited to the following areas: brakes, clutches, fuel
systems, and exhaust systems. Exhaust systems are critical safety areas that

must

use approved POLARIS parts. Please see your authorized POLARIS

dealer for service.

39

FEATURES

PASSENGER SEAT

The passenger seat is available on all Adventure Matryx models.

PASSENGER SEAT INSTALLATION

1. Clean the top of the tunnel with a clean shop rag, and clear any debris from

inside the mounting channels.

2. Position the passenger seat onto the tunnel above the mounting brackets

q

.

3. Connect the main seat harness connector

w

to the 12-volt power harness

e

.

40

FEATURES

4. Align the latch handles to the

mounting brackets on the
tunnel.

5. Lift upward on the latch

handles

r

to engage the

latch pins securely within the
brackets.

PASSENGER SEAT REMOVAL

1. To remove the seat, lift the seat upward while pulling up on the two latch

handles.

2. Disconnect the seat harness connector from the 12-volt power harness.

EXTENDED IDLE ENGINE SHUTOFF

This engine feature causes the ECU to shut down the engine when coolant
temperature reaches 181° F (83° C) and there is no throttle lever input for 15
minutes.

NOTICE

If equipped with a Polaris Interactive Digital Display (PIDD), the gauge will

remain on because the key is in the ON position.

ECU SPEED LIMITER

The ECU monitors the vehicle speed supplied by the vehicle speed sensor. The
sensor is mounted to the transmission behind the brake disc.

41

FEATURES

GEAR POSITION

ENGINE SPEED LIMIT

Neutral

N/A

Reverse – Override button off (button
not pressed)

3500 rpm

Reverse – Override button on (button
pressed)

6500 rpm

Low/High – Speed sensor signal lost

6600 rpm

42

FEATURES

GAUGE

STANDARD INSTRUMENT CLUSTER

q

Playback

w

Low Battery Voltage

e

Low Oil

r

Engine Hot

t

Check Engine

y

Low Fuel

u

High Beam

i

Parking Brake

o

Reverse

a

Security

NOTICE

Certain products will damage the lens and other plastic surfaces. Do not use

alcohol to clean the instrument cluster. Immediately clean off any gasoline that

splashes on the instrument cluster.

43

GAUGE

The instrument cluster and
gauge (if equipped) contains
indicator lights and the rider
information center. The
information center can be
controlled by the SELECT button

s

and ARROW buttons

d

on

the hand controls.

INDICATOR LAMPS

ICON

INDICATOR

DESCRIPTION

Check Engine

This indicator appears if an EFI-related
fault occurs. Do not operate the
snowmobile if this warning appears.
Serious engine damage could result. Your
dealer can assist.

Engine Hot

The over-temperature indicator will

illuminate

when the engine is

overheating. Take action to cool the
engine. The indicator will

flash

when

engine temperature reaches critical levels.

Stop the engine immediately.

Low Oil

The Low Oil Indicator illuminates when low
engine oil pressure is detected. When the
light illuminates, stop the engine
immediately and inspect the engine oil
level. See page 151 for oil check
procedure. Operating with low oil pressure
could result in serious engine damage.

Low Battery
Voltage

The low battery voltage indicator
illuminates when the battery voltage is low.

44

GAUGE

ICON

INDICATOR

DESCRIPTION

Neutral

This lamp illuminates when the
transmission is in the neutral position.

Low Fuel

The low fuel indicator illuminates when
fuel is low.

High Beam

The high beam indicator illuminates when
the lights are set to high beam.

Parking Brake

The parking brake indicator illuminates
when the parking brake is engaged. It will
also illuminate when the service brake is in
use.

Reverse

The reverse indicator flashes when the
transmission is in reverse.

Active Security
System

The security indicator illuminates when the
security system is activated.

45

GAUGE

RIDER INFORMATION CENTER

The rider information center is located in the instrument cluster. The center
displays vehicle speed, engine speed, odometer, resettable trip meters (2), total
engine hours of operation, fuel level, engine temperature, and a diagnostic
display mode.

Setting changes must be made with the engine running or with the vehicle
powered by an external DC power supply connector. The information center is
set to display standard units of measurement for distance and temperature.

q

Information Display Area

- This area displays either engine speed or vehicle

speed (whichever is not displayed in the speed display), engine temperature and
maximum vehicle speed.

w

Speed Display

- The speed display area displays either vehicle speed or

engine speed.

e

Fuel Gauge

- Not available on all models. The segments of the fuel gauge

show the level of fuel in the fuel tank. When the last segment clears, a low fuel
warning is activated. All segments including the fuel icon will flash. Refuel
immediately.

NOTICE

The low fuel indicator and fuel level gauge on the Standard Instrument Cluster

are not supported on models with a fuel level gauge on the fuel cap.

46

GAUGE

TIP

If the fuel icon fails to display, an open or short circuit has occurred in the fuel

sensor circuit. See your authorized POLARIS dealer.

r

Odometer/Engine Hour Display

- This area displays the odometer, Trip A,

Trip B and engine hours.

INFORMATION DISPLAY AREA

This area displays either engine speed or vehicle speed (whichever is not
displayed in the speed display), engine temperature, maximum vehicle speed,
and speed or RPM. To change the display,

press and release

the MODE button

or the MODE switch until the desired item is displayed.

SPEED DISPLAY AREA

The speed display area displays either vehicle speed or engine speed. Vehicle
speed is displayed in either miles per hour (MPH) or kilometers per hour (km/h).
Engine speed is displayed in revolutions per minute (RPM).

1. To change which item displays, first make sure the information display area

is set to display either engine speed or vehicle speed.

2.

Press and release

the center button.

FUEL GAUGE (IF EQUIPPED)

The segments of the fuel gauge show the level of fuel in the fuel tank. When the
last segment clears, a low fuel warning is activated. All segments including the
fuel icon will flash. Refuel immediately.

NOTICE

The low fuel indicator and fuel level gauge on the Standard Instrument Cluster

are not supported on models with a fuel level gauge on the fuel cap.

TIP

If the fuel icon fails to display, an open or short circuit has occurred in the fuel

sensor circuit. See your authorized POLARIS dealer.

ODOMETER/ENGINE HOUR DISPLAY AREA

This area displays the odometer, Trip 1 meter, Trip 2 meter, CLOCK, and Engine
Hours meter.

47

GAUGE

The odometer displays the total distance traveled by the vehicle since
manufacture. Each trip meter records the distance traveled by the vehicle on a
trip if the meter is reset before each trip. The CLOCK displays the time, and the
engine hour meter displays the total hours the engine has been in operation
since manufacture.

To change the display,

press and release

the SET button or SET switch until the

desired item is displayed.

To reset a trip meter,

press and hold

the SET button or SET switch until the

meter resets to zero.

PLAYBACK FUNCTION

The playback function allows the rider to record and play back engine speed,
vehicle speed and throttle position sensor information for up to three minutes.

TO RECORD

1.

Press and hold

the center

button on the instrument cluster to enter the

Options Menu.

2.

Press and release

the MODE button until PLAYBACK appears in the

information display area.

48

GAUGE

3.

Press and release

the SET button.

RECORD will appear in the information display area.

4. To begin recording,

Press and release

the SET button.

The playback indicator will flash while recording is in progress. Recording is
complete when the light stops flashing.

NOTICE

To stop recording at any time during the recording process,

press and release

the SET button.

TO PLAYBACK

1. To play back the recorded data, stop the vehicle and wait for engine speed to

drop below clutch engagement.

2.

Press and hold

the center

button on the instrument cluster to enter the

Options Menu.

3.

Press and release

the MODE button until PLAYBACK appears in the

information display area.

49

GAUGE

4.

Press and release

the SET button twice.

PLAY will appear in the information display area.

5.

Press and release

the SET button to play the recorded data.

Once playback has concluded, REPLAY will appear in the information
display area.

6.

Press and release

the SET button to REPLAY recorded data.

7.

Press and release

the MODE button to end playback and return to the

Options Menu.

STANDARD/METRIC DISPLAY

The odometer and temperature displays can be viewed in either standard or
metric units of measurement. Both displays change if units are changed. The
new settings will remain until changed by the operator.

Change Method 1

1.

Press and hold

the center

button on the instrument cluster to enter the

Options Menu.

2.

Press and release

the MODE button until engine temperature appears in the

information display area.

3.

Press and release

the SET button or SET switch to change units.

50

GAUGE

Change Method 2

1.

Press and release

the SET button or SET switch until the odometer appears

in the information display area.

2.

Press and hold

the SET button or SET switch until the units change.

51

GAUGE

SECURITY SYSTEM (IGNITION LOCK SYSTEM)

This system is an optional feature and will not function until it has been activated
by your authorized POLARIS dealer. If you have this feature activated, you can
lock the ignition to prevent unauthorized use when leaving the snowmobile
unattended. A locked system will limit engine speed to 3000 RPM, which
prevents clutch engagement, and the snowmobile will not move when throttle is
applied.

If you wish to use this feature, you must complete all four tasks on the following
pages to have your system activated and to change the security code to one of
your own choosing.

FIRST TIME USE OF YOUR SECURITY SYSTEM

Perform all tasks in the order shown if you wish to activate and use the optional
security system.

TASK 1: Activate the security system

See your authorized POLARIS dealer to have the optional security system
feature activated in the electronic control unit (ECU).

TASK 2: Lock the System the First Time

NOTICE

To lock the system for the first time, use code 000.

1.

Press and hold

the center

button on the instrument cluster to enter the

Options Menu.

2.

Press and release

the MODE button until SECURITY OFF appears in the

information display area.

52

GAUGE

3.

Press and release

the SET button.

ENTER CODE will appear in the information display area.

4.

Press and release

the SET button to increase the 1st digit.

5.

Press and hold

the SET button to accept the 1st digit and advance to the 2nd

digit.

6.

Press and release

the SET button to increase the 2nd digit.

53

GAUGE

7.

Press and hold

the SET button to accept the 2nd digit and advance to the 3rd

digit.

8.

Press and hold

the SET button to accept the 3rd digit and submit code.

If code is correct, SECURITY ON will appear in the information display area.
The system is now locked. Proceed immediately to Task 3.

If code is incorrect, BAD CODE will appear in the information display area.
Return to step 3 to re-enter code.

54

GAUGE

TASK 3: Unlock the System

NOTICE

To unlock the system for the first time, use code 000.

1. While the engine is running,

Press and release

the SET button.

ENTER CO will appear in the information display area.

2.

Press and release

the SET button to increase the 1st digit.

3.

Press and hold

the SET button to accept the 1st digit and advance to the 2nd

digit.

4.

Press and release

the SET button to increase the 2nd digit.

55

GAUGE

5.

Press and hold

the SET button to accept the 2nd digit and advance to the 3rd

digit.

6.

Press and release

the SET button to increase the 3rd digit.

7.

Press and hold

the SET button to accept the 3rd digit and submit code.

If code is correct, SECURITY OFF will appear in the information display area

NOTICE

The system is now

unlocked

.

If code is incorrect, BAD CODE will appear in the information display area.
Return to step 1 to re-enter code.

8. You must now enter a new security code. Proceed immediately to TASK 4.

56

GAUGE

TASK 4: Enter Your New Security Code

1. Immediately after locking and unlocking the system, and while SECURE

OFF is displayed, simultaneously

press and hold

the MODE and SET

buttons.

SET NEW CODE will appear on the information display area.

2.

Press and release

the SET button to increase the 1st digit.

3.

Press and hold

the SET button to accept the 1st digit and advance to the 2nd

digit.

4.

Press and release

the SET button to increase the 2nd digit.

5.

Press and hold

the SET button to accept the 2nd digit and advance to the 3rd

digit.

57

GAUGE

6.

Press and release

the SET button to increase the 3rd digit.

7.

Press and hold

the SET button to accept the 3rd digit.

CODE SET will appear in the information display area, and then the new
code will blink three times in the information display area

NOTICE

Your new code is now set. The system is NOT locked.

8. Record your new security code in a safe place for future reference.

Record your new personal security code here: __________________

TIP

If you lose your personal security code, see your authorized POLARIS dealer

to have the code reset to “000”. Then perform TASK 2 through TASK 4 to

change the code to one of your own choosing.

58

GAUGE

LOCKING SYSTEM WITH PERSONAL SECURITY
CODE

1. Start the engine.

2.

Press and hold

the center

button on the instrument cluster to enter the

Options Menu.

3.

Press and release

the MODE button until SECURITY OFF appears in the

information display area.

4.

Press and release

the SET button.

ENTER CODE will appear in the information display area.

5.

Press and release

the SET button to increase the 1st digit.

59

GAUGE

6.

Press and hold

the SET button to accept the 1st digit and advance to the 2nd

digit.

7.

Press and release

the SET button to increase the 2nd digit.

60

GAUGE

8.

Press and hold

the SET button to accept the 2nd digit and advance to the 3rd

digit.

9.

Press and hold

the SET button to accept the 3rd digit and submit code.

If code is correct, SECURITY ON will appear in the information display area.
The system is now locked. Proceed immediately to Task 3.

If code is incorrect, BAD CODE will appear in the information display area.
Return to step 3 to re-enter code.

61

GAUGE

UNLOCKING SYSTEM WITH PERSONAL SECURITY
CODE

1. While the engine is running,

Press and release

the SET button.

ENTER CODE will appear in the information display area.

2.

Press and release

the SET button to increase the 1st digit.

3.

Press and hold

the SET button to accept the 1st digit and advance to the 2nd

digit.

4.

Press and release

the SET button to increase the 2nd digit.

5.

Press and hold

the SET button to accept the 2nd digit and advance to the 3rd

digit.

62

GAUGE

6.

Press and release

the SET button to increase the 3rd digit.

7.

Press and hold

the SET button to accept the 3rd digit and submit code.

If code is correct, SECURITY OFF will appear in the information display area

NOTICE

The system is now

unlocked

.

If code is incorrect, BAD CODE will appear in the information display area.
Return to step 1 to re-enter code.

CHANGING TO A NEW SECURITY CODE

Any time you wish to change your current security code to a new code, perform
TASK 2 through TASK 4 of the First Time Use of Your Security System
procedure. Instead of using the factory default code “000” in TASK 2 and TASK
3, use your current security code.

63

GAUGE

SECURITY SYSTEM ACCESS QUICK REFERENCE

Now that you have become familiar with the procedure for locking and unlocking
the system, use the chart below as a quick reference.

SECURITY SYSTEM ACCESS QUICK REFERENCE CHART

ACTION

RESULT

1. Start engine

2.

Press and hold

the center

button

3.

Press and release

the SET button

until SECURITY appears in
information display area.

4.

Press and release

SET button.

Displays ENTER CODE (to lock
the system)

Press and release

the SET button

Advances a digit on the ENTER
CODE screen

Press and hold

the SET button

Accepts a digit and displays the
next digit position (if any remain)
on the ENTER CODE screen

While SECURITY OFF is shown on the
information display area, simultaneously

Press and hold

the MODE and SET

button.

Allows user to change security
code.

SPEED LIMITER

ENABLE THE SPEED LIMITER

• Press and hold the Polaris button.
• Press the MODE button to scroll through menu options until SPD LMT

appears in the information display area. Then press the SET button.

• Enter your passcode.
• Press SET Button to toggle ON or OFF.

64

GAUGE

SPEED LIMIT STATUS

• Press and hold the Polaris button
• Press MODE button to scroll through menu options.
• “SPD LMT” will display as ON or OFF.

On = Enabled

Off = Disabled

CHANGE SPEED LIMIT

• Press and hold the Polaris button
• Press MODE button to scroll through menu options.
• Press SET Button when “SET SPD” appears on the screen.
• Enter Passcode.
• Press SET button on “MAX SPD” menu option.
• Press SET and MODE buttons to increase and decrease the speed setting.

DIAGNOSTIC DISPLAY MODE

The diagnostic display mode is for
informational purposes only. Your
authorized POLARIS dealer can
perform all major repairs.

The diagnostic mode is accessible only
when the check engine warning
indicator is illuminated

and

a diagnostic

code is active.

65

GAUGE

Do not stop the engine if you want to view the active code (failure code). Active
codes cannot be retrieved if power is interrupted to the instrument cluster. The
codes will become inactive codes if power is interrupted. Inactive codes are
stored in the history of the unit. Please see your authorized POLARIS dealer can
help retrieve inactive codes.

Use the following procedure to view active codes.

1. Do not stop the engine.

2.

Press and hold

the center

button on the instrument cluster to enter the

Options Menu.

3.

Press and release

the MODE button until DIAGCODE appears in the

information display area. The Diagnostic display mode will appear in the
Options Menu if there is an active trouble code.

TIP

When the diagnostic mode is displayed, the check engine warning indicator will

begin to flash.

4. A set of two numbers will appear in the display.

• The 2-6 digit suspect parameter number (SPN) in the information display

area indicates which component is generating the fault code.

• The 1-2 digit failure mode indicator (FMI) number in the odometer area

indicates the fault mode, such as open or short circuit.

5. More than one fault may be active. Press and hold the SET button or SET

switch for two seconds to toggle to the next active code. Repeat until all
codes are retrieved.

6. See Diagnostic Trouble Codes for code definitions and failure descriptions.

HEATED GRIPS

The heated handlebar grips can
be operated using the left hand
controls. To customize the
temperature of the grips, follow
the procedure below.

66

GAUGE

ACTIVATE HEATED GRIPS

To activate the SmartWarmer
system in the handlebars, press
the Heated Grips button

q

on

the left hand controls. There are
four heat levels to choose from:

• Low
• Medium
• High
• Off

SET GRIP TEMPERATURE

The temperature of each heat level can be customized using your gauge or
hand controls. Use the following procedure to adjust the temperature of your
heated hand grips.

1. Start the engine.

2.

Press and hold

the center

button to enter the Options Menu.

3.

Press and release

the MODE button until HEATERS is displayed in the

information display area.

Using the Gauge Buttons

1.

Press and release

the MODE button to select which SmartWarmer element

to customize: grips or thumb. Press the SET button to select.

2.

Press and release

the MODE button to choose a heat level: low, medium, or

high. Press the SET button to select.

3. Use the SET and MODE buttons to increase/decrease the temperature to

desired setting.
• MODE decreases the temperature.
• SET increases the temperature.

4. Press the Polaris button to lock in temperature.

5. Press the MODE button to advance to the next heat setting.

6. Repeat steps 3-5 for each setting: low, medium, and high.

7. Press the Polaris button to exit.

8.

Press and release

the SET or Polaris button to exit. The grips will adjust to

the temperatures of the new settings when the hand grip warmers are
enabled.

67

GAUGE

Using the Left Hand Controls

1.

Press and release

the Select

button

w

to select which

SmartWarmer element to
customize: grips or thumb.
Press the Select button to
select.

2.

Press and release

the Down

Arrow

r

to choose a heat

level: low, medium, or high.
Press the Select button to
select.

1. Use the Up arrow and Down arrows to increase/decrease the temperature to

desired setting.
• UP increases

e

the temperature.

• DOWN arrow

r

decreases the temperature.

2. Press the Select button to lock in temperature.

3. Press the Down arrow to advance to the next heat setting.

4. Repeat steps 3-5 for each setting: low, medium, and high.

5. Press the Select button to exit.

6. Press the SET or Polaris button on the gauge to exit. The grips will adjust to

the temperatures of the new settings when the hand grip warmers are
enabled.

ENGINE OVERHEAT INDICATORS

The over-temperature indicators on the standard instrument cluster and Polaris
Interactive Digital Display (PIDD) will illuminate and/or flash when the engine is
overheating.

TEMPERATURE

ACTION

232 °F (111 °C)

Indicator lamp illuminates

248 °F (119 °C)

Indicator lamp flashes, engine shut
down

68

GAUGE

OVER-TEMPERATURE INDICATOR (STANDARD
CLUSTER)

The over-temperature indicator on
the standard instrument cluster will

illuminate

when the engine is

overheating. Take action to cool the
engine. See the Engine Cooling
Actions section for more
information. The indicator will

flash

when engine temperature reaches
critical levels.

Stop the engine

immediately.

OVERHEAT WARNING (7S DISPLAY)

When the engine is overheating, a red
bar will appear at the top of the 7S
display.

Stop the engine immediately

and take action to cool the engine. See
the Engine Cooling Actions section for
more information.

FLASHING INDICATOR

Flashing indicators indicate continued operation could result in serious engine
damage. The engine management system will automatically reduce engine
power and create a misfire condition. Stop the engine

immediately

. Allow the

engine to cool down.

NOTICE

If engine overheating seems to be caused by something other than poor

cooling conditions, your authorized POLARIS dealer or other qualified

technician can perform a diagnosis.

69

GAUGE


Content      ..      1      2      3      ..