Snowmobile Lynx DEEP SNOW SPORT SERIES. OPERATOR’S GUIDE (2023) - page 2
INJECTION OIL
Recommended Injection Oill
Rotax® engines were developed and validated using the XPS® oil.
BRP recommends the use of its XPS injection oil or an equivalent at
all time. Damages caused by the use of an injection oil not suitable for
this 2-stroke direct fuel injection engine may not be covered by the
BRP Limited Warranty.
RECOMMENDED Injection Oil
850 E-TEC
XPS 2T E-TEC Synthetic Oil (full synthetic)
IF THE RECOMMENDED XPS ENGINE OIL IS NOT
AVAILABLE
Use a 2-stroke lubricant designed for snowmobiles meeting or
exceeding the following lubricant industry specifications:
- JASO FD (M345-2004)
- SAE Grade 4 (F / M 4)
Injectiion Oiil Level Veriifiicatiion
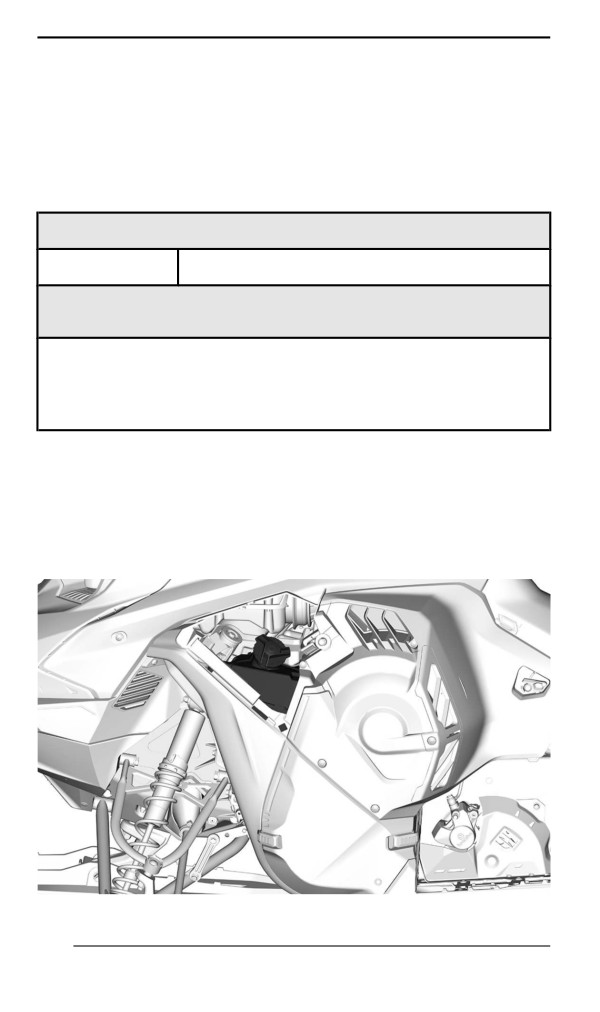
The injection oil reservoir is located behind the LH side panel. Refer to
Equipment for opening procedure.
Always maintain a sufficient amount of recommended injection oil in
the injection oil reservoir.
TYPICAL
152
INJECTION OIL
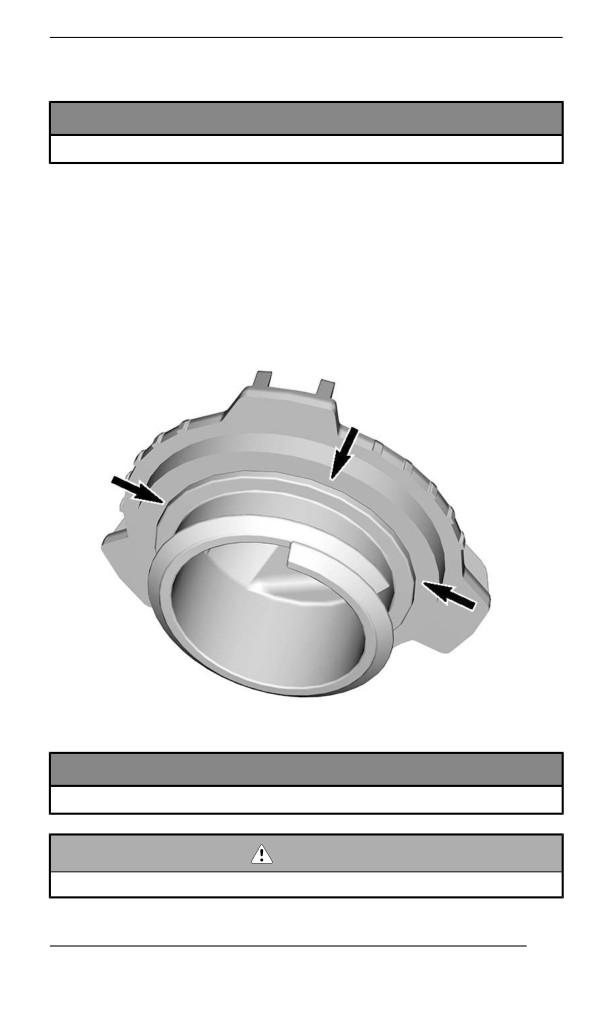
Marks on the tank indicates "1/4" and "1/2" of the total amount of oil.
NOTICE
Check level and refill every time you refuel.
Adding Injection Oil
Remove injection oil reservoir cap.
Add injection oil.
NOTE:
Do not overfill.
Wipe the reservoir cap seal and flange area.
Reinstall cap.
NOTICE
Do not overtighten.
WARNING
Wipe off any oil spills. Oil is highly flammable when heated.
153
BREAK-IN PERIOD
Operatiion During Break-In
Engine
During the break-in period:
- Avoid prolonged full throttle operation.
- Avoid sustained accelerations.
- Avoid prolonged cruising speeds.
- Avoid engine overheating.
However, brief accelerations and speed variations contribute to a
good break-in.
During a predetermined period, the engine management system con-
trols some engine parameters.
The duration is based on fuel volume. It will take approximately two
fuel tanks to complete the break-in.
During this period:
- The engine performance and behavior will not be optimal.
- The fuel and oil consumption will be higher.
Drive Belt
A new drive belt requires a break in period of 50 km (30 mi).
During the break-in period:
- Avoid strong acceleration and deceleration.
- Avoid pulling a load.
- Avoid high speed cruising.
If the vehicle creeps, lower the drive belt height from the preliminary
setting. Refer to Drive Belt in maintenance procedure.
154
BASIC PROCEDURES
Engine Startiing Procedure
Procedure
1. Apply parking brake.
2. Recheck throttle control lever operation.
3. Put your helmet on.
4. Ensure that the tether cord cap is installed on the engine cut-off
switch and that the cord is attached to your clothing eyelet.
5. Ensure that the emergency engine stop switch is in the ON position
(up).
WARNING
Never depress throttle while starting engine.
6. Release parking brake.
NOTE:
For an initial cold start, do not release parking brake. Perform the ve-
hicle warm-up procedure as explained below.
Manuall Start Models
Grab rewind starter handle, pull handle slowly until a resistance is felt,
then hold handle firmly and pull vigorously to start engine.
NOTE:
The maximum torque that can be transmitted to the engine by the re-
wind starter is 80 Nm (59 lbf-ft). The maximum force that can be ex-
erted on the on the rope is 2 200 N (494.6 lbf).
Ellectric Start Modells
Press the START/RER button to engage the electric starter and start
the engine. Release button immediately when engine has started.
NOTICE
Do not engage electric starter for more than 10 seconds at a
time. A rest period should be observed between the cranking
cycles to allow electric starter to cool down.
Emergency Startiing
The engine can be started with the emergency starter rope supplied in
the storage compartment. Refer to Body and Seat.
155
BASIC PROCEDURES
Remove the drive belt guard. Refer to Body and Seat.
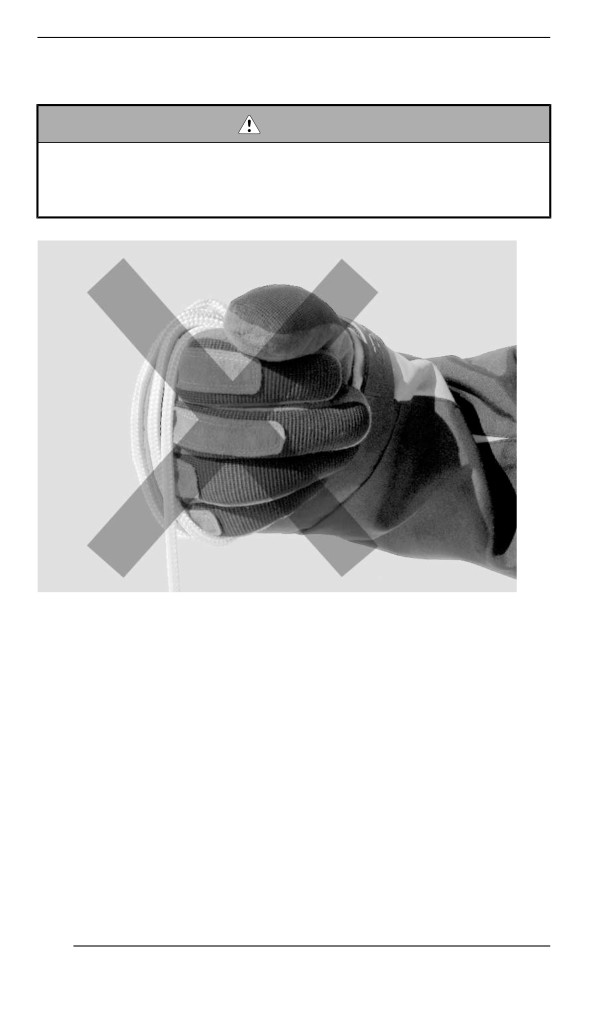
WARNING
Do not wind starting rope around your hand. Hold rope by the
handle only. Do not start the engine by the drive pulley unless it
is a true emergency situation. Have the snowmobile repaired
as soon as possible.
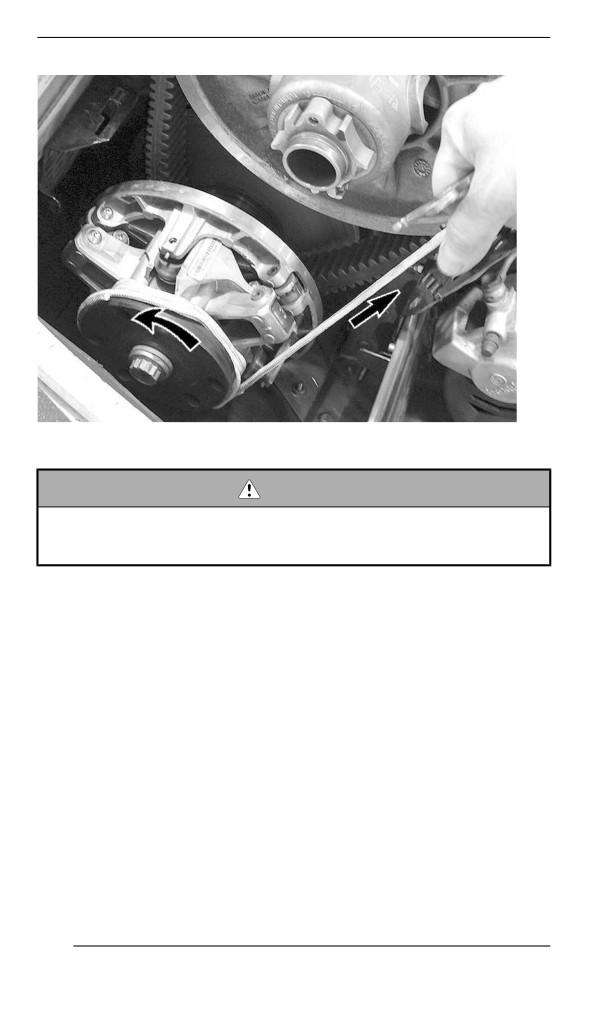
Attach one end of emergency rope to the rewind handle.
NOTE:
The suspension adjustment tool can be used as an emergency
handle.
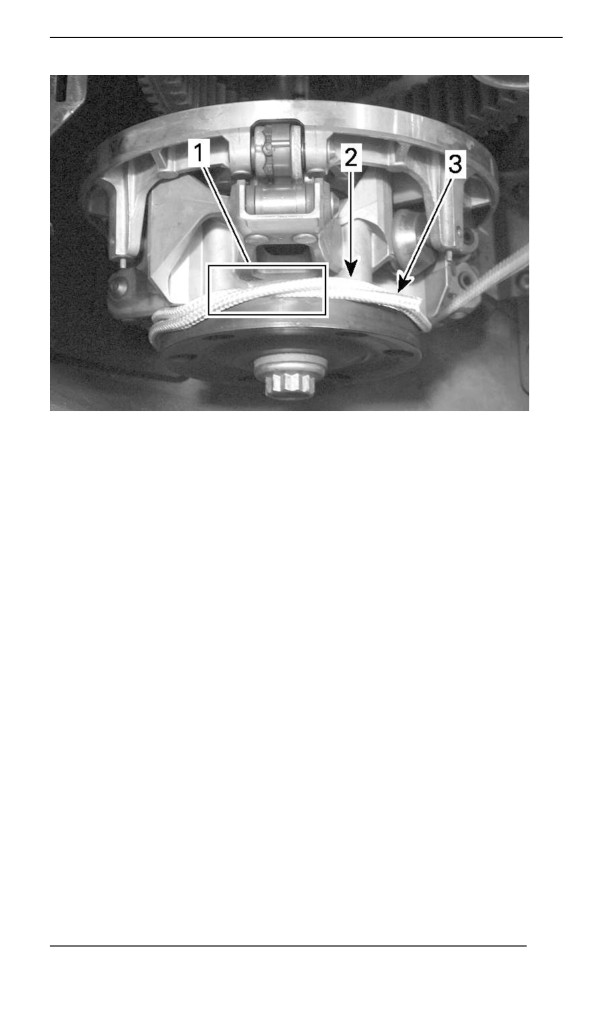
Cross the rope on the first turn as shown.
156
BASIC PROCEDURES
1. Rope crossed
2. Rope to be winded
3. Rope end
Wind rope two turns counterclockwise tightly around the drive pulley
where shown.
Pull the rope using a sharp, crisp pull so the rope comes free of the
drive pulley.
157
BASIC PROCEDURES
Start engine as per usual manual starting.
WARNING
When starting the snowmobile in an emergency situation, using
drive pulley, do not reinstall the belt guard and return slowly to
have snowmobile repaired.
Vehiiclle Warm-Up
Before every ride, vehicle has to be warmed up as follows.
1. Start engine as explained in Engine Starting Procedure above.
2. Allow engine to warm up one or two minutes at idle speed.
NOTE:
Engine will shut down after approximately 12 minutes of idling.
3. Disengage parking brake.
4. Apply throttle until drive pulley engages. Drive at low speed the first
two or three minutes.
158
BASIC PROCEDURES
NOTICE
If vehicle does not move when throttle is applied, stop engine,
remove tether cord cap from the engine cut-off switch, then do
the following.
– Check if skis are stuck on the ground. Lift one ski at a time
by the handle, then put it down.
– Check if track is stuck on the ground. Lift rear of snowmobile
enough to clear track from the ground, then drop.
– Check rear suspension for hard snow or ice accumulation
that could interfere with track rotation. Clean the area.
CAUTION
Beware of injuries by using proper lifting techniques, notably
using your legs force. Do not attempt to lift the rear of vehicle if
it is above your limits.
WARNING
Make sure tether cord cap is removed before standing in front
the vehicle, getting close to the track or rear suspension
components.
NOTE:
Warm-up is electronically controlled. During this period (up to 10 mi-
nutes depending on ambient temperature), engine RPM is limited.
Reverse (RER)
When the engine is running, depressing the RER button will slow
down engine RPM to almost a stop and advance the ignition timing to
invert crankshaft rotation.
- Engine will automatically shift into forward when restarting after
stopping or stalling.
- Shifting procedure will take place only when the engine is running.
- If engine is running at a speed above 4300 RPM, the function of
the RER button is disabled.
- It is recommended to warm up the engine to its normal operating
temperature before shifting.
Shifting in Reverse
1. Bring vehicle to a complete stop.
2. Apply and hold brake. Remain seated, refer to Rider Position (Re-
verse Operation) in Riding the vehicle for posture information.
159
BASIC PROCEDURES
3. With engine at idle speed, select reverse (R) gear using the Start /
RER button.
4. Wait until reverse beeper sounds, then gently depress throttle
lever.
WARNING
The reverse speed is not limited. Always proceed with caution
as fast reverse could result in loss of vehicle stability. Come to
complete stop before activating the reverse. Always remain
seated and apply the brake before shifting. Ensure the path be-
hind is clear of obstacles or bystanders before proceeding.
Shifting in Forward from Reverse
1. Bring vehicle to a complete stop.
2. Apply and hold brake.
3. Press and release the RER button.
4. Apply throttle slowly and evenly. Allow drive pulley to engage then
accelerate carefully.
Shutting Off the Engiine
Release throttle lever and wait until engine has returned to idle speed.
Shut off the engine using either the emergency engine stop switch or
by pulling off the tether cord cap from the engine cut-off switch.
WARNING
Always remove the tether cord cap from engine cut-off switch
when vehicle is not in operation in order to prevent accidental
engine starting or to avoid unauthorized use by children or
others or theft.
160
RIDING CONDITIONS AND YOUR
SNOWMOBILE
Alltiitude
At factory, your snowmobile was calibrated to be used within an alti-
tude range (relative to sea level).
A new snowmobile has a tag attached to the handlebar indicating its
calibration. Refer to Safety Information on Vehicle.
If for any reason you don't know your snowmobile calibration, contact
an authorized BRP snowmobile dealer.
If your snowmobile is to be used at an altitude outside the specified
range, have it calibrated accordingly by an authorized BRP snowmo-
bile dealer.
NOTICE
An inappropriate altitude calibration would decrease perform-
ance and may cause serious damage to the snowmobile.
Temperature
The engine management of these engines provides the optimum air/
fuel ratio for all temperatures.
Hard Packed Snow
All models covered in this guide which are equipped with a minimum
track profile of 44 mm (1.75 in) are built for deep snow conditions and
should never be used during a prolonged period of time in marginal or
hard packed snow conditions.
In the event you have to ride in these types of conditions:
- Avoid exceeding a speed of 70 km/h (45 mph) in all conditions
- Avoid hard acceleration (over 75% of throttle)
- Ice scratchers should be applied
- Engine temperature should not exceed 75% on the temperature
gauge.
NOTICE
Running these types of tracks at high speed on a trail, on hard
packed surfaces or on ice puts more stress on the lugs, which
tends to heat up as a result. It also could drastically reduce the
life of specific wear parts. To avoid potential degradation, de-
lamination or damages to the track and wear parts, reduce your
speed and minimize the distance that is being ridden on these
types of surfaces.
161
RIDING CONDITIONS AND YOUR SNOWMOBILE
Vehicles Equipped with Ice Scratchers
Ice scratchers are equipped on the vehicle to increase engine cooling
efficiency, to lubricate and to cool track clips and sliders. They must
be used whenever on ice, hard packed snow, or any conditions that
do not lift enough snow particles into the rear suspension and the
tunnel.
NOTICE
Although it is not recommended to ride a snowmobile equipped
with a high lug profile track on trails or hard packed snow condi-
tions, it is highly suggested to combine idler wheels and ice
scratchers on a vehicle used in these conditions.
IMPORTANT
Ridding in these trail conditions puts the reliability of the track and
its warranty at risk
If equipped with the following track profile heights, never exceed the
recommended sustained vehicle speeds listed.
Track Profile Height
Maximum Sustained Speed
57 mm (2.25 in)
110 km/h (70 MPH)
60 mm (2.36 in)
64 mm (2.52 in)
95 km/h (60 MPH)
75 mm (3 in)
162
TUNE YOUR RIDE
Snowmobile handling and comfort depend upon multiple adjustments.
WARNING
Suspension adjustment could affect vehicle handling. Always
take time to familiarize yourself with the vehicle''s behavior after
any suspension adjustment have been made. Always adjust LH
and RH suspension components to the same setting.
Choice of suspension adjustments vary with carrying load, operator's
weight, personal preference, riding speed and field condition.
NOTE:
Some adjustments may not apply to your snowmobile.
WARNING
Before proceeding with any suspension adjustment, remember:
– Park in a safe place.
– Remove the tether cord cap from the engine cut-off switch.
– Use appropriate lifting device or have assistance to share
lifting stress. If a lifting device is not used, use proper lifting
techniques, notably using your legs force.
– Do not attempt to lift the front or rear of vehicle if it is above
your limits.
– Support front of vehicle off the ground with a suitable device
before adjusting suspension.
– Support rear of vehicle off the ground with a wide-base
snowmobile stand with a rear deflector panel.
– Make sure support device is stable and secure.
The best way to set up the suspension is to customize each adjust-
ment one at a time. Various adjustments are interrelated. It may be
necessary to readjust center spring after adjusting front springs for in-
stance. Test run the snowmobile under the same conditions; trail,
speed, snow, operator riding position, etc. Proceed methodically until
you are satisfied.
Following are guidelines to fine-tune suspension. Use suspension ad-
justment tool provided in the tool kit.
Front Suspensiion Adjustments
Ski Stance
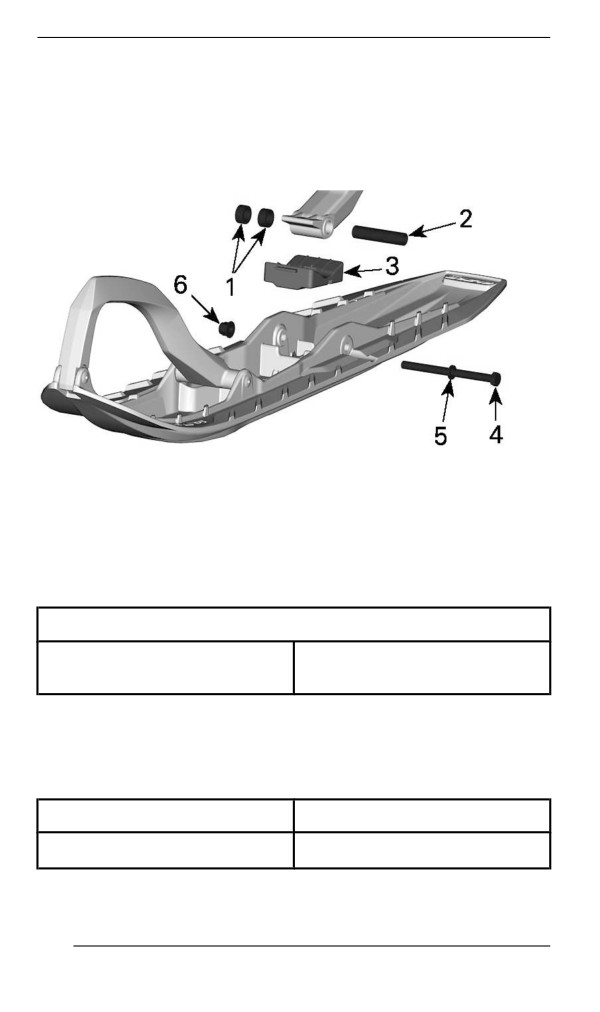
Skis can be set to three different widths.
To obtain the different widths, place the spacers:
163
TUNE YOUR RIDE
- Inside the skis leg (narrowest ski stance setting: easiest to initiate
turn on sidehills), or
- Outside the skis leg (widest ski stance setting: most stable on cor-
ners), or
- On each side (central setting: best steering accuracy on deep
snow).
1. Spacers
2. Axle
3. Stopper
4. Screw
5. Washer
6. Nut
TIGHTENING TORQUE
48 ± 6 Nm
Ski nut
(35 ± 4 lbf-ft)
Front Springs
Front spring preload has an effect on front suspension firmness.
Front spring preload also has an effect on the steering behavior.
Action
Result
Increasing preload
Firmer front suspension
164
TUNE YOUR RIDE
Action
Result
Higher front end
More precise steering
More bump absorption
capability
Softer front suspension
Lower front end
Decreasing preload
Lighter steering
Less bump absorption
capability
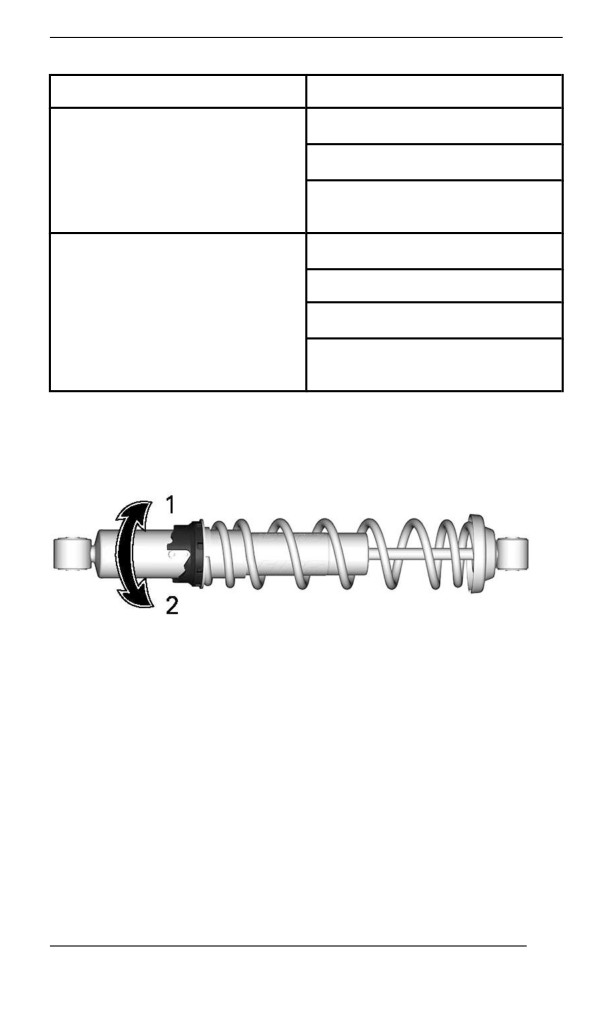
Cam Type Adjuster
Using the suspension adjustment tool provided in the tool kit, turn the
cam to increase or decrease the spring preload.
1. Increase preload
2. Decrease preload
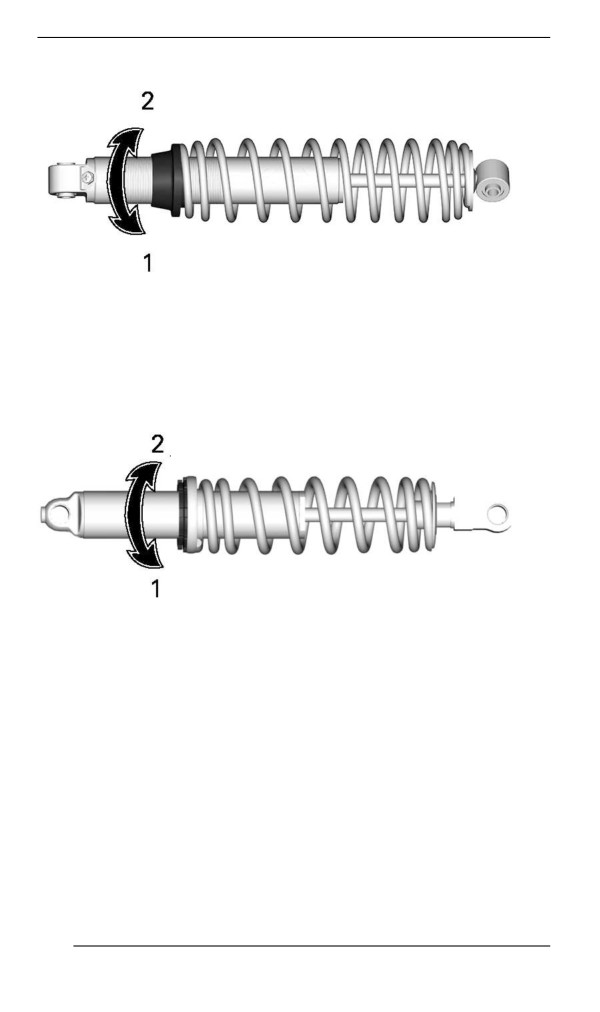
Ring Type 1 Adjuster
Grab and turn the ring and the spring to increase or decrease the
spring preload.
165
TUNE YOUR RIDE
1. Increase preload
2. Decrease preload
Ring Type 2 Adjuster
Grab and turn the ring and the spring to increase or decrease the
spring preload.
1. Increase preload
2. Decrease preload
Front Shock Absorber Adjustments (KYB PRO R Series Only)
Compression Dampiing (iif equiipped)
NOTE:
Both low and high speed compression damping are adjusted
simultaneously.
Low speed compression damping controls how the shock absorber re-
acts to a low suspension velocity (slow compression strokes, in most
cases when riding at lower speeds).
166
TUNE YOUR RIDE
High speed compression damping controls how the shock absorber
reacts to a high suspension velocity (quick compression strokes, in
most cases when riding at higher speeds).
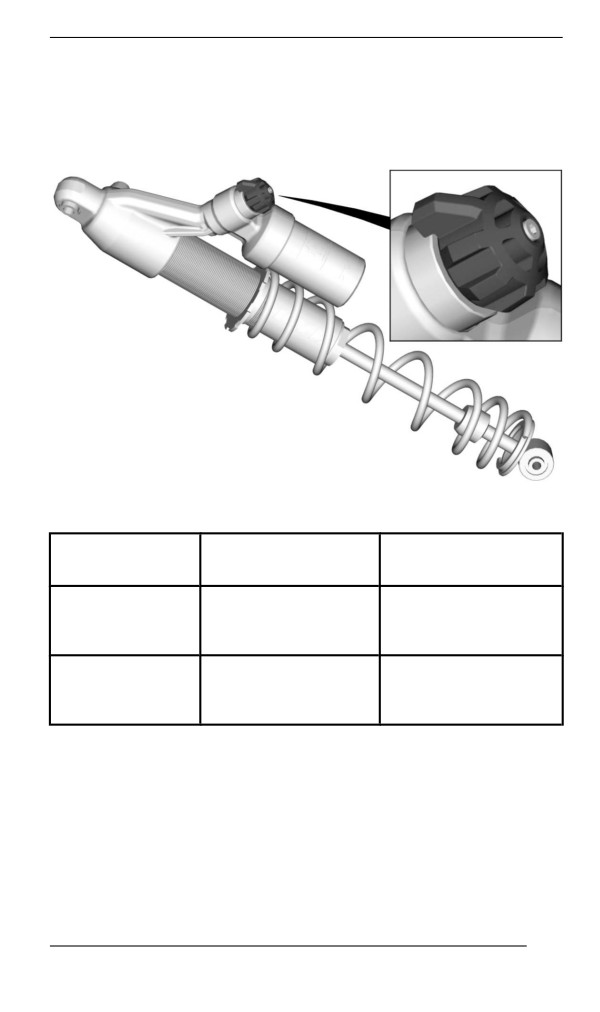
To adjust, turn the adjuster button located on the reservoir.
3 POSITIONS COMPRESSION DAMPING ADJUSTER BUTTON
Result on big and
Turning
Action
small bumps
Increasing
Firmer compression
Clockwise
compression
damping
damping force
Decreasing
Counter
Softer compression
compression
Clockwise
damping
damping force
Rebound Damping
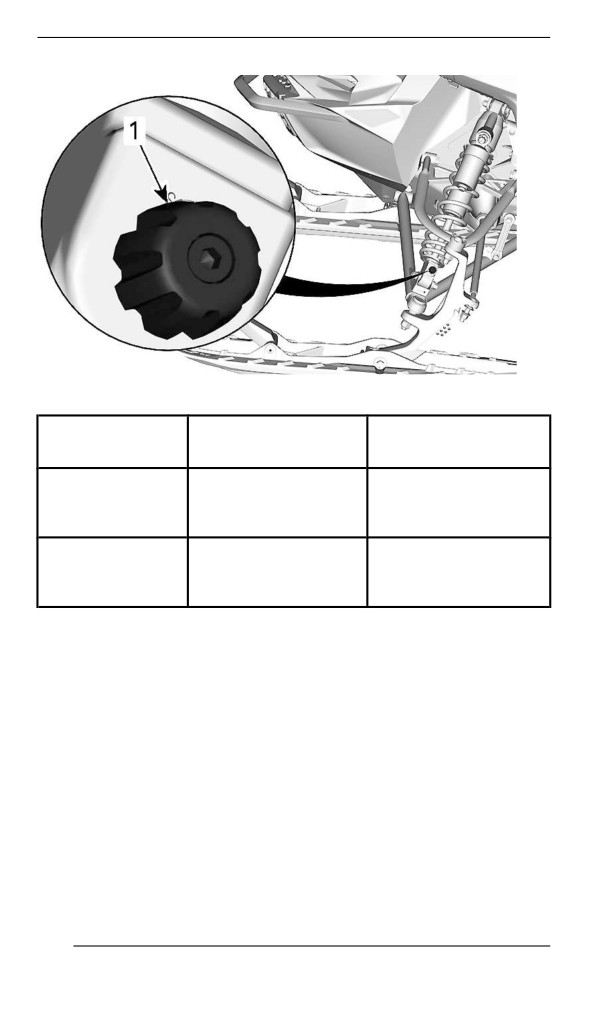
Rebound damping controls how the shock absorber restrains the ex-
tension stroke.
167
TUNE YOUR RIDE
1. Rebound adjuster
Result on big and
Turning
Action
small bumps
Firmer rebound
Increasing rebound
Clockwise
damping (slower
damping force
extension speed)
Softer rebound
Counter
Decreasing rebound
damping (faster
Clockwise
damping force
extension speed)
NOTE:
In repetitive short small bumps (ripple), it is recommended to use a
lower rebound damping setting.
168
TUNE YOUR RIDE
Rear Suspension Adjjustments
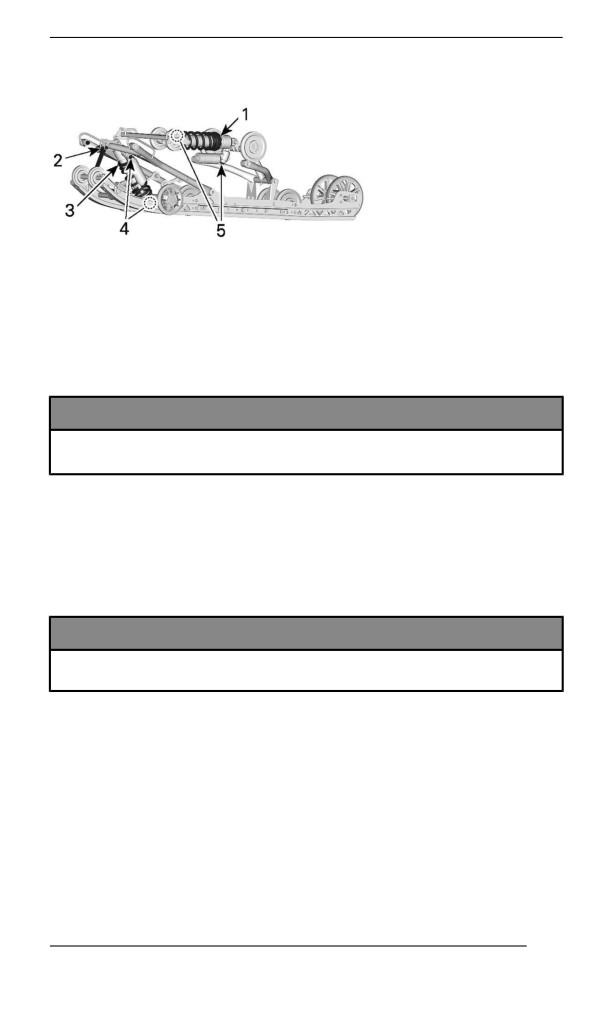
TYPICAL - ADJUSTABLE COMPONENTS
1. Rear spring
2. Stopper strap
3. Center spring
4. Center shock absorber
5. Rear shock absorber
NOTICE
Whenever adjusting rear suspension, check track tension and
adjust if necessary.
Stopper Strap
Stopper strap length has an effect on the amount of weight the center
spring has to carry especially during acceleration, therefore on the
front end uplift.
Stopper strap length also has an effect on center spring travel.
NOTICE
Whenever stopper strap length is changed, track tension must
be checked.
NOTE:
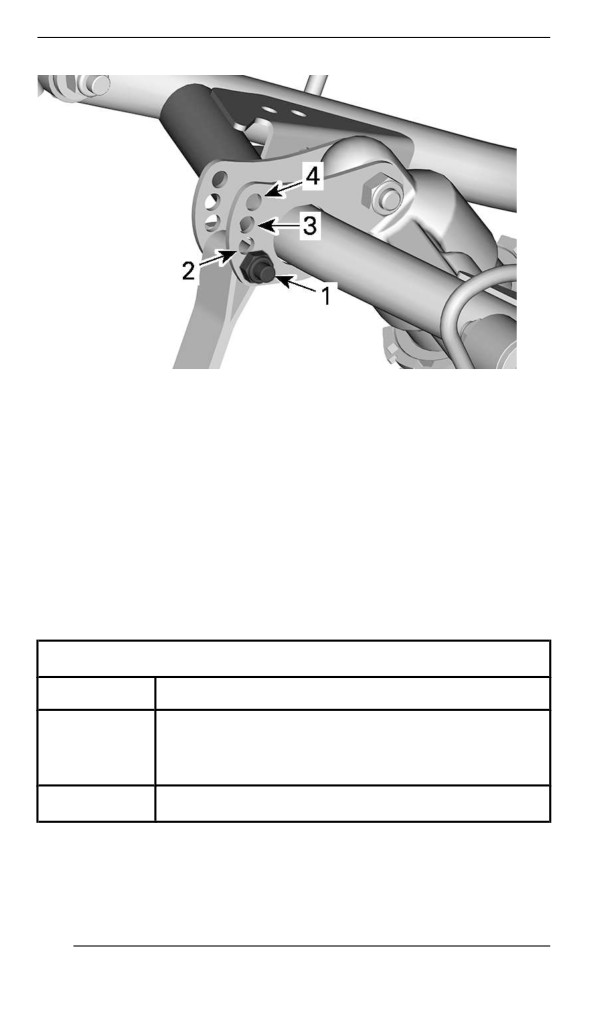
Stopper strap can be set to position 1, 2, 3 or 4. Smaller numbers cor-
respond to a longer strap setting.
169
TUNE YOUR RIDE
STOPPER STRAP POSITIONS
1. Position 1 (longest)
2. Position 2
3. Position 3
4. Position 4 (shortest)
When operating the snowmobile in deep snow or hill climbing, it may
be necessary to vary stopper strap length and/or riding position, to
change the angle at which the track rides on the snow. Operator's fa-
miliarity with the various adjustments as well as snow conditions will
dictate the most efficient combination.
Generally, a longer stopper strap setting gives better performance on
a flat landscape and a shorter setting will improve handling in steep hill
climbing and deep snow conditions.
Stopper Strap Setting
Position
use
Boon docking:
1
- Better bump absorption
- Lighter and easier handling on flat landscape.
2
Normal setting: Best overall setting (General use)
170

TUNE YOUR RIDE
Stopper Strap Setting
Position
use
Hill climb:
- Better track attack angle for hill climbing
3
- Better maneuverability on deep snow and on
sidehilling
Steep hill climb:
- Better track attack angle for hill climbing
4
- Less transfer
- Lower ride height
Center Spring
Center spring preload has an effect on steering effort, handling and
bump absorption.
Also, since center spring preload adjustment puts more or less pres-
sure on the front of the track, it has an effect on the performance in
deep snow.
Action
Result
Lighter steering
More bump absorption
capability
Increasing preload
Better deep snow starts
Better deep snow performance
and handling
Heavier steering
Less bump absorption
Decreasing preload
capability
Better trail handling
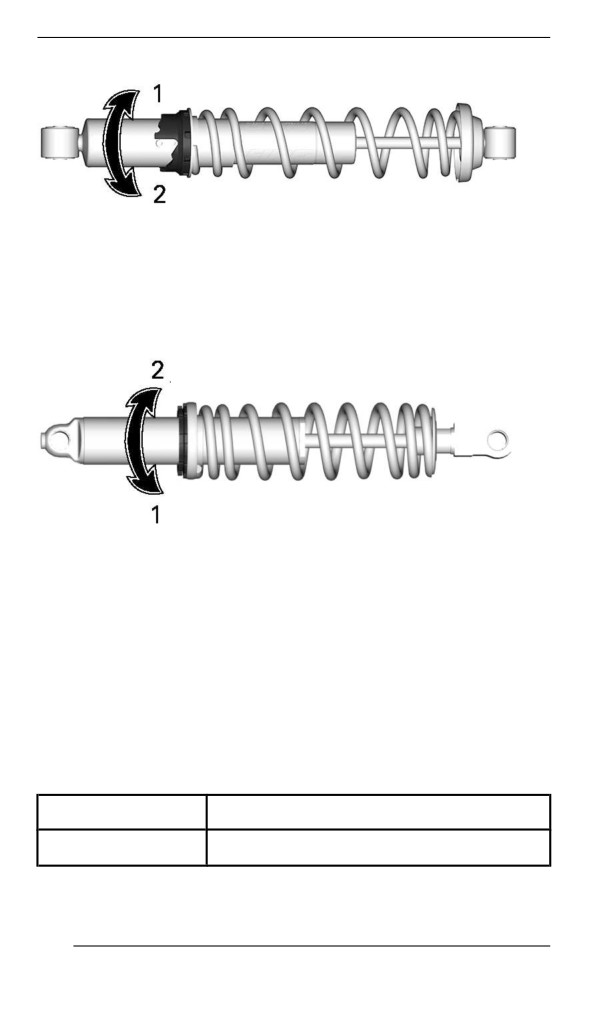
Cam Type Adjuster
Using the suspension adjustment tool provided in the tool kit, turn the
cam to increase or decrease the spring preload.
171
TUNE YOUR RIDE
1. Increase preload
2. Decrease preload
Ring Type Adjuster
Grab and turn the ring and the spring to increase or decrease the
spring preload.
1. Increase preload
2. Decrease preload
Rear Spring
Rear spring preload has an effect on comfort, ride height and load
compensation.
Also, adjusting rear spring preload shifts more or less weight to the
snowmobile front end. As a result, more or less weight is applied to
the skis. This has an effect on performance in deep snow, steering ef-
fort and handling.
Slight suspension bottoming occurring under the worst riding condi-
tions indicates a good choice of spring preload.
Action
Result
Increasing preload
Firmer rear suspension
172
TUNE YOUR RIDE
Action
Result
Higher rear end
More bump absorption capability
Heavier steering
Softer rear suspension
Lower rear end
Less bump absorption capability
Decreasing preload
Lighter steering
Better deep snow performance and
handling
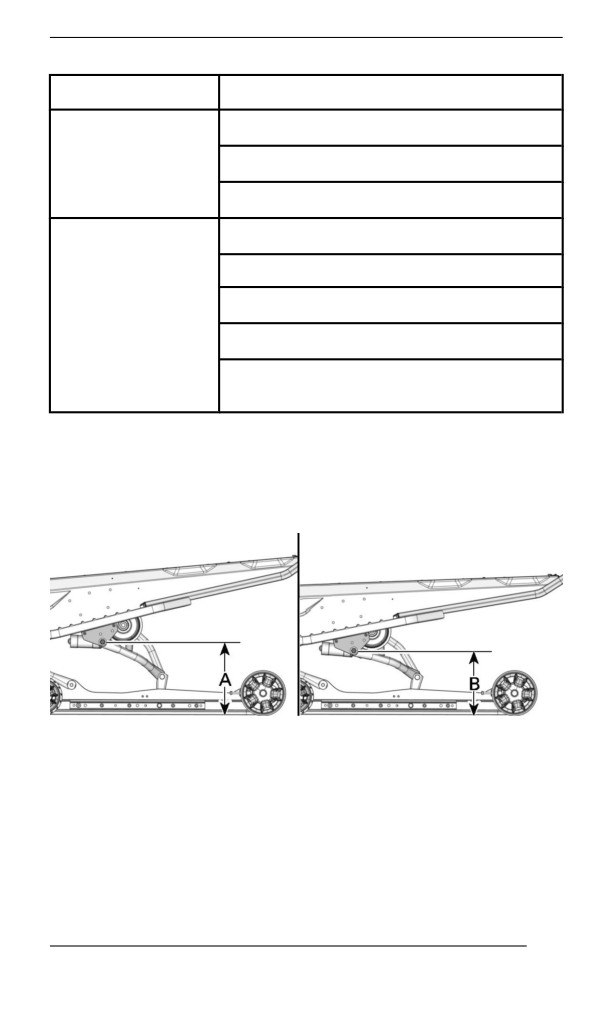
Refer to the following to determine if preload is correct.
- A = Suspension fully extended
- B = Suspension has collapsed with operator, passenger(s) and
load added
- C = Distance between dimension “A” and “B”, see table below
TYPICAL - DISTANCE BETWEEN GROUND AND UPPER REAR
ARM PIVOT
173
TUNE YOUR RIDE
C
What to do
85 to 95 mm (3.3 to 3.7 in)
No adjustment required
More than
Adjusted too soft. Increase
95 mm (3.7 in)
preload
Less than
Adjusted too firm. Decrease
85 mm (3.3 in)
preload
NOTE:
If the specification is unattainable with the original springs, visit an au-
thorized BRP snowmobile dealer for other available springs.
For normal setting, refer to Suspension Adjustment Table.
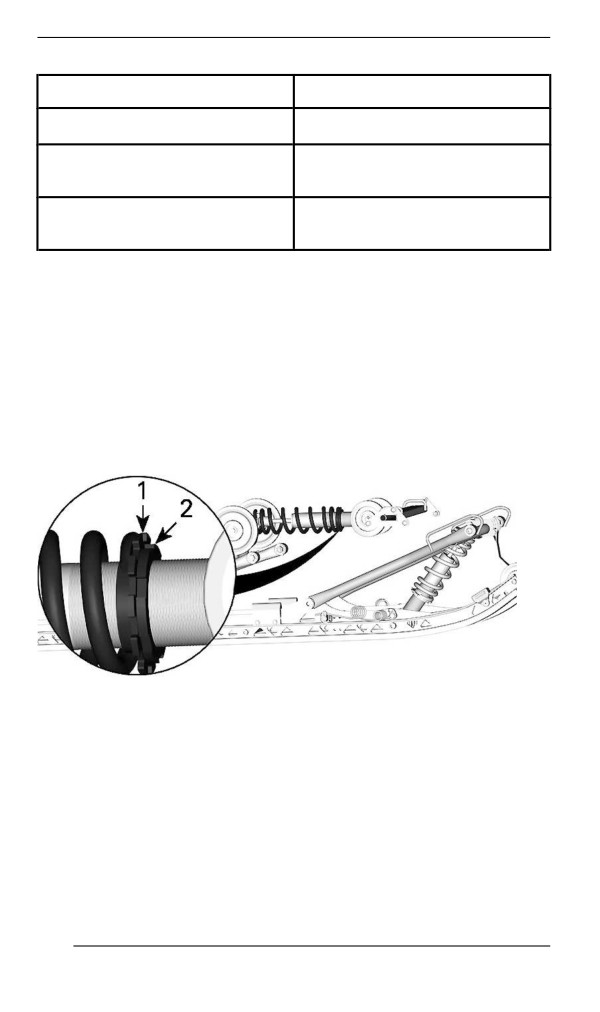
To adjust, unscrew the locking ring, then turn the adjustment ring to
set the spring preload.
When the desired preload is set, tighten the locking ring against the
adjustment ring.
1. Adjustment ring
2. Locking ring
Center and Rear Shock Absorber Adjustments (KYB HLCR
Series Only)
Compression Dampiing
Low speed compression damping controls how the shock absorber re-
acts to a low suspension velocity (slow compression strokes, in most
cases when riding at lower speeds).
174
TUNE YOUR RIDE
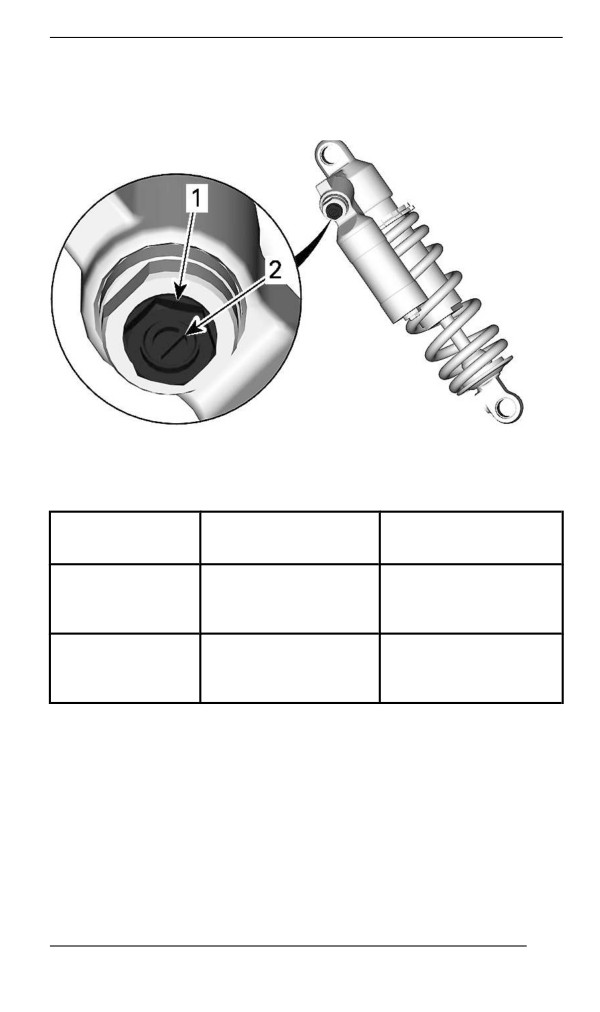
High speed compression damping controls how the shock absorber
reacts to a high suspension velocity (quick compression strokes, in
most cases when riding at higher speeds).
1. High speed compression adjuster (hexagonal)
2. Low speed compression adjuster (slotted)
Result on big and
Turning
Action
small bumps
Increasing
Firmer compression
Clockwise
compression
damping
damping force
Decreasing
Counter
Softer compression
compression
Clockwise
damping
damping force
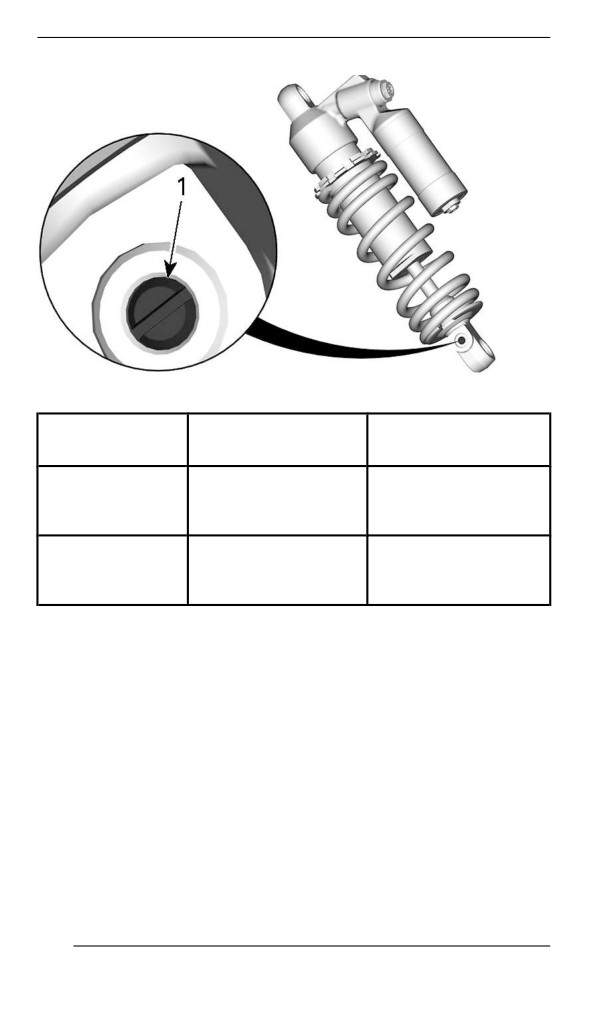
Rebound Damping
Rebound damping controls how the shock absorber restrains the ex-
tension stroke.
175
TUNE YOUR RIDE
1. Rebound adjuster
Result on big and
Turning
Action
small bumps
Firmer rebound
Increasing rebound
Clockwise
damping (slower
damping force
extension speed)
Softer rebound
Counter
Decreasing rebound
damping (faster
Clockwise
damping force
extension speed)
NOTE:
In repetitive short small bumps (ripple), it is recommended to use a
lower rebound damping setting.
176
TUNE YOUR RIDE
Adjustment Tiips According to Vehiiclle Behaviior
Problem
Corrective measures
Check ski alignment.
-
Reduce front suspension spring
Front suspension darting
preload.
-
Increase center spring preload.
–
Reduce rear spring preload.
Steering feels too heavy
-
Reduce front suspension spring
at steady speeds
preload.
-
Increase center spring preload.
-
Set coupling blocks to a lower
Steering feels too heavy
position (if equipped).
during acceleration
-
Reduce rear spring preload.
–
Lengthen limiter strap.
-
Set coupling blocks to a higher
Too much ski lift during
position (if equipped).
cornering or acceleration
-
Shorten limiter strap.
–
Increase rear spring preload.
–
Reduce rear spring preload.
Rear of snowmobile
-
Reduce compression damping
seems too stiff
adjustment
if equipped
Rear of snowmobile
-
Increase rear spring preload.
seems too soft
–
Increase compression damping
adjustment
Rear suspension is
if equipped.
frequently bottoming
-
Increase rear spring preload.
–
Increase center spring preload.
–
Lengthen limiter strap.
177
TUNE YOUR RIDE
Problem
Corrective measures
- Reduce center spring preload.
- Increase rear spring preload.
Snowmobile seems to
- Increase front suspension spring
pivot around its center
preload.
- Shorten limiter strap.
- Set coupling blocks to a lower
Track spins too much at
position (if equipped).
start
- Lengthen limiter strap.
178
MAINTENANCE
179
MAINTENANCE SCHEDULE
Maintenance is very important to keep your vehicle in safe operating
condition. The vehicle should be serviced as per the maintenance
schedule.
Proper maintenance is the owner’s responsibility. A warranty claim
may be denied if, among other things, the owner or operator caused
the problem through improper maintenance or use.
Perform periodic checks and follow the maintenance schedule. The
maintenance schedule does not exempt the pre-ride inspection.
WARNING
Failure to properly maintain the vehicle according to the main-
tenance schedule and procedures can make it unsafe to
operate.
EPA Regullatiion - Canadiian and USA Vehiiclles
A repair shop or person of the owner''s choosing may maintain,
replace, or repair emission control devices and systems. These in-
structions do not require components or service by BRP or authorized
BRP snowmobile dealers.
Although an authorized BRP snowmobile dealer has an in-depth tech-
nical knowledge and tools to service your vehicle, the emission-related
warranty is not conditioned on the use of an authorized BRP snowmo-
bile dealer or any other establishment with which BRP has a commer-
cial relationship.
Proper maintenance is the owner’s responsibility. A warranty claim
may be denied if, among other things, the owner or operator caused
the problem through improper maintenance or use.
For emission-related warranty claims, BRP is limiting the diagnosis
and repair of emission-related parts to the authorized BRP snowmo-
bile dealers. For more information, please refer to the US EPA Emis-
sions PERFORMANCE WARRANTY contained in the warranty
section.
You must follow the instructions for fuel requirements in the fueling
section of this manual. Even if gasoline containing greater than ten
volume percent ethanol is readily available, the US EPA issued a pro-
hibition against the use of gasoline containing greater than 10 vol %
ethanol that applies to this vehicle. The use of gasoline containing
greater than 10 vol% ethanol with this engine may harm the emission
control system.
180
MAINTENANCE SCHEDULE
Deep Snow Usage
Deep Snow usage requires maintenance tasks to be performed be-
tween the regular yearly intervals. These are identified as A + in the
chart below.
If you regularly ride deep snow and perform frequent hill climbs,
follow the A+ Deep Snow interval and perform the tasks outlined in the
chart below.
181
MAINTENANCE SCHEDULE
Maiintenance Schedulle
Make sure to perform proper maintenance at recommended intervals
as indicated in the tables.
The maintenance chart indicates the items needing to be addressed
based on 2 criteria, whichever happens first:
- Calendar time
- Odometer reading.
Your driving habits determines the factors you shall adhere too. For
example:
- Someone who uses their vehicle every weekend would most likely
follow the odometer reading to determine the frequency of his
maintenance.
- Someone who uses their vehicle seldomly over the year or only on
a few occasions would follow the calendar time to determine the
frequency of his maintenance.
IMPORTANT: The following tables show the appropriate mainte-
nance application for the first 2 years. For subsequent years, repeat
the same pattern alternatively.
Maiintenance Overviiew
Calendar
Odometer
Deep Snow
Time
Every
1500 km (1000 mi)
A+
Month
1 Year
3000 km (2000 mi)
A
Every
4500 km (3000 mi)
A+
Month
2 Years
6000 km (4000 mi)
A and B
182
MAINTENANCE SCHEDULE
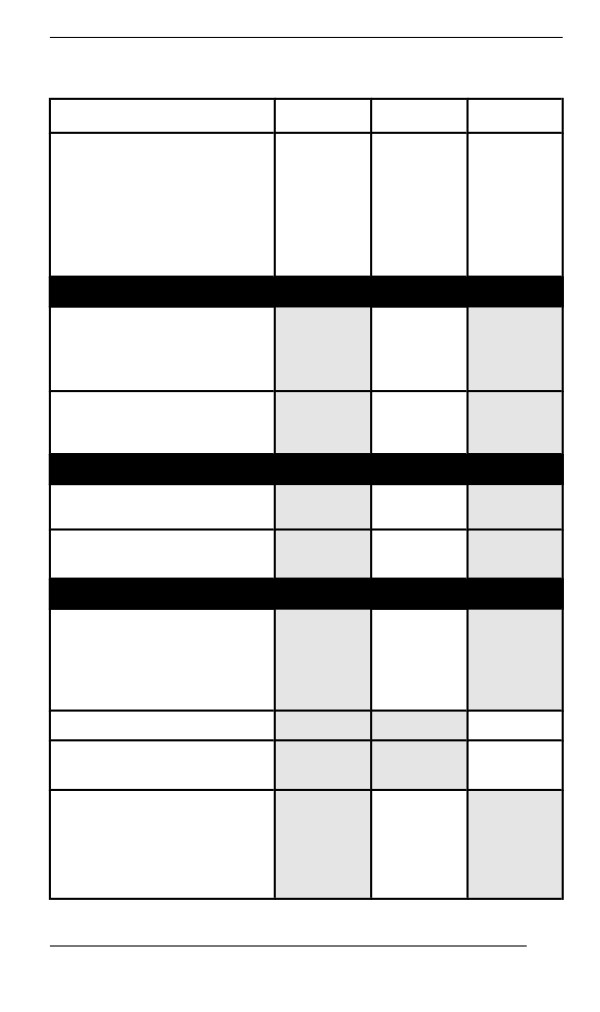
E-TEC Engines
DEEP SNOW
A+
A
B
Every 2
A=Adjust
Every
Every
years
C=Clean
month
year
or
I=Inspect
or
or
6000
L=Lubricate
1500 km
3000 km
km
R=Replace
(1000
(2000
(4000
T=Torque
mi)
mi)
mi)
Air and Fuel Delivery
Fuel components (fuel
cap, hoses, clamps and
I
tank fixation) and
function*
R
In-line fuel filter
Every 5
years
Body and Chassis
Body panels and
I, T
hardware
Pivots, latches, hinges
L
and key barrels
Engine and Cooling
Engine cooling
components (coolant
concentration, coolant
I, A
level, hose condition,
clamps, leaks)*
Engine rubber mounts
I
Rewind starter (manual
C, L
start models)
R
Every 3
Spark plugs - Except
years
Turbo R
or
10 000
km
183
MAINTENANCE SCHEDULE
DEEP SNOW
A+
A
B
Every 2
A=Adjust
Every
Every
years
C=Clean
month
year
or
I=Inspect
or
or
6000
L=Lubricate
1500 km
3000 km
km
R=Replace
(1000
(2000
(4000
T=Torque
mi)
mi)
mi)
(6000
mi)
R
Every
100
hours
Spark plugs - Turbo R
or
3000 km
(2000
mi)
I, C
Every 3
years
Oil injection pump
or
strainer
10 000
km
(6000
mi)
I, C
Every 3
years
or
RAVE valves
10 000
km
(6000
mi)
R
Engine coolant
Every 5
years
Exhaust and Emissions
184

MAINTENANCE SCHEDULE
DEEP SNOW
A+
A
B
Every 2
A=Adjust
Every
Every
years
C=Clean
month
year
or
I=Inspect
or
or
6000
L=Lubricate
1500 km
3000 km
km
R=Replace
(1000
(2000
(4000
T=Torque
mi)
mi)
mi)
Exhaust components
(gaskets, pipes, muffler
I
condition, leaks)*
Exhaust manifold
T
Brake
Brake components and
I, L
function*
R
Brake fluid
Every 2
years
Drive
A
After the
first
75 km
(50 mi)
then
every
Chaincase drive chain
500 km
A
tension
(300 mi),
up to
then
every
1500 km
(1000
mi)
Gearbox / chaincase oil
I
level
A
Track alignment and
After the
I, A
tension
first
185

MAINTENANCE SCHEDULE
DEEP SNOW
A+
A
B
Every 2
A=Adjust
Every
Every
years
C=Clean
month
year
or
I=Inspect
or
or
6000
L=Lubricate
1500 km
3000 km
km
R=Replace
(1000
(2000
(4000
T=Torque
mi)
mi)
mi)
75 km
(50 mi)
then
every
500 km
(300 mi),
up to
then
every
1500 km
(1000
mi)
Gearbox / chaincase oil
R
Continuously Variable Transmission (CVT)
CVT components and
I, C, L
function*
CVT drive belt condition
I
CVT drive belt tension
A
A
Drive pulley retaining
T
screw
Electrical
Battery connections and
I
condition
Electrical harness
I
routing
Headlight aim
A
Modules and applicable
I
software updates
186
MAINTENANCE SCHEDULE
DEEP SNOW
A+
A
B
Every 2
A=Adjust
Every
Every
years
C=Clean
month
year
or
I=Inspect
or
or
6000
L=Lubricate
1500 km
3000 km
km
R=Replace
(1000
(2000
(4000
T=Torque
mi)
mi)
mi)
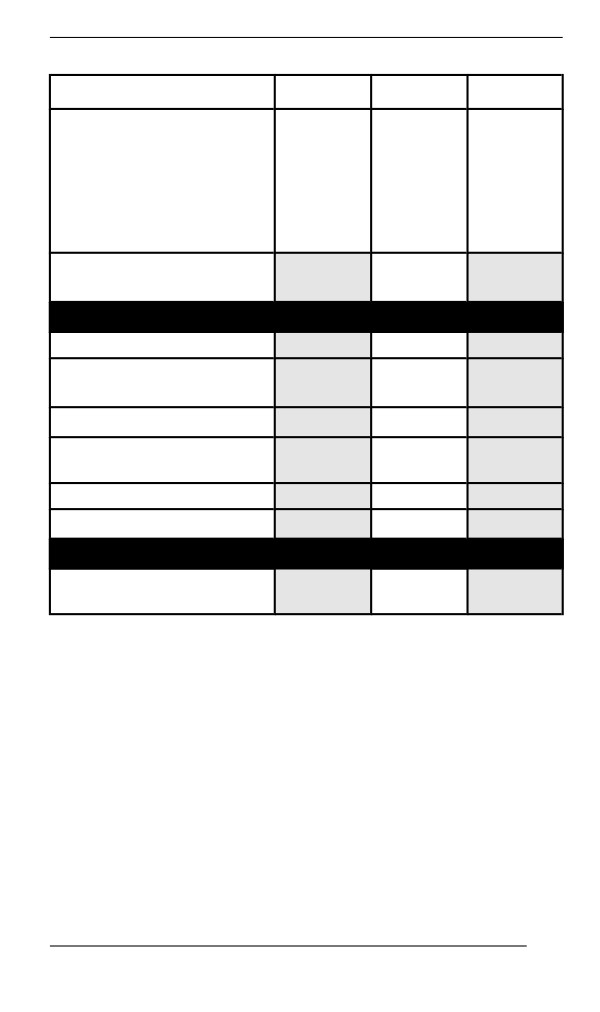
Operation of control
I
switches and lighting
Steering and Controls
Ski runners
I
Gearbox position lever
I, A
operation
Steering alignment
I, A
Steering components
I
and function*
Throttle cable
A
Throttle operation
I
Suspension
Suspension components
I, L
and function*
*For an extensive list of maintenance actions to be performed, refer to
the Maintenance Checklist.
187
MAINTENANCE PROCEDURES
This section includes instructions for basic maintenance procedures.
WARNING
Turn off the engine, remove tether cord cap and follow these
maintenance procedures when performing maintenance. If you
do not follow proper maintenance procedures you can be in-
jured by hot parts, moving parts, electricity, chemicals or other
hazards.
WARNING
Should removal of a locking device be required (e.g. lock tabs,
self-locking fasteners, etc.) when undergoing disassembly/as-
sembly, always replace with a new one.
Engiine Coolant
WARNING
Never open coolant tank cap when engine is hot.
Verifying the Engine Coolant Level – Except Turbo Engine
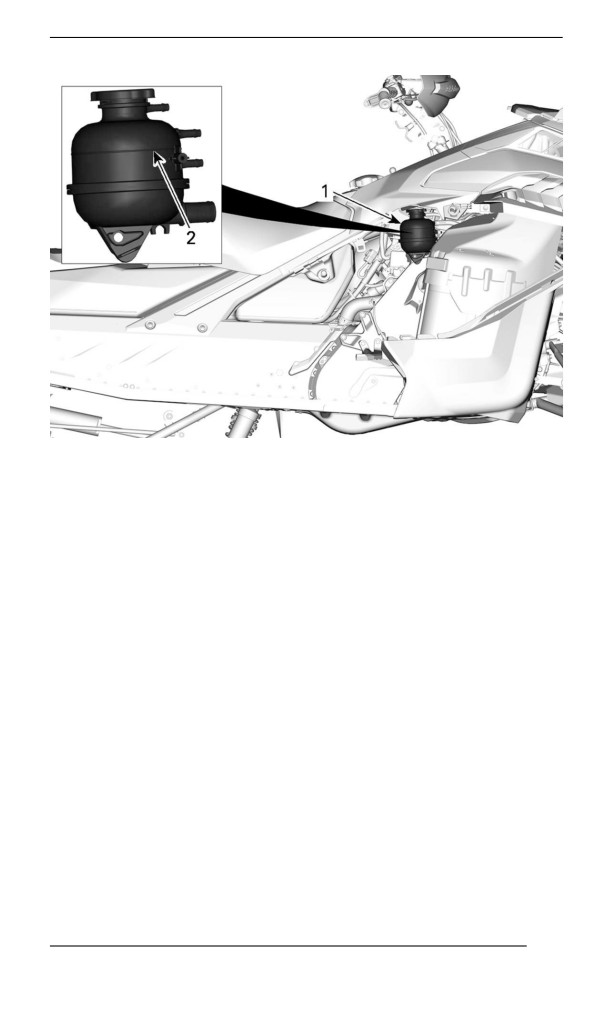
1. Open the RH side panel. Refer to Body and Seat.
2. Check coolant level at room temperature. Liquid should be at cold
level line of coolant tank.
3. Add coolant if required.
NOTE:
When checking level at low temperature it may be slightly lower then
the mark.
4. If coolant level keeps dropping during or after each ride or if entire
system has to be refilled, refer to an authorized BRP snowmobile
dealer, repair shop or person of your own choosing for servicing.
188
MAINTENANCE PROCEDURES
TYPICAL
1. Coolant reservoir
2. COLD line
Verifying the Engine Coolant Level – Turbo Engine
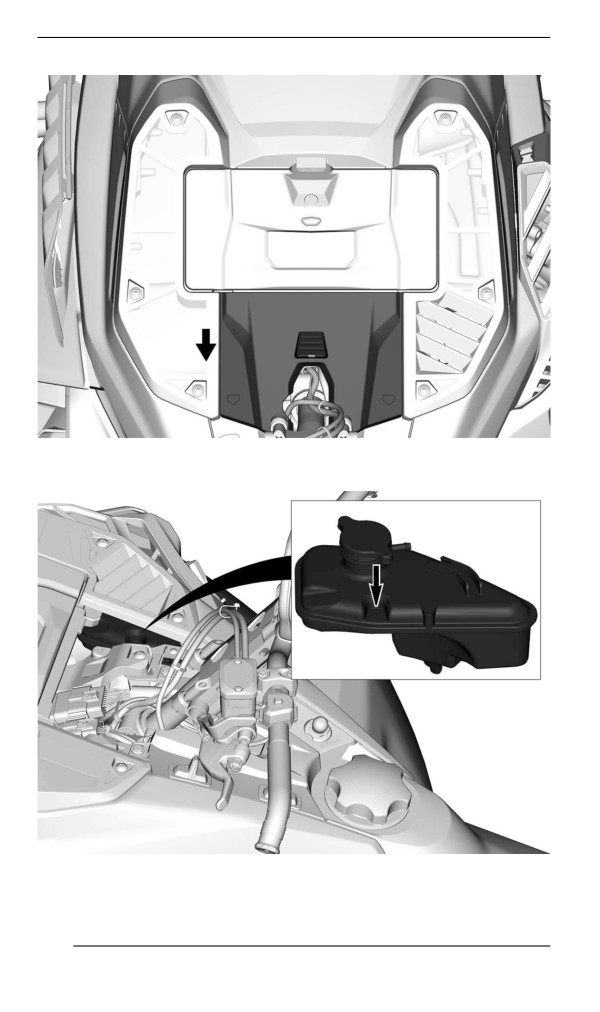
1. Remove access panel.
189
MAINTENANCE PROCEDURES
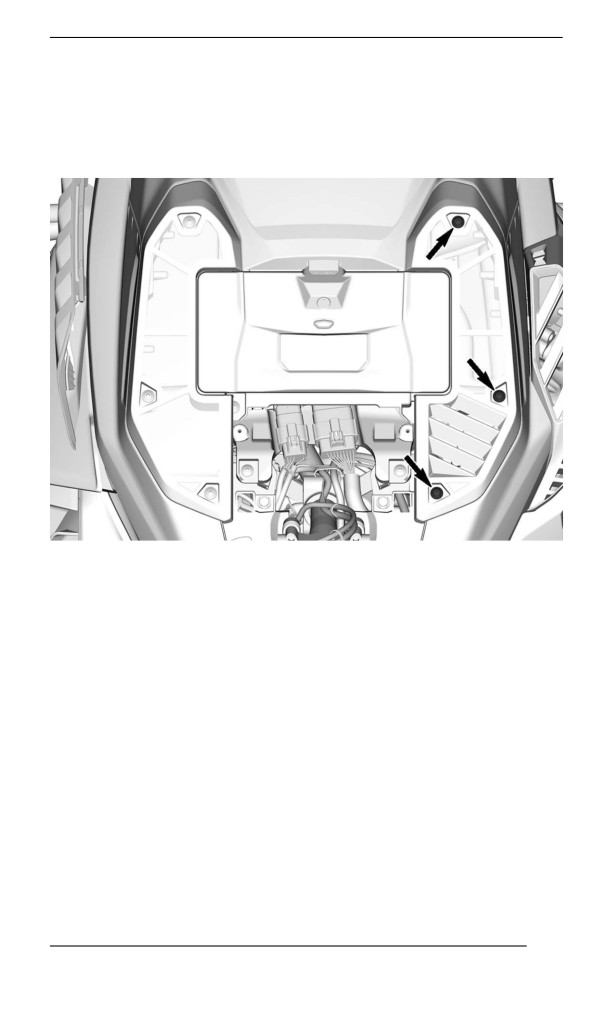
2. Check coolant level at room temperature. Liquid should touch the
flat surface of the eyesight.
3. Add coolant if required.
190
MAINTENANCE PROCEDURES
NOTE:
When checking level at low temperature it may be slightly lower then
the mark.
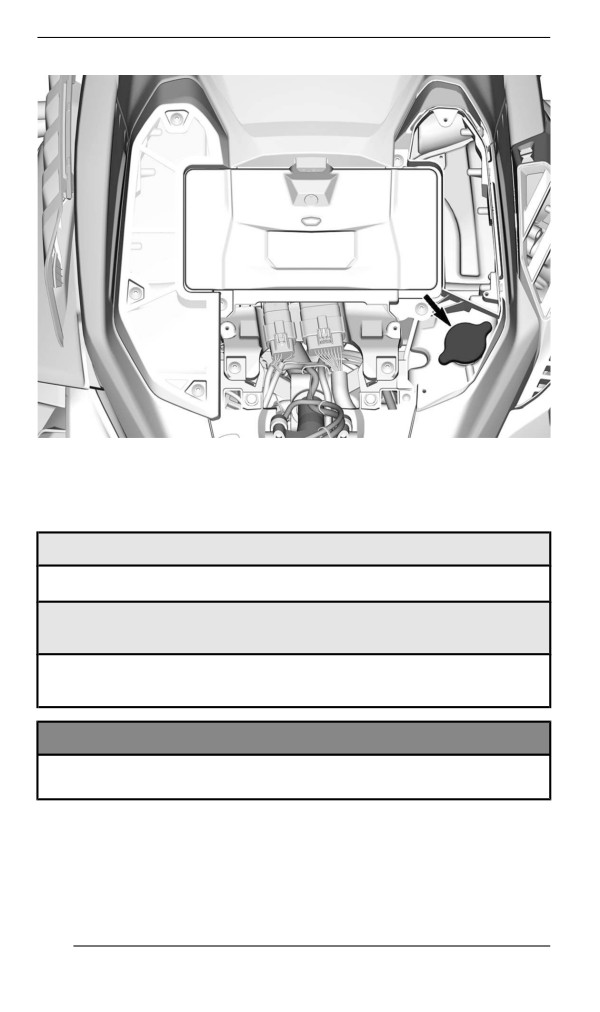
4. Remove the following fasteners then the RH air filter.
5. Add coolant by the filler neck.
191
MAINTENANCE PROCEDURES
6. If coolant level keeps dropping during or after each ride or if entire
system has to be refilled, refer to an authorized BRP snowmobile
dealer, repair shop or person of your own choosing for servicing.
Recommended Engine Coolant
RECOMMENDED COOLANT
XPS Extended life pre-mixed coolant
IF THE RECOMMENDED XPS COOLANT IS NOT
AVAILABLE
Distilled water and antifreeze solution (50% distilled water, 50%
antifreeze)
NOTICE
Always use ethylene-glycol antifreeze containing corrosion in-
hibitors specifically for internal combustion aluminum engines.
192
MAINTENANCE PROCEDURES
Exhaust System
Exhaust System Verification
The muffler tail pipe should be centered with the exit hole in the bottom
pan. Exhaust system must be free of rust or leaks. Make sure that all
parts are securely in place.
Check retaining springs and heat shields condition and replace if
necessary.
The exhaust system is designed to reduce noise and to improve the
total performance of the engine. Modification may be in violation of lo-
cal laws.
NOTICE
If any exhaust system component is removed, modified or dam-
aged, severe engine damage may result.
Spark Plugs
Spark plugs inspection or replacement may be performed by an au-
thorized BRP snowmobile dealer, repair shop, or person of your own
choosing. Spark plugs inspection or replacement requires an in-depth
technical knowledge. Though not required, it is recommended that an
authorized BRP snowmobile dealer performs spark plugs inspection
or replacement.
Brake Fluid
Verifying the Brake Fluid Level
NOTICE
Vehicle must be on a level surface before checking any fluid
levels.
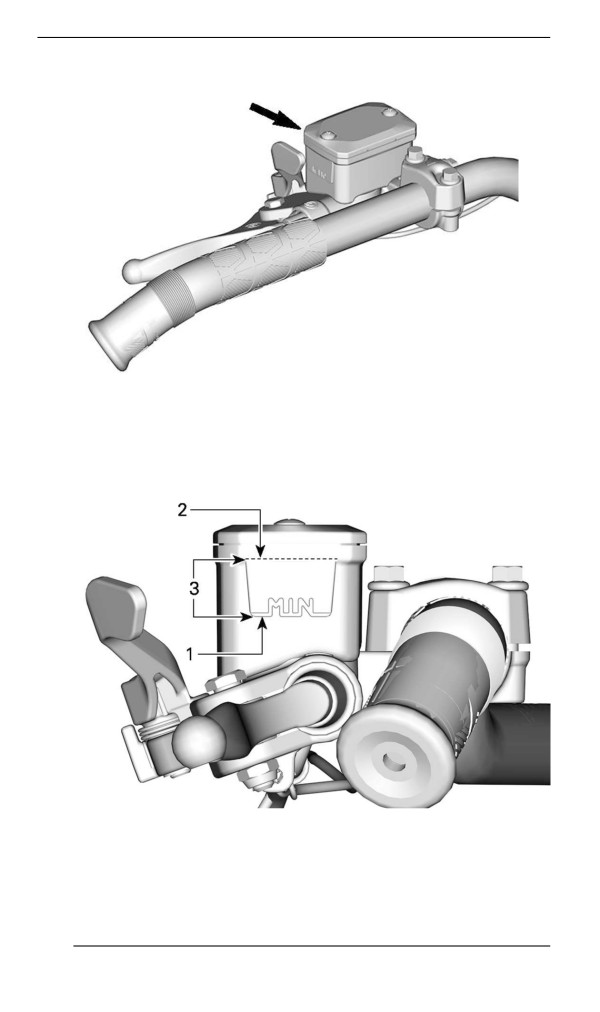
1. Position the handlebar in the straight-ahead position to ensure the
reservoir is level.
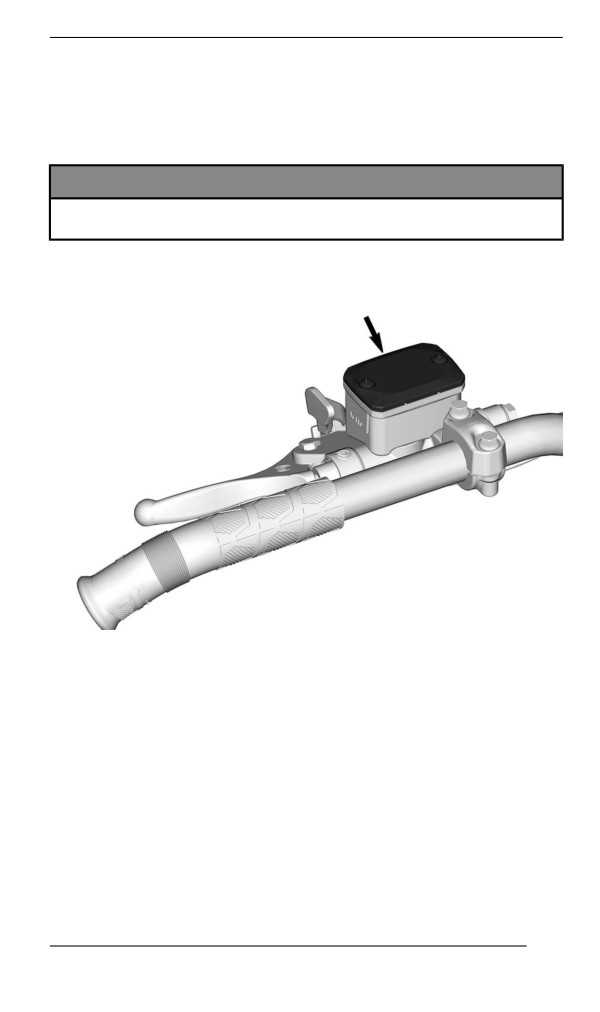
2. Check brake fluid in the reservoir for proper level.
193
MAINTENANCE PROCEDURES
TYPICAL
Brake fluid must always be above the MIN. line when brake lever is
squeezed.
TYPICAL
1. Minimum
2. Maximum
3. Operating range
194
MAINTENANCE PROCEDURES
If brake fluid level keeps dropping during or after each ride, or if en-
tire system has to be refilled, refer to an authorized BRP dealer, re-
pair shop, or a person of your own choosing for servicing.
Adding Brake Fluid
NOTICE
Vehicle must be on a level surface before checking any fluid
levels.
1. Clean the reservoir cap.
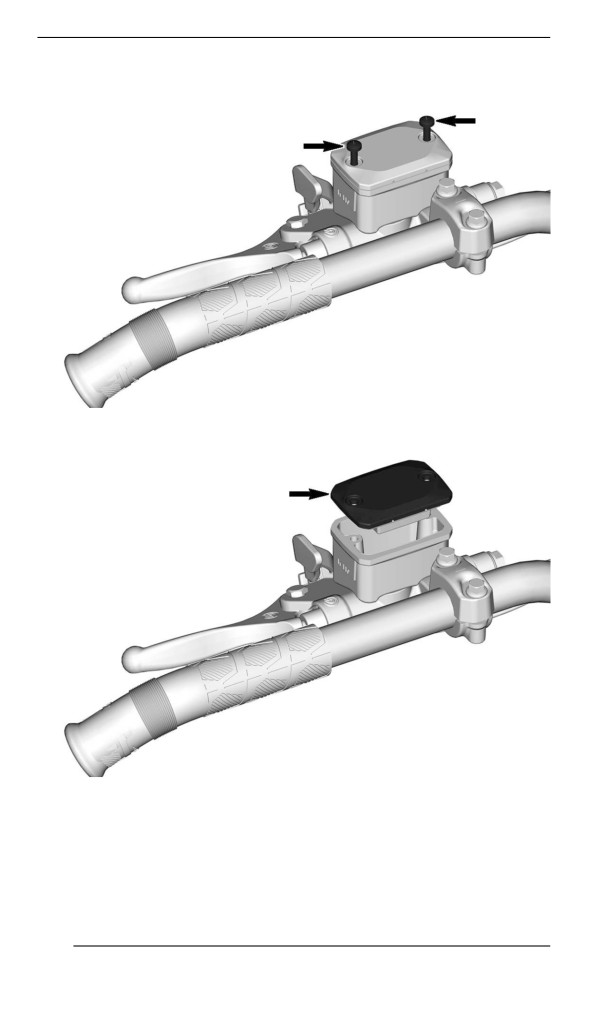
2. Remove the screws retaining the reservoir cap.
195
MAINTENANCE PROCEDURES
3. Remove the reservoir cap.
4. Add fluid as required. Do not overfill. Use only the recommended
brake fluid. Refer to Recommended Brake Fluid in this subsection.
196
MAINTENANCE PROCEDURES
CAUTION
Avoid getting brake fluid on skin or eyes - it may cause severe
burns. In case of contact with the skin, wash thoroughly. In
case of contact with the eyes, immediately rinse with plenty of
water for at least 10 minutes and then consult a doctor
immediately.
NOTICE
– Brake fluid can damage paint, rubber and plastic parts
– Protect these nearby parts with a rag when servicing the
brake system
– Rinse thoroughly in case of spillage.
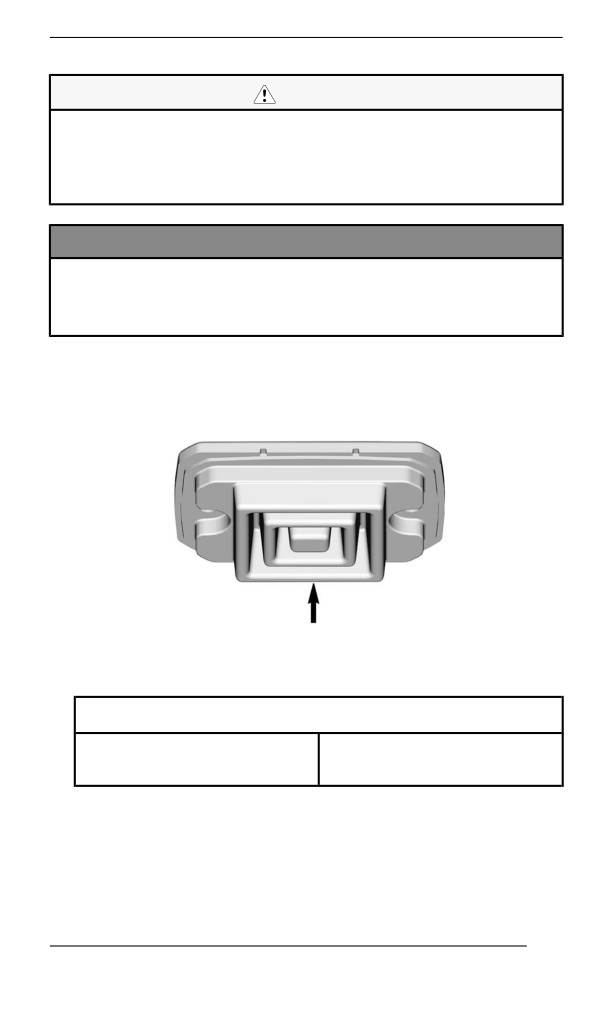
5. Ensure the diaphragm is pushed in the reservoir cap before instal-
ling the cap one the reservoir.
6. Reinstall reservoir cap and screws. Tighten to specification.
Tightening Torque
0.7 ± 0.1 Nm
Reservoir cap screws
(6 ± 1 lbf-in)
197
MAINTENANCE PROCEDURES
Recommended Brake Fluid
Recommended Brake Fluid
XPS DOT 4 Brake Fluid
Alternative or if not available
DOT 4 Brake Fluid
Use only DOT 4 brake fluid from a sealed container. An opened con-
tainer may be contaminated or may have absorbed moisture from the
air.
WARNING
Use only DOT 4 brake fluid from a sealed container. To avoid
serious damage to the braking system, do not use fluids other
than the recommended one, nor mix different fluids for topping
up.
Chaiincase Oill
Recommended Chaincase Oil
Recommended Chaincase Oil
XPS Synthetic chaincase oil
Alternative or if not available
75W140 gear oil that meets the API GL-5 specification
NOTICE
If the recommended XPS chaincase oil is not available, use a
75W140 gear oil that meets the API GL-5 specification. The
chaincase of this snowmobile has been developed and vali-
dated using the XPS™ Synthetic chaincase oil. BRP strongly
recommends the use of its XPS Synthetic chaincase oil at all
times. Damages caused by oil which is not suitable for the
chaincase will not be covered by the BRP limited warranty.
Verifying the Chaincase Oil Level
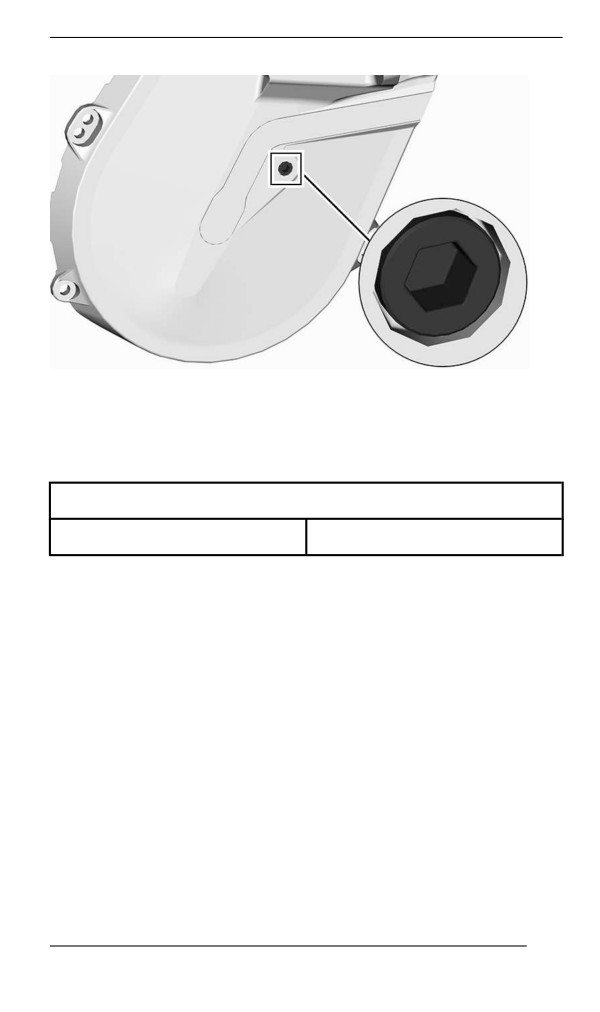
With the vehicle on a level surface, check the oil level by removing the
check plug.
198
MAINTENANCE PROCEDURES
CHECK PLUG
Oil level must reach the threaded hole.
If level is correct, reinstall check plug and tighten to the specified
torque.
Tightening Torque
Check plug
6 ± 1 Nm (53 ± 9 lbf-in)
If level is insufficient, refer to Chaincase Filling Procedure.
Replacing the Chaincase Oil
Draiining the Chaiincase Oiil
1. Place the vehicle on a level surface.
2. Place a drain pan under the chaincase drain plug area.
3. Remove filler cap.
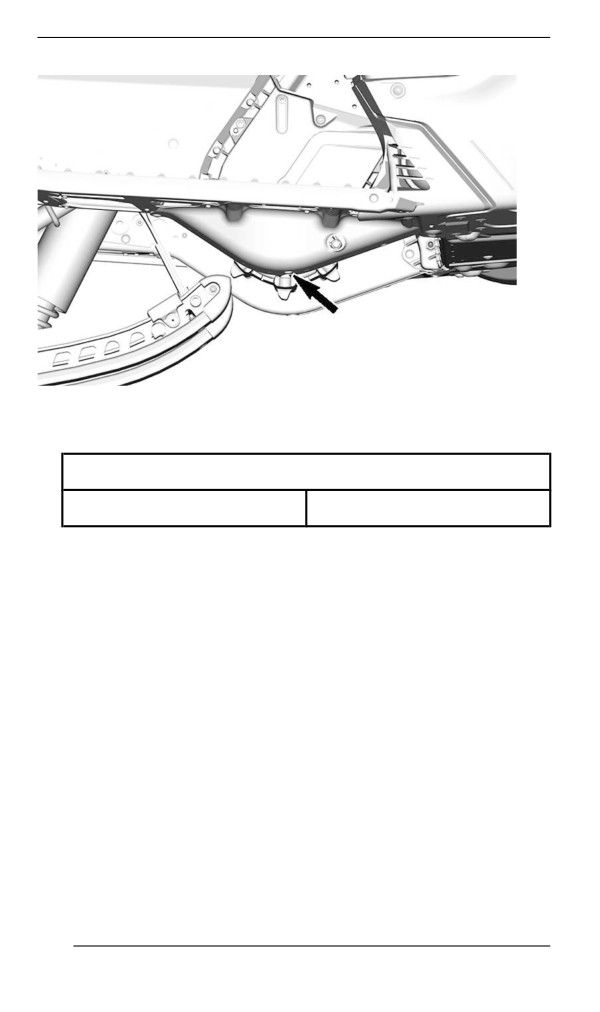
4. Remove the drain plug located at the bottom of the chaincase.
199
MAINTENANCE PROCEDURES
5. Wait a while to allow all oil to drain out of the chaincase.
6. Install drain plug and tighten to specification.
Tightening Torque
Chaincase drain plug
6 ± 1 Nm (53 ± 9 lbf-in)
Fiillling the Chaincase
1. Open the RH side panel. Refer to Equipment.
2. Remove the check plug.
200
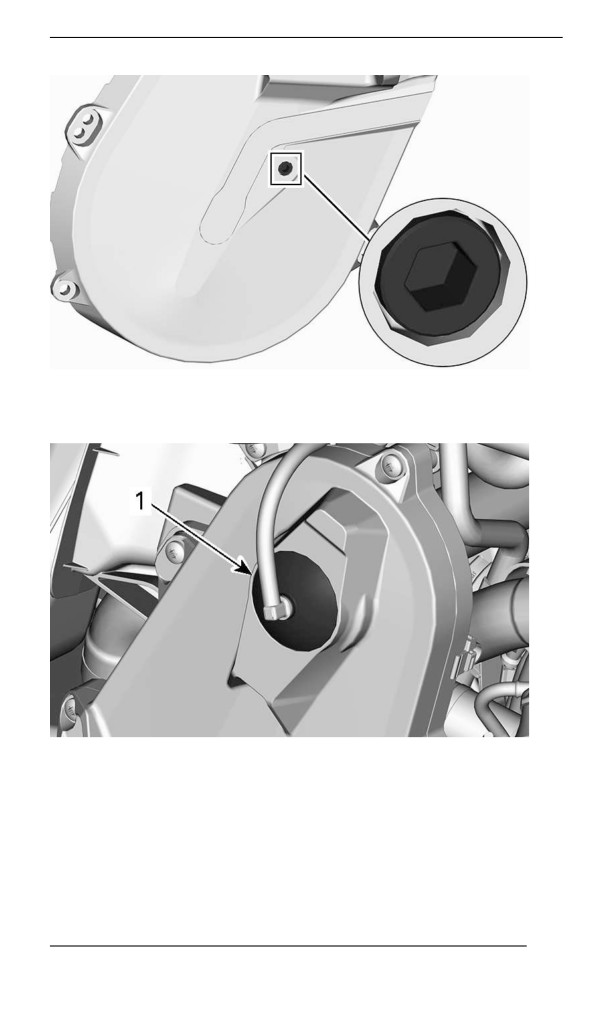
MAINTENANCE PROCEDURES
CHECK PLUG
3. Remove the filler cap.
TYPICAL - TOP OF CHAINCASE
1. Filler cap
4. Pour recommended oil in the filler hole until oil comes out by the
check plug hole.
5. Reinstall check plug and tighten to specification.
201
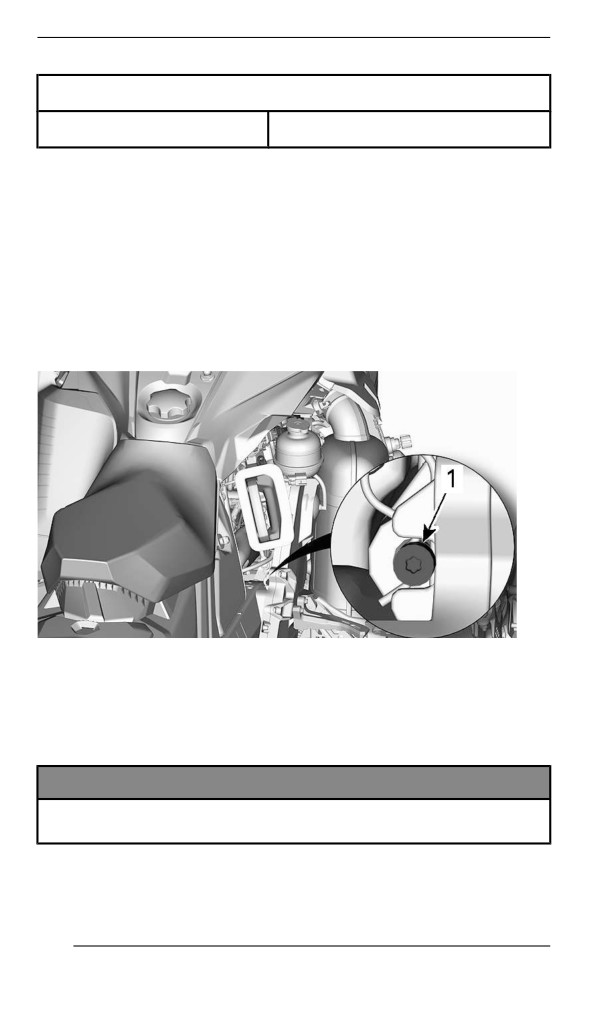
MAINTENANCE PROCEDURES
Tightening Torque
Check plug
6 ± 1 Nm (53 ± 9 lbf-in)
Reinstall the filler cap.
Drive Chaiin
Access to Chaincase
Open RH side panel, refer to Equipment.
Drive Chain Adjustment
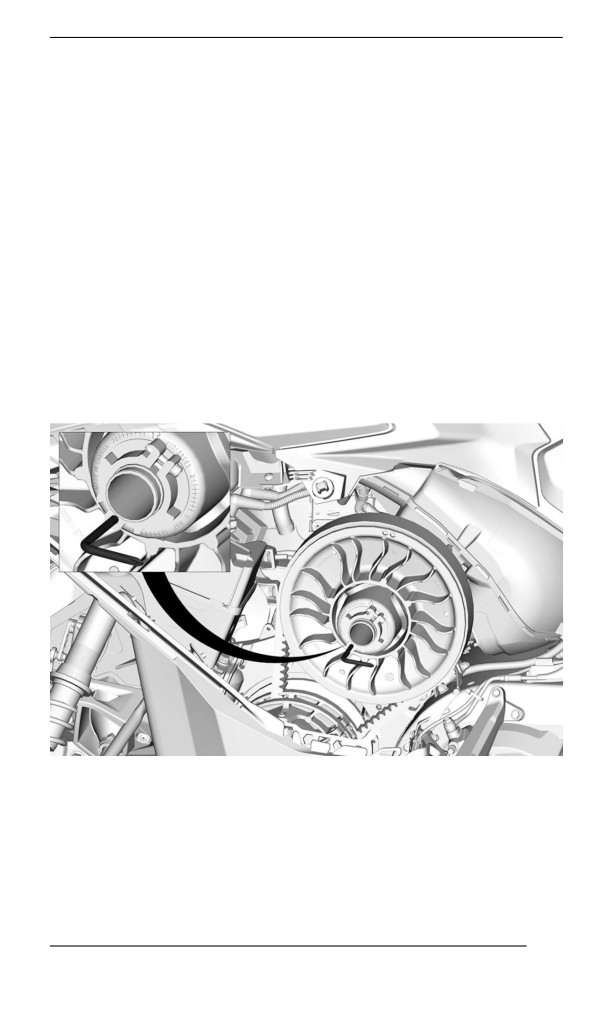
Using the Torx end of the driven pulley expander, GENTLY turn ten-
sioner clockwise to eliminate the play.
TYPICAL
Do not force the tensioner in.
NOTE:
Do not remove the hair cotter pin.
NOTICE
Overtightening the drive chain could result in severe damage to
the chaincase components.
202
MAINTENANCE PROCEDURES
Driive Belt
Drive Belt Inspection
Remove the drive belt guard. Refer to the procedure in Equipment.
Inspect belt for cracks, fraying or abnormal wear (uneven wear, wear
on one side, missing cogs, cracked fabric). If abnormal wear is noted,
probable cause could be pulley misalignment, excessive RPM with
frozen track, fast starts without warm-up period, burred or rusty
sheave, oil on belt or distorted spare belt. Contact an authorized BRP
snowmobile dealer.
Replacing the Drive Belt
Removing the Drive Bellt
1. Remove tether cord cap from engine cut-off switch.
2. Remove drive belt guard. Refer to Equipment.
3. Insert the driven pulley expander provided in the threaded hole on
the adjuster hub as shown.
TYPICAL - PULLEY EXPANDER INSTALLED ON ADJUSTER
HUB
4. Open the driven pulley by screwing the tool in.
5. Remove the drive belt by slipping it over the top of the driven pul-
ley, then over the drive pulley.
203
MAINTENANCE PROCEDURES
Installling the Driive Bellt
1. If necessary, open the driven pulley. Refer to Removing the Drive
Belt above.
2. Slip the belt over the drive pulley, then over the driven pulley.
NOTICE
Do not force or use tools to pry the belt into place, as this could
cut or break the cords in the belt.
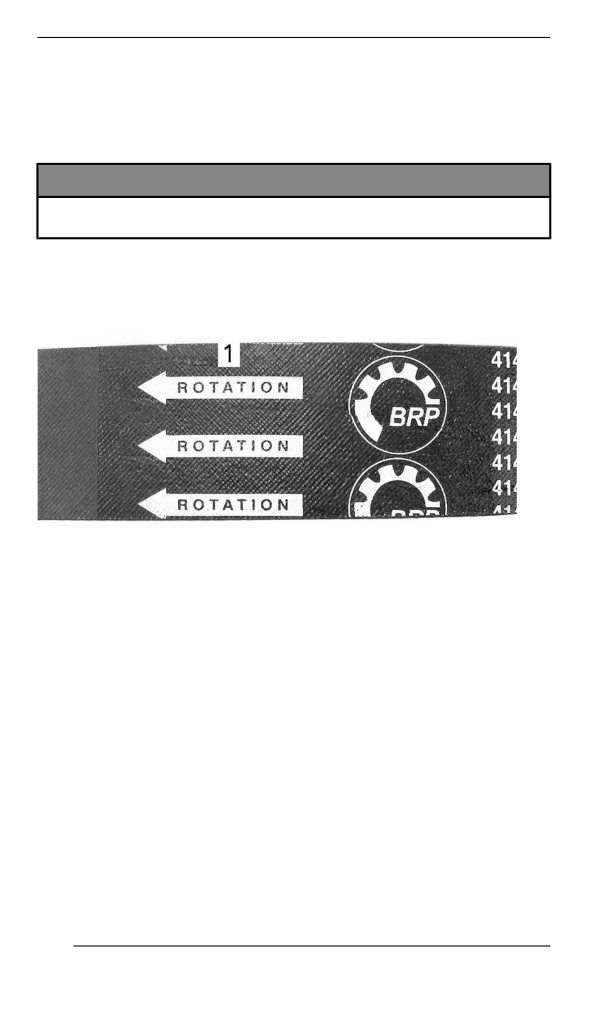
NOTE:
The maximum drive belt life span is obtained when belt is installed
with arrows in the direction of rotation.
1. To be pointed in the direction of rotation
3. Unscrew and remove the driven pulley expander from the pulley.
4. Rotate the driven pulley several times to properly set the belt be-
tween the sheaves.
5. If a new belt was installed, an adjustment will be required for the
proper belt height. Refer to Adjusting the Drive Belt Height below.
6. Install belt guard. Refer to Equipment.
7. Close side panel. Refer to Body and Seat.
Adjusting the Drive Belt Height
The drive belt height must be checked every time a new drive belt is
installed and as part of the pre-ride inspection.
To adjust the drive belt height, proceed as follows:
1. Remove tether cord cap from engine cut-off switch.
2. Remove drive belt guard.
3. Loosen the clamping bolt.
204
MAINTENANCE PROCEDURES
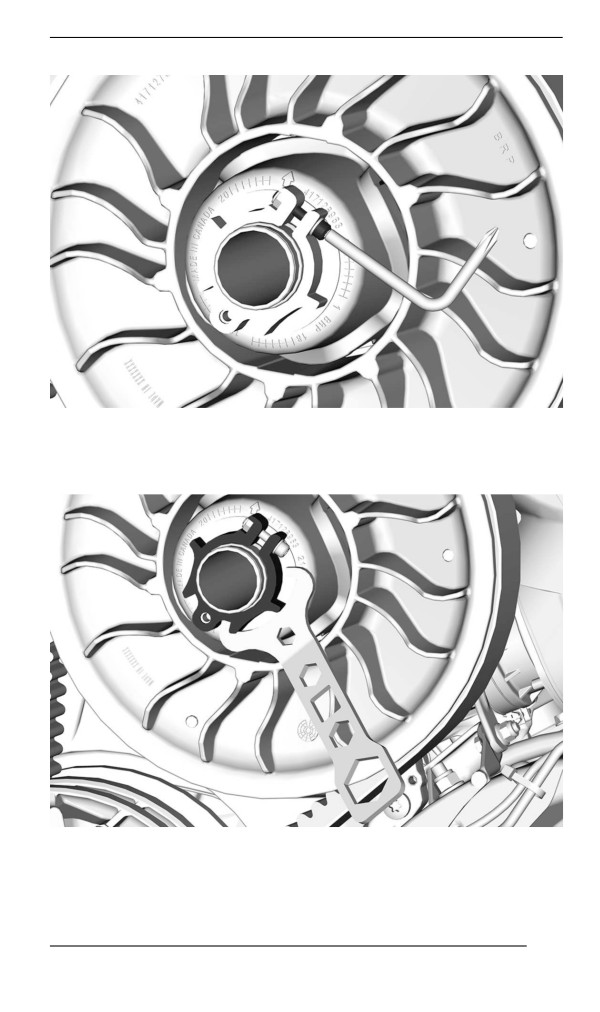
4. Using the suspension adjustment tool provided, turn the ring 1/4
turn at a time then rotate the driven pulley to properly set the drive
belt between the pulley sheaves.
205
MAINTENANCE PROCEDURES
NOTE:
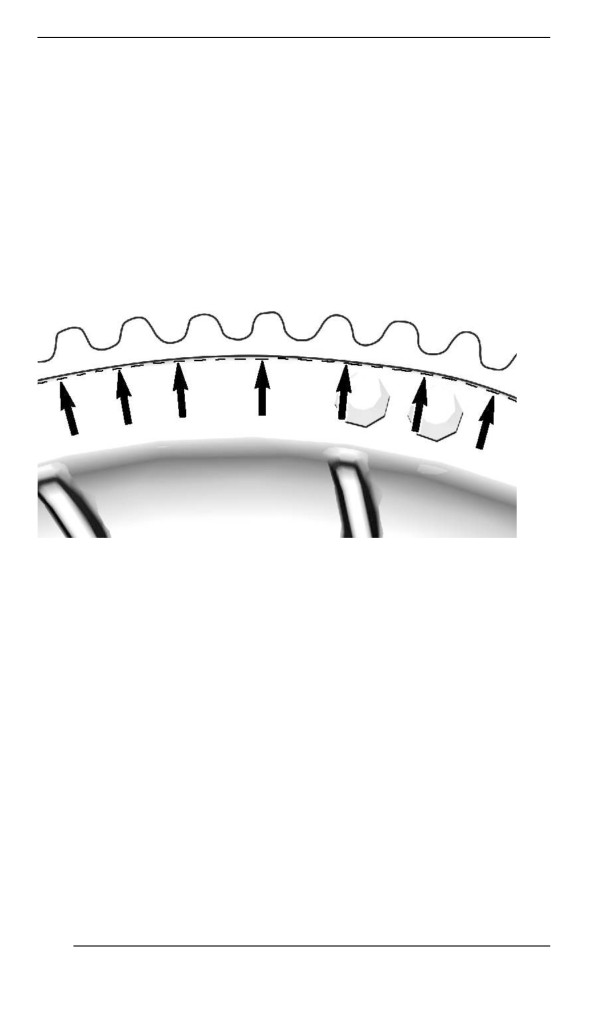
The adjustment ring has left hand treads.
850 E-TEC
Repeat step 4 until the cord of drive belt is just hidden by the driven
pulley edge.
NOTE:
Turning the ring counterclockwise lowers the drive belt in the pulley.
Turning the ring clockwise raises the drive belt in the pulley.
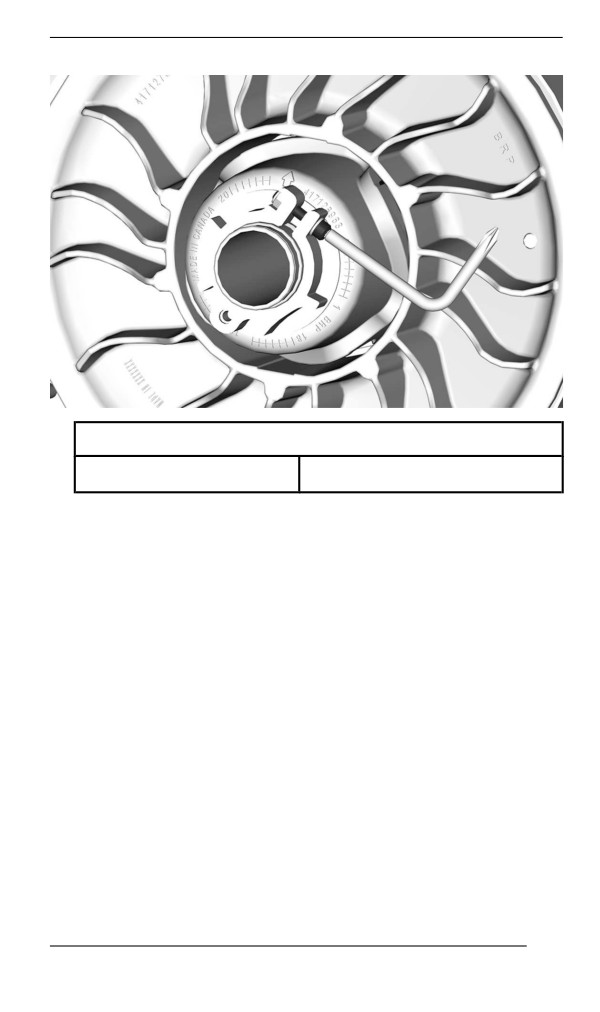
5. Firmly tighten the clamping bolt. If possible, tighten to specification
using a torque wrench.
206
MAINTENANCE PROCEDURES
TIGHTENING TORQUE
Clamping bolt
5.5 ± 0.5 Nm (49 ± 4 lbf-in)
6. Install drive belt guard.
7. Install side panel.
NOTE:
These settings are correct as a preliminary adjustment for most mod-
els. In some cases, when starting the engine, the vehicle could creep,
indicating that the drive belt is too tight.
If the vehicle creeps, lower the drive belt height from the prelimi-
nary setting. Repeat procedure until creeping stops.
Reverse Activation
NOTE:
The reverse may not activate if the belt is positioned too high in the
driven pulley. If reverse activation does not work properly, ensure the
drive belt is properly adjusted. Adjust the drive belt lower in the driven
pulley if needed.
207
MAINTENANCE PROCEDURES
Drive Pulley
Drive Pulley Adjustment
WARNING
Remove tether cord cap from engine cut-off switch before per-
forming any adjustment. Vehicle must be parked in a safe
place, away from the trail.
WARNING
NEVER disassemble or modify the drive pulley.
Improper assembly or modifications could cause the pulley to
explode violently under the stress generated by the high rota-
tional speed.
Visit your BRP snowmobile dealer to maintain or service the
drive pulley. Improper servicing or maintenance may affect per-
formance and reduce belt life. Always respect maintenance
schedules.
The drive pulley is factory calibrated to transmit maximum engine
power at a predefined RPM. Factors such as ambient temperature, al-
titude or surface condition may vary this critical engine RPM thus af-
fecting snowmobile efficiency.
This adjustable drive pulley allows setting maximum engine RPM to
maintain maximum power.
Ramp cams should be adjusted so that actual maximum engine RPM
matches the maximum horsepower RPM. Refer to Technical Specifi-
cations (Engine).
NOTE:
Use a precision digital tachometer for engine RPM adjustment.
There are 5 positions in which the ramp cam can be set.
Each position modifies the maximum engine RPM by about 200 RPM.
Lower position numbers decrease engine RPM in steps of 200 RPM
and higher position numbers increase it in steps of 200 RPM.
Procedure
1. Refer to Body and Seat in Vehicle Information and remove:
- LH side panel
- Drive pulley guard
208
MAINTENANCE PROCEDURES
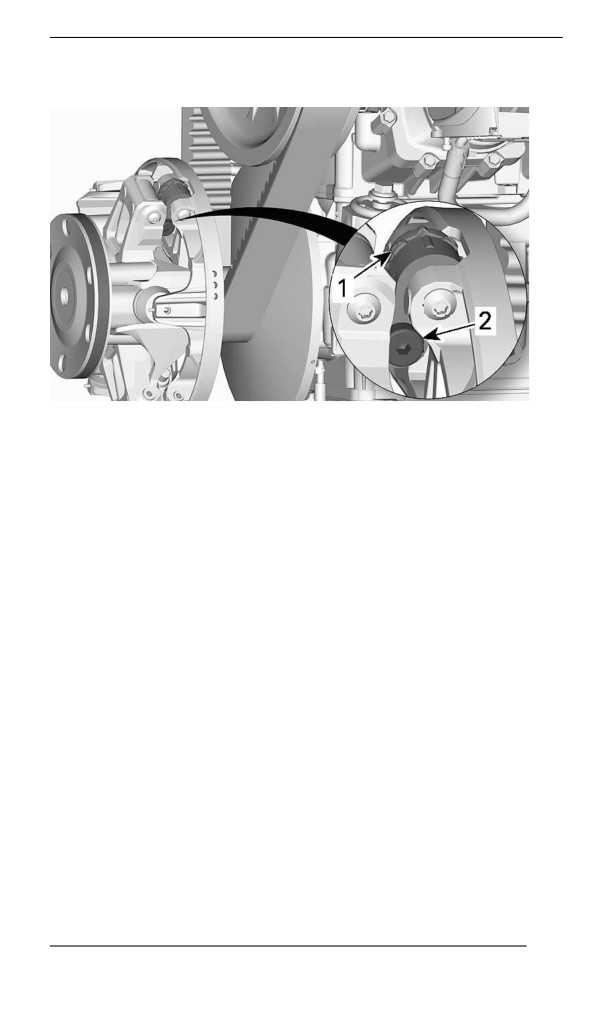
2. Locate the cam and the pivot screw on the drive pulley.
TYPICAL
1. Cam
2. Pivot screw
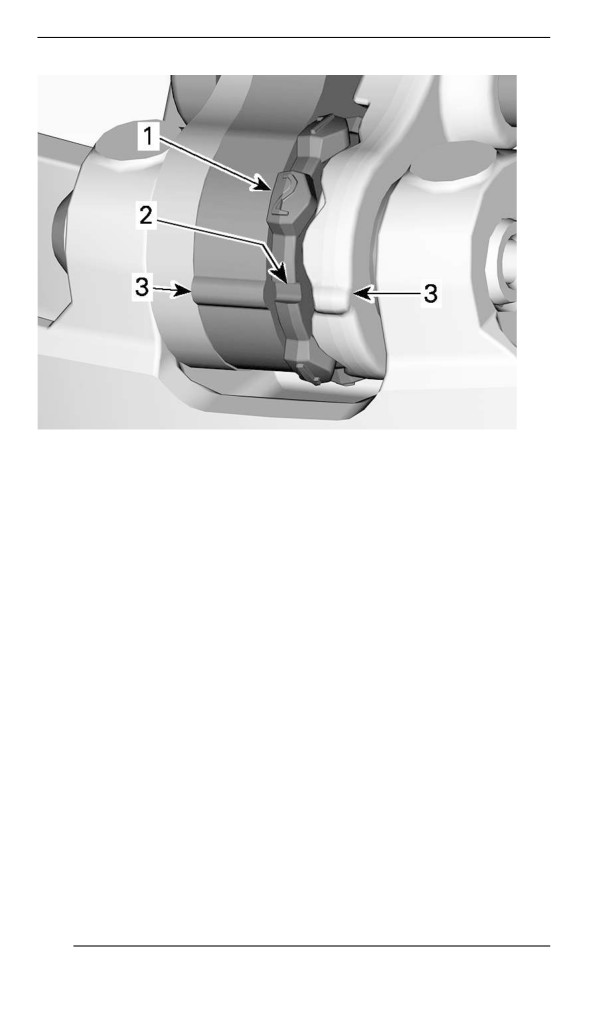
The cam position is identified as follows:
- Positions 1, 2, 4 and 5 are numbered.
- Position 3 (middle) is identified by a notch.
- There are notches on each side of the cam used as pointers.
209
MAINTENANCE PROCEDURES
1. Numbered position
2. Position 3 - Notch
3. Pointers
To adjust, proceed as follows for all 3 cams:
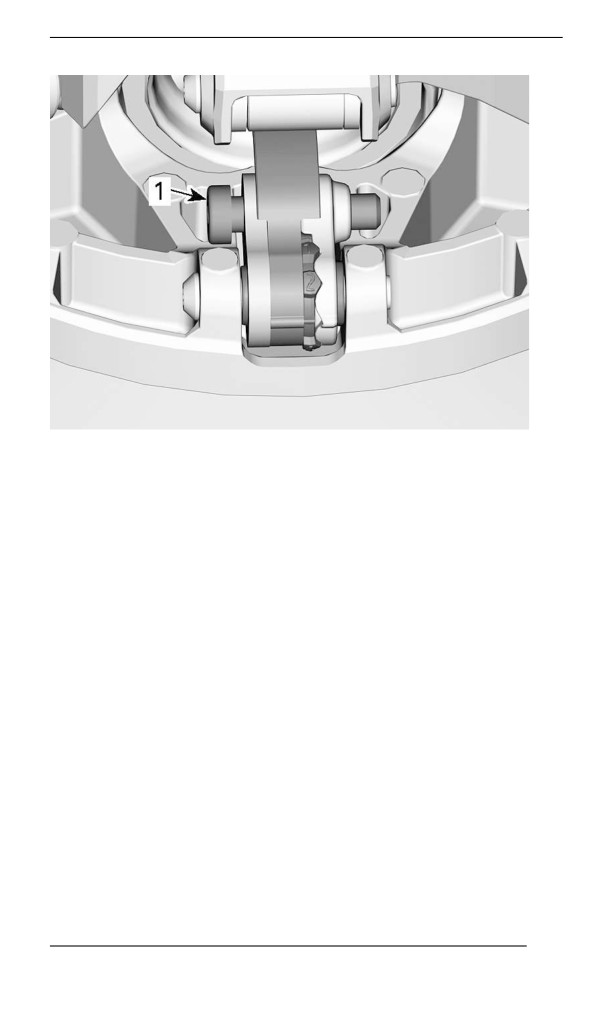
3. Using the Allen end of the driven pulley expander, loosen the pivot
screw.
210
MAINTENANCE PROCEDURES
1. Pivot screw
4. Move the right lever aside to be able to turn the cam.
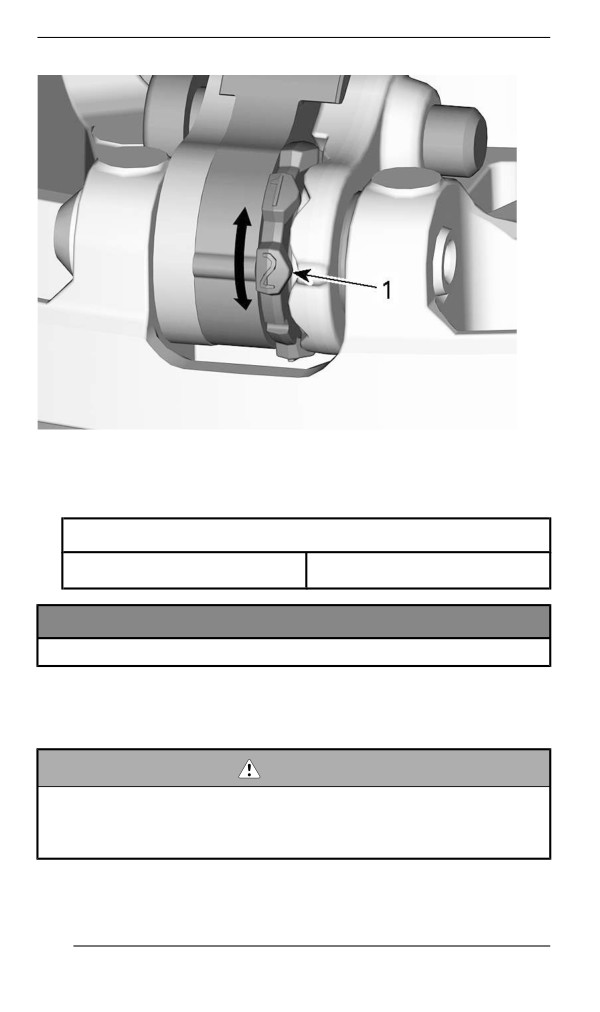
5. Turn cam to the desired position.
211
MAINTENANCE PROCEDURES
1. Desired cam position (here #2)
6. Tighten the pivot screw.
TIGHTENING TORQUE
Pivot
8 ± 1 Nm (71 ± 9 lbf-in)
NOTICE
Always adjust all 3 cams to the same setting.
Track
Track Condition
WARNING
Remove tether cord cap from engine cut-off switch before per-
forming any maintenance or adjustment, unless otherwise
specified. Vehicle must be parked in a safe place, away from
the trail.
Remove tether cord cap from engine cut-off switch.
212
MAINTENANCE PROCEDURES
Lift the rear of the snowmobile and support it with a wide-base snow-
mobile mechanical stand with a rear deflector panel. With the engine
off, rotate the track by hand, and inspect condition. If worn or cut, or if
track fibers are exposed, or if missing or defective inserts or guides
are noted; contact an authorized BRP snowmobile dealer.
Look for any defects, such as:
- Perforations in the track
- Tears in the track (particularly around traction holes on studded
tracks)
- Lugs that are broken or torn off, exposing portions of rods
- Delamination of the rubber
- Broken rods
- Missing track guide(s)
WARNING
Riding with a damaged track or studs could lead to a loss of
control.
Track Tension and Alignment
NOTE:
Track tension and alignment are interrelated. Do not adjust one with-
out the other.
WARNING
To prevent serious injury to individuals near the snowmobile:
– NEVER stand behind or near a moving track.
– Always use a wide-base snowmobile stand with a rear de-
flector panel if it is necessary to rotate track.
– When the track is raised off the ground, only run it at the low-
est possible speed.
Centrifugal force could cause debris, damaged or loose studs,
pieces of torn track, or an entire severed track to be violently
thrown backwards out of the tunnel with tremendous force, pos-
sibly resulting in the loss of a leg or other serious injury.
Verifying the Track Tensiion
NOTE:
Ride the snowmobile in snow about 15 to 20 minutes prior to adjusting
track tension.
213
MAINTENANCE PROCEDURES
1. Remove tether cord cap from engine cut-off switch.
2. Lift rear of vehicle and support it off the ground.
CAUTION
Use proper lifting techniques, notably using your legs force. Do
not attempt to lift the rear of vehicle if it is above your limits.
3. Allow rear suspension to fully extend.
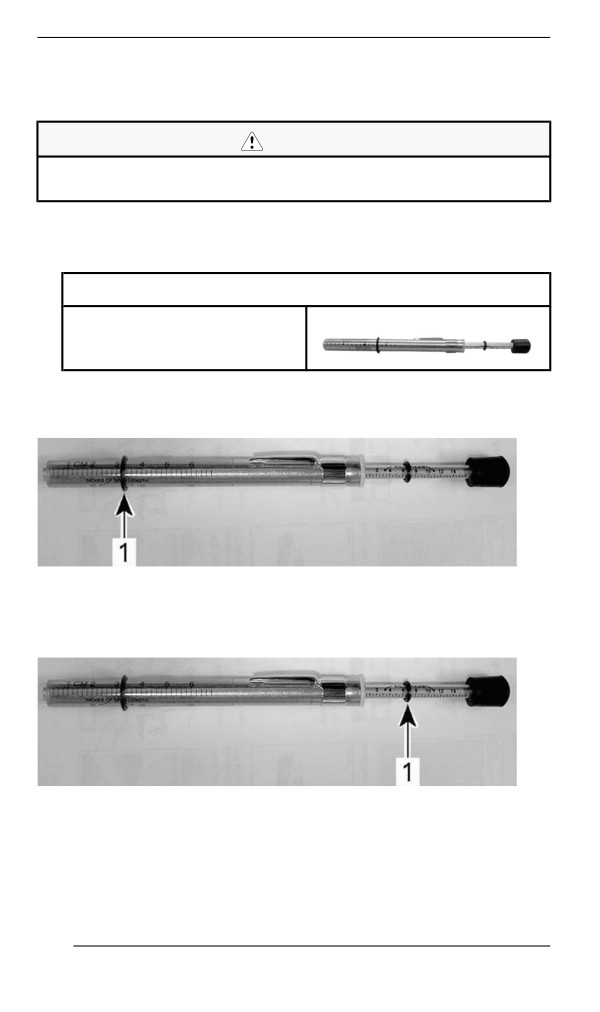
4. Prepare the tensiometer.
Service tool
Tensiometer (P/N 414348200)
1. Set the bottom O-ring as per the Track Deflection from the ap-
plicable vehicle in the Technical Specifications table.
1. Bottom O-ring
2. Place the upper O-ring to 0 kgf (0 lbf).
1. Upper O-ring
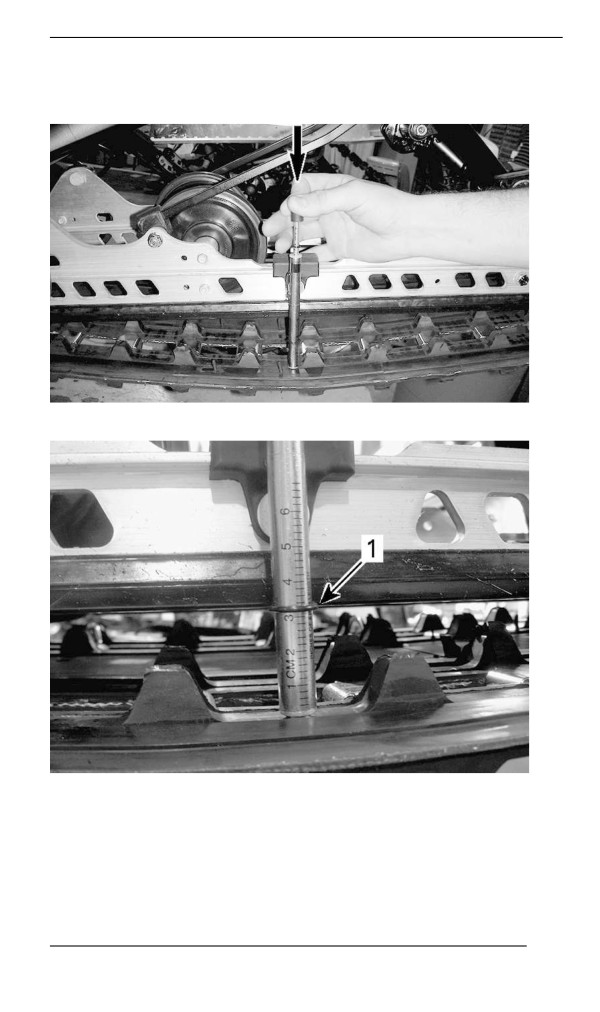
5. Position the tensiometer on track, halfway between front and rear
idler wheels.
214
MAINTENANCE PROCEDURES
6. Push the tensiometer downwards until bottom O-ring (deflection
set earlier) be aligned with the bottom of slider shoe.
TYPICAL
TYPICAL
1. Deflection O-ring aligned with slider shoe
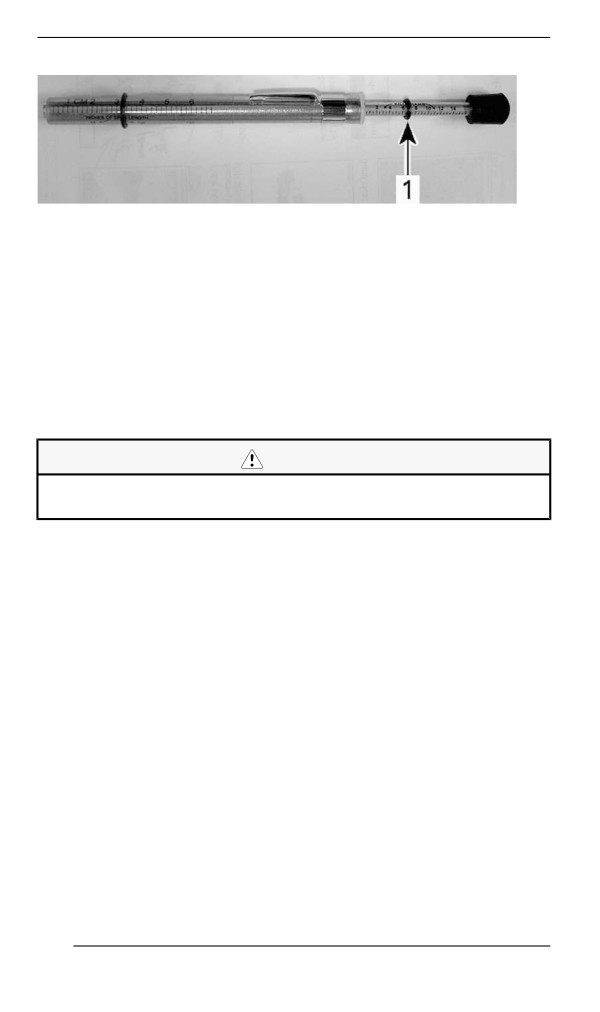
7. Read load recorded by the upper O-ring on the tensiometer.
215
MAINTENANCE PROCEDURES
TYPICAL - LOAD READING
1. Upper O-ring
8. Load reading must be as per the track deflection in the Technical
Specifications.
9. If load reading is not in accordance with the specification, adjust
track tension. Refer to Track Tension Adjustment.
Adjjusting the Track Tensiion
1. Remove tether cord cap from engine cut-off switch.
2. Lift rear of vehicle and support it off the ground.
CAUTION
Use proper lifting techniques, notably using your legs force. Do
not attempt to lift the rear of vehicle if it is above your limits.
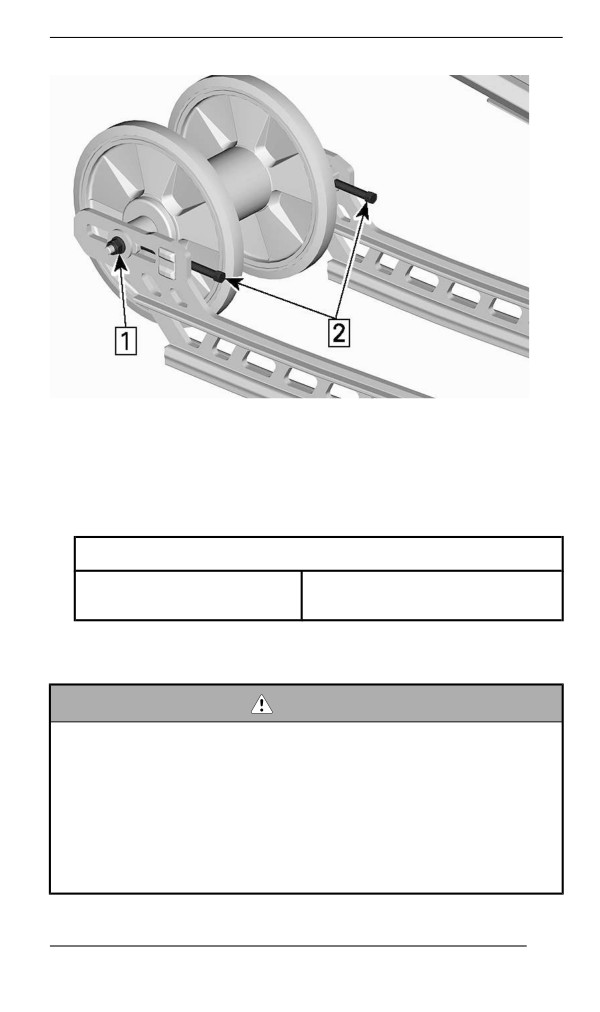
3. Loosen the rear axle nut.
4. Tighten or loosen both adjustment screws (equally) to increase or
decrease track tension.
216
MAINTENANCE PROCEDURES
1. Loosen the axle nut
2. Tighten or loosen the adjustment screws
5. If correct tension is unattainable, contact an authorized BRP snow-
mobile dealer.
6. Retighten the rear axle nut to specification.
TIGHTENING TORQUE
Rear idler wheel retaining
48 ± 6 Nm (35 ± 4 lbf-ft)
nut and screw
7. Check track alignment as described below.
Alligning the Track
WARNING
Before checking track alignment, ensure that the track is free of
all particles which could be thrown out while track is rotating.
Keep hands, tools, feet and clothing clear of track. Always lift
the snowmobile on a wide-base stand with a rear deflector pan-
el. Ensure no one is standing in close proximity to the snowmo-
bile, especially at the rear of the track. Never rotate track at
high speed.
Centrifugal force could cause debris, damaged or loose studs,
pieces of torn track, or an entire severed track to be violently
thrown backwards out of the tunnel with tremendous force.
217
MAINTENANCE PROCEDURES
1. Lift rear of vehicle and support it off the ground.
CAUTION
Use proper lifting techniques, notably by using the force of your
legs . Do not attempt to lift the rear of vehicle if it is above your
limits.
2. Start engine and accelerate slightly so that track slowly turns. This
must be done in a short period of time (15 to 20 seconds).
3. Check that the track is well centered; equal distance on both sides
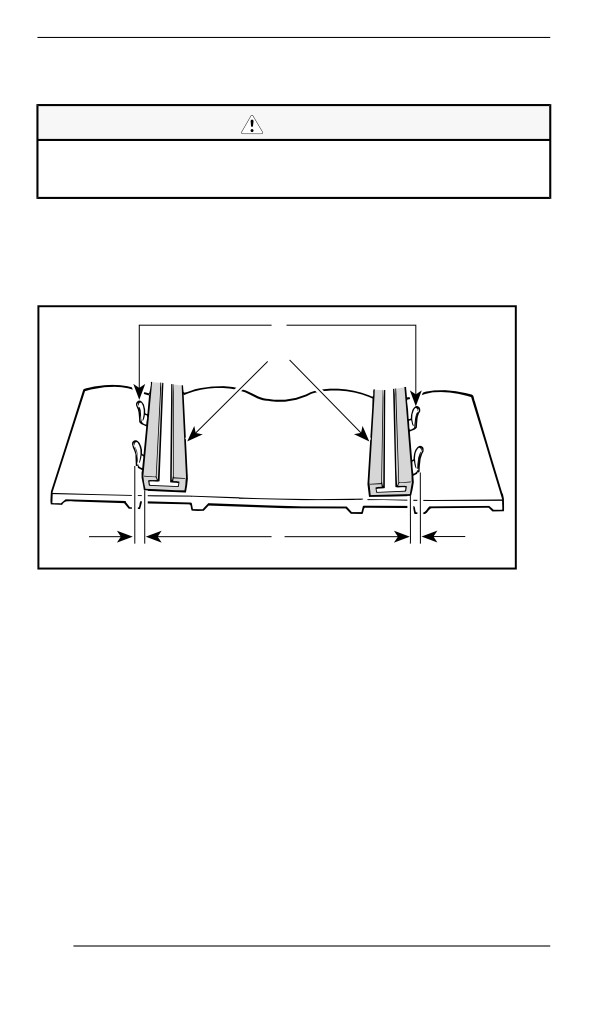
between edges of track guides and slider shoes.
1
2
3
A01F05A
1. Guides
2. Slider shoes
3. Equal distance
4. To correct track alignment:
218
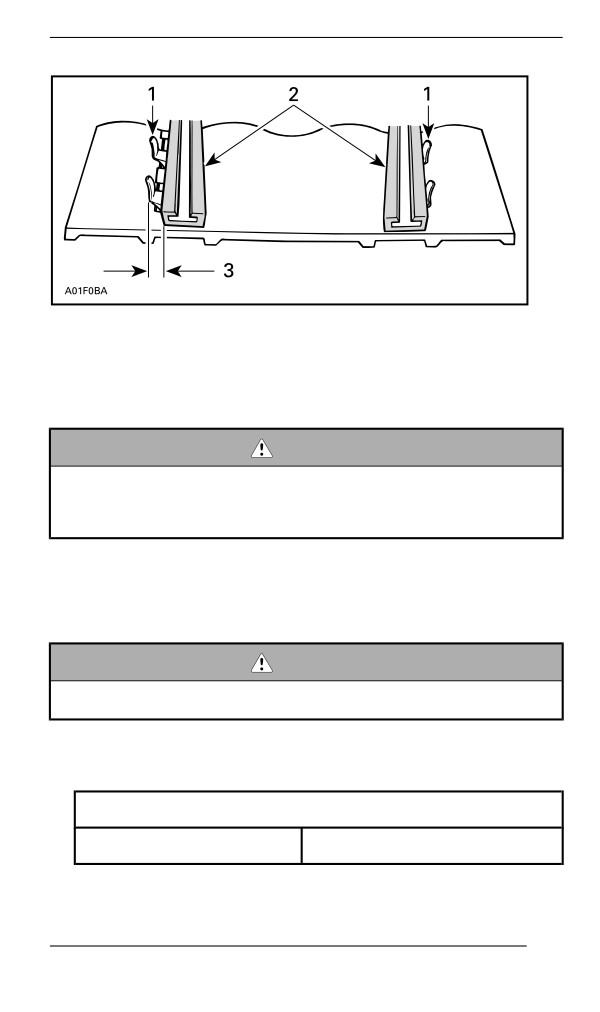
MAINTENANCE PROCEDURES
1. Guides
2. Slider shoes
3. Tighten on this side
1. Stop engine.
2. Remove tether cord cap from engine cut-off switch.
WARNING
Remove tether cord cap from engine cut-off switch before per-
forming any maintenance or adjustment, unless otherwise
specified. Vehicle must be parked in a safe place, away from
the trail.
3. Loosen the rear axle nut.
4. Tighten adjustment screw on side where the slider shoe is the
farthest from the track insert guides.
5. Tighten the rear axle nut.
WARNING
Properly tighten wheel retaining bolt, otherwise wheel may
come off and cause track to “lock”.
6. Restart engine and rotate track slowly to recheck alignment.
7. Tighten the rear axle nut to specified torque.
Tightening Torque
Rear axle screw
48 ± 6 Nm (35 ± 4 lbf-ft)
8. Reposition snowmobile on the ground.
219
MAINTENANCE PROCEDURES
Suspensiion
Rear Suspension Condition
Visually inspect all suspension components including slider shoes,
springs, wheels, etc.
NOTE:
During normal driving, snow will act as a lubricant and coolant for the
slider shoes. Extensive riding on ice or sanded snow, will create ex-
cessive heat build-up and cause premature slider shoe wear.
Suspension Stopper Strap Condition
Inspect stopper straps for wear and cracks, bolt and nut for tightness.
If loose inspect holes for deformation. Replace as required. Tighten
nut to specification.
Tightening Torque
Stopper strap nut
11 ± 1 Nm (97 ± 9 lbf-in)
Steering and Front Suspension Condition
Visually inspect steering and front suspension for tightness of compo-
nents (steering arms, control arms and links, tie rods, ball joints, ski
bolts, ski legs, etc.). If necessary, contact an authorized BRP snowmo-
bile dealer.
Skiis
Wear and Condition of Skis and Runners
Check the condition of the skis and ski runner carbides. If worn, con-
tact an authorized BRP snowmobile dealer.
WARNING
Excessively worn skis and/or ski runners will adversely affect
snowmobile control.
220
MAINTENANCE PROCEDURES
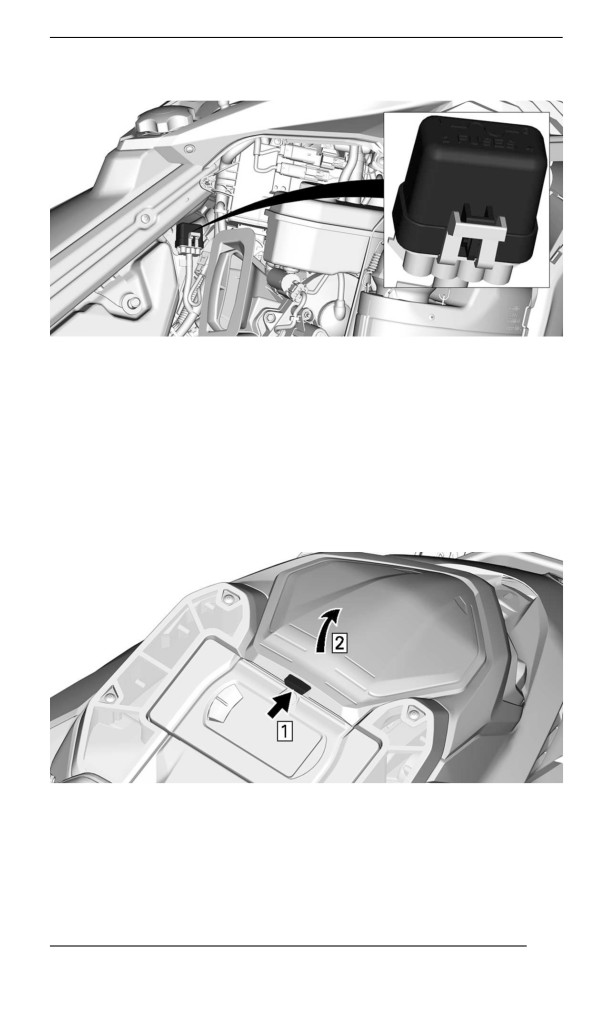
Fuses Location
TYPICAL
Unlock fuse block from its cover.
Refer to Technical Specifications for fuse rate and configuration.
Headliights
Headlights Beam Aiming
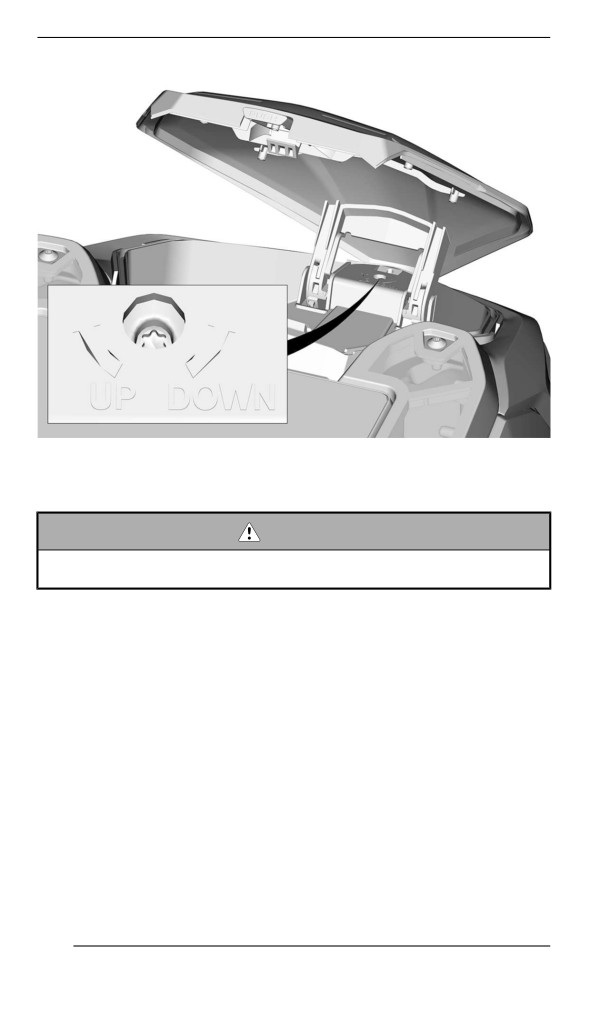
Open the storage compartment.
Step 1. Push button
Step 2. Lift cover
Turn the adjustment screw to reach desired beam height.
221
MAINTENANCE PROCEDURES
TYPICAL
Battery
WARNING
Never charge or boost the battery while it is installed on the
vehicle.
Removing the Battery
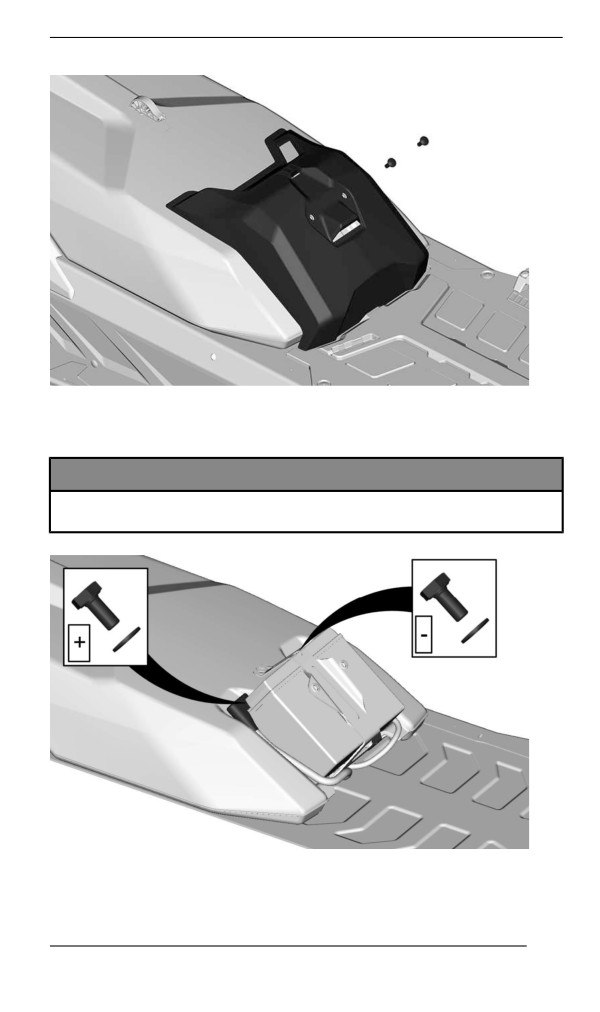
1. Remove the seat.
2. Remove the battery cover.
222
MAINTENANCE PROCEDURES
TYPICAL
3. Disconnect the negative terminal first, then the positive terminal.
NOTICE
Battery BLACK ( – ) cable must always be disconnected first
and connected last.
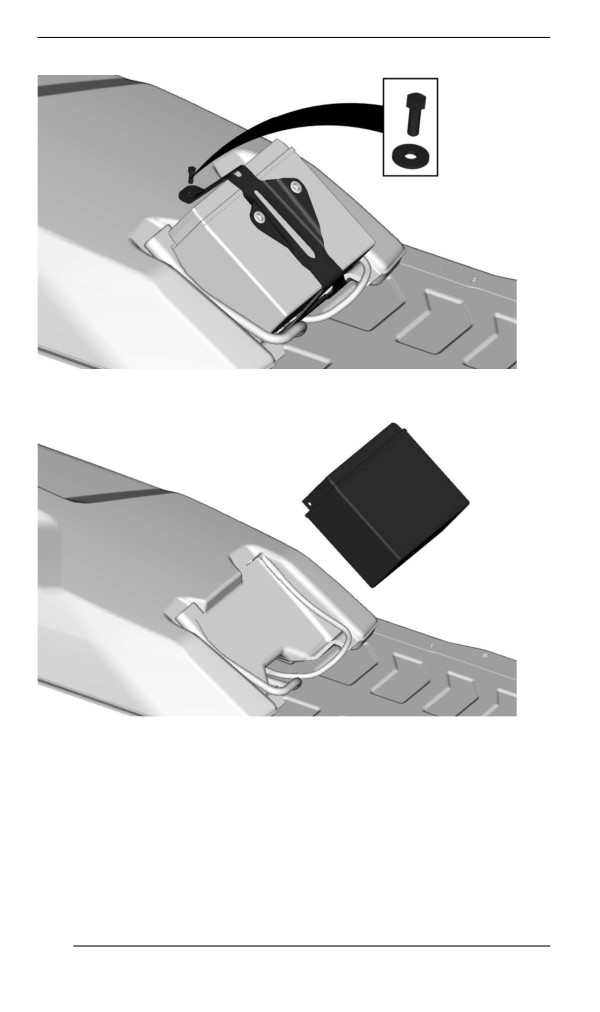
4. Remove the battery hold down bracket.
223
MAINTENANCE PROCEDURES
5. Remove the battery.
Cleaning the Battery
Clean battery casing and battery posts using a soft brush and a solu-
tion of baking soda and water.
Remove corrosion from battery cable terminals and battery posts us-
ing a firm wire brush.
Rinse with clear water then dry well.
224
MAINTENANCE PROCEDURES
Charging the Battery
Use any automotive type battery charger. Always refer to the battery
charger manufacturer’s instructions.
Installing the Battery
NOTICE
Battery BLACK ( – ) cable must always be disconnected first
and connected last.
The installation is the reverse of the removal procedure. However, pay
attention to the following details.
TIGHTENING TORQUE
Battery terminals (positive and
10 ± 2 Nm (89 ± 18 lbf-in)
negative)
Battery hold down bracket
5 ± 0.5 Nm (44 ± 4 lbf-in)
Battery cover retaining screws
1.5 ± 0.5 Nm (13 ± 4 lbf-in)
225
VEHICLE CARE
Post-Operation Care
Remove snow and ice from rear suspension, track, front suspension,
steering mechanism and skis.
WARNING
Make sure D.E.S.S. key is removed from D.E.S.S. post before
standing in front the vehicle, getting close to the track or rear
suspension components.
Always cover your snowmobile when leaving it outside overnight or
during extended periods of inactivity. This will protect it from frost and
snow as well as help retain its appearance.
Vehiiclle Clleaniing and Protection
Wash snowmobile with water mixed with a mild detergent. Use only
microfiber cloths or an equivalent.
NOTICE
Never use a high pressure washer to clean the vehicle. USE
LOW PRESSURE ONLY (EX: garden hose).
NOTICE
Never use XPS Brake and Parts Cleaner or any petroleum
based cleaners on plastic parts.
Non Compatible Cleaning Products
material type
non-compatible cleaning Products
All plastics, vinyls,
BRAKE AND PARTS CLEANER OR
painted steel and
ANY PETROLEUM BASE CLEANING
aluminium.
PRODUCTS
Compatible Cleaning Products
material type
cleaning Product
All plastics, vinyls,
Soapy water
painted steel and
XPS Spray Cleaner and Polish
aluminium.
XPS All Purpose Cleaner
226
VEHICLE CARE
For more information and products, Visit the XPS Products website at
227
STORAGE
During summer, or when a snowmobile is not in use for more than
three months, proper storage is necessary.
Storage
Clean the vehicle
Add fuel stabilizer to fuel following the product manufacturer
recommendations.
Run the engine after adding the product to the fuel
Lubricate engine. Refer to Engine Storage Procedure in this
section.
Lubricate brake lever pivot
Lubricate rear suspension
Charge battery monthly to keep it fully charged during storage (if
equipped)
Block muffler outlet with rags
Lift rear of vehicle until track is clear of the ground. Do not release
track tension
CAUTION
Use appropriate lifting device or have assistance to share lifting
stress. If a lifting device is not used, use proper lifting techni-
ques, notably using your legs force. Do not attempt to lift the
rear of vehicle if it is above your limits.
NOTICE
The snowmobile has to be stored in a cool and dry place and
covered with an opaque but ventilated tarpaulin. This will pre-
vent sun rays and grime from affecting plastic components and
vehicle finish.
NOTICE
Fuel stabilizer should be added prior to engine lubrication to
prevent the loss of the chemical properties of fuel and protect
the fuel system against varnish deposits.
228
STORAGE
Engine Storage Procedure
The engine has to be properly lubricated at storage for internal parts
protection.
E-TEC Engine - 4.5” and 7.2” Digital Display
Follow these simple steps.
To engage the procedure, do the following:
1. Place the vehicle in a well ventilated area.
2. Start the engine and let it run at idle speed until it reaches its oper-
ating temperature (watch the coolant temperature on the display or
verify the rear heat exchanger becomes warm).
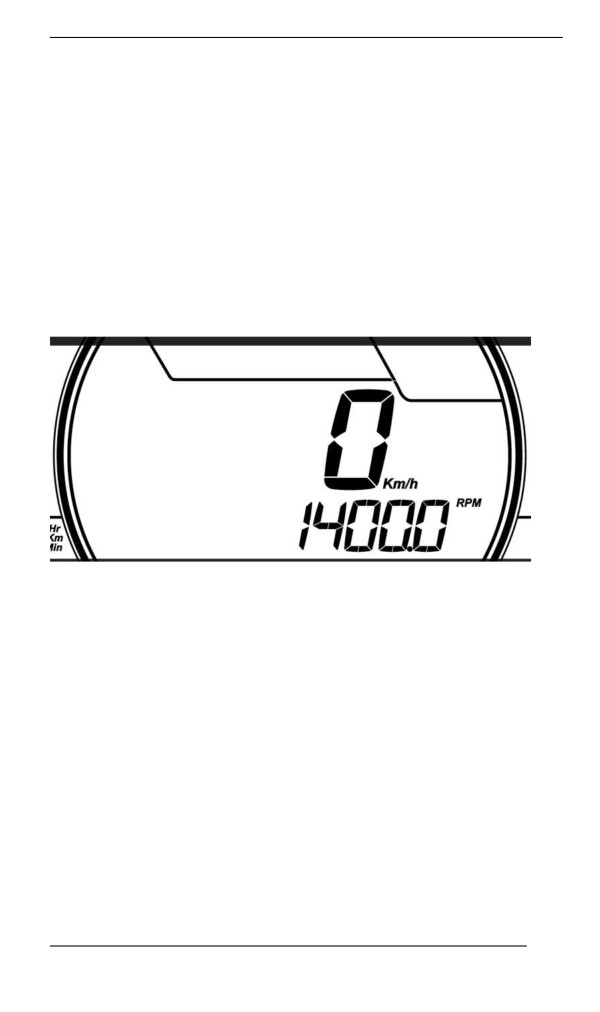
3. Push the SET (S) button to select odometer mode.
TYPICAL
NOTE:
The storage mode does not function in other modes (trip A, trip B and
hr trip).
4. Repeatedly depress the HI/LOW beam switch rapidly, then, while
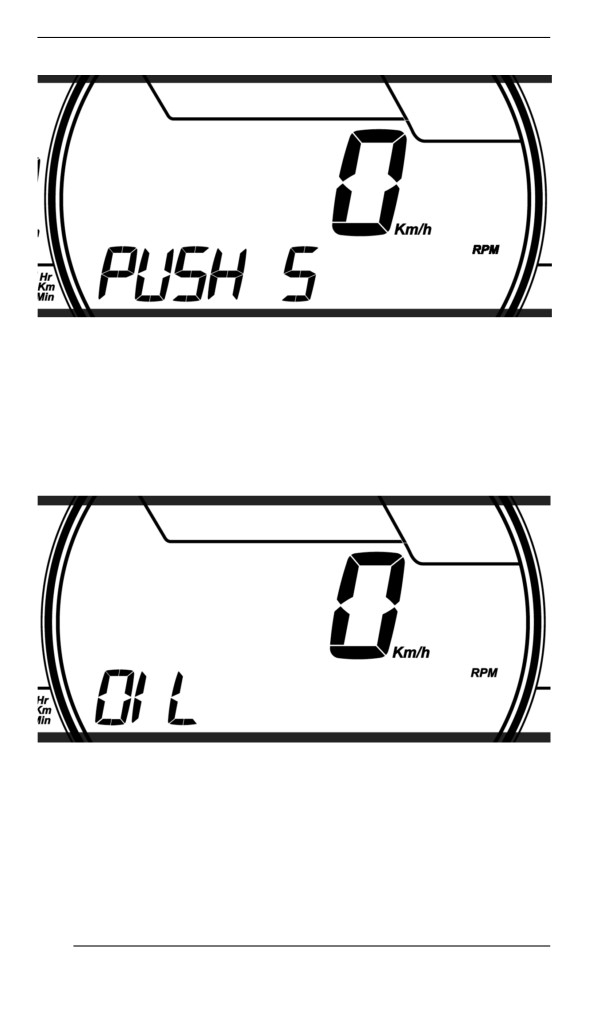
doing this, press and hold the SET button until PUSH "S" ap-
pears on the display.
229
STORAGE
TYPICAL
5. Release all buttons when gauge displays PUSH (S) appears.
6. Again, press and hold the SET (S) button for 2 - 3 seconds.
NOTE:
The gauge will display OIL when the storage procedure is initiated.
7. When gauge displays OIL, release button and wait for the lubrica-
tion function to end.
TYPICAL
Do not touch anything during engine lubrication cycle.
The engine lubrication function takes approximately 1 minute. Dur-
ing this time the engine RPM will increase slightly to approximately
1600 RPM and the oil pump will "oil flood" the engine.
230
STORAGE
At the end of engine lubrication procedure, the ECM will turn the
engine off.
Remove tether cord cap from engine cut-off switch.
NOTICE
Do not start the engine during storage period.
E-TEC Engine - 10.25” Color Touchscreen Display
To engage the procedure, do the following:
1. Place the vehicle in a well ventilated area near storage area.
2. Start the engine and let it run at idle speed until it reaches its oper-
ating temperature (watch the coolant temperature on the display or
verify the rear heat exchanger becomes warm).
3. Go to
”Vehicle Settings”, select
“Vehicle Health” and then
“Procedures”.
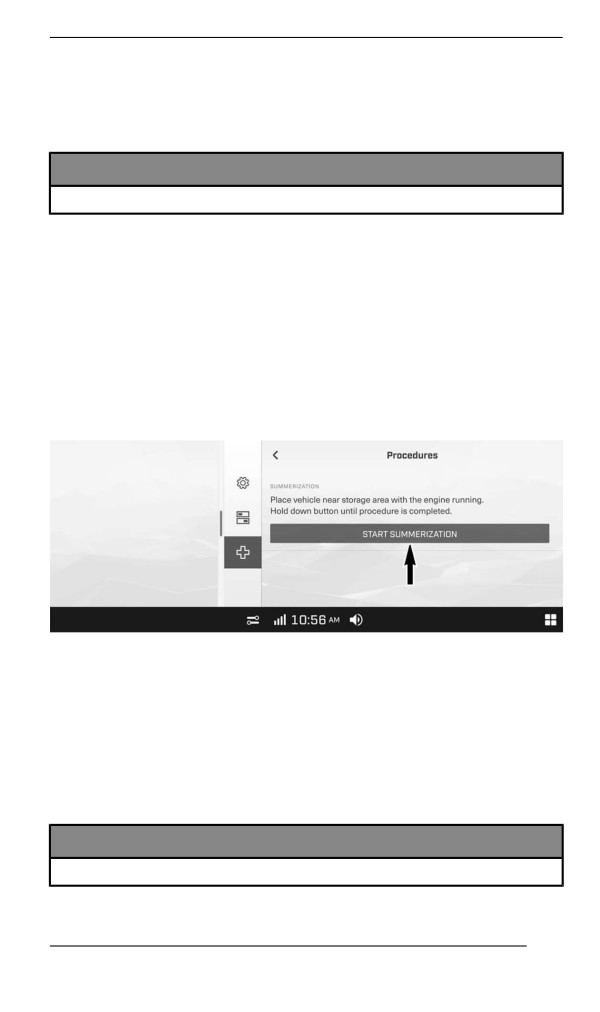
4. Press and hold on “Start Summerization” and follow the steps on
screen.
Do not touch anything during engine lubrication cycle.
The engine lubrication function takes approximately 1 minute. Dur-
ing this time the engine RPM will increase between 1500 and 2000
RPM and the oil pump will "oil flood" the engine.
At the end of engine lubrication procedure, the ECM will turn the
engine off.
Remove tether cord cap from engine cut-off switch.
NOTICE
Do not start the engine during storage period.
231
PRESEASON PREPARATION
Proper vehicle preparation is necessary when a vehicle has not been
used for more than three months.
Using the maintenance schedule, perform the items titled EVERY
YEAR AT PRESEASON.
Visit your authorized BRP snowmobile dealer for more information.
232
MAINTENANCE RECORDS
Send photocopy of maintenance record to BRP if needed.
Pre-delivery
Serial
Signature/Print:
number:
Mileage /
km:
Hours:
Date:
Dealer
no:
Notes:
Refer to vehicle Pre-Delivery Bulletin for detailed installation
procedures
233
MAINTENANCE RECORDS
First inspection
Mileage /
Signature/Print:
km:
Hours:
Date:
Dealer
no:
Notes:
For maintenance schedule refer to Maintenance Information
section of this operator's guide
Service
Mileage /
Signature/Print:
km:
Hours:
Date:
Dealer
no:
Notes:
For maintenance schedule refer to Maintenance Information
section of this operator's guide
234
MAINTENANCE RECORDS
Service
Mileage /
Signature/Print:
km:
Hours:
Date:
Dealer
no:
Notes:
For maintenance schedule refer to Maintenance Information
section of this operator's guide
Service
Mileage /
Signature/Print:
km:
Hours:
Date:
Dealer
no:
Notes:
For maintenance schedule refer to Maintenance Information
section of this operator's guide
235
MAINTENANCE RECORDS
Service
Mileage /
Signature/Print:
km:
Hours:
Date:
Dealer
no:
Notes:
For maintenance schedule refer to Maintenance Information
section of this operator's guide
Service
Mileage /
Signature/Print:
km:
Hours:
Date:
Dealer
no:
Notes:
For maintenance schedule refer to Maintenance Information
section of this operator's guide
236
MAINTENANCE RECORDS
Service
Mileage /
Signature/Print:
km:
Hours:
Date:
Dealer
no:
Notes:
For maintenance schedule refer to Maintenance Information
section of this operator's guide
Service
Mileage /
Signature/Print:
km:
Hours:
Date:
Dealer
no:
Notes:
For maintenance schedule refer to Maintenance Information
section of this operator's guide
237
MAINTENANCE RECORDS
Service
Mileage /
Signature/Print:
km:
Hours:
Date:
Dealer
no:
Notes:
For maintenance schedule refer to Maintenance Information
section of this operator's guide
Service
Mileage /
Signature/Print:
km:
Hours:
Date:
Dealer
no:
Notes:
For maintenance schedule refer to Maintenance Information
section of this operator's guide
238
MAINTENANCE RECORDS
Service
Mileage /
Signature/Print:
km:
Hours:
Date:
Dealer
no:
Notes:
For maintenance schedule refer to Maintenance Information
section of this operator's guide
Service
Mileage /
Signature/Print:
km:
Hours:
Date:
Dealer
no:
Notes:
For maintenance schedule refer to Maintenance Information
section of this operator's guide
239
MAINTENANCE RECORDS
Service
Mileage /
Signature/Print:
km:
Hours:
Date:
Dealer
no:
Notes:
For maintenance schedule refer to Maintenance Information
section of this operator's guide
Service
Mileage /
Signature/Print:
km:
Hours:
Date:
Dealer
no:
Notes:
For maintenance schedule refer to Maintenance Information
section of this operator's guide
240
TECHNICAL
INFORMATION
241
VEHICLE IDENTIFICATION
Vehiiclle Descriiptiion Decal
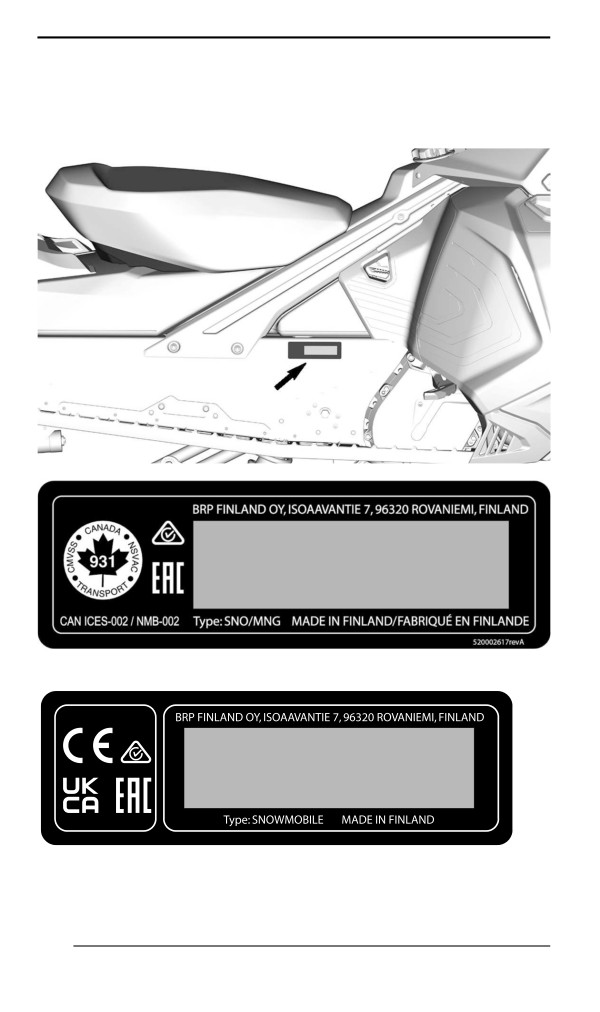
Vehicle description decal is located on right hand side of tunnel.
FOR NORTH AMERICAN MARKET
520002459
FOR EUROPEAN MARKET
242
VEHICLE IDENTIFICATION
Identificatiion Numbers
The main components of your snowmobile (engine and frame) are
identified by different identification numbers. It may sometimes be-
come necessary to locate these numbers for warranty purposes or to
trace your snowmobile in the event of loss. These numbers are re-
quired by the authorized BRP snowmobile dealer to complete war-
ranty claims properly. We strongly recommend that you take note of
all the identification numbers on your snowmobile and supply them to
your insurance company.
Vehicle Identification Number (VIN)
VIN is scribed on vehicle description decal. See above. It is also en-
graved on tunnel near vehicle description decal.
Model number and model year are part of the information found in the
VIN. See illustration.
2BP
S
LSAB
9
A
V
000001
2BP = Canada
Serial
Model number
YH2 = Finland
number
Factory
S = Ski-Doo
V = Valcourt
L = Lynx
Numeric or
R = Rovaniemi
Alphabetic
Model year: P = 2023
Q = 2024
R=2025etc.
243
VEHICLE IDENTIFICATION
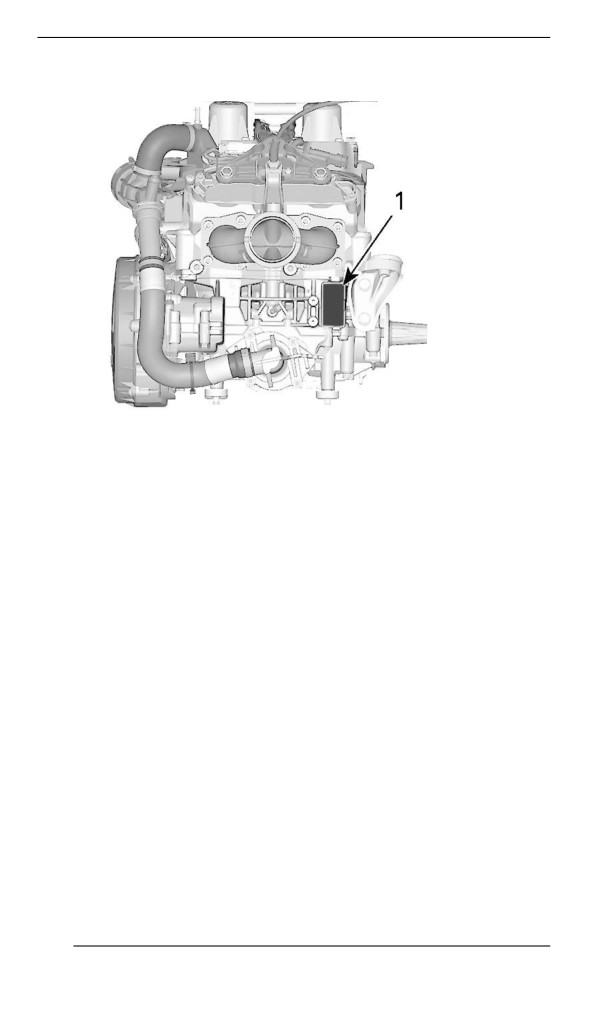
Engine Identification Number Location
1. Engine identification number
244
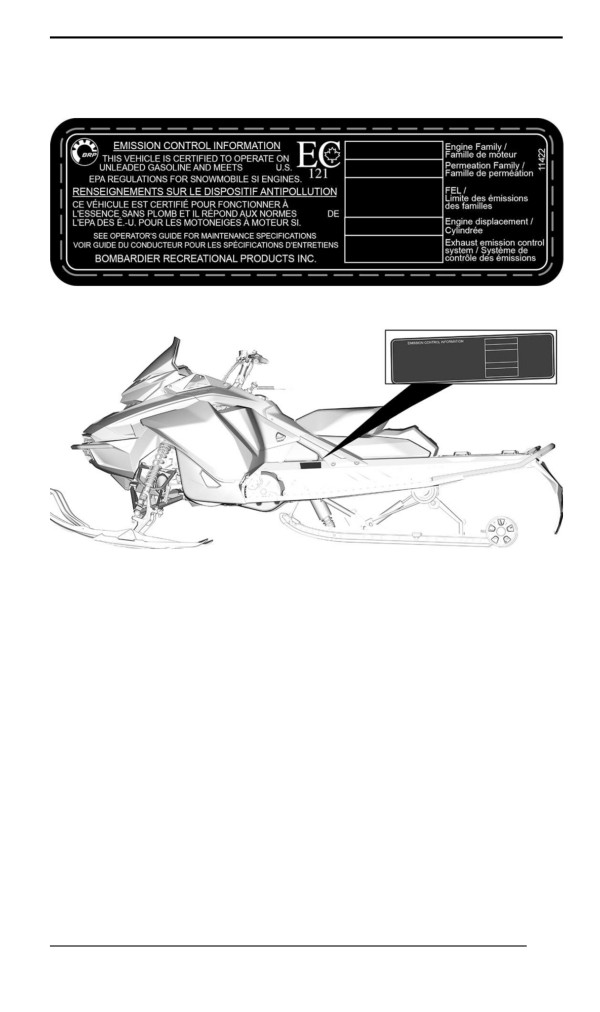
COMPLIANCE LABELS
EPA Complliance Label
EPA COMPLIANCE LABEL
TYPICAL
245
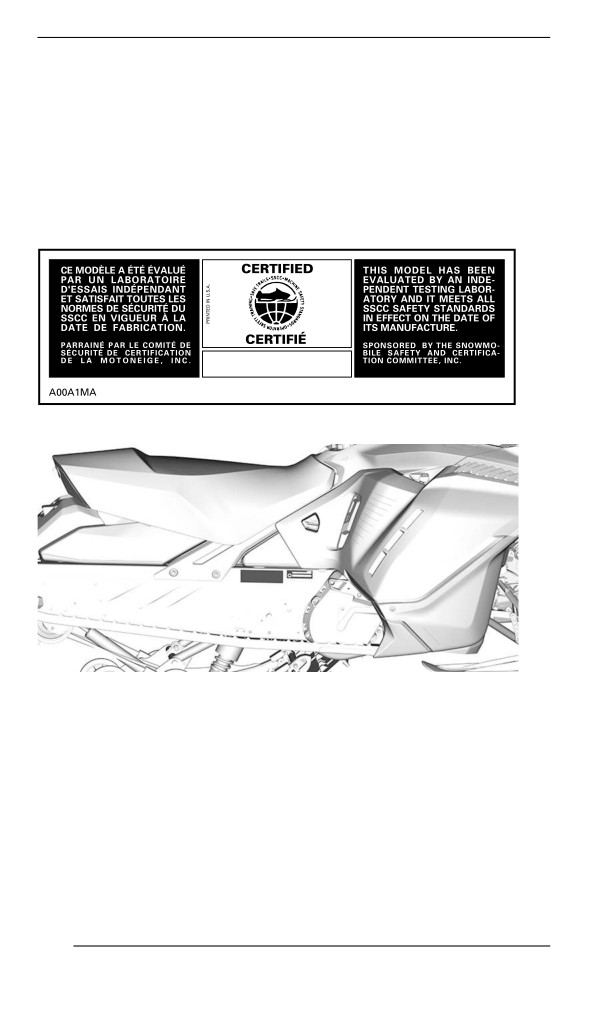
COMPLIANCE LABELS
SSCC Labell
Safety standards for snowmobiles have been adopted by the Snow-
mobile Safety and Certification Committee (SSCC) of which BRP is a
proud participating member. Assurance that your snowmobile meets
these standards is easily checked by locating the Certification Label
on a right vertical portion of the vehicle.
The following label shows that an independent testing laboratory has
verified compliance with the SSCC safety standards.
SSCC LABEL
TYPICAL
Regullatiion (EU) 2016/1628 appllicablle for
Non-Road Mobiile Machineries
Vehicles who comply to Regulation (EU) 2016/1628 (NRMM) are iden-
tified on the engine.
246
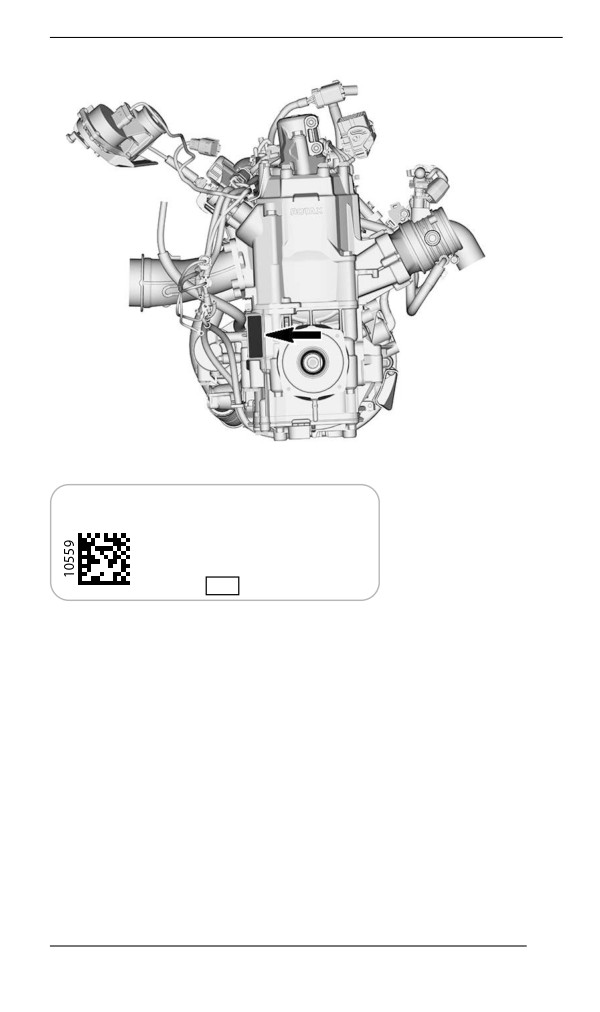
COMPLIANCE LABELS
TYPICAL
Rotax
NRSC H CO2 g/kWh:
XXXX
#
MXXXXXXX
Prod. date:
MM-YYYY
Family type:
XXXXXX
e13
SMB/P V-####
TYPICAL - NRMM IDENTIFICATION LABEL
Depending on your particular vehicle configuration, an additional
NRMM identification label may be installed on the tunnel, near the
chaincase.
247
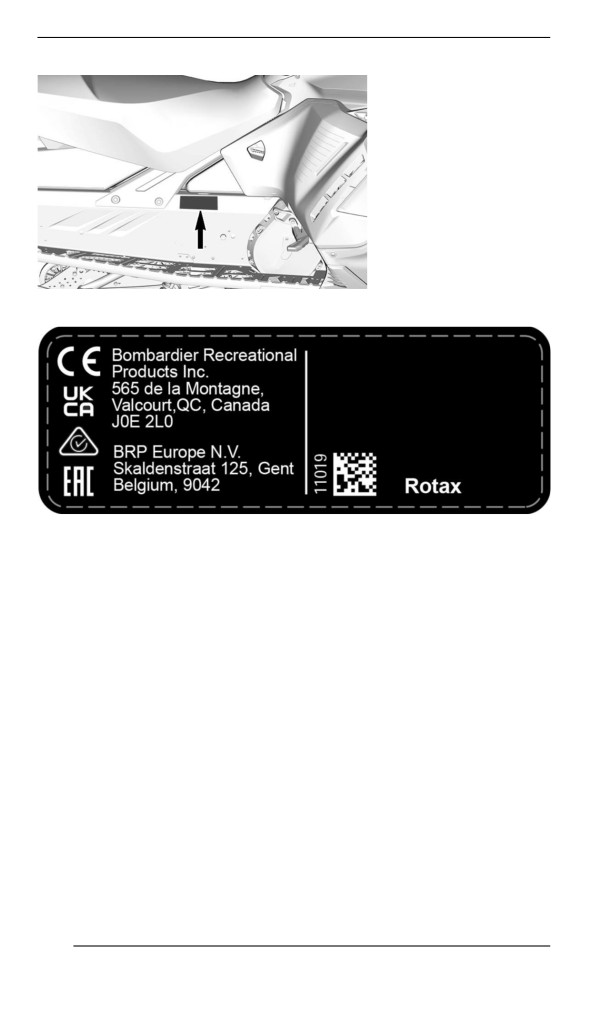
COMPLIANCE LABELS
TYPICAL - ON RH SIDE OF TUNNEL
NRMM IDENTIFICATION ON VEHICLE
248

NOISE EMISSION AND VIBRATION VALUES
850 E-TEC
MODEL
850 E-TEC
Turbo R
NOISE EMISSION AND VIBRATION VALUES1
Sound
103.3 dB
99.9 dB
power level
(Uncertainty
(Uncertainty
(LWA)
(Kwa) 3 dB)
(Kwa) 3 dB)
Noise
Sound
92 dB
87 dB
pressure
(Uncertainty
(Uncertainty
(LpA)
(KpA) 3 dB)
(KpA) 3 dB)
Hand-arm
<2.5 m/s2
<2.5 m/s2
system
Vibra
tion
Whole
body at
<0.5 m/s2
<0.5 m/s2
seat
1: Noise emission and Vibration values are measured
in accordance with Annexes A and B of ISMA 1
regulation on a snow covered or grass surface in
neutral or without belt.
249
EU DECLARATION OF CONFORMITY
250
UK DECLARATION OF CONFORMITY
251
EAC DECLARATION OF CONFORMITY
Left blank for Eurasian Conformity
mark where applicable
252
EPA CERTIFIED ENGINES
Engine Emiissiions Information
Manufacturer''s Responsibility
Snowmobile manufacturers of snowmobile engines need to determine
the exhaust emission levels for each engine horsepower family and
certify these engines with the United States of America Environmental
Protection Agency (EPA). An emissions control information label,
showing emission levels and engine specifications, must be placed on
each vehicle at the time of manufacture.
Dealer''s Responsibility
When performing service on a certified BRP snowmobiles that carry
an emissions control information label, adjustments must be kept with-
in published factory specifications.
Replacement or repair of any emission related component must be
executed in a manner that maintains emission levels within the pre-
scribed certification standards.
Dealers are not to modify the engine in any manner that would alter
the horsepower or allow emission levels to exceed their predeter-
mined factory specifications.
Exceptions include manufacturer's prescribed changes, such as alti-
tude adjustments for example.
Owner Responsibility
The owner / operator is required to have engine maintenance per-
formed to maintain emission levels within prescribed certification
standards.
The owner / operator is not to, and should not allow anyone to modify
the engine in any manner that would alter the horsepower or allow
emissions levels to exceed their predetermined factory specifications.
EPA Emission Regulations
All BRP snowmobiles manufactured by BRP are certified to the EPA
as conforming to the requirements of the regulations for the control of
air pollution from new snowmobile engines. This certification is contin-
gent on certain adjustments being set to factory standards. For this
reason, the factory procedure for servicing the product must be strictly
followed and, whenever practicable, returned to the original intent of
the design.
The responsibilities listed above are general and in no way a complete
listing of the rules and regulations pertaining to the EPA requirements
on exhaust emissions for snowmobile products. For more detailed in-
formation on this subject, you may contact the following locations:
253
EPA CERTIFIED ENGINES
MAIL:
U.S. Environmental Protection Agency
Certification Division
Gasoline Engine Compliance Center
2000 Traverwood Drive
Ann Arbor MI 48105
USA
INTERNET WEB SITE:
254
RADIO FREQUENCY DIGITALLY ENCODED
SECURITY SYSTEM (RF D.E.S.S. KEY)
This device complies with FCC Part 15 and Industry Canada license
exempt RSS standard(s).
Operation is subject to the following two conditions: (1) this device
may not cause interference, and (2) this device must accept any inter-
ference, including interference that may cause undesired operation of
the device.
Changes or modifications not expressly approved by the party respon-
sible for compliance could void the user’s authority to operate the
equipment.
IC Registration Number: 12006A-1001002222
FCC ID: 2ACER-1001002222
We, the party responsible for compliance, declare under our sole re-
sponsibility that the device is in conformity with the provisions of the
following Council Directive: 2014/53/EU. To which this declaration re-
lates is in conformity with the essential requirements and other rele-
vant requirements. The product is in conformity with the following
directives, harmonized standards and regulations:
Radio Equipment Directive
(RED)
2014/53/EU and Harmonized
Standards:
IEC 62368-1:2014, CISPR 25:2016, ISO 11452-2:2004, ETSI EN 300
330 V2.1.1:2017
Radio Equipment Statutory Instrument 2017/1206 and Designated
Standards:
IEC 62368-1:2014, CISPR 25:2016, ISO 11452-2:2004, ETSI EN 300
330 V2.1.1:2017
255
MULTIFUNCTION GAUGE REGULATORY
INFORMATION
Technical Information
Transmitter:
- BT operating frequency range: 2402 - 2480 MHz
- BT version: 5.0
- BT max transmit power: +8 dBm
Manufacturer and Address
Manufacturer:
- Enovation Controls LLC
Address:
-
5311 S 122nd E. Ave. Tulsa,
OK 74146,
USA
To display the regulatory information on the vehicle digital display:
From the app menu, go to Preferences / General / About.
USA and Canada
This device complies with FCC Part 15 and Industry Canada license
exempt RSS standard (s). Operation is subject to the following two
conditions:
(1) this device may not cause interference, and
(2) this device must accept any interference, including interference
that may cause undesired operation of the device.
Le présent appareil est conforme aux CNR d'Industrie Canada appli-
cables aux appareils radio exempts de licence. L'exploitation est au-
torisée aux deux conditions suivantes:
(1) l'appareil ne doit pas produire de brouillage, et
(2) l'utilisateur de l'appareil doit accepter tout brouillage radioélectri-
que subi, même si le brouillage est susceptible d'en compromettre le
fonctionnement.
Changes or modifications not expressly approved by the party respon-
sible for compliance could void the user's authority to operate the
equipment.
IC: 3147A-BT850
FCC ID: SQGBT850
RF exposure:
- The equipment complies with FCC RF exposure limits set forth for
an uncontrolled environment.
- This equipment must be installed and operated with a separation
distance of at least 20 cm from all persons.
256
MULTIFUNCTION GAUGE REGULATORY INFORMATION
- The antenna(s) used for this transmitter must not be co-located or
operating in conjunction with any other antenna or transmitter.
Japan
This device is granted pursuant to the Japanese Radio Law (
)
and the Japanese Telecommunications Business Law
(
). This device should not be modified (otherwise the
granted designation number will become invalid).
Europe
Declaration of Conformity
Simplified EU Declaration of Conformity according Radio Equipment
Directive 2014/53/EU.
257
MULTIFUNCTION GAUGE REGULATORY INFORMATION
DE
Hiermit erklärt Enovation Controls LLC, dass der Funkanlagentyp OD1025-01 der Richtlinie 2014/53/EU entspricht.
Der vollständige Text der EU-Konformitätserklärung ist unter der folgenden Internetadresse verfügbar:
FR
Le soussigné, Enovation Controls LLC, déclare que l'équipement radioélectrique du type OD1025-01 est
conforme à la directive 2014/53/UE. Le texte complet de la déclaration UE de conformité est disponible à
l'adresse internet suivante: https://www.brp.com/en/sustainability/product-responsibility.html
BG
Enovation Controls LLC
,
OD1025-01
2014/53/.
:
EL
Με την παρούσα ο/η Enovation Controls LLC, δηλώνει ότι ο ραδιοεξοπλισ×όØ OD1025-01 πληροί την οδηγία 2014/53/EE.
Το πλήρεØ κεί×ενο τηØ δήλωσηØ συ××όρφωσηØ ΕΕ διατίθεται στην ακόλουθη ιστοσελίδα στο διαδίκτυο:
CS
Tímto Enovation Controls LLC prohlašuje, že typ rádiového zařízení OD1025-01 je v souladu se směrnicí 2014/53/EU.
Úplné znění EU prohlášení o shodě je k dispozici na této internetové adrese:
DA
Hermed erklærer Enovation Controls LLC, at radioudstyrstypen OD1025-01 er i overensstemmelse med direktiv
2014/53/EU.
EU-overensstemmelseserklæringens fulde tekst kan ðndes på følgende internetadresse:
ET
Käesolevaga deklareerib Enovation Controls LLC, et käesolev raadioseadme tüüp OD1025-01 vastab direktiivi
2014/53/EL nõuetele.
ELi vastavusdeklaratsiooni täielik tekst on kättesaadav järgmisel internetiaadressil:
ES
Por la presente, Enovation Controls LLC declara que el tipo de equipo radioeléctrico OD1025-01 es conforme
con la Directiva 2014/53/UE.
El texto completo de la declaración UE de conformidad está disponible en la dirección Internet siguiente:
FI
Enovation Controls LLC vakuuttaa, että radiolaitetyyppi OD1025-01 on direktiivin 2014/53/EU mukainen.
EU-vaatimustenmukaisuusvakuutuksen täysimittainen teksti on saatavilla seuraavassa internetosoitteessa:
EN
Hereby, Enovation Controls LLC declares that the radio equipment type OD1025-01 is in compliance with
Directive 2014/53/EU. The full text of the EU declaration of conformity is available at the following internet
HR
Enovation Controls LLC ovime izjavljuje da je radijska oprema tipa OD1025-01 u skladu s Direktivom 2014/53/EU.
Cjeloviti tekst EU izjave o sukladnosti dostupan je na sljedećoj internetskoj adresi:
HU
Enovation Controls LLC igazolja, hogy a OD1025-01 típusú rádióberendezés megfelel a 2014/53/EU irányelvnek.
Az EU-megfelelőségi nyilatkozat teljes szövege elérhető a következő internetes címen:
IT
Il fabbricante, Enovation Controls LLC, dichiara che il tipo di apparecchiatura radio OD1025-01 è conforme
alla direttiva 2014/53/UE.
Il testo completo della dichiarazione di conformità UE è disponibile al seguente indirizzo Internet:
258
MULTIFUNCTION GAUGE REGULATORY INFORMATION
LT
Aš, Enovation Controls LLC, patvirtinu, kad radijo įrenginių tipas OD1025-01 atitinka Direktyvą 2014/53/ES.
Visas ES atitikties deklaracijos tekstas prieinamas šiuo interneto adresu:
LV
Ar šo Enovation Controls LLC deklarē, ka radioiekārta OD1025-01 atbilst Direktīvai 2014/53/ES.
Pilns ES atbilstības deklarācijas teksts ir pieejams šādā interneta vietnē:
MT
B'dan, Enovation Controls LLC, niddikjara li dan it-tip ta' tagħmir tar-radju OD1025-01 huwa konformi mad-Direttiva
2014/53/UE. It-test kollu tad-dikjarazzjoni ta' konformità tal-UE huwa disponibbli f'dan l-indirizz tal-Internet li ġej:
NL
Hierbij verklaar ik, Enovation Controls LLC, dat het type radioapparatuur OD1025-01 conform is met Richtlijn
2014/53/EU.
De volledige tekst van de EU-conformiteitsverklaring kan worden geraadpleegd op het volgende internetadres:
PL
Enovation Controls LLC niniejszym oświadcza, że typ urządzenia radiowego OD1025-01 jest zgodny z dyrektywą
2014/53/UE. Pełny tekst deklaracji zgodności UE jest dostępny pod następującym adresem internetowym:
PT
O(a) abaixo assinado(a) Enovation Controls LLC declara que o presente tipo de equipamento de rádio OD1025-01 está
em conformidade com a Diretiva 2014/53/UE.
O texto integral da declaração de conformidade está disponível no seguinte endereço de Internet:
RO
Prin prezenta, Enovation Controls LLC declară că tipul de echipamente radio OD1025-01 este în conformitate cu
Directiva 2014/53/UE. Textul integral al declaraiei UE de conformitate este disponibil la următoarea adresă internet:
SV
Härmed försäkrar Enovation Controls LLC att denna typ av radioutrustning OD1025-01 överensstämmer med direktiv
2014/53/EU. Den fullständiga texten till EU-försäkran om överensstämmelse nns på följande webbadress:
SL
Enovation Controls LLC potrjuje, da je tip radijske opreme OD1025-01 skladen z Direktivo 2014/53/EU.
Celotno besedilo izjave EU o skladnosti je na voljo na naslednjem spletnem naslovu:
SK
Enovation Controls LLC týmto vyhlasuje, že rádiové zariadenie typu OD1025-01 je v súlade so smernicou 2014/53/EÚ.
Úplné EÚ vyhlásenie o zhode je k dispozícii na tejto internetovej adrese:
IS
Enovation Controls LLC lýsir því hér með yr að þráðlausi arskiptabúnaðurinn OD1025-01 er í samræmi við tilskipun
2014/53/ESB. Óstyttan texta ESB-samræmisyrlýsingarinnar er að nna á ve anginu:
Liechtenstein
Hiermit erklärt Enovation Controls LLC, dass der Funkanlagentyp OD1025-01 der Richtlinie 2014/53/EU entspricht.
Der vollständige Text der EU-Konformitätserklärung ist unter der folgenden Internetadresse verfügbar:
NO
Hermed erklærer Enovation Controls LLC at radioutstyrstypen OD1025-01 er i samsvar med direktiv 2014/53/EU.
Hele teksten i EU-samsvarserklæringen nnes på følgende internettadresse:
RU
µ¾ÀÉÌÑÒÓ Enovation Controls LLC ÑÌÔÕ¾ÓÖÒÀ ×ÌÓØÙÓÚÕ, ÛÕ¾ ÜÌÝÒ¾ÕÚÞÑÒÛÚÔß¾Ú ¾à¾ÜâݾØÌÑÒÚ
ßÌÕÚä¾ÜÒÒ OD1025-01 ¾ÕØÚÛÌÚÕ ÕÜÚà¾ØÌÑÒÓÀ åÒÜÚßÕÒØæ 2014/53/EU.
ç¾ÙÑæì ÕÚßÔÕ ÝÚßÙÌÜÌíÒÒ Ô¾¾ÕØÚÕÔÕØÒÓ îï ݾÔÕâÉÚÑ ÑÌ ÔÌìÕÚ
259
MULTIFUNCTION GAUGE REGULATORY INFORMATION
This page is intention-
ally blank
260
TECHNICAL
SPECIFICATIONS
261
ENGINE
850 E-TEC
ENGINE
850 E-TEC
Rotax 850 E-TEC
liquid cooled with
Engine type
reed valves and
electronic RAVE
Number of cylinder
2
Bore
82 mm (3.228 in)
Stroke
80.4 mm (3.165 in)
Displacement
849 cm³ (51.81 in³)
Maximum power engine speed
7900 ± 100 RPM
FUEL SYSTEM
E-TEC direct
injection with
Fuel delivery
integrated auxiliary
injection system
Idle speed (not adjustable)
1200 ± 200 RPM
ELECTRICAL SYSTEM
30 A @ 14.5 V
Lighting system output
1340 W @ 6000
RPM
NGK ILKR8Q7
(engine and spark
Type
plug threads are
indexed)
Spark plug
Not adjustable 0.6
Gap(1)
to 0.7 mm (.024 to
.028 in)
262
ENGINE
LUBRICATION SYSTEM
Electronic oil
Oil injection pump type
injection pump
XPS 2T E-TEC
Type(2)
Recommended
synthetic oil
Injection oil
3.4 l (3.6
Quantity
qt(liq.,US))
850 E-TEC Turbo R
ENGINE
Rotax 850 E-TEC
turbocharged liquid
Engine type
cooled with reed
valves and
electronic RAVE
Number of cylinder
2
Bore
82 mm (3.228 in)
Stroke
80.4 mm (3.165 in)
Displacement
849 cm³ (51.81 in³)
Maximum power engine speed
7900 ± 100 RPM
FUEL SYSTEM
E-TEC direct
injection with
Fuel delivery
integrated auxiliary
injection system
Idle speed (not adjustable)
1200 ± 200 RPM
263

ENGINE
ELECTRICAL SYSTEM
30 A @ 14.5 V
Lighting system output
1340 W @ 6000
RPM
NGK ILKR8Q7
(engine and spark
Type
plug threads are
indexed)
Spark plug
Not adjustable 0.6
Gap(1)
to 0.7 mm (.024 to
.028 in)
LUBRICATION SYSTEM
Electronic oil
Oil injection pump type
injection pump
XPS 2T E-TEC
Type(2)
Recommended
synthetic oil
Injection oil
3.4 l (3.6
Quantity
qt(liq.,US))
264

VEHICLE
SHREDDER
COOLING SYSTEM
XPS Extended life
Recommended
pre-mixed coolant
Ethyl glycol and
distilled water
Coolant type
(50%/50%)
Alternative, or if
or coolant
not available
specifically
formulated for
aluminum engines
3700 850
7.3 l (7.3
E-TEC
qt(liq.,US))
3900 850
E-TEC
7.4 l (7.8
Coolant capacity
3900 850
qt(liq.,US))
E-TEC Turbo R
7.5 l (7.9
4100 models
qt(liq.,US))
FUEL SYSTEM
In-tank electrical
Fuel pump
fuel pump
Type
Premium unleaded
gasoline (fuel which
may contain up to
10% MAX ethanol
Fuel
91 Pump Posted
Octane rating
AKI (R+M)/2)
95
(RON)
37 l (9.8
Fuel tank capacity
gal(liq.,US))
265
VEHICLE
ELECTRICAL SYSTEM
Battery (model with 10.25” display
12 V, 3 A•h
touchscreen)
Low beams
2 x 14 W
Headlamp
High beams
18.5 W
Taillight and stoplight
2 x 2.6/3.5 W LED
F1
Start/RER
5A
F2
Accessories/
25 A
Loads
Fuses
F3
Battery
30 A
F4
Cluster
15 A
DRIVE SYSTEM - CHAINCASE
Recommended
XPS Synthetic
chaincase oil
Type
75W140 gear oil
Chaincase
Alternative, or if
that meets the API
oil
not available
GL-5 specification
350 ml (12 fl
Capacity
oz(US))
RE 3700 850 E-TEC Turbo R
21/51
RE 3900 850 E-TEC
Chain drive
RE 3700 850 E-TEC
21/49
ratio
All DS 850 E-TEC
RE 3900 850 E-TEC Turbo R
21/53
All DS 850 E-TEC Turbo R
266

VEHICLE
DRIVE SYSTEM - DRIVE AND DRIVEN PULLEYS
Drive pulley type
pDrive with clickers
All 850 E-TEC
3300 ± 100 RPM
(Sea level calibration)
4100
(850 E-TEC)
3600 ± 100 RPM
Drive pulley
(High altitude calibration)
engage
ment RPM
850 E-TEC Turbo R
3400 ± 100 RPM
(Sea level calibration)
All 850 E-TEC Turbo R
3800 ± 100 RPM
(High altitude calibration)
Driven pulley type
QRS
Not adjustable
Z
20.9 mm (.823 in)
Pulley
distance
Not adjustable
X
41.1 ± 1.8 mm
(1.618 ± .071 in)
Not adjustable
New
3 mm (.118 in)
Offset
Y-X
Not adjustable
After break-in
2 ± 0.5 mm (.079 ±
.02 in)
Width
38.3 mm (1.508 in)
Drive belt
Wear limit
35.9 mm (1.413 in)
DRIVE SYSTEM - TRACK
3700
8
Drive sprocket number of
teeth
All others
6
38.1 cm x 370.5 cm
Track dimension (Width
x 63.5 cm
3700
x Length x Profile Height)
(15 in x 146 in x 2.5
in)
267

VEHICLE
DRIVE SYSTEM - TRACK
38.1 cm x 392 cm x
63.5 cm
(15 in x 154 in x 2.5
in)
3900
38.1 cm x 392 cm x
76.2 cm
(15 in x 154 in x 3
in)
38.1 cm x 419 cm x
63.5 cm
(15 in x 165 in x 2.5
in)
4100
38.1 cm x 419 cm x
76.2 cm
(15 in x 165 in x 3
in)
Deflection
32 mm (1.26 in)
Track
adjust
6.0 to 8.5 kgf (13 to
ment(3)
Force
19 lbf)
BRAKE SYSTEM
Single 200 mm
Brake
Type
cross drilled carbon
steel disc
Type
DOT 4
Brake fluid
65 ml (2.2 fl
Quantity
oz(US))
Fixed twin pistons
Caliper
(2 x 40mm)
Brake pad material
Organic
Minimum brake pad thickness (includes
5 mm (0.197 in)
backing plate)
268
VEHICLE
BRAKE SYSTEM
Minimum brake disc thickness
4.5 mm (0.177 in)
Maximum brake disc warpage
0.25 mm (0.01 in)
FRONT SUSPENSION
Suspension type
LFS
DS
215 mm (8.5 in)
Suspension maximum
travel
RE
207 mm (8.2 in)
DS
KYB 36 Kashima
Shock absorber type
KYB 36 CR
RE
Kashima
Stabilizer bar type
Link
REAR SUSPENSION
Suspension type
PPS2-DS+
Suspension maximum travel
264 mm (10.4 in)
DS
KYB 36 Kashima
Center
RE
KYB 46 Kashima
Shock
absorber
DS
KYB 36 Kashima
type
Rear
KYB 46 HLCR
RE
Kashima
WEIGHT AND DIMENSIONS
DS 3900 (2.5") 850
E-TEC
206 kg (454 lb)
DS 3900 (3") 850 E-TEC
206.8 kg (456 lb)
Mass (dry)
DS 3900 (3") 850 E-TEC
216 kg (476 lb)
Turbo R
269
VEHICLE
WEIGHT AND DIMENSIONS
DS 4100 (3") 850 E-TEC
218 kg (481 lb)
Turbo R
RE 3700 850 E-TEC
214 kg (472 lb)
RE 3900 850 E-TEC Turbo R
225 kg (496 lb)
DS 3900
325 cm (128 in)
DS 4100
338 cm (133 in)
Overall
length
RE 3700
312 cm (122.8 in)
RE 3900
325 cm (124 in)
Overall width
112 cm (44 in)
Overall height
128 cm (50.4 in)
Ski stance
92,1 cm (36 in)
(1)
Do not attempt to adjust gap on this spark
NOTICE
plug.
(2)
Refer to INJECTION OIL for detailed information.
(3)
Refer to Track Tension Verification in Maintenance
Procedures for detailed procedure.
270
TROUBLESHOOT-
ING
271
TROUBLESHOOTING GUIDELINES
ELECTRIC STARTER DOES NOT WORK
1. Emergency engine stop switch in OFF position or tether
cord cap not installed on engine cut-off switch.
- Place the emergency engine stop switch in the ON position
and install tether cord cap (on engine cut-off switch.
2. Throttle applied while attempting an engine start.
- Release throttle while cranking.
ENGINE IS CRANKING BUT FAILS TO START
1. No fuel to the engine.
- Check fuel tank level, add fuel if necessary.
2. System voltage too low.
- Contact an authorized BRP snowmobile dealer.
ENGINE RPM DOES NOT REACH CLUTCH ENGAGEMENT
POINT
1. D.E.S.S. did not read D.E.S.S. key code in the tether cord
cap. D.E.S.S. pilot lamp blinks (slow short beeps/
repetitive).
- Properly install tether cord cap.
2. D.E.S.S. has read a different code than the one
programmed. D.E.S.S. pilot lamp blinks rapidly (fast short
beeps/repetitive).
- Install a tether cord cap for which this snowmobile was
programmed.
3. ECM does not recognize the D.E.S.S. key.
- Refer to an authorized BRP snowmobile dealer.
272
TROUBLESHOOTING GUIDELINES
ENGINE LACKS ACCELERATION OR POWER
1.
Engine warm-up in progress.
- Drive vehicle at low speeds for a few minutes.
2.
Engine break-in period not completed.
- Complete break-in period.
3.
Drive and driven pulleys require servicing.
- Contact an authorized BRP snowmobile dealer.
4.
Engine overheats.
- Check coolant level, see Maintenance procedures.
- Check heat exchangers cleanliness. Clean if necessary.
5.
Drive belt worn too thin.
- If the drive belt has lost more than 3 mm (1/8 in) of its
original width, it will affect vehicle performance.
- Replace drive belt.
6.
Incorrect track adjustment.
- See MAINTENANCE and/or an authorized Lynx dealer for
proper alignment and tension adjustments.
7.
R.A.V.E. valves problem.
- Seek service from an authorized BRP snowmobile dealer,
repair shop, or person of your own choosing for
maintenance, repair, or replacement.
8.
Fuel pressure too low.
- Seek service from an authorized BRP snowmobile dealer,
repair shop, or person of your own choosing for
maintenance, repair, or replacement.
273
TROUBLESHOOTING GUIDELINES
ENGINE BACKFIRES
1. Engine is running too hot.
- See item 4 of ENGINE LACKS POWER.
2. Ignition timing is incorrect or there is an ignition system
failure.
- Seek service from an authorized BRP snowmobile dealer,
repair shop, or person of your own choosing for
maintenance, repair, or replacement.
3. Exhaust system leak.
- Seek service from an authorized BRP snowmobile dealer,
repair shop, or person of your own choosing for
maintenance, repair, or replacement.
4. Fuel pressure too low.
- Seek service from an authorized BRP snowmobile dealer,
repair shop, or person of your own choosing for
maintenance, repair, or replacement.
ENGINE MISFIRES
1. Water in fuel.
- Drain fuel system and refill with fresh fuel.
2. RAVE valves malfunction.
- Have RAVE valves system inspected. Seek service from an
authorized BRP snowmobile dealer, repair shop, or person
of your own choosing for maintenance, repair, or
replacement.
HEATED GRIPS/THUMB WARMERS ARE NOT WORKING
1. Engine RPM is too low.
- Make sure engine RPM is above 2000.
ENGINE HAS SHUT DOWN
1. The engine shuts down after long periods of idling.
- Do not let engine idle too long. Refer to Vehicle warm-up in
operating instruction.
274
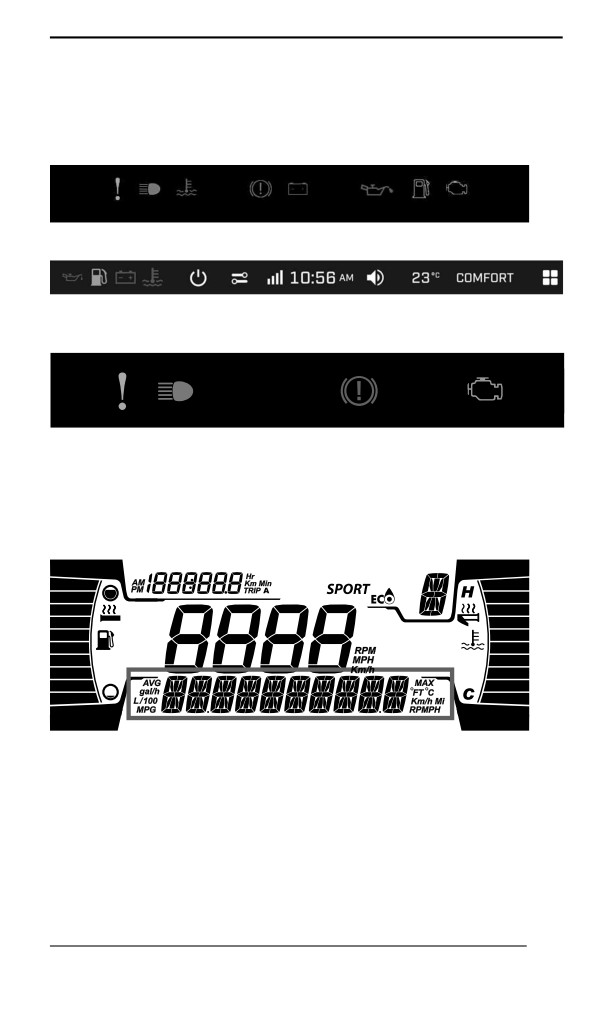
MONITORING SYSTEM
Piilot Lamps, Messages and Beeper Codes
Gauge pilot lamp(s) will inform you if an anomaly occurs or to inform
you of a particular condition.
PILOT LAMPS – 4.5” DIGITAL DISPLAY
DIGITAL PILOT LAMP
–
10.25” COLOR DIGITAL
TOUCHSCREEN
PILOT LAMPS – 10.25” COLOR DIGITAL TOUCHSCREEN
Pilot lamp can flash alone or in combination with another lamp.
Notifications will appear on the top right corner of the screen as a com-
plement of the pilot lamps to give you a brief description if an anomaly
occurs or to inform you of a particular condition.
4.5" DIGITAL LOWER DISPLAY
275
MONITORING SYSTEM
10.25” COLOR DIGITAL TOUCHSCREEN
Messages will be displayed with a beep code and pilot lamp(s).
Beeper codes will be heard, and messages will be displayed to catch
your attention.
See table below for details.
NOTE:
Some of the listed pilot lamps and messages do not apply to all
models.
Pilot
Message
lamp
BEEPER
Description
Display
ON
Engine is overheating,
reduce
snowmobile
speed and run in loose
snow or stop engine
immediately and let
engine cool down.
4 short
HIGH
beeps
Check coolant level,
ENGINE
refer to Maintenance. If
every 30
TEMPERA
coolant level is correct
seconds
TURE
and
overheating
persists, contact an
authorized
BRP
snowmobile dealer. Do
not run the engine if
condition persists.
276
MONITORING SYSTEM
Pilot
Message
lamp
BEEPER
Description
Display
ON
Reduce speed or stop
engine. Let engine cool
down and restart. If
overheating
persists,
MUFFLER
contact an authorized
OVERHEAT
BRP
snowmobile
dealer. Do not run the
engine if
condition
persists.
Critical overheat. Stop
engine immediately and
let engine cool down.
Check coolant level,
HIGH
refer to Maintenance. If
ENGINE
coolant level is correct
TEMPERA
and
overheating
TURE
persists, contact an
authorized
BRP
Short
snowmobile dealer. Do
beeps
not run the engine if
repeating
condition persists.
rapidly
MUFFLER
Critical overheat. Stop
OVERHEAT
engine immediately and
let engine cool down. If
overheating
persists,
contact an authorized
ECM
BRP
snowmobile
OVERHEAT
dealer. Do not run the
engine if
condition
persists.
Indicate a low or high
4 short
battery
voltage
beeps
condition.
Visit
an
BATT VOLT
every 5
authorized
BRP
minutes
snowmobile dealer as
soon as possible.
277

MONITORING SYSTEM
Pilot
Message
lamp
BEEPER
Description
Display
ON
Engine fault, see an
authorized
BRP
4 short
CHECK
snowmobile
dealer,
beeps
ENGINE
repair shop or person of
your own choosing as
soon as possible.
Displayed when brake
is applied for more than
15 seconds while
—
—
throttle lever is
squeezed and vehicle is
moving at more than 5
km/h (3 mph).
Engine detonation
(RPM is limited when
this condition occurs).
- Ensure
recommended fuel is
used.
4 short
- Check fuel quality,
beeps
replace if
—
KNOCK
every 5
necessary.
minutes
- If fault still occurs,
contact an
authorized BRP
snowmobile dealer,
repair shop, or
person of your own
choosing.
4 short
Engine RPM limited for
beeps
—
REV LIMIT
protection when certain
every 5
faults occur.
minutes
Indicates that maximum
engine RPM is reached.
—
—
OVER REV
Check
clutch
calibration.
278
MONITORING SYSTEM
Pilot
Message
lamp
BEEPER
Description
Display
ON
Short
Shutdown procedure in
beeps
force due to engine
—
SHUTDOWN
repeating
overheating or fuel
rapidly
pump problem.
The belt temperature
2 short
reaches
75
C 167 F.
beeps
BELT
Message and beeps
—
every 10
OVERHEAT
disappears when the
seconds
temperature
drops
below 75 C 167 F.
If a critical condition is
2 short
detected over 1 minute.
beeps
BELT
Message and beeps
—
every 15
OVERLOAD
disappears if the driver
seconds
reduces critical style of
riding.
If
it
stills in critical
2 short
condition
over
10
beeps
BELT
—
minutes. Message will
every 10
OVERLOAD
not disappear until the
seconds
engine shutdown.
279
MONITORING SYSTEM
Pilot
Message
lamp
BEEPER
Description
Display
ON
2 short
Good key, vehicle ready
—
beeps
to operate.
Unable to read key (bad
Short
connection). Make sure
beeps,
WRONG KEY
the key is clean and
repeating
correctly snapped on
DESS
slowly
post.
Invalid key or key not
Short
programmed. Use the
beeps
BAD KEY
proper key for the
repeating
vehicle or have the
rapidly
programmed.
Fuel
level
sensor
—
—
problem.
(blin-
king)
Fault Codes
The fault codes can be displayed on the center display.
The fault codes are accessible in the setting menu.
Contact an authorized BRP snowmobile dealer for code signification.
280
WARRANTY
281
BRP INTERNATIONAL LIMITED WARRANTY:
2023 LYNX® SNOWMOBILES
SCOPE OF THE LIMITED WARRANTY
Bombardier Recreational Products Inc. (“BRP”) warrants its 2023
LYNX snowmobiles sold by distributors or dealers authorized by BRP
to distribute LYNX snowmobiles ("LYNX Distributor / Dealer") outside
of the fifty United States, Canada, members of the European Econom-
ic Area (which is comprised of the member states of the European
Union plus United Kingdom, Norway, Iceland and Liechtenstein)
(“EEA”), members states of the Commonwealth of the Independent
States (including Ukraine and Turkmenistan) (''CIS'') and Turkey, from
defects in material or workmanship for the period and under the condi-
tions described below.
Non-factory installed parts and accessories are not covered under this
limited warranty. Please refer to the applicable parts and accessories
limited warranty text.
This limited warranty will become null and void if: (1) the snowmobile
was used for racing or any other competitive activity, at any point,
even by a previous owner; or (2) the snowmobile has been altered or
modified in such a way so as to adversely affect its operation, perform-
ance or durability, or has been altered or modified to change its in-
tended use.
LIMITATIONS OF LIABILITY
TO THE EXTENT PERMITTED BY LAW, THIS WARRANTY IS
EXPRESSLY GIVEN AND ACCEPTED IN LIEU OF ANY AND
ALL OTHER WARRANTIES, EXPRESSED OR IMPLIED, IN-
CLUDING WITHOUT LIMITATION ANY WARRANTY OF MER-
CHANTABILITY OR FITNESS FOR A PARTICULAR PURPOSE.
TO THE EXTENT THAT THEY CANNOT BE DISCLAIMED, THE
IMPLIED WARRANTIES ARE LIMITED IN DURATION TO THE
LIFE OF THE EXPRESS WARRANTY. INCIDENTAL AND CON-
SEQUENTIAL DAMAGES ARE EXCLUDED FROM COVERAGE
UNDER THIS WARRANTY. SOME JURISDICTIONS DO NOT
ALLOW FOR THE DISCLAIMERS, LIMITATIONS AND EXCLU-
SIONS IDENTIFIED ABOVE, AS A RESULT, THEY MAY NOT
APPLY TO YOU. THIS WARRANTY GIVES YOU SPECIFIC
RIGHTS, AND YOU MAY ALSO HAVE OTHER LEGAL RIGHTS
WHICH MAY VARY FROM COUNTRY TO COUNTRY. (FOR
PRODUCTS PURCHASED IN AUSTRALIA REFER TO “FOR
PRODUCTS SOLD IN AUSTRALIA ONLY”, BELOW).
Neither the LYNX Distributor / Dealer nor any other person has been
authorized to make any affirmation, representation or warranty regard-
ing the product, other than those contained in this limited warranty,
and if made, shall not be enforceable against BRP.
282
BRP INTERNATIONAL LIMITED WARRANTY: 2023 LYNX® SNOWMOBILES
BRP reserves the right to modify this warranty at any time, being
understood that such modification will not alter the warranty conditions
applicable to the products sold while this warranty is in effect.
EXCLUSIONS – ARE NOT WARRANTED
The following are not warranted under this limited warranty under any
circumstances:
-
Normal wear and tear;
–
Routine maintenance items, tune ups, adjustments;
–
Damage caused by negligence or failure to provide proper mainte-
nance and/or storage, as described in the operator's guide;
-
Damage resulting from removal of parts, improper repairs, service,
maintenance, modifications or use of parts or accessories not
manufactured or approved by BRP which in its reasonable judge-
ment are either incompatible with the product or adversely affect
its operation, performance and durability, or resulting from repairs
done by a person that is not an authorized servicing BRP snowmo-
bile distributor/ dealer;
-
Damage caused by abuse, abnormal use, neglect, racing or opera-
tion of the product on surfaces other than snow, or operation of the
product in a manner inconsistent with the recommended operation
described in the Operator’s Guide;
-
Damage resulting from accident, submersion, fire, snow or water
ingestion, theft, vandalism or any act of God;
-
Operation with fuels, oils or lubricants which are not suitable for
use with the product (see the Operator’s Guide);
-
Damage resulting from rust, corrosion or exposure to the
elements;
-
Incidental or consequential damages, or damages of any kind in-
cluding without limitation towing, storage, transportation expenses,
telephone, rental, taxi, inconvenience, insurance coverage, loan
payments, loss of time, loss of income; or time missed for down-
time experience due to service work.
-
And damage resulting from studs installed on tracks if the installa-
tion does not conform to BRP’s instructions.
WARRANTY COVERAGE PERIOD
This warranty will be in effect from (1) the date of delivery to the first
retail consumer or (2) the date the product is first put into use, which-
ever occurs first and for a period of:
TWELVE (12) CONSECUTIVE MONTHS, for private or commercial
use owners. However, the warranty coverage period on a snowmobile
delivered between June 1st and December 1st of a given year will ex-
pire November 30th of the following year.
283
BRP INTERNATIONAL LIMITED WARRANTY: 2023 LYNX® SNOWMOBILES
The repair or replacement of parts or the performance of service under
this warranty does not extend the life of this warranty beyond its origi-
nal expiration date.
Note that the duration and any other modalities of the warranty cover-
age are subject to the applicable national or local legislation in the cus-
tomer's country.
FOR PRODUCTS SOLD IN AUSTRALIA ONLY
Nothing in these Warranty terms and conditions should be taken to ex-
clude, restrict or modify the application of any condition, warranty,
guarantee, right or remedy conferred or implied under the Competition
and Consumer Act 2010 (Cth), including the Australian Consumer
Law or any other law, where to do so would contravene that law, or
cause any part of these terms and conditions to be void. The benefits
given to you under this limited warranty are in addition to other rights
and remedies that you have under Australian law.
Our goods come with guarantees that cannot be excluded under the
Australian Consumer Law. You are entitled to a replacement or refund
for a major failure and for compensation for any other reasonably fore-
seeable loss or damage. You are also entitled to have the goods re-
paired or replaced if the goods fail to be of acceptable quality and the
failure does not amount to a major failure.
CONDITIONS TO HAVE WARRANTY COVERAGE
This warranty coverage is available only if each of the following condi-
tions has been fulfilled:
- The 2023 LYNX snowmobile must be purchased as new and un-
used by its first owner from a LYNX Distributor / Dealer authorized
to distribute LYNX snowmobiles in the country in which the sale
occurred;
- The BRP specified pre-delivery inspection process must be com-
pleted and documented;
- The product must have undergone proper registration by an au-
thorized LYNX Distributor / Dealer;
- The 2023 LYNX snowmobile must be purchased in the country or
union of countries in which the purchaser resides.
- Routine maintenance outlined in the operator’s guide must be
timely performed in order to maintain warranty coverage. BRP re-
serves the right to make warranty coverage contingent upon proof
of proper maintenance.
BRP will not honour this limited warranty to any private use owner or
commercial use owner if one of the preceding conditions has not been
met. Such limitations are necessary in order to allow BRP to preserve
both the safety of its products, and also that of its consumers and the
general public.
284
BRP INTERNATIONAL LIMITED WARRANTY: 2023 LYNX® SNOWMOBILES
WHAT TO DO TO OBTAIN WARRANTY
COVERAGE
The customer must cease using the snowmobile upon the appearance
of an anomaly. The customer must notify a servicing LYNX Distributor
/ Dealer within two (2) days of the appearance of a defect, and provide
it with reasonable access to the product and reasonable opportunity to
repair it. The customer must also present to the authorized LYNX Dis-
tributor / Dealer, proof of purchase of the product and must sign the re-
pair / work order prior to starting the repair in order to validate the
warranty repair. All parts replaced under this limited warranty become
the property of BRP.
Note that the notification period is subject to the applicable national or
local legislation in customer's country.
WHAT BRP WILL DO
To the extent permitted by law, BRP’s obligations under this warranty
are limited to, at its sole discretion, repairing parts found defective
under normal use, maintenance and service, or replacing such parts
with new genuine LYNX parts without charge for parts and labour, at
any authorized LYNX Distributor / Dealer during the warranty cover-
age period under the conditions described herein. BRP’s responsibility
is limited to making the required repairs or replacements of parts. No
claim of breach of warranty shall be cause for cancellation or rescis-
sion of the sale of the snowmobile to the owner. You may have other
legal rights which may vary from country to country.
In the event that service is required outside of the country of original
sale, the owner will bear responsibility for any additional charges due
to local practices and conditions, such as, but not limited to, freight, in-
surance, taxes, license fees, import duties, and any and all other finan-
cial charges, including those levied by governments, states, territories
and their respective agencies.
BRP reserves the right to improve or modify products from time to time
without assuming any obligation to modify products previously
manufactured.
TRANSFER
If the ownership of a product is transferred during the warranty cover-
age period, this limited warranty, subject to its terms and conditions,
shall also be transferred and be valid for the remaining coverage peri-
od provided BRP or an authorized LYNX Distributor / Dealer receives
a proof that the former owner agreed to the transfer of ownership, in
addition to the coordinates of the new owner.
285
BRP INTERNATIONAL LIMITED WARRANTY: 2023 LYNX® SNOWMOBILES
CONSUMER ASSISTANCE
In the event of a controversy or a dispute in connection with this limited
warranty, BRP suggests that you try to resolve the issue at the LYNX
Distributor / Dealer level. We recommend discussing the issue with
the authorized LYNX Distributor / Dealer's service manager or owner.
If the matter still remains unresolved, contact BRP by filling out the
customer contact form at www.brp.com or contact BRP by mail at one
of the addresses listed under the CONTACT US section of this guide.
286
BRP LIMITED WARRANTY FOR THE
EUROPEAN ECONOMIC AND THE
COMMONWEALTH OF THE INDEPENDENT
STATES (CIS) AREAS AND TURKEY : 2023
LYNX® SNOWMOBILES
SCOPE OF THE LIMITED WARRANTY
Bombardier Recreational Products Inc. (“BRP”) warrants its 2023
LYNX snowmobiles sold by distributors or dealers authorized by BRP
to distribute LYNX snowmobiles ("LYNX Distributor / Dealer") in mem-
ber states of the European Economic Area (which is comprised of the
member states of the European Union plus the United Kingdom, Nor-
way, Iceland and Liechtenstein) ("EEA"), in member states of the
Commonwealth of the Independent States (including Ukraine and
Turkmenistan) (''CIS'') and Turkey from defects in material or work-
manship for the period and under the conditions described below.
Non-factory installed parts and accessories are not covered under this
limited warranty. Please refer to the applicable parts and accessories
limited warranty text.
This limited warranty will become null and void if: (1) the snowmobile
was used for racing or any other competitive activity, at any point,
even by a previous owner; or (2) the snowmobile has been altered or
modified in such a way so as to adversely affect its operation, perform-
ance or durability, or has been altered or modified to change its in-
tended use.
LIMITATIONS OF LIABILITY
TO THE EXTENT PERMITTED BY LAW, THIS WARRANTY IS
EXPRESSLY GIVEN AND ACCEPTED IN LIEU OF ANY AND
ALL OTHER WARRANTIES, EXPRESSED OR IMPLIED, IN-
CLUDING WITHOUT LIMITATION ANY WARRANTY OF MER-
CHANTABILITY OR FITNESS FOR A PARTICULAR PURPOSE.
TO THE EXTENT THAT THEY CANNOT BE DISCLAIMED, THE
IMPLIED WARRANTIES ARE LIMITED IN DURATION TO THE
LIFE OF THE EXPRESS WARRANTIES. INCIDENTAL AND
CONSEQUENTIAL DAMAGES ARE EXCLUDED FROM COVER-
AGE UNDER THIS WARRANTY. SOME JURISDICTIONS DO
NOT ALLOW FOR THE DISCLAIMERS, LIMITATIONS AND EX-
CLUSIONS IDENTIFIED ABOVE, AS A RESULT, THEY MAY
NOT APPLY TO YOU. THIS WARRANTY GIVES YOU SPECIFIC
RIGHTS, AND YOU MAY ALSO HAVE OTHER LEGAL RIGHTS
WHICH MAY VARY FROM COUNTRY TO COUNTRY.
Neither the LYNX Distributor / Dealer nor any other person has been
authorized to make any affirmation, representation or warranty regard-
ing the product, other than those contained in this limited warranty,
and if made, shall not be enforceable against BRP.
287
BRP reserves the right to modify this warranty at any time, being
understood that such modification will not alter the warranty conditions
applicable to the products sold while this warranty is in effect.
EXCLUSIONS – ARE NOT WARRANTED
The following are not warranted under this limited warranty under any
circumstances:
-
Normal wear and tear;
–
Routine maintenance items, tune ups, adjustments;
–
Damage caused by negligence or failure to provide proper mainte-
nance and/or storage, as described in the operator's guide;
-
Damage resulting from removal of parts, improper repairs, service,
maintenance, modifications or use of parts or accessories not
manufactured or approved by BRP which in its reasonable judge-
ment are either incompatible with the product or adversely affect
its operation, performance and durability, or resulting from repairs
done by a person that is not an authorized servicing BRP snowmo-
bile distributor/ dealer;
-
Damage caused by abuse, abnormal use, neglect, racing or opera-
tion of the product on surfaces other than snow, or operation of the
product in a manner inconsistent with the recommended operation
described in the Operator’s Guide;
-
Damage resulting from accident, submersion, fire, snow or water
ingestion, theft, vandalism or any act of God;
-
Operation with fuels, oils or lubricants which are not suitable for
use with the product (see the Operator’s Guide);
-
Damage resulting from rust, corrosion or exposure to the
elements;
-
Incidental or consequential damages, or damages of any kind in-
cluding without limitation towing, storage, transportation expenses,
telephone, rental, taxi, inconvenience, insurance coverage, loan
payments, loss of time, loss of income; or time missed for down-
time experience due to service work.
-
And damage resulting from studs installed on tracks if the installa-
tion does not conform to BRP’s instructions.
WARRANTY COVERAGE PERIOD
This warranty will be in effect from (1) the date of delivery to the first
retail consumer or (2) the date the product is first put into use, which-
ever occurs first and for a period of:
TWENTY-FOUR (24) CONSECUTIVE MONTHS, for private use own-
ers and TWELVE (12) CONSECUTIVE MONTHS for commercial use
owners. However, the warranty coverage period on a snowmobile de-
livered between June 1st and December 1st of a given year will expire
November 30th of the applicable year. A snowmobile is used commer-
cially when it is used in connection with generating income or any work
288
or employment during any part of the warranty period. A snowmobile
is also used commercially when, at any point during the warranty peri-
od, it has commercial tags or is licensed for commercial use.
The repair or replacement of parts or the performance of service under
this warranty does not extend the life of this warranty beyond its origi-
nal expiration date.
Note that the duration and any other modalities of the warranty cover-
age are subject to the applicable national or local legislation in the cus-
tomer's country.
CONDITIONS TO HAVE WARRANTY COVERAGE
This warranty coverage is available only if each of the following condi-
tions has been fulfilled:
- The 2023 LYNX snowmobile must be purchased as new and un-
used by its first owner from a LYNX Distributor / Dealer authorized
to distribute LYNX products in the country in which the sale
occurred;
- The BRP specified pre-delivery inspection process must be com-
pleted and documented;
- The product must have undergone proper registration by an au-
thorized LYNX Distributor / Dealer;
- The 2023 LYNX snowmobile must be purchased within the EEA by
an EEA resident, in the CIS for residents of the countries com-
prised in such area and in Turkey for residents of Turkey; and
- Routine maintenance outlined in the operator’s guide must be
timely performed in order to maintain warranty coverage. BRP re-
serves the right to make warranty coverage contingent upon proof
of proper maintenance.
BRP will not honour this limited warranty to any private use owner or
commercial use owner if one of the preceding conditions has not been
met. Such limitations are necessary in order to allow BRP to preserve
both the safety of its products, and also that of its consumers and the
general public.
WHAT TO DO TO OBTAIN WARRANTY
COVERAGE
The customer must cease using the snowmobile upon the appearance
of an anomaly. The customer must notify a servicing LYNX Distributor
/ Dealer within two (2) months of the appearance of a defect, and pro-
vide it with reasonable access to the product and reasonable opportu-
nity to repair it. The customer must also present to the authorized
LYNX Distributor / Dealer, proof of purchase of the product and must
sign the repair / work order prior to starting the repair in order to
289
validate the warranty repair. All parts replaced under this limited war-
ranty become the property of BRP.
Note that the notification period is subject to the applicable national or
local legislation in customer's country.
WHAT BRP WILL DO
To the extent permitted by law, BRP’s obligations under this warranty
are limited to, at its sole discretion, repairing parts found defective
under normal use, maintenance and service, or replacing such parts
with new genuine LYNX parts without charge for parts and labour, at
any authorized LYNX Distributor / Dealer during the warranty cover-
age period under the conditions described herein. BRP’s responsibility
is limited to making the required repairs or replacements of parts. No
claim of breach of warranty shall be cause for cancellation or rescis-
sion of the sale of the snowmobile to the owner. You may have other
legal rights which may vary from country to country.
In the event that service is required outside of the EEA, CIS or Turkey,
the owner will bear responsibility for any additional charges due to lo-
cal practices and conditions, such as, but not limited to, freight, insur-
ance, taxes, license fees, import duties, and any and all other financial
charges, including those levied by governments, states, territories and
their respective agencies.
BRP reserves the right to improve or modify products from time to time
without assuming any obligation to modify products previously
manufactured.
TRANSFER
If the ownership of a product is transferred during the warranty cover-
age period, this limited warranty, subject to its terms and conditions,
shall also be transferred and be valid for the remaining coverage peri-
od provided BRP or an authorized LYNX Distributor / Dealer receives
a proof that the former owner agreed to the transfer of ownership, in
addition to the coordinates of the new owner.
CONSUMER ASSISTANCE
In the event of a controversy or a dispute in connection with this limited
warranty, BRP suggests that you try to resolve the issue at the LYNX
Distributor / Dealer level. We recommend discussing the issue with
the authorized LYNX Distributor / Dealer's service manager or owner.
If the matter still remains unresolved, contact BRP by filling out the
customer contact form at www.brp.com or contact BRP by mail at one
of the addresses listed under the CONTACT US section of this guide.
290
ADDITIONAL TERMS AND CONDITIONS FOR FRANCE ONLY
The following terms and conditions are applicable to products sold in
France only:
The seller shall deliver goods that are complying with the contract and
shall be responsible for defects existing upon delivery. The seller shall
also be responsible for defects resulting from packaging, assembling
instructions or the installation when it is its responsibility per the con-
tract or if accomplished under its responsibility. To be compliant with
the contract, the good shall:
1. Be fit for normal use for goods similar thereto and, if applicable:
- Correspond to the description provided by the seller and have
the qualities presented to the buyer though sample or model;
- Have the qualities that a buyer may legitimately expect consid-
ering the public declarations of the seller, the manufacturer of
its representative, including in advertising or labeling; or
2. Have the characteristics mutually agreed upon as between the par-
ties or be fit for the specific use intended by the buyer and brought
to the attention of the seller and which accepted.
The action for failure to comply is prescribed after two years after de-
livery of the goods. The seller is responsible for the warranty for hid-
den defects of the good sold if such hidden defects are rendering the
good unfit for the intended use, or if they diminish its use in such a
way that the buyer would not have acquired the good or would have
given a lesser price, had he known. The action for such hidden defects
shall be taken by the buyer within 2 years of the discovery of the
defect.
291
BRP LIMITED WARRANTY USA AND
CANADA: 2023 LYNX® SNOWMOBILES
SCOPE OF THE LIMITED WARRANTY
Bombardier Recreational Products Inc. (“BRP”) warrants its 2023
LYNX snowmobiles sold by authorized BRP dealers (as defined be-
low) in the United States of America (“USA”) and in Canada from de-
fects in material or workmanship for the period and under the
conditions described below. This limited warranty will become null and
void if: (1) the snowmobile was used for racing or any other competi-
tive activity, at any point, even by a previous owner; or (2) the snow-
mobile has been altered or modified in such a way so as to adversely
affect its operation, performance or durability, or has been altered or
modified to change its intended use.
Non-factory installed parts and accessories are not covered under this
limited warranty. Please refer to the applicable parts and accessories
limited warranty text.
LIMITATIONS OF LIABILITY
THIS WARRANTY IS EXPRESSLY GIVEN AND ACCEPTED IN
LIEU OF ANY AND ALL OTHER WARRANTIES, EXPRESSED
OR IMPLIED, INCLUDING WITHOUT LIMITATION ANY WAR-
RANTY OF MERCHANTABILITY OR FITNESS FOR A PARTIC-
ULAR PURPOSE. TO THE EXTENT THAT THEY CANNOT BE
DISCLAIMED, THE IMPLIED WARRANTIES ARE LIMITED IN
DURATION TO THE LIFE OF THE EXPRESS WARRANTY. IN-
CIDENTAL AND CONSEQUENTIAL DAMAGES ARE EX-
CLUDED FROM COVERAGE UNDER THIS WARRANTY. SOME
STATES/PROVINCES DO NOT ALLOW FOR THE DISCLAIM-
ERS, LIMITATIONS AND EXCLUSIONS IDENTIFIED ABOVE,
AS A RESULT, THEY MAY NOT APPLY TO YOU. THIS WAR-
RANTY GIVES YOU SPECIFIC RIGHTS, AND YOU MAY ALSO
HAVE OTHER LEGAL RIGHTS WHICH MAY VARY FROM
STATE TO STATE, OR PROVINCE TO PROVINCE.
Neither the distributor, any BRP dealer nor any other person has been
authorized to make any affirmation, representation or warranty regard-
ing the product, other than those contained in this limited warranty,
and if made, shall not be enforceable against BRP. BRP reserves the
right to modify this limited warranty at any time, being understood that
such modification will not alter the warranty conditions applicable to
the products sold while this warranty is in effect.
EXCLUSIONS – ARE NOT WARRANTED
The following are not warranted under any circumstances:
- Normal wear and tear;
- Routine maintenance items, tune ups, adjustments;
292
BRP LIMITED WARRANTY USA AND CANADA: 2023 LYNX® SNOWMOBILES
- Damage caused by failure to provide proper maintenance and/or
storage, as described in the Operator's Guide;
- Damage resulting from removal of parts, improper repairs, service,
maintenance, modifications or use of parts or accessories not
manufactured or approved by BRP or resulting from repairs done
by a person that is not an authorized servicing BRP dealer;
- Damage caused by abuse, abnormal use, neglect, use of the prod-
uct on surfaces other than snow, or operation of the product in a
manner inconsistent with the recommended operation described in
the Operator’s Guide;
- Damage resulting from accident, submersion, fire, theft, vandalism
or any act of God;
- Operation with fuels, oils or lubricants which are not suitable for
use with the product (see the Operator’s Guide);
- Snow or water ingestion;
- Incidental or consequential damages, or damages of any kind in-
cluding without limitation towing, storage, telephone, rental, taxi, in-
convenience, insurance coverage, loan payments, loss of time,
loss of income; and
- Damage resulting from studs installed on tracks if the installation
does not conform to BRP’s instructions.
WARRANTY COVERAGE PERIOD
This limited warranty will be in effect from the date of delivery to the
first retail consumer or the date the product is first put into use, which-
ever occurs first and for the following period:
TWELVE (12) CONSECUTIVE MONTHS, for private or commercial
use owners. However, the warranty coverage period on a snowmobile
delivered between June 1st and December 1st of a given year will ex-
pire November 30th of the following year.
For emission-related components; please also refer to the US EPA
EMISSION-RELATED WARRANTY contained herein.
The repair or replacement of parts or the performance of service under
this warranty does not extend the life of this warranty beyond its origi-
nal expiration date.
CONDITIONS REQUIRED FOR WARRANTY
COVERAGE
This warranty coverage is available only if each of the following condi-
tions has been fulfilled:
- The 2023 LYNX snowmobile must be purchased as new and un-
used by its first owner from a BRP dealer authorized to distribute
LYNX snowmobiles in the country in which the sale occurred
(“BRP dealer”);
293
BRP LIMITED WARRANTY USA AND CANADA: 2023 LYNX® SNOWMOBILES
- The BRP specified pre-delivery inspection process must be com-
pleted and documented and signed by the purchaser;
- The 2023 LYNX snowmobile must have undergone proper regis-
tration by an authorized BRP dealer;
- The 2023 LYNX snowmobile must be purchased in the country in
which the purchaser resides; and
- Routine maintenance outlined in the Operator’s Guide must be
timely performed in order to maintain warranty coverage. BRP re-
serves the right to make warranty coverage contingent upon proof
of proper maintenance.
BRP will not honor this limited warranty to any private use owner or
commercial use owner if one of the preceding conditions has not been
met. Such limitations are necessary in order to allow BRP to preserve
both the safety of its products, and also that of its consumers and the
general public.
WHAT TO DO TO OBTAIN WARRANTY
COVERAGE
The customer must cease using the snowmobile upon the appearance
of an anomaly. The customer must notify a servicing BRP dealer with-
in three (3) days of the appearance of a defect, and provide it with rea-
sonable access to the product and reasonable opportunity to repair it.
The customer must also present to the authorized BRP dealer, proof
of purchase of the product and must sign the repair/work order prior to
starting the repair in order to validate the warranty repair. All parts re-
placed under this limited warranty become the property of BRP.
WHAT BRP WILL DO
BRP’s obligations under this warranty are limited to, at its sole discre-
tion, repairing parts found defective under normal use, maintenance
and service, or replacing such parts with new genuine LYNX parts
without charge for parts and labor , at any authorized BRP dealer dur-
ing the warranty coverage period under the conditions described here-
in. No claim of breach of warranty shall be cause for cancellation or
rescission of the sale of the snowmobile to the owner.
In the event that service is required outside of the country of original
sale, the owner will bear responsibility for any additional charges due
to local practices and conditions, such as, but not limited to, freight, in-
surance, taxes, license fees, import duties, and any and all other finan-
cial charges, including those levied by governments, states, territories
and their respective agencies.
BRP reserves the right to improve or modify products from time to time
without assuming any obligation to modify products previously
manufactured.
294
BRP LIMITED WARRANTY USA AND CANADA: 2023 LYNX® SNOWMOBILES
TRANSFER
If the ownership of a product is transferred during the warranty cover-
age period, this limited warranty, subject to its terms and conditions,
shall also be transferred and be valid for the remaining coverage peri-
od provided BRP or an authorized LYNX Distributor/ Dealer receives a
proof that the former owner agreed to the transfer of ownership, in ad-
dition to the coordinates of the new owner.
CONSUMER ASSISTANCE
In the event of a controversy or a dispute in connection with this limited
warranty, BRP suggests that you try to resolve the issue at the dealer-
ship level. We recommend discussing the issue with the authorized
dealer's service manager or owner.
If the matter still remains unresolved, contact BRP by filling out the
customer contact form at www.brp.com or contact BRP by mail at one
of the addresses listed under the CONTACT US section of this guide.
295
US EPA EMISSION-RELATED WARRANTY
Bombardier Recreational Products Inc. (“BRP”) warrants to the ulti-
mate purchaser and each subsequent purchaser that this new engine,
including all parts of its exhaust emission-control system and its evap-
orative emission-control system, meets two conditions:
1. It is designed, built, and equipped so it conforms at the time of sale
to the ultimate purchaser with the requirements of 40 CFR 1051
and 40 CFR 1060.
2. It is free from defects in materials and workmanship that may keep
it from meeting the requirements of 40 CFR 1051 and 40 CFR
1060.
Where a warrantable condition exists, BRP will repair or replace, as it
elects, any part or component with a defect in materials or workman-
ship that would increase the engine’s emissions of any regulated pol-
lutant within the stated warranty period at no cost to the owner,
including expenses related to diagnosing and repairing or replacing
emission-related parts. All defective parts replaced under this warranty
become the property of BRP.
For all emission-related warranty claims, BRP is limiting the diagnosis
and repair of emission-related parts to the authorized LYNX dealers,
unless for emergency repairs as required by item 2 of the following
list.
As a certifying manufacturer, BRP will not deny emission-related war-
ranty claims based on any of the following:
1. Maintenance or other service BRP or BRP's authorized facilities
performed.
2. Engine/equipment repair work that an operator performed to cor-
rect an unsafe, emergency condition attributable to BRP as long as
the operator tries to restore the engine/equipment to its proper con-
figuration as soon as possible.
3. Any action or inaction by the operator unrelated to the warranty
claim.
4. Maintenance that was performed more frequently than BRP
specify.
5. Anything that is BRP fault or responsibility.
6. The use of any fuel that is commonly available where the equip-
ment operates unless BRP written maintenance instructions state
that this fuel would harm the equipment’s emission control system
and operators can readily find the proper fuel. See maintenance in-
formation section and fuel requirements of fueling section.
Emission-Rellated Warranty Periiod
The emission-related warranty is valid for the following period which-
ever comes first:
296
US EPA EMISSION-RELATED WARRANTY
Kilo
hours
months
meters
Exhaust emission-related
200
30
4000
components
Evaporative emission-related
N/A
24
N/A
components
Components Covered
The emission-related warranty covers all components whose failure
would increase an engine’s emissions of any regulated pollutant, in-
cluding the following listed components:
1.
For exhaust emissions, emission-related components include any
engine parts related to the following systems:
- Air-induction system
- Fuel system
- Ignition system
- Exhaust gas recirculation systems
2.
The following parts are also considered emission-related compo-
nents for exhaust emissions:
- Aftertreatment devices
- Crankcase ventilation valves
- Sensors
- Electronic control units
3.
The following parts are considered emission-related components
for evaporative emissions:
- Fuel tank
- Fuel cap
- Fuel line
- Fuel line fittings
- Clamps*
- Pressure relief valves*
- Control valves*
- Control solenoids*
- Electronic controls*
- Vacuum control diaphragms*
- Control cables*
- Control linkages*
- Purge valves
- Vapor hoses
- Liquid/vapor separator
- Carbon canister
- Canister mounting brackets
297
US EPA EMISSION-RELATED WARRANTY
- Carburetor purge port connector
NOTE:
*As related to the evaporative emission control system
4. Emission-related components also include any other part whose
only purpose is to reduce emissions or whose failure will increase
emissions without significantly degrading engine/equipment
performance.
Limited Appllicabillity
As a certifying manufacturer, BRP may deny emission-related war-
ranty claims for failures that have been caused by the owner’s or oper-
ator’s improper maintenance or use, by accidents for which the
manufacturer has no responsibility, or by acts of God. For example, an
emission-related warranty claim need not be honored for failures that
have been directly caused by the operator’s abuse of the engine/
equipment or the operator’s use of the engine/equipment in a manner
for which it was not designed and are not attributable to the manufac-
turer in anyway.
If you have any question regarding your warranty rights and responsi-
bility or for the name and location of the nearest authorized BRP deal-
er, you should contact BRP by filling out the customer contact form at
www.brp.com or contact BRP by mail at one of the addresses listed
under the CONTACT US section of this guide, or call at
1-888-272-9222.
298
CUSTOMER
INFORMATION
299
DATA PRIVACY INFORMATION
Bombardier Recreational Products inc., its affiliates and subsidiaries
(“BRP”) is committed to protecting your privacy and support a general
policy of openness about how we collect, use and disclose your per-
sonal information in the course of managing our relationship with you.
More details can be found by visiting BRP’s Privacy Policy at:
https://brp. com/en/privacy-policy. html or by scanning the QR
Code below.
Please be assured that we have appropriate security measures in
place to ensure that your personal information is protected against
loss and unauthorized access.
Your personal information that may be collected by BRP, directly from
you or from authorized dealers or authorized third parties, includes:
- Contact, Demographic & Registration Information (e.g., name,
full address, phone number, email, gender, ownership history, lan-
guage of communication)
- Vehicle Information (e.g., serial number, purchase and delivery
date, unit usage, vehicle location and movements)
- Third Party Information (e.g., information received from BRP
partners, joint-marketing activities information, social media)
- Technological Information (e.g., IP address, type of device, op-
erating system, browser type, webpages you view, cookies and
similar technologies when you use BRP or dealers’ websites or
mobile application)
- Interaction with BRP Information (e.g., information collected
when you call BRP’s in-house sales representatives, buy items on
a BRP web Site, sign up for BRP emails, participate in BRP-spon-
sored contests and sweepstakes or attend BRP-sponsored
events)
- Transactional Information (e.g., information necessary to handle
returns, payment information when you purchase our products or
services through our websites or mobile applications and other is-
sues related to your purchase of BRP products)
This information may be used and processed for the following
purposes:
- Safety & Security
- Customer Support for Sales & After Sales (e.g., complete or follow
up with you about your purchase or maintenance)
- Registration & Warranty
- Communication (e.g., sending you a BRP satisfaction survey)
- Online Behavioural Advertising, Profiling and Location-Based
Services
(e.g., offer customized experience)
- Compliance & Dispute Resolution
- Marketing & Advertising
- Assistance (e.g., help with any delivery issues, handle returns, and
other issues related to your purchase of BRP products).
300
DATA PRIVACY INFORMATION
We also may use personal information to generate aggregated or stat-
istical data that no longer identifies you personally.
Your personal information may be disclosed to the following:
BRP, BRP’s authorized dealerships, distributors, service pro-
viders, advertising & market research partners and other author-
ized third parties.
We may receive information about you from diverse sources, including
third parties, such as BRP’s authorized dealerships and partners, with
whom we offer services or engage in joint-marketing activities. We
may also receive information about you from social media platforms
such as Facebook and Twitter, when you interact with us on those
platforms.
Depending on the circumstances, your personal information may be
communicated outside the region where you reside. Your personal in-
formation is retained only for as long as necessary for the purpose for
which we obtained it and according to our retention policies.
To exercise your data privacy rights (e.g. right of access, right of recti-
fication), to withdraw your consent in order to be removed from the ad-
dress list for marketing purposes or for the satisfaction survey or for
general data privacy questions, please contact BRP’s Data Protection
Officer at or by mail at privacyofficer@brp.com or by mail at:
BRP Legal Service, 726 St-Joseph, Valcourt, Quebec, Canada, J0E
2L0.
When BRP processes your personal information, they do so in
compliance with its Privacy Policy available at: https://www.brp.
com/en/privacy-policy.html or by using the following
QR Code.
301
CONTACT US
Arteparc Bâtiment B
Route de la côte d'Azur,
13 590 Meyreuil
Asiia Paciific
Australia
Norway
Level 26
Ingvald Ystgaardsvei 15
477 Pitt Street
N-7484 Trondheim
Sydney, NSW 2020
Salg, marketing, ettermarked
Level 26
Sweden
477 Pitt Street
Spinnvägen 15
Sydney, NSW 2020
903 61 Umeå
Australia
Sweden 90821
China
Switzerland
Room 301, Building 6,
Avenue d’Ouchy 4-6
10 Hengshan Road,
1006 Lausanne
Xuhui District,
Shanghai 200030
Latiin Ameriica
Japan
Brazil
21F Shinagawa East One
Av. James Clerck Maxwell, 230
Tower
Campinas, Sao Paulo
2-16-1 Konan, Minato-ku-ku,
CEP 13069-380
Tokyo 108-0075
Mexico
New Zealand
Av. Ferrocarril 202
Suite 1.6, 2-8 Osborne Street,
Parque Industrial Querétaro
Newmarket, Auckland 2013
Santo Rosa Jauregui, Querétaro
C.P. 76220
Europe, Middle East
and Africa
North Ameriica
Belgium
Canada
Oktrooiplein 1
3200A, rue King Ouest,
9000 Gent
Suite 300
Sherbrooke (Québec) J1L 1C9
Czech Republic
Stefanikova 43a
United States of America
Prague 5
10101 Science Drive
150 00
Sturtevant, Wisconsin
53177
Germany
Itterpark 11
40724 Hilden
Finland
Isoaavantie 7
PL 8040
96101 Rovaniemi
France
302
CHANGE OF ADDRESS/OWNERSHIP
If your address has changed or if you are the new owner of the snow-
mobile, be sure to notify BRP by either:
- Notifying an authorized BRP snowmobile dealer or distributor.
- North America Only: calling at 1 888 272-9222.
- Mailing one of the change of address cards on the following pages
at one of the BRP addresses indicated in the Contact Us section of
this guide.
In case of change of ownership, please join a proof that the former
owner agreed to the transfer.
Notifying BRP, even after the expiration of the limited warranty, is very
important as it enables BRP to reach the snowmobile owner if neces-
sary, like when safety recalls are initiated. It is the owner’s responsibil-
ity to notify BRP.
STOLEN UNITS: If your personal snowmobile is stolen, you should
notify BRP or an authorized BRP snowmobile dealer. We will ask you
to provide your name, address, phone number, the vehicle identifica-
tion number and the date it was stolen.
303