Vauxhall Vivaro C (2023 year). Manual in english - page 5


  Index      Manuals     Vauxhall Vivaro C (2023 year). Manual in english


Search            copyright infringement  


Content      ..     3      4      5      6     ..


Vauxhall Vivaro C (2023 year). Manual in english - page 5


134

Infotainment system

Multimedia Navi

Control panel
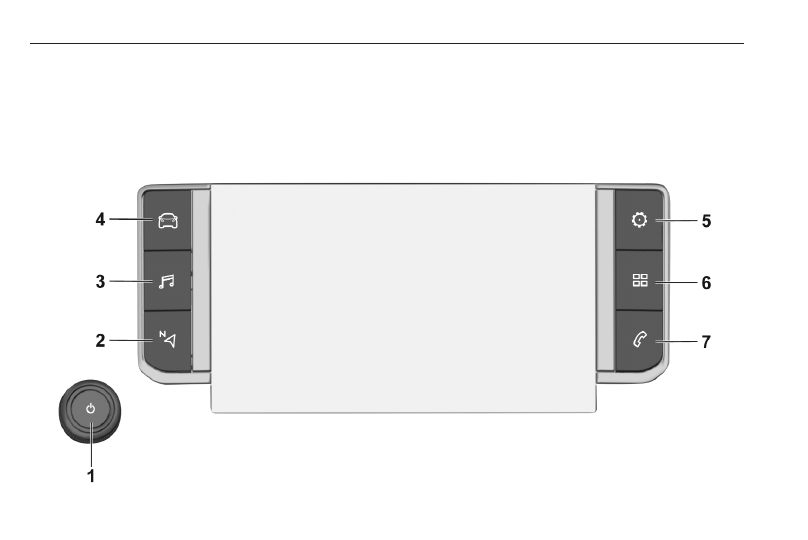
Infotainment system

135

1

)

If switched off: switch

power on / off
If switched on: mute system
Turn: adjust volume

2

c

Display embedded

navigation map ................... 151

3

b

Open audio menu:
Radio ................................... 151
External devices (USB,

Bluetooth) ............................ 148

4

_

Open vehicle settings menu 116

5

:

Open settings menu

6

d

Open apps menu ................ 148

7

a

Open phone menu .............. 164

Steering wheel controls

1

Y

 / 

Z

Toggle between the

menus in the Driver

Information Centre

2

+
Increase volume

3

8

Mute the audio

4


Decrease volume

1

Y

 / 

Z

Play next or previous radio

station / song

2

a

SRC

Toggle between the audio

sources or open phone

menu if phone connected

3

Y

Activate or deactivate

speech recognition

4

LIST
Display radio stations list

or folder list

136

Infotainment system

Steering column controls

1

Y

 / 

Z

Play next or previous radio

station / song

2

LIST
Display radio stations list

or folder list

3

OK
Confirm a selection in the

Info Display

4

SRC/TEL
Toggle between the audio

sources or open phone

menu if phone connected

5

+
Increase volume

6


Decrease volume
Long press: mute the audio

Control elements

The Infotainment system is operated

via function buttons, a touch screen

and menus that are shown on the

display.
Inputs are made optionally via:

● the control panel on the

Infotainment system

● the touchscreen
● the steering wheel controls
● the speech recognition 

3

 162

Switching the Infotainment

system on or off

Press 

)

. After switching on, the last

selected Infotainment source

becomes active.

Notice

Some functions of the Infotainment

system are only available if ignition

is switched on or engine is running.

Infotainment system

137

Automatic switch-off

If the Infotainment system has been

switched on pressing 

)

 while the

ignition is switched off, it will switch off

again automatically when the Eco

mode becomes active.

Setting the volume

Turn 

)

. The current setting is shown

on the display.
When the Infotainment system is

switched on, the last selected volume

is set.

Speed compensated volume

When the speed compensated

volume is activated, the volume is

adapted automatically to make up for

the road and wind noise as you drive.

Mute

Press 

)

 to mute the Infotainment

system.
To cancel the mute function,

press 

)

 again. The last selected

volume is set again.

Modes of operation

Audio-Media

Press 

b

 to display the main menu of

the last selected audio mode.

Changing the media source

Select SOURCES to display the

menu for media source selection.

Select the desired media source.
For a detailed description of:

● Radio functions 

3

 145

● External devices 

3

 148

Navigation

Press 

c

 to display the navigation

map showing the area around the

current location.

138

Infotainment system

For a detailed description of basic

functions of the navigation system

3

 151.

Navigation menu

Select MENU to display the

navigation menu.

The navigation menu serves as

central entry point for:

● Address search and input
● Defining trips with several

waypoints

● Defining criteria for route

guidance

● Cancelling and resuming route

guidance

Navigation 

3

 151.

Phone

Before the phone function can be

used, a connection has to be

established between the Infotainment

system and the mobile phone.

For a detailed description of

preparing and establishing a

Bluetooth connection between the

Infotainment system and a mobile

phone 

3

 164.

If the mobile phone is connected,

press 

a

 to display the main menu of

the phone function.

For a detailed description of mobile

phone operation via the Infotainment

system 

3

 164.

Network and connected services

Press 

d

 and then select OPTIONS

to display the Bluetooth, network and

connected services settings.

Infotainment system

139

To connect the vehicle to a Wi-Fi

network, touch 

y

. A list of all

available Wi-Fi networks is displayed.
It is also possible to share the Wi-Fi

connection for other devices.
To update the service and connection

status, go to the menu for connected

services 

z

 and touch 

R

.

To use the connected services, make

sure that data sharing and the vehicle

position are activated in the privacy

menu in the System settings.

Apps

To show specific apps of your

smartphone on the display of the

Infotainment system, connect your

smartphone.
Press 

d

 to display the main menu of

the apps mode.
Touch Apple CarPlay or

Android Auto. A menu with different

selectable apps is displayed.
For a detailed description 

3

 148.

Settings

Press 

:

 and then select Audio

settings to display the respective

menu.

Press 

:

 and then OPTIONS to

display a menu for various system-

related settings.

Vehicle settings

Select 

_

 to open a menu for various

vehicle-related settings.
Vehicle personalisation 

3

 116.

140

Infotainment system

Menu operation

Selecting or activating a screen

button or menu item

Touch a screen button or menu item.

Notice

Most icons displayed in a menu, like

e

 or 

d

 in the illustrated example,

serve as screen buttons that initiate

certain actions if you touch them.

The corresponding system function is

activated, a message is shown, or a

submenu with further options is

displayed.

3

 and 

A

 / OK screen buttons

When operating the menus, touch

3

 in the respective submenu to

return to the next higher menu level.
When no 

3

 screen button is

displayed, you are on the top level of

the respective menu.
After selecting menu items or

performing settings in a menu, touch

A

 / OK to confirm your settings.

Otherwise all performed selections or

settings will be lost.

Shortcuts to important menus

The texts and icons displayed in the

top line, of e.g. the navigation main

menu, serve as shortcuts to some

important menus. For example, touch

the station name to open the station

list menu.

Infotainment system

141

Scrolling a list

If there are more items available than

presentable on the screen, the list

must be scrolled.
To scroll through a list of menu items,

you may optionally:

● Place your finger anywhere on

the screen and move it upwards

or downwards.

Notice

Constant pressure must be applied

and the finger must be moved at a

constant speed.

● Touch 

S

 or 

R

 at the top or

bottom of the scroll bar.

● Touch anywhere on the guiding

line of the scroll bar.

● Move the slider of the scroll bar

up and down with your finger.

Updating a list

Touch 

U

 to manually update, e.g.,

station lists, contacts lists or

destination lists.

Input fields and keyboards

Input fields are indicated by 

>

.

Touch the input field to open a

keyboard for text or number input.

Depending on the application or

function currently active, different

keyboards are displayed.
Keyboards for text input

Keyboards for text input may contain

several input fields. To enable a field

for text input, touch it.
To enter a character, touch the

respective screen button. The

character is entered upon release.
Touch and hold a letter screen button

to display associated letters in a letter

pop-up menu. Release and then

select the desired letter.
To switch to the symbol keyboard,

touch 0..#.

142

Infotainment system

To switch back to the letter keyboard

or to switch between capital and small

letters, touch Aa.
To switch the letter keyboard

between normal order and

alphabetical order, touch

M

 .

To delete the most recently entered

character or symbol, touch 

T

.

To delete a character or symbol at

any point of your input: touch at the

desired point to place a blinking

cursor, then touch 

T

.

Audio settings

Press 

:

, select Audio settings and

then select the Ambience tab.

Several predefined settings are

available to optimise the tone for a

specific style of music (e.g. Pop-

Rock or Classical).
To adjust the tone individually, select

Personalised. Change the settings as

desired and then confirm your

settings.

Notice

If you change the settings of a

predefined setting, e.g. Pop-Rock,

this settings will be applied to the

User or Personalised setting.

Activating the Loudness function may

optimise the tone at low volume

levels.

Balance and fader

Select the Balance tab.

Several predefined settings are

available to adjust the volume

distribution inside the vehicle (e.g. All

passengers or Front only).
To change the current setting, e.g. All

passengers, select that setting and

then select the desired new setting

from the displayed list.
You may individually adjust the

predefined settings.
To define the point in the passenger

compartment where the volume is at

its highest level, move the cursor in

the illustration on the right side of the

screen to the desired point.

Infotainment system

143

To return to the default factory

settings, select Reset.

Volume settings

Press 

:

, select Audio settings and

then select the Sound tab.

Audible touch feedback

If the audible touch feedback function

is activated, each touch of a screen

button or menu item is indicated by a

beeping sound.
To adjust the touch beep volume,

activate Touch tones and then adjust

the setting.

Speed compensated volume

Activate or deactivate Volume linked

to speed.
If activated, the volume of the

Infotainment system is adapted

automatically to make up for the road

and wind noise as you drive.

Speech output

Select the Voice tab.

Adjust the volume for all speech

outputs of the system, e.g. traffic

announcements, navigation

messages etc.

Ringtone

Select the Ringtone tab.
Adjust the ringtone volume of

incoming calls.

System settings

Press 

:

 and then select OPTIONS.

Configuring the system

Select System settings to perform

some basic system configurations,

e.g.:

● Adjust the display of units for

temperature or fuel consumption.

● Reset the system configuration to

factory defaults.

● Update the installed software

version.

Changing display language

To adjust the language for the menu

texts, select Languages and then

select the desired language.

Notice

If the selected display language is

supported by the embedded speech

recognition, the language of the

speech recognition will be changed

accordingly; if not, embedded

speech recognition will be not

available.

Adjusting time and date

Select Setting the time-date.

144

Infotainment system

Changing time and date formats

To change the time and date formats,

select the respective tabs and then

select the desired formats.
Setting time and date

By default the displayed time and

date is automatically adjusted by the

system.
To manually adjust the displayed time

and date:
Select the Time tab.
Set Synchronization with GPS (UTC)

to OFF and then select the Time field

to set the desired time.
Select the Date tab and then select

the Date: field to set the desired date.

Adjusting the screen

Select Screen configuration.
Text scroll function

Select the Animation tab.
If long texts on the screen should be

scrolled automatically, activate

Automatic scrolling.
If Automatic scrolling is deactivated,

long texts are truncated.
Adjusting the brightness

Select Brightness and set the

brightness of the screen to the

desired level.

Storing your personal settings

Select Setting of the profiles.

You can store a multitude of settings

in a personal profile. For example, all

current tone settings, all radio

presets, one phone book, the map

settings and your preferred

addresses.
In case you share the vehicle with

other people, this enables you to

restore your personal settings from

your profile at any time.
A maximum of three personal profiles

may be stored.
Additionally, a Common profile is

available. All settings done at any

time are automatically stored in that

profile. If no personal profile is

activated, the Common profile is

active.
Storing your personal profile

After performing all your personal

settings:
Select one of the personal profile

tabs.
Select the input field 

>

 and enter the

desired name of your personal profile.
If you want to add a photo to the

profile:

Infotainment system

145

Connect a USB device with the

desired photo stored on it to the USB

port 

3

 148, touch the photo frame

and then select the desired photo.
Confirm your selection to download

the selected photo to the system.
Finally, confirm your inputs to store

them in your personal profile.
Activating your personal profile

Press 

:

 and then select the tab with

the name of your personal profile.
Activating the Common profile

If a personal profile is currently active:
Press 

:

 and then select Deactivate

profile.
Resetting a personal profile

You can at any time reset a personal

profile to restore the default factory

settings on that profile.
Select the respective profile and then

select Reset profile.
Resetting the Common profile

You can at any time reset the

Common profile to restore the default

factory settings on that profile.
Select Common profile and then

select Reset the common profile.

Audio

Activating the radio

Press 

b

. The audio main menu last

selected is displayed.
If the radio main menu is not active,

select SOURCES and then select

Radio.

The station last played will be

received.

Selecting a waveband

Repeatedly select Band to toggle

between the different wavebands.

Searching for stations

Automatic station search

Briefly touch 

P

 or 

Q

 to play the

previous or next receivable station.

Manual station search

Press and hold 

P

 or 

Q

. Release when

the required frequency has almost

been reached.
A search is made for the next station

that can be received and it is played

automatically.

Station tuning

If you exactly know the reception

frequency of a radio station, you may

enter that frequency manually.
Select OPTIONS, select Radio

stations and then select the desired

waveband.
Select Freq., enter the reception

frequency and confirm your input.
If a station is receivable on that

frequency, the respective station is

played.

146

Infotainment system

Station lists

In the station lists, all receivable radio

stations within the current reception

area are available for selection.
To display the station list of the

waveband currently active, select

List.
Select the desired station.
Update station lists

If the stations stored in the waveband-

specific station list can no longer be

received, the AM and the DAB station

lists must be updated. The FM station

list is updated automatically.
Select OPTIONS, select Radio

stations and then select the desired

waveband.
To start an update for the selected

waveband, select 

U

.

Storing favourite stations

Up to 15 radio stations of all

wavebands can be stored as

favourites in the Presets list.
Select Presets to display the preset

buttons.

Storing the currently active station

Touch and hold the desired button for

a few seconds. The respective

frequency or station name is

displayed on the button.
If a station is already stored on a

preset button, that station will be

overwritten by the new one.

Storing a station from a station list

Select OPTIONS, select Radio

stations and then select the desired

waveband.

Briefly touch the button next to the

desired station. Alternatively, select

7

 to switch to the tiled view. Then

briefly touch 

a

 on the tile of the

desired station.
Select Add to favourites and then

touch and hold for a few seconds on

the list row where you want to store

the station.
If a station is already stored on a list

row, that station will be overwritten by

the new one.

Retrieving stations

In the radio main menu select

Presets and then briefly touch the

preset button of the desired station.

Infotainment system

147

RDS configuration

In the radio main menu select

OPTIONS and then select Radio

settings to open the menu for RDS

configuration.

Activating RDS

Select General and then activate

Alternative frequency.
If Alternative frequency is activated,

RDS is displayed in the bottom line of

the radio main menu.

Radio text

If RDS is activated, information on the

radio programme currently active or

the music track currently playing are

displayed below the programme

name.
To show or hide the information,

activate or deactivate Display radio

text.

Traffic announcements

Many RDS stations broadcast traffic

news. If the traffic announcements

function is activated, radio or media

playback is interrupted for the

duration of a traffic announcement.

Select Announcements and then

activate or deactivate Traffic

announcement.
If Traffic announcement is activated,

TA is displayed in the bottom line of

the radio main menu.

Digital audio broadcasting

Digital audio broadcasting (DAB)

broadcasts radio stations digitally.
DAB stations are indicated by the

programme name instead of the

broadcasting frequency.

DAB Announcements

Besides their music programmes, a

lot of DAB stations also broadcast

announcements of various

categories. If you activate some or all

categories, the currently received

DAB service is interrupted when an

announcement of these categories is

made.
In the radio main menu select

OPTIONS, select Radio settings and

then select Announcements.

Activate the desired announcement

categories, e.g., News or Weather.

Different announcement categories

can be selected at the same time.

FM-DAB Linking

This function enables switching from

an FM station to a corresponding

DAB station and vice versa.
Switching from FM to DAB occurs as

soon as a corresponding DAB station

is available. Therefore, it is

recommended to store favourite

stations as DAB stations to reduce

frequent switching.
Switching from DAB to FM occurs if

the signal is too weak to be picked up

by the receiver.
Activation

Precondition is that Alternative

frequency is activated before FM-

DAB Linking can be activated.
To activate FM-DAB Linking, select

OPTIONS in the radio main menu and

then select FM-DAB Follow-up in the

Radio settings.
The following symbol will be

displayed when FM-DAB Linking is

activated:

148

Infotainment system

Deactivation

To deactivate FM-DAB Linking, select

OPTIONS in the radio main menu and

then deselect FM-DAB Follow-up in

the Radio settings.
FM-DAB Linking will automatically be

deactivated when Alternative

frequency is deactivated.

External devices

A USB port is located in the centre

console.

Caution

To protect the system, do not use

a USB hub.

Notice

The USB ports must always be kept

clean and dry.

USB ports

An MP3 player, USB device, SD card

(via USB connector / adapter) or

smartphone can be connected to the

USB port.
The Infotainment system can play

audio files or show picture files

contained in USB devices.
When connected to a USB port,

various functions of the devices

mentioned above can be operated via

the controls and menus of the

Infotainment system.

Notice

Not all auxiliary devices are

supported by the Infotainment

system.

Connecting / disconnecting a device

Connect one of the devices

mentioned above to a USB port. If

required, use the appropriate

connection cable. The music function

starts automatically.

Notice

If a non-readable USB device is

connected, a corresponding error

message appears and the

Infotainment system automatically

switches to the previous function.

To disconnect a USB device, select

another function and then remove the

USB device.

Caution

Avoid disconnecting the device

during playback. This may

damage the device or the

Infotainment system.

Bluetooth audio streaming

Streaming allows you to listen to

music from your smartphone.
For a detailed description on how to

establish a Bluetooth connection

3

 164.

If audio playback does not start

automatically, it may be necessary to

start the playback on the smartphone.

Infotainment system

149

First adjust the volume on your

smartphone (to a high level). Then

adjust the volume of Infotainment

system.

File formats

The audio equipment supports

different file formats.

Playing audio via USB or

Bluetooth

Activating the music function

Connecting the USB or Bluetooth

device.
If device already connected, but

playback of stored music files not

active:
Press 

b

, select SOURCES and then

select the respective source.
Playback of the audio tracks starts

automatically.

Playback functions

Interrupting and resuming playback

Touch 

5

 to interrupt playback. The

screen button changes to 

4

.

Touch 

4

 to resume playback.

Playing the previous or next track

Touch 

P

 or 

Q

.

Fast forwarding and rewinding

Touch and hold 

P

 or 

Q

. Release to

return to normal playback mode.
Alternatively, you can move the slider

showing the current track position to

the left or right.

Playing tracks randomly

Touch button repeatedly to toggle

between the available random

modes.

1

: play tracks of currently selected

list (album, artist, etc.) in random

order.

2

: play all tracks stored on

connected device in random order.

k

: play tracks of currently selected

list (album, artist, etc.) in normal

playback mode.
Repeating tracks

Touch button repeatedly to switch

repeat mode on or off.

3

: repeat tracks of currently

selected list (album, artist, etc.).

l

: play tracks of currently selected

list (album, artist, etc.) in normal

playback mode.

Browse music functions

(only available for devices connected

via USB)

150

Infotainment system

You can have your music files sorted

according to different criteria. Two

options are available for browsing the

music files stored on the connected

USB device.
Browsing via main menu

If you want to change the currently

active USB source, select

SOURCES and then select the

desired source. The respective main

menu is displayed.
Select the button showing the

currently selected sorting criteria, e.g.

Sort: Album or Sort: Artist, and then

select the desired new sorting criteria.

A sorting process is performed.
Select List and then select the desired

track.
Playback of the selected track is

started.
Browsing via device menu

Select OPTIONS and then select

Music files.
If you want to change the currently

active USB source, select Other.
Select the desired sorting criteria, e.g.

Albums or Artists, and then select the

desired track.

Playback of the selected track is

started.

Playing audio via the AUX input

Depending on the version, in the

glovebox there is an AUX socket for

the connection of external audio

sources.

Notice

The socket must always be kept

clean and dry.

It is possible, for example, to connect

a portable CD player with a 3.5 mm

jack plug to the AUX input.

To select the AUX input as the audio

source, make sure that the AUX input

is activated in the Audio settings.

Activating the picture viewer

Connecting the USB device.
If device already connected, but

picture viewer not active:
Press 

b

, select OPTIONS and then

select Managing photos.
Select the desired picture.
A slide show of all stored picture files

starts automatically.

Touch the screen to display the menu

bar.

Infotainment system

151

Viewing the previous or next

picture

Touch 

f

 or 

g

.

Starting or stopping a slide show

Select 

4

 to view the pictures stored

on the USB device in a slide show.
Touch 

5

 to end the slide show.

Phone projection

The phone projection applications

Apple CarPlay and Android Auto

display selected apps from your

smartphone on the Info Display and

allow their operation directly via the

Infotainment controls.
Check with the device's manufacturer

if this function is compatible with your

smartphone and if this application is

available in the country you are in.

Preparing the smartphone

iPhone

®

: Make sure Siri

®

 is activated

on your phone.
Android phone: Download the

Android Auto app to your phone from

the Google Play™ Store.

Connecting the smartphone

iPhone

Connect the phone to the USB port.
If the phone is already connected via

Bluetooth, upon connecting to the

USB port and launching Apple

CarPlay, the Bluetooth connection

will disconnect.
Android phone

Connect the phone via Bluetooth

3

 164 and then connect the phone to

the USB port.

Starting phone projection

Press 

d

 and then touch

Apple CarPlay or Android Auto.
The phone projection screen

displayed depends on your

smartphone and software version.

Returning to the Infotainment screen

Press, e.g., the 

b

 button on the

control panel.

Navigation

This chapter is about the embedded

navigation system which guides to

desired destinations.

The current traffic situation is taken

into account in the route calculation.

For this purpose, the Infotainment

system receives traffic

announcements in the current

reception area via RDS-TMC.
The navigation system cannot,

however, take into account traffic

incidents, traffic regulations changed

at short notice and hazards or

problems that arise suddenly (e.g.

road works).

Caution

The usage of the navigation

system does not release the driver

from the responsibility for a

correct, vigilant attitude in road

traffic. The relevant traffic

regulations must always be

followed. If a navigation instruction

contradicts traffic regulations, the

traffic regulations always apply.

152

Infotainment system

Functioning of the navigation

system

The position and movement of the

vehicle are detected by the navigation

system using sensors. The travelled

distance is determined by the

vehicle’s speedometer signal, turning

movements on bends by a sensor.

The position is determined by the

GPS (Global Positioning System)

satellites.
By comparing the sensor signals with

the digital maps, it is possible to

determine the position with an

accuracy of approx. 10 m.
The system will also work with poor

GPS reception. However, the

accuracy of the determination of the

position will be reduced.
After the entry of the destination

address or point of interest (nearest

petrol station, hotel, etc.), the route is

calculated from the current location to

the destination selected.
Route guidance is provided by voice

output and an arrow, as well as with

the aid of a multi-colour map display.

Important information

TMC traffic information system and

dynamic route guidance

The TMC traffic information system

receives all current traffic information

from TMC radio stations. This

information is included in the

calculation of the overall route. During

this process, the route is planned so

that traffic problems related to pre-

selected criteria are avoided.
To be able to use TMC traffic

information, the system must receive

TMC stations in the relevant region.

Map data

All required map data is stored within

the Infotainment system.
Map updates are available at a

Vauxhall Service Partner or at the

My Vauxhall customer portal. To

download the map updates from the

Vauxhall customer portal, a

My Vauxhall account and a USB stick

with at least 16 GB memory and

FAT 32 / MBR formatting are

necessary.

Download and save the map data on

a computer and unpack the data onto

the USB stick.
To update the map data in the

Infotainment system, connect the

USB stick to the Infotainment system,

select the navigation function and

follow the steps on the Info Display.
The installation of the map update will

take up to 1 hour. Do not switch off the

engine during the installation

process.
Some functions of the Infotainment

system, e.g. the navigation function,

are not available during the

installation process.

Information on the map display

Press 

c

 to display the navigation

map showing the area around the

current location.

Infotainment system

153

Route guidance not active

● The map view is displayed.
● The current location is indicated

by an arrow.

● The name of the street you are

currently in is displayed at the

bottom left of the map view.

Route guidance active

● The map view is displayed.
● The active route is indicated by a

coloured line.

● The moving vehicle is marked by

an arrow pointing into the

direction of travel.

● The next turning manoeuvre is

shown in a separate field at the

top left of the map view.
Depending on the situation

information on lane guidance or

the second next turning

manoeuvre may be displayed

additionally.

● The arrival time and the

remaining distance to the

destination is shown at the top

right of the map view.

Customise the map display

Map views

Three different map views are

available: North orientation, Vehicle

orientation and Perspective view.
Repeatedly touch 

L

 to toggle

between these map views.

Map colours

Depending on the external lighting

conditions, the colouring of the map

screen (light colours for the day and

dark colours for the night) can be

adapted.
Touch 

!

 to display a menu on the

right side of the screen.

154

Infotainment system

Select Map colour repeatedly to

toggle between light and dark

colours.

POI (Points of Interest) icons on the

map

POIs are points of general interest,

e.g. petrol stations or car parks.
The display of POI categories shown

on the map may be personally

adapted.
Activate the desired POI categories.

The map view changes accordingly.

Alternatively, select POI on map to

display a menu with a multitude of

POI categories and subcategories to

choose from. Activate the desired

POI categories.

Traffic events

Traffic events may be indicated on the

map. Additionally, information on

these events may be displayed in a

list.
Select Consult map to switch to an

alternative map display with new

menu options.

The map view is switched to North

orientation mode and and may

display a greater part of the route.

Touch the traffic jam icon to show

traffic events on the map. Touch 

Ï

 to

show a list with information on these

traffic events.
If you want to display a different map

section:
Touch 

+

 to show the area around the

current location.
Touch 

,

 to show the entire route.

Touch 

.

 to show the area around the

destination.
To return to the default navigation

view, touch 

3

.

Autozoom function

Infotainment system

155

If the autozoom function is activated

(AUTO is displayed below the map

view), the zoom level changes

automatically when approaching a

turning manoeuvre during active

route guidance. This way, you always

get a good overview of the respective

manoeuvre.
If the autozoom function is

deactivated, the selected zoom level

remains the same during the whole

route guidance process.
To activate or deactivate the function:
Select MENU, select Settings and

then select the Aspect tab.
Activate or deactivate Automatic

zoom setting.

Map manipulation

Moving visible map section

Place your finger anywhere on the

screen and move it in the desired

direction.
The map moves accordingly,

displaying a new section. A new

button bar is shown.

8

: show area around current

location again.

9

: show area around home

address.

0

: show area around destination.

To return to the default navigation

view, select 

3

.

Centring visible map section

Touch the desired location on the

screen to centre the map around this

location.
A red 

K

 is displayed at the respective

location and the corresponding

address is shown on a label.

Manual zooming

To zoom in on a selected map

location, place two fingers on the

screen and move them away from

each other.
Alternatively, touch + below the map

view.
To zoom out and display a larger area

around the selected location, place

two fingers on the screen and move

them towards each other.
Alternatively, touch - below the map

view.

Showing an overview of the route

Touch 

ø

, select Consult map and

then touch 

ö

.

The map view is switched to North

orientation and shows an overview of

the current route.

156

Infotainment system

To return to the default navigation

view, touch 

3

.

Voice guidance

The route guidance process can be

supported by voice prompts given out

by the system.
To activate or deactivate the function:
Select MENU in the navigation main

menu, select Settings and then select

the Vocal tab.
Activate or deactivate Activate

navigation messages.

Navigation settings

Select MENU in the navigation main

menu, and then select Settings to

display the respective menu with a

variety of navigation related settings.

Please explore the different settings.

Some have already been described

above, others are described in the

following sections.

Selecting an address from the

map

Touch the desired location on the

map. The map centres around this

location.

A red 

K

 is displayed at the respective

location and the corresponding

address is shown on a label.
To start route guidance, select 

L

.

Quick address or POI search

Select Search…. A menu with a list of

recent destinations and a keyboard is

displayed.

To refine the area for your address or

POI search, select 

J

 and then select

the desired option.
To hide the keyboard and show the

entire list, select 

N

. To show the

keyboard again, select 

O

.

Infotainment system

157

If you want to search for POIs (Points

of Interest) only, select the POI tab.
Enter an address or search term. As

soon as characters are entered an

address search is performed and the

list of found addresses is updated

continuously.
Select the desired list item.
Depending on the current situation

and your selection, the navigation

system may react differently:

● If the selected list item is a valid

destination address and route

guidance is currently not active:
The navigation main menu is

displayed again and route

guidance is started.

● If the selected list item is a valid

destination address but route

guidance is already active:
A message is displayed and you

need to decide first if the old

destination should be replaced,

or if you want to add the selected

address as an intermediate

destination to a waypoint trip.

Detailed description on waypoint

trips, see below.

Select the desired option.

● If the navigation system needs

more detailed information for

route calculation:
Enter a further search term to

refine your search.

Detailed address entry

Select MENU and then select Enter

address to display a keyboard for

address entry.

As soon as characters are entered,

an address search is started. Every

additional character is considered in

the matching process and a list of

matching addresses is displayed.

Select the desired address or change

your input to initiate a new search.
Continue with the address entry until

the entire address you are searching

for is found.
To start route guidance to the

respective address, confirm your

input.

Storing your favourite addresses

If you want to store the entered

address, select 

6

.

You may store the address as, e.g.,

your Home address or your Work

address.

158

Infotainment system

Select the desired option, confirm

your selection and then enter a name

for the address.
The stored address can then be

easily selected as destination

address via the destination lists

Preferred or Contacts, see below.

Destination lists

Select MENU and then select My

destinations.

Select Recent to display a list of all

recently entered destinations.

Select Preferred to display all

destinations which were stored

before as home address, work

address or preferred address.
Select Contacts to display a list with

contact names and all related

addresses stored before as personal

contacts.
To start route guidance to the

respective address, select a list entry.

Points of interest

A point of interest (POI) is a specific

location that might be of general

interest, e.g. a petrol station, a

parking area or a restaurant.
The data stored within the navigation

system contains a great number of

predefined POIs, which are indicated

on the map (if activated).

Selecting a POI from the map

Touch the desired POI icon on the

map. The map centres around this

location.
Touch the icon again.

A red 

K

 is displayed at the respective

location and the corresponding

address is shown on a label.
To start route guidance, select 

L

.

For a detailed description on route

guidance.

Showing a list of POIs around a

location

Touch the desired location on the

map. The map centres around this

location.
A red 

K

 is displayed at the respective

location and the corresponding

address is shown on a label.
Touch and hold 

K

.

A list of POIs around the location is

displayed.
Select the desired POI to start route

guidance.
For a detailed description on route

guidance.

Searching for POIs via categories

Select MENU and then select Points

of interest.

Infotainment system

159

Select a POI main category, e.g.,

Travel and then select a subcategory,

e.g. Airport. A new menu is displayed.
Select a search area, e.g., Around the

vehicle to refine the search.
After the POI search is performed,

select the desired POI.
To search for POIs at another

location, select Address.
To search for POIs via keyword (see

below), select Search.

Searching via keyword

Select MENU, select Search, enter a

keyword, e.g., "Station", enter or

select a city name and confirm your

input.
After the POI search is performed,

select the desired POI.

Waypoint trips

A waypoint is an intermediate

destination that is considered in the

calculation of a route to its final

destination. To create a waypoint trip,

you may add one or several

waypoints.
Enter or select the final destination of

your waypoint trip and start route

guidance.
While under active route guidance,

select MENU and then select Route /

Waypoints.

Select Add waypoint and then select

an option for address entry, e.g. Find

POI.
Enter or select a new address. The

address is inserted into the list of

waypoints.
If desired, enter further waypoints as

described above.
If you want to change the order of the

waypoints:
Touch 

Ú

 and then touch the displayed

arrows to move the list entries up or

down.
Select Calculate to recalculate the

route according to the changed order.

160

Infotainment system

To return to the navigation main

menu, select Finish.
To display a detailed route list of the

waypoint trip, select the Route tab.

Route guidance

Route guidance is provided by the

navigation system through visual

instructions and voice prompts (voice

guidance).
Visual instructions

Visual instructions are provided on

the display.

Notice

When route guidance is active and

you are not within the navigation

application, turning manoeuvres are

shown on the instrument cluster

display.

Voice guidance

Navigation voice prompts announce

which direction to follow, when

approaching an intersection at which

you need to turn.
To activate or deactivate the voice

prompts function select MENU in the

navigation main menu, select

Settings, select the Vocal tab and

then activate or deactivate Activate

navigation messages.

If voice prompts are activated you can

additionally specify whether street

names should be spoken or not.
To replay the last voice guidance

instruction, touch the turn arrow on

the left side of the screen.

Settings for route guidance

Select MENU in the navigation main

menu and then select Guidance

criteria to display the respective

menu.

When the menu is opened, several

optional routes are automatically

calculated by the navigation system,

e.g. the fastest route or the most

ecological route.

Infotainment system

161

To show the different optional routes

on a map, select See on map.
If you want, e.g., avoid motorways on

your route, set the respective option

to OFF.
Take account of traffic

Traffic events are taken into

consideration when the system

determines a route to a destination.
During active route guidance, the

route can be modified according to

incoming traffic messages.
Three options are available for Take

account of traffic:
If you want the system to

automatically modify the route

according to new traffic messages,

select Automatic.
If you want to be consulted when a

route is modified, select Manual.
If you do not want routes to be

modified, select None.

Starting, cancelling, resuming route

guidance

To start route guidance, enter or

select a destination address.

Depending on the situation, route

guidance may start automatically, or

you may have to follow some

instructions on the screen.
To cancel route guidance, select

MENU in the navigation main menu

and then select STOP NAVIGATION.
To resume a cancelled route

guidance, select MENU in the

navigation main menu and then

select RESUME GUIDANCE.

Turn list

The next turning manoeuvre is

displayed on the left side of the

screen.
To display a list of all upcoming turns

on the active route, select MENU in

the navigation main menu, select

Route / Waypoints and then select the

Route tab.

To display a turning manoeuvre on

the map, touch the turn arrow icon

next to the desired list entry. The map

jumps to the respective location on

the map.

162

Infotainment system

To display the previous or next

turning manoeuvre on the map, touch

P

 or 

Q

.

To avoid the route section currently

displayed on the map, touch 

6

.

If desired, further route sections may

be selected to be avoided.
Confirm your selection(s).

Speech recognition

Embedded speech recognition

The embedded speech recognition of

the Infotainment system enables you

to operate various functions of the

Infotainment system via voice input. It

recognises commands and numeric

sequences independently of the

relevant speaker. The commands

and numeric sequences can be

spoken without a voice pause

between the individual words.
In the event of incorrect operation or

commands, the speech recognition

gives visual and / or acoustic

feedback and requests you to re-

enter the desired command. Apart

from this, the speech recognition

acknowledges important commands

and will enquire if necessary.
In general, there are different ways to

speak commands for performing the

desired actions.

Notice

To ensure that conversations inside

the vehicle do not lead to

unintentional triggering of the

system functions, the speech

recognition does not start until it has

been activated.

Important information

Language support

● Not all languages available for

the display of the Infotainment

system are also available for the

speech recognition.

● If the display language currently

selected is not supported by the

speech recognition, speech

recognition is not available.
In such a case, you need to select

another language for the display

if you want to control the

Infotainment system via voice

input. To change the display

language 

3

 132.

Address input of destinations in

foreign countries

In case you want to enter the address

of a destination located in a foreign

country via voice input, you need to

change the language of the Info-

Display to the language of the foreign

country.
E.g., if the display is currently set to

English and you want to enter the

name of a city located in France, you

need to change the display language

to French.
For changing the display language,

see "Language" in chapter "System

settings" 

3

 132.

Input order for destination addresses

The order in which the parts of an

address need to be entered using the

speech recognition system is

dependent on the country where the

destination is located.
If the speech recognition system

rejects your address entry, repeat the

command with a different order of the

address parts.

Infotainment system

163

Activating speech recognition

Notice

Speech recognition is not available

during an active phone call.

Activation via the 

Y

 button on the

steering wheel

Press 

Y

 on the steering wheel.

The audio system mutes, a voice

output message prompts you to say a

command, and help menus with the

most important commands currently

available are shown on the display.
The speech recognition is ready for

voice input, after a beep has been

given.
You can now say a voice command to

initiate a system function (e.g. playing

a preset radio station).

Adjusting the volume of voice

prompts

Press volume button on the steering

wheel upwards (increase volume)

Y

 or downwards (decrease volume)

Z

.

Interrupting a voice prompt

As an experienced user, you can

interrupt a voice prompt by briefly

pressing 

Y

 on the steering wheel.

Alternatively you can say "Set

dialogue mode as expert".
A beep is heard immediately, and a

command can be stated without

having to wait.

Cancelling a dialogue sequence

To cancel a dialogue sequence and

to deactivate the speech recognition,

press 

a

 on the steering wheel.

If you do not say any command for a

certain period of time, or if you say

commands that are not recognised by

the system, a dialogue sequence is

automatically cancelled.

Operation via speech commands

Follow the instructions given by voice

output and shown on the display.

For best results:

● Listen for the voice prompt and

wait for the beep before saying a

command or replying.

● Read the example commands on

the display.

● The voice prompt can be

interrupted by pressing 

Y

 again.

● Wait for the beep and then speak

the command naturally, not too

fast, not too slow.

Usually commands can be spoken in

a single command.

Voice pass-thru application

The voice pass-thru application of the

Infotainment system allows access to

the speech recognition commands on

your smartphone.
Voice pass-through is available via

the phone projection applications

Apple CarPlay and Android Auto

3

 148.

Activating speech recognition

Press and hold 

Y

 on the steering

wheel until a speech recognition

session is started.

164

Infotainment system

Adjusting the volume of voice

prompts

Turn 

)

 on the control panel or press

volume button on the steering wheel

upwards (increase volume) 

Y

 or

downwards (decrease volume) 

Z

.

Deactivating speech recognition

Press 

a

 on the steering wheel. The

speech recognition session is ended.

Phone

The phone function provides you with

the possibility of having mobile phone

conversations via a vehicle

microphone and the vehicle

loudspeakers as well as operating the

most important mobile phone

functions via the Infotainment system

in the vehicle. To be able to use the

phone function, the mobile phone

must be connected to the

Infotainment system via Bluetooth.
Not all phone functions are supported

by every mobile phone. The usable

phone functions depend on the

relevant mobile phone and network

provider. You can find further

information on this in the operating

instructions for your mobile phone, or

you can enquire about them with your

network provider.

Important information for

operation and traffic safety

9

Warning

Mobile phones have effects on

your environment. For this reason

safety regulations and directions

have been prepared. You should

be familiar with the related

directions before you use the

telephone function.

9

Warning

Use of the hands-free facility while

driving can be dangerous because

your concentration is reduced

when telephoning. Park your

vehicle before you use the hands-

free facility. Follow the stipulations

of the country in which you find

yourself at present.

Do not forget to follow the special

regulations that apply in specific

areas and always switch off the

mobile phone if the use of mobile

phones is prohibited, if

interference is caused by the

mobile phone or if dangerous

situations can occur.

Pairing a device

During the pairing process, PIN code

exchange between the Bluetooth

device and the Infotainment system

and connection of the Bluetooth

devices to the Infotainment system

are carried out.

Important information

● Two paired Bluetooth devices

can be connected to the

Infotainment system at the same

time. One device in hands-free

mode, the other in audio

streaming mode, see description

on Bluetooth profile settings

below.
However, two devices cannot be

used in hands-free mode at the

same time.

Infotainment system

165

● Pairing only needs to be carried

out once, unless the device is

deleted from the list of paired

devices. If the device has been

connected previously, the

Infotainment system establishes

the connection automatically.

● Bluetooth operation considerably

drains the device's battery.

Therefore, connect the device to

the USB port for charging.

Pairing a new device

1. Activate the Bluetooth function of

the Bluetooth device. For further

information, see the operating

instructions for the Bluetooth

device.

2. If another Bluetooth device is

already connected:
Press 

a

, select OPTIONS, select

Bluetooth connection and then

touch 

*

 Search.

If no Bluetooth device is currently

connected:
Press 

a

 and then touch Bluetooth

search.

A search for all Bluetooth devices

in the near environment is

performed.

3. Select the Bluetooth device you

wish to pair from the displayed list.

4. Confirm the pairing procedure:

● If SSP (secure simple

pairing) is supported:
Confirm the messages on the

Infotainment system and the

Bluetooth device.

● If SSP (secure simple

pairing) is not supported:
On the Infotainment system:

a message is displayed

asking you to enter a PIN

code on your Bluetooth

device.
On the Bluetooth device:

enter the PIN code and

confirm your input.

5. Activate the functions you want

the paired smartphone to perform

and confirm your settings. You

can change these Bluetooth

profile settings at any time, see

below.

The Infotainment system and the

device are paired.

6. The phone book is downloaded

automatically to the Infotainment

system. Depending on the phone,

the Infotainment system must be

allowed access to the phone

book. If required, confirm the

messages displayed on the

Bluetooth device.
If this function is not supported by

the Bluetooth device, a

corresponding message is

displayed.

Operations on paired devices

Press 

a

, select OPTIONS and then

select Bluetooth connection.
A list of all paired devices is

displayed.

Changing the Bluetooth profile

settings

Touch 

a

 next to the desired paired

device.
Activate or deactivate the profile

settings as desired and confirm your

settings.


Content      ..     3      4      5      6     ..