Vauxhall Crossland X (2023 year). Manual in english - page 5


  Index      Manuals     Vauxhall Crossland X (2023 year). Manual in english


Search            copyright infringement  


Content      ..     3      4      5      6     ..


Vauxhall Crossland X (2023 year). Manual in english - page 5


134

Infotainment system

Multimedia

Control panel
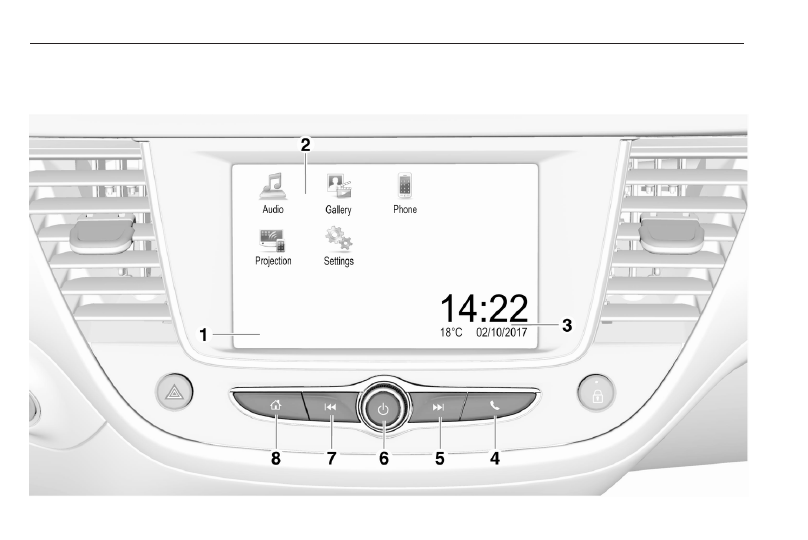
Infotainment system

135

1

Info Display / touchscreen

2

Home menu
Screen buttons for access to:
Audio: audio functions
Gallery: picture and movie

functions
Phone: mobile phone functions
Projection: phone projection
Settings: system settings

3

Time, date and

temperature indicators

4

=

Short press: open phone

menu ................................... 153
or open phone projection

function (if activated) ........... 147
Long press: activate

speech recognition .............. 152

5

Z

Short press: skip to next

station when radio active .... 143

or skip to next track when

external devices active ....... 147
Long press: seek up when

radio active .......................... 143
or fast forward when

external devices active ....... 147

6

)

Short press: switch on

Infotainment system if turned off
or mute system if turned on 
Long press: switch off

Infotainment system
Turn: adjust volume

7

Y

Short press: skip to

previous station when

radio active .......................... 143
or skip to previous track

when external devices

active ................................... 147

Long press: seek down

when radio active ................ 143
or fast rewind when

external devices active ....... 147

8

!

Short press: display the

home screen
Long press: open phone

projection function (if

activated) ............................ 147

136

Infotainment system

Steering wheel controls

1

SRC (Source)
Select audio source

2

c

 / 

d

Select next / previous

preset radio station when

radio active .......................... 143

or select next / previous

track / picture when

external devices active ....... 147
or select next / previous

entry in call / contacts list

when phone function

active and call / contact list

open .................................... 153

3

A

Short press: display the

home screen
Long press: if Apple

CarPlay™ or Android™

Auto activated, show the

respective menu .................. 147

4

e

Activate / deactivate mute

function

5

Y

 / 

Z

Turn upwards /

downwards: increase /

decrease volume

6

6

Take phone call .................. 153

or open call / contacts list . . . 153
or switch between calls

when calls are waiting ......... 153

7

Y

Activate speech recognition 153

Infotainment system

137

Control elements

The Infotainment system is operated

via function buttons, a touchscreen

and menus that are shown on the

display.
Inputs are made optionally via:

● the control panel on the

Infotainment system

● the touchscreen
● the steering wheel controls
● the speech recognition 

3

 153

Switching the Infotainment

system on or off

Short press 

)

 to switch the system

on. After switching on, the last

selected Infotainment source

becomes active.

Notice

Some functions of the Infotainment

system are only available if ignition

is switched on or engine is running.

Long press 

)

 to switch the system

off.

Automatic switch-off

If the Infotainment system has been

switched on by pressing 

)

 while the

ignition is switched off, it will

automatically switch off again after

10 minutes.

Setting the volume

Turn 

)

. The current setting is shown

on the display.
When the Infotainment system is

switched on, the last selected volume

is set, provided that it is lower than the

maximum start-up volume. For a

detailed description.

Speed compensated volume

When the speed compensated

volume is activated, the volume is

adapted automatically to make up for

the road and wind noise while driving.

Mute

Press 

)

 to mute the Infotainment

system.
To cancel the mute function,

press 

)

 again. The last selected

volume is set again.

Modes of operation

Press 

!

 to display the home screen.

Audio

Select Audio to open the main menu

of the last selected audio mode.
Select Source on the screen to

display the interaction selector bar.

To change to another audio mode,

touch one of the items in the

interaction selector bar.
For a detailed description of:

● radio functions 

3

 143

● external devices 

3

 147

138

Infotainment system

Gallery

Select Gallery to open the picture and

movie menu for files stored on an

external device, e.g. USB device or

smartphone.
Select 

2

 or 

3

 to display the picture

or movie menu. Select the desired

picture or movie file to show the

respective item on the display.

For a detailed description of:

● picture functions 

3

 147

● movie functions 

3

 147

Phone

Before the phone function can be

used, a connection has to be

established between the Infotainment

system and the mobile phone.
For a detailed description of

preparing and establishing a

Bluetooth connection between the

Infotainment system and a mobile

phone 

3

 153.

If the mobile phone is connected,

select Phone to display the main

menu.

For a detailed description of mobile

phone operation via the Infotainment

system 

3

 153.

Projection

To show specific apps of a

smartphone displayed on the

Infotainment system, connect the

smartphone.
Select Projection to start the

projection function.
Depending on the smartphone

connected, a main menu with

different selectable apps is displayed.
For a detailed description 

3

 147.

Settings

Select Settings to open a menu for

various system-related settings, e.g.

deactivating Audible Touch

Feedback.

Infotainment system

139

u

 screen button

When operating the menus, press

u

 in the respective submenu to

return to the next higher menu level.
Press 

!

 to display the home screen.

Selecting or activating a screen

button or menu item

Touch a screen button or menu item.
The corresponding system function is

activated, a message is shown, or a

submenu with further options is

displayed.

Moving items on the home screen

Touch and hold the element until red

boxes appear around the icons. Move

it to the desired location and release

the element.

Notice

Constant pressure must be applied

and the finger must be moved at

constant speed.

All other items are rearranged.
Press one of the buttons on the

control panel to exit edit mode.

Notice

Edit mode exits automatically after

30 seconds of inactivity.

Scrolling lists

If there are more items available than

presentable on the screen, the list

must be scrolled.
To scroll through a list, swipe the

page or use the arrows.
To return to the top of the list, touch

the list title.

140

Infotainment system

Scrolling pages

To scroll from one page to another,

swipe the page or use the arrows.

Audio settings

In the tone settings menu, the tone

characteristics can be set. The menu

may be accessed from each audio

main menu.
To open the tone settings menu,

select Menu in the respective audio

main menu. If necessary, scroll

through the list of menu items and

select Tone Settings. The respective

menu is displayed.

Equaliser mode

Use this setting to optimise the tone

for the style of music, e.g. Rock or

Classical.
Select the desired sound style in the

interaction selector bar at the bottom

of the screen. By choosing Custom,

the following settings can manually

be adjusted.
Bass

Use this setting to enhance or

attenuate the deep frequencies of the

audio sources.
Touch 

g

 or 

h

 to adjust the setting.

Midrange

Use this setting to enhance or

attenuate the midrange frequencies

of the audio source.
Touch 

g

 or 

h

 to adjust the setting.

Treble

Use this setting to enhance or

attenuate the high frequencies of the

audio sources.
Touch 

g

 or 

h

 to adjust the setting.

Setting balance and fader

Use the illustration at the right side of

the menu to adjust balance and fader.
To define the point in the passenger

compartment where the sound is at its

highest level, touch the

corresponding point in the illustration.

Alternatively, the red marker can be

moved to the desired point.

Notice

The balance and fader settings are

valid for all audio sources. They

cannot be adjusted individually for

each audio source.

Infotainment system

141

Volume settings

Adjusting the maximum startup

volume

Press 

!

 and then select Settings.

Select Radio, scroll through the list

and then select Max Startup Volume.
Touch 

g

 or 

h

 to adjust the setting.

Adjusting the speed compensated

volume

Press 

!

 and then select Settings.

Select Radio, scroll through the list

and then select Auto Volume.
To adjust the degree of volume

adaptation, select one of the options

in the list.
Off: no enhancement of volume with

increasing vehicle speed.
High: maximum enhancement of

volume with increasing vehicle

speed.

Activating or deactivating the audible

touch feedback function

If the audible touch feedback function

is activated, each touch of a screen

button or menu item is indicated by a

beeping sound.
Press 

!

 and then select Settings.

Select Radio and then scroll through

the list to Audible Touch Feedback.

Touch the screen button next to

Audible Touch Feedback to activate

or deactivate the function.

Volume of traffic announcements

To adjust the volume of traffic

announcements, set the desired

volume while a traffic announcement

is given out by the system. The

respective setting is then stored by

the system.

System settings

The following settings concern the

whole system. All other settings are

described in the respective chapters

of this manual.

Time and date settings

Press 

!

 and then select Settings.

Select Time and Date to display the

respective submenu.

142

Infotainment system

Set Time Format

To select the desired time format,

touch the screen buttons 12 h or 24 h.
Set Date Format

To select the desired date format,

select Set Date Format and choose

between the available options in the

submenu.
Auto Set

To choose whether time and date are

to be set automatically or manually,

select Auto Set.
For time and date to be set

automatically, select On - RDS.

For time and date to be set manually,

select Off - Manual. If Auto Set is set

to Off - Manual, the submenu items

Set Time and Set Date become

available.
Set time and date

To adjust the time and date settings,

select Set Time or Set Date.
Touch 

g

 or 

h

 to adjust the settings.

Language settings

Press 

!

 and then select Settings.

Select Language to display the

respective menu.
To adjust the language for the menu

texts, touch the desired language.

Text scroll function

If long text is displayed on the screen

e.g. song titles or station names, the

text may either be scrolled continually

or it may be scrolled once and

displayed in truncated form.
Press 

!

 and then select Settings.

Select Radio.

The text will be scrolled continually by

activating Text Scroll.

Black display function

The display can be turned off.
Press 

!

 and then select Settings.

Scroll through the list and select Turn

Display Off. The display is turned off.

The audio functions remain active.
To turn the display on again, touch the

screen or press a button.

Factory defaults

Press 

!

 and then select Settings.

Scroll through the list and select

Return to Factory Settings.

Infotainment system

143

To restore all vehicle personalisation

settings, select Restore Vehicle

Settings.
To delete the paired Bluetooth

devices, the contacts list and the

voice mail numbers stored, select

Clear All Private Data.
To reset tone and volume settings,

delete all favourites, and erase the

ringtone selection, select Restore

Radio Settings.
In each case, a warning message is

displayed. Select Continue to reset

the settings.

System version

Press 

!

 and then select Settings.

Scroll through the list and select

Software Information.
If a USB device is connected, the

vehicle information can be saved to

this USB device.
Select System Update and then Save

Vehicle Info to USB.
For a system update, contact a

workshop.

Vehicle settings

See Vehicle personalisation 

3

 83.

Audio

Activating the radio

Press 

!

 and then select Audio. The

audio main menu last selected is

displayed.
Select Source in the radio main menu

to open the interaction selector bar.

Select the desired waveband.
The station last played in the selected

waveband will be received.

Searching for stations

Automatic station search

Briefly press 

Y

 or 

Z

 to play the

previous or next station in the station

memory.

Manual station search

Press and hold 

Y

 or 

Z

 on the

control panel. Release when the

required frequency has almost been

reached.
A search is made for the next station

that can be received and it is played

automatically.

144

Infotainment system

Notice

FM waveband: when the RDS

function is activated, only RDS

stations are searched for, and when

the radio traffic service (TP) is

activated, only traffic service

stations are searched for.

Station tuning

Touch 

4

 on the screen. The Direct

tune screen is shown.

Enter the desired frequency. Use 

5

to delete digits entered. If necessary,

touch 

H

 or 

/

 to subsequently adjust

the input.
Confirm the input to play the station.

Station lists

Select Menu in the radio main menu

to open the corresponding

waveband-specific submenu.
Select Station List. All receivable

stations of the relevant waveband

and in the current reception area are

displayed.
Select the desired station.

Notice

The currently received radio station

is indicated by the 

4

 symbol next to

the station name.

Category lists

Numerous radio stations broadcast a

PTY code, which specifies the type of

programme transmitted (e.g. news).

Some stations also change the PTY

code depending on the content which

is currently transmitted.
The Infotainment system stores these

stations, sorted by programme type in

the corresponding category list.

Notice

The Categories list item is not

available for the AM waveband.

To search for a programme type

determined by the stations, select

Categories.
A list of programme types currently

available is displayed.
Select the desired programme type. A

list of stations of the selected

programme type is displayed.
Select the desired station.

Notice

The currently received radio station

is indicated by the 

4

 symbol next to

the station name.

Update station lists

If the stations stored in the waveband-

specific station list can no longer be

received, the station lists must be

updated.

Notice

The FM station list is updated

automatically.

Select Menu in the radio main menu

and then select Update Station List.

Notice

If a waveband-specific station list is

updated, the corresponding

category list is also updated.

Infotainment system

145

A station search is started and a

corresponding message is displayed.

Once the search is finished, the

respective station list is displayed.

Notice

The currently received radio station

is indicated by the 

4

 symbol next to

the station name.

Storing favourite stations

Stations of all wavebands can be

stored manually in the favourite lists.

Five favourite lists with five favourites

each are available.

Notice

The currently received station is

highlighted.

Storing the currently active station

If required, touch 

P

 or 

Q

 to scroll to the

desired favourite list.
To store the currently active radio

station as a favourite, touch and hold

the desired favourite button for a few

seconds. The favourite button will be

titled as the corresponding frequency

or station name.

Retrieving a station

If required, touch 

P

 or 

Q

 to scroll to the

desired favourite list.
Select the desired favourite.

Defining the number of available

favourite lists

To define the number of favourite lists

displayed for selection, press 

!

 and

then select Settings on the screen.
Select Radio and then Manage

Favourites to display the respective

submenu.
Activate or deactivate the favourite

lists to be displayed.

RDS configuration

Touch Menu in the FM radio main

menu to open the corresponding

waveband-specific submenu.

Activating RDS

Scroll to RDS.
Activate or deactivate RDS.

Traffic announcements

Radio traffic service stations are RDS

stations that broadcast traffic news. If

the traffic service is switched on, the

currently playing audio source is

interrupted for the duration of the

traffic announcement.
Activating the traffic programme

function

Select Menu in the FM radio main

menu to open the corresponding

waveband-specific submenu.
Touch the screen button next to

Traffic Programme to activate or

deactivate the function.

Notice

In the station list, TP is displayed

next to the stations providing a traffic

programme.

146

Infotainment system

If the radio traffic service is activated,

[TP] is shown in the top line of all main

menus. If the current station is not a

radio traffic service station, TP is

greyed-out and a search is started

automatically for the next radio traffic

service station. As soon as a radio

traffic service station is found, TP is

highlighted. If no radio traffic service

station is found, TP remains greyed-

out.
If a traffic announcement is broadcast

on the respective station, a message

is displayed.
To interrupt the announcement and

return to the function previously

activated, touch the screen or

press 

)

.

Regionalisation

Sometimes RDS stations broadcast

regionally different programmes on

different frequencies.
Select Menu in the FM radio main

menu to open the corresponding

waveband-specific submenu and

scroll to Region.
Activate or deactivate Region.

If regionalisation is activated,

alternative frequencies with the same

regional programmes are selected

where necessary. If regionalisation is

switched off, alternative frequencies

of the stations are selected without

regard to regional programmes.

Digital audio broadcasting

Digital audio broadcasting (DAB)

broadcasts radio stations digitally.
DAB stations are indicated by the

programme name instead of the

broadcasting frequency.

DAB Announcements

Besides their music programmes, a

lot of DAB stations also broadcast

announcements of various

categories. If some or all categories

are activated, the currently received

DAB service is interrupted when an

announcement of these categories is

made.
Select Menu in the DAB radio main

menu to open the corresponding

waveband-specific submenu.

Scroll through the list and select DAB

Announcements to display a list of the

categories available.
Activate all or just the desired

announcement categories. Different

announcement categories can be

selected at the same time.

DAB-DAB Linking

If this function is activated, the device

switches over to the same service

(programme) on another DAB

ensemble (if available) when the DAB

signal is too weak to be picked up by

the receiver.
Select Menu in the DAB radio main

menu to open the corresponding

waveband-specific submenu.
Scroll through the list and activate or

deactivate DAB-DAB Linking.

DAB-FM Linking

This function enables switching from

a DAB station to a corresponding FM

station and vice versa.

Infotainment system

147

If this function is activated, the device

switches over to a corresponding FM

station of the active DAB service (if

available) when the DAB signal is too

weak to be picked up by the receiver.
Scroll through the list and activate or

deactivate DAB-FM Linking.

L Band

This function defines which DAB

wavebands are to be received by the

Infotainment system.
L Band (earth and satellite radio) is

another radio band that can be

received additionally.
Select Menu in the DAB radio main

menu to open the corresponding

waveband-specific submenu.
Scroll through the list and activate or

deactivate L Band.

Intellitext

The Intellitext function allows the

reception of additional information

such as financial information, sports,

news etc.

Notice

The content available depends on

the station and region.

Select Menu in the DAB radio main

menu to open the corresponding

waveband-specific submenu.
Scroll through the list and select

Intellitext.
Select one of the categories and

choose a specific item to display

detailed information.

EPG

The Electronic Programme Guide

provides information on the current

and upcoming programme of the

respective DAB station.
Select Menu in the DAB radio main

menu and then select Station List.
To display the programme of the

desired station, touch the icon next to

the station.

External devices

A USB port for the connection of

external devices is located in the

centre console.

Notice

The USB port must always be kept

clean and dry.

USB port

An MP3 player, USB device, SD card

(via USB connector / adapter) or

smartphone can be connected to the

USB port.
Up to two USB devices can be

connected to the Infotainment system

at a time.

Notice

For the connection of two USB

devices, an external USB hub is

required.

The Infotainment system can play

audio files, show picture files or play

movie files contained in USB devices.
When connected to the USB port,

various functions of the devices

mentioned above can be operated via

the controls and menus of the

Infotainment system.

Notice

Not all auxiliary devices are

supported by the Infotainment

system. Check the compatibility list

on our website.

148

Infotainment system

Connecting / disconnecting a device

Connect one of the devices

mentioned above to the USB port. If

required, use the appropriate

connection cable. The music function

starts automatically.

Notice

If a non-readable USB device is

connected, a corresponding error

message appears and the

Infotainment system automatically

switches to the previous function.

To disconnect the USB device, select

another function and then remove the

USB device.

Caution

Avoid disconnecting the device

during playback. This may

damage the device or the

Infotainment system.

USB Auto Launch

By default, the USB audio menu is

displayed automatically as soon as a

USB device is connected.
If desired, this function can be

deactivated.

Press 

!

 and then select Settings to

open the settings menu.
Select Radio, scroll to USB Auto

Launch and touch the screen button

next to the function.
To reactivate the function, touch the

screen button again.

Bluetooth

Devices which support the Bluetooth

music profiles A2DP and AVRCP can

be connected wirelessly to the

Infotainment system. The

Infotainment system can play music

files contained in these devices.

Connecting a device

For a detailed description on how to

establish a Bluetooth connection

3

 153.

File formats and folders

The maximum capacity of a device

supported by the Infotainment system

amounts to 5000 music files,

5000 picture files, 500 movie files,

5000 folders and 15 stages of folder

structure. Only devices formatted in

the FAT16 / FAT32 file system are

supported.
If there are images included in the

audio metadata, these images are

displayed on the screen.

Notice

Some files may not be played

properly. This may be due to a

different recording format or the

condition of the file.
Files from online shops to which

Digital Rights Management (DRM)

has been applied cannot be played.

The Infotainment system can play the

following audio, picture and movie

files stored on external devices.

Audio files

The playable audio file formats are

MP3 (MPEG-1 Layer 3, MPEG-2

Layer 3), WMA, AAC, AAC+, ALAC

OGG WAF (PCM), AIFF, 3GPP

(audio only), Audio Books and LPCM.

iPod

®

 and iPhone

®

 devices play

ALAC, AIFF, Audio Books and LPCM.

Infotainment system

149

When playing a file with ID3 tag

information, the Infotainment system

can display information, e.g. on the

track title and artist.

Picture files

The displayable picture file formats

are JPG, JPEG, BMP, PNG and GIF.
JPG files must be 64 to 5000 pixels in

width and 64 to 5000 pixels in height.
BMP, PNG and GIF files must be 64

to 1024 pixels in width and 64 to

1024 pixels in height.
The pictures should not exceed a file

size of 1MB.

Movie files

The playable movie file formats are

AVI and MP4.
The maximum resolution is 1280 x

720 pixels. The frame rate must be

less than 30 fps.
The usable codec is H.264/MPEG-4

AVC.
The playable audio formats are MP3,

AC3, AAC and WMA.
The displayable subtitle format is

SMI.

Activating the music function

If the device is not yet connected to

the Infotainment system, connect the

device.
Usually, the respective audio main

menu is displayed automatically.
If playback is not started

automatically, e.g. if USB Auto

Launch is deactivated, take the

following steps:
Press 

!

 and then select Audio to

open the audio main menu last

selected.
Select Source in the interaction

selector bar and then select the

desired audio source to open the

respective audio main menu.
Playback of the audio tracks starts

automatically.

Playback functions

Interrupting and resuming playback

Touch 

5

 to interrupt playback. The

screen button changes to 

4

.

Touch 

4

 to resume playback.

Playing the next or previous track

Touch 

Z

 to play the next track.

Touch 

Y

 within the first 2 seconds of

the track playing to return to the

previous track.

Returning to the beginning of the

current track

Touch 

Y

 after 2 seconds of the track

playing.

150

Infotainment system

Fast forwarding and rewinding

Touch and hold 

Y

 or 

Z

. Release to

return to normal playback mode.
Alternatively, the slider showing the

current track position can be moved

to the left or right.

Playing tracks randomly

Touch 

6

 to play the tracks in random

order. The screen button changes to

7

.

Touch 

7

 again to deactivate the

shuffle function and go back to the

normal playback mode.

Browse Music function

To display the browse screen, touch

the screen. Alternatively, select

Menu in the audio main screen to

display the respective audio menu

and then select Browse Music.
Different categories, in which the

tracks are sorted, are displayed, e.g.

Playlists, Artists, or Albums.

Select the desired category,

subcategory (if available) and then

choose a track.
Select the track to start playback.

Activating the picture viewer

If the device is not yet connected to

the Infotainment system, connect the

device.
Press 

!

 and then select Gallery to

open the media main menu.
Touch 

2

 to open the picture main

menu to display a list of items stored

on the USB device. Select the desired

picture. If this is stored within a folder,

select the respective folder first.

Touch the screen to hide the menu

bar. Touch the screen again to

redisplay the menu bar.

Full screen mode

Select 

8

 to display the picture in full

screen mode. Touch the screen to

exit full screen mode.

Viewing the next or previous picture

Touch 

Q

 or swipe to the left to view the

next picture.
Touch 

P

 or swipe to the right to view

the previous picture.

Rotating a picture

Select 

h

 to rotate the picture.

Infotainment system

151

Zoom in on a picture

Touch 

9

 once or several times to

zoom in on a picture or to return to its

original size.

Viewing a slide show

Select 

0

 to view the pictures stored

on the USB device in a slide show.
Touch the screen to end the slide

show.

Picture menu

Select Menu in the bottom line of the

screen to display the Picture Menu.

Slide show time

Select Slide Show Time to display a

list of possible time sequences and

select the desired time sequence.

Clock and temperature display

To display time and temperature in

full screen mode, activate Clock.

Temp. Display.

Display settings

Select Display Settings to open a

submenu for the adjustment of

brightness and contrast.
Touch 

g

 or 

h

 to adjust the settings.

Activating the movie function

If the device is not yet connected to

the Infotainment system, connect the

device.
Press 

!

 and then select Gallery to

open the media main menu.
Touch 

3

 to open the movie main

menu to display a list of items stored

on the USB device. Select the desired

movie. If this is stored within a folder,

select the respective folder first.
The movie is shown.

Function buttons

Full screen

Select 

8

 to display the movie in full

screen mode. Touch the screen to

exit full screen mode.

Interrupting and resuming playback

Touch 

5

 to interrupt playback. The

screen button changes to 

4

.

Touch 

4

 to resume playback.

Playing the next or previous track

Touch 

/

 to play the next movie file.

152

Infotainment system

Touch 

H

 within the first 5 seconds of

the movie playing to return to the

previous movie file.

Returning to the beginning of the

current movie

Touch 

H

 after 5 seconds of the movie

playing.

Fast forwarding and rewinding

Touch and hold 

H

 or 

/

. Release to

return to normal playback mode.

Movie menu

Select Menu in the bottom line of the

screen to display the Movie Menu.

Clock and temperature display

To display time and temperature in

full screen mode, activate Clock.

Temp. Display.

Display settings

Select Display Settings to open a

submenu for adjustment of brightness

and contrast.
Touch 

g

 or 

h

 to adjust the settings.

Preparing the smartphone

Android phone: Download the

Android Auto app to the smartphone

from the Google Play™ Store.
iPhone: Make sure Siri

®

 is activated

on the smartphone.

Activating phone projection in the

settings menu

Press 

!

 to display the home screen

and then select Settings.
Scroll through the list to

Apple CarPlay or Android Auto.
Make sure the respective application

is activated.

Connecting the mobile phone

Connect the smartphone to the USB

port.

Starting phone projection

To start the phone projection function,

press 

!

 and then select Projection.

Notice

If the application is recognised by

the Infotainment system, the

application icon may change to

Apple CarPlay or Android Auto.

Alternatively, the function can be

started by pressing 

!

 for a few

seconds.
The phone projection screen

displayed depends on the

smartphone and software version.

Returning to the home screen

Press 

!

.

Speech recognition

The voice pass-thru application of the

Infotainment system allows access to

the speech recognition commands on

Infotainment system

153

a smartphone. See the smartphone

manufacturer's operating instructions

to find out whether the smartphone

supports this feature.
In order to use the voice pass-thru

application, the smartphone must be

connected to the Infotainment system

via USB cable 

3

 147 or via Bluetooth

3

 153.

Activating speech recognition

Press and hold 

=

 on the control panel

or 

Y

 on the steering wheel to start a

speech recognition session. A voice

command message is displayed on

the screen.
As soon as a beep is heard, a

command can be said. For

information on the commands

supported, see the operating

instructions of the smartphone.

Adjusting the volume of voice

prompts

Turn 

)

 on the control panel or press

Y

 / 

Z

 on the right side of the

steering wheel to increase or

decrease the volume of voice

prompts.

Deactivating speech recognition

Press 

6

 on the steering wheel. The

voice command message disappears

and the speech recognition session is

ended.

Phone

The phone function provides the

possibility of having mobile phone

conversations via a vehicle

microphone and the vehicle

loudspeakers as well as operating the

most important mobile phone

functions via the Infotainment system

in the vehicle. To be able to use the

phone function, the mobile phone

must be connected to the

Infotainment system via Bluetooth.
Not all phone functions are supported

by every mobile phone. The usable

phone functions depend on the

relevant mobile phone and network

provider. Further information on this

can be found in the operating

instructions of the mobile phone or by

the network provider.

Important information for

operation and traffic safety

9

Warning

Mobile phones have effects on the

environment. For this reason,

safety regulations and directions

have been prepared. Be familiar

with the related directions before

using the telephone function.

9

Warning

Use of the hands-free facility while

driving can be dangerous because

the concentration is reduced when

telephoning. Park the vehicle

before using the hands-free

facility. Follow the stipulations of

the country you are in.
Do not forget to follow the special

regulations that apply in specific

areas and always switch off the

mobile phone if the use of mobile

phones is prohibited, if

154

Infotainment system

interference is caused by the

mobile phone or if dangerous

situations can occur.

Pairing a device

Important information

● Up to ten devices can be paired

to the system.

● Only one paired device can be

connected to the Infotainment

system at a time.

● Pairing only needs to be carried

out once, unless the device is

deleted from the list of paired

devices. If the device has been

connected previously, the

Infotainment system establishes

the connection automatically.

● Bluetooth operation considerably

drains the device's battery.

Therefore, connect the device to

the USB port for charging.

Pairing a new device

1. Activate the Bluetooth function of

the Bluetooth device. For further

information, see the operating

instructions of the Bluetooth

device.

2. Press 

!

 and then select

Settings on the display.
Select Bluetooth and then Device

Management to display the

respective menu.

Notice

If no phone is connected, the Device

Management menu can also be

accessed via the phone menu:

Press 

!

 and then select Phone.

3. Touch Search Device. All

discoverable Bluetooth devices in

the environment are displayed in

a new search list.

4. Touch the respective Bluetooth

device.

5. Confirm the pairing procedure:

● If SSP (secure simple

pairing) is supported:
Confirm the messages on the

Infotainment system and the

Bluetooth device.

● If SSP (secure simple

pairing) is not supported:
On the Infotainment system:

an Info message is displayed

asking to enter a PIN code on

the Bluetooth device.
On the Bluetooth device:

enter the PIN code and

confirm the input.

6. The Infotainment system and the

device are paired.

Infotainment system

155

Notice

If the Bluetooth device is

successfully paired, 

w

 next to the

Bluetooth device indicates that the

phone function is enabled and 

p

indicates that the Bluetooth music

function is enabled.

7. The phone book is downloaded

automatically to the Infotainment

system. Depending on the phone,

the Infotainment system must be

allowed access to the phone

book. If required, confirm the

messages displayed on the

Bluetooth device.
If this function is not supported by

the Bluetooth device, a

corresponding message is

displayed.

Changing the Bluetooth PIN code

Press 

!

 and then select Settings.

Select Bluetooth and then Change

Pairing PIN to display the respective

submenu. A keypad is displayed.
Enter the desired four-digit PIN code.
To delete an entered number, select

5

.

Confirm the input by selecting Enter.

Connecting a paired device

Press 

!

 and then select Settings.

Select Bluetooth and then Device

Management to display the

respective menu.
Select the respective Bluetooth

device. The device is connected.

Notice

The connected device and the

available options are highlighted.

Disconnecting a device

Press 

!

 and then select Settings.

Select Bluetooth and then Device

Management to display the

respective menu.
Select the Bluetooth device currently

connected. A message will be

displayed.
Select Yes to disconnect the device.

Deleting a device

Press 

!

 and then select Settings.

Select Bluetooth and then Device

Management to display the

respective menu.
Select 

f

 next to the Bluetooth device.

A message will be displayed.
Select Yes to delete the device.

Device info

Press 

!

 and then select Settings.

Select Bluetooth and then Device

Information to display the respective

menu.
The information displayed includes

Device Name, Address, and PIN

Code.

Phone main menu

Press 

!

 and then select Phone to

display the respective menu.

156

Infotainment system

Many functions of the mobile phone

can now be controlled via the phone

main menu (and associated

submenus), and via the phone-

specific controls on the steering

wheel.

Initiating a phone call

Entering a phone number

Press 

!

 and then select Phone.

Enter a telephone number using the

keypad in the phone main menu.
To delete one or more entered

characters, touch or touch and hold

5

.

Touch 

w

 to start dialling.

Using the phone book

Notice

When pairing a mobile phone with

the Infotainment system via

Bluetooth, the phone book of the

mobile phone is downloaded

automatically.

Press 

!

 and then select Phone.

Select Contacts in the phone main

menu.

Notice

The 

+

 symbol next to a phone

number indicates that the contact is

stored on the SIM card.

Quick search

1. Select 

,

 to display a list of all

contacts.

2. Scroll through the list of contacts

entries.

3. Touch the desired contact. A

menu with all phone numbers

stored for the selected contact is

displayed.

4. Select the desired phone number

to initiate the call.

Search menu

If the phone book contains a large

number of entries, the search menu

can be used to find the desired

contact.
Select 

*

 in the Contacts menu to

display the search tab.

Infotainment system

157

The letters are organised in

alphabetical groups on the screen

buttons: abc, def, ghi, jkl, mno, pqrs,

tuv, and wxyz.
Use 

5

 to delete an entered group of

letters.

1. Select the button containing the

first letter of the desired contact.
E.g.: If the desired conact starts

with 'g' select the ghi screen

button.
All contacts containing one of the

letters on this button, in the

example 'g', 'h', and 'i', are

displayed.

2. Select the button containing the

second letter of the desired

contact.

3. Continue to enter more letters of

the desired contact until the

desired contact is displayed

4. Touch the desired contact. A

menu with all phone numbers

stored for the selected contact is

displayed.

5. Select the desired phone number

to initiate the call. The following

screen is shown.

Contacts settings

The contacts list can be sorted by last

name or first name.

Press 

!

 and then select Settings to

display the respective menu.
Select Bluetooth and then Sort

Order. Activate the desired option.

Using the call history

All incoming, outgoing, or missed

calls are registered.
Press 

!

 and then select Phone.

Select Call History in the phone main

menu.

Select 

-

 for outgoing calls, 

"

 for

missed calls, 

!

 for incoming calls

and 

.

 for all calls. The respective call

list is displayed.

158

Infotainment system

Select the desired entry to initiate a

call.

Redialling a number

The last dialled phone number can be

redialled.
Press 

!

, select Phone and then

select 

w

.

Using speed dial numbers

Speed dial numbers that are stored

on the mobile phone can also be

dialled using the keypad of the phone

main menu.
Press 

!

 and then select Phone.

Touch and hold the respective digit on

the keypad to initiate the call.

Incoming phone call

Taking a call

If an audio mode, e.g. the radio or

USB mode, is active at the moment a

call comes in, the audio source is

muted and stays muted until the call

ends.
A message with the caller's phone

number or name (if available) is

displayed.

To answer the call, select 

w

.

Rejecting a call

To reject the call, select 

x

.

Changing the ring tone

Press 

!

 and then select Settings.

Select Bluetooth and then Ringtones

to display the respective menu. A list

of all paired devices is displayed.
Select the desired device. A list of all

ringtones available for this device is

displayed.
Select one of the ringtones.

Functions during a call

During an ongoing phone call, the

phone main menu is displayed.

Deactivating the hands-free mode

temporarily

To continue the conversation via the

mobile phone, activate 

/

.

To return to the hands-free mode,

deactivate 

/

.

Deactivating the microphone

temporarily

To mute the microphone, activate 

(

.

To reactivate the microphone,

deactivate 

(

.

Infotainment system

159

Ending a phone call

To end the call, select 

x

.

Voice mail box

The voice mail box can be operated

via the Infotainment system.

Voice mail number

Press 

!

 and then select Settings.

Select Bluetooth. Scroll through the

list and select Voice Mail Numbers.
A list of all paired devices is

displayed.
Select the respective phone. A

keypad is displayed.
Enter the voice mail number for the

respective phone.

Calling the voice mail box

Press 

!

 and then select Phone.

Select 

)

 on the screen. The mail

box is called.
Alternatively, enter the voice mail

number via the phone keypad.

160

Climate control

Climate control

Climate control systems ............. 160

Heating and ventilation system 160

Air conditioning system ........... 161

Electronic climate control

system .................................... 164

Auxiliary heater ........................ 168

Air vents ..................................... 169

Adjustable air vents ................. 169

Fixed air vents ......................... 169

Maintenance .............................. 170

Air intake ................................. 170

Air conditioning regular

operation ................................ 170

Service .................................... 170

Climate control systems

Heating and ventilation

system

Controls for:

● temperature 

£

● air distribution 

l

M

 and 

K

● fan speed 

Z

● demisting and defrosting 

à

● heated rear window and heated

exterior mirrors 

b

● heated windscreen 

,

● heated seats 

ß

Temperature 

£

Adjust the temperature by turning

£

 to the desired temperature.

red area : warmer

blue area : colder
Heating will not be fully effective until

the engine has reached normal

operating temperature.

Air distribution 

l


M


K

Press:

l

: to windscreen and front door

windows

M

: to head area and rear seats via

adjustable front air vents

K

: to front and rear foot well and

windscreen

Combinations are possible.

Fan speed 

Z

Adjust the air flow by turning 

Z

 to the

desired speed.

Climate control

161

Demisting and defrosting the

windows 

á

● Press 

á

: the air distribution is

directed towards the windscreen.

● Set temperature controller 

£

 to

warmest level.

● Set fan speed 

Z

 to highest level.

● Switch on heated rear window 

b

.

● Open side air vents as required

and direct them towards the door

windows.

Heated rear window 

b


3

 23.

Heated exterior mirrors 

b


3

 20.

Heated windscreen 

,


3

 24.

Heated seats 

ß


3

 30.

Air conditioning system

Controls for:

● temperature 

£

● air distribution 

l

M

 and 

K

● fan speed 

Z

● demisting and defrosting 

à

● air conditioning A/C
● air recirculation 

4

● heated rear window and heated

exterior mirrors 

b

● heated windscreen 

,

● heated seats 

ß

Some changes of settings are

indicated briefly in the Info Display.

Activated functions are indicated by

the LED in the respective button.

Temperature 

£

Adjust the temperature by turning

£

 to the desired temperature.

red area : warmer

blue area : colder
Heating will not be fully effective until

the engine has reached normal

operating temperature.

162

Climate control

Air distribution 

l


M


K

Press:

l

: to windscreen and front door

windows

M

: to head area and rear seats via

adjustable front air vents

K

: to front and rear foot well and

windscreen

Combinations are possible.

Fan speed 

Z

Adjust the air flow by turning 

Z

 to the

desired speed.

Air conditioning A/C

Press A/C to switch on cooling.

Activation is indicated by the LED in

the button. Cooling is only functional

when the engine is running and

climate control fan is switched on.
Press A/C again to switch off cooling.
The air conditioning system cools and

dehumidifies (dries) as soon as the

outside temperature is slightly above

the freezing point. Therefore

condensation may form and drip from

under the vehicle.
If no cooling or drying is required,

switch off the cooling system for fuel

saving reasons.
Activated cooling may inhibit

Autostops.
Stop-start system 

3

 175.

Demisting and defrosting the

windows 

à

● Press 

à

: the air distribution is

directed towards the windscreen.

● Set temperature controller 

£

 to

warmest level.

● Switch on air conditioning A/C if

required.

● Set fan speed 

Z

 to highest level.

● Switch on heated rear window 

b

.

● Switch on heated

windscreen 

,

.

● Open side air vents as required

and direct them towards the door

windows.

Climate control

163

Notice

If 

à

 is pressed while the engine is

running, an Autostop will be inhibited

until 

à

 is pressed again.

If 

à

 is pressed while the engine is in

an Autostop, the engine will restart

automatically.

Stop-start system 

3

 175.

Air recirculation system 

4

Press 

4

 to activate air recirculation

mode, LED is indicated.
Select air recirculation to assist in

cooling the interior or in blocking

outside odours or exhaust.

Press 

4

 again to deactivate air

recirculation mode.

9

Warning

The exchange of fresh air is

reduced in air recirculation mode.

In operation without cooling, the

air humidity increases, so the

windows may mist up from inside.

The quality of the passenger

compartment air deteriorates,

which may cause the occupants to

feel drowsy.

In warm and very humid ambient air

conditions, the windscreen may mist

up from outside when cold air is

directed towards it. If windscreen

mists up from outside, activate

windscreen wiper and deactivate 

l

.

Maximum cooling

Briefly open the windows so that hot

air can disperse quickly.

● Switch on air conditioning A/C.
● Press 

4

 for air recirculation

system on.

● Press 

M

 for air distribution.

● Set temperature control 

£

 to

coldest level.

● Set fan speed 

Z

 to highest level.

● Open all vents.

Heated rear window 

b


3

 23.

Heated exterior mirrors 

b


3

 20.

Heated windscreen 

,


3

 24.

164

Climate control

Heated seats 

ß


3

 30.

Electronic climate control

system

The dual zone climate control allows

different temperatures for driver side

and front passenger side.
In automatic mode, temperature, fan

speed and air distribution are

regulated automatically.

Controls for:

● temperature on driver side 

£

● MENU enters the Climate setting

menu in the Info Display

● fan speed 

Z

● automatic mode AUTO
● temperature on front passenger

side 

£

● cooling A/C
● manual air recirculation 

4

● demisting and defrosting 

à

● heated rear window and heated

exterior mirrors 

b

● heated windscreen 

,

● heated seats 

ß

Activated functions are indicated by

the LED in the respective control.
The electronic climate control system

is only fully operational when the

engine is running.
Make sure the sun sensor used by the

electronic climate control system is

not covered 

3

 56.

Climate settings menu

Press MENU to enter the climate

setting menu.
Settings for:

● air distribution 

l

M

K

● fan speed 

Z

● temperature for driver and

passenger side

● dual zone temperature

synchronisation MONO

● cooling A/C
● automatic mode AUTO

Climate control

165

Climate setting menu can also be

displayed

● by pressing 

!

 and then

selecting Climate on the 7''

Colour Info Display or

● by pressing 

Í

 and then selecting

Climate from the menu on the 8''

Colour Info Display.

Automatic mode AUTO

Basic settings for automatic control

with maximum comfort:

● Press AUTO to start the cooling

automatically.

● Open all air vents to allow

optimised air distribution in

automatic mode.

● Set the preselected

temperatures for driver and front

passenger using the left and right

rotary knob. Recommended

temperature is 22 °C.

Temperature is indicated in

displays beside the controls and

in the climate settings menu.

● Air recirculation mode 

4

 should

be deactivated. When

deactivated the LED in the button

is not illuminated.

Three different pre-set fan speeds

can be selected by repeatedly

tapping on AUTO either on the

climate control panel or on the Info

Display (OPTIONS).

● Soft for a soft and silent air

distribution.

● Normal for thermal comfort and

silent air distribution.

● Fast for a dynamic and efficient

air distribution.

The selected setting is shown on the

Info Display.

Manual settings

Climate control system settings can

be changed by activating the

following functions:

Fan speed 

Z


Content      ..     3      4      5      6     ..