Manitou MRT 1440 ST3B (400°), MRT 1640 ST3B (400°), MRT 1840 ST3B (400°-360°). MANUALE D’ISTRUZIONI - 29
 

  Index      Manuals     Manitou MRT 1440 ST3B (400°), MRT 1640 ST3B (400°), MRT 1840 ST3B (400°-360°). MANUALE D’ISTRUZIONI


Search            copyright infringement  


Content      ..     27      28      29     


Manitou MRT 1440 ST3B (400°), MRT 1640 ST3B (400°), MRT 1840 ST3B (400°-360°). MANUALE D’ISTRUZIONI - 29


4-14

IT

EN

NL

648747 IT

-EN-NL (29/08/2013)

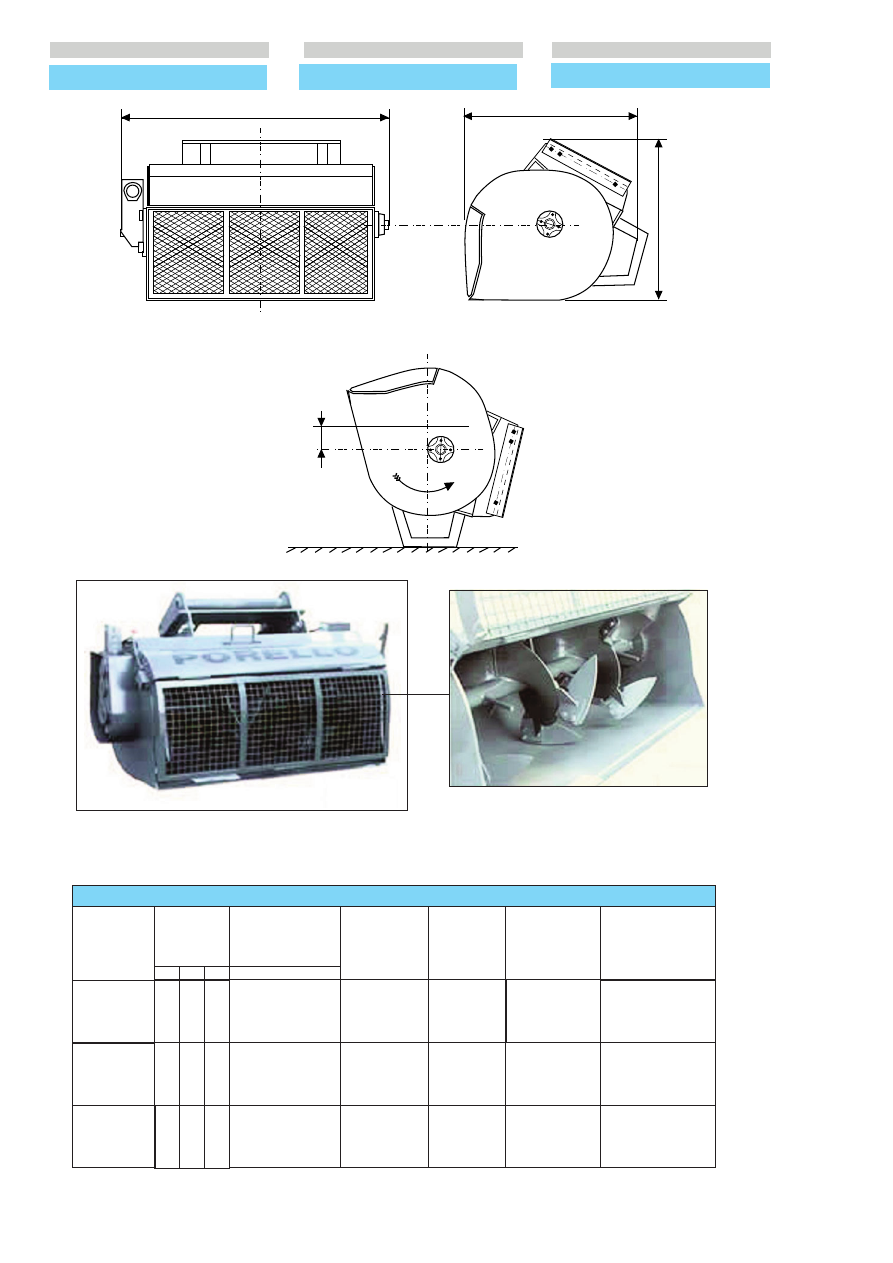
BUCKET

MENGBAK

BENNA MISCELATRICE

CARATTERISTICHE - CHARACTERISTICS - KENMERKEN

DESCRIZIONE
DESIGNATION

BESCHRIJVING

CAPACITA’ TOTALE

TOTAL CAPACITY

TOTALE INHOUD

PESO A VUOTO

IDLING WEIGHT 

LEDIG GEWICHT

(Kg)

APERTURA BOCCHETTA

HOSE OPENING

OPENING

MIX 350 

650 L

650

IDRAULICA

HYDRAULIC

HYDRAULISCH

MIS. INGOMBRO

OVERAL LENGTH

TOTAALAFMETIN-

GEN

(mm)

MIX 500 

785 L

780

IDRAULICA

HYDRAULIC

HYDRAULISCH

MIX 750 

1255 L

1000

IDRAULICA

HYDRAULIC

HYDRAULISCH

A

B

C

1570 1080 1120

1840 1080 1120

2000 1300 1250

LIVELLO DA CENTRO ALBERO

LEVEL FROM SHAFT  CENTRE

NIVEAU VANAF MIDDEN AS

D (mm)

75

140

130

RESA

YIELD

RENDEMENT

350 L

500 L

750 L

D

A

B

C

COMMISSIONING AND USE

Checking and inspections.

Before starting a work cycle, the 
following checks/inspections are 
necessary:
- inspect the electrical connections and 

condition of the relative wiring;

- inspect the hydraulic connections and 

condition of the relative piping; 

- check the condition and position of the

material outlet hose pipe;

- check the working of the micro switch

which regulates machine safety.

- check the condition of the hooking of 

the bucket to the earth moving machine.

Work cycle.

The work cycle can be divided into two
parts, the first concerns use while the
second deals with cleaning and checking.

Use:

- open the guard and check to ensure 

that the bucket is hooked (Fig.1) ;

- load the bucket (Fig.1) with the 

quantity of material indicated in the
"Features" Table; 

- close the guard (Fig.2);
- position the bucket for mixing and start 

the screw movement (Fig.2) ;

- allow enough time for mixing;
- to unload the material, use the radio 

control to open the outlet provided and 
check the unloading hose pipe (Fig.2).
Unloading operations can also be done

with the guard open (Fig.3);  in this 

case, the screw conveyor is stopped,
so it is necessary to act on the earth
moving machine to control and position 
the outlet.

INBEDRIJFSTELLING EN GEBRUIK

Uit te voeren controles.

Alvorens met een werkcyclus aan te van-
gen, de volgende controles uitvoeren:
- controleer de elektrische aansluiting en
de staat van de kabels;
- controleer de hydraulische aansluiting en
de staat van de slangen;
- controleer de staat en de positie van de
materiaalafvoerpijp;
- controleer de werking van de micro-
schakelaar voor de veiligheid van de
machine.
- controleer de staat van de bevestiging
van de bak aan de machine.

Werkcyclus.

De werkcyclus kan in twee delen onderver-
deeld worden, het eerste voor het gebruik
en het tweede voor de reiniging en de con-
troles.

Het gebruik:

- open het beschermcarter en controleer
de vasthaking (Fig.1) ;
- laad het materiaal in de bak (Fig.1) in
overeenstemming met de hoeveelheden in
de tabel “Kenmerken”;
- sluit het beschermcarter (Fig.2);
- plaats de bak in de stand voor het men-
gen en start de beweging van de vijzel
(Fig.2) ;
- laat de nodige tijd voorbijgaan voor het
mengen;
- los het materiaal door met de radiobestu-
ring de speciale opening open te zetten en
controleer de afvoerpijp (Fig.2). Het mate-
riaal kan ook door het open beschermcar-
ter gelost worden (Fig.3) ; in dit geval staat
de vijzel stil, gebruik de heftruck om de
afvoer te richten en te plaatsen.

MESSA IN SERVIZIO E UTILIZZO

Verifica e controlli da effettuare.

Prima di iniziare un ciclo di lavoro si devo-

no effettuare i seguenti controlli:

- verificare il collegamento elettrico e lo 

stato dei cavi relativi;

- verificare il collegamento idraulico e lo

stato dei tubi relativi; 

- controllare lo stato e posizione del 

flessibile di scarico del materiale;

- controllare il funzionamento del 

microinterruttore che regola la sicurezza  

della macchina.

- controllare lo stato dell’aggancio della 

benna alla macchina operatrice. 

Ciclo di lavoro.

Il ciclo di lavoro può essere suddiviso in
due parti, la prima d’utilizzo e la 
seconda di pulizia e controlli.

L’ utilizzo:

- aprire il carter di protezione e verificare 

l’avvenuto agganciamento (Fig.1) ;

- effettuare il caricamento dei materiali 

nella benna (Fig.1) rispettando le 
quantità  indicate nella tabella
“Caratteristiche”; 

- chiudere il carter di protezione (Fig.2);
- posizionare la benna in posizione per 

la miscelazione e avviare il movimento  
della coclea (Fig.2) ;

- lasciar passare il tempo necessario di

impasto;

- effettuare l’operazione di scarico

aprendo col radiocomando la 
bocchetta apposita e controllando il 
tubo flessibile di scarico (Fig.2).
L’operazione di scarico si può 
effettuare anche attraverso il carter di 
protezione aperto (Fig.3) ; 
in questo caso la coclea è ferma, si 
deve agire sulla macchina operatrice 
per dirigere e posizionare lo scarico.

1

2

3

4-15

IT

EN

NL

648747 IT

-EN-NL (29/08/2013)

Cleaning and checking:

- washing operations are extremely 

important and determine the life of the 
bucket and its main components;

- position the bucket in hold position 

(Fig.4);

- open the guard (Fig.4);
- spray water inside the bucket  (Fig.4) 

to loosen all the encrusted material;

- close the guard (Fig.5);
- start up the bucket and run the screw 

conveyor through a few turns for 
further wash (Fig.5);

- unload the bucket  (Fig.5);
- check to make sure the bucket is free 

of encrusted material, especially the 
safety micro switch.  

For other problems

, check the electrical

and hydraulic connections before carrying
out a detailed mechanical check.

Stopping the machine:

- press the emergency button on the

bucket (Fig.6) ;

- lift the guard (Fig.4);
- switch off the earth moving machine

motor;

- disconnect the hydraulic pipes or 

electric plug. 

When the bucket is not in use, it must be
unhooked and placed in the correct

parking position

(Fig.7).

Reiniging en controles:

- de reinigingswerkzaamheden zijn zeer
belangrijk en bepalen de levensduur van
de bak en van zijn belangrijkste onderde-
len;
- plaats de bak in ingehouden stand
(Fig.4);
- open het carter (Fig.4);
- spuit water in de bak (Fig.4) totdat alle
incrustaties los komen;
- sluit het carter (Fig.5);
- start de bak en laat de vijzel een paar
keer draaien voor een nog betere reiniging
(Fig.5);
- los de bak (Fig.5);
- controleer of er geen incrustaties in de
bak aanwezig zijn en controleer vooral de
veiligheidsmicroschakelaar.

Voor eventuele storingen

, eerst de elektri-

sche en hydraulische verbindingen contro-
leren voor een uitgebreide mechanische
controle uit te voeren.

Machine stopzetten:

- de noodknop op de bak (Fig.6)
indrukken;
- het beschermcarter oplichten (Fig.4);
- de motor van de heftruck uitzetten;
- de hydraulische slangen losmaken of de
elektriciteit losschakelen.

Als de bak niet gebruikt wordt, moet u hem
loskoppelen en goed in de 

parkeerstand

(Fig.7) zetten.

4-16

IT

EN

NL

648747 IT

-EN-NL (29/08/2013)

Pulizia e controlli:

- le operazioni di lavaggio sono molto 

importanti e determinano la durata
della benna e dei suoi principali 
componenti;

- posizionare la benna in posizione 

ritenuta (Fig.4);

- aprire il carter (Fig.4);
- spruzzare acqua dentro la benna 

(Fig.4) fintanto che non si staccano 
tutte le incrostazioni ;

- chiudere il carter (Fig.5);
- avviare la benna e far effettuare alla 

coclea qualche giro per un ulteriore 
lavaggio  (Fig.5);

- scaricare la benna  (Fig.5);
- controllare che la benna sia senza 

incrostazioni dentro e soprattutto il 
microinterruttore per la sicurezza.  

Per eventuali malfunzionamenti

,

prima di in approfondito controllo 
meccanico, controllare i collegamenti elet-
trici ed idraulici.

Come arrestare la macchina:

- premere il pulsante d’emergenza sulla 

benna (Fig.6) ;

- alzare il carter di protezione (Fig.4);
- spegnere il motore della macchina

operatrice;

- staccare i tubi idraulici o la presa

elettrica. 

Quando non si utilizza la benna, occorre
sganciarla e appoggiarla correttamente  in

posizione di parcheggio

(Fig.7).

4

5

6

7

MAINTENANCE

All maintenance operations must be car-
ried out with the electrical and hydraulic
connections disconnected; the connec-
tions must be retained only for checking
the micro switch. 

Greasing

(Fig.8) :

Every 3-4 work cycles, or at least once a
day.
Use normal industrial grease.

Filling oil

(Fig.9) : 

check the level on the external indicator
provided, unscrew the indicator if neces-
sary and top up with 

SAE 90 EP

type oil,

up to the MAX level indicated by the red
dot on the glass.

Changing the oil completely

(Fig.9) : this

must be done after the first 300 hours,
and subsequently every 200 hours. 
With the reduction gear hot, drain out the
oil through the drain plug  A (Fig.9).
Then refit plug A  and proceed with filling
the oil, as indicated in the previous point. 

ONDERHOUD

Alle onderhoudswerkzaamheden moeten
met losgemaakte elektrische en hydrauli-
sche verbindingen worden uitgevoerd,
alleen voor de controle van de micro-
schakelaar 
kunnen en moeten de verbindingen aan-
gesloten zijn.

Invetten (Fig.8) 

:

Om de 3-4 werkcycli of minstens een maal
per dag.
Gebruik normaal industrieel vet.

Olie bijvullen (Fig.9) :

Controleer het van buitenaf zichtbare olie-
peil, draai indien nodig de indicator los en
vul olie bij van het type 

SAE 90 EP, 

tot aan

het MAX niveau, het rode punt op het glas.

Totale olieverversing (Fig.9)

: na de eerste

300 werkuren en vervolgens om de 200
uren.
Met warme olie in de reductor, de olie
aftappen door de aftapdop A los te
draaien (Fig.9). Na de olie afgevoerd te
hebben de dop A weer plaatsen en olie bij-
vullen, zoals onder het vorige punt besch-
reven is

4-17

IT

EN

NL

648747 IT

-EN-NL (29/08/2013)

MANUTENZIONE

Tutte le oprazioni di manutenzione devono
essere eseguite con i collegamenti elettrici ed
idraulici staccati, solamente per il controllo
del microinterruttore i collegamenti 
possono e devono essere allacciati. 

Ingrassaggio (Fig.8)

:

Ogni 3-4 cicli di lavoro o almeno una volta al
giorno.
Utilizzare del normale grasso industriale.

Rabbocco olio (Fig.9) : 

controllare il livello visibile all’esterno nel-
l’apposito indicatore, se necessario svitare
l’indicatore e rabboccare olio del tipo 

SAE

90 EP, 

fino al raggiungimento del livello

MAX, punto rosso sul vetrino.

La sostituzione totale dell’olio (Fig.9)

: deve

essere effettuata dopo le prime 300 ore e
successivamente ogni 200 ore. 
Con olio riduttore caldo, scaricare l’olio 
svitando il tappo di scarico  A (Fig.9).
Terminato rimontare il tappo A  e procedere al
rabbocco del olio, come indicato punto prece-
dente. 

MAX

8

9

A

Micro switch

(Fig.10) : to guarantee maxi-

mum efficiency for operator safety, check
the micro switch and keep it clean.

Radio control 

(Fig.11) : check the battery

charge periodically.

Changing the blades 

(Fig.12) : if the bla-

des are found to be worn after a certain
period of use, they can be replaced.
Contact your agent or dealer.

Microschakelaar(Fig.10) :

voor de maximale efficiëntie en veiligheid
van de bediener, de microschakelaar con-
troleren en schoon houden.

Radiobesturing (Fig.11) :

controleer regelmatig of de batterij niet
leeg is.

Vervangen van de schoepen (Fig.12) :

als na een bepaalde werkingsperiode de
schoepen versleten blijken te zijn, dan
kunnen ze vervangen worden. Neem hier-
voor contact op met uw agent of dealer.

4-18

IT

EN

NL

648747 IT

-EN-NL (29/08/2013)

Microinterruttore (Fig.10) :

per garantire la massima efficenza per la
sicurezza dell’operatore, controllare e mante-
nere pulito il microinterruttore.

Radiocomando (Fig.11) :

é necessario controllare periodicamente la
carica della pila.

Sostituzione delle palette (Fig.12) :

se dopo un certo periodo di funzionamento si
riscontra un consumo delle palette è possibi-
le provvedere alla loro sostituzione.
Contattare il vostro agente o concessionario.

10

12

11

4-19

IT

EN

NL

648747 IT

-EN-NL (29/08/2013)

BUCHET

BETONBAK

BENNA PER CALCESTRUZZO

B

A

C

D

Q

CARATTERISTICHE - CHARACTERISTICS - KENMERKEN

DESCRIZIONE
DESIGNATION

BESCHRIJVING

CARICO

LOAD

LAST

D

CAPACITA’

CAPACITY

INHOUD

MIS. INGOMBRO
OVERAL LENGTH

TOTAALAFMETIN-

GEN

PESO

WEIGHT

GEWICHT

GL 400

550

400/880 Kg

157 Kg

A

B

C

1270 1300 850

GL 600

600

600/1320 Kg

277 Kg

1380 1435 1070

GL 800

650

800/1760 Kg

308 Kg

1540 1635 1070


Content      ..     27      28      29