CG935G Wheel Loader. Manual - part 24
 

  Index      loaders     SICHUAN CHENGDU CHENGGONG CG935G Wheel Loader - service manual


Search            


Content   ..  22  23  24  25   ..


CG935G Wheel Loader. Manual - part 24


- 97 - 

8. Fit on the oil filling cap. 

9. Start the engine and run it for a few minutes. 

10. Maintain 

the 

hydraulic 

oil level in the middle of the oil gauge, and if necessary, refuel 

it through the oil filling port. 

11.   Shut down the engine.


9.4 Maintenance of Each 50 Working 

Hours or Every Week


 Firstly carry on the aforementioned 

examination items 

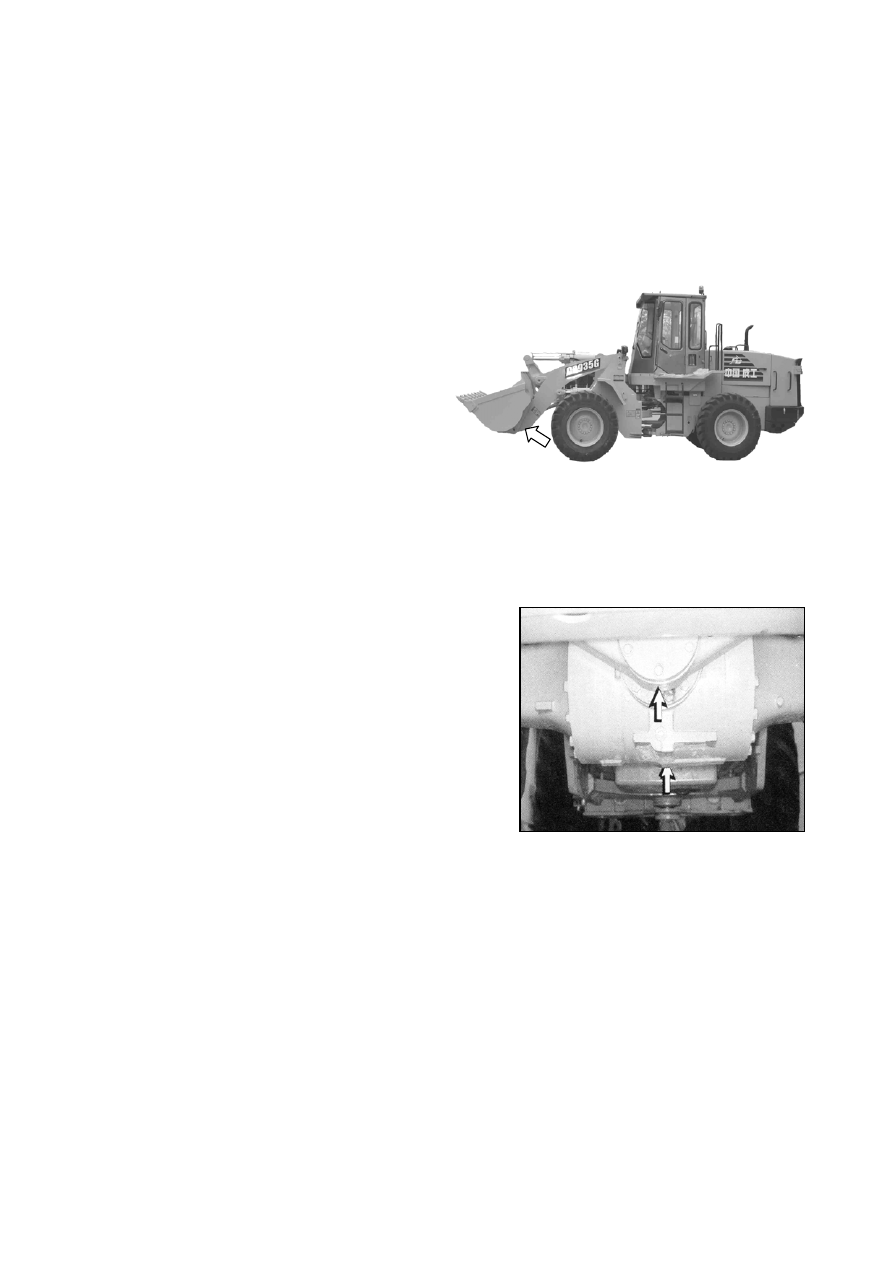
Lower hinge pin of dipper 

Lubricate the hinge pin 

Lubricate two hinge pins under the dipper. 

9.5 Maintenance of Each 100 Working Hours or Every Two Weeks 

 Firstly carry on the aforementioned 

examination items 

Oscillating frame of rear axle 

Lubricate the two lubricating joints of the 

oscillating frame of the rear axle. 

Hinge pin of hydraulic oil cylinder and tie bar 

Lubricate 11 hinging joints of the working device 

(excluding two hinge pins of the dipper). 

Steering cylinder’s hinge pin 

Lubricate 4 bearings of the left and right steering cylinders. 

Articulated bearing of front and rear frames 

Lubricate the upper and lower articulated bearings of the front and rear frames. 

Air conditioning System 

1. For the integral air conditioning system, do not dismantle it randomly so as to prevent the 

condensator from leakage. Examine it regularly; especially examine whether the pipe joints 

are loosened and whether the collecting screws are loosened. For any problem, the 

corresponding measures shall be taken. 

- 98 - 

2. Regularly examine the belt for proper tightness. Usually, after working for 100 hours, it 

shall be examined one time. 

3. Regularly clean the dust on the surface of condenser. It may be cleaned with water or 

high-pressure air blower to prevent weakening the condensation effect. Usually, after 

working for 100 hours, it shall be cleaned one time. Spray rinsing with steam is not 

allowed. 

4. While removing the system refrigerant, discharge it slowly to avoid randomly discharging 

of the antifreezing oil. Keep it away from skin. 

5. While replacing the parts, add the antifreezing oil according to the requirements. 

6. The expansion valve has been adjusted well according to the relevant regulations. Do not 

adjust it without authorization. 

9.6 Maintenance of Each 250 Working Hours or Every Month


 Firstly carry on the aforementioned examination items 

Engine oil and filter 

Replace engine oil and filter 

1. Disassemble the oil drain plug of crankcase, discharge oil, clean the plug and install it. 

2. Open the machine’s left maintenance door, disassemble the filter with a zonary wrench. 

3. Clean the filter’s shell base, remove all old filter gaskets. 

4. Smear new filter gasket with a thin layer of engine lubricant.   

5. Install new filter by hand, tighten it for semi-circle when the gasket touch the base. 

6. Disassemble the oil filling cap, and add fresh oil into the crankcase. See also “Viscosity and 

Full Capacity of Operation Oil”. Clean the oil filling cap and install it. 

7. Start the engine to heat oil, detect leakage, and shutdown the engine. 

8. Maintain the engine oil in the normal position of oil gauge. 

9. Install the maintenance door. 

Braking system 

Test the braking capacity of the service brake. 

There shall not have any people and obstacles around the machine. 

Fixed link of the front and rear frames shall be packed up.   

Test the brake on dry road. 

- 99 - 

The following tests are used to determine whether the service brake functions are normal 

or not, not to measure the maximum braking force. The vehicle braking force needed by the 

engine running at a certain speed is adapted with the setting value of the engine and the 

efficiency of the driving system, as well as the braking capacity of the brake. 

When the machine begins moving, the revolving speed of the engine when braking, the 

service brake shall be compared with that of the engine as braking stopper is under the original 

test, and shall be a system wear symbol. 

1. Start the engine, slightly raise the bucket, brake the service brake, and release the parking 

brake. 

2. When braking the service brake, put forward the gearshift at the second gear. 

3. Gradually increase the revolving speed of the engine to high speed idle, and the machine 

shall not move. 

4. Let the revolving speed of the engine drop to low speed idle, set the gearshift to stop short, 

close up the parking brake, put the bucket on the ground, and shutdown the engine. 

 If the loader starts moving, lower the rpm immediately and apply parking brake. 

If the machine still moves when tasting the service brake, please connect with 

related service station and allow serviceman to check the machine. If necessary, the service 

brake shall be repaired before reuse of the machine. 

Test the braking capacity of the parking brake. 

There shall not have any people and obstacles around the machine. 

There shall not have any people and obstacles around the machine. 

Fixed link of the front and rear frames shall be packed up.   

Fixed link of the front and rear frames shall be packed up. 

Carry on the test on dry cement road which slant angle is about 8 degree and the length of 

the slope is about 20 meters. 

The following tests are used to determine whether the service brake functions are normal 

or not, not to measure the maximum braking force. 

 Start the engine, and raise the bucket to the transport position (40 centimeters above the 

ground). 

 Drive the machine to the center of the slope, tramp the service braking pedal to stop the 

- 100 - 

machine (do not loosen the pedal at this time). 

 Set the gearshift to the stop short and close up the parking brake. 

 Loosen the service braking pedal (shall not turn off the engine), observe whether the 

machine moves down or not. At this point in time, if the machine doesn’t move in five 

minutes, the parking brake is normal. 

If the machine moves, immediately tramp the service braking pedal to stop the 

machine and quickly drive it off the slope. 

If the machine still moves when testing the parking brake, please connect with 

related service station and allow serviceman to check the machine. If necessary, the 

parking brake shall be repaired or adjusted before re-use the machine. 

Cooling system 

Add coolant additive. 

Do not add additive randomly before reading and understanding the content of the 

chapter “Cooling System Specification”. 

The maintenance door of the radiator cap is located on the top of the aft closure of the 

machine. 

1. Open the maintenance gate. 

2. Slowly unscrew the radiator cap and release pressure. 

3. Add 0.25L coolant. 

4. Fit on the radiator cap and close the maintenance gate. 

Splines of propeller shaft 

Lubricant splines 

1. Disassemble the fixed link of the front and rear frames and start the engine. 

2. Turn the machine right or left to the limit position. 

3. Put the bucket on the ground, close up the parking brake, and shutdown the engine. 

4. Lubricate the hinged splines of propeller shaft. 

Cooling Fan and Generator Belt 

Check – Adjust – Replace 

Check belt conditions and tension. In case the belt is worn out or damaged, the whole belt 

component should be replaced. 


Content   ..  22  23  24  25   ..