DIESEL PARTICULATE FILTER HANDLING. Manual - part 4


  Index      Engines     DIESEL PARTICULATE FILTER HANDLING - service manual 2013 year


Search            


Content   ..  2  3  4  5   ..


DIESEL PARTICULATE FILTER HANDLING. Manual - part 4


ENGINE

DIESEL PARTICULATE FILTER HANDLING MANUAL, WSM

1-S5

[2]  DPF EXCHANGE FLOW
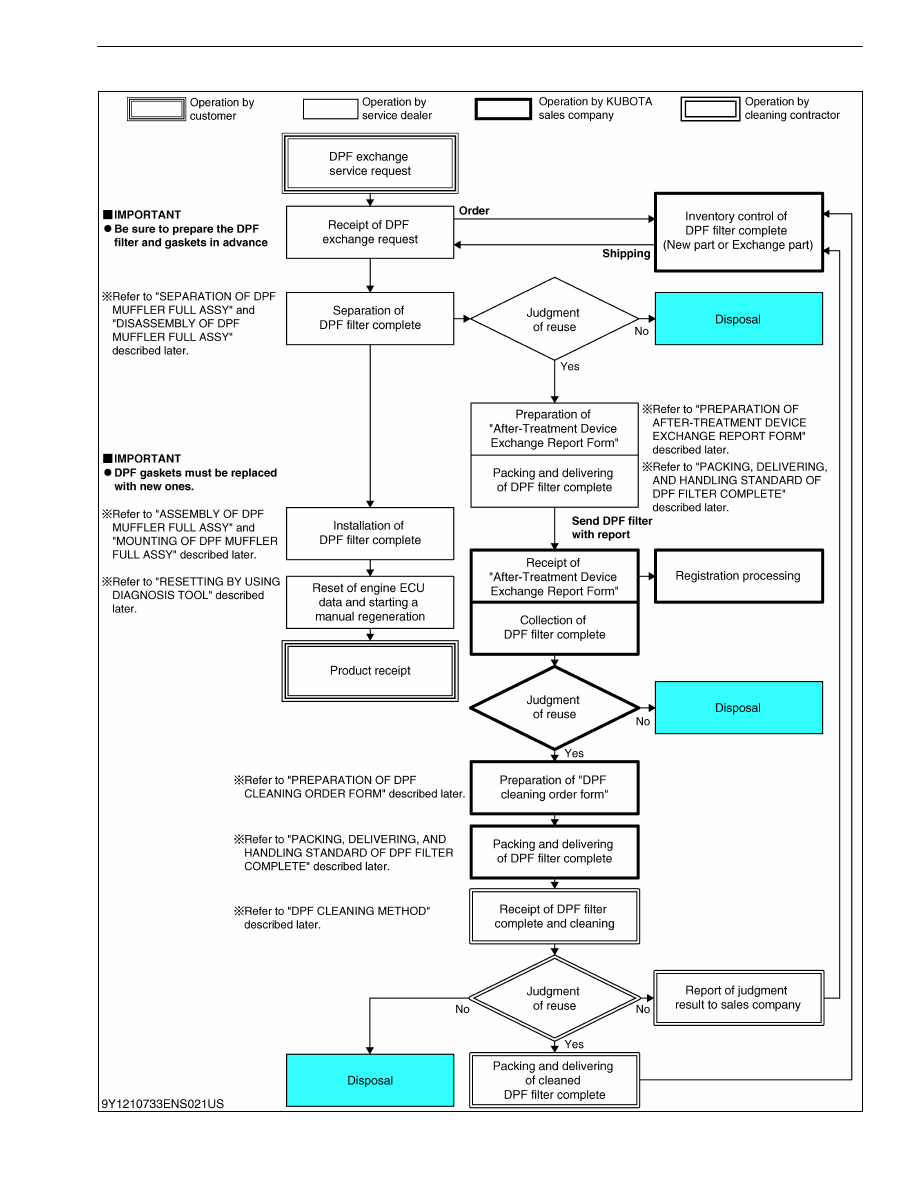
ENGINE

DIESEL PARTICULATE FILTER HANDLING MANUAL, WSM

1-S6

4. DPF CLEANING PROCEDURE

[1]  TO ENSURE SAFETY AND GOOD PERFORMANCE IN DPF 

CLEANING PROCEDURE

(1) Always work in the workshop equipped with a electric hoist (including mobile hoist).
(2) Put a product (engine) on a stable ground, and set the parking brake.
(3) As the DPF muffler full assy is hot just after the engine shutdown, make sure to start operation after it gets cool. 
(4) Make sure not to let any foreign substances enter the opening section during the operation.
(5) Make sure not to damage the DPF muffler full assy by falling or impact as it contains a ceramic filter. 

IMPORTANT

• Since the DPF that was dropped or given a shock cannot be reused even if there is no damage outwardly,

replace it with a new one.

ENGINE

DIESEL PARTICULATE FILTER HANDLING MANUAL, WSM

1-S7

[2]  SEPARATION OF DPF MUFFLER FULL ASSY

Follow the procedures below to separate DPF muffler full assy from a product (engine). 

Prior Arrangement for Installation and Removal of DPF
1. Before removing the DPF muffler full assy from a product

(engine), connect the diagnosis tool (Diagmaster), check the
failure history (DTC), and save to the "Project" on the
Diagmaster.
Before removing the DPF for cleaning, keep the records of the
engine serial number, DPF filter complete part number, DPF
filter complete serial number, and engine operating time, which
are required in preparing the DPF cleaning order form.
Record the engine operating time by checking the “Hourmeter”
on the data monitor of the diagnosis tool (Diagmaster).

(1) Engine Serial Number
(2) DPF Filter Complete Part Number / 

DPF Filter Complete Serial Number

(a) CAN Communication Connector 

(For Servicing)

[A] D1803-CR-E4, D1803-CR-TE4, 

V2403-CR-E4, V2403-CR-TE4

[B] V2607-CR-E4, V2607-CR-TE4, 

V3307-CR-TE4

[C] V3800-CR-TE4, V3800-CR-TIE4, 

V3800-CR-TE4C, 
V3800-CR-TIE4C

[D] D1803-CR-E4, D1803-CR-TE4, 

V2403-CR-E4, V2403-CR-TE4, 
V2607-CR-E4

[E] V2607-CR-TE4, V3307-CR-TE4
[F] V3800-CR-TE4, V3800-CR-TIE4, 

V3800-CR-TE4C, 
V3800-CR-TIE4C

ENGINE

DIESEL PARTICULATE FILTER HANDLING MANUAL, WSM

1-S8

(1) D1803-CR-E4, D1803-CR-TE4, V2403-CR-E4, V2403-CR-TE4

Connector of Exhaust Temperature Sensor and Differential
Pressure Sensor
1. Disconnect the connectors of exhaust temperature sensor (6),

(7), (8) and differential pressure sensor (2) from wiring harness.

2. Remove the connectors of exhaust temperature sensor (6), (7),

(8) from the bracket.

3. Remove the clamps (4).
4. Remove the tube (9), (10) from the differential pressure pipe (3),

(11).

5. Remove the differential pressure sensor (2).
6. Remove the differential pressure sensor bracket (1).

Separation of Muffler Full Assembly (DPF)
1. Unscrew the screw of muffler flange.
2. Unscrew the muffler full assembly (DPF) mounting screws (2).
3. Remove the muffler full assembly (DPF) (1).

NOTE

• When installing and removing the DPF muffler, make sure

that the temperature sensor, differential pressure sensor,
and differential pressure pipe do not make contact with
surrounding parts.

(1) Differential Pressure Sensor 

Bracket

(2) Differential Pressure Sensor
(3) Differential Pressure Pipe
(4) Clamp
(5) Screw of Muffler Flange
(6) Connector of Exhaust Temperature 

Sensor (T2)

(7) Connector of Exhaust Temperature 

Sensor (T1)

(8) Connector of Exhaust Temperature 

Sensor (T0)

(9) Tube
(10) Tube
(11) Differential Pressure Pipe

(1) Muffler Full Assembly (DPF)

(2) Muffler Full Assembly (DPF) 

Mounting Screw


Content   ..  2  3  4  5   ..