BBM 25 Push Mower Model: BB25-Kawasaki. Manual - part 3
 

  Index      Engines     BBM 25 Push Mower Model: BB25-Kawasaki - service manual


Search            


Content   ..  1  2  3  4   ..


BBM 25 Push Mower Model: BB25-Kawasaki. Manual - part 3


9

ASSEMBLY - SETUP

Taking the following precautions will lessen the risk of 
injury and property damage.
Use extreme care in handling gasoline. Gasoline is ex-
tremely fl ammable and the vapors are explosive.

- Extinguish all cigarettes, cigars, pipes, and other
sources of ignition.
- Use only approved gasoline containers.
- Never remove gas cap or add fuel with the engine
running.
- Allow engine to cool a minimum of 3 minutes before
refueling.
- Never fuel the machine indoors.
- Never store the machine or fuel container where there
is an open fl ame, spark, or pilot light such as on a water
heater or other appliances.
- Never fi ll containers inside a vehicle or on a truck or
trailer bed with a plastic liner.  Always place containers
on the ground away from your vehicle when fi lling.
- Remove the mower from the truck or trailer and refuel
it on the ground.  If this is not possible, then refuel the
equipment with a portable container, rather than from a
gasoline dispenser nozzle.
- Keep the nozzle in contact with the rim of the fuel tank
or container opening at all times until fueling is com-
plete.  Do not use a nozzle lock-open device.
- If fuel is spilled on clothing, change clothing
immediately.
- Never overfi ll fuel tank.  Always wipe off any spilled fuel
or oil.  Replace fuel cap and tighten.

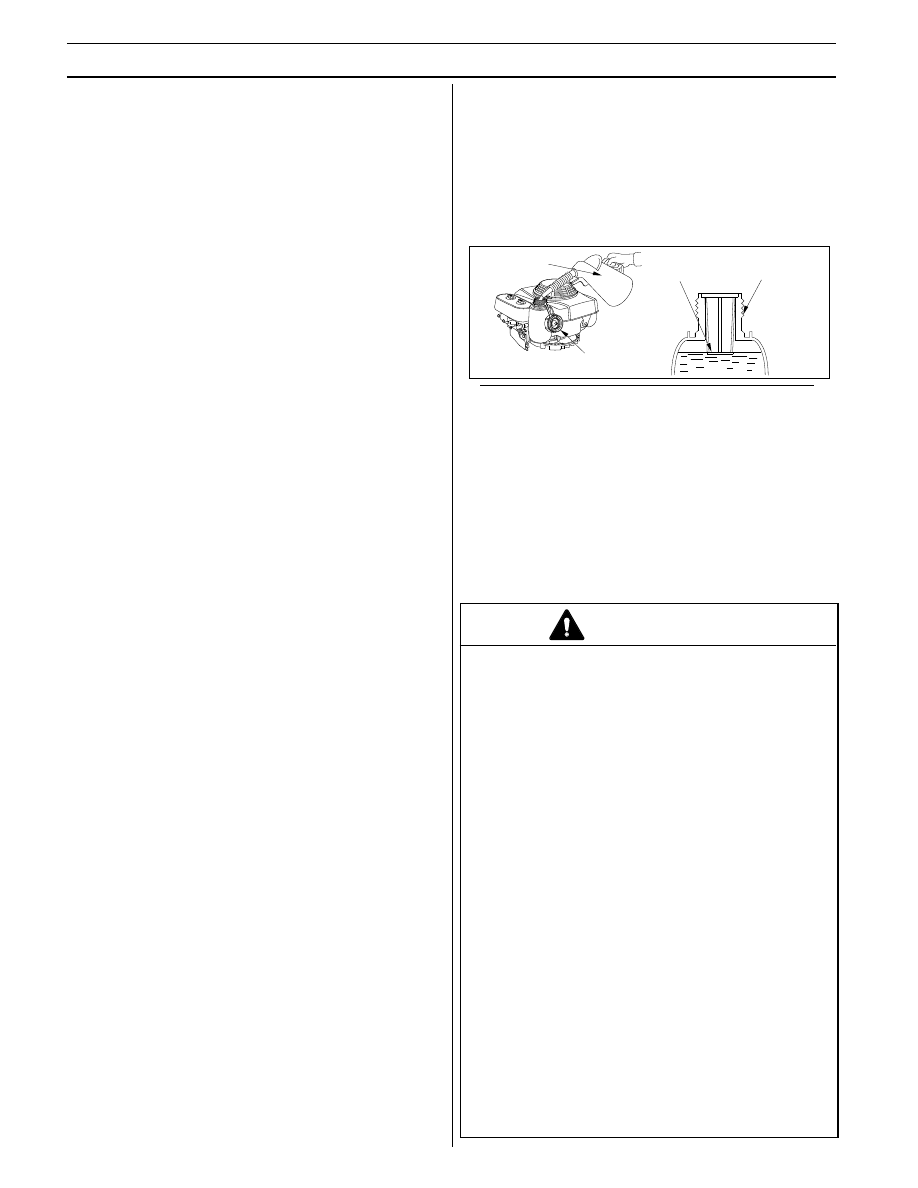
WARNING

MAXIMUM

FUEL LEVEL

FUEL FILLER

NECK

FUEL FILLER CAP

APPROVED FUEL
CONTAINER

STEP 9
Before fi lling the engine with gasoline - follow all instructions in 
this manual as well as all instructions provided in the 
Kawasaki

 Owner’s Manual.   

Maximum fi ll volume: 
Kawasaki:   1.9 Qt (1.8 Liter) -  87 octane or higher

The engine will not operate on gasoline marketed as 
E-85 (85% ethanol)

10

CONTROLS & OPERATION

Before operating the mower for the fi rst time, please review 
and understand the entire manual including all Warnings and 
Cautions.  
Even if you have operated other mowers in the past please 
take time to become familiar with how this mower works and 
practice all operations to build up your skills. 

BEFORE ANY OPERATION ALWAYS:

- Inspect the mower for any visible damage or broken parts
- Check the oil level in the engine
- Make sure that when you release the upper control bar

that the blade will disengage and stop.  If it does not stop


immediately do not use the lawn mower until the problem has


been corrected.  Contact 

Bad Boy Mowers for advice.

- Never operate the mower with obvious damage or


malfunction until the problems have been corrected. 

WARNING

N

ever make any adjustments or repairs with the 

engine running.  Disconnect the spark plug wire, 
and keep the wire away from the spark plug to 
prevent accidental starting. 

STARTING THE ENGINE
To start a cold engine it is important to use the “Choke” 
position.  To start a warm engine it is not necessary to use the 
choke.

For best performance use the “Full Throttle” position for all 
mowing.  To verify that the engine is running at full throttle 
please follow the steps outlined under the set up instructions 
-

 Step 7 on Page 8 or 9.

Bad Boy Mower dealer can typically also verify the correct 

full

 throttle adjustment.  The engine speed should be 

approximate-ly  3600 RPM without the blade engaged (no 
load).

BLADE CONTROL - BBC  (Blade Brake Clutch)
It is a multi step process to engage the blade. Do not start the 
engine and the blade on an uncut lawn.  If the blade is blocked 
by tall grass or debris it can damage the belt drive between the 
engine and the blade during the engagement. 

1. Start the engine and let it warm up for 10 to 30 seconds.
2. Set the throttle control to the “Full Throttle” position.
3. Push the lock (1) for the upper control bar to the side.
4. Push down on the upper control bar until it rests on the
handlebar (2).  You will distinctly hear the blade operating -
making a fan like noise.
5. When the upper control bar is released the blade should
stop within 3 seconds.

Additional maintenance instructions are found on Page 14.

WARNING

NEVER insert a hand or any other object in the grass 
discharge chute to verify that the blade has stopped.

If the blade continues to run (no change in the noise 
or size of the grass bag) after releasing the upper 
control bar it is an indication of a malfunction of the 
BBC system.  

If the blade did not stop during the BBC Function Test 
procedure or if you are unsure - Immediately stop the 
engine by using the throttle control on the left side of 
the control panel.  The BBC system will require a repair 
before further use.  Immediately contact 

Bad Boy 

Mowers for advice.  Do not under any circumstances 
defeat the function of the BBC system.  This can cause 
serious injury or death.

CHOKE

FULL THROTTLE

IDLE THROTTLE STOP

1

2

BBC Function Test - Before each use
A simple test to verify the BBC function is to install an empty 
grass collection bag.  The mulch plug should not be installed.

1. Start the engine.
2. Engage the blade per above procedure.  Notice how the
noise changes and that the bag becomes “infl ated”.
3. Release the upper control bar.  If the bag does not “defl ate”
immediately, it indicates that the blade is still engaged and
rotating.
4. IF the bag defl ated - verify that the blade has stopped
rotating by removing the grass bag and look at the stopped
blade through the grass discharge chute.

11

CONTROLS & OPERATION

Drive Adjustment

3

1

2

When operating the lower control 
bar (1) typical movement on the 
red adjustment knob (3) should be 
between 1/4” to 3/8” (6 to 10 mm)

DRIVE CONTROL

The drive system consists of a two speed transmission and an 
adjustable belt drive from the engine to the transmission.

The transmission speed can be set to LO - N - HI
HI speed is approximately  4mph - a fast walking speed.
LO speed is approximately 3mph - an average walking speed.

The shifter arm is intentionally made fl exible.  When the arm is 
locked in the LO or the HI position the transmission will 
automatically mesh into the gears as soon as the drive is 
engaged by operating the lower control bar. 

ENGAGING THE DRIVE

To engage and disengage the drive system pull up on the 
lower control bar (1).  Typically the drive will engage when the 
lower control bar is approximately 1 to 1.5 inches from the 
handle (2). 

Notice
Due to wear, the drive engagement position of the lower 
control bar can change.  If the distance between the lower 
bar and the handle (2) is less than a 1/4 inch when the mower 
starts to drive make an adjustment on the red knob located 
below the engine fuel tank (3).  
If needed turn the red knob 2 turns clockwise.  Verify the drive 
position of the control  bar by operating the mower.  If needed 
repeat the adjustment.

HEIGHT ADJUSTMENT

Each wheel can be adjusted individually to a specifi c cutting 
height from 1 inch to 4.5 inch.  Notice: It is only possible to 
move the adjustment on one side 2 - 3 steps each time.

Moving the front wheel height adjusters forward raises the 
cutting height.  Moving the rear wheel height adjusters towards 
the rear of the mower raises the rear cutting height.  

Always adjust the height adjusters to the same position both in 
the front and the rear for best cutting results.

WARNING

Never readjust the cutting height while the engine 
is running.  STOP the engine.  Never lift the 
mower by placing your hand or fi ngers under the 
edge of the mower deck.  

MODES OF OPERATION

This mower is approved to be used in two different operational 
modes:

1  With a grass catcher in place
An original equipment 

Bad Boy Mower catcher has been 

tested to be used with this mower.  It is important to always 
inspect the catcher for deterioration.  If the material is ripped or 
worn the bag shall not be used.   

2. With the mulch plug installed
If the mulch plug is installed ensure that the rear door can
close completely.

WARNING

Do not operate the lawn mower without the mulch 
plug or the 

Bad Boy Mower grass catcher in 

place.  Never attempt to operate the mower with 
the rear door removed, damaged or propped 
open. 

Low 1”  (25mm)

High 4.5” (114mm)

7 steps - 1/2”  (13mm)

               the engine before 

making any height adjustment

12

MAINTENANCE

In addition to this schedule follow the Maintenance Schedule in the Kawasaki Owner’s Manual.


This maintenance schedule assumes daily use by a landscape company.  
One Month of use is assumed to be 15 to 20 days of operation.

Maintenance - 

Service Interval

Procedures

Before each use

Check the engine oil level.
Check the operation and integrity of the BBC control system (see page 10).
Inspect the mower blade for wear or damage.
Inspect the cables for any wear or damage.
Inspect the grass catcher for any damage.
Check for any loose or missing screws or damaged parts.
Clean under the lawn mower deck (after usage).

First 20 Hours or 
Within 4 weeks

Change the engine oil (see page 13).
Check the throttle cable adjustment (see pages 8-9).

Every 50 Hours or
every 2 months  

Lubricate the pivot arms on the control panel with oil.
Check the function and adjustment of the Blade Brake Clutch cable (see page 14)
Check and clean the engine air fi lter (see the engine Owner’s Manual) 

Every 100 Hours or 
every 4 months 

Change the engine oil (more often in dusty conditions). 
Check the spark plug.
Clean the engine with compressed air.

Every 200 Hours or
every 8 months

Replace the paper air fi lter (more frequently in dusty conditions).
Replace the spark plug.
Adjust the valve clearance.

NOTICE

Several of the operations described in this 
Maintenance section involves placing the mower 
on its right side.  
To avoid spills of oil and gasoline always:
- Place the mower on a hard surface such as a

concrete driveway or a garage fl oor.

- Never place the mower on its side when there is

gasoline in the tank - do the service of the mower
when you have run out of gasoline during normal
operation.

- Always make sure that the Oil Filler Cap is

tightened.

Any spillage of oil or gasoline can be extremely
fl ammable and explosive and under certain
conditions can cause serious personal injury and
property damage.

CLEANING THE MOWER

We do not recommend using a garden hose to clean the 
mower.  The buildup of moist grass, fertilizer and water can 
cause extreme corrosion damage to many parts of the mower 
and the engine. 
Never use a Pressure Washer:
The use of a pressure washer can force water and moisture 
into ball bearings and engine parts and cause substantial dam-
age. 

- Clean the underside of the mower by scraping any build-up

of grass and trash.

- Clean off the outside of the engine and the top of the mower

with compressed air.  Any accumulation of debris under the
belt cover can typically also be removed with compressed air
without removing the protective belt cover.

- Wash the Grass Bag with a garden hose frequently.  The
holes that allows the grass bag to breathe will eventually clog
with dirt.  A clogged bag will not collect the grass clippings
effectively.  Do not install and use a wet grass catcher.  It will
plug prematurely.


Content   ..  1  2  3  4   ..