BBM MAVERICK MODELS ZERO-TURN MOWER. Manual - part 6
 

  Index      Engines     BBM MAVERICK MODELS ZERO-TURN MOWER - service manual


Search            


Content   ..  4  5  6  7   ..


BBM MAVERICK MODELS ZERO-TURN MOWER. Manual - part 6


PAGE 

21

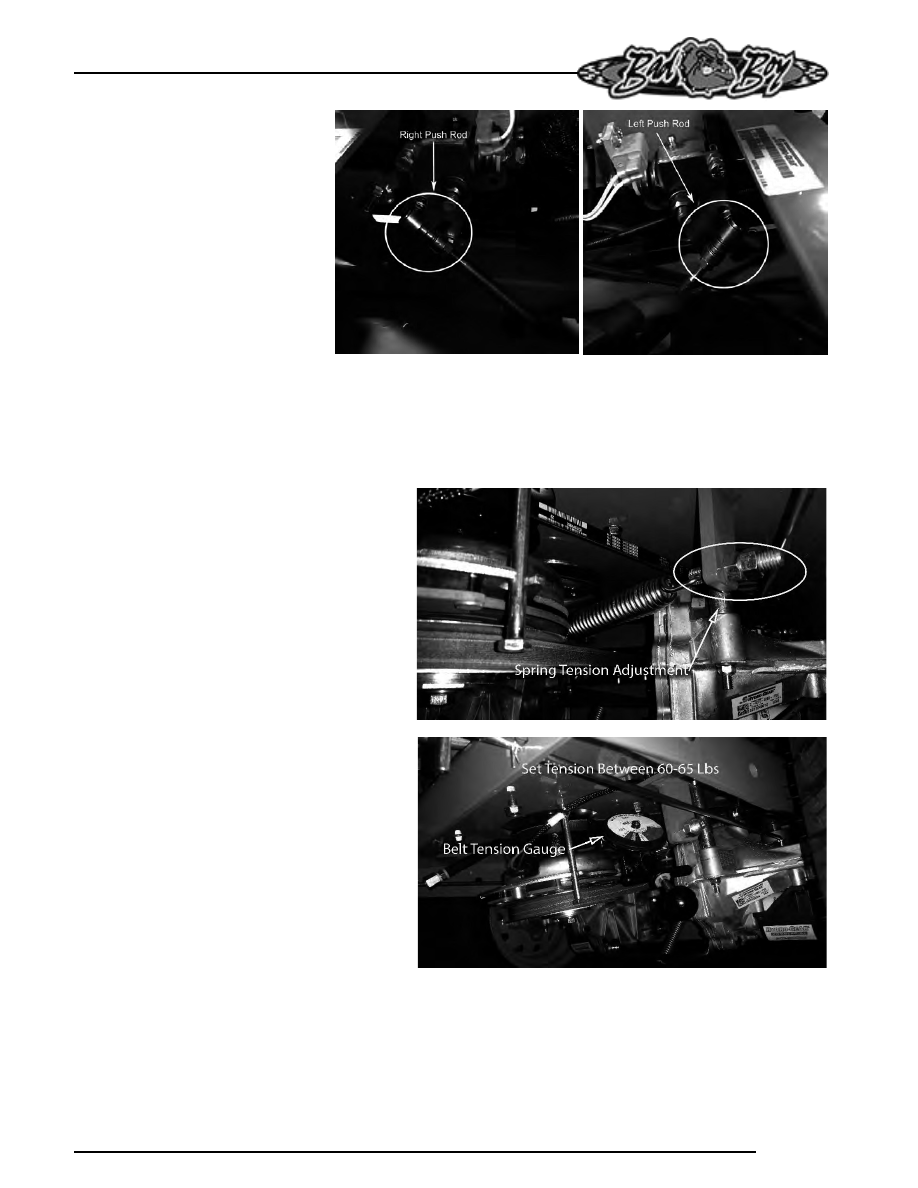
When adjusting the tracking on the 

mower, the length of the pushrods can 

be changed by screwing the pivot joint 

in or out on the ends of the rods.  

Shortening the overall length of the 

rod slows the pump down.  

Lengthening the rod will increase the 

speed of the pump.   

SECTION 2: DRIVE BELT


Shown on the right is the tensioner for your 
pump belt. Adjusting this will either increase or 
decrease tension on the belt. Use a ¾” wrench 
to loosen the jam nuts and either tighten for 
more belt tension or loosen for less belt tension. 

The belt tension should be set between 60-65 

lbs. 

Use a belt tension gauge to ensure the proper 
tension. Your dealer or service center will have 
a belt tension gauge or you can buy one (Part 
Number 041-9999-00). 

PAGE 

22

SECTION 3: ENGINE 

Kohler Confidant


This machine has an oil drain hose installed on 
the engine to allow for easier oil changes. Bad 
Boy  recommends that the oil and filter be 
changed after the initial 8 hrs of use, and at 
intervals of 50 usage hours or yearly, whichever 
occurs first after that. The oil capacity is 2 
quarts. Bad Boy 10W-30 synthetic blend engine 
oil is recommended for maximum protection. 

3.1 Changing your engine oil and oil filter:

1)

Remove oil dipstick and open oil drain.
Allow oil to completely drain. (Make sure to have
an oil pan ready to capture old oil and properly
dispose old oil.)

2)

The oil filter is located on the right side of the
engine. Clean area around oil filter. Place a
container under the oil filter to capture any oil
and remove filter. Wipe off mounting surface and
reinstall drain plug. Torque to 10 ft.*lb.

3)

Place new filter in shallow pan with open end up.
Fill with new oil until oil reaches the bottom of the
threads. Allow 2 minutes for oil to be absorbed
by filter material.

4)

Apply a thin film of clean oil to rubber gasket on
new filter

5)

Refer to instructions on oil filter for proper
installation.

PAGE 

23

6)

Fill crankcase with approximately 2 quarts of
new oil. Level should top of indicator on dipstick.

7)

Reinstall oil fill/dipstick and tighten securely.

8)

Start engine; check for oil leaks. Stop Engine;
correct oil leaks. Recheck oil level

9)

Dispose of used oil and filter in accordance with
local ordinances.

The fuel filter is located in the fuel line about 12˝ from 
the carburetor on the side of the engine. Replace the filter 
yearly. Prior to the removal of the old filter, note the 
direction of fuel flow as indicated on the filter. Have towels 
readily available in order to quickly remove any fuel leakage. 
Always use new hose clamps and ensure the security of 
the new filter by lightly pulling on each hose. Always 
perform maintenance outdoors or in a well


ventilated area. Do not smoke or allow any open flames 
in the vicinity of any maintenance activities. 

3.2 Changing your fuel filter:

1)

Locate your fuel filter and mark the direction it is
facing.

2)

Clamp each side of the fuel filter to minimize and
gas spills.

3)

Remove the clips from each side of the fuel filter
and remove the fuel filter.

4)

Place the new fuel filter in the same direction as the
old and place clips back into place and remove
clamps.

PAGE 

24

The air cleaner is the engine’s only defense 
against damaging foreign particles. It is very 
important that the  air cleaner element is inspected 
prior to each use. Remove the element and tap its 
sides in order to remove debris. Do not blow the 
filter out using compressed air. Doing so will 
greatly reduce the air cleaner’s effectiveness. 
Replace yearly; more often in  dusty environments. 
Adhering to these practices will help prevent loss 
of power and premature engine failure. 

3.3 Changing the air cleaner :

1)

Unlock the air cleaner cover and remove
to access the air cleaner.

2)

Remove the paper element and
precleaner.

3)

Replace or wash precleaner in warm
water with detergent. Rinse and allow to
air dry.

4)

Lightly oil precleaner with new engine oil;
squeeze out excess oil.

5)

Replace paper element and place
precleaner onto new paper element.

6)

Install onto base and place cover back on
and lock into place.


Content   ..  4  5  6  7   ..