XD5000E Diesel Portable Generator. Manual - part 3
 

  Index      Engines     XD5000E Diesel Portable Generator - service manual


Search            


Content   ..  1  2  3  4   ..


XD5000E Diesel Portable Generator. Manual - part 3


Operator’s Manual for Portable Generator

7

Remove Contents from Carton

1. Open carton completely by cutting each

corner from top to bottom.

2. Remove and verify carton contents prior to

assembly. Carton contents should contain

the following:

TABLE 3. Contents

TABLE 4. Portability Kit (optional)

3. Call Generac Customer Service 1-888-

GENERAC with the unit model and serial

number for any missing carton contents.

4. Record model, serial number, and date of

purchase on front cover of this manual.

Assembly

Call Generac Customer Service at 1-888-

GENERAC for any assembly issues or con-

cerns. Please have model and serial number

available.
The following tools are required to install the

accessory kit.
• Ratchet with 10mm and 13mm sockets 
• 13mm box wrenches
NOTE: The wheels are not intended for

over-the-road use.
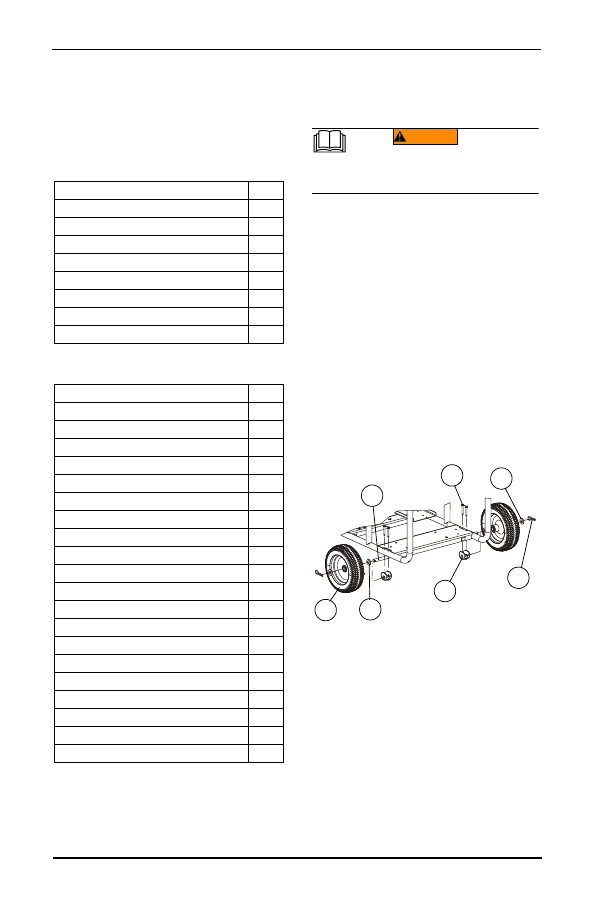
Install wheels as follows. See 

Figure 2-8

.

1. Insert cotter pin (E) to one end of axle (B).
2. In this order; slide washer (D), wheel (A),

washer, (D), axle mount (2-C), washer (D),

wheel (A), washer (D), and cotter pin (E)

onto axle.

3. Place wheel assembly under frame so

axle mounts align with holes in cradle

frame.

4. Secure with M6 screws (L).
.

Figure 2-8. Wheel Assembly

Install frame foot and rubber bumpers as

shown in 

Figure 2-9

.

1. Slide onto M8 screw (Q), flat washer (M),

rubber foot (K).

2. Slide assembly through frame foot (J). Add

M8  flat  washer  (N),  and  secure  with  M8-

1.25 Locknut (P).

3. Place foot bracket assembly under cradle.
4. Slide M8 flat washers (N) onto M8-

1.25x110 screws (T) and insert through

foot bracket assembly and cradle.

5. Secure with M8 flat washer (N) and M8

locknut (P).

Item

Qty.

Main Unit

1

Owner’s Manual

1

Liter Oil SAE 30

2

Product Registration Card

3

Service Warranty

1

Emissions Warranty

1

Muffler Extension

1

Battery Bracket Assembly

1

Portability Kit (optional)

Qty.

10” Wheel (A)

2

Axle (B)

1

Axle Mount (C)

2

5/8” Flat Washer (D)

4

Cotter Pin (E)

2

Handle (F)

1

Handle Mount (G)

2

Handle Grip (H)

2

Frame Foot (J)

2

Rubber Feet (K)

2

M6-1x50mm Screw (L)

4

.344”x1.0” Flat Washer (M)

2

M8 Flat Washer (N)

10

M8-1.25 Locknut (P)

6

M8-1.25x30 Screw (Q)

2

M8-1.25x45 Screw (R)

2

M8-1.25x50 Screw (S)

2

M8-1.25x110 Screw (T)

2

5/16x1.25 Pin Release (U)

1

Lanyard

1

(000100a)

WARNING

Consult Manual. Read and understand manual
completely before using product. Failure to 
completely understand manual and product
could result in death or serious injury.

000704

B

L

E

C

D

C

A

8

Operator’s Manual for Portable Generator

.

Figure 2-9. Frame Foot Assembly

Install handle as shown in 

Figure 2-10

.

1. Place a M8 flat washer (N) onto M8-

1.25x45 screw (R) and through handle

bracket and handle (A).

2. Secure with M8 flat washer (N) and M8

locknut (P).

3. Install handle grips (H).
.

Figure 2-10. Handle Assembly

Battery Installation (if equipped)

The following tools are required to install the

battery.
• 7/16” (11mm) ratchet, socket and wrench
Install the battery as follows. See 

Figure 2-11

.

1. Place battery onto battery tray with the

positive terminal on the right.

2. Connect red battery wire to positive (+) ter-

minal with a bolt, washer and nut.

3. Slide red battery terminal post cover over

terminal and hardware.

4. Connect black battery wire to negative (-)

terminal with a bolt, washer and nut.

5. Slide black battery terminal post cover

over terminal and hardware.

6. Slide one spacer onto each screw.
7. Slide these assemblies through holes in

top of bracket.

8. Place bracket assembly over top of bat-

tery. Do not to touch battery terminal hard-

ware. The screws will pass through holes

on battery tray.

9. Place washer, lock washer and wing nut

onto screw.

10.  Tighten wing nuts until the lock washers

are compressed to being flat.

NOTE: If the battery is unable to start the

engine, charge it with the 12V charger

included in the accessory box (see the

"Charging a Battery" section for details).

Figure 2-11. Battery Installation

Add Engine Oil

Use high detergent, premium quality motor oil

certified for service class CI-4 or CJ-4. SAE

20W-40 is recommended for general, all tem-

perature use. See 

Figure 2-12

.

Figure 2-12. Oil Recommendations

1. Place generator on a level surface.
2. Verify oil fill area is clean.
3. Remove oil fill cap and wipe dipstick clean.

Se

Figure 2-13

.

Figure 2-13. Remove Dipstick

000710

M

P

P

N

Q

K

T

J

000706

F

R

H

P

N

000716

A

B

(000135)

CAUTION

Engine damage. Verify proper type and quantity of 
engine oil prior to starting engine. Failure to do so 
could result in engine damage.

-4 °F

(-20 °C)

14 °F

(-10 °C)

32 °F

(0 °C)

50 °F

(10 °C)

68 °F

(20 °C)

86 °F

(30 °C)

104 °F

(40 °C)

SAE 15W-40

SAE 20W

SAE 30

SAE 40

SAE 10-W30

SAE 20W

SAE 10W

000578

000115

Operator’s Manual for Portable Generator

9

4. Add recommended engine oil.
NOTE: Some units have more than one oil

fill location. It is only necessary to use one

oil fill point.
5. Thread dipstick into oil filler neck. Oil level

is checked with dipstick fully installed.

6. Se

Figure 2-14

Remove dipstick and ver-

ify oil level is within safe operating range.

7. Install oil fill cap/dipstick and hand-tighten.

Figure 2-14.  Safe Operating Range

Fuel

IMPORTANT! DO NOT use Home Heating Oil

or Bio-Diesel Fuel.
Use No. 2D diesel fuel when temperatures are

above freezing. When temperatures are below

freezing, blend No.1D diesel fuel and No. 2D

diesel fuel together for a climate adjusted fuel

ratio. 
Diesel fuel must meet the following require-

ments:
• Sulfur content of 15 parts per million (ppm)

maximum.

• Minimum Cetane index of 40.
NOTE: Low ambient temperatures as well

as engine operation at high altitudes may

require the use of fuels with higher Cetane

ratings.

Fuel Maintenance

• Always treat diesel fuel for long term stor-

age. Use the approved fuel additive and

water abatement material. Test stored fuel

every 90 days and provide additional treat-

ment if required. Periodically check and dry

abatement material as necessary.

000116

(000105)

DANGER

Explosion and Fire. Fuel and vapors are extremely 
flammable and explosive. Add fuel in a well 
ventilated area. Keep fire and spark away. Failure to
do so will result in death or serious injury. 

(000166)

DANGER

Do not overfill fuel tank. Fill to 1/2 in. of top of tank to
allow for fuel expansion. Overfilling may cause fuel to
spill onto engine causing fire or explosion, which will
result in death or serious injury.

10

Operator’s Manual for Portable Generator

Section 3 Operation

Operation and Use Questions

Call Generac customer service at 1-888-GEN-

ERAC with questions or concerns about

equipment operation and maintenance.

Before Starting Engine

1. Verify engine oil level is correct.
2. Verify fuel level is correct.
3. Verify unit is secure on level ground, with

proper clearance and is in a well ventilated

area.

Prepare Generator for Use

Grounding the Generator When 

Used as a Portable

The generator is equipped with an equipment

ground connecting the generator frame and

the ground terminals on the AC output recep-

tacles (see NEC 250.34 (A). This allows the

generator to be used as a portable without

grounding the frame of the generator as spec-

ified in NEC 250.34. See 

Figure 3-1

.

• Neutrals bonded to frame.

Figure 3-1. Grounding the Generator

Special Requirements

Review all Federal or State Occupational

Safety and Health Administration (OSHA) reg-

ulations, local codes, or ordinances that apply

to the intended use of the generator.
Consult a qualified electrician, electrical

inspector, or the local agency having jurisdic-

tion:
• In some areas, generators are required to

be registered with local utility companies.

• If the generator is used at a construction

site, there may be additional regulations

which must be observed.

Connecting the Generator to a 
Building Electrical System

When connecting directly to a building electri-

cal system, it is recommended that a manual

transfer switch be used. Connections for a

portable generator to a building electrical sys-

tem must be made by a qualified electrician

and in strict compliance with all national and

local electrical codes and laws.

Know Generator Limits

Overloading a generator can result in damage

to the generator and connected electrical

devices. Observe the following to prevent

overload:
• Add up the total wattage of all electrical

devices to be connected at one time. This

total should NOT be greater than the gener-

ator's wattage capacity.

(000103)

DANGER

Asphyxiation. Running engines produce carbon 
monoxide, a colorless, odorless, poisonous gas. 
Carbon monoxide, if not avoided, 
will result in death or serious injury.

(000178)

DANGER

Asphyxiation. Always use a battery operated carbon  
monoxide alarm indoors and installed according to  
the manufacturer’s instructions. Failure to do so will  
result in death or serious injury.

SUPERCEDED

(000179)

DANGER

The exhaust system must be properly maintained. Do not alter 
or modify the exhaust system as to render it unsafe or make it 
noncompliant with local codes and/or standards. Failure to  
do so will result in death or serious injury.

(000118)

DANGER

Risk of fire. Do not use generator without spark
arrestor installed. Failure to do so could result 
in death or serious injury. 

(000110)

WARNING

Risk of Fire. Hot surfaces could ignite 
combustibles, resulting in fire. Fire could result 
in death or serious injury.

(000108)

WARNING

Hot Surfaces. When operating machine, do not 
touch hot surfaces. Keep machine away from 
combustibles during use. Hot surfaces 
could result in severe burns or fire.

(000136)

CAUTION

Equipment and property damage. Disconnect electrical 
loads prior to starting or stopping unit. Failure to do so 
could result in equipment and property damage.

000707


Content   ..  1  2  3  4   ..