DB2 Server for VSE System Administration (Version 7 Release 5) - page 1
Contents
About This Manual
ix
Conversion of Packages
40
Organization of This Manual
ix
Migrating from Version 3 Release 2
40
Syntax Notation Conventions
xi
Choosing a Server Name
40
SQL Reserved Words
xiv
Elimination of the SET XPCC Command . .
40
Choosing an Application Server Default
CHARNAME
40
Summary of Changes
xvii
Considerations for Mixed Primary Keys with
Summary of Changes for DB2 Version 7 Release 5
xvii
Field Procedures
43
|
Enhancements, New Functions, and New
Considerations for EXPLAIN Tables
43
|
Capabilities
. xvii
Considerations for VSE Guest Sharing
43
Migrating from Version 3 Release 4
44
Chapter 1. Planning for Installation . . . 1
Considerations for Assembler Even Precision
Usage Environments
1
Packed Decimal
44
Batch Application Processing
1
Considerations for SQLSTATE Changes for
Online (CICS) Transaction Processing
2
SQL92 Support
44
Interactive Application Development
4
Migrating from Version 3 Release 5
44
Query/Report Writing
5
Considerations for Uncommitted Read
44
Components of the Relational Database
Considerations for Support of ESA-mode
Management System
6
Processors Only
44
Prerequisite Programs
7
Considerations for the Renaming of the Product
44
Virtual Storage Requirements
8
Considerations for the Removal of the User
Hardware Requirements
8
Facility Subset
44
DBNAME Directory Requirements
11
Migrating from Version 5 Release 1
45
DB2 Key Processing
11
Choosing the Default CHARNAME for All
Application Requesters
45
Chapter 2. Planning for Database
Considerations for VSE DRDA Online Requester
Generation
13
Support
45
Setting Up the DB2 Product Key
13
Considerations for RDS Above 16M
45
Database Generation Parameters
13
Migrating from Version 6 Release 1
45
Defining Database Directory Size
14
Considerations for the DBNAME Directory . .
45
Defining the Database Log
16
Considerations for Key Enablement
45
Establishing Database Capacity Parameters . . . 17
Migrating from Version 7 Release 1
45
Establishing Initial Dbspace Requirements . . . 18
Migrating from Version 7 Release 2
45
Determining Initial Dbextent Requirements . . . 21
Migrating from Version 7 Release 3
46
Choosing an Application Server Name
23
Migrating from Version 7 Release 4
46
Setting Up the DBNAME Directory
23
Release Coexistence Considerations
46
The IBM-Supplied DBNAME Directory
29
Changing the Server Name and Application Server
Updating the DBNAME Directory
29
Identifier
46
CICS CEDA DEF CONNECTIONS Command for
Moving a Database
46
a Remote Entry
31
Using the SQLDBDEF Utility
46
Choosing the Application Server Default
CHARNAME and CCSID
31
Chapter 4. Planning for Operation of
Choosing the Application Server Default Character
the Database Manager
47
Subtype
33
Starting the Application Server
47
Choosing the Default CHARNAME and CCSID for
Modes of Operation
47
Application Requesters
34
Multiple User Mode Initialization Parameters .
47
Preparing for Database Regeneration
34
Single User Mode Initialization Parameters . .
67
Database Generation Worksheet
35
Tape Support
68
Starting the Application Server in Multiple User
Chapter 3. Planning for Database
Mode
69
Migration
39
Running Multiple User Mode Application
Migration Considerations
39
Programs
70
Increasing the HELPTEXT Dbspace
39
Starting the Application Server in Single User
Migrating from Version 3 Release 1
40
Mode
72
Considerations for Invalid Indexes
40
Overriding Initialization Parameters
76
iii
Creating a Parameter Data Set
77
Recovering from DASD Failures that Damage
Stopping the Application Server
78
the Database and Log
148
Taking an Archive
78
Establishing DASD Recovery Procedures
148
Verifying the Directory
80
Choosing a Log Mode
148
Online Support Considerations
80
Backing Up the History Area
151
Choosing Dynamic or Static Tape Devices . .
151
Chapter 5. Operating the Online
Archiving Procedures
152
Performing Database Archives With Database
Support
81
Manager Facilities
152
Operating VSE Guest Sharing
81
Performing Database Archives With User
Operator Responsibilities
82
Facilities
153
Starting the Online Resource Adapter -- The
Performing Log Archives
154
CIRB Transaction
83
Labeling Your Archive Tapes
156
Adding Connections -- The CIRA Transaction . . 90
Recovery Procedures
157
Automatic Restart Resynchronization
93
Restarting Procedures
157
Changing the Default Server -- The CIRC
Restoring the Database
158
Transaction
99
Restarting from Failure of a Database Restore
161
Removing Connections -- The CIRR Transaction
100
Restarting from a System Failure While
Displaying Information -- The CIRD Transaction
103
Archiving
163
Stopping the Online Support -- The CIRT
Restarting from Failure of a Database
Transaction
112
Generation or COLDLOG Operation
163
Password Implications on Online Resource
Relocating the Database Manager
163
Adapter Termination
116
Replacing a Dbextent
164
Replacing a Log
164
Chapter 6. Maintaining Database
Recovering to a Secondary System
165
Security
119
Protecting VSAM Data Sets
119
Chapter 9. Special Topics in Recovery
VSAM Restrictions
119
Design
167
Controlling Access by ISQL Users
119
Switching Log Modes
167
Controlling Access by Remote Users
121
From LOGMODE=A
167
DRDA Security
122
From LOGMODE=L
167
Enabling Password Encryption and Decryption
From LOGMODE=Y or N
168
for DRDA
122
Using Alternate Logging
169
Using Dual Logging
170
Chapter 7. Managing Database
Reconfiguring and Reformatting the Logs
171
Storage
123
Log Reconfiguration
171
Storage Concepts
123
Log Reformatting
172
How Information is Stored in Dbspaces . .
124
History Area
173
Adding Dbspaces to the Database
125
Nonrecoverable Storage Pools
177
The ADD DBSPACE Operation
125
Characteristics of Dbspaces in Nonrecoverable
Considerations for Adding Dbspaces
126
Storage Pools
178
Expanding the Database Directory
128
Data That Can be Placed in Nonrecoverable
Acquiring Dbspaces for Packages
129
Storage Pools
181
Managing Storage Pools
131
Data That Should Not Be Placed in
Design Considerations for Storage Pools . .
131
Nonrecoverable Dbspaces
183
Monitoring Storage Pools
132
Setting Up Nonrecoverable Storage Pools and
Maintaining Storage Pools
133
Dbspaces
184
Querying for Nonrecoverable Storage Pools and
Chapter 8. Making Backups and
Dbspaces
184
Recovering from Failures
143
Understanding Recovery Concepts
143
Chapter 10. Using the Accounting
What is a Logical Unit of Work?
143
Facility
187
What is a Log?
144
Preparing to Use the Accounting Facility
187
What is a Checkpoint?
145
Setting Up Your System
187
What Happens after a System Failure?
145
Setting Up a Job Control for the Accounting
What is an Archive?
146
Files
187
Recovering from DASD Failures that Damage
Starting the Accounting Facility
193
the Database
147
Operating the Accounting Facility
194
Recovering from DASD Failures that Damage a
Generation of Accounting Records
195
Log
148
Using DRDA Accounting
195
iv System Administration
Supplying Accounting Data from DRDA
Changing the CCSID Attribute of an Existing
Applications
196
Column
251
Formats of the Accounting Records
197
Changing the Subtype Attribute of an Existing
Initialization Records
198
Column
251
Operator and Checkpoint Records
198
Setting the Application Requester Default
Termination Records
199
CHARNAME and CCSIDs
251
User Records
199
The SQLGLOB File Batch Query/Update
Remote User Records
200
Program
253
DRDA Records
201
Setting the Application Server Default Character
VSE Guest User Records
202
Subtype
253
Maintaining Accounting Data
202
Setting the DBCS Option for the Application Server 254
Considerations for an Accounting Dbspace .
203
Setting the Default Application Requester DBCS
Tables to Hold Accounting Data
203
Option
254
Loading the Accounting Data
206
EUC Conversions
256
Converting VSAM ESDS Accounting File
Unicode Conversions
256
Records into VSAM Managed SAM Feature
Examples of Setting Values for an Installation . . 256
Records
208
Example 1
257
Example 2
258
Chapter 11. Generating Additional
Identifying Classification and Translation Tables
for a CCSID
259
Databases
211
National Language Support for Messages and
Learning about Configuration Concepts
211
HELP Text
259
Reasons for Adding a Database Partition . .
211
Changing the ISQL Default Language
261
Database Generation Process
213
National Language Messages in a VSE Guest
Step 1: Update the DBNAME Directory . .
214
Sharing Environment
262
Step 2: Defining the Database Data Sets . .
214
Step 3: Setting Up Your Database Job Control
217
Chapter 13. Creating Installation Exits
263
Step 4: Generating the Database
219
Step 5: Installing the Database Components .
225
Supplying Account Numbers for Users
263
Step 6: Reload CCSID-Related Packages . .
226
How the ARIUXIT Module Works
264
Step 7: Optionally Changing the Application
Coding Your Own Accounting Exit
268
Server Default CHARNAME
226
Installing Your Version of ARIUXIT
274
Step 8: Optionally Changing the Application
Service Considerations for ARIUXIT
275
Server Default Character Subtype
227
Defining Your Own Datetime Format
275
Step 9: Optionally Setting the DBCS Option to
Datetime Formats
275
YES
227
How Datetime Exits Work
276
Step 10: Changing the Password of
Coding Your Own Datetime Exit
279
Authorization ID SQLDBA
227
Installing Your Version of ARIUXDT or
Step 11: Optionally Install the DRDA Code .
227
ARIUXTM
283
Step 12: Optionally Load Phases into SVA . .
228
Updating the SYSTEM.SYSOPTIONS Catalog
Table
284
Coding Your Own TRANSPROC Exit
284
Chapter 12. Choosing a National
284
Language and Defining Character
Coding Your Own Cancel Exit
287
Sets
231
288
Considerations when changing default
Field Procedures
290
CHARNAME and CCSID
232
Specifying the Field Procedure
291
Changing from pre-Euro CHARNAME to
When Field Procedures are Called
291
Euro-compatible CHARNAME
233
General Considerations for Writing Field
Using Alternative Character Sets
234
Procedures
292
Hexadecimal Values of the Sample Character
A Warning about Blanks
292
Sets
234
Maintaining Field Procedures
293
Specifying an IBM-Supplied Character Set at
Recovering from Abends in Exits
293
Run Time
241
Security with Field Procedures
293
Using Double-Byte Character Set (DBCS)
243
Field Procedures for Cultural Sorts
293
Identifiers Containing DBCS Characters . .
243
Field Procedure Interface to the Database
Constants and Data Containing DBCS
Manager
294
Characters
244
Field-Definition (Function Code 8)
296
CCSID Conversion
245
Field-Encoding (Function Code 0)
299
Determining CCSID Values
248
Field-Decoding (Function Code 4)
300
Setting the Application Server Default
CHARNAME and CCSIDs
249
Contents v
Chapter 14. Using a DRDA
Estimating Storage Pool Requirements
344
Estimating SYS0001 Dbspace Requirements . .
344
Environment
313
SYS0001 Storage Estimating General Formula
Benefits of Using the DRDA Protocol
313
Assumptions
345
Added Responsibilities in Using the DRDA
Derivation of the General Formula for SYS0001
Protocol
314
Storage Estimating
349
Types of Distributed Access
314
Formula for SYS0001 Storage Estimating . .
349
Remote Unit of Work
314
Examples of Using the SYS0001 Storage
Distributed Unit of Work
315
Estimating Formula
350
Summary of DRDA Support in DB2 Server for
Modifying the SYS0001 Storage Estimating
VSE
316
General Formula
351
Preparing to Implement DRDA
316
Estimating ISQL Dbspace Requirements
353
On the Application Requester
316
Estimating Dbspace Sizes for Routines
353
On the Application Server
317
Estimating Dbspace Size for Stored SQL
CICS Transaction Definitions Required for
Statements (Stored Queries)
354
DRDA
317
CICS Programs Required for DRDA
318
Entries Required in DFHSIT
319
Appendix C. Maximum Values
357
Terminal Definitions Required by AXE
319
Database Manager Maximum Values
357
Entries Required in DFHSNT
319
Database Maximum Values
358
CICS Transaction Server (TS) Considerations
319
Installing and Removing the DRDA Code
320
Appendix D. Updating
Installing the DRDA Code on the Application
SYSTEM.SYSSTRINGS
359
Server
320
Removing the DRDA Code on the Application
Appendix E. Defining Your Own
Server
320
Character Set
363
Installing the DRDA Code on the Application
Requester
320
Step 1: Identify All Characters in Your Character
Removing the DRDA Code on the Application
Set
364
Requester
321
Step 2: Classify the Characters
366
Using DRDA
321
Step 3: Determine Translation Characters
374
Creating Packages on the Remote Server
322
Step 4: Update the SYSTEM.SYSCHARSETS
Using the DBS Utility on Remote Application
Catalog Table
376
Servers
323
Step 5: Update the SYSTEM.SYSCCSIDS Catalog
Using ISQL on non-DB2 Server for VSE
Table
376
Application Servers
324
Step 6: Update the SYSTEM.SYSSTRINGS Catalog
Two-Phase Commit Processing
325
Table
377
Using the Two-Phase Commit Protocol
325
Step 7: Update the CCSID-Related Phases
378
CICS/VSE Syncpoint Manager and the Task
Related User Exit (TRUE)
327
Appendix F. Macro List
379
Managing In-Doubt LUW’s
328
Operator Commands
328
Appendix G. Service and Maintenance
Making Heuristic Decisions
329
Utilities
381
Resynchronization
330
SQLDBDEF EXEC
381
Resync When Partner is Not Active
330
Authorization
381
Resolution of In-doubts
330
Syntax
382
Description
382
Chapter 15. Using TCP/IP with DB2
Server for VSE
335
Appendix H. DRDA Considerations
385
Preparing the Application Server to use TCP/IP
335
Omissions from the Standards
385
Preparing the Application Requester to use TCP/IP 338
Extensions to the Standards
385
DB2 Server for VSE Facility Restrictions
386
Appendix A. Processor Storage
Requirements
339
Appendix I. Incompatibilities Between
Releases
389
Appendix B. Estimating Database
Definition of an Incompatibility
389
Storage
341
Impact on Existing Applications
389
Storage Capacities of IBM DASD Devices
341
V2R1 and V1R3.5 Incompatibilities
390
Relationship of Megabytes to 4-Kilobyte Pages . . 343
V2R2 and V2R1 Incompatibilities
392
Estimating Directory Space Requirements
343
Detailed Notes on V2R2-V2R1 Incompatibilities
394
vi System Administration
V3R1 and V2R2 Incompatibilities
395
Notices
423
Detailed Notes on V3R1-V2R2 Incompatibilities
399
Programming Interface Information
425
V3R2 and V3R1 Incompatibilities
405
Trademarks
425
Detailed Notes on V3R2-V3R1 Incompatibilities
409
V3R4 and V3R2 Incompatibilities (VSE Only) . . . 411
Bibliography
427
Detailed Notes on V3R4-V3R2 Incompatibilities
418
V3R5 and V3R4 Incompatibilities
420
Index
431
V5R1 and V3R5 Incompatibilities
420
V6R1 and V5R1 Incompatibilities
421
V7R1 and V6R1 Incompatibilities
421
Contacting IBM
443
V7R2 and V7R1 Incompatibilities
421
Product information
443
V7R3 and V7R2 Incompatibilities
421
Contents vii
About This Manual
This manual describes how to carry out system planning and administration tasks
for DB2 Server for VSE.
Note: If your installation is using VSE guest-sharing to access a database manager
on a VM operating system, you can use this manual to carry out tasks that
involve operating the database manager or improving performance on VSE.
However, for a complete description of VM administrative tasks, including
those that involve the database virtual machine, you will need the DB2
Server for VM System Administration manual.
The following tasks are described here:
v Installation
v Migration
v Operation
v Management of resources (including security)
v Modification of facilities (including national language support).
Organization of This Manual
v
“Summary of Changes” on page xvii lists the changes made to the product since
Version 7 Release 4.
v
Chapter 1, “Planning for Installation,” on page 1 summarizes the software,
hardware, and storage requirements for installing the database manager. It does
not describe the actual installation procedure. For information on that, see the
DB2 Server for VSE Program Directory.
v
Chapter 2, “Planning for Database Generation,” on page 13 describes how to set
up your initial database, including specifying parameters to define the logical
and physical limits for its capacity and setting its initial DASD allocations.
v
Chapter 3, “Planning for Database Migration,” on page 39 explains the planning
you must do before migrating a database from a previous release of the database
manager to the Version 7 Release 5 level. For the actual migration steps, see the
DB2 Server for VSE Program Directory.
v
Chapter 4, “Planning for Operation of the Database Manager,” on page 47
explains how to choose appropriate startup parameters which will determine the
operational characteristics of the application server when it is started by the DB2
Server for VSE operator.
Note: Starting, operating, and stopping the application server are also discussed
in the DB2 Server for VSE & VM Operation manual.
v
Chapter 5, “Operating the Online Support ,” on page 81 explains how to enable
VSE guest users to access the application server on a VM/ESA operating system,
and how to operate the online support for CICS/VSE® transactions.
Note: These subjects are also discussed in the DB2 Server for VSE & VM
Operation manual.
v
Chapter 6, “Maintaining Database Security,” on page 119 discusses how to
control access to the application server.
ix
v
Chapter 7, “Managing Database Storage,” on page 123 explains how to manage
the disk storage allocated to the database, including adding (or defining)
dbspaces, defining storage pools, adding dbextents to storage pools, and
managing storage pools.
v
Chapter 8, “Making Backups and Recovering from Failures,” on page 143
describes facilities provided for recovery from system failures and DASD
failures; how to back up your database; and how to recover from different types
of failures.
v
Chapter 9, “Special Topics in Recovery Design,” on page 167 discusses dual
logging and switching log modes.
v
Chapter 10, “Using the Accounting Facility,” on page 187 describes the DB2
Server for VSE accounting facility, which tracks how database resources are
consumed by users.
v
Chapter 11, “Generating Additional Databases,” on page 211 describes how to
add databases to your system.
v
Chapter 12, “Choosing a National Language and Defining Character Sets,” on
page 231 contains information on national language character set and coded
character set identifier (CCSID) support, as well as how to provide HELP text
and messages in languages supported by the database manager.
v
Chapter 13, “Creating Installation Exits,” on page 263 describes the types of
installation exits that you can code to customize the database manager:
- Accounting exits, to customize account information
- Date and time exits, to create your own date or time format if the
IBM-supplied formats do not fit your requirements
- TRANSPROC exits, to carry out DBCS conversions
- Cancel exits, to replace the product-supplied cancel function when coding
your own interactive program
- Field Procedures, to change the sorting sequence by encoding and decoding
data if the standard sorting sequence does not meet your requirements.
v
Chapter 14, “Using a DRDA Environment,” on page 313 discusses using the
database manager in a distributed environment.
v
Chapter 15, “Using TCP/IP with DB2 Server for VSE,” on page 335 discusses
using TCP/IP to access application servers.
v
Appendix A, “Processor Storage Requirements,” on page 339 presents
guidelines for estimating the processor requirements needed for running the
database manager.
v
Appendix B, “Estimating Database Storage,” on page 341 contains procedures for
estimating the sizes of the database directory, public dbspaces, and the ISQL
dbspace.
v
Appendix C, “Maximum Values,” on page 357 contains the system and database
maximums for the database manager.
v
Appendix D, “Updating SYSTEM.SYSSTRINGS,” on page 359 details how to
update this catalog table to support your own CCSID conversion.
v
Appendix E, “Defining Your Own Character Set,” on page 363 describes how to
create your own character set.
v
Appendix F, “Macro List,” on page 379 lists the macros identified as
programming interfaces for customers by the database management system.
v
Appendix G, “Service and Maintenance Utilities,” on page 381 lists and describes
service and maintenance utilities.
v
Appendix H, “DRDA Considerations,” on page 385 discusses what you should
consider in a distributed environment.
x
System Administration

v Appendix I, “Incompatibilities Between Releases,” on page 389 describes the
incompatibilities between releases.
A bibliography is provided at the back of the book.
Syntax Notation Conventions
Throughout this manual, syntax is described using the structure defined below.
v Read the syntax diagrams from left to right and from top to bottom, following
the path of the line.
The ►►─── symbol indicates the beginning of a statement or command.
The ───► symbol indicates that the statement syntax is continued on the next
line.
The ►─── symbol indicates that a statement is continued from the previous line.
The ───►◄ symbol indicates the end of a statement.
Diagrams of syntactical units that are not complete statements start with the
►─── symbol and end with the ───► symbol.
v Some SQL statements, Interactive SQL (ISQL) commands, or database services
utility (DBS Utility) commands can stand alone. For example:
►► SAVE
►◄
Others must be followed by one or more keywords or variables. For example:
►► SET AUTOCOMMIT OFF
►◄
v Keywords may have parameters associated with them which represent
user-supplied names or values. These names or values can be specified as either
constants or as user-defined variables called host_variables (host_variables can only
be used in programs).
►► DROP SYNONYM synonym
►◄
v Keywords appear in either uppercase (for example, SAVE) or mixed case (for
example, CHARacter). All uppercase characters in keywords must be present;
you can omit those in lowercase.
v Parameters appear in lowercase and in italics (for example, synonym).
v If such symbols as punctuation marks, parentheses, or arithmetic operators are
shown, you must use them as indicated by the syntax diagram.
v All items (parameters and keywords) must be separated by one or more blanks.
v Required items appear on the same horizontal line (the main path). For example,
the parameter integer is a required item in the following command:
About This Manual xi

►► SHOW DBSPACE integer
►◄
This command might appear as:
SHOW DBSPACE 1
v Optional items appear below the main path. For example:
►► CREATE
INDEX
►◄
UNIQUE
This statement could appear as either:
CREATE INDEX
or
CREATE UNIQUE INDEX
v If you can choose from two or more items, they appear vertically in a stack.
If you must choose one of the items, one item appears on the main path. For
example:
►► SHOW LOCK DBSPACE
ALL
►◄
integer
Here, the command could be either:
SHOW LOCK DBSPACE ALL
or
SHOW LOCK DBSPACE 1
If choosing one of the items is optional, the entire stack appears below the main
path. For example:
►► BACKWARD
►◄
integer
MAX
Here, the command could be:
BACKWARD
or
BACKWARD 2
or
BACKWARD MAX
xii System Administration
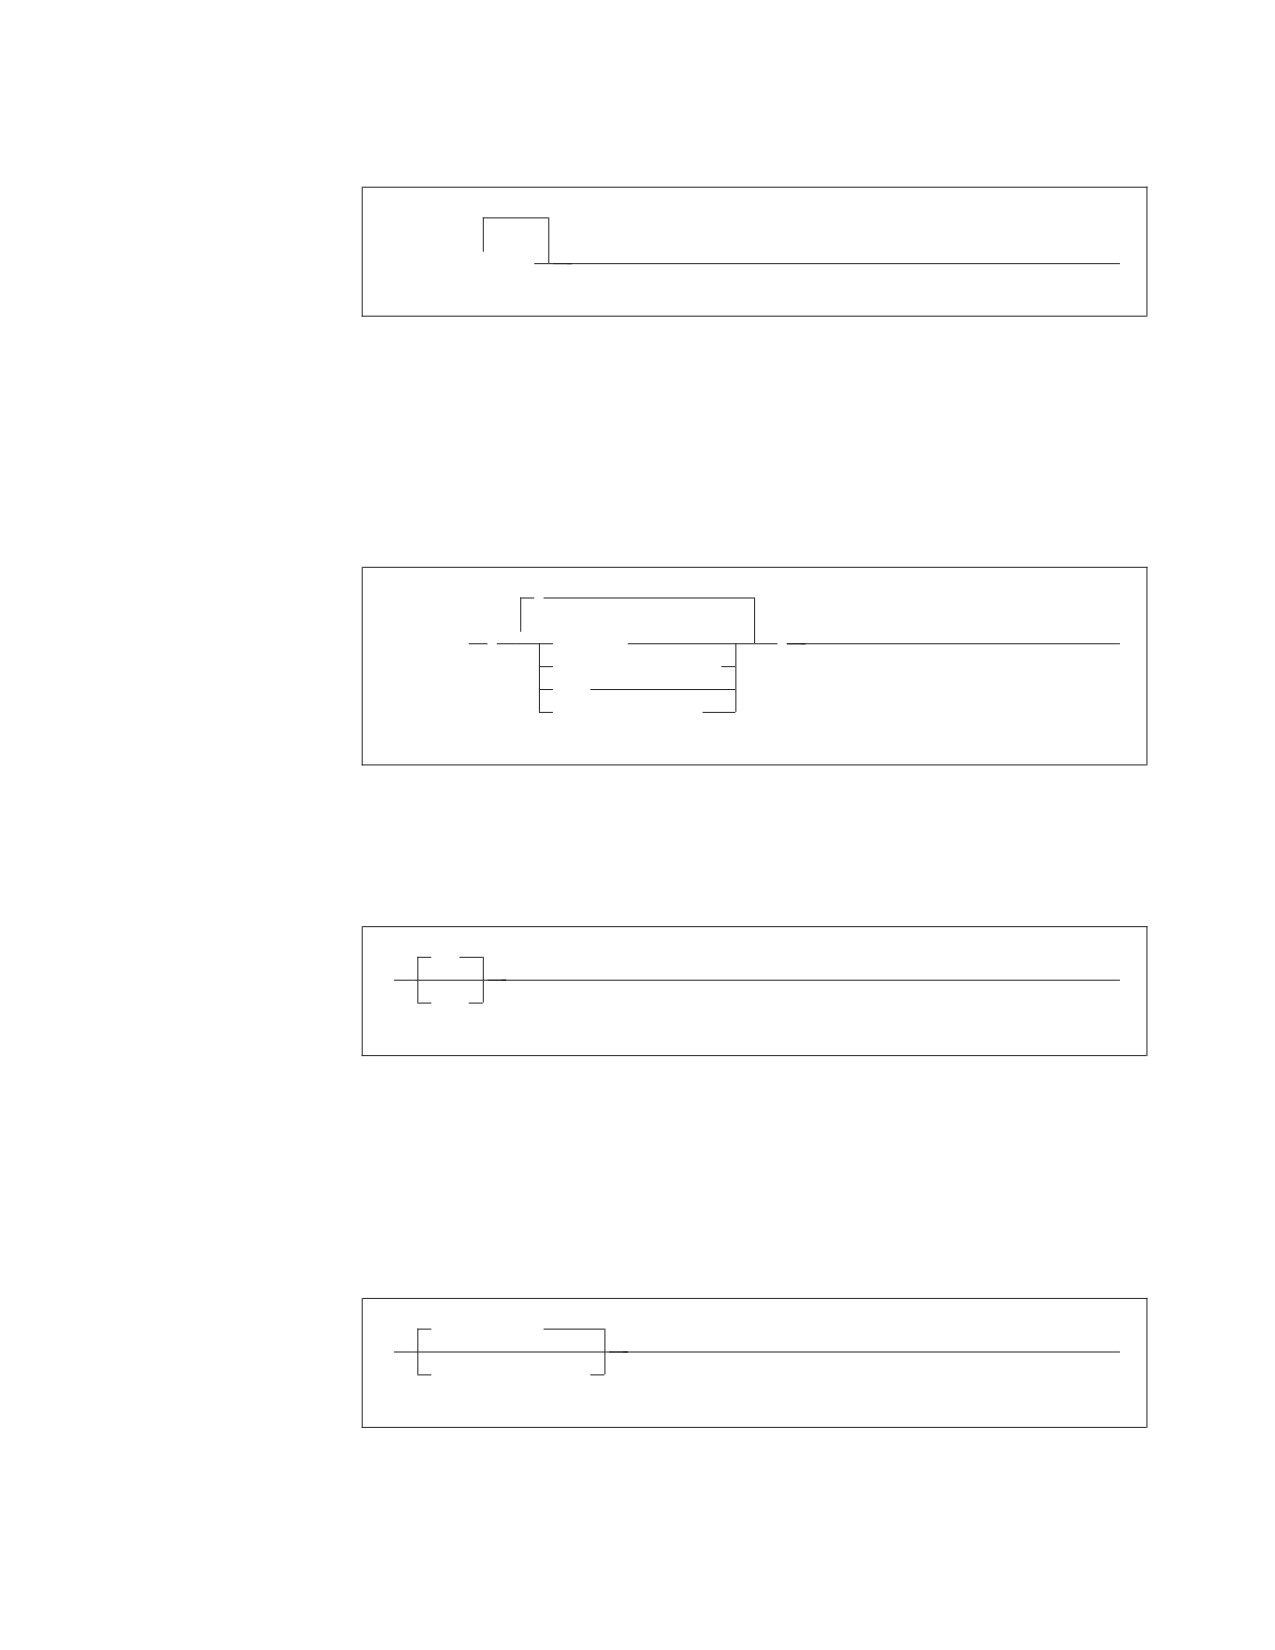
v The repeat symbol indicates that an item can be repeated. For example:
►► ERASE
▼
name
►◄
This statement could appear as:
ERASE NAME1
or
ERASE NAME1 NAME2
A repeat symbol above a stack indicates that you can make more than one
choice from the stacked items, or repeat a choice. For example:
,
▼
►► VALUES
(
constant
)
►◄
host_variable_list
NULL
special_register
v If an item is above the main line, it represents a default, which means that it will
be used if no other item is specified. In the following example, the ASC keyword
appears above the line in a stack with DESC. If neither of these values is
specified, the command would be processed with option ASC.
ASC
►►
►◄
DESC
v When an optional keyword is followed on the same path by an optional default
parameter, the default parameter is assumed if the keyword is not entered.
However, if this keyword is entered, one of its associated optional parameters
must also be specified.
In the following example, if you enter the optional keyword PCTFREE =, you
also have to specify one of its associated optional parameters. If you do not
enter PCTFREE =, the database manager will set it to the default value of 10.
PCTFREE = 10
►►
►◄
PCTFREE = integer
v Words that are only used for readability and have no effect on the execution of
the statement are shown as a single uppercase default. For example:
About This Manual xiii
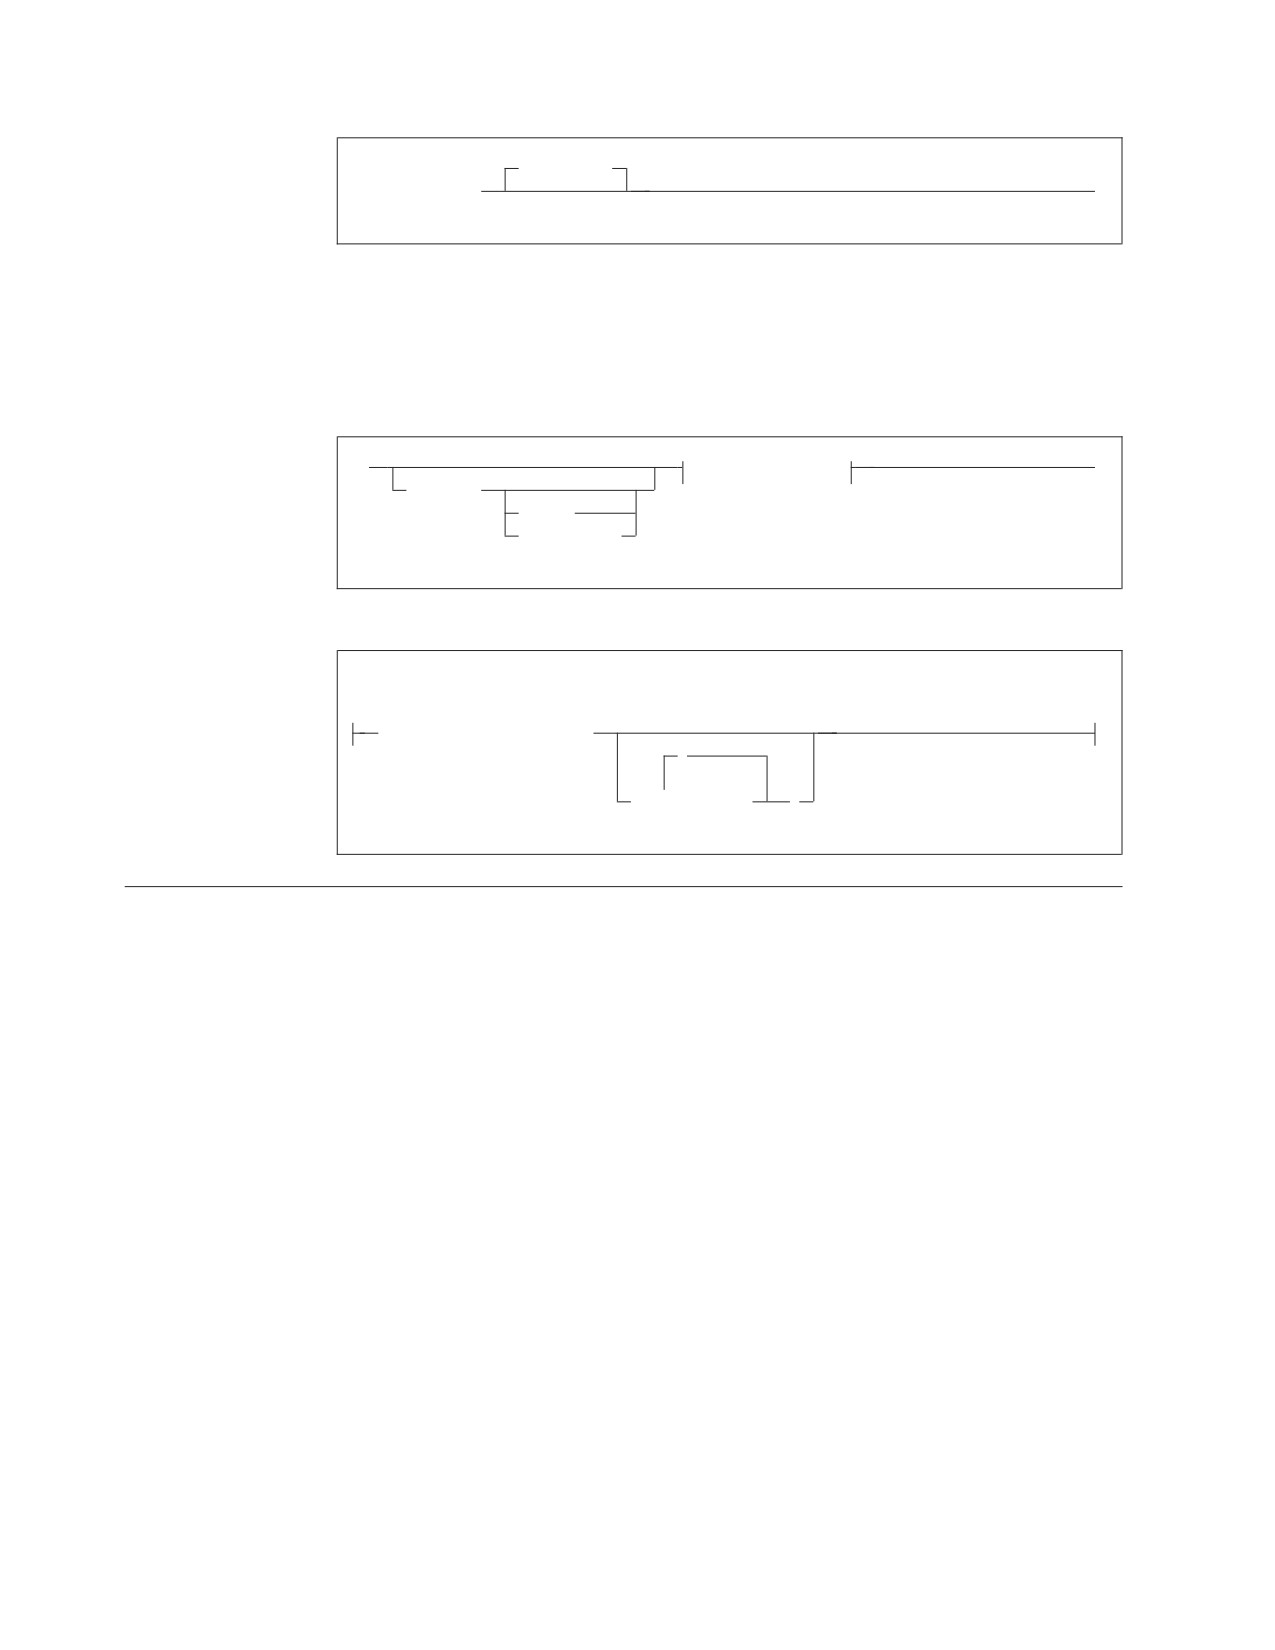
PRIVILEGES
►► REVOKE ALL
►◄
Here, specifying either REVOKE ALL or REVOKE ALL PRIVILEGES means the
same thing.
v Sometimes a single parameter represents a fragment of syntax that is expanded
below. In the following example, fieldproc_block is such a fragment and it is
expanded following the syntax diagram containing it.
►►
fieldproc_block
►◄
NOT NULL
UNIQUE
PRIMARY KEY
fieldproc_block:
FIELDPROC program_name
,
▼
(
constant
)
SQL Reserved Words
The following words are reserved in the SQL language. They cannot be used in
SQL statements except for their defined meaning in the SQL syntax or as host
variables, preceded by a colon.
In particular, they cannot be used as names for tables, indexes, columns, views, or
dbspaces unless they are enclosed in double quotation marks (").
xiv System Administration
ACQUIRE
GRANT
RESOURCE
ADD
GRAPHIC
REVOKE
ALL
GROUP
ROLLBACK
ALTER
ROW
AND
HAVING
RUN
ANY
AS
IDENTIFIED
SCHEDULE
ASC
IN
SELECT
AVG
INDEX
SET
INSERT
SHARE
BETWEEN
INTO
SOME
BY
IS
STATISTICS
STORPOOL
CALL
LIKE
SUM
CHAR
LOCK
SYNONYM
CHARACTER
LONG
COLUMN
TABLE
COMMENT
MAX
TO
COMMIT
MIN
CONCAT
MODE
UNION
CONNECT
UNIQUE
COUNT
NAMED
UPDATE
CREATE
NHEADER
USER
CURRENT
NOT
NULL
VALUES
DBA
VIEW
DBSPACE
OF
DELETE
ON
WHERE
DESC
OPTION
WITH
DISTINCT
OR
WORK
DOUBLE
ORDER
DROP
PACKAGE
EXCLUSIVE
PAGE
EXECUTE
PAGES
EXISTS
PCTFREE
EXPLAIN
PCTINDEX
PRIVATE
FIELDPROC
PRIVILEGES
FOR
PROGRAM
FROM
PUBLIC
About This Manual xv
xvi System Administration
Summary of Changes
|
This is a summary of the technical changes to the DB2 Server for VSE & VM
|
database management system for this edition of the book. Several manuals are
|
affected by some or all of the changes discussed here. For your convenience, the
|
changes made in this edition are identified in the text by a vertical bar (|) in the
|
left margin. This edition may also include minor corrections and editorial changes
|
that are not identified.
This summary does not list incompatibilities between releases of the DB2 Server
for VSE & VM product; see either the DB2 Server for VSE & VM SQL Reference, DB2
Server for VM System Administration, or the DB2 Server for VSE System
Administration manuals for a discussion of incompatibilities.
Summary of Changes for DB2 Version 7 Release 5
Version 7 Release 5 of the DB2 Server for VSE & VM database management
system is intended to run on the Z/VM Version 5 Release 2 or later environment
and on the Z/VSE(®) Version 3 Release 1 or later environment.
|
Enhancements, New Functions, and New Capabilities
|
The following have been added to DB2 Version 7 Release 5:
|
Explain Option on DBSU REBIND PACKAGE Command
|
This new functionality allows the EXPLAIN(YES/NO) option on REBIND
|
PACKAGE command. If EXPLAIN(YES) is issued, then all four update tables
|
(structure, plan, cost, reference) will be updated. If EXPLAIN(NO) is issued, then
|
none of the four update tables will be updated.
|
For more information, see the following DB2 Server for VSE & VM documentation:
|
v DB2 Server for VSE & VM Database Services Utility
|
v DB2 Server for VSE & VM Performance Tuning Handbook
|
v DB2 Server for VSE & VM Quick Reference
|
v DB2 Server for VSE & VM SQL Reference
|
For Fetch only
|
This new functionality accepts the ″FOR FETCH ONLY″ clause after a cursor select
|
statement. It causes a cursor to become read-only (no UPDATEs or DELETEs are
|
permitted using this cursor). If a read-only cursor is referenced in an UPDATE or
|
DELETE statement, SQLCODE -510 will be issued and the statement is not
|
processed. In addition, under the SBLOCK preprocessor option, ″FOR FETCH
|
ONLY″ forces blocking to be used on the read-only cursor regardless of whether
|
there is a COMMIT. If there is no ″FOR FETCH ONLY″ clause, under SBLOCK,
|
blocking would only be done if a COMMIT was absent.
|
For more information, see the following DB2 Server for VSE & VM documentation:
|
v DB2 Server for VM Messages and Codes
|
v DB2 Server for VSE & VM Application Programming
|
v DB2 Server for VSE & VM Performance Tuning Handbook
|
v DB2 Server for VSE & VM Quick Reference
xvii
|
v DB2 Server for VSE & VM SQL Reference
|
Application Message Formatter
|
This functionality provides an Application Programming Interface (API) that
|
retrieves the descriptive text for an SQLCODE, given an SQLCA input parameter.
|
The API will be available for Assembly, COBOL, C, PL/I and FORTRAN.
|
In DB2 for VM and DB2 for VSE Online, the user may specify the language of the
|
returned text. The languages supported by DB2 for VSE/VM are American English
|
(AMENG), uppercase English (UCENG), German (GER), French (FRANC) and
|
Japanese (KANJI). VSE Batch does not support switching to another language.
|
Therefore the default will be used regardless of the user’s specification. The values
|
of SQLCODE, SQLSTATE, SQLERRD1 and SQLERRD2 will be automatically
|
appended to the returned text. The user may also specify to have the entire
|
SQLCA included. If the SQLCODE could not be found in the repository, the entire
|
SQLCA will be returned in the buffer.
|
If the SQLCA was set by another product (such as DB2 UBD), the descriptive text
|
is retrieved if the SQLCODE exists in the DB2 for VM/VSE repositories. However,
|
the token substitutions may not be correct.
|
For more information, see DB2 Server for VSE & VM Application Programming.
|
Convert buffer read/write to compiler macro
|
The DRDA code has over 100 small modules. Each call to an external module has a
|
certain amount of overhead associated with it. Certain modules are called very
|
frequently and this can add up to a significant amount of time. This functionality
|
improves the performance by converting few modules to macros or internal
|
procedures, to reduce this overhead.
|
Modify Build Tree Creation
|
This functionality modifies Build Tree creation used by DRDA parsing and
|
generation. It is built in such a way that every code point that is used to search
|
through the tree must be converted to a different format before the search can be
|
done. If modified build tree was created with the converted point, then the code
|
point would not have to be converted every time the tree must be searched. This
|
improves the performance of the DRDA code path length with the minimal search.
|
Split code point search routines
|
When parsing a data stream within each parser action routine, a binary search is
|
done to find the specific code point. Some action specific routines are quite large,
|
so the binary search can be long. Splitting and spreading the code point evenly
|
among other modules would reduce the overheads and improves the performance
|
of the DRDA code path length.
|
DRDA Multi-Row Insert
|
Multi Row insert is a means of caching homogenous insert statements and sending
|
them as a block to the server for processing. This reduces the overhead of sending
|
a large number of singular inserts and receiving as many responses.
|
Buffering of homogenous inserts eliminates the need to send an SQL statement to
|
the DB2 server every time an insert is made, thereby improving performance over
|
DRDA.
|
For more information, see the following DB2 Server for VSE & VM documentation:
|
v DB2 Server for VSE & VM Application Programming
xviii
System Administration
|
v DB2 Server for VSE & VM Database Administration
|
v DB2 Server for VM System Administration
|
v DB2 Server for VSE & VM Performance Tuning Handbook
|
v DB2 Server for VSE & VM Quick Reference
|
v DB2 Server for VSE & VM SQL Reference
|
Connection Pooling for DRDA TCP/IP in Online Resource
|
Adapter
|
Connection pooling is a technique that allows multiple users to share a cached set
|
of pre-established connections that provide access to a database. Establishing a
|
connection between a user and a server takes a sizeable time. Users who have
|
validated their entry to a database once need not establish a connection every time
|
a request is submitted. Instead, they can use a pre-established connection from a
|
pool of such connections and get their results much faster.
|
From the user’s point of view, there is a considerable improvement in response
|
time after this line item is implemented.
|
For more information, see the following documentation on DB2 Server for VSE &
|
VM:
|
v DB2 Server for VSE System Administration
|
v DB2 Server for VSE & VM Application Programming
|
v DB2 Server for VSE & VM Operation
|
v DB2 Server for VSE & VM Performance Tuning Handbook
|
IBM DB2 Server for VSE, Client Edition
|
This feature allows the customer the flexibility to install and use only the client
|
(run-time support) component of DB2 Server for VSE without the requirement to
|
buy and install the server component during the installation process of DB2 server
|
for VSE product. The client-only installation enables customers to reduce the total
|
cost of ownership when they have their databases residing on a non-local platform
|
(like VM, z/OS, LUW) and have a large number of their DB2 applications on VSE
|
(like ISQL on CICS, DBSU on VSE, other online/batch applications on VSE).
|
For more information, see the following DB2 Server for VSE & VM documentation:
|
v DB2 Server for VSE System Administration
|
v DB2 Server for VSE Program Directory
|
IBM DB2 Server for VM, Client Edition
|
This feature allows the customer the flexibility to install and use only the client
|
(run-time support) component of DB2 Server for VM without the requirement to
|
buy and install the server component during the installation process of DB2 server
|
for VM product. The client-only installation enables our customers to reduce the
|
total cost of ownership when they have their databases residing on a non-local
|
platform (like VM, z/OS, LUW) and have a large number of their DB2 applications
|
on VM (like ISQL, DBSU, other user applications on VM).
|
For more information, see the following DB2 Server for VSE & VM documentation:
|
v DB2 Server for VM System Administration
|
v DB2 Server for VM Program Directory
Summary of Changes xix
|
Handling Commit Responses from DB2 UDB Stored Procedures
|
This feature will allow DB2 Resource Manager on VSE/VM to accept and process
|
results of a stored procedure running in a UDB server with a COMMIT statement
|
in the stored procedure.
|
Currently, DB2 for VM/VSE client does not handle responses from ’COMMIT’
|
statements coded in DB2 UDB stored procedures. Implementation of this feature
|
will enable handling responses of COMMIT statements in DB2 UDB stored
|
procedures and thus allow users to have COMMIT statements in their stored
|
procedures, while using DB2 for VM/VSE client.
|
COMMIT statements, however, are not allowed in stored procedures on the DB2
|
Server for VM/VSE.
|
For more information, see DB2 Server for VSE & VM Application Programming.
|
Make on-line programs AMODE 31 RMODE ANY
|
This feature converts DB2 server for VSE online program which presently operate
|
under 24 bit addressing mode from AMODE 24, to AMODE 31 RMODE ANY.
|
Presently, all the online programs are loaded below 16M line. Implementation of
|
this line item ensures that all the online program will be loaded above the 16M
|
line, which results in more virtual storage below the line, which can be utilized by
|
other applications.
|
For more information, see the following DB2 Server for VSE & VM documentation:
|
v DB2 Server for VSE System Administration
|
v DB2 Server for VSE Program Directory
|
Provide BIND File Support in VM and in VSE Batch Environments
|
This feature provides the facility of binding packages across servers. The process of
|
binding is achieved by dividing the program preparation method into two steps.
|
The first step does the precompilation of the embedded SQL programs with the
|
prep parameter ’BIND’. Invocation of VSE/VM preprocessor creates a ’bindfile’.
|
The bindfile can be bound against any DB2 server using VSE/VM binder. During
|
this process, the access path is generated, SQL statements are verified,
|
authorization checks are performed, and package on the target server is created.
|
This line item eliminates the need of re-prepping the source code or porting of
|
packages across DB2 servers.
|
For more information, see the following DB2 Server for VSE & VM documentation:
|
v DB2 REXX SQL for VM/ESA Installation and Reference
|
v DB2 Server for VM Messages and Codes
|
v DB2 Server for VSE & VM Application Programming
|
v DB2 Server for VSE & VM Database Administration
|
v DB2 Server for VM Program Directory
|
v DB2 Server for VSE Program Directory
|
Convert TCP/IP LE/C interface to EZASMI API
|
The feature of converting TCP/IP LE/C interface to EZASMI API intends to
|
replace the current LE/C interface and implement the EZA Assembler Interface
|
(EZASMI)to enhance performance in DB2 Client/Server for VSE over DRDA.
|
Currently, either LE/C interface or CSI Assembler Interface is used for TCP/IP
|
functions. The EZASMI interface makes the code all Assembler.
xx System Administration
|
For more information, see DB2 Server for VSE Program Directory
Summary of Changes xxi
xxii System Administration
Chapter 1. Planning for Installation
Before installing the database manager, you must:
v Determine which of the usage environments will be appropriate for your
processing requirements
v Understand a typical DB2 Server for VSE configuration
v Have the appropriate prerequisite programs
v Determine your virtual storage requirements
v Determine your hardware requirements
v Determine the DBNAME directory requirements
v Set up the DB2 key, if you are using z/VSE 3.1
Usage Environments
To determine what software and hardware you need, you must first categorize
your planned use of the database manager as one or more of the following:
v Batch application processing
v Online (CICS) transaction processing
v Interactive application development
v Query or report writing
Each of these environments is described in detail below, including the DB2 Server
for VSE functions supported, and options that are either recommended or required
for the associated program products.
Batch Application Processing
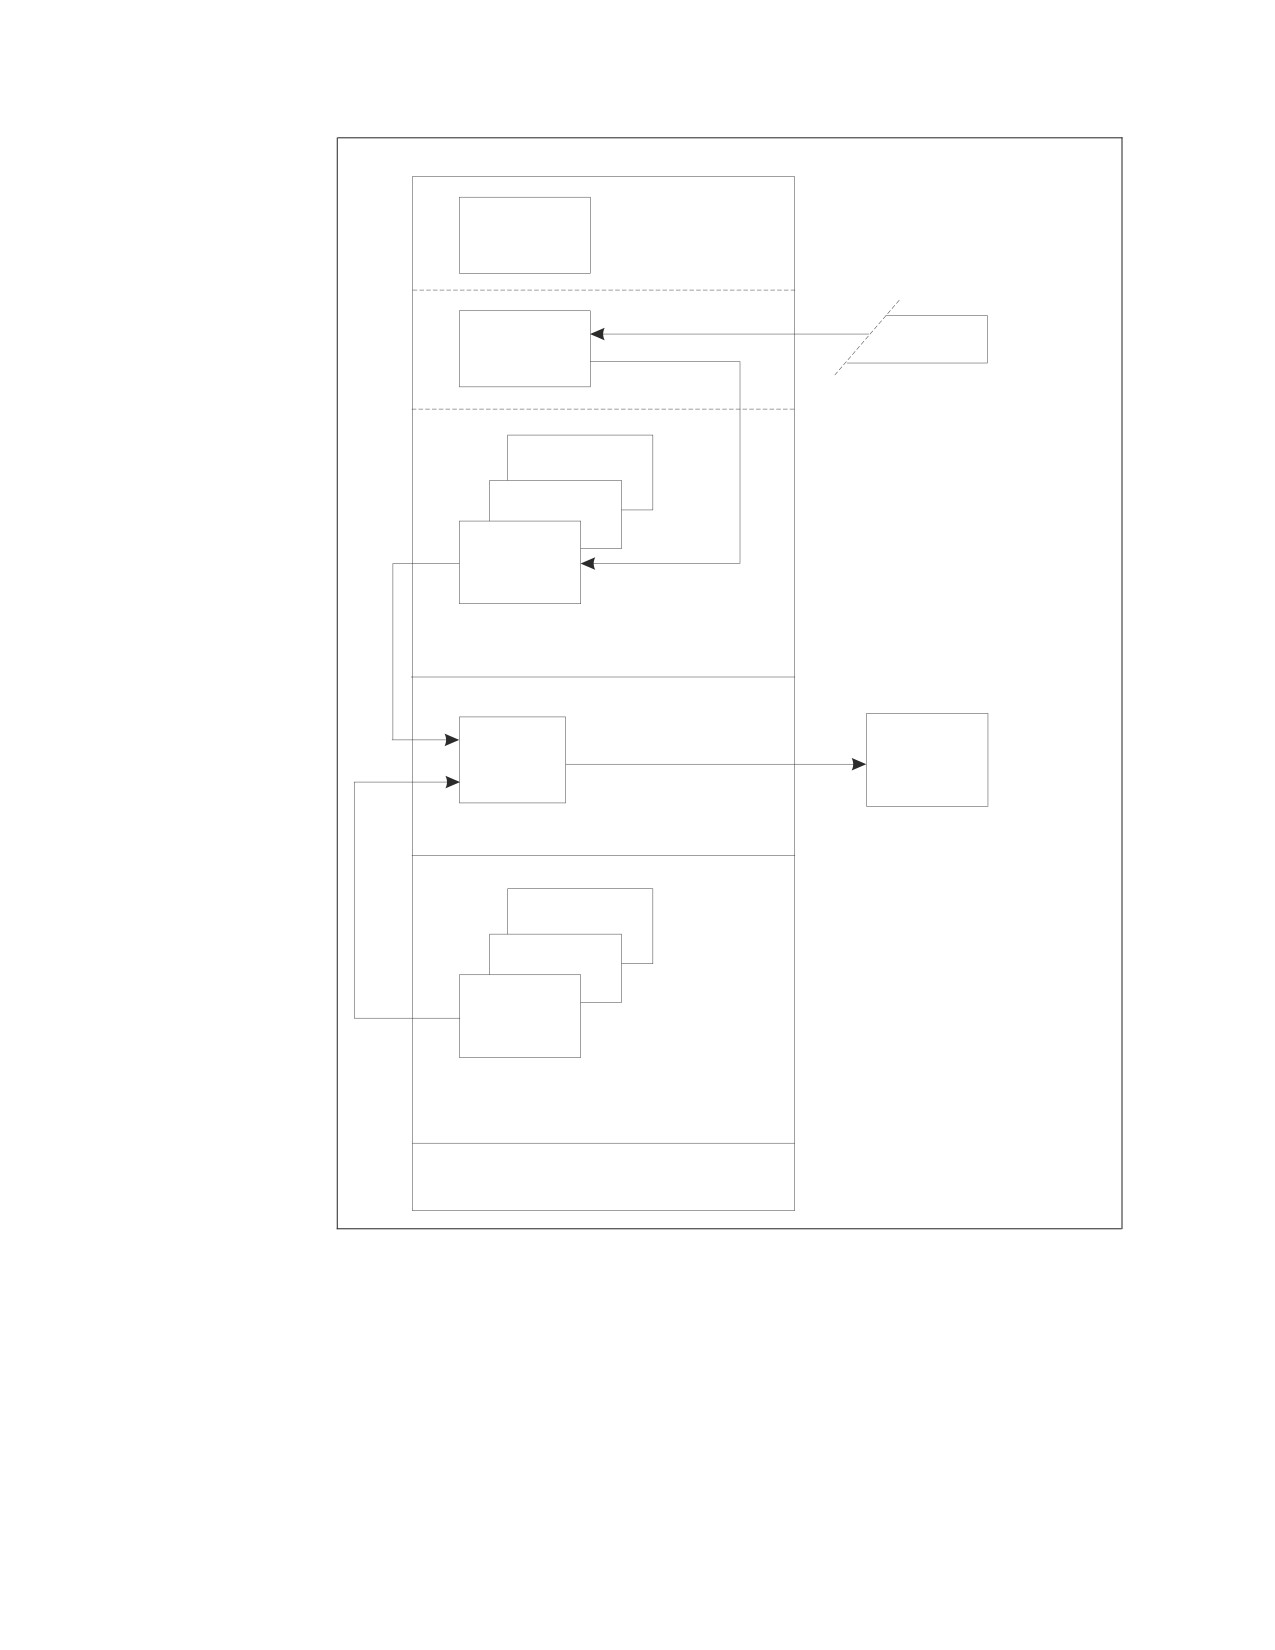
Batch processing, as shown in Figure 1, is used for submitting jobs to run in a
non-interactive mode. A job is submitted using job control (JCL) with or without
the VSE/ICCF facilities. The only requirement beyond the base prerequisites is one
of the supported programming languages.
Batch facilities are useful for job-preparation tasks like preprocessing and
compiling host language programs, or for running applications. Application
programs that do not require end-user access can be run in batch. Batch processing
places minimal demands on system resources (real storage and processor power).
1
VSE/ICCF
Monitor
TTF
VSE/ICCF
Terminals
Transaction
Preprocessor
DBS utility
DB2/VSE
Application
VSE/ICCF Interactive
Partitions
DB2/VSE
DB2/VSE
DBMS
Database
Database Partition
Preprocessor
DBS utility
DB2/VSE
Application
Batch Partition
(or partitions)
VSE/ADVANCED FUNCTIONS
Figure 1. Batch Configuration
Online (CICS) Transaction Processing
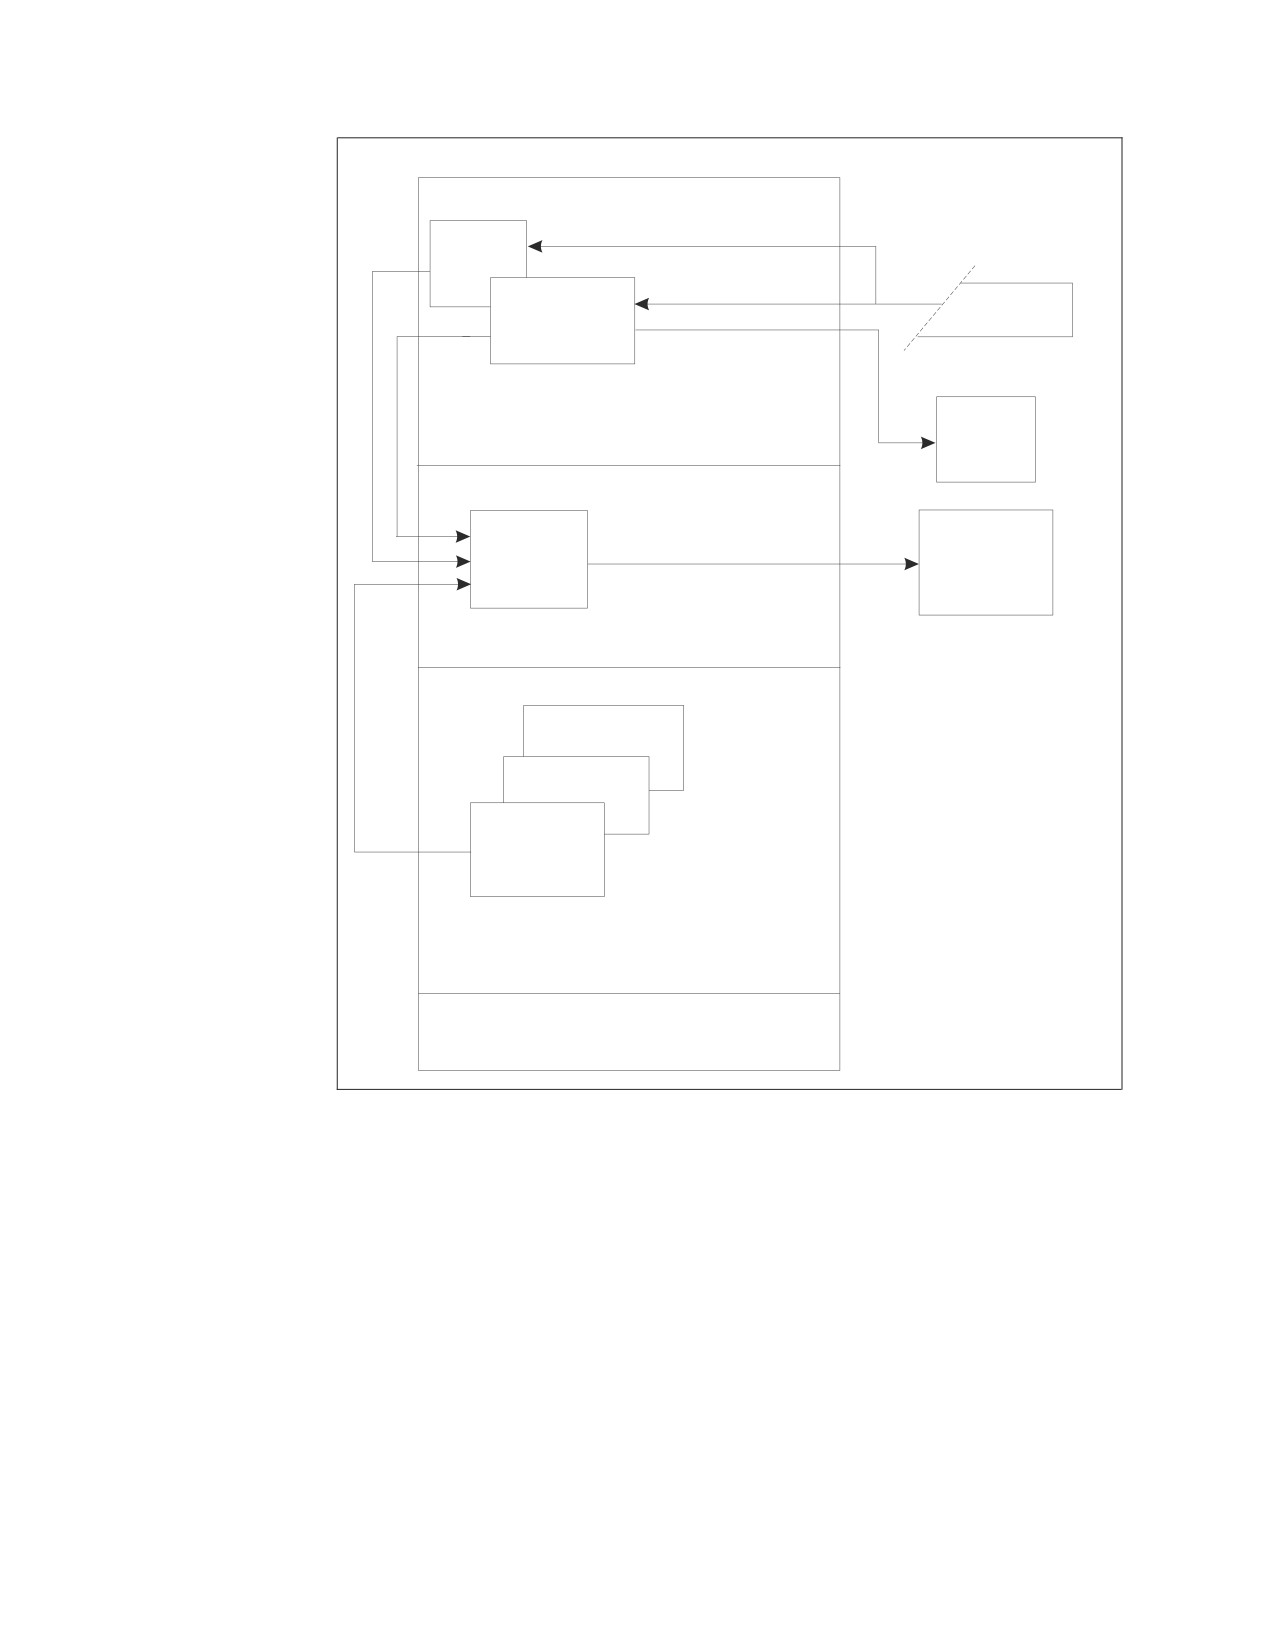
Online transaction processing, as shown in Figure 2 on page 4, requires installation
of the online support, and of CICS/VSE, or an equivalent product to support
double-byte character set (DBCS) characters and to provide the terminal
management and transaction-processing support. Online programs can be written
in any of the supported programming languages. You can install ISQL, but its use
is limited to data administration functions. Consider this environment for
2
System Administration
preplanned business applications where end user access to the system is managed
through CICS/VSE transactions programmed for specific end user tasks.
For this environment, configure the system as follows:
v CICS/VSE options:
- Dynamic transaction backout program (DBP): required for proper
coordination and recovery with the database manager.
- Exec level support: required to support transaction access to the database
manager.
- User exit interface: also required for transaction access to the database
manager.
- CICS/VSE monitoring facility: optional but recommended. If it is used, the
database manager participates in the monitoring by providing performance
class information.
- CICS/VSE restart resynchronization: required if you plan to access databases
from the CICS online environment.
v VSE/Power facility: required for the system printer or remote workstation
printer report writing support in ISQL (which runs as a CICS/VSE transaction);
not required for report writing to a CICS/VSE terminal printer. This is the only
facility to provide multiple copy capability.
Chapter 1. Planning for Installation
3
SQL
TR
SQL
Terminals
Transaction
DRDA
CICS Partition
Remote
Database
DB2/VSE
DB2/VSE
DBMS
Database
Database Partition
Preprocessor
DBS utility
DB2/VSE
Application
Batch Partition
(or partitions)
VSE/ADVANCED FUNCTIONS
Figure 2. Online Transaction Processing Configuration
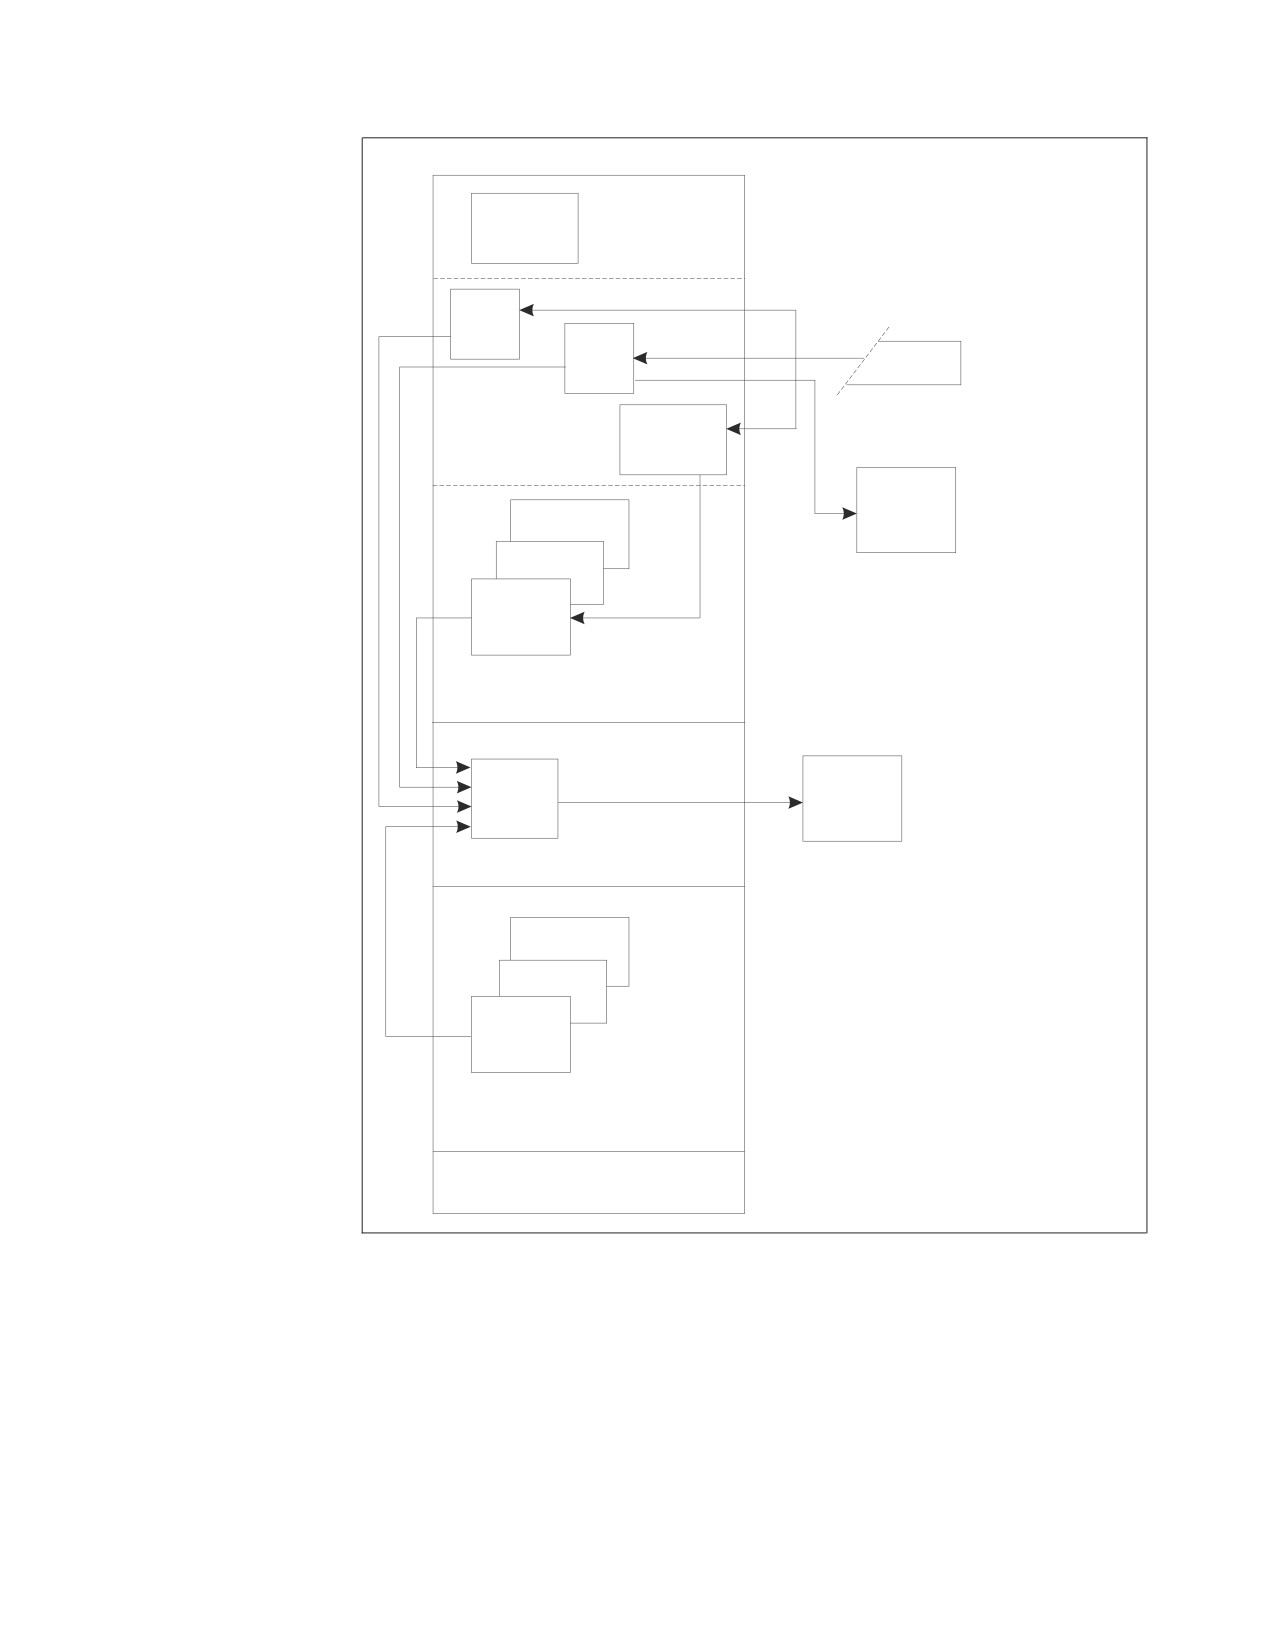
Interactive Application Development
An application development environment, as shown in Figure 3 on page 5,
involves a large amount of data design, application coding, and testing. Such
activities typically involve less SQL activity in the form of data definition, catalog
queries, and program preprocessing. Correspondingly there is greater demand for
real storage and processor resources than that demanded by application or
transaction processing.
4
System Administration
VSE/ICCF
Monitor
SQL
Trans.
ISQL
Terminals
Trans.
CICS/VSE
VSE/ICCF
Interactive
Transaction
Partition
DRDA
Remote
Preprocessor
Database
DBS utility
DB2/VSE
Application
VSE/ICCF Interactive
Partitions
DB2/VSE
DB2/VSE
DBMS
Database
Database Partition
Preprocessor
DBS utility
DB2/VSE
Application
Batch Partition
(or partitions)
VSE/ADVANCED FUNCTIONS
Figure 3. Interactive Application Development Configuration
The configuration requirements are the same as those described for online
transaction processing.
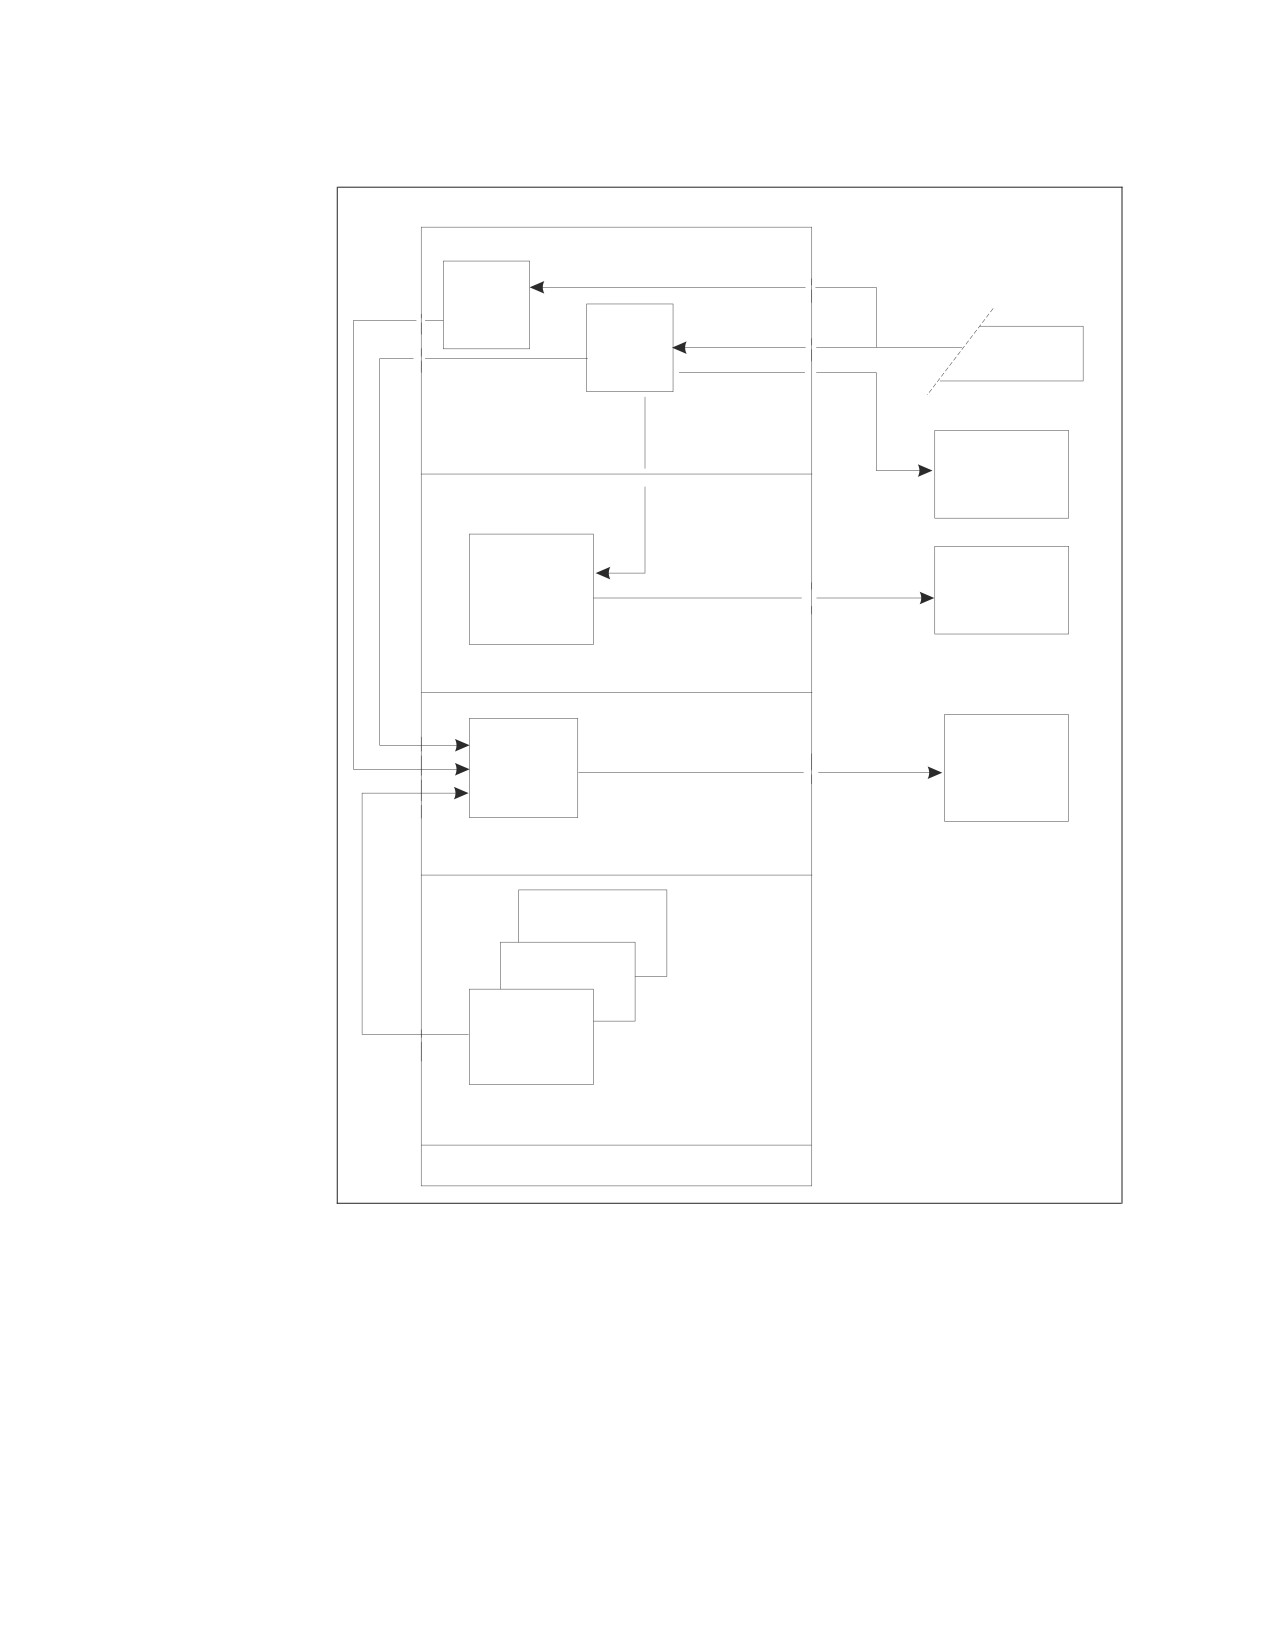
Query/Report Writing
The query/report writing environment, as shown in Figure 4 on page 6, supports
dynamic SQL query and report writing by end users. This environment places a
relatively high demand on system resources, because user requests must be
dynamically interpreted, the number of requests is not limited, and sorting may be
Chapter 1. Planning for Installation
5
very frequent.
SQL
Trans.
ISQL
Trans.
Terminals
CICS/VSE
Partition
Terminal
Printer
VSE/Power
System
Product
Printer
VSE/Power Partition
DB2/VSE
DB2/VSE
DBMS
Database
Database Partition
Preprocessor
DBS utility
DB2/VSE
Application
Batch Partition
(or partitions)
VSE/ADVANCED FUNCTIONS
Figure 4. Query/Report Writing Configuration
The configuration requirements are the same as those described for the online
transaction processing environment.
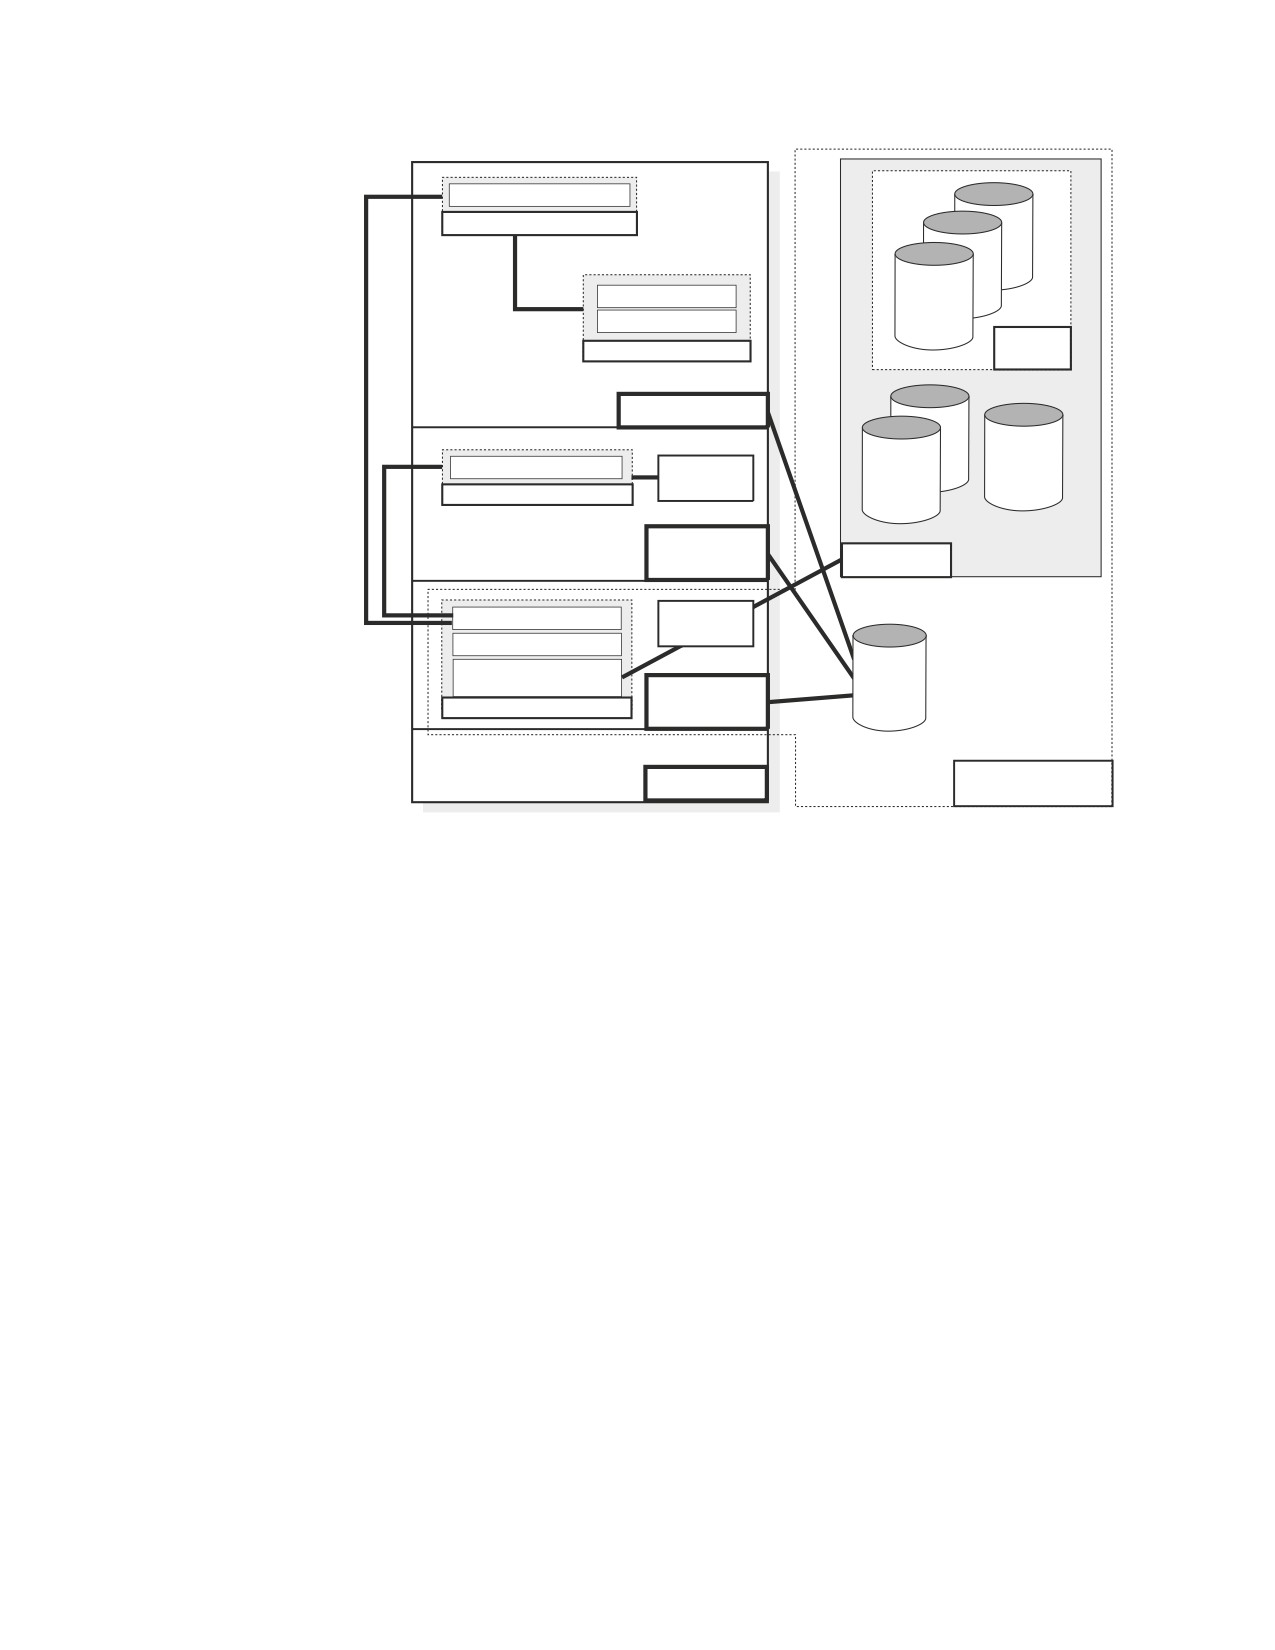
Components of the Relational Database Management System
Figure 5 on page 7 depicts a typical configuration with one database, one batch
partition user, and a CICS® partition with several interactive users.
6
System Administration
Online Resource Adapter
Application Requester
ent
Interactive SQL
ent
CICS Application
Dbextent
Storage
Applications
Pool
CICS Partition
Batch Resource Adapter
Application
Program
Directory
Application Requester
Log
VSE Batch
Partition
Database
Data System Control
VSAM
Relational Data System
Database Storage
DB2
Subsystem
Database
for VSE
Database Manager
Partition
Library
VSE
Application Server
Figure 5. Basic Components of the RDBMS in VSE
The database is composed of :
v A collection of data contained in one or more storage pools, each of which in turn
is composed of one or more database extents (dbextents).
v A directory that identifies data locations in the storage pools. There is only one
directory per database.
v A log that contains a record of operations performed on the database. A database
can have one, two, or four logs.
The database manager is the program that provides access to the data in the
database. It is loaded into the database partition from the DB2 Server for VSE
library.
The application server is the facility that responds to requests for information from
and updates to the database. It is composed of the database and the database
manager.
The application requester is the facility that transforms a request from an
application into a form suitable for communication with an application server.
Prerequisite Programs
This section summarizes the program products required or recommended for the
DB2 Server for VSE functions and environments available with this release. Unless
otherwise stated, the database manager works with all subsequent versions,
releases, and modification levels of the products listed in this section as well as
with equivalent non-IBM products.
Chapter 1. Planning for Installation
7

When installing this product on a VSE system, you require an environment
provided by VSE/Enterprise Systems Architecture (VSE/ESA) Version 2 Release 3
Modification 1 or later. DB2 Server for VSE requires VSE/VSAM which is included
with this operating system.
Table 1 summarizes the components needed for the usage environments, as well as
the languages supported by each environment.
Table 1. VSE Environments
DB2/VSE Components1
Supported Languages
COBOL
FOR-
DB2/VSE Environments
Base
ORA
ISQL
PL/I
COBOL
II
TRAN
C
ASM
Batch
U
U
U
U
U
U
U
Online
U
U
U
U
U
U
U
U
Interactive application
U
U
U
U
U
U
U
U
U
development
Query/Report Writing
U
U
U
Notes:
1
For this column:
v Base refers to the database manager components that support batch applications, the preprocessors, and
the utilities including the database services (DBS) utility.
v ORA (online resource adapter) refers to the DB2 Server for VSE support for transaction processing
(CICS) environments.
v ISQL refers to the terminal user query and report-writing facilities.
Virtual Storage Requirements
The size of the partition running the database manager is your primary design
consideration for determining virtual storage requirements. Virtual storage
requirements of other components are less significant as they are smaller or
transient in nature.
Several factors contribute to the virtual storage requirements of the partition. The
dominant ones are the sizes of the buffer pools (used for directory and data), the
number of concurrent users to be supported, the complexity of the SQL requests,
and the additional storage required for the optional DRDA support. (The DRDA
support makes DB2 Server for VSE data accessible to users equipped with the
DRDA remote unit of work application requester function. For more information,
see Chapter 14, “Using a DRDA Environment,” on page 313.)
Refer to the DB2 Server for VSE Program Directory for the recommended partition
size, and for detailed formulas for calculating virtual storage requirements.
Hardware Requirements
Hardware requirements include real storage, DASD space, tape, and display
terminals.
Real Storage Requirements
You need not allocate any real storage for the database manager over and above
what is already defined for the partition. However, if more real storage is available,
there is less paging, thus improving performance.
8
System Administration
The VSE guest sharing facility requires 40 kilobytes of real storage for each
database communication link.
DASD Space Requirements
DASD space requirements are discussed under the following categories: libraries,
database data sets, and starter database. If you use the accounting facility, you can
direct its output to DASD or tape. For guidelines on estimating DASD space
requirements for the accounting facility, see Chapter 10, “Using the Accounting
Facility,” on page 187.
Libraries: Refer to the DB2 Server for VSE Program Directory for the requirements
of the DB2 Server for VSE library on various devices.
Database Data Sets: A database requires a minimum of three VSAM datasets:
v A directory extent, to hold internal control information for the database.
v Either one, two, or four log extents, to hold recovery information. Only one
(known as the active log) is required, but defining an alternate log volume may
prevent inappropriate log archives from occurring. Whether alternate logging is
used or not, the use of dual log volumes on separate volumes is recommended,
to protect against I/O errors on access to the log information.
v Database extents (dbextents), to hold the user data of the database. It is possible
to have only one dbextent, but a typical database has several.
The directory and log extents are described in Chapter 2, “Planning for Database
Generation,” on page 13, and database extents are described in Chapter 7,
“Managing Database Storage,” on page 123.
The Starter Database: The A-type member ARISDBG, which comes with this
product, contains IBM-supplied specifications for generating a starter database.
This database consists of one directory data set, one log data set, and one user-data
dbextent. You can later add more dbextents, up to a logical maximum size of about
4.6 gigabytes, using the information in “Adding Dbextents to a Storage Pool” on
page 133.
It is recommended that you generate the starter database at the time of installation,
and experiment with it in order to familiarize yourself with the database manager.
You may then keep it as your production database. However, as your needs grow,
you may find it necessary to transfer its contents to another database, which can be
a major undertaking. Thus, once you are familiar with how it works, it is best to
discard it and generate your own database by following the guidelines in Chapter
2, “Planning for Database Generation”.
The initial physical size of the starter database is predefined and will be about the
same on all IBM storage devices. Figure 6 on page 10 shows the approximate
cylinder allocations (or block allocations, in the case of FB-512) on various devices.
Chapter 1. Planning for Installation
9
Starter Database
Data Set
Allocations
3375 Cyls
3380 Cyls
3390 Cyls
9345 Cyls
FB-512 Blocks
Directory
53
34
29
38
31,620
Log
13
8
7
9
9,600
Data Extent
Minimum
38
24
21
27
28,800
Recommended
121
77
65
85
92,400
Total Allocations
Minimum
104
66
57
74
70,020
Recommended
187
119
101
132
133,620
Figure 6. Recommended Starter Database DASD Sizes
This starter database must be able to fit in a single dbextent. If you do not have
enough DASD, you will not be able to use the IBM-supplied specifications, and
will have to generate your own database at the time of installation. If you want to
define the equivalent of the starter database on the devices shown in Figure 6, you
must define multiple dbextents on multiple volumes.
If you are migrating from a previous release of the database manager, you already
have at least one database, so generating the starter database is optional. The
advantage of doing so is that you can use it as a test database to verify your
installation, but the disadvantages are the work involved and the necessary DASD
allocations. Thus to deal with migration needs, the database manager provides
allocations for generating a starter database that is large enough to hold the initial
database components (for example, HELP text, catalog tables, and FORTRAN
packages), but not much else. Figure 6 also shows the data set sizes for a minimum
starter database.
VSAM Catalogs: The database manager must have a VSAM master catalog and
optionally, a VSAM user catalog. Each of the database data sets (the directory, the
logs, and the dbextents) must be cataloged in either a user catalog or the master
catalog.
Tape Requirements
One tape drive is required for installation. Once the database manager is running,
tape drives are only required for the following activities:
v Database archive and log archive processing (both creating the archive and
restoring the database from the archive) to support recovery from DASD failures
v Unloading and reloading data into the database using the DBS utility
v Holding the output of the trace facility
v Holding the output of the accounting facility
For all of these facilities except archiving, you can use DASD instead of tape.
Also, with the exception of accounting output, the database manager does not
require the continuous use of any tape drive: tape mounts are requested when
needed. If you are using tape drives, you should have at least two to cover all
your needs.
10
System Administration
The database manager supports all tape drives that are supported by the operating
system.
Display Terminal Requirements
A variety of display terminals are supported, including the larger screen sizes
offered by some models of the 3278 and 3279 (or equivalent) devices. Since CICS is
needed to provide terminal support for DB2 Server for VSE online applications, the
terminal must be one that is supported by CICS.
You can direct ISQL-printed output to a terminal printer rather than the system
printer. To use terminal printers with ISQL, update the CICS tables as described in
the DB2 Server for VSE Program Directory manual.
Terminals and workstations that follow the line disciplines represented on
VSE/Power remote job entry are also supported by ISQL.
Note: To display and print DBCS characters (for example, Japanese HELP text), a
DBCS terminal and printer (for example, the IBM 5550 terminal) are
required.
DBNAME Directory Requirements
The DBNAME directory is a required directory of all DBNAMEs accessible from
the VSE system. It identifies:
v The system default application server and partition defaults
v All valid TPNs used to access the DB2 Server for VSE application server from
remote application requesters
v Communications parameters required for a local VSE DRDA requester to access
a remote DRDA Server over SNA or TCP/IP.
The DBNAME directory is contained in A-type source member ARISDIRD.
IBM-supplied defaults are provided, but these can be changed. For more
information, see “Setting Up the DBNAME Directory” on page 23.
DB2 Key Processing
When running on VSE/ESA 2.5 or later, DB2 Server for VSE is key-enabled. For
information on setting up the DB2 key, see the DB2 Server for VSE Program
Directory.
Chapter 1. Planning for Installation
11
12
System Administration
Chapter 2. Planning for Database Generation
As described in “The Starter Database” on page 9, when you first install the
database manager you should generate an initial database using the IBM-supplied
specifications. This eases installation, and enables you to gain experience with the
system.
However, once you know how to work with this database, you will probably want
to discard it and create several databases that are tailored to your own needs. This
chapter describes the parameters that are set at the time of database generation,
and presents some general design considerations.
If you are migrating from an earlier version of the database manager, then instead
of reading this chapter go to Chapter 3, “Planning for Database Migration,” on
page 39.
The database-generation process does not require definition of any data specifics; it
merely establishes the potential capacity of the database. Some of the
capacity-planning decisions require knowledge of the data and application
requirements of your users. For example, to estimate how big the database will
become, you need to know the potential number of tables that will be stored, and
the storage requirements of those tables. To obtain this information, consult with
the person responsible for the data and application requirements for the database.
Also refer to the DB2 Server for VSE & VM Database Administration manual.
Setting Up the DB2 Product Key
When running on VSE/ESA 2.5 or later, DB2 Server for VSE is key-enabled. For
information on setting up the DB2 key, see the DB2 Server for VSE Program
Directory.
Database Generation Parameters
Planning for the generation of a database entails establishing logical and physical
limits for its capacity, and setting its initial DASD allocations.
The parameters that you must establish at this time are summarized in Table 2 on
page 14. This figure also shows the IBM-provided values used for the starter
database.
Note: The parameters that have a Yes entry in the Fixed column must be
established during generation of the database, and cannot be changed for
the lifetime of the database. Also note that some parameters are established
by running the VSAM IDCAMS program, whereas others are established by
input to an IBM-supplied job called ARISQLDS.
Following the figure is a discussion of how to set these parameters, and of the
issues to consider when setting them.
13

Table 2. Database Parameters Set at Database Generation Time
Starter
Parameter
Default
Minimum
Maximum
Database
Fixed
Set by
Database directory size
None
2 tracks
1 volume
34 cylinders
No
IDCAMS
Log data set (or data sets)
None
1 cylinder
524,287
8 cylinders
No
IDCAMS
-Size (each)
None
1
4Kb pages
1
-Number
4 volumes
Maximum number of storage
32
1
999
256
Yes
ARISQLDS
pools (MAXPOOLS)
Maximum number of dbextents
64
1
999
256
Yes
ARISQLDS
(MAXEXTNT)
Maximum number of dbspaces
1000
10
32000
10240
Yes
ARISQLDS
(MAXDBSPC)
Catalog dbspace
None
128
8388607
12800
Yes
ARISQLDS
(PUBLIC.SYS0001)
Size (4 kilobyte pages)
First package dbspace
None
128
8388607
2048
Yes
ARISQLDS
(PUBLIC.SYS0002)
Size (4 kilobyte pages)
HELP text dbspace
None
2304
8388607
8192
No
ARISQLDS
(PUBLIC.HELPTEXT)
Size (4 kilobyte pages)
ISQL dbspace
None
128
8388607
1024
No
ARISQLDS
(PUBLIC.ISQL)
Size (4 kilobyte pages)
SAMPLE dbspace
None
512
8388607
512
No
ARISQLDS
(PUBLIC.SAMPLE)
Size (4 kilobyte pages)
Internal dbspaces
None
128
8388607
1024
No
ARISQLDS
-Size (each)
None
5
31997
80
(4 kilobyte pages)
-Number
Initial dbextents
None
1 cylinder
1 volume
77 cylinders
No
IDCAMS
-Size (each)
None
1
999
1
-Number
Notes:
1. The cylinder specifications listed above for the starter database are for IBM
3380 storage devices. Make the appropriate adjustment for your storage
devices.
2. PUBLIC means that the dbspace is publicly owned.
Defining Database Directory Size
The DB2 Server for VSE directory (called BDISK) contains control information and
page tables for mapping dbspace page references to physical DASD locations. Its
size determines the maximum number of dbextent pages and the number of page
table entries that can be supported by the database being generated.
Use the VSAM DEFINE CLUSTER command to define the BDISK data set. The
directory size is established by the TRK, CYL, or BLK parameter. If necessary, you
14
System Administration

can later expand the directory to hold more dbspace pages, or more dbspace and
dbextent pages. Refer to “Expanding the Database Directory” on page 128 for more
details.
Table 3 shows the recommended cylinder (or block) allocations for various DASD
device types, based on assumed maximum database sizes.
Table 3. Recommended Directory Allocations for Various Database Sizes
Directory Space for Various IBM Storage Devices
Maximum
Database
FB-512
Size
3375
3380
3390
9345
BLOCKS
10 megabytes
TRK(3)
TRK(3)
TRK(3)
TRK(4)
BLK(124)
50 megabytes
TRK(7)
TRK(6)
TRK(6)
TRK(7)
BLK(310)
100
CYL(1)
TRK(11)
TRK(10)
TRK(12)
BLK(496)
megabytes
500
CYL(5)
CYL(4)
CYL(4)
CYL(6)
BLK(2232)
megabytes
1 gigabyte
CYL(10)
CYL(8)
CYL(7)
BLK(4480)
2 gigabytes
CYL(19)
CYL(16)
CYL(14)
CYL(21)
BLK(8866)
4 gigabytes
CYL(38)
CYL(32)
CYL(27)
CYL(42)
BLK(17696)
5 gigabytes
CYL(47)
CYL(40)
CYL(34)
CYL(52)
BLK(22080)
10
gigabytes
CYL(92)
CYL(80)
CYL(68)
CYL(101)
BLK(44144)
50
gigabytes
CYL(459)
CYL(400)
CYL(337)
CYL(504)
BLK(220286)
Note: The values in this table apply when the defaults are used for MAXPOOLs,
MAXDBSPC, and MAXEXTNT. These parameters are described in
“Establishing Database Capacity Parameters” on page 17.
Use Table 3 to choose the initial directory size. Detailed information for generating
its values is contained in Appendix B, “Estimating Database Storage,” on page 341.
When estimating the maximum database size, include the sizes of the public,
private, and internal dbspaces.
The directory data set for the starter database supports about 4.9 gigabytes of data.
This includes space for internal dbspace definitions so the actual space supported
for public and private dbspaces is about 4.6 gigabytes.
Directory Allocation Considerations
Maximum Database Size: The directory data set cannot extend beyond a single
volume; therefore, the maximum database size is limited by the single volume
capacity of the device type used. The absolute maximum size for a database is
either 64 gigabytes or the limit imposed by the device type, whichever is smaller.
For the limits imposed by various devices, see Table 38 on page 341 and Table 39
on page 342.
Placement of Directory: The directory data set will be used extensively by the
database manager for resolution of data addresses. Thus, you should not allocate it
to a volume that will contain either the log data sets or heavily used data
dbextents. Instead, place it on a separate volume to avoid device contention.
Chapter 2. Planning for Database Generation
15
If DASD is limited on your system and the directory must share a volume with
data dbextents, put it on a volume with a dbextent that contains infrequently
referenced data. For example, sharing a volume with private dbspaces or historical
data is preferable to sharing one with public dbspaces or current, highly active
data.
Defining the Database Log
The database manager requires at least one log data set and can support four. It is
recommended that you use two log data sets, one being the active log and the
other one being an exact copy of it.
The log data sets contain information, recorded during database processing, that is
used to support database recovery facilities. This includes control information (for
example, COMMIT statement and checkpoint records) and the specifics of database
changes (for example, inserts, updates, and deletes).
If you define more than one log data sets they must be exactly the same size. Do
not define them on different device types because it is almost impossible (because
of rounding) to get identically sized data sets using space allocation algorithms.
To establish the size of the log data sets use the VSAM DEFINE CLUSTER
commands for LOGDSK1 and (optionally) LOGDSK2, ALTLGD1, and ALTLGD2.
The size you specify will depend on the use of the database and on the type of
recovery capabilities you want. If you underestimate this size at database
generation time, you can redefine it afterwards, as described in “Log
Reconfiguration” on page 171.
Log Size Considerations
The log size depends on the number of changes that you expect will be made to
the database and on whether or not you plan to use archiving facilities. If either
database or log archiving is enabled, the log must be large enough to hold all the
logging done between archives; otherwise it need only be large enough to hold the
logging done in a few hours.
Note: If you are putting dbspaces in nonrecoverable storage pools, keep in mind
that only minimal logging is done for them, so the following log size
considerations would not apply to those dbspaces.
Log Size without Archiving: If you run the database manager without the
archiving facilities (LOGMODE=Y or N), log space is reclaimed as applications
finish and checkpoints of the database are taken. Usually, this occurs every few
seconds or every few minutes. Many uses of the database manager can be
supported by a log size of only one or two cylinders; however, a long-running
application may require more log space.
Typically, the largest demand for log space is online loading or reorganization jobs.
These jobs run longer than most applications and cause a lot of logging to occur.
A starting estimate for the initial log size is twice the space requirements of your
largest dbspace. If you have one exceptionally large dbspace, you can disregard it
and use the size of the next largest dbspace. The data in the largest dbspace can be
loaded and reorganized offline with logging inhibited.
Log Size with Archiving: If you are using the archiving facilities (LOGMODE=A
or L), log space is not reclaimed until an archive is taken. That is, log space is not
16
System Administration
reused between archives of the log or database. Typically, you would only archive
the database once or twice a week. You may choose to do log archiving more
frequently, depending on database usage.
To estimate the size of the log, consider the amount of logging that will occur
between archives. A useful approach is to estimate the percentage of data that will
be generated, deleted, and changed over one archive period as follows:
logsize estimate =
(percentage generated
+ percentage deleted
+ percentage changed x 2)
x database size
For example, assume that in a one-week period the database size grows by 5% but
also shrinks by 4%, and that 6% of the database (rows) are changed. Your estimate
for the log size would be:
logsize estimate =
.21 x database size
If your database size were 100 megabytes and you wanted an archive period of
one week, your log size estimate would be:
logsize estimate =
21 megabytes
This is approximately 30 cylinders of an IBM 3390 DASD device.
Logging Generated by Loading: The log requirements for processing the DBS
utility DATALOAD and RELOAD commands in multiple user mode are:
v If the NEW option is used: enough space to hold the log entries for all table
rows to be inserted
v If the PURGE option is used: enough space to hold the log entries for all table
rows to be deleted as well as for all rows to be inserted.
The log space consumption caused by these operations can be avoided by running
the DBS utility in single user mode with LOGMODE=N specified, or by using the
COMMITCOUNT option to force periodic checkpoints in multiple user mode.
Placement of Logs: Like the directory data set the log data sets are frequently
referenced during processing. To avoid device contention, they should reside on
separate volumes from the directory or heavily used dbextents.
Placement of Dual Logs: If dual logging is defined, place the logs on separate
volumes. If they were allocated to the same one, loss of that volume would cause
the loss of both logs, thus defeating the purpose of dual logging.
Establishing Database Capacity Parameters
The MAXPOOLS, MAXEXTNT, MAXDBSPC, and CUREXTNT keyword control
statements can be specified on control card input to database generation (done by
program ARISQLDS with the STARTUP=C initialization parameter). The first three
of these statements are optional. The last one must be specified.
The MAXPOOLS, MAXEXTNT, and MAXDBSPC values are fixed when the
database is generated: once defined, they cannot be changed for its lifetime. To
avoid future limitation problems, it is recommended that you set them to the
allowed maximums. This will take about 1 cylinder of DASD on a 3380 device for
the directory, and 280K virtual storage when the database manager is running.
Chapter 2. Planning for Database Generation
17
Estimating MAXPOOLS
The MAXPOOLS specification determines the maximum number of storage pools
that can be defined in the database. Storage pools control the location of data on
DASD volumes - that is, what dbspaces are located on what volumes. You can
make a generous estimate for MAXPOOLS, since the value specified results in only
a small directory space allocation for each potential storage pool. You should plan
on having one storage pool for each user group (or billing account), and one for
each major application you expect the database to support.
Estimating MAXEXTNT
The MAXEXTNT controls the maximum number of dbextents that are defined to
support the database being generated. Dbextents determine the physical allocation
of DASD space for a storage pool.
Because a dbextent is a VSAM data set, it cannot span DASD volumes. This means
that you need at least as many dbextents as volumes. You can, of course, define
multiple dbextents on one volume. It also means that if you have a dbspace that
spans multiple volumes, the corresponding storage pool requires multiple
dbextents.
Because you should plan to support multiple dbextents for each storage pool and
you should be prepared to extend most, if not all, of your planned storage pools,
MAXEXTNT should be much larger than MAXPOOLS. Your estimate for it can be
generous because this value results in only a small directory space allocation for
each potential dbextent.
Estimating MAXDBSPC
MAXDBSPC controls the maximum number of dbspaces, including internal
dbspaces, that can be defined for the database. See “Determining the Internal
Dbspace Requirements” on page 20. A dbspace is a logical allocation of database
space for holding one or more tables and their indexes. A dbspace is assigned to a
storage pool when it is defined and draws on the actual DASD space available in
that storage pool on an as-needed basis. Typically, dbspaces are defined to support
private space allocations for individual users and space allocations for specific
applications; thus, the number of dbspaces required generally depends on the
number of users and the number of tables needed for applications. Each user
probably requires from one to five private dbspaces over the lifetime of the
database, and each application requires, at most, one dbspace for each table being
accessed. For performance reasons, one table per dbspace is recommended.
As with the previous two parameters, your estimate for MAXDBSPC can be
generous, because the value you specify will result in only a small allocation of
directory space for each potential dbspace.
Estimating CUREXTNT
CUREXTNT determines the number of dbextents defined during database
generation. This number should be sufficient to support your initial storage
requirements. You can add more dbextents after database generation.
Establishing Initial Dbspace Requirements
Determining the System Dbspace Requirements
Any public dbspace that has SYS as the first three characters in its name is
reserved for system use only. The system dbspaces established at database
generation time are PUBLIC.SYS0001, PUBLIC.SYS0002, PUBLIC.HELPTEXT,
PUBLIC.ISQL, and PUBLIC.SAMPLE.
18
System Administration
This section presents only general concepts related to setting the initial dbspace
sizes. For more information, see “Specifying Initial Dbspaces” on page 223 and
Appendix B, “Estimating Database Storage,” on page 341.
v
PUBLIC.SYS0001 holds the database catalog tables. The size required for it varies
considerably, depending on factors such as the number of tables, columns,
indexes, views, and users in the database. For guidelines, see “Estimating
SYS0001 Dbspace Requirements” on page 344.
Note: Physical space is not actually consumed until required, so you can afford
to define the SYS0001 dbspace to be very large. Be generous: this dbspace
cannot be dropped or recreated after the database is generated. If you
make it too small and SYS0001 runs out of usable space, you will have to
regenerate the database which can be a considerable task.
v
PUBLIC.SYS0002 holds the definitions of views and packages. This dbspace,
which cannot be dropped or recreated after generation, can hold a combination
of 255 views and packages. If you anticipate more views and packages than this,
you can acquire additional dbspaces after database generation, as described in
“Acquiring Dbspaces for Packages” on page 129.
v
PUBLIC.HELPTEXT holds the online HELP tables. You will need 2304 pages for
each IBM-supplied HELP text that you install. The starter database uses 8192
pages.
v
PUBLIC.ISQL holds several tables; EXAMPLE.ROUTINE, SQLDBA.ROUTINE,
and SQLDBA.STORED QUERIES. An allocation of 1024 pages should be enough
for most uses. If you have many users or expect to make extensive use of the
ISQL stored queries facility, consider increasing this. See “Estimating ISQL
Dbspace Requirements” on page 353.
v
PUBLIC.SAMPLE contains copies of the sample tables for ISQL users, to help
them gain experience with using the database manager. Usually, every ISQL user
has a copy of the sample tables. An allocation of 512 pages should be enough for
all your users, but you can increase the size if you have many ISQL users.
Alternatively, you can ask experienced ISQL users to drop their copies after they
no longer need them to free space for new users’ tables.
The ARISDBU A-type member contains SQL statements to acquire the public
dbspaces HELPTEXT, ISQL, and SAMPLE. If you want to increase their size,
update the appropriate ACQUIRE DBSPACE statement in ARISDBU.
Except for PUBLIC.SAMPLE, the sizes that you establish for system dbspaces at
database generation time can limit the logical capacity of your database. Because
physical space is not actually used until required, you should establish large sizes
for them. The large recommended sizes shown in Figure 7 on page 20 will support
most uses of the database manager.
Chapter 2. Planning for Database Generation
19

Default
System dbspace
Recommended Sizes (in Pages)
in pages
SYS0001 (Catalog Tables)
30 +
.33 x the number of tables
12,800
+
.40 x the number of views
+
.10 x the number of columns
+
.50 x the number of packages
+
.03 x the number of dbspaces
(including package
dbspaces)
+ 10.28 x the number of users
+
8.10 x the number of package
dbspaces
+
.25 x the number of
character sets
+
.13 x the number of keys
SYS000n (packages)
2,048 for each dbspace
2,048
PUBLIC.HELPTEXT
2,304 x Number of languages installed
8,192
PUBLIC.ISQL
The larger of : 1,024 or
1,024
(0.88 x the number of stored queries)
PUBLIC.SAMPLE
512
512
Figure 7. Guidelines for the Sizes of the System Dbspaces
Determining the Initial User Dbspace Requirements
When you generate the database, you need only consider the dbspace requirements
for its initial use. To determine the initial user dbspace requirements, either consult
with the database administrator or refer to the DB2 Server for VSE & VM Database
Administration manual. The ADD DBSPACE facility can be used to add more later,
up to the MAXDBSPC value.
For more information, refer to Chapter 7, “Managing Database Storage,” on page
123.
Determining the Internal Dbspace Requirements
The database manager uses internal dbspaces to process commands that require
sort operations and to process views that require materialization. For information
on sorting and materialization, see the DB2 Server for VSE & VM Database
Administration manual.
The internal dbspaces are held until a COMMIT or ROLLBACK statement is
issued; therefore, a single application may hold a number of internal dbspaces at
one time. For example, if each SELECT needs an average of two internal dbspaces,
and a certain program issues five SELECTs before issuing a COMMIT statement,
then that program will hold 10 internal dbspaces. Internal dbspaces that are not in
use take up minimal space (approximately 4 bytes of directory space for each
page).
Allocate at least 30 internal dbspaces; more if your installation has interactive
users. The exact number required depends on the number of logical units of work
(LUWs) that are concurrently active and the amount of sorting and view
materialization required in those LUWs. Because the number of NCUSERS is
comparable to the number of concurrently active LUWs, as a guideline, in addition
20
System Administration
to the minimum of 30, you may want to provide 10 internal dbspaces for each
NCUSER (see the description of the NCUSERS parameter on “NCUSERS” on page
55). After the database has been generated, you can always add more internal
dbspaces by using the ADD DBSPACE function. All internal dbspaces (and their
storage pool assignments) are redefined on each run of this function.
The physical placement of the internal dbspaces affects performance, especially
when you perform a sort operation on a large table. You should place internal
dbspaces in their own storage pool, and use multiple dbextents over multiple
devices. There are several ways of doing this. Suppose you had 300 3380-type
cylinders for internal dbspace dbextents, you could use one of these strategies:
1. Make the first dbextent small (less than 100 cylinders), and each succeeding
dbextent twice the size of the preceding one. For example, have dbextents that
are 20, 40, 80, and 160 cylinders in size.
2. Graduate the sizes of the dbextents. For example, have dbextents that are 10,
20, 30, 40, 50, 60, and 90 cylinders in size. The last dbextent is extra large so
that unusually large sorts can be accommodated.
3. Have several small dbextents and a few big ones. For example, have five
dbextents of 20 cylinders each, and two of 100 cylinders.
The purpose of all these strategies is to spread input/output activity over more
devices as the size of a sort increases. The strategy you adopt determines how
many dbextents a sort requires. With the first strategy, a sort requiring 60 cylinders
uses two dbextents. With the second and third strategies, the same sort requires
three dbextents. Use a strategy that is suitable for your organization.
Sorting is done for ORDER BY, GROUP BY, join, CREATE INDEX, or UNION
operations. The internal dbspaces must be large enough to hold the rows being
sorted. For example, if an ORDER BY operation is requested using all the columns
of an entire table, the internal dbspace must be large enough to hold the whole
table. Less space is required if all the columns are not selected. During index
creation, space is required only for the key columns. To calculate the required size
of an internal dbspace, use the formula (KEYSIZE + 8 bytes) * ROWCOUNT. Make
the internal dbspaces large enough to hold the largest table or query result you
want to be able to sort. The dbspace size estimates are discussed under
Appendix B, “Estimating Database Storage,” on page 341.
The number of internal dbspaces required also depends on the planned usage of
the system. Fewer are needed for preplanned application processing than for
dynamic query processing, as query users usually hold dbspaces longer than do
preplanned applications.
Internal dbspaces can also be stored on a virtual disk. Only use virtual disks for
internal dbspaces because information on a virtual disk is lost when the database
is restarted. For more information on virtual disk support, see the DB2 Server for
VSE & VM Performance Tuning Handbook manual.
Determining Initial Dbextent Requirements
Sufficient space must be allocated during database generation to support your
initial dbspace data storage requirements. You must define at least one dbextent for
each storage pool that initially contains dbspaces. The specific amount to allocate
for each storage pool depends on the following considerations:
v System dbspace support
Chapter 2. Planning for Database Generation
21
System dbspaces are heavily used, so they should not share their storage pool
(storage pool 1) with heavily used user dbspaces. Until you gain experience with
your data, do not put user dbspaces in the same storage pool as system
dbspaces.
You should undercommit storage pool support for the SYS0001 and SYS0002
dbspaces. If the catalog tables grow significantly, you can later allocate an
additional dbextent, probably on a separate device, to avoid excessive device
contention on catalog access.
Storage pool support for PUBLIC.HELPTEXT should be large enough to hold
the HELP tables; PUBLIC.ISQL must be large enough to hold your initial needs
for stored queries; and PUBLIC.SAMPLE should be large enough to hold the
number of sample data tables needed.
v
End user dbspace support
Dbspaces for use primarily by end users should be supported by one or more
storage pools. Public and private dbspaces can share a storage pool; however,
you may want to manage space allocation differently for these two cases.
A recommended approach to storage pool support for end user data is to define
more dbextent space than is needed to support your initial dbspace definitions.
This approach is called overcommitting, and ensures that end user space
requirements can be accommodated as existing users need more space or more
users are added to the system.
If your installation plans to bill users for DASD storage space, you may want to
consider separate storage pools for different user groups (or account numbers).
Note: You can also use statistics from the SYSTEM.SYSDBSPACES catalog table
to achieve this.
v
Dbspace support for applications
Storage pool support of dbspaces for use primarily by application programs
varies, depending on the nature of the data and the storage management
technique. In general, consider using different storage pools for different
applications, and undercommitting storage pool support for application
dbspaces.
The dbspaces for applications should be defined to be larger than is believed
necessary, to avoid later reorganization because of data growth. If you do this,
storage pool requirements are smaller than the dbspace sizes indicate. The initial
storage pool allocations should be large enough to cover initial loading of the
data plus growth over the next planning period (for example, six months or a
year).
v
Internal dbspace support
Storage pool support for internal dbspaces should be undercommitted, since you
probably do not need storage to support all internal dbspaces at the maximum
size. As a rough estimate, the storage pool for internal dbspaces should have
enough DASD space available to hold data for three internal dbspaces (at the
internal dbspace size specified at database generation).
Storage space for internal dbspaces is taken from the storage pool assigned at
database generation time. In general, this storage pool should not be used for
system dbspaces or other heavily used dbspaces. Consider using a separate
storage pool just for internal dbspaces.
For more information on storage organization techniques, see Chapter 7,
“Managing Database Storage,” on page 123.
22
System Administration
Choosing an Application Server Name
In planning for database generation, you choose two names for your database.
v The first name is the mapped DBNAME (DBNAME).
v The second name is the basic DBNAME. This is the VSE subsystem application
identifier, APPLID. It identifies the application server subsystem to VSE.
These names are specified in the DBNAME directory. In this directory, the mapped
DBNAME is mapped to the basic DBNAME. Details regarding this directory can
be found in “Setting Up the DBNAME Directory.”
When the application server is started, you must supply the mapped DBNAME.
This value is now the server name, and is stored in the CURRENT SERVER register.
Attention: The mapped DBNAME is the name the application requesters should
specify when connecting to the application server.
The mapped DBNAME must be from one to 18 characters. It should start with an
uppercase alphabetic character. The remaining characters can be alphabetic,
numeric or underscore characters. The mapped DBNAME must not be prefixed
with “SYSARI”. It should be unique within a set of networks that are
interconnected, and be defined and stored in the DBNAME directory in the
production library.
The basic DBNAME has a length of eight alphanumeric characters, and must be
unique within the VSE system because it is used to identify the application server
subsystem to the VSE system. The basic DBNAME is either the VSE APPLID
(SYSARI0x) or, in the case of guest sharing, the VM resource identifier (RESID).
There are 36 reserved basic DBNAMEs (SYSARI00 to SYSARI09, SYSARI0A to
SYSARI0Z), which must be reserved for VSE application servers only. If the basic
DBNAME is not prefixed with “SYSARI”, it is assumed to be a VM application
server and must be defined with a SET APPCVM TARGET command if it is on a
remote system. In this case, the basic DBNAME defined in the DBNAME directory
must be identical to the VM RESID.
You must also decide whether the application server will be accessed from remote
application requesters. If the DRDA environment will be used, you must also
choose a CICS transaction program name (TPN) to represent the application server.
Note: When using remote access, it is recommended that the system administrator
ensure that server names are unique within a set of interconnected SNA
networks. APPLIDs are predetermined. For more information on these
requirements, see Chapter 14, “Using a DRDA Environment,” on page 313.
Setting Up the DBNAME Directory
The DBNAME directory is a required user-definable directory of ALL Local,
Remote and Host VM application server names. A Local server executes in a
partition in the VSE system. A Remote server exists external to the VSE system
(and must be connected via SNA or TCP/IP). A Host VM server exists on the VM
system on which the VSE system runs as a guest and DB2 Guest Sharing is used
between the VSE requesters and the VM server.
In addition, the DBNAME Directory contains all Transaction Program Names
(TPNs) used by remote application requesters to identify the local DB2 Server for
VSE application servers which they want to access.
Chapter 2. Planning for Database Generation
23
The IBM supplied default DBNAME Directory is contained in the A-type source
member called ARISDIRD. It contains the default mapped DBNAME ″SQLDS″,
which defines a Local server which is also the System Default DBNAME. It also
contains the default Registered TPN (X'07F6C4C2), which points to the default
DBNAME ″SQLDS″.
The DBNAME Directory consists of a number of entries that define all mapped
DBNAMEs and all TPNs. Each mapped DBNAME can have an ALIAS name, to
allow multiple entries (with different options) to specify the same mapped
DBNAME. The Alias name defaults to the mapped DBNAME, if not specified.
Each Alias name MUST be unique within the DBNAME Directory source file and
this will be enforced.
There are four types of entries, as follows:
v LOCAL: This type of entry defines a server that physically exists on the same
VSE system as the DBNAME Directory.
v HOSTVM: This type of entry is for Guest Sharing only and defines a server that
exists on the Host VM system on which the VSE system is a guest.
v REMOTE: This type of entry defines a DRDA-conforming server on a system
that is physically remote from the VSE system and is connected to the VSE
system via an SNA or a TCP/IP communications network.
v LOCALAXE: This type of entry identifies a local mapped DBNAME and the
TPN of a remote requester that can access this local DBNAME via the
APPC-to-XPCC Exchange (AXE) CICS Transaction. This type of entry cannot have
an Alias name.
The first three types of entries define mapped DBNAMEs, while the LOCALAXE
entry defines the names of CICS ″AXE″ transactions and their target local servers.
The DBNAME Directory does not have a maximum size. It is searched sequentially
and the first entry that matches the search argument is used. Where there are
multiple default partition entries, the last default partition entry will be used.
Therefore, it is possible to have overriding entries, but excessive overrides impact
search performance and should be avoided.
The following four figures show the syntax of the four directory entry types. The
keywords and values are defined after these figures.
Each entry consists of a number of lines, each of which specifies a single
’KEYWORD=value’. The first line MUST be the TYPE of the entry and the second
line MUST be the DBNAME of the entry. Blank lines are ignored. If the first 2
non-blank characters of the line are ’*’, ’/*’, or ’--’ then the line will be ignored and
can be used for comments.
24
System Administration

►► TYPE=LOCAL DBNAME=local_database_name APPLID= SYSARI0
x
►
►
►
DBNAME
0
ALIAS
=
alias_name
TCPPORT
=
portnumber
►
►◄
N
PARTDEF
= pd
SYSDEF
=
Y
Figure 8. LOCAL Type Entry
A Sample LOCAL Directory entry with only required lines:
TYPE=LOCAL
DBNAME=VSEDATABASE
APPLID=SYSARI00
►► TYPE=HOSTVM DBNAME=host_vm_database_name RESID=vm_database_iucv_resid
►
►
►◄
DBNAME
N
PARTDEF
= pd
ALIAS
=
alias_name
SYSDEF
=
Y
Figure 9. HOSTVM Type Entry
A Sample HOSTVM Directory entry with only required lines:
TYPE=HOSTVM
DBNAME=VMDATABASE3
RESID=VMRESID3
Chapter 2. Planning for Database Generation
25
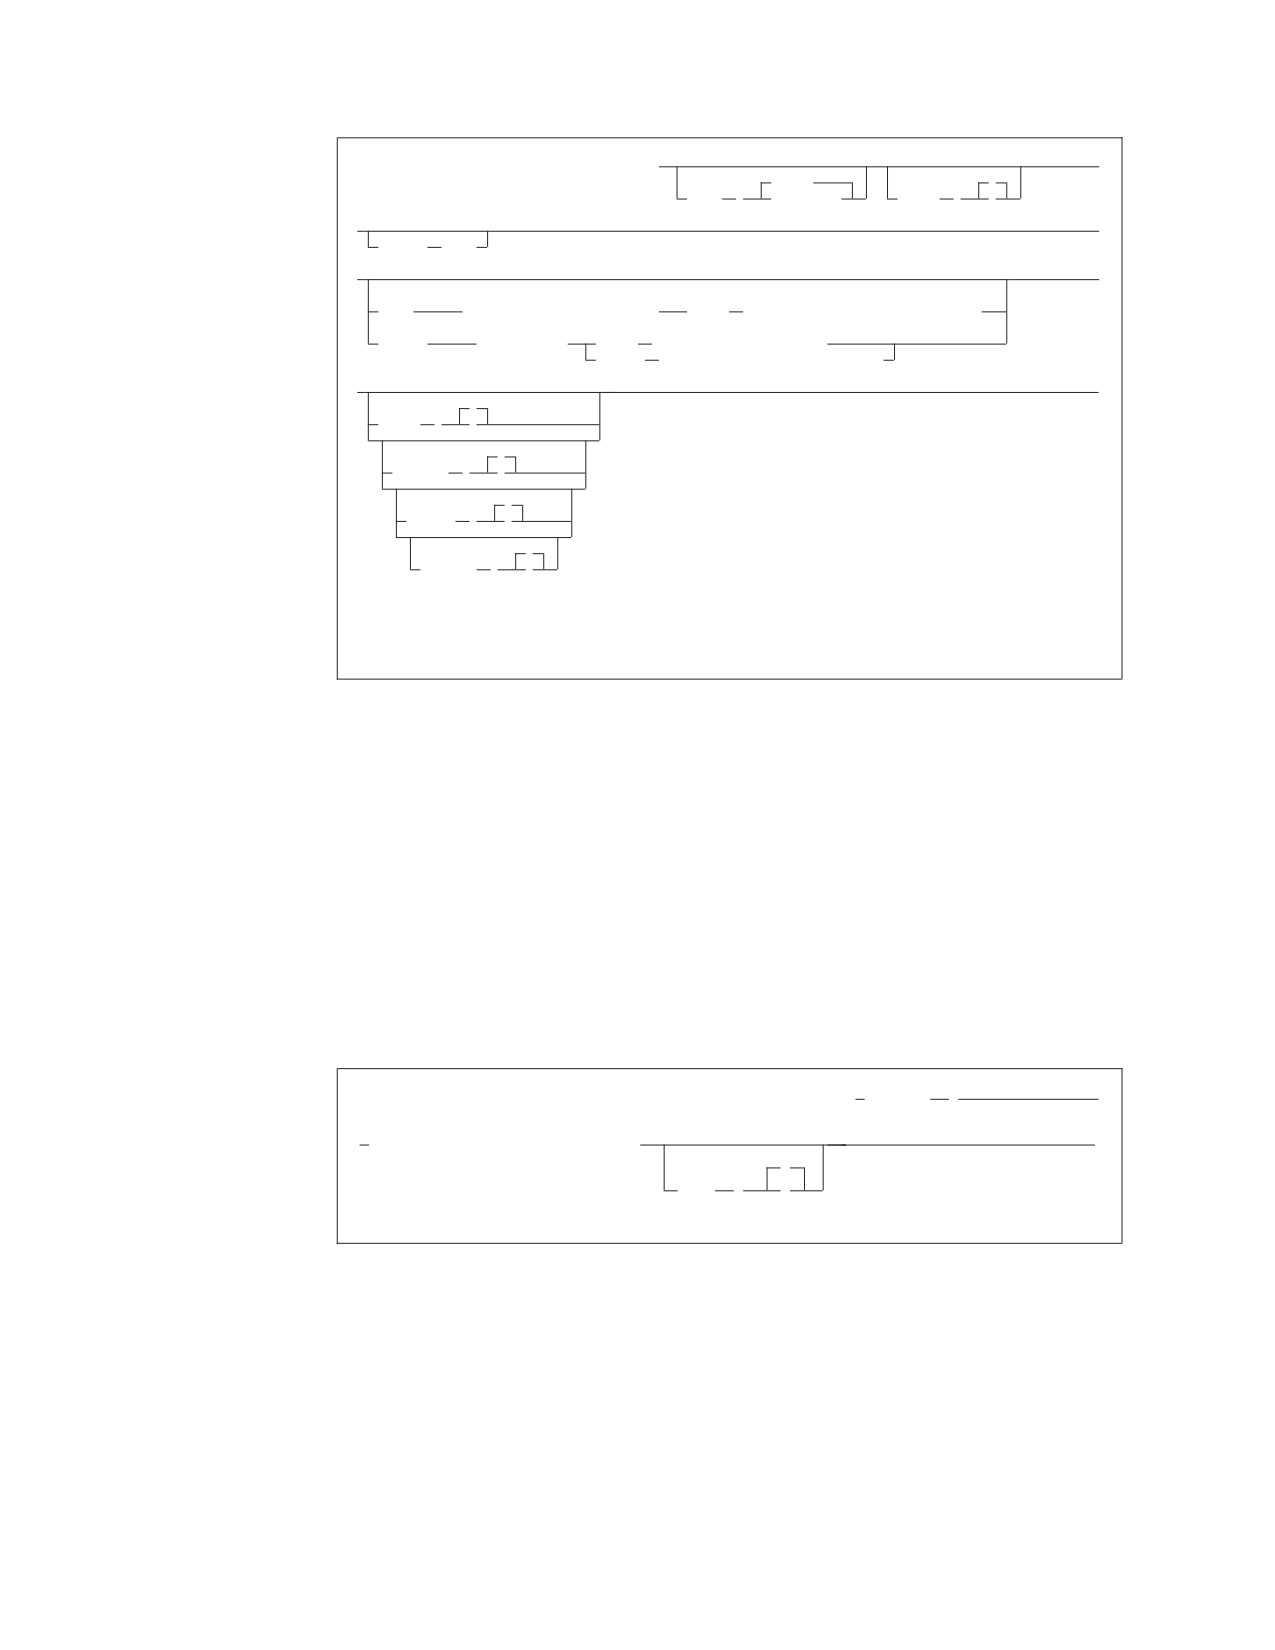
►► TYPE=REMOTE DBNAME=remote_database_name
►
DBNAME
N
ALIAS
=
alias_name
SYSDEF
=
Y
►
►
PARTDEF
= pd
►
►
(1)
SYSID
= cics_appc_connection_name
REMTPN
= remote_transaction_program_name
(1)
TCPPORT
= portnumber
IPADDR
= dotted_decimal_address
TCPHOST
= remote_server_tcpip_host_name
|
►
►◄
N
PWDENC
=
Y
Y
CONNPOOL
=
N
Y
PWUPPER
=
N
Y
CONNPOOL
=
N
Notes:
1
Either ’SYSID=’ or ’TCPPORT=’ must be specified, and both can be specified.
Figure 10. REMOTE Type Entry
A Sample REMOTE Directory entry with only required lines:
TYPE=REMOTE
DBNAME=REMOTEDB
SYSID=REMS
REMTPN=REMTRANSPROGRAMNAME
or
|
TYPE=REMOTE
|
DBNAME=REMOTEDB
|
TCPPORT=4865
|
IPADDR=98.76.54.32
|
CONNPOOL=Y
►► TYPE=LOCALAXE DBNAME=local_database_name APPLID= SYSARI0
x
►
► TPN=cics_axe_transaction_name
►◄
N
PRIV
=
Y
Figure 11. LOCALAXE Type Entry
A Sample LOCALAXE Directory entry with only required lines:
TYPE=LOCALAXE
DBNAME=LOCALDB
APPLID=SYSARI0Q
TPN=WXYZ
These keywords and values are described below:
26
System Administration
TYPE=
This value is required, it is the type of entry that follows and must be one
of LOCAL, HOSTVM, REMOTE or LOCALAXE. It must be the first line
of an entry.
DBNAME
This 1 to 18 character mapped name is required. It does not need to be
unique within the file but it cannot begin with SYSARI. The first character
must be alphabetic or ’#’, ″$″ or ″@″; other characters can be alphabetic,
numeric, ″#″, ″$″, ″@″ or ″_″. It must be the second line of an entry.
ALIAS=’alias’
This identifies an alias database name for the mapped DBNAME; it is
optional but if specified it MUST be unique within the file. An alias name
is an 18 byte name and defaults to the mapped DBNAME. When the
Directory is searched via a DBNAME, it is the alias name that is searched,
but it is the mapped DBNAME that is used to connect to the server. Note
that a LOCALAXE entry cannot have an alias name, because it is always
searched via the TPN.
APPLID
This is the basic DBNAME and is the XPCC ″Application Name″ that
corresponds to the DBNAME. It is required for LOCAL and LOCALAXE
entries. There must be a one to one correspondence between each APPLID
and DBNAME in the file. The value must be specified as SYSARI0x, where
″x″ is upper case A through Z, or 0 through 9.
TPN This is the CICS AXE Transaction Program Name that is used by remote
requesters to access this local DBNAME server and is required for
LOCALAXE entries only. This is a 4 character value consisting of upper
case A-Z, 0-9, or ″#″, ″$″, ″@″, or ″_″. Alternatively, it can be specified as an
8 character hexadecimal value consisting of 0-9 or A-F.
PRIV This is a flag to determine if this TPN is a privileged user of a local
server’s Real Agent. It must be ″Y″ or ″N″ and is optional only for
LOCALAXE entries. Normally a Real Agent is released when a requester
reaches the end of an LUW. A privileged TPN will retain exclusive use of
the Real Agent until the end of the SNA or TCP/IP communications
session. Note that privileged TPNs can cause contention problems for other
users of the server.
PARTDEF
This option indicates that this DBNAME is the Partition Default for the
partition(s) specified in the value. It is used when either a server or
requester is started without specifying a DBNAME and is optional only for
LOCAL, HOSTVM or REMOTE entries. A server started in the specified
partition will use this entry’s DBNAME. A requester executing in the
specified partition will connect to this entry’s DBNAME. It is a two
character partition name, for example: ″BG″, ″F3″, ″H2″ or ″X*″. For
dynamic partitions, the second character may be an asterisk (*) to indicate
that this DBNAME is the default for any dynamic partition whose name
begins with the first character. The default is blank, which means that this
DBNAME is not the default for any partition.
SYSDEF
This option indicates that this DBNAME is the System Default. It is used
when either a server or requester is started without specifying a DBNAME
and no Partition Default is found; it is optional only for LOCAL, HOSTVM
Chapter 2. Planning for Database Generation
27
or REMOTE entries. You must specify ″Y″ or ″N″, ″N″ being the default.
Only one entry in the directory can be specified as the System Default and
this restriction is enforced.
SYSID
This option specifies the CICS APPC Connection Name (of an entry in the
CICS Terminal Control Table, defined by the CICS CEDA DEF
CONNECTIONS command) that identifies the SNA connection with the
remote system where the DRDA-capable DBNAME server resides. This is a
4 character value consisting of upper case alphabetic, numeric or ″#″, ″@″,
″$″ or ″_″ characters. The default is blank, which indicates that there is no
SNA access to this DBNAME server. If SYSID is specified in this entry,
REMTPN must also be specified. A REMOTE entry must specify SYSID or
TCPPORT, or both.
SYSID is optional only for REMOTE entries.
REMTPN
This is the 1-32 character Remote Transaction Program Name of the remote
server which is optional only for REMOTE entries. This value is not
checked and there is no default. It must be specified if the SYSID option is
specified.
TCPPORT=’port’
This option only applies to LOCAL or REMOTE entries.
For LOCAL entries, it identifies the TCP/IP Port Number to be used by
the LOCAL server to accept incoming TCP/IP connections. This value can
be overridden by the local server ’TCPPORT’ Start Up Parameter. The
default is minus one, meaning that the TCP/IP support to be used will be
determined by the Server. Valid values range from zero through 65,535,
with zero indicating TCP/IP support is NOT to be used by this server.
For REMOTE entries, it identifies the TCP/IP Port Number to be used by
the local requester when making a connection to the REMOTE server. Valid
values range from minus one through 65,535. Minus one and zero both
mean that no port number was specified in this DBNAME directory entry,
which means that no TCP/IP communications is available to this remote
server. If this parameter is specified for REMOTE entries, IPADDR or
TCPHOST must also be specified. A REMOTE entry must specify SYSID or
TCPPORT, or both.
IPADDR=’port’
This option only applies to REMOTE entries and identifies the TCP/IP
Dotted-Decimal Address of the REMOTE server. The value must be
specified as ″nnn.nnn.nnn.nnn″, where the periods (″.″) are required
delimiters and each ″nnn″ value is a decimal number between 0 and 255. If
this parameter is specified, TCPPORT must also be specified, and
TCPHOST must NOT be specified.
TCPHOST=’host_name’
This option only applies to REMOTE entries and identifies the TCP/IP
Host Name of the REMOTE server. It is a 1-64 character Host Name and
must be known to the TCP/IP network. This value is not validated and
there is no default. If this parameter is specified, TCPPORT must also be
specified, and IPADDR must NOT be specified.
PWDENC
This option only applies to REMOTE entries. You must specify ″Y″ or ″N″,
″N″ being the default. Specify a value of ″Y″ to encrypt the CONNECT
28
System Administration
password. The target database server must support decryption of the
password. A value of ″N″, or the absence of this option, will result in the
password being sent to the server as plain text.
|
PWUPPER
|
The PWUPPER parameter is valid only for REMOTE entries for remote
|
servers. You must specify ″Y″ or ″N″, ″Y″ being the default. Specify a value
|
of ″Y″ to generate the passwords in uppercase. A setting of ″N″ will allow
|
the password to be sent to the remote server as it is entered.
|
CONNPOOL
|
This option only applies to REMOTE with TCPPORT entries for online
|
users. You must specify ″Y″ or ″N″, ″Y″ being the default. A value of ″Y″ or
|
the absence of this option, activates the CONNECTION POOLING feature
|
upon CIRB/CIRA entry for the target database. Specifying a value of ″N″,
|
will result in deactivating this feature while accessing the target database.
|
Recommended for online users whose applications are database switching
|
intensive between remote databases connected over TCP/IP and other
|
databases. Recommended also for online users who have applications with
|
frequent SQL CONNECT statements across LUWs to the same remote
|
database.
The IBM-Supplied DBNAME Directory
The following example shows the IBM-supplied default DBNAME Directory,
including the System Default local server DBNAME of ″SQLDS″ and the default
registered DRDA AXE TPN Name X'07F6C4C2, which maps to a DBNAME of
″SQLDS″ and an APPLID of ″SYSARI00″.
You must not delete either of these supplied entries and you should insert any
additional entries preceding the two supplied entries. However, if you add an
entry for a server that is to be the System Default entry (for example, the entry
contains the SYSDEF=Y option), you must remove the SYSDEF=Y option from the
supplied entry, as only one entry can use that option.
TYPE=LOCALAXE
DBNAME=SQLDS
APPLID=SYSARI00
TPN=07F6C4C2
TYPE=LOCAL
DBNAME=SQLDS
APPLID=SYSARI00
SYSDEF=Y
Updating the DBNAME Directory
The DBNAME Directory source file is an A-type member ARISDIRD in the
production library. All local server, remote server and host VM server DBNAMEs
must be identified in this member.
Place your new entries before the IBM-supplied entries. Remember to remove the
SYSDEF=Y option from the IBM-supplied entry if you define a different System
Default entry. Catalog your changed member back into the production library. If
you catalog your changed member under a different name than ″ARISDIRD″, be
sure to update the ″PARM=″ field of the EXEC statement in the ARISBDID JCL
before executing the JCL.
Chapter 2. Planning for Database Generation
29
The member must then be processed by the IBM-supplied ARISBDID Job Control
Language member to catalog the DBNAME Directory Service Phase
(″ARICDIRD.PHASE″) into the production library. For more information on this
process, see the DB2 Server for VM Program Directory. Any errors or warnings
during this processing will appear in the SYSLST listing.
Sample DBNAME Directory
The following is a sample DBNAME Directory, with explanatory notes:
TYPE=LOCAL
DBNAME=SQLDB4_SANJOSE
APPLID=SYSARI03
PARTDEF=F4
If a server is started in partition F4 and no DBNAME start up parameter is
specified, then this entry is used. Likewise, if an application is executing in
partition F4 and issues an SQL CONNECT statement without a ’TO’ clause, it will
use this entry and access DBNAME ’SQLDB4_SANJOSE’.
TYPE=LOCAL
DBNAME=SQLDB1_NY
APPLID=SYSARI02
SYSDEF=Y
This entry is the System Default entry. Any application executing in a partition that
is NOT identified in this directory will access DBNAME ’SQLDB1_NY’.
TYPE=LOCAL
DBNAME=SQLDB3_TOR
ALIAS= SQLDB3_TOR
APPLID=SYSARI0A
PARTDEF=BG
Applications executing in partition BG will access DBNAME SQLDB3_TOR.
TYPE=LOCAL
DBNAME=SQLDB3_TOR
ALIAS= SQLDB3_TORX
APPLID=SYSARI0A
PARTDEF=X*
Applications executing in a dynamic partition with a partition name beginning
with ’X’ will access DBNAME SQLDB3_TOR. Note the use of the ALIAS= keyword
above. As the previous entry used the alias ’SQLDB3_TOR’, and all alias names
MUST be unique, this entry must use a different alias name, even though the
DBNAMEs in both entries are equal.
TYPE=LOCALAXE
DBNAME=TORONTO_LAB
APPLID=SYSARI07
TPN=SQL1
PRIV=Y
When a remote DRDA requestor communicates with CICS and passes a TPN of
’SQL1’, CICS starts transaction ’SQL1’ (after validation). Transaction ’SQL1’ will
connect to this entry’s APPLID via XPCC, which is DBNAME ’TORONTO_LAB’.
Also, because the ″PRIV=Y″ option is specified, CICS transaction ’SQL1’ has
extended use of the server’s Real Agent until the DRDA conversation ends.
TYPE=HOSTVM
DBNAME=VMDATABASE1
RESID=VMDB1
30
System Administration
//////////////////////////////////////////