Harley-Davidson Boom Box GTS Quick Start Guide
Boom!™ Box GTS Quick Start Guide
09-06-18
RADIO
SETUP (cont.)
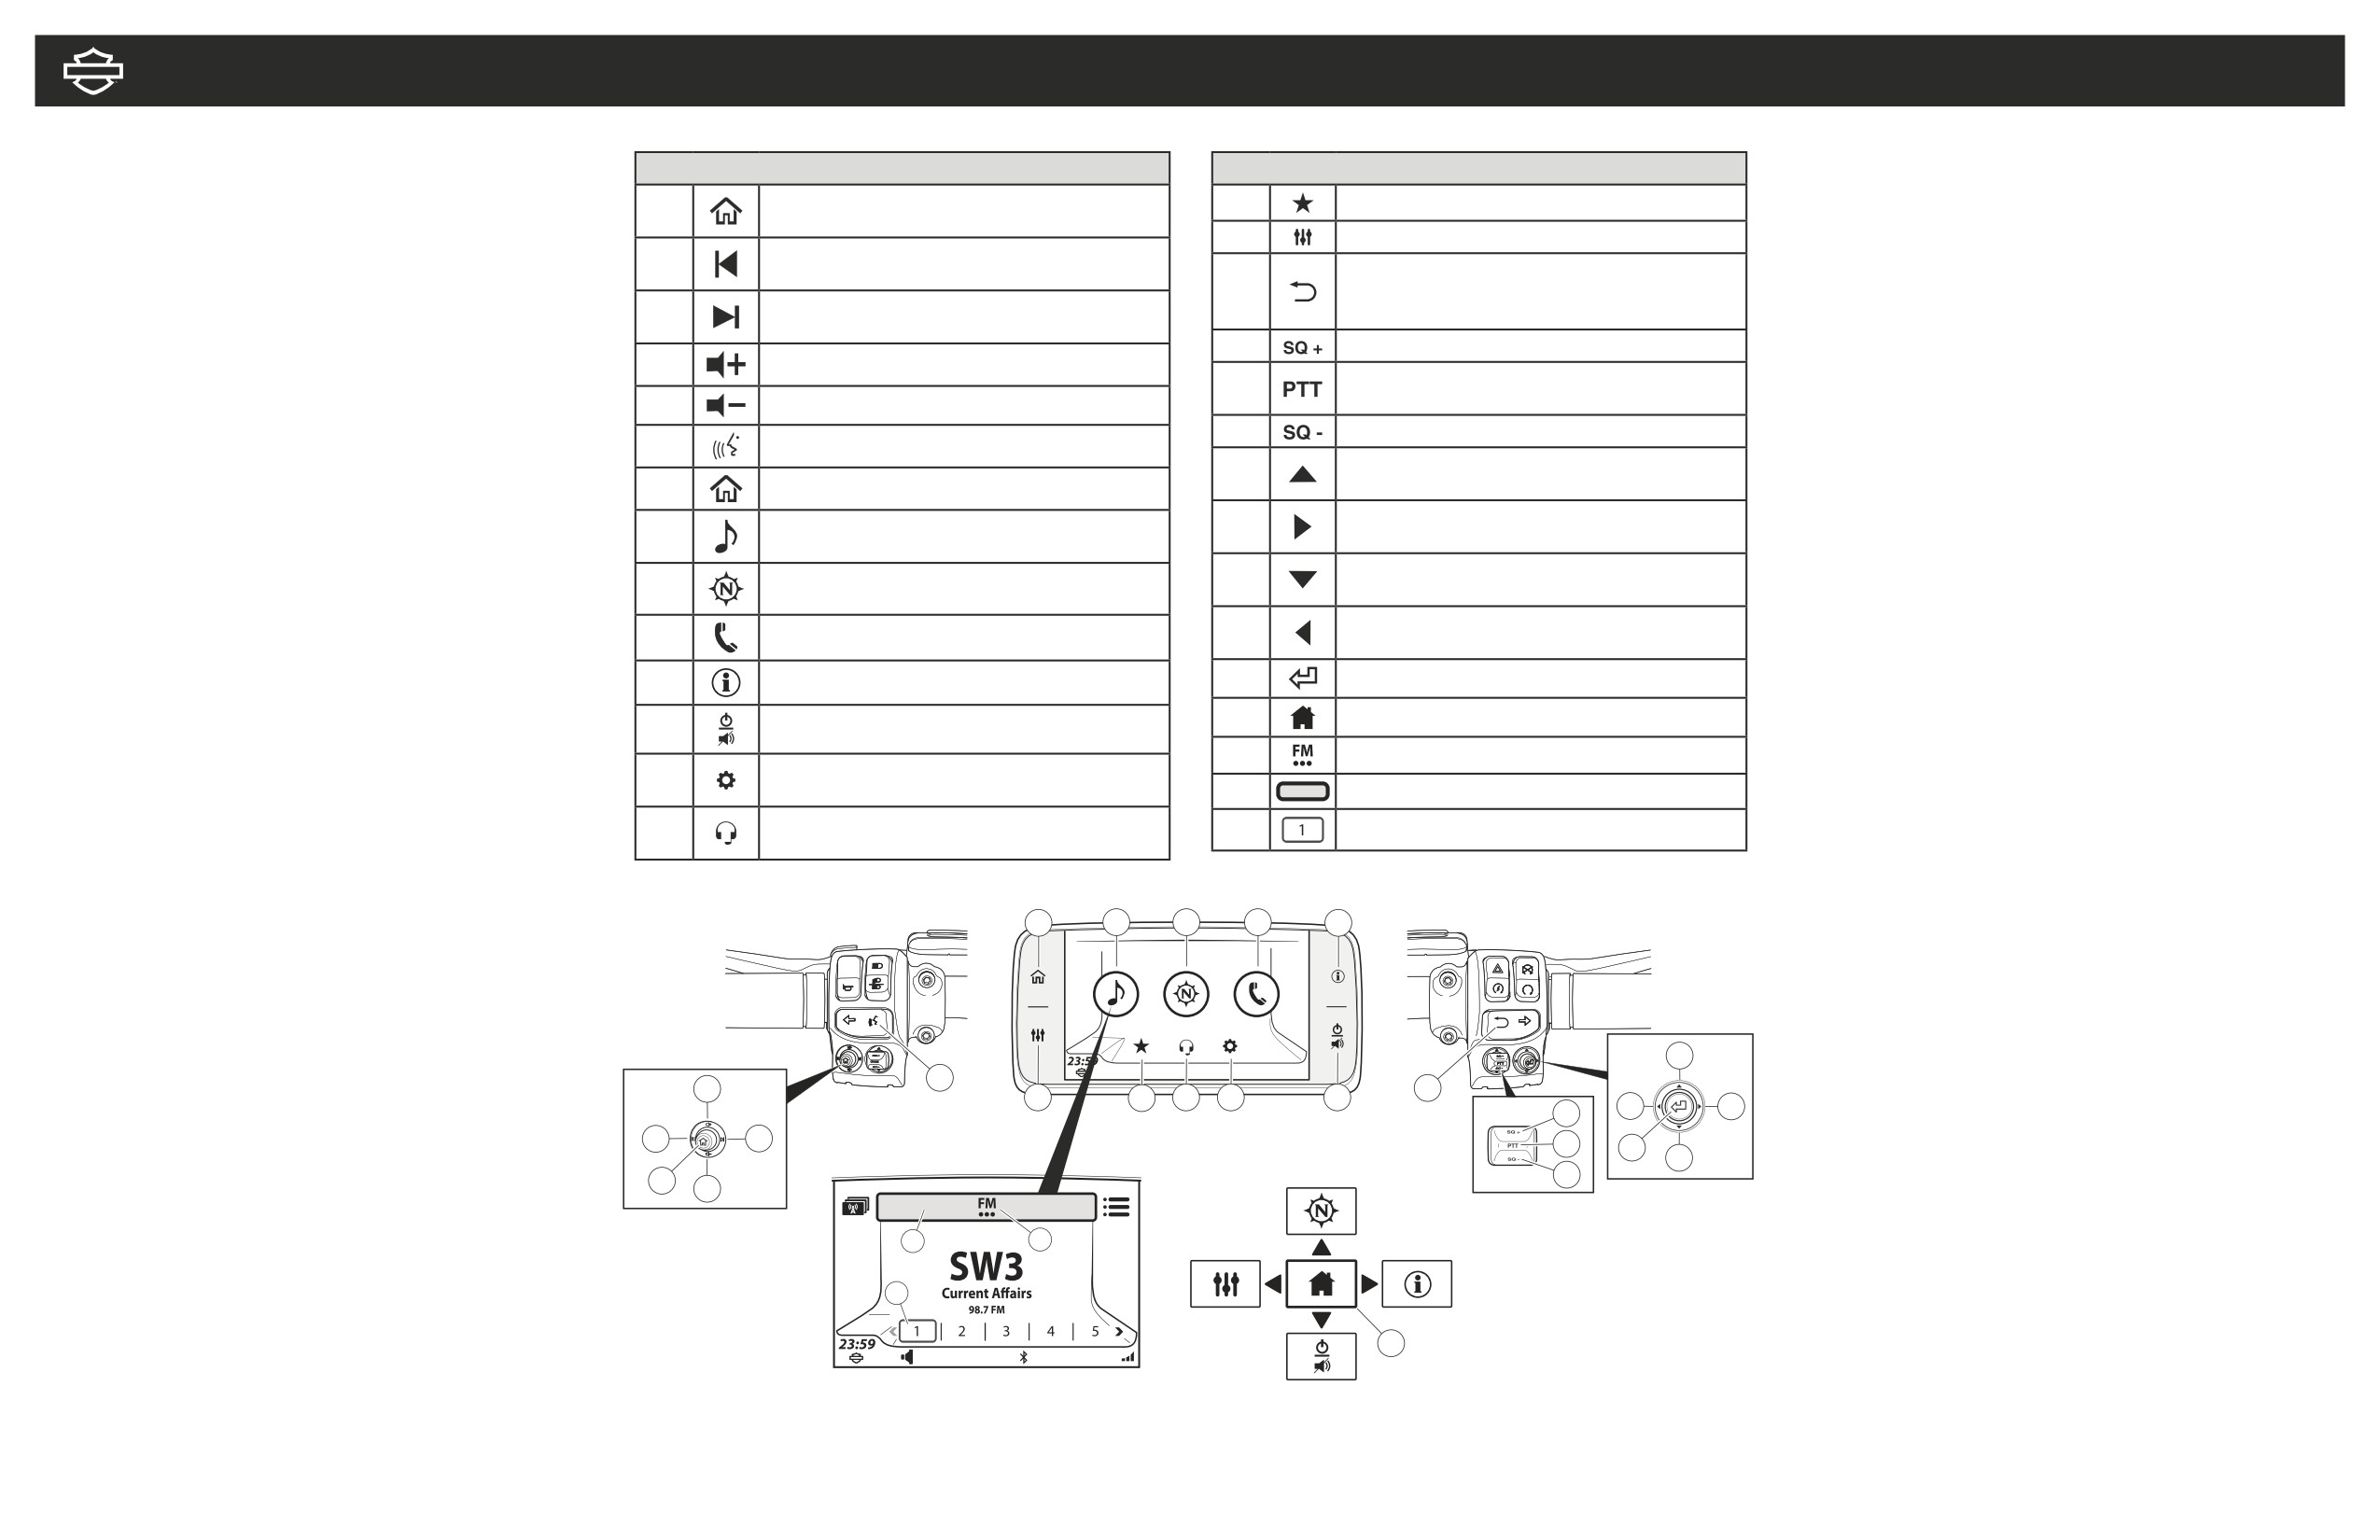
ITEM ICON FUNCTION
ITEM ICON FUNCTION
Turning System ON/OFF
Speaker Volumes
Home Short Press: Toggles between current screen and
15
Favorites: Displays saved favorites.
1
1. Switch power to Accessory, Ignition or Run (CVO models).
Home screen. Long Press: Toggles the Quick Jump screen.
1. Navigate: Home (7) > Setup (13) > Audio Settings >
16
Audio Setup: Displays audio setting screen.
2. If radio is OFF, press POWER (12).
Speaker Volumes.
Previous /Seek Down Media: Previous media file.
2
Back Button Short Press: Back to previous screen.
2. Adjust: Media/Tuner, Prompt Nav, Phone, CB, Beep.
3. Read the warning and select Accept.
Tuner: Tune/seek down.
17
Long Press: Screen transitions between normal day color
NOTE
Next/Seek 3 Up Media: Next media file.
3
and high contrast color.
Pressing MUTE for more than 3 seconds will turn off radio
Tuner: Tune/seek up.
Activating Headsets or Speakers
18
CB Squelch +: Increases CB squelch level (if equipped).
(if equipped with headset)
4. To mute or unmute audio, briefly press MUTE (12).
4
Volume Up: Increases volume.
CB Push to Talk: Press and hold to transmit on CB/
19
1. Navigate: Home (7) > Setup (13) > Audio Settings >
5
Volume Down: Decreases volume.
intercom (if equipped).
Audio Routing.
Select Source
20
CB Squelch: Decreases CB squelch level (if equipped).
2. Select: Speaker or headset.
1. Navigate: Home (7) > Audio (8).
6
Voice Recognition: Initiates a voice recognition session.
Cursor Up: Moves the highlighting up through
2. Select: Source field (28).
21
7
Home: Displays Home screen.
the selections.
Streaming Audio
3. Select band: AM - FM - WB (27).
4. Select media: USB (when connected), phone (Bluetooth),
Cursor Right: Moves the highlighting right through
NOTE
Audio: Displays active source with audible
22
8
the selections. Tuner: Next preset up.
SiriusXM (if equipped) (27).
The device must first be paired with the Boom! Audio system before
content information.
Cursor Down: Moves the highlighting down through
it can be used - See BLUETOOTH
23
9
Navigation: Displays map with current position.
the selections.
Seek and Save Station
Device must also support Bluetooth audio streaming profile
Cursor Left: Moves the highlighting left through
1. Select: SEEK DOWN (2) or SEEK UP (3) on left
24
1. Navigate: Home (7) > Audio (8).
10
Phone: Displays menus for staying connected.
the selections. Tuner: Next preset down.
hand control.
2. Select: Source button (28).
2. Press and hold preset (29) until it beeps.
25
Select/Enter: Selects highlighted item.
3. Select media: Phone (Bluetooth (27).
11
Info: Displays vehicle status.
26
Quick Jump.
Selecting a Favorite
12
Mute/Power: Toggles power on and off.
BLUETOOTH
27
Band/Media.
If selecting a favorite that is saved from a phone or media
Setup: Configure system settings.
Pair a Phone or Other Device
13
device, the radio will not recognize the file unless the media
Do before riding the motorcycle.
28
Source Field.
1. Activate Bluetooth on your device.
source is connected.
Communication: Displays enabled
2. Navigate: Home (7) > Phone (10).
14
29
Preset.
1. Navigate: Home (7) > Favorites (15).
communication devices.
3. Prompt: No device connected. Would you like to
2. Select: Favorite.
connect a device?
a. Select: Yes.
4. Select: Add new device.
SETUP
7
8
9
10
11
5. Prompt: Does PIN match on device?
Audio Settings
a. Check PINs (auto-generated) on audio system
1. Navigate: Home (7) > Setup (13) > Audio Settings.
and device.
2. Adjust: BASS or TREBLE.
b. Select: Yes (if numbers match).
6. Prompt: Would you like to set an Emergency number?
21
a. Select: Yes or No.
Saving a Favorite
6
4
17
1. Navigate: Home (7) > Favorites (15).
16
15
14
13
12
24
22
18
PHONE
2. Press and hold desired preset until screen title changes to
Select a Favorite Type.
2
3
19
25
NOTE
23
3. Select: Type.
The phone must first be paired with the audio system before it can be used
20
1
a. Tuner: Currently playing station, SXM, AM, FM or WB.
5
through the Boom!™ Box infotainment system - see BLUETOOTH
b. Phone: Recent, Contacts on Radio or Contacts on
Phone. Select from list.
28
27
A Harley-Davidson headset with microphone is required to make and receive
c. Location: Recent or Saved. Select from list.
calls via Bluetooth
d. Media: USB. Select from list.
29
Making a Call
26
1. Navigate: Home (7) > Phone (10).
2. Select: Calls, Contacts, SOS (Emergency) or Keypad.
Receiving a Call
1. Select: Accept or Ignore.
Boom!™ Box GTS Quick Start Guide
09-06-18
NAVIGATION SYSTEM
APPLE CARPLAY®
One Box Search
Activation Requirements
1. Navigate: Home (7) > Navigation (9).
• Rider headset with microphone connected to radio
8
9
34
2. Select: Search (30).
30
through a wired or wireless connection1
3. Select: Search.
31
• An iPhone 5 or newer model
a. Input location information.
• iPhone connected via the USB port
1 The vehicle may require the purchase and installation of additional
Route to Destination: Go Home
parts or accessories to enable wired/wireless headset connections.
1. Navigate: Home (7) > Navigation (9).
Consult your Harley-Davidson® dealer.
2. Select: Search (30).
32
3. Select: Go Home.
Setup
33
NOTE
15
14
13
Saving a Destination: Go Home
No app is required for Apple CarPlay operation.
1. Navigate: Home (7) > Navigation (9).
1. Switch power to Accessory, Ignition or Run (CVO™ models).
Boom!™ Box Home screen
2. Select: Search (30).
Quick Jump (26)
2. Connect: Wired or wireless headset to vehicle.
3. Select: Go Home.
3. Connect: iPhone to USB port on vehicle.
On the left-hand control do a long press on the Home button (1).
4. From Set Home screen, select a destination
a. CarPlay icon (34) replaces phone icon (10)
This will display the Quick jump screen.
(perform a search, select a recent destination,
on Home page.
select a POI or a Saved file).
4. Select: CarPlay (34).
5. Select: Save.
VOICE RECOGNITION
5. Apple CarPlay is visible on radio screen.
6. Select: As Home.
1. Select: Voice recognition (6).
Troubleshoot
2. When the system beeps, speak a voice command into
Skip Waypoint
headset microphone.
If Apple CarPlay does not activate, in no specific order
NOTE
please verify:
While in route and from Map screen
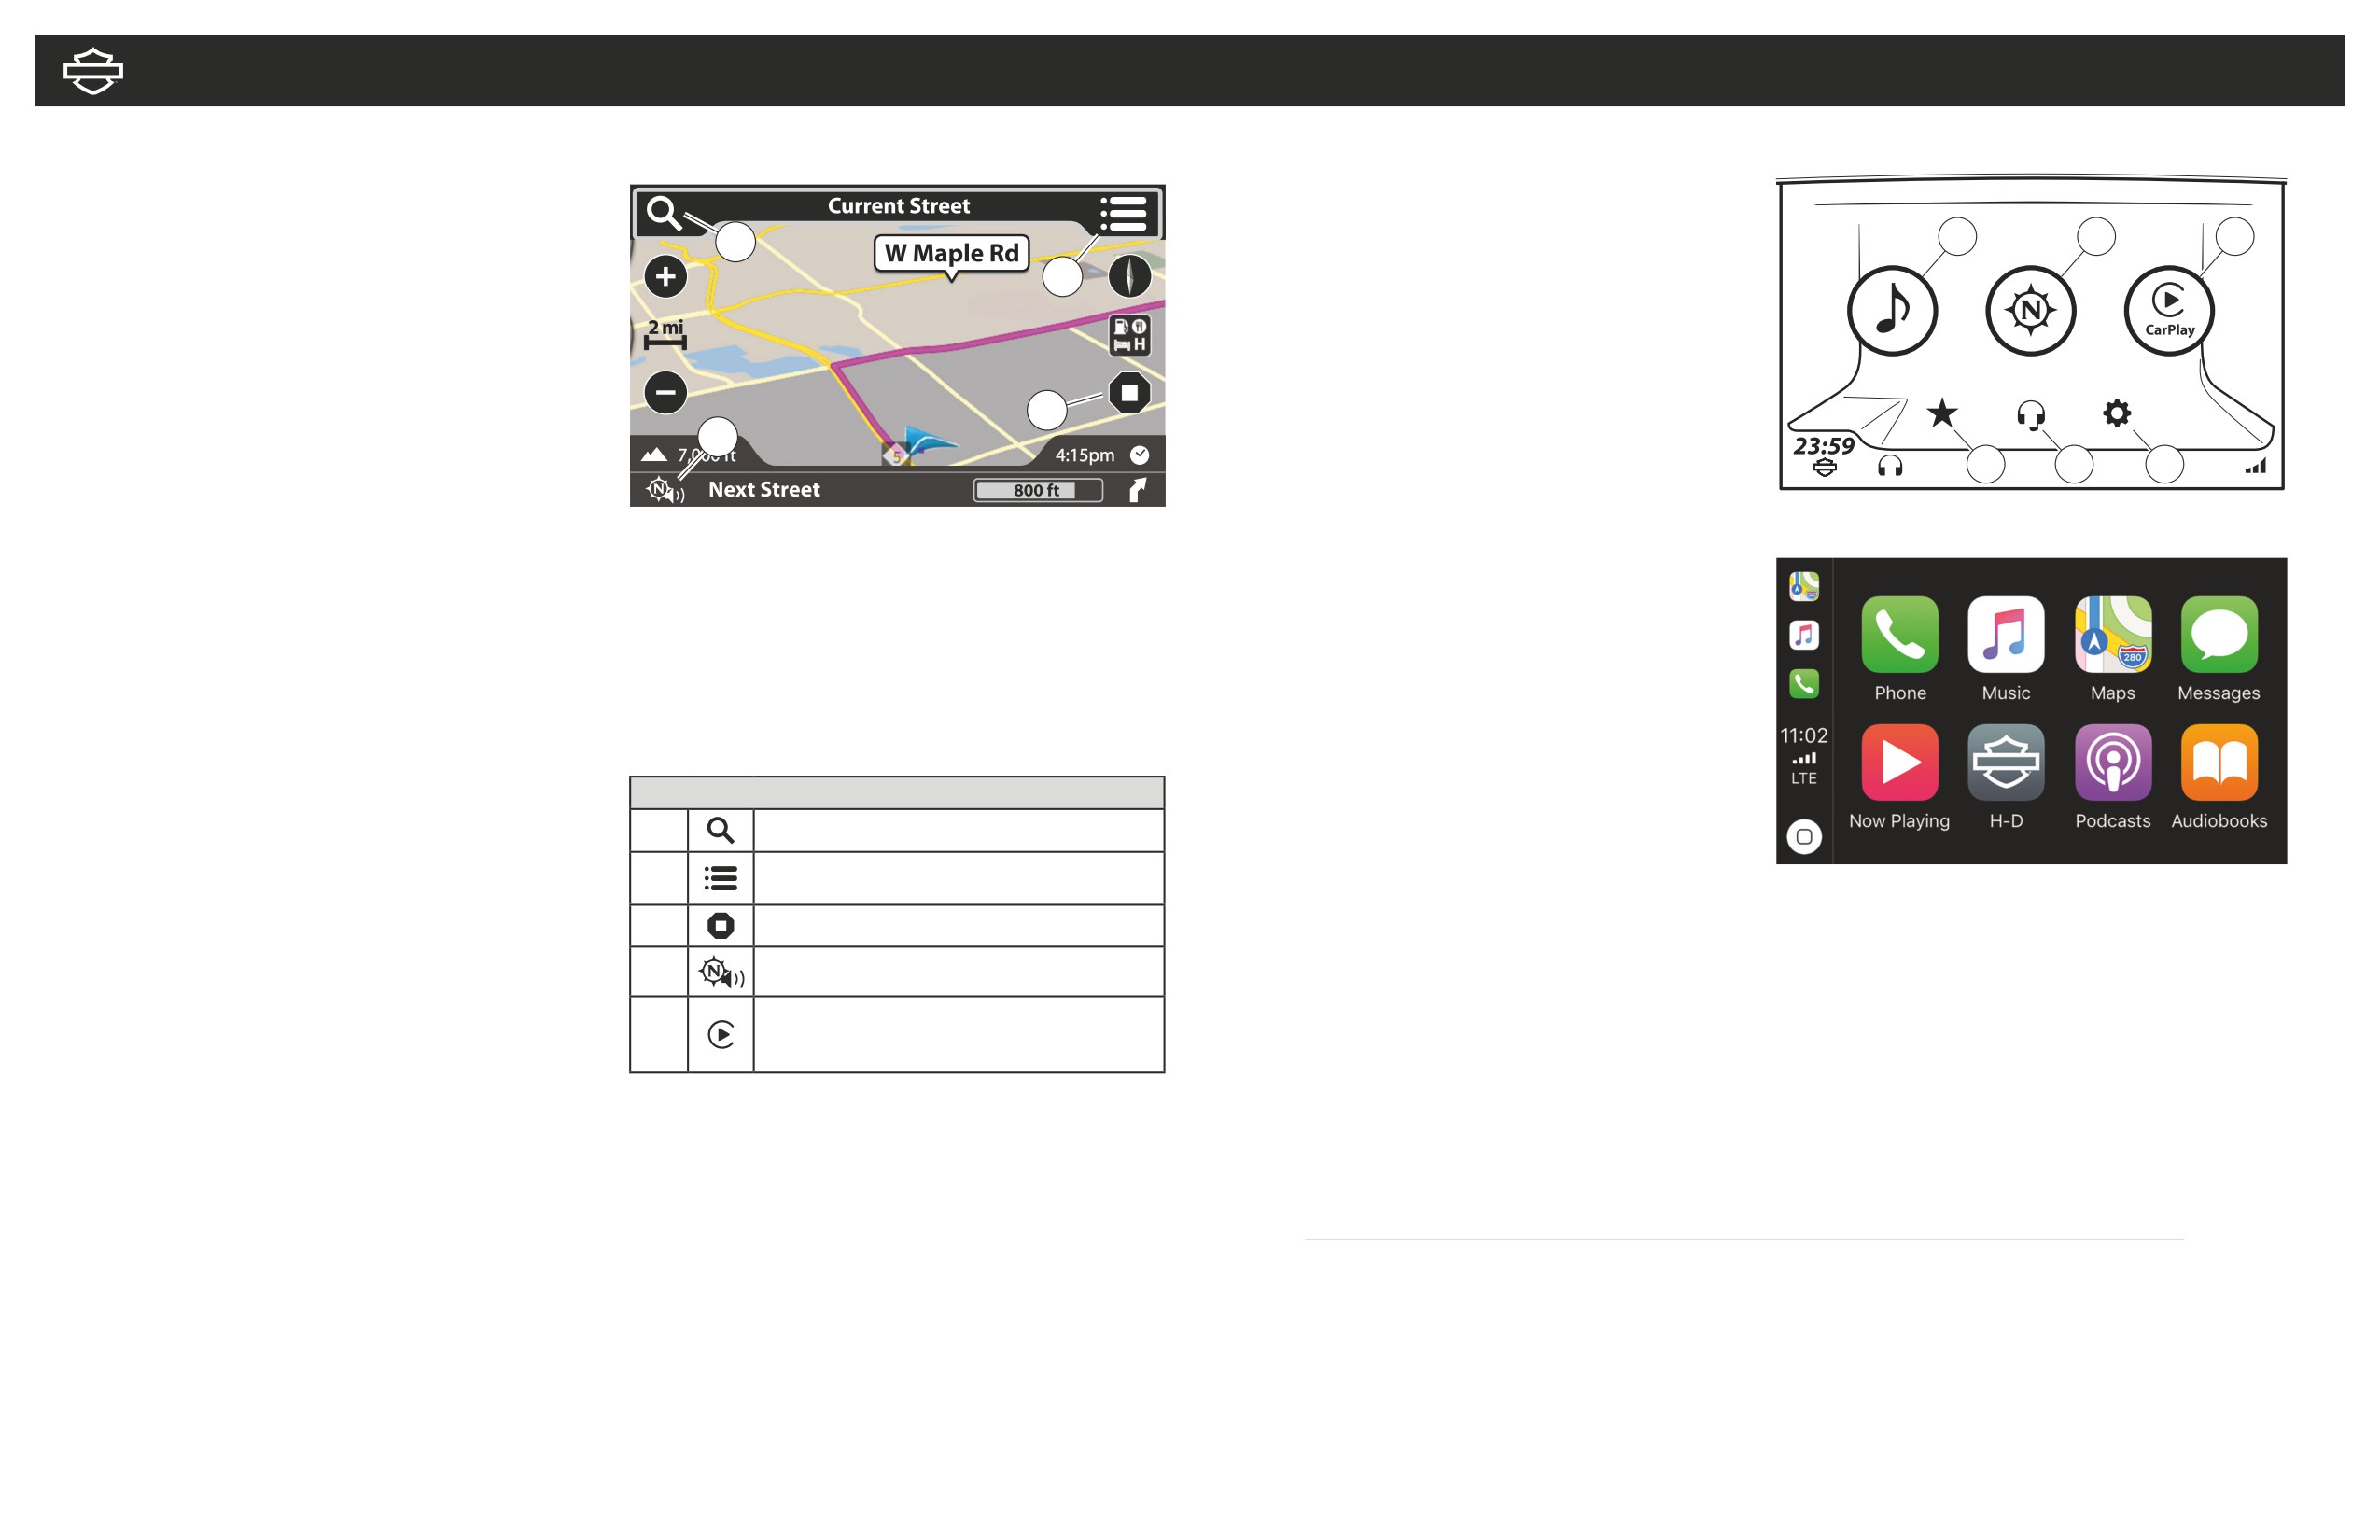
ITEM ICON FUNCTION
1. Headset is connected to vehicle.
1. Select: Menu (31).
2. iPhone is connected via USB port.
30
Search: Opens up search bar.
2. Select: Skip.
3. Projection Mode is turned on in radio settings.
3. Select: Yes.
a. Navigate: Home (7) > Setup (13).
Menu: Opens a menu of additional options.
31
b. Select: Projection Mode ON.
Select the icon again to return to the original screen.
Apple CarPlay screen
4. Verify Apple CarPlay is enabled in iPhone settings.
Route to Destination: Repeat Navigation Instruction
32
Pause or stop route.
5. Verify Siri is enabled in iPhone settings.
Apple CarPlay is a trademark of Apple Inc., registered in the U.S. and other countries.
1. Select: Repeat icon (33). This will repeat the last
6. Verify Apple CarPlay can be accessed while iPhone
command given by navigation.
33
Repeat: Repeat navigation route instruction.
is locked in iPhone settings.
Apple CarPlay: Takes the things you want to do with
Canceling or Pausing a Route: Using Menu
34
your iPhone while riding and puts them right on your
1. Select: Stop icon (32) on the map screen.
radio’s display.
2. Select: Stop or Pause.
NOTE
When selecting a new route, the system provides a notification to
either add or replace the existing route
There is no need to manually cancel the current route when adding or
replacing it with a new route
HARLEY-DAVIDSON
Harley-Davidson Customer Care Representative:
A full version of the Boom!™ Box 6.5 GTS
1-800-258-2464 or 414-343-4056.
owner’s manual downloadable at
Harley-Davidson.com or
Representatives are available:
H-D.com/BoomBoxGTS/manual
Monday through Friday, 8:00 a.m. - 8:00 p.m.
Central Standard Time (CST)
Part No. 94000634